Grails Webapplication. This article explains how to build a Grails application. This article is based on Java 1.6 and Grails 2.4.4.
1. Grails
1.1. What is Grails?
Grails is a web framework based on Groovy and Java that can be deployed into existing Java web servers, e.g., Tomcat or Jetty.
Grails allows to quickly create web applications; its scaffolding capabilities let you create a new project within few minutes. Grails is based on the convention over configuration idea that allows the application to auto-wire itself based on naming schemes (instead of using configuration files, e.g, XML files).
Grails uses JavaEE as the architectural basis and Spring for structuring the application via dependency injection.
The Grails framework allows instance development without requiring any configuration. Just download Grails and you are ready to start. Grails accomplish this by automatically providing the Tomcat web container and the HSQLDB database during development. If you deploy you Grails application later, you can use another web container or database.
Grails is plug-in based and currently uses its own build system (Gant) but plans to migrated to Gradle. The Grails homepage provides several predefined plugins which extend the Grails framework.
During the start of a new development with Grails you mainly use the command line to generated new user interfaces.
1.2. Object relationship mapping (ORM) with GORM
Grails uses
GORM
(Grails Object Relational Mapping) for the
persistence of the domain
model. GORM is based on
Hibernate. You can
test with the
HSQLDB and run
in production
against
another database by changing the configuration file (DataSource.groovy).
2. Groovy
Groovy is (almost) a superset of Java, e.g., most valid Java constructs are also valid Groovy constructs. Groovy has several advanced features in addition to the standard Java features, e.g., closures, native support for lists and maps, a shorter syntax and much more.
See Groovy tutorial for an introduction into Groovy.
3. Installation
3.1. Installation of the Grails command line tools
Download the latest official release of Grails from the https://grails.org/download]]Grails download page]. Unzip the download to a directory of your choice.
Setup your
GRAILS_HOME
environment variable pointing to your
installation directory of
Grails.
Also add
the
$GRAILS_HOME/bin
to the
PATH
variable.
Please make sure that the environment variable JAVA_HOME is set to the JDK and not the JRE.
The JDK is required to develop with Grails.
|
Test your installation by opening a command line and running the following command.
grails -versionThis should result in the output of the currently installed Grails version.
3.2. Installing the Grails Eclipse plug-in
The Eclipse IDE has great support for the Grails applications.
Open the Eclipse Update manager via the menu entry to install the Grails Eclipse plug-in. Enter the following URL in this dialog:
http://dist.springsource.com/release/TOOLS/update/e4.4/
The update site is Eclipse version dependent, see Groovy/Grails Tool Suite™ Downloads if you use a different release than Eclipse 4.4.
4. Exercise: Create Grails web application
4.1. Target
We want to develop a guestbook application, in this exercise see start with the intial template.
4.2. Create your application
Let’s create the application with the name
com.vogella.grails.guestbook.
#The name of the application is used for the URL on which
the
application will later run and the WAR file which will be later
created.
Create a new directory that will contain your Grails application. Open a command shell, switch to this new directory and type in the following command.
grails create-app com.vogella.grails.guestbookAfter a little while the command line tells you that the application was generated.
This command creates the directory structure and the base configuration of your new web application.

This created already a full web application.
4.3. Run your application
The created application can already run. In the shell switch
into your
directory
com.vogella.grails.guestbook.
You can then start
your
application with the following
command.
grails run-appThis should start the Grails internal web container and you should receive the message:
Server running. Browse to
https://localhost:8080/com.vogella.grails.guestbook
Open a browser and open the URL
https://localhost:8080/com.vogella.grails.guestbook
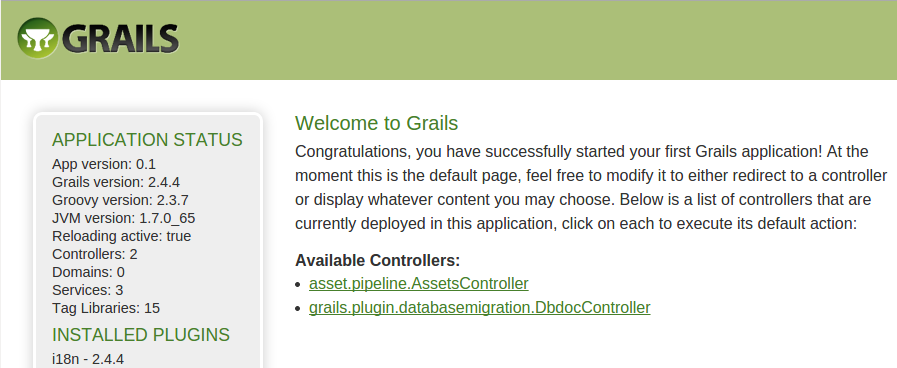
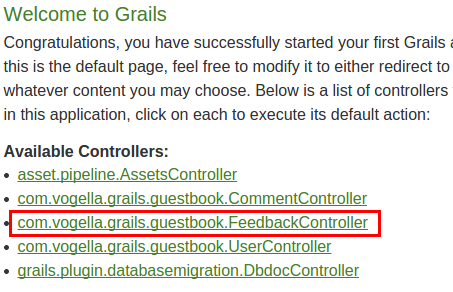
Congratulations to your first running Grails application!
5. Exercise: Extend Grails web application
5.1. Target
In this exercise, you finish the guestbook application you started in Exercise: Create Grails web application.
5.2. Stop the server
If you Grails application from Exercise: Create Grails web application is still running, stop the server via Ctrl+C. We need the command line to create more elements.
5.3. Create the domain model
Our application does not do anything at the moment. Lets create the a domain model. For your feedback system we would like to have:
-
Class Feedback: The feedback itself
-
Class User: The person who gives feedback
-
Class Comment: A remark to the feedback
Grails can create templates with empty classes and prepared unit tests for your domain model. Create the domain model scaffolds via the following commands:
grails create-domain-class com.vogella.grails.guestbook.Feedback
grails create-domain-class com.vogella.grails.guestbook.User
grails create-domain-class com.vogella.grails.guestbook.Comment
This creates Groovy classes for the specified domain model in the directory .\grails-app/domain.
In the
directory
.\test\unit
you
find empty files for your unit tests.
Use a text editor to change the classes to the following:
package com.vogella.grails.guestbook

class Feedback {
    String title
    String feedback
    Date dateCreated // Predefined names by Grails will be filled automatically
    Date lastUpdated // Predefined names by Grails will be filled automatically

    // relationsship to the other classes
    User user
    static hasMany=[comments:Comment]

    // contrains are defined as static
    static constraints = {
        title(blank:false, nullable: false, size:3..80)
        feedback(blank:false, nullable:false,size:3..500)
        user(nullable:false)
    }

}
package com.vogella.grails.guestbook
class User {
String name
String email
String webpage
static constraints = {
name (blank:false, nullable:false, size:3..30, matches:"[a-zA-Z1-9_]+")
email (email:true)
webpage (url:true)
}
String toString(){
return name;
}
}package com.vogella.grails.guestbook
class Comment {
String comment
Date dateCreated // Predefined names by Grails will be filled automatically
Date lastUpdated // Predefined names by Grails will be filled automatically
User user;
// delete a comments for a feedback if the feedback item is deleted
static belongsTo=[feedback:Feedback]
static constraints = {
comment (blank:false, nullable: false, size:5..500)
user (nullable: true) // Comments are allowed without a user
}
String toString(){
if (comment?.size()>20){
return comment.substring(0,19);
} else
return comment;
}
}Grails allows defining
constraints for the domain model via a
static
method. Some of these
constraints, e.g.,
nullable
are reflected
in the database, others are
only used to validate this
value via the
user interface, e.g., the URL
constraint.
All model classes come with have a version and id property of type Long and a toString() method by default.
These methods will be dynamically injected if the model has no implementation of its own.
dataCreated and lastUpdated are also known by Grails and will be filled automatically.
|
|
Changes in the domain model may require a restart of the Grails server and running the following command: |
5.4. Dynamic Scaffolding
Grails supports dynamic and static scaffolding for the user interface. If you use dynamic scaffolding, then a user interface for the domain class is dynamically generated by the Grails runtime. This user interface allows the operations Create, Read, Update and Delete (CRUD).
To use dynamic scaffolding, create controllers for your domain class via the following commands:
grails generate-controller com.vogella.grails.guestbook.Feedback
grails generate-controller com.vogella.grails.guestbook.User
grails generate-controller com.vogella.grails.guestbook.Comment
This creates controller classes in the directory /grails-app/controllers.
Activate the dynamic scaffolding in each controller by
replacing the
line which starts with
def index
with
def scaffold = NameOfTheDomainClass.
For example, for the
FeedbackController.
package com.vogella.grails.guestbook


import static org.springframework.http.HttpStatus.*
import grails.transaction.Transactional

@Transactional(readOnly = true)
class FeedbackController {


    static allowedMethods = [save: "POST", update: "PUT", delete: "DELETE"]
    //!!!!!!only change here!!!!!!!!!!!!!!!!!
    def scaffold = Feedback // Note the capital "F"
    //!!!!!!

    def show(Feedback feedbackInstance) {
        respond feedbackInstance
    }

    def create() {
        respond new Feedback(params)
    }

    @Transactional
    def save(Feedback feedbackInstance) {
        if (feedbackInstance == null) {
            notFound()
            return
        }

        if (feedbackInstance.hasErrors()) {
            respond feedbackInstance.errors, view:'create'
            return
        }

        feedbackInstance.save flush:true

        request.withFormat {
            form multipartForm {
                flash.message = message(code: 'default.created.message',
                        args: [message(code: 'feedback.label',
                                default: 'Feedback'), feedbackInstance.id])
                redirect feedbackInstance
            }
            '*' { respond feedbackInstance, [status: CREATED] }
        }
    }

    def edit(Feedback feedbackInstance) {
        respond feedbackInstance
    }

    @Transactional
    def update(Feedback feedbackInstance) {
        if (feedbackInstance == null) {
            notFound()
            return
        }

        if (feedbackInstance.hasErrors()) {
            respond feedbackInstance.errors, view:'edit'
            return
        }

        feedbackInstance.save flush:true

        request.withFormat {
            form multipartForm {
                flash.message = message(code: 'default.updated.message', args: [message(code: 'Feedback.label', default: 'Feedback'), feedbackInstance.id])
                redirect feedbackInstance
            }
            '*'{ respond feedbackInstance, [status: OK] }
        }
    }

    @Transactional
    def delete(Feedback feedbackInstance) {

        if (feedbackInstance == null) {
            notFound()
            return
        }

        feedbackInstance.delete flush:true

        request.withFormat {
            form multipartForm {
                flash.message = message(code: 'default.deleted.message',
                        args: [message(code: 'Feedback.label', default: 'Feedback'),
                               feedbackInstance.id])
                redirect action:"index", method:"GET"
            }
            '*'{ render status: NO_CONTENT }
        }
    }

    protected void notFound() {
        request.withFormat {
            form multipartForm {
                flash.message = message(code: 'default.not.found.message', args: [message(code: 'feedback.label', default: 'Feedback'), params.id])
                redirect action: "index", method: "GET"
            }
            '*'{ render status: NOT_FOUND }
        }
    }
}
Do this also for
UserController
and
CommentController.
5.5. Testing the generated application
Run the application again via:
grails run-appBrowse to
https://localhost:8080/com.vogella.grails.guestbook
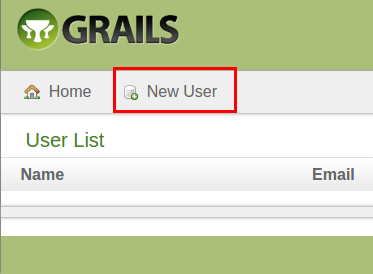
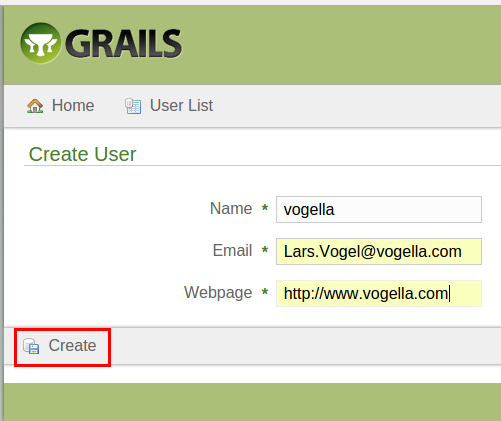
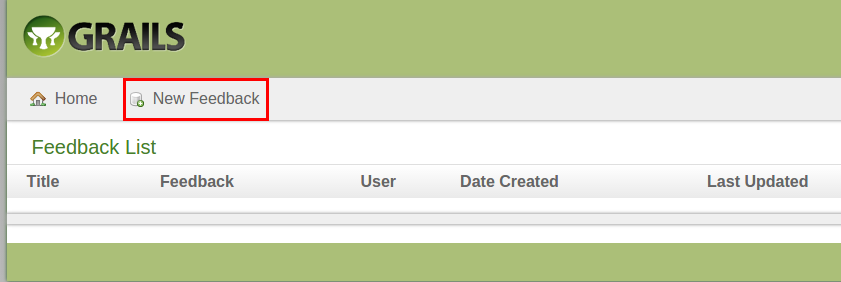
You should have a full CRUD (create, retrieve, update, delete) application available. To start the app, click on UserController and create a user.
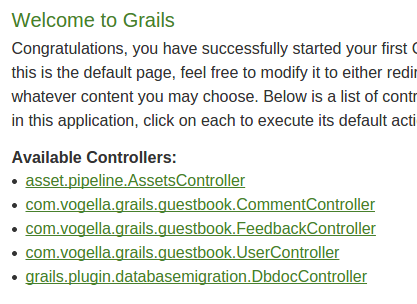
Afterwards, use the FeedbackController to create a comment.
Click on New Feedback and enter a feedback.
6. Exercise: Bootstrap and persists data
6.1. Target
In this exercise, you create example data and store the data between application restarts. This exercise builds on Exercise: Extend Grails web application.
6.2. Bootstrapping example data
Grails allows to simulate example data (this is called
bootstrapping).
To create example data, you can use the class
BootStrap.groovy
from
the
directory
./grails-app/conf
with some data.
This class is
automatically executed whenever the
server is started
and can be used
to create some example data for
testing.
Change the code to the following.
import com.vogella.grails.guestbook.*

class BootStrap {

    def init = { servletContext ->
    User user = new User(name:'lars', email:'muster@muster.com', webpage:'https://www.vogella.com')
    User otherUser = new User(name:'jim', email:'jim@muster.com', webpage:'https://www.vogella.com')
    if (!user.save()){
        log.error "Could not save user!!"
        log.error "${user.errors}"
    }
    if (!otherUser.save()){
        log.error "Could not save otherUser!!"
    }

    Feedback feedback = new Feedback(title:'First feedback', feedback:'This is my first feedback', user:user)
    feedback.save()

    Comment comment = new Comment(comment:'Hello, my name is Jim', user:otherUser)
    comment.feedback = feedback
    comment.save();

}

    def destroy = {
    }

}
The grails server should pickup the change automatically. Wait a while (or re-start the server to be sure) and check if you get an error message.
6.3. Store the data
By default, the data maintained in the web application is not stored. If your entries should be saved to the database after server shutdown, use the following command to start it.
grails prod run-app| Remove the bootstrapped entries as you will otherwise get errors as the system tries to create the same entries again. |
6.4. Static scaffolding
To switch from dynamic scaffolding to static scaffolding, you need to have views. Grails can generate them for you.
Type in the following to create a scaffold for the controller and the view.
grails generate-views com.vogella.grails.guestbook.Feedback
grails generate-views com.vogella.grails.guestbook.User
grails generate-views com.vogella.grails.guestbook.Comment
If you receive the error "Error starting Sun’s native2ascii", then make sure that your environment variable JAVA_HOME points to the JDK and not JRE.
The JDK is required for this step.
|
Remove
def scaffold = true
in your controller to use your
generated views.
This creates the GSP (Groovy Server pages) for your actions in
the
directroy
grails-app\views.
GSP are standard HTML code with
Groovy mixed in.
Have a look at the
coding. The
controller
defines
several actions
(list,
show, delete, edit).
For all
these
actions
corresponding views
have been
created under
grails-app/views.
7. Change the layout of your Grails application
7.1. Changing the generated views
If you are not satisfied with the order of the fields, you can change the views directly. For example, in the following view I did change the order of the fields so that name is displayed before comment.
<html>
    <head>
        <meta http-equiv="Content-Type" content="text/html; charset=UTF-8"/>
        <meta name="layout" content="main" />
        <title>Create Feedback</title>
    </head>
    <body>
        <div class="nav">
            <span class="menuButton"><a class="home" href="${createLinkTo(dir:'')}">Home</a></span>
            <span class="menuButton"><g:link class="list" action="list">Feedback List</g:link></span>
        </div>
        <div class="body">
            <h1>Create Feedback</h1>
            <g:if test="${flash.message}">
            <div class="message">${flash.message}</div>
            </g:if>
            <g:hasErrors bean="${feedback}">
            <div class="errors">
                <g:renderErrors bean="${feedback}" as="list" />
            </div>
            </g:hasErrors>
            <g:form action="save" method="post" >
                <div class="dialog">
                    <table>
                        <tbody>

                        <tr class="prop">
                                <td valign="top" class="name">
                                    <label for="name">Name:</label>
                                </td>
                                <td valign="top" class="value ${hasErrors(bean:feedback,field:'name','errors')}">
                                    <input type="text" id="name" name="name" value="${fieldValue(bean:feedback,field:'name')}"/>
                                </td>
                            </tr>

                            <tr class="prop">
                                <td valign="top" class="name">
                                    <label for="feedback">Feedback:</label>
                                </td>
                                <td valign="top" class="value ${hasErrors(bean:feedback,field:'feedback','errors')}">
                                    <input type="text" id="feedback" name="feedback" value="${fieldValue(bean:feedback,field:'feedback')}"/>
                                </td>
                            </tr>


                        </tbody>
                    </table>
                </div>
                <div class="buttons">
                    <span class="button"><input class="save" type="submit" value="Create" /></span>
                </div>
            </g:form>
        </div>
    </body>
</html>
7.2. Using CSS
Grails created the default CSS style sheets under the
directory web-app/css/main.css
You can directly change the main.css to make your application look different. For example, if the feedback field should be larger than the name field add the following to main.css.
#feedback {
    height: 80px;
    width: 160px;
}
8. Create a WAR archive
Type the following command to create a war archive. This archive can be deployed to a web container, for example, Tomcat.
grails war9. Testing your application
The command create-domain-class automatically creates a
test for the domain-class. Go to your directory
test/integration
and open the file FeedbackTests.groovy.
You can run your test via the following command.
grails test-app10. Using Eclipse for Grails development
The following requires that Eclipse is installed with the Groovy plug-in. Please see Groovy Eclipse Plugin for more information.
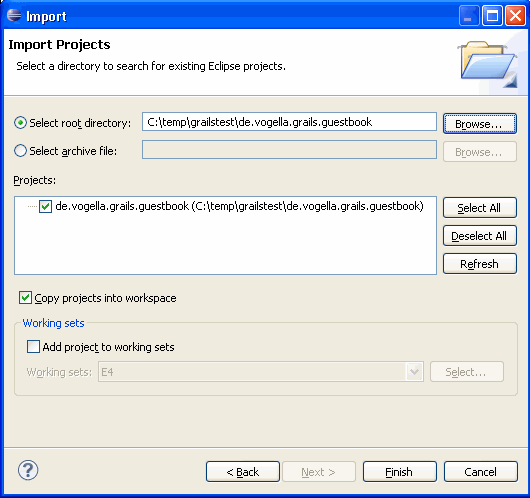
After running grails create-app
you may notice the .project
and .classpath file.
These Eclipse related files are
created
automatically
and allow you to import the project into Eclipse.
Import
your project via
The environment variable
GRAILS_HOME may not be
set in Eclipse.
Select your project, right-click on
it and select properties.
Select the Java Build Path and here the tab
Libraries. Press Add Variable and then Configure Variables. Press
New and add
GRAILS_HOME.
| At least for me the configuration dialog showed an error. I did ignore this error and the re-compiled project did not show errors. |
A tighter integration of Grails is achieved by the SpringSource Tool Suite (STS).
11. Grails links
11.1. vogella Java example code
If you need more assistance we offer Online Training and Onsite training as well as consulting