GWT Tutorial. This tutorial describes how to develop a Web application with GWT and the Google Plugin for Eclipse. This article assumes basic Eclipse and Java knowledge.
1. Overview
1.1. Google Web Toolkit
The Google Web Toolkit (GWT) is a toolkit to develop Ajax web application with Java. The programmer writes Java code and this code is translated into HTML and Javascript via the GWT compiler.
|
It seems that Google does not actively develop this framework anymore. Google promotes the Flutter framework for cross platform (mobile, desktop and web) application. If you are starting a new project consider using Flutter instead of GWT. You get a similar good developer experience with the programming language Dart compared to Java it is even nicer. |
The compiler creates browser specific HTML and JavaScript to support all the major browsers correctly. GWT supports a standard set of UI widgets, has build in support for the browser back button and a JUnit based test framework.
GWT provides two modes
-
Development Mode: allows to debug the Java code of your application directly via the standard Java debugger.
-
Web mode: the application is translated into HTML and Javascript code and can be deployed to a web server.
1.2. Modules, Entry Points and HTML pages
GWT applications are described as modules.
A module named modulename is described by a configuration file modulename.gwt.xml.
Each module can define one or more Entry point classes.
An entry point is the starting point for a GWT
application,
similar to the main method in a standard Java program.
A Java class which is an entry point must implement the
interface
"com.google.gwt.core.client.EntryPoint" which defines the
method
onModuleLoad().
The module is connected to a HTML page, which is called "host page". The code for a GWT web application executes within this HTML document.
The HTML page can define "div" containers to which the GWT application can assign UI components or the GWT UI components are simply assigned to the body tag of the HTML page.
1.3. Using CSS
The look and feel of a GWT application can be customized via CSS files. Each widget in GWT can be given a HTML "div" container and can therefore be individually styled by CSS. You use the Java method setStyle(String s) for this.
2. Installation of the Google Cloud Tools for Eclipse
Google offers an Eclipse plug-in that provides support for the development with the Eclipse IDE.
From inside Eclipse, select and search for Google Cloud Tools for Eclipse.
Google lists the currently supported version in its Google Plug-in for Eclipse page. See https://cloud.google.com/eclipse/docs/quickstart for details.
If you plan to create GWT applications, also install it via and search for GWT Eclipse plug-in.
3. Exercise: Create and start your first GWT application
The following is a description of the usage of the Google plug-in to create a new GWT application.
3.2. Project
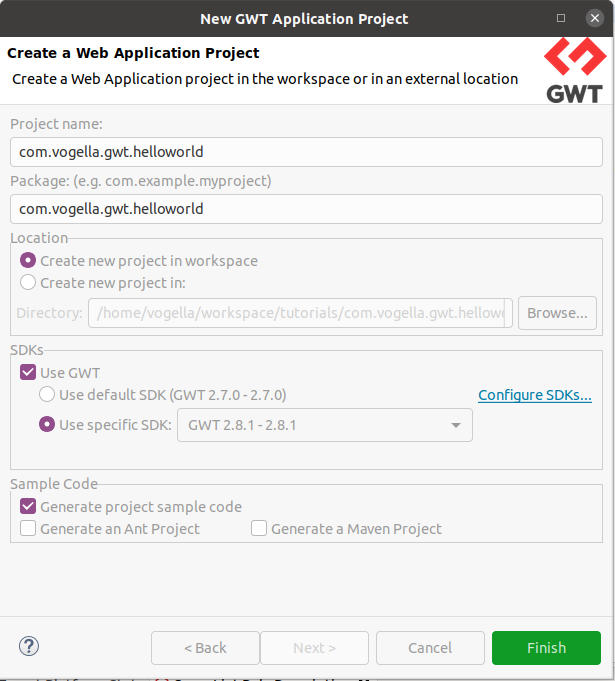
Create a new project via . Use the following data:
-
Project name: com.vogella.gwt.helloworld
-
Package : com.vogella.gwt.helloworld
Select the rest of the options similar to the following screenshot:
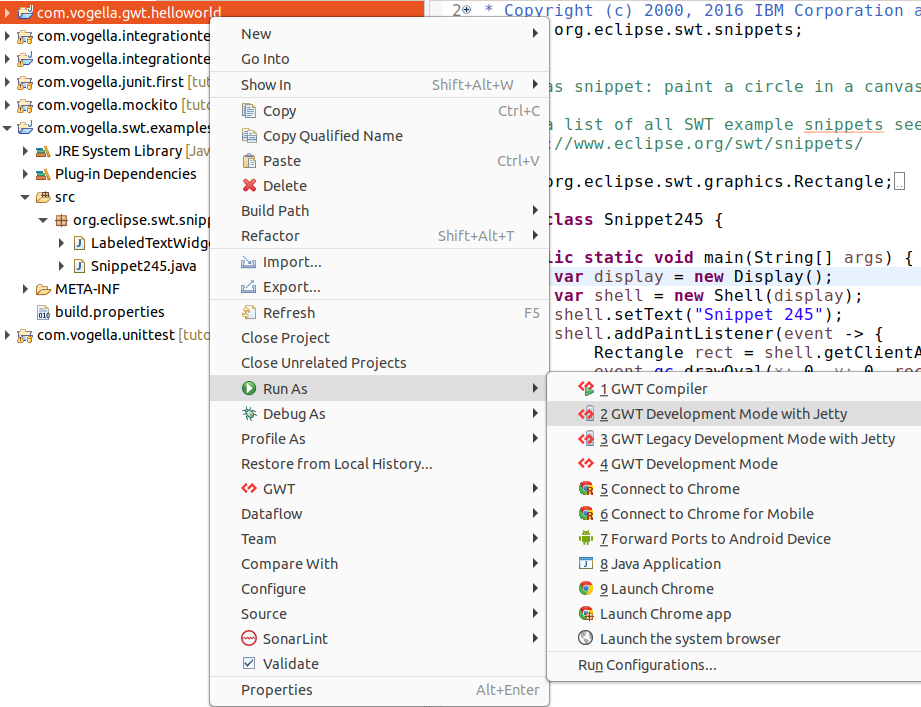
3.3. Start the generated project
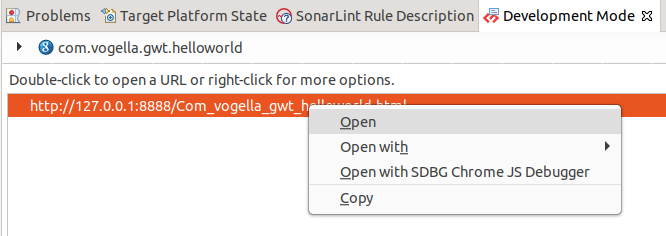
To run your application right-click the project and select . This opens a new view "Development Mode. Copy the url from this view.
Paste this url in your browser or right-click on the entry and select Open.
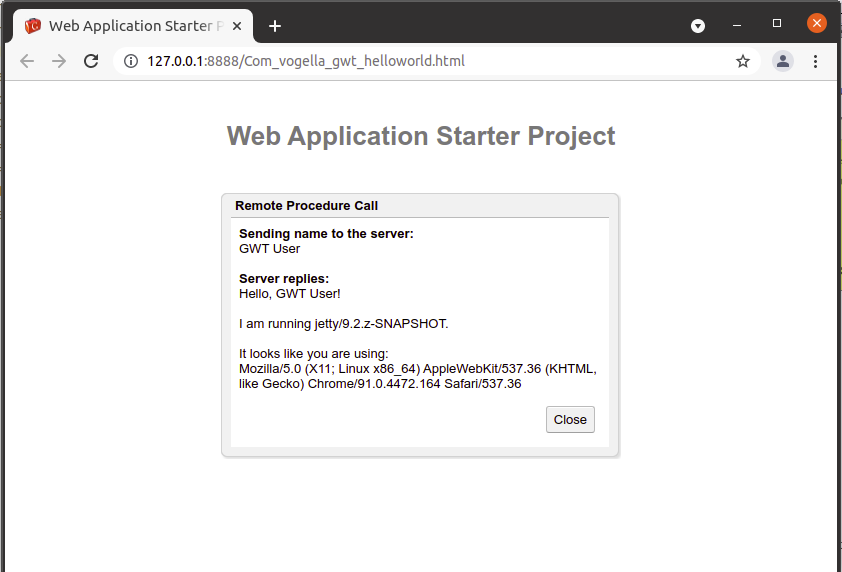
The result should look like this:
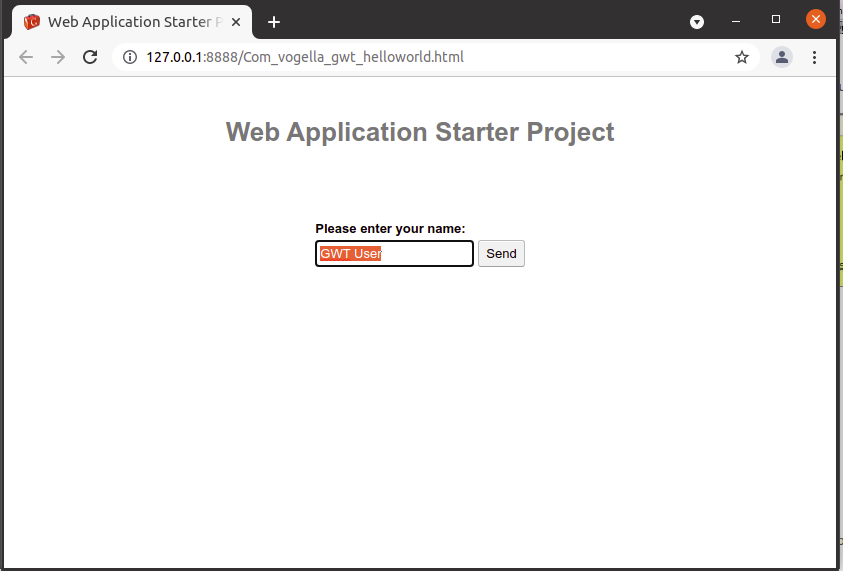
Congratulations! You created and started your first GWT application.
4. GWT Project Structure
4.1. Overview
If you investigate your example from the last chapter you will see the following project structure.
An GWT application consists of the following parts
-
Module descriptor: XML file which specifies mainly the entry point of the application. It has the name of your module plus .gwt.xml
-
war: Under the folder "war" you find the HTML page that contains the GWT application. Additional public resources, e.g., other HTML pages, images or css files should be stored here. Here you also find the standard WEB-INF folder.
-
Source code: under your default package you find a package "client". All Java code which is compiled for the client (Webbrowser) must be stored under client. For the service you would use the package "server".
4.2. Module Descriptor
The main purpose of the Module descriptor in *.gwt.xml file is to define your entry-point. It also defines standard GWT css styles which you are using.
<?xml version="1.0" encoding="UTF-8"?>
<!DOCTYPE module PUBLIC "-//Google Inc.//DTD Google Web Toolkit 1.6.4//EN" "http://google-web-toolkit.googlecode.com/svn/tags/1.6.4/distro-source/core/src/gwt-module.dtd">
<module rename-to='de_vogella_gwt_helloworld'>
  <!-- Inherit the core Web Toolkit stuff.                        -->
  <inherits name='com.google.gwt.user.User'/>

  <inherits name='com.google.gwt.user.theme.standard.Standard'/>

  <!-- Specify the app entry point class.                         -->
  <entry-point class='de.vogella.gwt.helloworld.client.HelloGwt'/>
</module>
5. Debugging GWT applications
Debugging a GWT application in development mode is easy. In this case you can just debug the Java code. Put a breakpoint into your code and start the debugger via selecting your project, right-click → debug as → Web Application.
You can then use standard Eclipse debugging capabilities. Please see Eclipse Debugging for details.
6. Client and Server Communication (RPC)
6.1. Overview
GWT provides its own remote procedure calls (RPC’s) that allow the GWT client to call server-side methods. The implementation of GWT RPC is based on the servlet technology. GWT allows Java objects to be sent directly between the client and the server; that are automatically serialized by the framework. With GWT RPC the communication is almost transparent for the GWT client and always asynchronous so that the client does not block during the communication. The server-side servlet is usually referred to as a "service" and the remote procedure call is referred to as "invoking a service." These object can then be used on the client (UI) side.
To create a GWT service you need to define the following:
-
An interface that extends RemoteService that lists the service methods.
-
An implementation - implements the interface and extends the RemoteServiceServlet.
-
Define an asynchronous interface to your service which will be used in the client code
6.2. Create project and domain model
Create a GWT project "de.vogella.gwt.helloserver" with the package "de.vogella.gwt.helloserver". Create the following class that represents the data model . This class implements "Serializable" because GWT requires that all classes that are involved in a server and client communication have to implement the interface "Serializable".
package de.vogella.gwt.helloserver.client.model;

import java.io.Serializable;

public class MyUser implements Serializable {
    private static final long serialVersionUID = 1L;

    private String id;
    private String username;
    private String numberOfHits;

    public String getId() {
        return id;
    }

    public void setId(String id) {
        this.id = id;
    }

    public String getUsername() {
        return username;
    }

    public void setUsername(String username) {
        this.username = username;
    }

    /**
     * @return the numberOfHits
     */
    public String getNumberOfHits() {
        return numberOfHits;
    }

    /**
     * @param numberOfHits
     *            the numberOfHits to set
     */
    public void setNumberOfHits(String numberOfHits) {
        this.numberOfHits = numberOfHits;
    }

    //
}
6.3. Interface
The client server communication is based on an interface which
defines the possible communication methods.
Create the following interface. By extending the RemoteService
interface the GWT compiler will understand that this interface
defines an RPC interface. The annotation defines the URL for the
service. This must match the entry we will later do in web.xml.
package de.vogella.gwt.helloserver.client.service;

import java.util.List;

import com.google.gwt.user.client.rpc.RemoteService;
import com.google.gwt.user.client.rpc.RemoteServiceRelativePath;

import de.vogella.gwt.helloserver.client.model.MyUser;

//
@RemoteServiceRelativePath("userService")
public interface MyUserService extends RemoteService {
    List<MyUser> getUserList();
    MyUser getUser(String id);
}| This interface needs to be available on the client side, therefore it must be placed in the client package. |
GWT uses asynchronous communication therefore you also need to create the asynchronous version of this interface. The name of this interface must be the interface name concatenated with "Async".
package de.vogella.gwt.helloserver.client.service;

import java.util.List;

import com.google.gwt.user.client.rpc.AsyncCallback;

import de.vogella.gwt.helloserver.client.model.MyUser;

public interface MyUserServiceAsync {
    void getUserList(AsyncCallback<List<MyUser>> callback);
    void getUser(String id, AsyncCallback<MyUser> callback);
}| The implementation of this asynchronous interface will be automatically created by the GWT compiler. |
6.4. Create the server
For the server implementation create a package "de.vogella.gwt.helloserver.server". Create the following class that extends RemoteServiceServlet.
package de.vogella.gwt.helloserver.server;

import java.util.ArrayList;
import java.util.List;

import com.google.gwt.user.server.rpc.RemoteServiceServlet;

import de.vogella.gwt.helloserver.client.model.MyUser;
import de.vogella.gwt.helloserver.client.service.MyUserService;

public class MyUserServiceImpl extends RemoteServiceServlet implements
        MyUserService {

    private static final long serialVersionUID = 1L;

    private List<MyUser> userList = new ArrayList<MyUser>();

    public MyUserServiceImpl() {
        MyUser user = new MyUser();
        user.setId("1");
        user.setUsername("Peter");
        user.setNumberOfHits("15");
        userList.add(user);

        user = new MyUser();
        user.setId("2");
        user.setUsername("Hanz");
        user.setNumberOfHits("25");
        userList.add(user);
    }

    public MyUser getUser(String id) {

        for (Object object : userList) {
            if (((MyUser) object).getId().equals(id))
                return ((MyUser) object);
        }
        return null;
    }

    public List<MyUser> getUserList() {
        return userList;
    }
}
6.5. Define servlet in web.xml
To make GWT aware of this service change the web.xml file in war/WEB-INF to the following.:
<?xml version="1.0" encoding="UTF-8"?>
<!DOCTYPE web-app
    PUBLIC "-//Sun Microsystems, Inc.//DTD Web Application 2.3//EN"
    "http://java.sun.com/dtd/web-app_2_3.dtd">

<web-app>

  <!-- Default page to serve -->
  <welcome-file-list>
    <welcome-file>De_vogella_gwt_helloserver.html</welcome-file>
  </welcome-file-list>

  <!-- Servlets -->
  <servlet>
    <servlet-name>userServlet</servlet-name>
    <servlet-class>de.vogella.gwt.helloserver.server.MyUserServiceImpl</servlet-class>
  </servlet>

  <servlet-mapping>
    <servlet-name>userServlet</servlet-name>
    <url-pattern>/de_vogella_gwt_helloserver/userService</url-pattern>
  </servlet-mapping>

</web-app>
6.6. UI component - Table
Create the following two classes which will be used to display the data in a table. The implementation of "MyTable" is based on FlexTable. FlexTable allows the building of tables in GWT.
package de.vogella.gwt.helloserver.client.table;

import java.util.ArrayList;
import java.util.List;

import de.vogella.gwt.helloserver.client.model.MyUser;

public class DataSource {

    private final List<MyUser> users;
    private List<String> header;

    public DataSource(List<MyUser> users) {
        header = new ArrayList<String>();
        header.add("Id");
        header.add("Name");
        header.add("Number of Hits");
        this.users = users;
    }

    public List<MyUser> getUsers() {
        return users;
    }

    public List<String> getTableHeader() {
        return header;
    }

}
package de.vogella.gwt.helloserver.client.table;
import java.util.List;
import com.google.gwt.user.client.ui.FlexTable;
import de.vogella.gwt.helloserver.client.model.MyUser;
public class MyTable extends FlexTable {
DataSource input;
public MyTable(DataSource input) {
super();
this.setCellPadding(1);
this.setCellSpacing(0);
this.setWidth("100%");
this.setInput(input);
}
public void setInput(DataSource input) {
for (int i = this.getRowCount(); i > 0; i--) {
this.removeRow(0);
}
if (input == null) {
return;
}
int row = 0;
List<String> headers = input.getTableHeader();
if (headers != null) {
int i = 0;
for (String string : headers) {
this.setText(row, i, string);
i++;
}
row++;
}
// make the table header look nicer
this.getRowFormatter().addStyleName(0, "tableHeader");
List<MyUser> rows = input.getUsers();
int i = 1;
for (MyUser myUser : rows) {
this.setText(i, 0, myUser.getId());
this.setText(i, 1, myUser.getUsername());
this.setText(i, 2, myUser.getNumberOfHits());
i++;
}
this.input = input;
}
}6.7. Callback
To receive a callback a class needs to be implemented that can then react on a failure or success in the communication. The interface AsyncCallback defines these two methods: "OnSuccess" and "OnFailure".
| Keep in mind that the server communication is asynchronous. If you call your server your GWT application will continue and at some undefined point in time it will receive the data from the server. Make sure that you do not assume in your code that the call to the server is finished. |
Create the following class.
package de.vogella.gwt.helloserver.client.service;

import java.util.List;

import com.google.gwt.user.client.Window;
import com.google.gwt.user.client.rpc.AsyncCallback;

import de.vogella.gwt.helloserver.client.model.MyUser;
import de.vogella.gwt.helloserver.client.table.DataSource;
import de.vogella.gwt.helloserver.client.table.MyTable;

/**
 * Class which handles the asynchronous callback from the server
 * <p>
 * Need to react on server communication failure and success
 *
 * @author Lars Vogel
 *
 */
public class MyUserCallback implements AsyncCallback<List<MyUser>> {

    private MyTable table;

    public MyUserCallback(MyTable table) {
        this.table = table;
    }

    public void onFailure(Throwable caught) {
        Window.alert(caught.getMessage());
    }

    public void onSuccess(List<MyUser> result) {
        List<MyUser> users = result;
        DataSource datasource = new DataSource(users);
        table.setInput(datasource);
        for (MyUser user : users) {
            System.out.println(user.getUsername());
        }
    }

}
This will simple print the received results to the command line.
6.8. Create your entry point
Create the following class.
package de.vogella.gwt.helloserver.client.entrypoint;

import com.google.gwt.core.client.EntryPoint;
import com.google.gwt.core.client.GWT;
import com.google.gwt.event.dom.client.ClickEvent;
import com.google.gwt.event.dom.client.ClickHandler;
import com.google.gwt.user.client.rpc.ServiceDefTarget;
import com.google.gwt.user.client.ui.Button;
import com.google.gwt.user.client.ui.DialogBox;
import com.google.gwt.user.client.ui.RootPanel;
import com.google.gwt.user.client.ui.VerticalPanel;

import de.vogella.gwt.helloserver.client.service.MyUserCallback;
import de.vogella.gwt.helloserver.client.service.MyUserService;
import de.vogella.gwt.helloserver.client.service.MyUserServiceAsync;
import de.vogella.gwt.helloserver.client.table.MyTable;

/**
 * Entry point classes define <code>onModuleLoad()</code>.
 */
public class HelloServer implements EntryPoint {

    private MyTable table;

    /**
     * This is the entry point method.
     */
    public void onModuleLoad() {
        table = new MyTable(null);

        Button button = new Button("Click me");

        // We can add style names
        button.addStyleName("pc-template-btn");
        // or we can set an id on a specific element for styling

        VerticalPanel vPanel = new VerticalPanel();
        vPanel.setWidth("100%");
        vPanel.setHorizontalAlignment(VerticalPanel.ALIGN_CENTER);
        vPanel.add(button);

        vPanel.add(table);

        // add table and button to the RootPanel
        RootPanel.get().add(vPanel);

        // create the dialog box
        final DialogBox dialogBox = new DialogBox();
        dialogBox.setText("Welcome to GWT Server Communication!");
        dialogBox.setAnimationEnabled(true);
        Button closeButton = new Button("close");
        VerticalPanel dialogVPanel = new VerticalPanel();
        dialogVPanel.setWidth("100%");
        dialogVPanel.setHorizontalAlignment(VerticalPanel.ALIGN_CENTER);
        dialogVPanel.add(closeButton);

        closeButton.addClickHandler(new ClickHandler() {
            @Override
            public void onClick(ClickEvent event) {
                dialogBox.hide();
            }
        });

        // Set the contents of the Widget
        dialogBox.setWidget(dialogVPanel);

        button.addClickHandler(new ClickHandler() {
            @Override
            public void onClick(ClickEvent event) {
                MyUserServiceAsync service = (MyUserServiceAsync) GWT
                        .create(MyUserService.class);
                ServiceDefTarget serviceDef = (ServiceDefTarget) service;
                serviceDef.setServiceEntryPoint(GWT.getModuleBaseURL()
                        + "userService");
                MyUserCallback myUserCallback = new MyUserCallback(table);
                service.getUserList(myUserCallback);
            }
        });

    }
}
Define your entry point in "De_vogella_gwt_helloserver.gwt.xml".
<?xml version="1.0" encoding="UTF-8"?>

<!DOCTYPE module PUBLIC "-//Google Inc.//DTD Google Web Toolkit 1.6.4//EN" "http://google-web-toolkit.googlecode.com/svn/tags/1.6.4/distro-source/core/src/gwt-module.dtd">

<module rename-to='de_vogella_gwt_helloserver'>
  <inherits name='com.google.gwt.user.User'/>
  <inherits name='com.google.gwt.user.theme.standard.Standard'/>

  <!-- Specify the app entry point class.                         -->
  <entry-point class='de.vogella.gwt.helloserver.client.entrypoint.HelloServer'/>

</module>
Change your "De_vogella_gwt_helloserver.html" page to the following.
<!DOCTYPE HTML PUBLIC "-//W3C//DTD HTML 4.01 Transitional//EN">

<html>
  <head>
    <meta http-equiv="content-type" content="text/html; charset=UTF-8">
    <link type="text/css" rel="stylesheet" href="De_vogella_gwt_helloserver.css">
    <title>Web Application Starter Project</title>

    <script type="text/javascript" language="javascript" src="de_vogella_gwt_helloserver/de_vogella_gwt_helloserver.nocache.js"></script>
  </head>

  <body>
</body>
</html>
Also change the "De_vogella_gwt_helloserver.css" to the following to make the table header look nicer.
body {
  padding: 10px;
}

/* stock list header row */
.tableHeader {
  background-color: #2062B8;
  color: white;
  font-style: italic;
}
6.9. Run
Run your application. If you click the button then a list of users on click should get loaded.

The eclipse console shows the values of the users send to your Google Web application via the service.
7. UIBinder
UIBinder allows to design GWT UI’s declarative via XML. Create a new GWT project "de.vogella.gwt.uibinder" with the package "de.vogella.gwt.uibinder". To use UIBinder you also need to inherit from "com.google.gwt.uibinder.UiBinder" in your "gwt.xml" file.
<?xml version="1.0" encoding="UTF-8"?>
<module rename-to='de_vogella_gwt_uibinder'>
    <inherits name='com.google.gwt.user.User' />
    <inherits name='com.google.gwt.uibinder.UiBinder' />

    <inherits name='com.google.gwt.user.theme.standard.Standard' />

    <!-- Specify the app entry point class.                         -->
    <entry-point class='de.vogella.gwt.uibinder.client.De_vogella_gwt_uibinder' />

    <!-- Specify the paths for translatable code                    -->
    <source path='client' />

</module>
In your client package create the file "HelloWidgetWorld.ui.xml".
<ui:UiBinder xmlns:ui='urn:ui:com.google.gwt.uibinder'
    xmlns:g='urn:import:com.google.gwt.user.client.ui'>
    <g:VerticalPanel>
        <g:HorizontalPanel>
            <g:Label>Label 2</g:Label>
            <g:TextBox ui:field='text1'>Some Text</g:TextBox>
        </g:HorizontalPanel>

        <g:HorizontalPanel>
            <g:Label>Label 2 </g:Label>
            <g:TextBox ui:field='text2'>More Text</g:TextBox>
        </g:HorizontalPanel>

        <g:ListBox ui:field='listBox' visibleItemCount='1' />

        <g:Button ui:field='submit'> Submit </g:Button>
    </g:VerticalPanel>
</ui:UiBinder>
Create the following class that uses the xml file for building actions. By convention the name of the xml must equal to the class name + "ui.xml".
package de.vogella.gwt.uibinder.client;

import com.google.gwt.core.client.GWT;
import com.google.gwt.event.dom.client.ClickEvent;
import com.google.gwt.uibinder.client.UiBinder;
import com.google.gwt.uibinder.client.UiField;
import com.google.gwt.uibinder.client.UiHandler;
import com.google.gwt.uibinder.client.UiTemplate;
import com.google.gwt.user.client.Window;
import com.google.gwt.user.client.ui.Button;
import com.google.gwt.user.client.ui.Composite;
import com.google.gwt.user.client.ui.ListBox;
import com.google.gwt.user.client.ui.Widget;

public class HelloWidgetWorld extends Composite {
    // Annotation not needed as we use the default but this allows to change the path
    @UiTemplate("HelloWidgetWorld.ui.xml")
    interface MyUiBinder extends UiBinder<Widget, HelloWidgetWorld> {
    }

    private static MyUiBinder uiBinder = GWT.create(MyUiBinder.class);

    @UiField
    ListBox listBox;

    @UiField Button submit;


    public HelloWidgetWorld(String... names) {
        // sets listBox
        initWidget(uiBinder.createAndBindUi(this));
        for (String name : names) {
            listBox.addItem(name);
        }
    }

     @UiHandler("submit")
      void handleClick(ClickEvent e) {
        Window.alert("Hello, UiBinder");
      }


}
Create also in the client package the file "MyHTMLTable.ui.xml". This creates a HTML Panel that allows us to layout the UI controls nicely.
<ui:UiBinder xmlns:ui='urn:ui:com.google.gwt.uibinder'
    xmlns:g='urn:import:com.google.gwt.user.client.ui'>
    <g:HTMLPanel>
        <table>
            <tr>
                <td>
                    <g:Label>Name</g:Label>
                </td>
                <td>
                    <g:TextBox ui:field="name" width="15em" />
                </td>

            </tr>
            <tr>
                <td>
                    <g:Label>Password</g:Label>
                </td>
                <td>
                    <g:TextBox ui:field="password" width="15em" />
                </td>
            </tr>
            <tr>
                <td colspan='2'>
                    <g:Button ui:field="logIn" text="login" />
                </td>
            </tr>
        </table>
    </g:HTMLPanel>
</ui:UiBinder>
Create the corresponding "MyHTMLTable.java" file.
package de.vogella.gwt.uibinder.client;

import com.google.gwt.core.client.GWT;
import com.google.gwt.uibinder.client.UiBinder;
import com.google.gwt.user.client.ui.Composite;
import com.google.gwt.user.client.ui.Widget;

public class MyHTMLTable extends Composite {
    // Annotation can be used to change the name of the associated xml file
    // @UiTemplate("HelloWidgetWorld.ui.xml")
    interface MyUiBinder extends UiBinder<Widget, MyHTMLTable> {
    }

    private static MyUiBinder uiBinder = GWT.create(MyUiBinder.class);


    public MyHTMLTable(String... names) {
        // sets listBox
        initWidget(uiBinder.createAndBindUi(this));
    }

}
In your entry point you can now load the class as an composite.
package de.vogella.gwt.uibinder.client;

import com.google.gwt.core.client.EntryPoint;
import com.google.gwt.user.client.ui.RootPanel;

/**
 * Entry point classes define <code>onModuleLoad()</code>.
 */
public class De_vogella_gwt_uibinder implements EntryPoint {

    public void onModuleLoad() {

        HelloWidgetWorld helloWorld =
          new HelloWidgetWorld("able", "baker", "charlie");
        RootPanel.get().add(helloWorld);
        RootPanel.get().add(new MyHTMLTable());
    }

}
Change the web.xml to the following.
<?xml version="1.0" encoding="UTF-8"?>
<!DOCTYPE web-app
    PUBLIC "-//Sun Microsystems, Inc.//DTD Web Application 2.3//EN"
    "http://java.sun.com/dtd/web-app_2_3.dtd">

<web-app>


  <!-- Default page to serve -->
  <welcome-file-list>
    <welcome-file>De_vogella_gwt_uibinder.html</welcome-file>
  </welcome-file-list>

</web-app>
The result should look like the following.
8. Using external jars / Java projects in GWT
8.1. Overview
The standard approach in Java is to have separated projects for separate purposes. For example, the domain model of the application is usually defined in its own project. One way of making these classes available to GWT is to copy them into the package "client" in your GWT project. This is bad practice as it leads to code duplication (which is inherently evil). This chapter describes how you can make these projects available to the GWT compiler as modules. GWT need to have access to the source files to compile them into Javascript code. If you add the project or the jar file to your GWT classpath then the Java compiler will not complain if you use the classes from the included project / jar but the GWT compiler will not be able to compile them.
To make the Java files available to the GWT compiler you need to:
-
Create a gwt.xml file in the Java project / jar file which you want to use - This will instruct the GWT compiler to use the listed classes.
-
Use the included library via the inherit definition
-
If you are using a jar file you also need to include the source files in the jar
8.2. Create the module project
Create a Java project "de.vogella.gwt.module.model" and package "de.vogella.gwt.module.model". Create the following class.
package de.vogella.gwt.module.model;

public class Person {
    private String firstName;

    /**
     * @return the firstName
     */
    public String getFirstName() {
        return firstName;
    }

    /**
     * @param firstName
     *            the firstName to set
     */
    public void setFirstName(String firstName) {
        this.firstName = firstName;
    }

}
Create in package "de.vogella.gwt.module" the file "model.gwt.xml" with the following content. This will be the module definition for GWT.
<module>
  <inherits name='com.google.gwt.user.User'/>
  <source path="model"></source>
</module>
8.3. Use the module in another project
We want to use this model in a GWT project. Create therefore a new GWT project "de.vogella.gwt.module.application" similar to the first example of this article with the following entry point.
package de.vogella.gwt.module.application.client;

import com.google.gwt.core.client.EntryPoint;
import com.google.gwt.user.client.ui.Label;
import com.google.gwt.user.client.ui.RootPanel;

import de.vogella.gwt.module.model.Person;

public class ModulTest implements EntryPoint {

    @Override
    public void onModuleLoad() {
        Person p = new Person();
        p.setFirstName("Lars");
        Label label = new Label("Hello " + p.getFirstName());
        RootPanel.get().add(label);
    }
}
To make the module project available for the Java compiler, right-click your project, select properties → Java Build Path and add a dependency to the project "de.vogella.gwt.module.model".
Make the Java class of your new module available to the GWT compiler by using "inherits" in your file "De_vogella_gwt_module_application.gwt.xml".
<?xml version="1.0" encoding="UTF-8"?>
<!DOCTYPE module PUBLIC "-//Google Inc.//DTD Google Web Toolkit 1.6.4//EN" "http://google-web-toolkit.googlecode.com/svn/tags/1.6.4/distro-source/core/src/gwt-module.dtd">
<module rename-to='de_vogella_gwt_module_application'>
  <!-- Inherit the core Web Toolkit stuff.                        -->
  <inherits name='com.google.gwt.user.User'/>

  <inherits name='com.google.gwt.user.theme.standard.Standard'/>
  <inherits name='de.vogella.gwt.module.model'/>

  <!-- Other module inherits                                      -->

  <!-- Specify the app entry point class.                         -->
  <entry-point class='de.vogella.gwt.module.application.client.ModulTest'/>
</module>| If you make a typo here you will get an error message: [ERROR] Unable to find 'de/vogella/gwt/module/model2.gwt.xml' on your classpath; could be a typo, or maybe you forgot to include a classpath entry for source? |
If everything was setup correctly you can run your application.
9. Build your own components
GWT allows you to build your own components based on other widgets. To do this you extends com.google.gwt.user.client.ui.Composite. These customer components can be used as normal GWT components. Building components is simple, you just offer the API your component should publish and then you call with each widget the initWidget() method. For example, you can create the following component which is a simple header label (I assume you can easily image a more complex example).
package mypackage.client;

import com.google.gwt.user.client.ui.Composite;
import com.google.gwt.user.client.ui.Label;

public class Header extends Composite {
    private Label title;

    public Header(String title) {
        this.title = new Label(title);
        initWidget(this.title);
    }

    public void setStyleName(String style) {
        this.title.setStyleName(style);
    }

    public void setTitle(String title) {
        this.title.setText(title);
    }

}
Adjust then the GWT module to use this component.
package mypackage.client;

import com.google.gwt.core.client.EntryPoint;
import com.google.gwt.user.client.Window;
import com.google.gwt.user.client.ui.Button;
import com.google.gwt.user.client.ui.ClickListener;
import com.google.gwt.user.client.ui.Label;
import com.google.gwt.user.client.ui.RootPanel;
import com.google.gwt.user.client.ui.Widget;

public class HelloGwt implements EntryPoint {

    public void onModuleLoad() {
        Header header = new Header("Hello");
        header.setStyleName("headerpane");
        Label label = new Label("Hello GWT !!!");
        label.setStyleName("label");
        Button button = new Button("Say something");
        button.addClickListener(new ClickListener() {
            public void onClick(Widget sender) {
                Window.alert("Hello, again");
            }
        });

        RootPanel.get().add(header);
        RootPanel.get().add(label);
        RootPanel.get().add(button);
    }
}
Adjust the css to make the title look nicer.
package mypackage.client;

import com.google.gwt.core.client.EntryPoint;
import com.google.gwt.user.client.Window;
import com.google.gwt.user.client.ui.Button;
import com.google.gwt.user.client.ui.ClickListener;
import com.google.gwt.user.client.ui.Label;
import com.google.gwt.user.client.ui.RootPanel;
import com.google.gwt.user.client.ui.Widget;

public class HelloGwt implements EntryPoint {

    public void onModuleLoad() {
        Header header = new Header("Hello");
        header.setStyleName("headerpane");
        Label label = new Label("Hello GWT !!!");
        label.setStyleName("label");
        Button button = new Button("Say something");
        button.addClickListener(new ClickListener() {
            public void onClick(Widget sender) {
                Window.alert("Hello, again");
            }
        });

        RootPanel.get().add(header);
        RootPanel.get().add(label);
        RootPanel.get().add(button);
    }
}
The result should look like the following.
10. Links and Literature
10.2. vogella Java example code
If you need more assistance we offer Online Training and Onsite training as well as consulting