This tutorial gives an introduction into the Flutter framework and explains how to setup your development environment.
1. About this guide
This tutorial gives an introduction into the Flutter framework
Other guides in this Flutter series explains the development with Flutter:
2. What is Flutter
2.1. Introduction to Flutter
Flutter is a UI toolkit to build native, fast and beautiful apps for iOS, Android, the web and desktop with a single codebase. It was introduced by Google in 2017 and has had its first 1.0 release on December 4th, 2018.
Flutter is written in C, C++ and Dart. Unlike Javascript, Dart is a statically typed, class-based language which is able to compile Just in Time (JIT) or Ahead of Time (AOT). Flutter supports hot reload of the code during development, which results in an extremely fast stateful reload of your app during development. The SDK utilizes the Skia Graphics Engine to render.
The following image shows the general Flutter architecture.
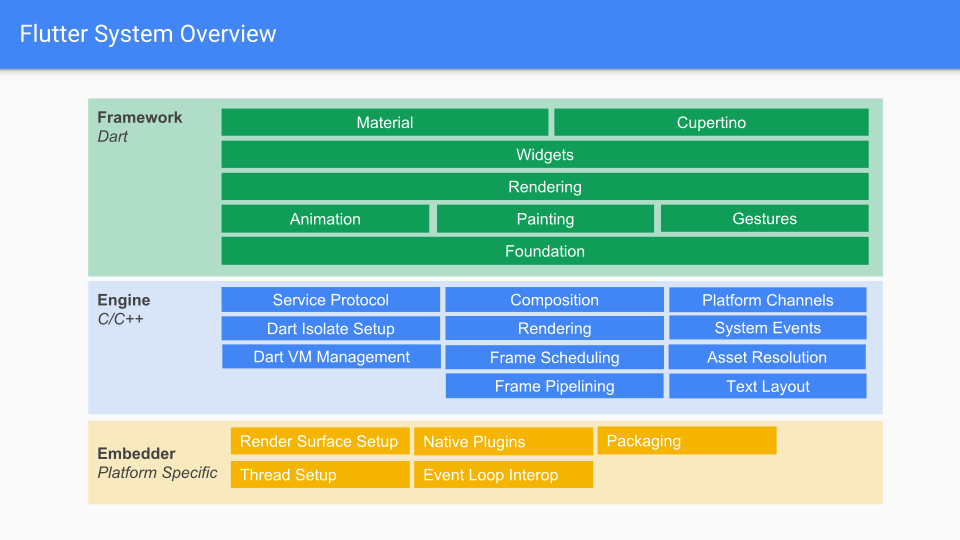
The top layer provides the building blocks of Flutter and is purely written in Dart. It contains libraries for animation, painting, rendering and widgets.
The Framework runs on top of the engine, which is primarily written in C/C++. The engine contains three core libraries:
-
Skia: an open-source graphics engine used by Google Chrome, Android, Chrome OS and many more.
-
Dart runtime
-
Text: Engine used to render and layout text
The bottom layer is the embedder. This layer is platform-specific and is where the surface for rendering Flutter is configured.
Flutter is motivated by the fact that the most successful apps, like the Netflix one, look the same on platforms like iOS and Android. Platform specific behavior like the scroll behavior is still supported by Flutter.
Flutter draws everything itself. Native component like the one used in the Android SDK may handle such updates in the native components.
2.2. Libraries
https://pub.dev/ provides Flutter and Dart libraries.
The Flutter tooling uses the pub tooling to read library and build configuration from a pubspec.yaml file and downloads and updates the application with the required libraries.
2.3. Development environment
Flutter can be developed by only using a text editor and the command line. More advanced tooling is provided by VSCode and Android Studio.
| We currently recommend Visual Studio Code as the development tool, as it is fast, stable and lightweight. |
3. Getting started with Flutter
The following assumes that you already have Flutter installed. Create a new Flutter app named getting_started by using the instructions from Create a Flutter app.
Open the lib\main.dart file and remove all code.
Replace the code with the following:
import 'package:flutter/material.dart';(1)

void main() => runApp(MyApp()); (2)

class MyApp extends StatelessWidget {(3)
  @override
  Widget build(BuildContext context) {(4)
    return MaterialApp(
      title: 'Flutter starter app',
      home: Scaffold( (5)
        appBar: AppBar(
          title: Text('Welcome to Flutter'),
        ),
        body: Center( (6)
          child: Text('Hello World'),
        ),
      ),
    );
  }
}| 1 | Makes the material library available |
| 2 | Arrow notation is a short notation for one-line methods or functions |
| 3 | Stateless widget is one of the fundamental widgets, you compose your app out of widgets |
| 4 | The build method of a widget describes how to create the widgets contained in this widget |
| 5 | Scaffold widget provides a default app bar, a title, and a body property that holds the widget tree for the home screen |
| 6 | The Center widget center its child into its container, in this case in the center of the screen |
The app should look like the following:
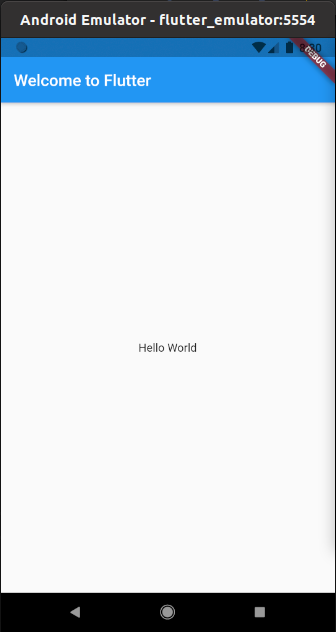
Pretty nice, right? You can create a new Flutter app in just a few minutes.
4. Widgets are the basis for everything in Flutter
Widgets are the basic elements used to construct the visual structure and behavior of a Flutter application. A widget can be thought of as a reusable, self-contained component that represents a part of the user interface, such as a button, text field, or an entire screen. Flutter provides lot of standard widgets, for example:
-
Center: Allows centering another widget. -
Row: Allows aligning other widgets in a row. -
Icon: Allows showing an icon, etc.
By combining these widgets together (similar to Lego blocks), you can create something more significant, such as a row of icons that are centered. An application with such a structure could look like the following:
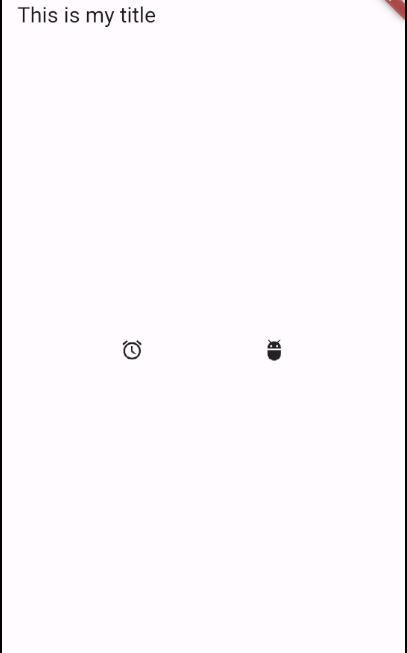
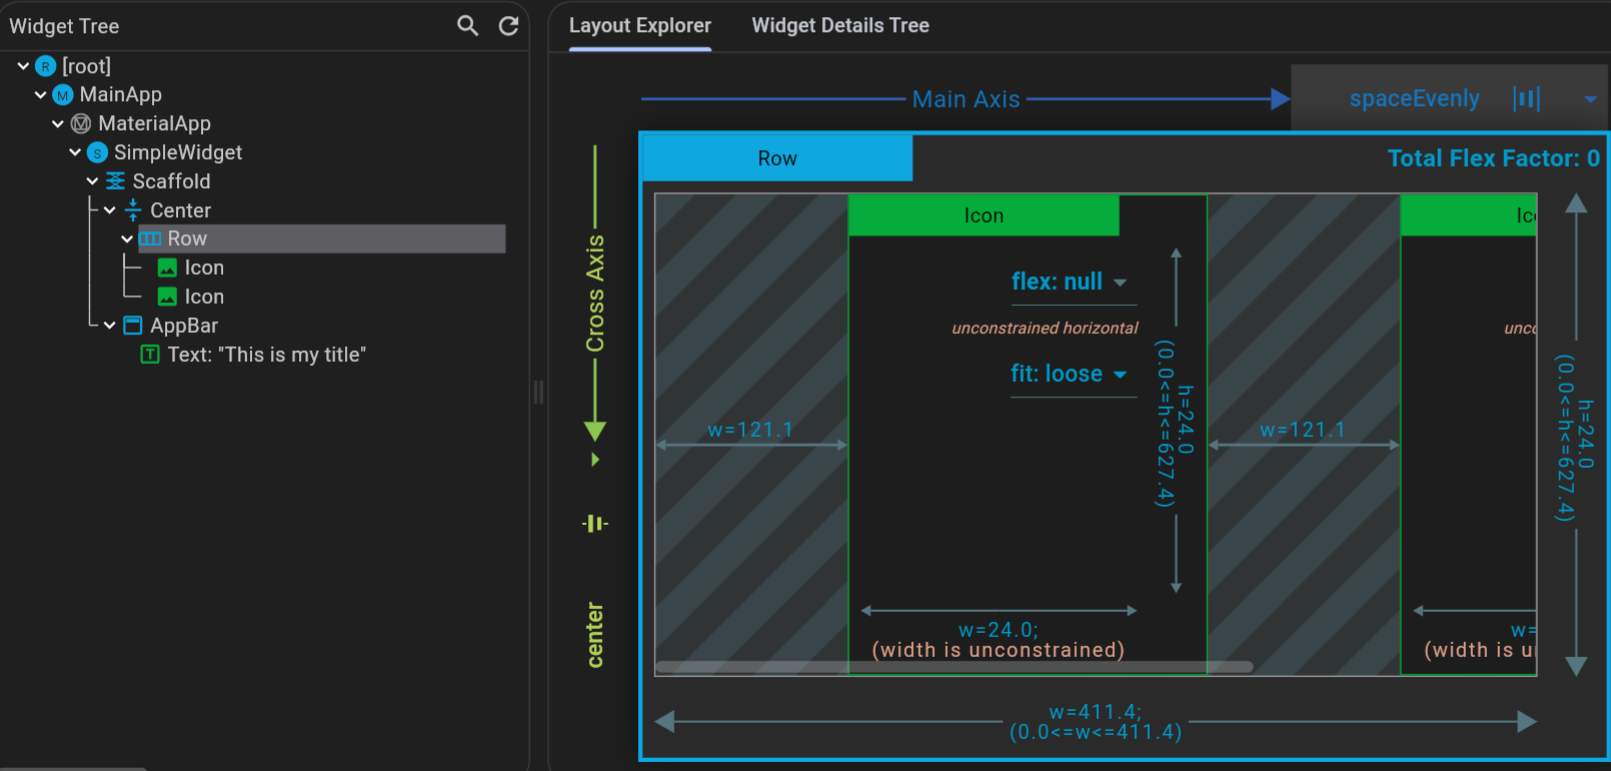
A structural view of the application would look like this:
The following listing shows a main.dart file that would create the application from the screenshot.
import 'package:flutter/material.dart';

void main() => runApp(const MyApp()); (1)

class MyApp extends StatelessWidget {
  const MyApp({super.key});

  // This widget is the root of your application
  @override
  Widget build(BuildContext context) {
    return MaterialApp(
      title: 'Flutter Demo',
      home: Scaffold( (2)
        appBar: AppBar(
          title: const Text("This is my title"),
        ),
        body: const Center(
          child: Row(
            mainAxisAlignment: MainAxisAlignment.spaceEvenly,
            children: [
              Icon(Icons.access_alarm),
              Icon(Icons.adb),
            ],
          ),
        ),
      ),
    );
  }
}| 1 | The main method is called on startup by the Flutter framework and creates your top-level widget. |
| 2 | The widget initially shown in the material app. |
The standard MaterialApp widget is commonly used as the first widget in the widget hierarchy.
It allows to:
-
Define possible app navigation.
-
Set the theme.
-
Define the first visible widget via the
homeproperty.
Widgets can be customized using properties and may have one or several children.
5. StatelessWidget or StatefulWidgets
Flutter distinguishes between widgets that manage data which can change within the widget and widgets that receive their data from the outside and never change this data themselves. Widgets that have changing data are called stateful widgets and widgets that do not manage their own data are called stateless.
You have to extend one of the following widgets from the framework to implement one of these types.
-
StatelessWidget: Widgets without mutable state. Any change in its data is provided from the outside these widgets. -
StatefulWidget: Widgets that manage mutable state.
5.1. StatelessWidget
Stateless widgets as immutable, therefore their properties are provided from the caller and cannot change.
Hence, every field in it should be marked as final.
For example, the Text widget is a stateless widget since its content remains constant, and the widget itself does not alter the text.
In contrast, the LinearProgressIndicator is not a stateless widget as it actively manages and reflects changes in its progress state.
| The Dart compiler does not enforce immutability. So it is possible to use non-final fields in StatelessWidgets. However, changing their values can result in negative side effects. |
Consider this simple example:
import 'package:flutter/material.dart';

void main() => runApp(App());

class App extends StatelessWidget {
  @override
  Widget build(BuildContext context) {
    return MaterialApp(
      home: Homepage(count: 10),
    );
  }
}

class Homepage extends StatelessWidget {
  final int count; (1)

  Homepage({this.count}); (2)

  @override
  Widget build(BuildContext context) {
    return Text('Pressed: $count');
  }
}| 1 | The count field is marked as final, therefore the Dart compiler does not allow any changes at runtime. |
| 2 | count is defined as an optional parameter using the {} notation. |
Using stateless widgets allows the runtime to optimize these widgets and make your app faster, therefore, prefer to use them, if no state is needed in a widget.
5.2. StatefulWidget
A stateful widget contains data that may change during the lifetime of the widget. A stateless widget can contain stateful widgets and vice versa.
Implementing a stateful widget requires two classes:
-
A
Statefulwidget that creates an instance of aStateclass. -
The
Stateclass for this widget.
The Stateful widget itself is immutable, while its state object persists over the lifetime of the widget.
This state class extends State<T> with T being the type of the corresponding StatefulWidget.
The created state class is exclusive to T and cannot be used in other StatefulWidget implementations.
You have to use the setState(…) function to update the state.
This method is available in all State<T> classes.
setState(…) takes a function (VoidCallback) as an argument.
Once you leave the setState method, Flutter will then re-render all impacted widgets.
The following is an example of an application using a stateful widget.
import 'package:flutter/material.dart';

void main() => runApp(App());

class App extends StatelessWidget {
  @override
  Widget build(BuildContext context) {
    return MaterialApp(
      home: Homepage(),
    );
  }
}

class Homepage extends StatefulWidget {
  @override
  HomepageState createState() => HomepageState();
}

class HomepageState extends State<Homepage> {
  int count = 0;                                    (1)

  @override
  Widget build(BuildContext context) {
    return MaterialButton(
      child: Text('Pressed: $count'),
      onPressed: () => setState(() => count++),     (2)
    );
  }
}| 1 | This attribute is the state of the widget in this example. |
| 2 | In setState(…), the value of the count field is updated. This instructs the Flutter framework to update the relevant widgets. |
Flutter takes care of many state-related operations for you. In other words, you do not have to care about which (nested) widget needs to be updated or repainted, etc.
Sometimes it might seem intuitive to just extend a Button widget if you want to generalize an often-used configuration.
But in this case, you should rather use a StatelessWidget and return a Button with the desired configuration.
|
6. Using Keys
Keys are not required for StatelessWidgets, as they do not have any state associated with them.
Keys are used to identify StatefulWidgets.
This means they can be recycled without messing up the state.
So in case StatefulWidgets of the same type are dynamically reordered, added, or removed, you need to use keys.
This is necessary so that Flutter can reconnect the state object with the correct element in the widget tree.
An example would be a list in which you can reorder list items.
The key should be placed on the top of the widget tree that should be preserved.
You can create keys with the UniqueKey() method or if it is based on your data, you can use ValueKey(yourdata.yourid).
For a detailed overview of using keys, see [https://medium.com/flutter/keys-what-are-they-good-for-13cb51742e7d](https://medium.com/flutter/keys-what-are-they-good-for-13cb51742e7d).
7. Exercise: Hide unwanted warnings
The Flutter tooling checks during development for bad programming patterns. Certain checks depend on the code and as we modify during development this code constantly, certain warnings make it harder to modify the code.
Therefore, while you are learning Flutter and constantly changing your code, you may want to turn off a few of these warnings. During the final touches of app development (before publishing it), you would enable these warnings again and fix them.
To ignore a few warnings which show a lot of warnings during development, you can open the analysis_options.yaml file and replace its content with the following:
include: package:flutter_lints/flutter.yaml

linter:
  rules:
    prefer_const_constructors: false
    prefer_const_constructors_in_immutables: false
    prefer_const_literals_to_create_immutables: false
8. Managing application state in Flutter
An application needs to handle its state (data). The following explanation speaks about state, keep in mind that this is data, e.g., one or several objects stored somewhere.
While each stateful widget in Flutter can have its own state, state typically needs to be available in multiple widgets in the application. In Flutter it is common to keep the state in the hierarchy above the widgets that use it as you have to rebuild your widgets to change the UI.
The following options are available:
-
manage this state yourself via widget constructors
-
use
InheritedWidgetwhich is provided by the Flutter SDK -
use Provider which is an external library and currently the recommended approach for doing this
-
Using Bloc
-
Using other alternatives
8.1. Using widget constructors
One approach to manage the state is that the root widget stores the data and pass it down the widget tree via the widget constructor. Widgets that update the state would have to call the other widgets, which would lead to highly coupled widgets. It also creates a lot of overhead and maintaining these kinds of apps can be difficult.
Therefore, this solution is not recommended.
8.2. Using InheritedWidget
InheritedWidget provides a simple way of accessing data in a widget hierarchy.
The parent widget extends InheritedWidget
class MyWidget extends InheritedWidget {
  const MyWidget({
    Key key,
    this.color,
    Widget child,
  }) : assert(color != null),
       assert(child != null),
       super(key: key, child: child);

  final Color color;

  static MyWidget of(BuildContext context) {
    return context.inheritFromWidgetOfExactType(MyWidget) as MyWidget;
  }

  @override
  bool updateShouldNotify(MyWidget old) => color != old.color;
}
Widgets below the hierarchy can access the data via the convenient MyWidget.of(context) method.
InheritedWidget works fine, but an even better solution is the usage of the provider package as described in the next chapter.
8.3. Using the Provider package
The Provider package provides a means to handle state.
Google currently recommends this approach for state management in Flutter apps.
See https://pub.dev/packages/provider for its latest version, which you can add as a dependency to your pubspec.yaml file.
It consists of providers that provide the data (from singleton services to data values that might change during the runtime of the app) down the widget hierarchy.
To provide data for all children of a widget, wrap this widget with a Provider widget.
This widget allows setting the state via the builder property.
If you want to provide data for your whole application, wrap your top level widget.
For example, if you want to provide one instance of UserService in your app, you can provide an instance of this class via a Provider widget.
@override
Widget build(BuildContext context) {
  return Provider(
    create: (context) => UserService(),
    child: MaterialApp(
      // Relevant app configuration
    )
  );
}
To access this instance of UserService in another widget use the static function Provider.of<T>(context) where T is the type of your value (in this case the UserService).
//...
var userService = Provider.of<UserService>(context);
//...
This enables you to build your own providers for your data and consume them inside any children of your initial provider.
Keep in mind that this always requires a BuildContext which is available in any build(…) method in your State<T> or StatelessWidget classes.
|
8.3.1. Multiple Provider
In case you have multiple providers, you can use the MultiProvider class.
It has a providers parameter that accepts a list of providers.
To use it, wrap your MaterialApp with a MultiProvider.
@override
Widget build(BuildContext context) {
  return MultiProvider(
    providers: [
      Provider(
        create: (context) => UserService(),
      ),
      Provider(
        create: (context) => EventService(),
      ),
    ],
    child: MaterialApp(
      // Relevant app configuration
    )
  );
}
To access any of these providers in the widget hierarchy below its declaration, you can again use the Provider.of<T>(context) function.
8.3.2. Change Notifiers
ChangeNotifier which is part of the Flutter SDK and provides change notifications to its listeners.
The function notifyListeners() can be called to notify listeners that something changed.
Other frameworks calls such a class an observable, in case you are familiar with this term.
class TaskModel with ChangeNotifier {
 final List<String> _todos = [];

  void addTask(String task) {
    _items.add(task);
    notifyListeners();
  }
}
This also works with asynchronous methods.
class AuthenticationService with ChangeNotifier {

  bool isAuthenticated = false;

  Future<void> _authenticate(String email, String password) async {
    // do authentication
    isAuthenticated = true;
    notifyListeners();
  }
}
8.3.3. Using ChangeNotifier with the Provider package
A class that implements ChangeNotifier can be provided through a ChangeNotifierProvider.
ChangeNotiferProvider(
    create: (context) => TaskModel(),
    child: MyApp(),
),
Changes can be listened to by Consumer<T> widgets where T is the type of your ChangeNotifier.
Inside its builder parameter you can return other widgets based on the changed value.
@override
Widget build(BuildContext context) {
  return Consumer<AuthenticationService>(
    builder: (context, authenticationService, child) { (1)
      if(authenticationService.isAuthenticated) {
        return UserPage();
      } else {
        return LoginPage();
      }
    }
  )
}| 1 | The builder also receives the optional child parameter of the Consumer that can be returned inside the builder if you just want to do updates to the local state. |
8.3.4. Using the Consumer widget
You can access your ChangeNotifierProvider via the Consumer widget.
return Consumer<TaskModel>(
  builder: (context, tasks, child) {
    return Text("Total number of items: ${tasks.size()}");
  },
);
The builder is called with three arguments.
-
The first one is context, which you also get in every build method
-
The second argument of the builder function is the instance of the ChangeNotifier. You can use the data in the model to define what the UI
-
The third argument is child, which is there for optimization. If you have a large widget subtree under your Consumer that doesn’t change when the model changes, you can construct it via the
childattribute. This will be passed here to you.
8.4. BLoC
The BLoC pattern is a little bit more Dart specific as it is based on streams that are implemented as a first class citizen in Dart. BLoC stand for Business Logic Component. The gist of this is that business logic, the logic of your app, should be moved to so called BLoCs. This removes said logic from the presentation layer and helps separating the logic from UI.
Per definition these BLoCs should also be platform independent. This has the added benefit of being transportable to other versions of your app (for example a Dart server backend or an AngularDart frontend). These BLoCs rely exclusively on Streams as their primary means of communication to other parts of the app.
BLoC helper packages are also available from pub.dev.
9. Network Communication
9.1. Futures
A Future<T> is a special class that is essential for async computation in Dart.
It provides a way to delay reactions to data until the data is there.
Use cases for this are network communication as you most likely want to wait for the data returned from the server before proceeding with your computation.
Futures are deeply integrated into the core of the Dart language.
The async/await syntax can be used to "await" the result of a computation before going further in the current method’s execution.
| This does not mean that the main thread is blocked while waiting. You can read more on that here: https://dart.dev/codelabs/async-await#execution-flow-with-async-and-await |
Many built-in methods of the Dart & Flutter SDKs return futures where appropriate.
A Future<T> is similar to a Promise in JavaScript, Task<T> in C# or a CompletableFuture<T> in Java.
|
9.2. The http Library
Network communication in Flutter can be simplified by using the http library by the dart.dev team.
To use the library you have to add it to the pubspec.yaml file of the project:
dependencies:
# ... more dependencies

  http: 0.12.0+2
# ...
The library contains a set of high level APIs to make working with network requests easy.
The usage of http is pretty straightforward.
It exposes the most common HTTP operations directly and returns the responses wrapped in a Future.
-
http.get(…) -
http.post(…) -
http.put(…) -
http.delete(…) -
For a full list refer to the official documentation.
This is useful as you can use the async/await syntax to "await" the response.
import 'package:http/http.dart' as http;

var response = await http.post('https://api.dev/...', { body: 'Some body'}); (1)| 1 | The await keyword is special Dart syntax that waits for the current method execution and unwraps the returned Future.
The response variable is now of type Response and not Future<Response>. |
9.3. Using Futures in UI
Normally, when working with network requested data, you want to wait until the data is loaded before your show the user the corresponding UI elements.
In Flutter this can be done using the FutureBuilder widget.
It takes three parameters:
-
future: The future that should be waited upon -
initialData: The data contained in thesnapshotparameter of thebuilderuntil thefutureis completed. -
builder: A function with the signature(BuildContext context, AsyncSnapshot<T> snapshot). It will be called every time something changes in the future (successful or erroneous completion). Typically this method should return a widget.
The documentation advises that the builder method could be called on every frame.
|
An example usage of the FutureBuilder:
Scaffold(
  body: FutureBuilder(
    future: _someFuture, (1)
    builder: (BuildContext context, AsyncSnapshot<String> snapshot) { (2)
      if (snapshot.hasData) { (3)
          return Text(snapshot.data);
      } else if (snapshot.hasError) { (4)
        return Text(snapshot.error.toString());
      } else { (5)
        return CircularProgressIndicator();
      }
    },
  ),
);| 1 | A previously defined Future<String> |
| 2 | In this case the type of Data contained in the AsyncSnapshot is of type String.
But it could be of any type. |
| 3 | If the snapshot has data, a Text widget is returned that displays the data |
| 4 | If the Future was erroneous its error should be displayed |
| 5 | The default case, when there is no data yet |
10. Calling native code
The communication with Flutter and native code works via channels.
Both the native components as well as the Flutter components have to use the same key for the channels to address them.
The channels need to be registered in the Android activity.
private static final String BATTERY_CHANNEL = "samples.flutter.dev/battery";
// more code

//This goes to the end of the onCreate method

new MethodChannel(getFlutterView(), BATTERY_CHANNEL).setMethodCallHandler(
  new MethodCallHandler() {
    @Override
    public void onMethodCall(MethodCall call, Result result) {
      if (call.method.equals("getBatteryLevel")) {
        int batteryLevel = getBatteryLevel();

        if (batteryLevel != -1) {
          result.success(batteryLevel);
        } else {
          result.error("UNAVAILABLE", "Battery level not available.", null);
        }
      } else {
        result.notImplemented();
      }
    }
  }
);
And Flutter needs to call it.
class _MyHomePageState extends State<MyHomePage> {
  final logger = Logger();
  static const platform = const MethodChannel('samples.flutter.dev/battery');

  // Get battery level.
  // Get battery level.
  String _batteryLevel = 'Unknown battery level.';

  Future<void> _getBatteryLevel() async {
    String batteryLevel;
    try {
      final int result = await platform.invokeMethod('getBatteryLevel');
      batteryLevel = 'Battery level at $result % .';
    } on PlatformException catch (e) {
      batteryLevel = "Failed to get battery level: '${e.message}'.";
    }

    setState(() {
       logger.e("Called");
      _batteryLevel = batteryLevel;
    });
  }

  @override
  Widget build(BuildContext context) {
    return Material(
      child: Center(
        child: Column(
          mainAxisAlignment: MainAxisAlignment.spaceEvenly,
          children: [
            RaisedButton(
              child: Text('Get Battery Level'),
              onPressed: _getBatteryLevel,
            ),
            Text(_batteryLevel),
          ],
        ),
      ),
    );
  }
}
11. Activate code checks
It is time to adhere to Dart conventions by activating automatic checks for it via the Dart linter.
Create the analysis_options.yaml file in your top-level folder.
Add the following content.
linter:
  rules:
    - avoid_empty_else
    - avoid_init_to_null
    - avoid_relative_lib_imports
    - avoid_return_types_on_setters
    - avoid_shadowing_type_parameters
    - avoid_types_as_parameter_names
    - curly_braces_in_flow_control_structures
    - empty_catches
    - empty_constructor_bodies
    - library_names
    - library_prefixes
    - no_duplicate_case_values
    - null_closures
    - prefer_contains
    - prefer_equal_for_default_values
    - prefer_is_empty
    - prefer_is_not_empty
    - prefer_iterable_whereType
    - recursive_getters
    - slash_for_doc_comments
    - type_init_formals
    - unawaited_futures
    - unnecessary_const
    - unnecessary_new
    - unnecessary_null_in_if_null_operators
    - unrelated_type_equality_checks
    - use_rethrow_when_possible
    - valid_regexps
The Flutter and Dart compiler should start complaining about violations against this standard.
Fix them until you have no more errors.
If you see no errors / warnings, try adding the new keyword in front of your widgets and ensure that you see a warning.
12. Guide to write standard, clean and effective Dart code
-
Be consistent
Try to make two pieces of code similar. Different only in meaningful way.
-
Be brief
If there are multiple ways to say something, pick the concise one. The goal is to make code economical, not dense.
12.1. Naming TODO
-
class name example: SliderMenu(), HttpRequest…
-
file name, package name, directories and library: file_system.dart, slider_menu.dart…
-
make import prefix lowercase: import 'dart.math' as math
-
name identifiers, constant names in lower camel-case:
i.e., the first word starts with lowercase with following start with uppercase
var item;
HttpRequest httpRequest
12.2. Naming NOT TODO
-
capitalize acronyms
not to do:
HTTPConnection (better: HttpConnectionInfo)
IOStream (better: IoStream)
-
Make abbreviation like words:
not to do:
ID (better: Id)
-
Do not use leading underscore for identifiers if not private
-
Do not use prefix letters: kDefaultTimeout
12.3. Ordering
-
dart imports before other imports
-
package imports before relative imports
-
place external package imports before other imports
-
specify exports in a separate section after all imports
-
order each subsection alphabetically
import 'dart:async';
import 'dart:html';

import 'package:bar/bar.dart';
import 'package:foo/foo.dart';

import 'package:my_package/util.dart';

import 'util.dart';

export 'src/error.dart';
12.4. format
For formatting, Dart provides an automated code formatter dartfmt.
Avoid lines longer than 80 characters.
12.5. Documentation
-
Format comments like sentences and use '//':
// Not if there is nothing before it.
if (_chunks.isEmpty) return false;-
use '///' to doc comments for members and types
12.6. Automatically check your code for code violations
You can check if your code aligns with the style guide guidelines by adding the following.
include: package:pedantic/analysis_options.1.9.0.yaml-
About Dart Linter, it enforces code standards, giving effective and standard code guide.
Create 'analysis_options.yaml' in your root folder containing your rules.
Refer previous sections for more details on analysis_options.yaml
12.7. Reference
For more detailed guides, refer to Guide
13. Using OAuth2.0 to connect with StackOverflow
13.1. OAuth2.0
The basic idea of OAuth2.0 is commonly used nowadays.
When someone tries to login from one website, he might be asked to login via Facebook. In this case, he authenticates with Facebook, giving the website access to required user-info from Facebook.
Here you use your application, StackOverflow, and one general user as an example.
For the explicit flow, you first register your app with StackOverflow (SO). Then you can get the client_id and client_secret from SO.
Then, you send the user, who is using your app, to the SO OAuth page. While connecting to the authentication page, you also send your client_id (so that SO recognizes that this is your app), scope (the data that our app needs), the redirectUri (the Uri which you redirect to after user authenticates with the SO).
Once the user is at the SO page, he types in his ID and password to authenticate himself with SO authentication server.
Upon successful authentication, the user is redirected to the redirectUri. Also, a code (the authentication code you need for access token later) you get from SO authentication server.
Then after getting the code, your app, together with the client_id and client_secret, connects with SO server. You ask for the relevant access_token that allows us to interact with SO database.
And the access_token is what you interact with SO API to get the relevant data of the user.
Note that in the process, client_id and client_secret are used to identify your identity (the app) to SO.
And the reason for having both code and access_token passed is because the authentication code is passed in frontend through browsers. This is considered unsafe. But your client_secret and the code can be used together to get the access_token from server side. This is then considered more safe.
13.2. Other OAuth2.0 methods with flutter
There are some packages you can use to reduce the work load when working with OAuth on flutter.
For general requesting, authentication, etc. FlutterOAuth
For getting the Authorization code grant, client credentials, Resources Owner Password Grant: oauth2
For already pre-implemented calls for different API, Amazon, Dropbox, Facebook, etc. simple_auth
14. Keep Secret Keys Out
This section introduces you the way to securely store secret keys. As some private keys might be needed for configuration, you need to keep them out of your app. The way used here is to store them locally, as one asset.
14.1. Setup
Create one secret.json file under assets folder.
Create one file for storing and handling data, key.dart.
Then add this to the yaml file, to claim your dependency.
flutter:
  assets:
    - assets/secret.json
14.2. Adding the data to json file
First, put your secret in json file.
{
    "key": "***the key to be added***"
}
14.3. Data File
To handle the data from json file, you need to first define one data class.
class Secret{
  final String key;

  Secret({this.key = ""});

  factory Secret.fromJson(Map<String, dynamic> jsonMap){
    return Secret(key: jsonMap["key"]);
  }
}
Then since the json file is stored locally, you need to implement the methods to extract the local json data.
create one SecretLoader class.
class SecretLoader{
 final String secretPath;

 SecretLoader({this.secretPath});

 Future<Secret> load() {
   return rootBundle.loadStructuredData<Secret>(this.secretPath,
   (jsonStr) async{
     final secret = Secret.fromJson(json.decode(jsonStr));
     return secret;
   });
 }
}
14.4. Using Key
After you implemented the Json file and data class, then you can use it in the source code. This way, you avoid putting secrets in source code and keeping it out of version control system.
Secret secret = await SecretLoader(secretPath: "assets/secret.json").load();15. Links and Literature
15.3. vogella Flutter and Dart example code
If you need more assistance we offer Online Training and Onsite training as well as consulting