This comprehensive tutorial covers unit testing with JUnit 5 (Jupiter), the latest version of the popular Java testing framework. You’ll learn how to write effective unit tests, use modern JUnit 5 features like dynamic tests and parameterized tests, and integrate JUnit with build systems like Maven and Gradle. While examples use Eclipse IDE, the concepts apply to all modern Java IDEs including Visual Studio Code and IntelliJ IDEA.
1. Overview
JUnit is the most widely-used unit testing framework in the Java ecosystem, trusted by millions of developers worldwide. JUnit 5 represents a major evolution of the framework, introducing powerful new features and taking advantage of modern Java capabilities.
This guide provides a comprehensive introduction to unit testing with JUnit 5, covering:
-
Setting up JUnit 5 with Maven and Gradle
-
Writing effective unit tests with modern Java features
-
Using advanced JUnit 5 features like dynamic tests, parameterized tests, and nested tests
-
Best practices for test organization and maintainability
-
Integration with popular IDEs and build tools
Whether you’re new to unit testing or upgrading from JUnit 4, this tutorial will help you master JUnit 5 and write better tests for your Java applications.
For further information about testing with Java see:
1.1. Configuration for using JUnit 5
To use JUnit 5 you have to make the libraries available for your test code. Jump to the section which is relevant to you, for example read the Maven part, if you are using Maven as build system.
Configure Maven to use JUnit 5
== Configure Maven dependencies for JUnit 5
=== Steps required to configure Maven to use JUnit5
To use JUnit5 in an Maven project, you need to:
-
Configure to use Java 11 or higher
-
Configure the maven-surefire-plugin and maven-failsafe-plugin to a higher version as the default (example uses 3.5.0) so that it can run JUnit5
-
Add dependencies to the JUnit5 API and engine for your test code
=== Configure Maven
Therefore you need to adjust your pom file, similar to the following:
    <properties>
        <project.build.sourceEncoding>UTF-8</project.build.sourceEncoding>
        <maven.compiler.source>21</maven.compiler.source>
        <maven.compiler.target>21</maven.compiler.target>
    </properties>

    <!--1 -->
    <build>
        <plugins>
            <plugin>
                <artifactId>maven-surefire-plugin</artifactId>
                <version>3.5.0</version>
            </plugin>
            <plugin>
                <artifactId>maven-failsafe-plugin</artifactId>
                <version>3.5.0</version>
            </plugin>
        </plugins>
    </build>

    <!--2 -->
    <dependencies>
        <!-- https://mvnrepository.com/artifact/org.hamcrest/hamcrest-library -->
        <dependency>
            <groupId>org.junit.jupiter</groupId>
            <artifactId>junit-jupiter-api</artifactId>
            <version>5.11.0</version>
            <scope>test</scope>
        </dependency>
        <dependency>
            <groupId>org.junit.jupiter</groupId>
            <artifactId>junit-jupiter-engine</artifactId>
            <version>5.11.0</version>
            <scope>test</scope>
        </dependency>

    </dependencies>
Once you have done this, you can start using JUnit5 in your Maven project for writing unit tests.
=== Update Maven settings (in case you are using the Eclipse IDE)
Right-click your pom file, select and select your project. This triggers an update of your project settings and dependencies.
Configure Gradle to use JUnit 5
== Update build.gradle file to use JUnit5
To use JUnit 5 with the Gradle build system, ensure you use at least Gradle 6.0 to avoid already fixed issues.
Modify your build.gradle file to contain at least the following entries. Your build file may contain more dependencies.
plugins {
    id 'java'
}

repositories {
    mavenCentral()
}

dependencies {
    testImplementation 'org.junit.jupiter:junit-jupiter:5.11.0'
}

test {
    useJUnitPlatform()
Configure JUnit 5 with Eclipse
If you are not using a build system and the JUnit library is not part of the classpath of your project during the creation of a new test, Eclipse prompts you to add it.
1.2. How to define a test in JUnit 5
A JUnit test is a method contained in a class that is dedicated to testing functionality.
This is called a test class.
To mark a method as a test method, annotate it with the @Test annotation.
This method executes the code under test and verifies the expected behavior.
The following code defines a minimal test class with one test method:
package com.vogella.junit.first;

import static org.junit.jupiter.api.Assertions.assertTrue;

import org.junit.jupiter.api.Test;

class AClassWithOneJUnitTest {

    @Test
    void demoTestMethod() {
        assertTrue(true);
    }
}
You can use assertion methods, provided by JUnit or other assertion frameworks, to verify that expected results match actual results. Such statements are called assertions or assertion statements.
Assertion statements typically allow you to define custom failure messages that are displayed when tests fail. You should provide meaningful messages to make it easier to identify and fix problems. This is especially important when someone else needs to understand a failing test.
1.3. Example: Writing comprehensive JUnit 5 tests
The following example demonstrates how to write comprehensive tests for a Java class, showcasing modern JUnit 5 features and best practices.
First, let’s create a simple Calculator class to test:
package com.vogella.junit5;

public class Calculator {

    public int multiply(int a, int b) {
        return a * b;
    }

    public int add(int a, int b) {
        return a + b;
    }

    public double divide(double a, double b) {
        if (b == 0) {
            throw new IllegalArgumentException("Division by zero is not allowed");
        }
        return a / b;
    }
}
Here’s a comprehensive test class that demonstrates various JUnit 5 features:
package com.vogella.junit5;

import static org.junit.jupiter.api.Assertions.assertEquals;
import static org.junit.jupiter.api.Assertions.assertThrows;

import org.junit.jupiter.api.BeforeEach;
import org.junit.jupiter.api.DisplayName;
import org.junit.jupiter.api.RepeatedTest;
import org.junit.jupiter.api.Test;

@DisplayName("Calculator Tests")
class CalculatorTest {

    private Calculator calculator;

    @BeforeEach                                         (1)
    void setUp() {
        calculator = new Calculator();
    }

    @Test                                               (2)
    @DisplayName("Multiplication of positive numbers")  (3)
    void testMultiplyPositiveNumbers() {
        assertEquals(20, calculator.multiply(4, 5),     (4)
                "4 * 5 should equal 20");               (5)
    }

    @RepeatedTest(5)                                    (6)
    @DisplayName("Multiplication with zero should return zero")
    void testMultiplyWithZero() {
        assertEquals(0, calculator.multiply(0, 5), "0 * 5 should equal 0");
        assertEquals(0, calculator.multiply(5, 0), "5 * 0 should equal 0");
    }

    @Test
    @DisplayName("Addition of positive numbers")
    void testAddPositiveNumbers() {
        assertEquals(9, calculator.add(4, 5), "4 + 5 should equal 9");
    }

    @Test
    @DisplayName("Division should work correctly")
    void testDivision() {
        assertEquals(2.5, calculator.divide(5.0, 2.0), 0.001, "5.0 / 2.0 should equal 2.5");
    }

    @Test
    @DisplayName("Division by zero should throw exception")
    void testDivisionByZero() {
        assertThrows(IllegalArgumentException.class,
            () -> calculator.divide(5.0, 0.0),
            "Division by zero should throw IllegalArgumentException");
    }
}| 1 | The method annotated with @BeforeEach runs before each test method, ensuring a fresh calculator instance |
| 2 | A method annotated with @Test defines a test method |
| 3 | @DisplayName provides a human-readable name for the test that appears in test reports |
| 4 | This assertion verifies that the expected value matches the actual result |
| 5 | The third parameter provides a custom failure message shown when the assertion fails |
| 6 | @RepeatedTest runs the same test multiple times, useful for detecting intermittent failures |
1.4. JUnit test class naming conventions
Build tools like Maven use a pattern to decide if a class is a test classes or not. The following is the list of classes Maven considers automatically during its build:
**/Test*.java           (1)
**/*Test.java           (2)
**/*Tests.java          (3)
**/*TestCase.java (4)| 1 | includes all of its subdirectories and all Java filenames that start with Test. |
| 2 | includes all of its subdirectories and all Java filenames that end with Test. |
| 3 | includes all of its subdirectories and all Java filenames that end with Tests. |
| 4 | includes all of its subdirectories and all Java filenames that end with TestCase. |
Therefore, it is common practice to use the Test or Tests suffix at the end of test classes names.
1.5. Where should tests be located?
Unit tests should be created in a separate source folder to keep test code separate from production code. The standard convention used by Maven and Gradle build tools is:
-
src/main/java- for production Java classes -
src/test/java- for test classes
This separation provides several benefits:
-
Clear distinction between production and test code
-
Tests are excluded from production deployments
-
Different classpaths can be configured for production and test code
-
Build tools can easily identify and run tests
1.6. Static imports for cleaner test code
JUnit 5 encourages the use of static imports for assertion statements to make test code more readable and concise. Static imports are a Java feature that allows you to use static methods and fields without specifying the class name.
JUnit assertion methods are defined as public static, making them perfect candidates for static imports.
The following example demonstrates assertions with and without static imports:
// Without static imports - verbose and harder to read
import org.junit.jupiter.api.Assertions;
// more code
Assertions.assertEquals(50, calculator.multiply(10, 5), "10 x 5 must be 50");
Assertions.assertTrue(result > 0, "Result should be positive");
Assertions.assertNotNull(calculator, "Calculator should not be null");

// With static imports - clean and readable
import static org.junit.jupiter.api.Assertions.assertEquals;
import static org.junit.jupiter.api.Assertions.assertTrue;
import static org.junit.jupiter.api.Assertions.assertNotNull;
// more code
assertEquals(50, calculator.multiply(10, 5), "10 x 5 must be 50");
assertTrue(result > 0, "Result should be positive");
assertNotNull(calculator, "Calculator should not be null");| Most IDEs can automatically add static imports when you use code completion for assertion methods. |
2. Assertions and assumptions
JUnit 5 provides a comprehensive set of assertion methods for validating expected behavior in your tests.
These assertions are static methods from the org.junit.jupiter.api.Assertions package and offer both simple and advanced testing capabilities.
2.1. Basic assertions
The following table shows the most commonly used assertion methods:
| Assertion method | Example and description |
|---|---|
|
|
|
|
|
|
|
|
|
|
|
|
|
|
2.2. Lazy assertion messages
Assertion messages can be provided as lambda expressions to avoid computational overhead when the assertion passes. This is particularly useful when constructing complex or expensive failure messages:
assertTrue(result > threshold,
    () -> "Expected result (" + result + ") to be greater than threshold (" + threshold + ")");

assertNotNull(expensiveObject,
    () -> "Failed to create object with parameters: " + Arrays.toString(parameters));
2.3. Testing for exceptions
JUnit 5 provides the assertThrows() method to verify that specific exceptions are thrown under certain conditions.
This is essential for testing error handling and validation logic in your code.
package com.vogella.junit.exceptions;

import static org.junit.jupiter.api.Assertions.assertEquals;
import static org.junit.jupiter.api.Assertions.assertThrows;

import org.junit.jupiter.api.BeforeEach;
import org.junit.jupiter.api.DisplayName;
import org.junit.jupiter.api.Test;

@DisplayName("User validation tests")
class UserValidationTest {

    private UserService userService;

    @BeforeEach
    void setUp() {
        userService = new UserService();
    }

    @Test
    @DisplayName("Should throw exception for invalid age")
    void shouldThrowExceptionForInvalidAge() {
        // Test that the expected exception is thrown
        IllegalArgumentException exception = assertThrows(
            IllegalArgumentException.class,
            () -> userService.setAge("invalid_age"),
            "Expected IllegalArgumentException for invalid age input"
        );

        // Verify the exception message
        assertEquals("Age must be a valid integer", exception.getMessage());
    }

    @Test
    @DisplayName("Should throw exception for negative age")
    void shouldThrowExceptionForNegativeAge() {
        IllegalArgumentException exception = assertThrows(
            IllegalArgumentException.class,
            () -> userService.setAge("-5"),
            "Expected IllegalArgumentException for negative age"
        );

        assertTrue(exception.getMessage().contains("Age cannot be negative"));
    }
}
The assertThrows() method returns the thrown exception, allowing you to make additional assertions about the exception properties such as the message or cause.
This approach lets you define exactly which part of your test should throw the exception. The test will still fail if an exception is thrown outside the expected scope.
2.4. Testing multiple assertions with assertAll
When a single assertion fails in a test, JUnit stops executing subsequent assertions.
If you want to ensure that all assertions are checked regardless of individual failures, use assertAll() for grouped assertions.
With grouped assertions, all assertions are executed even after a failure, and error messages are grouped together for better debugging:
@Test
@DisplayName("Validate person properties")
void validatePersonProperties() {
    Person person = new Person("John", "Doe", 30);

    assertAll("person properties",
        () -> assertEquals("John", person.getFirstName(), "First name should match"),
        () -> assertEquals("Doe", person.getLastName(), "Last name should match"),
        () -> assertTrue(person.getAge() > 0, "Age should be positive"),
        () -> assertNotNull(person.getEmail(), "Email should not be null")
    );
}
If these tests fail, the result shows all failures grouped together:
=> org.opentest4j.MultipleFailuresError: person properties (2 failures)
expected: <John> but was: <null>
expected: <null> but was: <test@example.com>
2.5. Testing with timeouts
JUnit 5 provides timeout assertions to ensure that operations complete within expected time limits. This is particularly useful for testing performance-critical code or preventing tests from hanging indefinitely.
import static org.junit.jupiter.api.Assertions.assertTimeout;
import static org.junit.jupiter.api.Assertions.assertTimeoutPreemptively;
import static java.time.Duration.ofSeconds;
import static java.time.Duration.ofMillis;

@Test
@DisplayName("Service operation should complete within timeout")
void serviceOperationShouldCompleteWithinTimeout() {
    // This assertion waits for the operation to complete, even if it exceeds the timeout
    assertTimeout(ofSeconds(2), () -> {
        return backupService.createBackup();
    });
}

@Test
@DisplayName("API call should return result within timeout")
void apiCallShouldReturnWithinTimeout() {
    String result = assertTimeout(ofMillis(500), () -> {
        return apiClient.fetchUserData(userId);
    });

    assertNotNull(result, "API should return valid result");
    assertTrue(result.contains("user"), "Result should contain user data");
}

@Test
@DisplayName("Long running operation should be cancelled after timeout")
void longRunningOperationShouldBeCancelled() {
    // This assertion interrupts the operation when timeout is exceeded
    assertTimeoutPreemptively(ofSeconds(1), () -> {
        Thread.sleep(5000); // This will be interrupted
    });
}
2.5.1. Key differences between timeout assertions
-
assertTimeout()- Waits for the operation to complete even if it exceeds the timeout, then reports the failure -
assertTimeoutPreemptively()- Interrupts the operation when the timeout is exceeded
Example failure messages:
// assertTimeout() failure:
=> org.opentest4j.AssertionFailedError: execution exceeded timeout of 1000 ms by 212 ms

// assertTimeoutPreemptively() failure:
=> org.opentest4j.AssertionFailedError: execution timed out after 1000 ms|
Timeout-based tests can be flaky in CI environments where system load varies. Consider using longer timeouts for integration tests or marking such tests with appropriate tags. |
2.6. Disabling tests and conditional execution
Sometimes you need to disable tests temporarily or run them only under certain conditions. JUnit 5 provides several mechanisms for this.
2.6.1. Using @Disabled annotation
The @Disabled annotation marks tests that should be skipped during execution:
@Test
@Disabled("Feature not yet implemented")
void testNewFeature() {
    // This test will be skipped
}

@Test
@Disabled // Without reason (not recommended)
void testWithBug() {
    // This test will be skipped
}| Always provide a meaningful reason when disabling a test to help other developers understand why it’s disabled. |
2.6.2. Using assumptions for conditional testing
Assumptions allow tests to run only when certain conditions are met. If an assumption fails, the test is marked as "aborted" rather than "failed":
import static org.junit.jupiter.api.Assumptions.assumeTrue;
import static org.junit.jupiter.api.Assumptions.assumeFalse;
import static org.junit.jupiter.api.Assumptions.assumingThat;

@Test
@DisplayName("Should run only on Windows")
void testWindowsSpecificFeature() {
    assumeTrue(System.getProperty("os.name").toLowerCase().contains("windows"),
        "Test requires Windows OS");

    // This code runs only on Windows
    // If not on Windows, test is marked as "aborted"
}

@Test
@DisplayName("Should skip on CI environment")
void testThatRequiresUserInterface() {
    assumeFalse(Boolean.parseBoolean(System.getenv("CI")),
        "Test should not run in CI environment");

    // This code runs only when not in CI
}

@Test
@DisplayName("Conditional execution within test")
void testWithConditionalBehavior() {
    String javaVersion = System.getProperty("java.version");

    // Always run this part
    assertTrue(javaVersion != null);

    // Run additional checks only on Java 11+
    assumingThat(javaVersion.startsWith("11") || javaVersion.startsWith("17"), () -> {
        // This code runs only on Java 11 or 17
        assertTrue(Runtime.version().feature() >= 11);
    });
}
You can also write an extension for @ExtendWith which defines conditions under which a test should run.
3. Dynamic and parameterized tests
JUnit 5 introduces powerful features for creating tests dynamically at runtime and running the same test logic with different input parameters. These features help reduce code duplication and make your test suites more comprehensive and maintainable.
3.1. Dynamic tests
Dynamic tests are created at runtime using test factories annotated with @TestFactory.
This allows you to generate tests based on data, configuration, or other runtime conditions.
Test factories can return:
-
Stream<DynamicTest> -
Collection<DynamicTest> -
Iterable<DynamicTest> -
Iterator<DynamicTest>
|
Methods annotated with |
Here’s a comprehensive example of dynamic tests:
package com.vogella.junit.dynamic;

import static org.junit.jupiter.api.Assertions.assertEquals;
import static org.junit.jupiter.api.Assertions.assertTrue;
import static org.junit.jupiter.api.DynamicTest.dynamicTest;

import java.util.Arrays;
import java.util.Collection;
import java.util.List;
import java.util.stream.Stream;

import org.junit.jupiter.api.DynamicTest;
import org.junit.jupiter.api.TestFactory;

@DisplayName("Dynamic Test Examples")
class DynamicTestExamples {

    @TestFactory
    @DisplayName("Dynamic tests for mathematical operations")
    Stream<DynamicTest> testMultiplicationOperations() {
        Calculator calculator = new Calculator();

        // Test data: {operand1, operand2, expected_result}
        int[][] testData = {
            {2, 3, 6},
            {5, 4, 20},
            {0, 10, 0},
            {-2, 3, -6}
        };

        return Arrays.stream(testData)
            .map(data -> dynamicTest(
                String.format("%d × %d = %d", data[0], data[1], data[2]),
                () -> assertEquals(data[2], calculator.multiply(data[0], data[1]))
            ));
    }

    @TestFactory
    @DisplayName("Dynamic tests from collection")
    Collection<DynamicTest> testStringOperations() {
        List<String> testStrings = Arrays.asList("hello", "world", "junit", "testing");

        return testStrings.stream()
            .map(input -> dynamicTest(
                "Testing string: '" + input + "'",
                () -> {
                    assertTrue(input.length() > 0, "String should not be empty");
                    assertTrue(input.matches("[a-z]+"), "String should contain only lowercase letters");
                }
            ))
            .toList();
    }
}
3.2. Parameterized tests
Parameterized tests allow you to run the same test logic with different input values, significantly reducing code duplication.
To use parameterized tests, you need to add the junit-jupiter-params dependency:
Adding junit-jupiter-params dependency for a Maven build
<dependency>
    <groupId>org.junit.jupiter</groupId>
    <artifactId>junit-jupiter-params</artifactId>
    <version>5.7.2</version>
    <scope>test</scope>
</dependency>
Adding junit-jupiter-params dependency for a Gradle build
If you are using Gradle:
dependencies {
  // .. your other dependencies
  testImplementation 'org.junit.jupiter:junit-jupiter-params:5.7.2'
}
3.2.1. Common parameterized test sources
JUnit 5 provides multiple ways to supply test data to parameterized tests.
Each @ParameterizedTest is executed once for each set of parameters provided.
@MethodSource - Using static methods
The @MethodSource annotation allows you to reference static methods that provide test data:
import static org.junit.jupiter.api.Assertions.assertEquals;
import static org.junit.jupiter.api.Assertions.assertTrue;

import java.util.stream.Stream;

import org.junit.jupiter.api.DisplayName;
import org.junit.jupiter.params.ParameterizedTest;
import org.junit.jupiter.params.provider.Arguments;
import org.junit.jupiter.params.provider.MethodSource;

@DisplayName("Parameterized Test Examples")
class ParameterizedTestExamples {

    @ParameterizedTest(name = "{0} × {1} = {2}")
    @MethodSource("multiplicationData")
    @DisplayName("Test multiplication with various inputs")
    void testMultiplication(int a, int b, int expected) {
        Calculator calculator = new Calculator();
        assertEquals(expected, calculator.multiply(a, b));
    }

    static Stream<Arguments> multiplicationData() {
        return Stream.of(
            Arguments.of(2, 3, 6),
            Arguments.of(0, 5, 0),
            Arguments.of(-2, 4, -8),
            Arguments.of(10, 10, 100)
        );
    }
}
Other parameter sources
JUnit 5 provides several built-in parameter source annotations for common use cases:
class OtherParameterSourceExamples {

    @ParameterizedTest(name = "Testing with value: {0}")
    @ValueSource(ints = {1, 2, 3, 5, 8, 13})
    void testWithValueSource(int number) {
        assertTrue(number > 0, "Number should be positive");
    }

    @ParameterizedTest(name = "Testing with string: ''{0}''")
    @ValueSource(strings = {"apple", "banana", "cherry"})
    void testWithStringValues(String fruit) {
        assertNotNull(fruit);
        assertTrue(fruit.length() > 3);
    }

    @ParameterizedTest(name = "Testing month: {0}")
    @EnumSource(value = Month.class, names = {"JANUARY", "FEBRUARY", "MARCH"})
    void testWithEnumSource(Month month) {
        assertTrue(month.ordinal() < 3, "Should be first quarter month");
    }

    @ParameterizedTest(name = "CSV: name={0}, age={1}")
    @CsvSource({
        "John, 25",
        "Jane, 30",
        "Bob, 35"
    })
    void testWithCsvSource(String name, int age) {
        assertNotNull(name);
        assertTrue(age > 0);
        assertTrue(name.length() >= 3);
    }

    @ParameterizedTest(name = "CSV file: {0}, {1}")
    @CsvFileSource(resources = "/test-data.csv", numLinesToSkip = 1)
    void testWithCsvFileSource(String name, int score) {
        assertNotNull(name);
        assertTrue(score >= 0);
    }

    @ParameterizedTest
    @NullSource
    @EmptySource
    @ValueSource(strings = {"  ", "\t", "\n"})
    void testWithNullEmptyAndBlankStrings(String input) {
        assertTrue(input == null || input.trim().isEmpty());
    }
}| Annotation & Code | Description |
|---|---|
a |
[source, java] ---- @MethodSource(names = "genTestData") void testMethod(String first, int second) { /* … */ } ---- |
The result of the named method is passed as argument to the test. |
a |
[source, java] ---- @CsvSource({ "foo, 1", "'baz, qux', 3" }) void testMethod(String first, int second) { /* … */ } ---- |
Expects strings to be parsed as Csv. The delimiter is |
a |
[source, java] ---- @ArgumentsSource(MyArgumentsProvider.class) void testMethod(String first, int second) { /* … */ } ---- |
3.2.2. Argument conversion
JUnit tries to automatically convert the source strings to match the expected arguments of the test method.
If you need explicit conversion you can specify a converter with the @ConvertWith annotation.
To define your own converter you have to implement the ArgumentConverter interface.
In the following example we use the abstract SimpleArgumentConverter base class.
@ParameterizedTest
@ValueSource(ints = {1, 12, 42})
void testWithExplicitArgumentConversion(@ConvertWith(ToOctalStringArgumentConverter.class) String argument) {
    System.err.println(argument);
    assertNotNull(argument);
}

static class ToOctalStringArgumentConverter extends SimpleArgumentConverter {
    @Override
    protected Object convert(Object source, Class<?> targetType) {
        assertEquals(Integer.class, source.getClass(), "Can only convert from Integers.");
        assertEquals(String.class, targetType, "Can only convert to String");
        return Integer.toOctalString((Integer) source);
    }
}
4. Additional information about JUnit 5 usage
4.1. Nested tests
The @Nested annotation can be used to annotate inner classes which also contain tests.
This allows to group tests and have additional @BeforeEach method, and one @AfterEach methods.
When you add nested test classes to our test class, the following rules must be followed:
-
All nested test classes must be non-static inner classes.
-
The nested test classes are annotated with
@Nestedannotation so that the runtime can recognize the nested test classes. -
a nested test class can contain
Testmethods, one @BeforeEach method, and one @AfterEach method.
| Because Java doesn’t allow static members in inner classes, a nested class cannot have additional @BeforeAll and @AfterAll methods. There is no limit for the depth of the class hierarchy. |
4.2. Test execution order
JUnit runs test methods in a deterministic but unpredictable order. You can use the @TestMethodOrder on the class to control the execution order of the tests, via:
-
@TestMethodOrder(MethodOrderer.OrderAnnotation.class) - Allows to use the @Order(int) annotation on methods to define order
-
@TestMethodOrder(MethodOrderer.DisplayName.class) - runs test method in alphanumeric order of display name
-
@TestMethodOrder(MethodOrderer.MethodName.class) - runs test method in alphanumeric order of method name
-
Custom implementation - Implement your own MethodOrderer via the orderMethods method that allows you to call context.getMethodDescriptors().sort(..)
The following demonstrates this with OrderAnnotation.class.
package com.vogella.unittest.sortmethods;

import org.junit.jupiter.api.MethodOrderer.OrderAnnotation;
import org.junit.jupiter.api.Order;
import org.junit.jupiter.api.Test;
import org.junit.jupiter.api.TestMethodOrder;

@TestMethodOrder(OrderAnnotation.class)
class OrderAnnotationDemoTest {

    @Test
    @Order(1)
    void firstOne() {
        // test something here
    }

    @Test
    @Order(2)
    void secondOne() {
        // test something here
    }

}
4.3. Using the @TempDir annotation to create temporary files and paths
The @TempDir annotation allows to annotate non-private fields or method parameters in a test method of type Path or File.
JUnit 5 has registered a ParameterResolutionException for this annotation and will create temporary files and paths for the tests.
It will also remove the temporary files after each test.
    @Test
    @DisplayName("Ensure that two temporary directories with same files names and content have same hash")
    void hashTwoDynamicDirectoryWhichHaveSameContent(@TempDir Path tempDir, @TempDir Path tempDir2) throws IOException {

        Path file1 = tempDir.resolve("myfile.txt");

        List<String> input = Arrays.asList("input1", "input2", "input3");
        Files.write(file1, input);

        assertTrue(Files.exists(file1), "File should exist");

        Path file2 = tempDir2.resolve("myfile.txt");

        Files.write(file2, input);
        assertTrue(Files.exists(file2), "File should exist");

    }
4.4. Test Suites
JUnit 5 supports test suites via the JUnit Platform Suite API. You can use the @Suite annotation and related annotations to group and run multiple test classes or packages together.
import org.junit.platform.suite.api.SelectPackages;
import org.junit.platform.suite.api.Suite;
import org.junit.platform.suite.api.SuiteDisplayName;

@Suite
@SuiteDisplayName("JUnit Platform Suite Demo")
@SelectPackages("example")
public class SuiteDemo {
}
Refer to the official JUnit 5 documentation for the latest details on suite support: https://junit.org/junit5/docs/current/user-guide/#running-tests-suite-engine
5. Exercise: Writing a JUnit 5 test with Maven and Eclipse in 5 mins
In this exercise, you learn how to write a JUnit 5 test using Maven and the Eclipse IDE.
5.1. Project creation
Create a new Maven project with the following settings:
-
Group:
com.vogella -
Artifact:
com.vogella.junit.first -
Version:
0.0.1-SNAPSHOT -
Packaging: jar
5.2. Configure Maven dependencies for JUnit 5
5.2.1. Steps required to configure Maven to use JUnit5
To use JUnit5 in an Maven project, you need to:
-
Configure to use Java 11 or higher
-
Configure the maven-surefire-plugin and maven-failsafe-plugin to a higher version as the default (example uses 3.5.0) so that it can run JUnit5
-
Add dependencies to the JUnit5 API and engine for your test code
5.2.2. Configure Maven
Therefore you need to adjust your pom file, similar to the following:
    <properties>
        <project.build.sourceEncoding>UTF-8</project.build.sourceEncoding>
        <maven.compiler.source>21</maven.compiler.source>
        <maven.compiler.target>21</maven.compiler.target>
    </properties>

    <!--1 -->
    <build>
        <plugins>
            <plugin>
                <artifactId>maven-surefire-plugin</artifactId>
                <version>3.5.0</version>
            </plugin>
            <plugin>
                <artifactId>maven-failsafe-plugin</artifactId>
                <version>3.5.0</version>
            </plugin>
        </plugins>
    </build>

    <!--2 -->
    <dependencies>
        <!-- https://mvnrepository.com/artifact/org.hamcrest/hamcrest-library -->
        <dependency>
            <groupId>org.junit.jupiter</groupId>
            <artifactId>junit-jupiter-api</artifactId>
            <version>5.11.0</version>
            <scope>test</scope>
        </dependency>
        <dependency>
            <groupId>org.junit.jupiter</groupId>
            <artifactId>junit-jupiter-engine</artifactId>
            <version>5.11.0</version>
            <scope>test</scope>
        </dependency>

    </dependencies>
Once you have done this, you can start using JUnit5 in your Maven project for writing unit tests.
5.2.3. Update Maven settings (in case you are using the Eclipse IDE)
Right-click your pom file, select and select your project. This triggers an update of your project settings and dependencies.
5.3. Package creation
Ensure you have the package named com.vogella.junit.first in the src/main/java and src/test/java folder. If these are missing, create it.
5.4. Create a Java class
In the src folder, create the following class in the com.vogella.junit.first package.
package com.vogella.junit.first;

public class MyClass {
    // the following is just an example
  public int multiply(int x, int y) {
    if (x > 999) {
      throw new IllegalArgumentException("X should be less than 1000");
    }
    return x / y;
  }
}
5.5. Create a JUnit test
Position the cursor on the MyClass in the Java editor and press Ctrl+1.
Select that you want to create a new JUnit test from the list.

| Alternatively, you can right-click on your new class in the :_Project Explorer_ or Package Explorer view and select . |
In the following wizard ensure that the New JUnit Jupiter test flag is selected. The source folder should select the test directory.
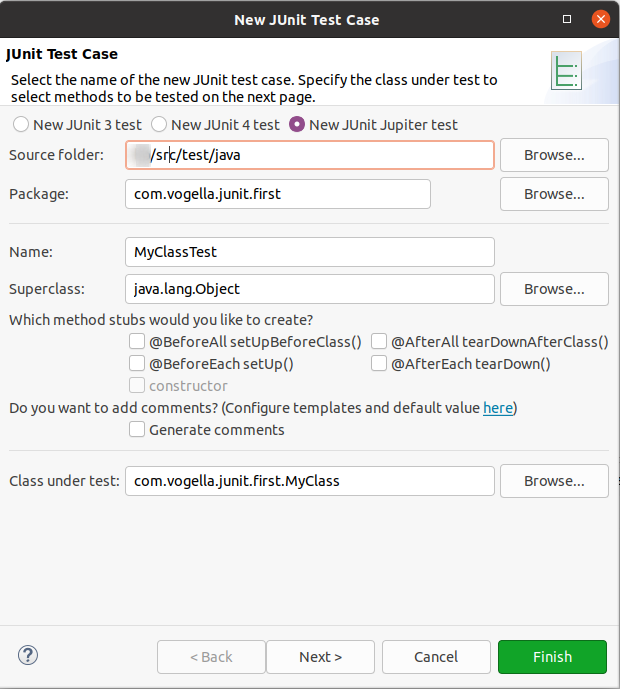
Press the Next button and select the methods that you want to test.
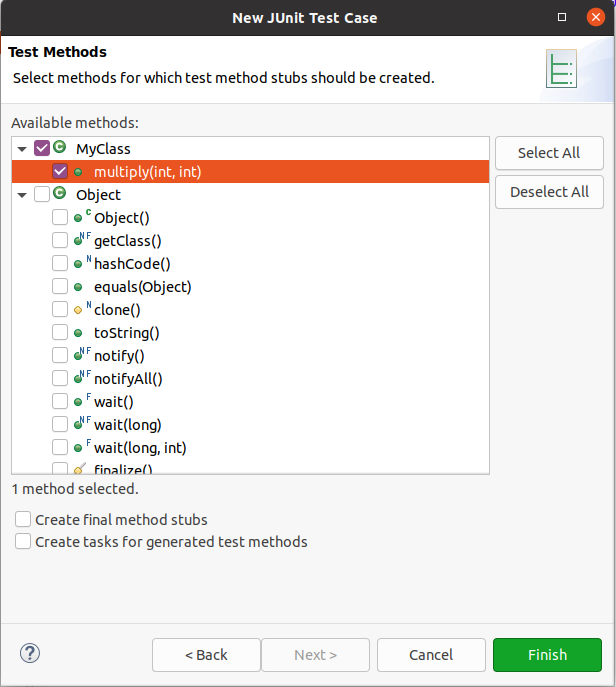
Create a test with the following code.
package com.vogella.junit.first;

import static org.junit.jupiter.api.Assertions.assertAll;
import static org.junit.jupiter.api.Assertions.assertEquals;
import static org.junit.jupiter.api.Assertions.assertThrows;

import org.junit.jupiter.api.BeforeEach;
import org.junit.jupiter.api.Test;

class MyClassTest {

    @Test
    void testExceptionIsThrown() {
        MyClass tester = new MyClass();
        assertThrows(IllegalArgumentException.class, () -> tester.multiply(1000, 5));
    }

    @Test
    void testMultiply() {
        MyClass tester = new MyClass();
        assertEquals(50, tester.multiply(10, 5), "10 x 5 must be 50");
    }
}
5.6. Run your test in Eclipse
Right-click on your new test class and select .

The result of the tests are displayed in the JUnit view. In our example one test should be successful and one test should show an error. This error is indicated by a red bar.
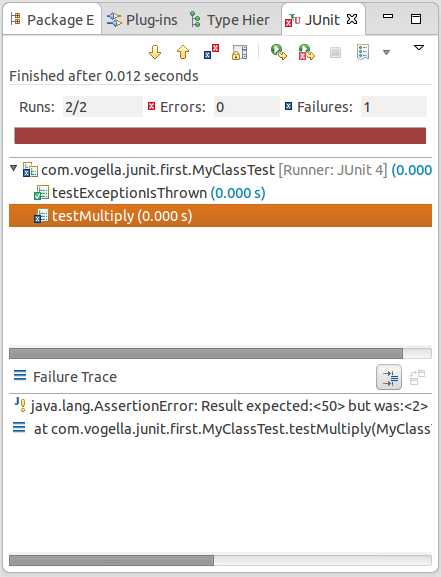
You discovered a bug in the tested code!
5.7. Fix the bug and re-run your tests
The test is failing, because our multiplier class is currently not working correctly. It does a division instead of multiplication. Fix the bug and re-run the test to get a green bar.
Solution
package com.vogella.junit.first;

public class MyClass {
    // the following is just an example
  public int multiply(int x, int y) {
    if (x > 999) {
      throw new IllegalArgumentException("X should be less than 1000");
    }
    return x * y;
  }
}
5.8. Review
After a few minutes you should have created a new project, a new class and a new unit test. Congratulations! If you feel like it, lets improve the tests a bit and write one grouped test.
5.9. Simplify your test code with @Before each
The initialization of MyClass happens in every test, move the initialization to a @BeforeEach method.
Solution
import org.junit.jupiter.api.BeforeEach;
// more import statements


class MyClassTest {

private MyClass tester;

@BeforeEach
void setup() {
    tester = new MyClass();
}

// tests are before
}
5.10. Define a group check with assertAll
Define a new test method that checks both condition at the same time with assertAll statement.
Change the condition to make both tests fail, run the test and ensure that both are executed.

Solution
@Test
    public void testGrouped() {
        assertAll( //
                () -> assertThrows(IllegalArgumentException.class, () -> tester.multiply(1, 5)),
                () -> assertEquals(501, tester.multiply(10, 5), "10 x 5 must be 50")
        );

    }
Afterwards, adjust the test so that both are successfully executed.
6. Exercise: Writing a JUnit 5 test with Gradle and Eclipse in 5 mins
In this exercise, you learn how to write a JUnit 5 test using the Gradle build system and the Eclipse IDE.
6.1. Project creation
Create a new Gradle project with the following settings:
-
Name:
com.vogella.junit.first
See Create a Grade project with Eclipse to learn how to create a Gradle project with Eclipse.
The wizard should also have created the package com.vogella.junit.first in the src/main/java and src/test/java folder. Remove the generated classes from it.
6.2. Update build.gradle file to use JUnit5
To use JUnit 5 with the Gradle build system, ensure you use at least Gradle 6.0 to avoid already fixed issues.
Modify your build.gradle file to contain at least the following entries. Your build file may contain more dependencies.
plugins {
    id 'java'
}

repositories {
    mavenCentral()
}

dependencies {
    testImplementation 'org.junit.jupiter:junit-jupiter:5.11.0'
}

test {
    useJUnitPlatform()
6.3. Create a Java class
In the src folder, create the following class in the com.vogella.junit.first package.
package com.vogella.junit.first;

public class MyClass {
    // the following is just an example
  public int multiply(int x, int y) {
    if (x > 999) {
      throw new IllegalArgumentException("X should be less than 1000");
    }
    return x / y;
  }
}
6.4. Create a JUnit test
Position the cursor on the MyClass in the Java editor and press Ctrl+1.
Select that you want to create a new JUnit test from the list.
| Alternatively, you can right-click on your new class in the :_Project Explorer_ or Package Explorer view and select . |
In the following wizard ensure that the New JUnit Jupiter test flag is selected. The source folder should select the test directory.
Press the Next button and select the methods that you want to test.
Create a test with the following code.
package com.vogella.junit.first;

import static org.junit.jupiter.api.Assertions.assertAll;
import static org.junit.jupiter.api.Assertions.assertEquals;
import static org.junit.jupiter.api.Assertions.assertThrows;

import org.junit.jupiter.api.BeforeEach;
import org.junit.jupiter.api.Test;

class MyClassTest {

    @Test
    void testExceptionIsThrown() {
        MyClass tester = new MyClass();
        assertThrows(IllegalArgumentException.class, () -> tester.multiply(1000, 5));
    }

    @Test
    void testMultiply() {
        MyClass tester = new MyClass();
        assertEquals(50, tester.multiply(10, 5), "10 x 5 must be 50");
    }
}
6.5. Run your test in Eclipse
Right-click on your new test class and select .
The result of the tests are displayed in the JUnit view. In our example one test should be successful and one test should show an error. This error is indicated by a red bar.
You discovered a bug in the tested code!
6.6. Fix the bug and re-run your tests
The test is failing, because our multiplier class is currently not working correctly. It does a division instead of multiplication. Fix the bug and re-run the test to get a green bar.
Solution
package com.vogella.junit.first;

public class MyClass {
    // the following is just an example
  public int multiply(int x, int y) {
    if (x > 999) {
      throw new IllegalArgumentException("X should be less than 1000");
    }
    return x * y;
  }
}
6.7. Review
After a few minutes you should have created a new project, a new class and a new unit test. Congratulations! If you feel like it, lets improve the tests a bit and write one grouped test.
6.8. Simplify your test code with @Before each
The initialization of MyClass happens in every test, move the initialization to a @BeforeEach method.
Solution
import org.junit.jupiter.api.BeforeEach;
// more import statements


class MyClassTest {

private MyClass tester;

@BeforeEach
void setup() {
    tester = new MyClass();
}

// tests are before
}
6.9. Define a group check with assertAll
Define a new test method that checks both condition at the same time with assertAll statement.
Change the condition to make both tests fail, run the test and ensure that both are executed.
Solution
@Test
    public void testGrouped() {
        assertAll( //
                () -> assertThrows(IllegalArgumentException.class, () -> tester.multiply(1, 5)),
                () -> assertEquals(501, tester.multiply(10, 5), "10 x 5 must be 50")
        );

    }
Afterwards, adjust the test so that both are successfully executed.
7. Exercise: Writing comprehensive JUnit 5 unit tests
In this exercise, you’ll develop comprehensive JUnit 5 tests for a given data model, applying the modern testing practices and features covered in this tutorial. You should already be familiar with creating Maven or Gradle projects and adding JUnit 5 dependencies.
For reference, see:
The following instructions assume you’re familiar with these setup steps.
7.1. Create project and configure JUnit 5
Create a new project called com.vogella.junit.exercise using either Maven or Gradle and configure it to use JUnit 5.
Ensure you have the necessary dependencies for both JUnit 5 core and parameterized tests.
7.2. Create domain model for testing
Create the com.vogella.unittest.model package and copy and paste the following classes on it.
package com.vogella.unittest.model;

import java.util.Date;

public class Movie {

    private String title;
    private Date releaseDate;
    @SuppressWarnings("unused")
    private String duration;

    public Movie(String title, Date releaseDate, String duration) {
        super();
        this.title = title;
        this.releaseDate = releaseDate;
        this.duration = duration;
    }

    public String getTitle() {
        return title;
    }

    public Date getReleaseDate() {
        return releaseDate;
    }

    @Override
    public int hashCode() {
        final int prime = 31;
        int result = 1;
        result = prime * result + ((releaseDate == null) ? 0 : releaseDate.hashCode());
        result = prime * result + ((title == null) ? 0 : title.hashCode());
        return result;
    }

    @Override
    public boolean equals(Object obj) {
        if (this == obj) return true;
        if (obj == null) return false;
        if (getClass() != obj.getClass()) return false;
        Movie other = (Movie) obj;
        if (releaseDate == null) {
            if (other.releaseDate != null) return false;
        } else if (!releaseDate.equals(other.releaseDate)) return false;
        if (title == null) {
            if (other.title != null) return false;
        } else if (!title.equals(other.title)) return false;
        return true;
    }

}
package com.vogella.unittest.model;
public enum Alignment {
SUPER_EVIL, EVIL, NEUTRAL, GOOD, SUPER_GOOD;
}package com.vogella.unittest.model;
import java.lang.annotation.ElementType;
import java.lang.annotation.Retention;
import java.lang.annotation.RetentionPolicy;
import java.lang.annotation.Target;
@Target(ElementType.TYPE)
@Retention(RetentionPolicy.RUNTIME)
public @interface Magical {
}package com.vogella.unittest.model;
/**
* Race in Tolkien's Lord of the Rings.
*
* @author Florent Biville
*/
public enum Race {
HOBBIT("Hobbit", false, Alignment.GOOD), MAIA("Maia", true, Alignment.GOOD), MAN("Man", false, Alignment.NEUTRAL), ELF("Elf", true, Alignment.GOOD), DWARF("Dwarf", false, Alignment.GOOD), ORC("Orc", false, Alignment.EVIL);
private final String name;
private final boolean immortal;
private Alignment alignment;
Race(String name, boolean immortal, Alignment alignment) {
this.name = name;
this.immortal = immortal;
this.alignment = alignment;
}
public String getName() {
return name;
}
public boolean isImmortal() {
return immortal;
}
public Alignment getAlignment() {
return alignment;
}
@Override
public String toString() {
return "Race [name=" + name + ", immortal=" + immortal + "]";
}
}package com.vogella.unittest.model;
@Magical
public enum Ring {
oneRing, vilya, nenya, narya, dwarfRing, manRing;
}package com.vogella.unittest.model;
public class TolkienCharacter {
// public to test extract on field
public int age;
private String name;
private Race race;
// not accessible field to test that field by field comparison does not use it
@SuppressWarnings("unused")
private long notAccessibleField = System.currentTimeMillis();
public TolkienCharacter(String name, int age, Race race) {
this.name = name;
this.age = age;
this.race = race;
}
public Race getRace() {
return race;
}
public String getName() {
return name;
}
public void setName(String name) {
this.name = name;
}
public void setAge(int age) {
if (age<0) {
throw new IllegalArgumentException("Age is not allowed to be smaller than zero");
}
this.age = age;
}
@Override
public int hashCode() {
final int prime = 31;
int result = 1;
result = prime * result + age;
result = prime * result + ((name == null) ? 0 : name.hashCode());
result = prime * result + ((race == null) ? 0 : race.hashCode());
return result;
}
@Override
public boolean equals(Object obj) {
if (this == obj) return true;
if (obj == null) return false;
if (getClass() != obj.getClass()) return false;
TolkienCharacter other = (TolkienCharacter) obj;
if (age != other.age) return false;
if (name == null) {
if (other.name != null) return false;
} else if (!name.equals(other.name)) return false;
if (race == null) {
if (other.race != null) return false;
} else if (!race.equals(other.race)) return false;
return true;
}
@Override
public String toString() {
return name + " " + age + " years old " + race.getName();
}
}Create the com.vogella.unittest.services package and copy and paste the following classes on it.
package com.vogella.unittest.services;

import static com.vogella.unittest.model.Race.DWARF;
import static com.vogella.unittest.model.Race.ELF;
import static com.vogella.unittest.model.Race.HOBBIT;
import static com.vogella.unittest.model.Race.MAIA;
import static com.vogella.unittest.model.Race.MAN;
import static com.vogella.unittest.model.Race.ORC;

import java.util.ArrayList;
import java.util.Date;
import java.util.HashMap;
import java.util.List;
import java.util.Map;

import com.vogella.unittest.model.Movie;
import com.vogella.unittest.model.Ring;
import com.vogella.unittest.model.TolkienCharacter;

/**
 * Init data for unit test
 */
public class DataService {

    static final String ERROR_MESSAGE_EXAMPLE_FOR_ASSERTION = "{} assertion : {}\n";


    // Some of the Lord of the Rings characters :
    final TolkienCharacter frodo = new TolkienCharacter("Frodo", 33, HOBBIT);

    final TolkienCharacter sam = new TolkienCharacter("Sam", 38, HOBBIT);

    final TolkienCharacter merry = new TolkienCharacter("Merry", 36, HOBBIT);

    final TolkienCharacter pippin = new TolkienCharacter("Pippin", 28, HOBBIT);

    final TolkienCharacter gandalf = new TolkienCharacter("Gandalf", 2020, MAIA);

    final TolkienCharacter gimli = new TolkienCharacter("Gimli", 139, DWARF);

    final TolkienCharacter legolas = new TolkienCharacter("Legolas", 1000, ELF);

    final TolkienCharacter aragorn = new TolkienCharacter("Aragorn", 87, MAN);

    final TolkienCharacter boromir = new TolkienCharacter("Boromir", 37, MAN);

    final TolkienCharacter sauron = new TolkienCharacter("Sauron", 50000, MAIA);

    final TolkienCharacter galadriel = new TolkienCharacter("Galadriel", 3000, ELF);

    final TolkienCharacter elrond = new TolkienCharacter("Elrond", 3000, ELF);

    final TolkienCharacter guruk = new TolkienCharacter("Guruk", 20, ORC);


    final Movie theFellowshipOfTheRing = new Movie("the fellowship of the Ring", new Date(), "178 min");

    final Movie theTwoTowers = new Movie("the two Towers", new Date(), "179 min");

    final Movie theReturnOfTheKing = new Movie("the Return of the King", new Date(), "201 min");


    public List<TolkienCharacter> getFellowship() {

        final List<TolkienCharacter> fellowshipOfTheRing = new ArrayList<>();


        // let's do some team building :)
        fellowshipOfTheRing.add(frodo);
        fellowshipOfTheRing.add(sam);
        fellowshipOfTheRing.add(merry);
        fellowshipOfTheRing.add(pippin);
        fellowshipOfTheRing.add(gandalf);
        fellowshipOfTheRing.add(legolas);
        fellowshipOfTheRing.add(gimli);
        fellowshipOfTheRing.add(aragorn);
        fellowshipOfTheRing.add(boromir);
        return fellowshipOfTheRing;
    }

    public List<TolkienCharacter> getOrcsWithHobbitPrisoners() {
        final List<TolkienCharacter> orcsWithHobbitPrisoners = new ArrayList<TolkienCharacter>();
        orcsWithHobbitPrisoners.add(guruk);
        orcsWithHobbitPrisoners.add(merry);
        orcsWithHobbitPrisoners.add(pippin);
        return orcsWithHobbitPrisoners;
    }

    public TolkienCharacter getFellowshipCharacter(String name) {
        List<TolkienCharacter> list = getFellowship();
        return list.stream().filter(s-> s.equals(name)).findFirst().get();
    }

    public Map<Ring, TolkienCharacter> getRingBearers() {

         Map<Ring, TolkienCharacter> ringBearers = new HashMap<>();

        // ring bearers
        ringBearers.put(Ring.nenya, galadriel);
        ringBearers.put(Ring.narya, gandalf);
        ringBearers.put(Ring.vilya, elrond);
        ringBearers.put(Ring.oneRing, frodo);
        return  ringBearers;
    }

}
7.3. Write tests for the model and the services
Create the following test class.
package com.vogella.unittest.services;

import static com.vogella.unittest.model.Race.HOBBIT;
import static org.junit.jupiter.api.Assertions.assertNotNull;
import static org.junit.jupiter.api.Assertions.fail;

import java.util.List;

import org.junit.jupiter.api.DisplayName;
import org.junit.jupiter.api.Tag;
import org.junit.jupiter.api.Test;

import com.vogella.unittest.model.TolkienCharacter;
import com.vogella.unittest.services.DataService;

class DataServiceTest {

    // TODO initialize before each test
    DataService dataService;

    @Test
    void ensureThatInitializationOfTolkeinCharactorsWorks() {
        TolkienCharacter frodo = new TolkienCharacter("Frodo", 33, HOBBIT);

        // TODO check that age is 33
        // TODO check that name is "Frodo"
        // TODO check that name is not "Frodon"
        fail("not yet implemented");
    }

    @Test
    void ensureThatEqualsWorksForCharaters() {
        Object jake = new TolkienCharacter("Jake", 43, HOBBIT);
        Object sameJake = jake;
        Object jakeClone = new TolkienCharacter("Jake", 12, HOBBIT);
        // TODO check that:
        // jake is equal to sameJake
        // jake is not equal to jakeClone
        fail("not yet implemented");
    }

    @Test
    void checkInheritance() {
        TolkienCharacter tolkienCharacter = dataService.getFellowship().get(0);
        // TODO check that tolkienCharacter.getClass is not a movie class
        fail("not yet implemented");
    }

    @Test
    void ensureFellowShipCharacterAccessByNameReturnsNullForUnknownCharacter() {
        // TODO imlement a check that dataService.getFellowshipCharacter returns null for an
        // unknow felllow, e.g., "Lars"
        fail("not yet implemented");
    }

    @Test
    void ensureFellowShipCharacterAccessByNameWorksGivenCorrectNameIsGiven() {
        // TODO imlement a check that dataService.getFellowshipCharacter returns a fellow for an
        // existing felllow, e.g., "Frodo"
        fail("not yet implemented");
    }


    @Test
    void ensureThatFrodoAndGandalfArePartOfTheFellowsip() {

        List<TolkienCharacter> fellowship = dataService.getFellowship();

        // TODO check that Frodo and Gandalf are part of the fellowship
        fail("not yet implemented");
    }

    @Test
    void ensureThatOneRingBearerIsPartOfTheFellowship() {

        List<TolkienCharacter> fellowship = dataService.getFellowship();

        // TODO test that at least one ring bearer is part of the fellowship
        fail("not yet implemented");
    }

    // TODO Use @RepeatedTest(int) to execute this test 1000 times
    @Test
    @Tag("slow")
    @DisplayName("Minimal stress testing: run this test 1000 times to ")
    void ensureThatWeCanRetrieveFellowshipMultipleTimes() {
        dataService = new DataService();
        assertNotNull(dataService.getFellowship());
        fail("this should run 1000 times");
    }

    @Test
    void ensureOrdering() {
        List<TolkienCharacter> fellowship = dataService.getFellowship();

        // ensure that the order of the fellowship is:
        // frodo, sam, merry,pippin, gandalf,legolas,gimli,aragorn,boromir
        fail("not yet implemented");
    }

    @Test
    void ensureAge() {
        List<TolkienCharacter> fellowship = dataService.getFellowship();

        // TODO test ensure that all hobbits and men are younger than 100 years

        // TODO also ensure that the elfs, dwars the maia are all older than 100 years
        fail("not yet implemented");

        // HINT fellowship.stream might be useful here
    }

    @Test
    void ensureThatFellowsStayASmallGroup() {

        List<TolkienCharacter> fellowship = dataService.getFellowship();

        // TODO Write a test to get the 20 element from the fellowship throws an
        // IndexOutOfBoundsException
        fail("not yet implemented");
    }

}
Solve the TODO and ensure that all tests can be successfully executed from your IDE. You may find issues in the DataService with these tests, fix them if you encounter them.
Solution
The following is a possible implementation of the tests:
package com.vogella.unittest.services;

import static com.vogella.unittest.model.Race.HOBBIT;
import static com.vogella.unittest.model.Race.MAIA;
import static org.junit.jupiter.api.Assertions.assertEquals;
import static org.junit.jupiter.api.Assertions.assertFalse;
import static org.junit.jupiter.api.Assertions.assertNotEquals;
import static org.junit.jupiter.api.Assertions.assertNotNull;
import static org.junit.jupiter.api.Assertions.assertNull;
import static org.junit.jupiter.api.Assertions.assertThrows;
import static org.junit.jupiter.api.Assertions.assertTrue;

import java.util.List;
import java.util.Map;

import org.junit.jupiter.api.BeforeEach;
import org.junit.jupiter.api.DisplayName;
import org.junit.jupiter.api.RepeatedTest;
import org.junit.jupiter.api.Tag;
import org.junit.jupiter.api.Test;

import com.vogella.unittest.model.Movie;
import com.vogella.unittest.model.Race;
import com.vogella.unittest.model.Ring;
import com.vogella.unittest.model.TolkienCharacter;
import com.vogella.unittest.services.DataService;

class DataServiceTest {

    DataService dataService;

    @BeforeEach
    void setup() {
        dataService = new DataService();
    }

    @Test
    void ensureThatInitializationOfTolkeinCharactorsWorks() {
        TolkienCharacter frodo = new TolkienCharacter("Frodo", 33, HOBBIT);
        assertEquals(33, frodo.age, "Frodo should be 33");
        assertEquals("Frodo", frodo.getName(), "Frodos character has wrong name");
        assertNotEquals("Frodon", frodo.getName(), "Frodos character has wrong name");
    }

    @Test
    void ensureFellowShipCharacterAccessByNameReturnsNullForUnknownCharacter() {
        TolkienCharacter fellowshipCharacter = dataService.getFellowshipCharacter("Lars");
        assertNull(fellowshipCharacter);
    }

    @Test
    void ensureFellowShipCharacterAccessByNameWorksGivenCorrectNameIsGiven() {
        TolkienCharacter fellowshipCharacter = dataService.getFellowshipCharacter("Frodo");
        assertNotNull(fellowshipCharacter);
    }

    @Test
    void ensureThatEqualsWorksForCharaters() {
        Object jake = new TolkienCharacter("Jake", 43, HOBBIT);
        Object sameJake = jake;
        Object jakeClone = new TolkienCharacter("Jake", 12, HOBBIT);

        assertEquals(jake, sameJake);
        assertNotEquals(jake, jakeClone);
    }

    @Test
    void checkInheritance() {
        TolkienCharacter tolkienCharacter = dataService.getFellowship().get(0);
        assertFalse(Movie.class.isAssignableFrom(tolkienCharacter.getClass()));
        assertTrue(TolkienCharacter.class.isAssignableFrom(tolkienCharacter.getClass()));
    }

    @Test
    void ensureThatFrodoAndGandalfArePartOfTheFellowsip() {

        List<TolkienCharacter> fellowship = dataService.getFellowship();
        TolkienCharacter frodo = new TolkienCharacter("Frodo", 33, HOBBIT);
        TolkienCharacter gandalf = new TolkienCharacter("Gandalf", 2020, MAIA);

        assertTrue(fellowship.contains(frodo));
        assertTrue(fellowship.contains(gandalf));
    }

    @Test
    void ensureThatOneRingBearerIsPartOfTheFellowship() {

        List<TolkienCharacter> fellowship = dataService.getFellowship();

        Map<Ring, TolkienCharacter> ringBearers = dataService.getRingBearers();
        assertTrue(ringBearers.values().stream().anyMatch(ringBearer -> fellowship.contains(ringBearer)));
    }

    @RepeatedTest(1000)
    @Tag("slow")
    @DisplayName("Ensure that we can call getFellowShip multiple times")
    void ensureThatWeCanRetrieveFellowshipMultipleTimes() {
        dataService = new DataService();
        assertNotNull(dataService.getFellowship());
    }

    @Test
    void ensureOrdering() {
        // ensure that the order of the fellowship is:
        // frodo, sam, merry,pippin, gandalf,legolas,gimli,aragorn,boromir
        List<TolkienCharacter> fellowship = dataService.getFellowship();
        assertEquals(dataService.getFellowshipCharacter("Frodo"), fellowship.get(0));
        assertEquals(dataService.getFellowshipCharacter("Sam"), fellowship.get(1));
        assertEquals(dataService.getFellowshipCharacter("Merry"), fellowship.get(2));
        assertEquals(dataService.getFellowshipCharacter("Pippin"), fellowship.get(3));
        assertEquals(dataService.getFellowshipCharacter("Gandalf"), fellowship.get(4));
        assertEquals(dataService.getFellowshipCharacter("Legolas"), fellowship.get(5));
        assertEquals(dataService.getFellowshipCharacter("Gimli"), fellowship.get(6));
        assertEquals(dataService.getFellowshipCharacter("Aragorn"), fellowship.get(7));
        assertEquals(dataService.getFellowshipCharacter("Boromir"), fellowship.get(8));

    }

    @Test
    void ensureAge() {
        List<TolkienCharacter> fellowship = dataService.getFellowship();
        // test to ensure that all hobbits and men are younger than 100 years
        // also ensure that the elfs, dwars the maia are all older than 100 years

        assertTrue(fellowship.stream()
                .filter(fellow -> fellow.getRace().equals(HOBBIT) || fellow.getRace().equals(Race.MAN))
                .allMatch(fellow -> fellow.age < 100));

        assertTrue(
                fellowship
                        .stream().filter(fellow -> fellow.getRace().equals(Race.ELF)
                                || fellow.getRace().equals(Race.DWARF) || fellow.getRace().equals(Race.MAIA))
                        .allMatch(fellow -> fellow.age > 100));
    }

    @Test
    void ensureThatFellowsStayASmallGroup() {

        List<TolkienCharacter> fellowship = dataService.getFellowship();

        assertThrows(IndexOutOfBoundsException.class, () -> fellowship.get(20));
    }

}
You actually found errors in the DataService implementations, adjust the following method:
    public TolkienCharacter getFellowshipCharacter(String name) {
        List<TolkienCharacter> list = getFellowship();
        return list.stream().filter(s -> s.getName().equals(name)).findFirst().orElseGet(() -> null);
    }
7.4. Verify on command line
Verify that your code compiles and your test are running via the command line with:
-
mvn clean verifyin case you are using Maven -
./gradlew testin case you are using Gradle
7.5. Add a long running method to your data service
Add a fake update method to your DataService which takes a long time to update the data and returns true on success.
public boolean update() {
    try {
        Thread.sleep(2000);
    } catch (InterruptedException e) {
        e.printStackTrace();
    }
    return true;
}
7.6. Develop a test to constrain the execution time of the long running method
Create a new test method in your DataServiceTest.
Use the assertTimeout assert statement to ensure that this test does not run longer than 3 seconds.
Solution
@Test
public void ensureServiceDoesNotRunToLong() {
    assertTimeout(Duration.ofSeconds(3),()-> dataService.update());
}
8. Exercise: Develop unit tests for a regular expression utility method for email verification
8.1. Create the data model used for testing
Create the com.vogella.unittest.email package and copy and paste the following classes on it.
package com.vogella.unittest.email;


import java.util.regex.Pattern;

public class EmailValidator  {

    /**
     * Email validation pattern.
     */
    public static final Pattern EMAIL_PATTERN = Pattern.compile(
            "[a-zA-Z0-9\\+\\.\\_\\%\\-\\+]{1,256}" +
                    "\\@" +
                    "[a-zA-Z0-9][a-zA-Z0-9\\-]{0,64}" +
                    "(" +
                    "\\." +
                    "[a-zA-Z0-9][a-zA-Z0-9\\-]{0,25}" +
                    ")+"
    );

    private boolean mIsValid = false;

    public boolean isValid() {
        return mIsValid;
    }

    /**
     * Validates if the given input is a valid email address.
     *
     * @param emailPattern The {@link Pattern} used to validate the given email.
     * @param email        The email to validate.
     * @return {@code true} if the input is a valid email. {@code false} otherwise.
     */
    public static boolean isValidEmail(CharSequence email) {
        return email != null && EMAIL_PATTERN.matcher(email).matches();
    }


}
8.2. Write tests for the model and the services
Create the following test class.
package com.vogella.unittest.email;

import static org.junit.jupiter.api.Assertions.assertFalse;
import static org.junit.jupiter.api.Assertions.assertTrue;
import static org.junit.jupiter.api.Assertions.fail;

import org.junit.jupiter.api.DisplayName;
import org.junit.jupiter.api.Test;


class EmailValidatorTest {
    // TODO Write test for EmailValidator
    // The names of the methods should give you a pointer what to test for

    @Test
    public void ensureThatEmailValidatorReturnsTrueForValidEmail() {
        assertTrue(EmailValidator.isValidEmail("lars.vogel@gmail.com"));
    }

    @Test
    @DisplayName("Ensure that the usage of a subdomain is still valid, see https://en.wikipedia.org/wiki/Subdomain")
    public void emailValidator_CorrectEmailSubDomain_ReturnsTrue() {
        fail("Fixme");
    }

    @Test
    @DisplayName("Ensure that a missiong top level domain returns false")
    public void emailValidator_InvalidEmailNoTld_ReturnsFalse() {
        fail("Fixme");
    }

    @Test
    public void emailValidator_InvalidEmailDoubleDot_ReturnsFalse() {
        fail("Fixme");
    }

    @Test
    public void emailValidator_InvalidEmailNoUsername_ReturnsFalse() {
        fail("Fixme");
    }

    @Test
    public void emailValidator_EmptyString_ReturnsFalse() {
        fail("Fixme");
    }

    @Test
    public void emailValidator_NullEmail_ReturnsFalse() {
        fail("Fixme");
    }

}
Fix all the failing test, unfortunately the test specification is not good. Try to write reasonable tests which fit the method name.
8.3. Verify
Run your new test via the IDE. Verify that your code compiles and your test are running via the command line.
8.4. Solution
The following listing contains a possible implementation of the test.
Solution
package com.vogella.unittest.email;

import static org.junit.jupiter.api.Assertions.assertFalse;
import static org.junit.jupiter.api.Assertions.assertTrue;

import org.junit.jupiter.api.Test;

class EmailValidatorTest {

    @Test
    void ensureThatEmailValidatorReturnsTrueForValidEmail() {
        assertTrue(EmailValidator.isValidEmail("lars.vogel@gmail.com"));
    }

    @Test
    void emailValidator_CorrectEmailSubDomain_ReturnsTrue() {
        assertTrue(EmailValidator.isValidEmail("lars.vogel@analytics.gmail.com"));
    }

    @Test
    void emailValidator_InvalidEmailNoTld_ReturnsFalse() {
        assertFalse(EmailValidator.isValidEmail("lars.vogel@gmail"));
    }

    @Test
    void emailValidator_InvalidEmailDoubleDot_ReturnsFalse() {
        assertTrue(EmailValidator.isValidEmail("lars..vogel@gmail.com"));
        assertFalse(EmailValidator.isValidEmail("lars..vogel@gmail..com"));
    }

    @Test
    void emailValidator_InvalidEmailNoUsername_ReturnsFalse() {
        assertFalse(EmailValidator.isValidEmail("@gmail.com"));
    }

    @Test
    void emailValidator_EmptyString_ReturnsFalse() {
        assertFalse(EmailValidator.isValidEmail(""));
    }

    @Test
    void emailValidator_NullEmail_ReturnsFalse() {
        assertFalse(EmailValidator.isValidEmail(null));
    }

}
9. Exercise: Testing exceptions and conditional enablement
9.1. Write tests checking for exceptions
We also want to check that exceptions with the correct error messages are thrown, if we call the class under test with incorrect data.
Create the following test class.
package com.vogella.unittest.services;


import static com.vogella.unittest.model.Race.HOBBIT;
import static org.junit.jupiter.api.Assertions.assertEquals;
import static org.junit.jupiter.api.Assertions.assertThrows;
import static org.junit.jupiter.api.Assertions.fail;

import org.junit.jupiter.api.Disabled;
import org.junit.jupiter.api.DisplayName;
import org.junit.jupiter.api.Test;

import com.vogella.unittest.model.TolkienCharacter;


public class DataModelAssertThrowsTest {

    @Test
    @DisplayName("Ensure that access to the fellowship throws exception outside the valid range")
    void exceptionTesting() {
        DataService dataService = new DataService();
        Throwable exception = assertThrows(IndexOutOfBoundsException.class, () -> dataService.getFellowship().get(20));
        assertEquals("Index 20 out of bounds for length 9", exception.getMessage());
    }

    @Test
    @Disabled("Please fix and enable")
    public void ensureThatAgeMustBeLargerThanZeroViaSetter() {
        TolkienCharacter frodo = new TolkienCharacter("Frodo", 33, HOBBIT);
        // use assertThrows() rule to check that the message is:
        // Age is not allowed to be smaller than zero
        frodo.setAge(-1);

    }

    @Test
    @Disabled("Please fix and enable")
    public void testThatAgeMustBeLargerThanZeroViaConstructor() {
        // use assertThrows() rule to check that an IllegalArgumentException exception is thrown and
        // that the message is:
        // "Age is not allowed to be smaller than zero"

        TolkienCharacter frodo = new TolkienCharacter("Frodo", -1, HOBBIT);

    }

}
Fix the disabled tests and enable them. The name should give a good indication what you have to test here.
You may discover that the data model does not behave as expected by the test, fix them in this case.
9.2. Verify
Run your update test via the IDE.
Verify that your code compiles and your test are running via the command line with the mvn clean verify.
9.3. Solution
Solution
package com.vogella.unittest.services;

import static com.vogella.unittest.model.Race.HOBBIT;
import static org.junit.jupiter.api.Assertions.assertEquals;
import static org.junit.jupiter.api.Assertions.assertThrows;

import java.util.List;

import org.junit.jupiter.api.DisplayName;
import org.junit.jupiter.api.Test;

import com.vogella.unittest.model.TolkienCharacter;

class DataModelAssertThrowsTest {

    @Test
    @DisplayName("Ensure that access to the fellowship throws exception outside the valid range")
    void ensureThatIndexOutOfBoundMessageForFellowAccessIsCorrect() {
        DataService dataService = new DataService();
        List<TolkienCharacter> fellowship = dataService.getFellowship();
        Throwable exception = assertThrows(IndexOutOfBoundsException.class, () -> fellowship.get(20));
        assertEquals("Index 20 out of bounds for length 9", exception.getMessage());
    }

    @Test
    void ensureThatAgeMustBeLargerThanZeroViaSetter() {
        // Age is not allowed to be smaller than zero
        TolkienCharacter frodo = new TolkienCharacter("Frodo", 33, HOBBIT);
        assertThrows(IllegalArgumentException.class, () -> frodo.setAge(-1));

    }

    @Test
    void ensureThatAgeMustBeLargerThanZeroViaConstructor() {
        // Age is not allowed to be smaller than zero

        IllegalArgumentException exception = assertThrows(IllegalArgumentException.class,
                () -> new TolkienCharacter("Frodo", -1, HOBBIT));
        assertEquals("Age is not allowed to be smaller than zero", exception.getMessage());
    }

}
The test indicates that you need to update the TolkienCharacter constructor.
public TolkienCharacter(String name, int age, Race race) {
        this.name = name;
        setAge(age);
        this.race = race;
    }
9.4. Enable test only on certain platforms
Write this test and adjust it so that is only runs on the operating system you are using.
package com.vogella.unittest.platform;

import static org.junit.jupiter.api.Assertions.assertTrue;

import org.junit.jupiter.api.Assumptions;
import org.junit.jupiter.api.Test;

class LinuxTests {
    @Test
    void testName() throws Exception {
        // only run on Linux
        Assumptions.assumeTrue(System.getProperty("os.name").contains("Linux"));
        assertTrue(true);
    }
}
10. Exercise: Writing nested tests to group tests for display
10.1. Write tests
Create the following test.
package com.vogella.unittest.nested;
import static org.junit.jupiter.api.Assertions.assertEquals;

import java.util.Arrays;
import java.util.List;

import org.junit.jupiter.api.BeforeEach;
import org.junit.jupiter.api.DisplayName;
import org.junit.jupiter.api.Nested;
import org.junit.jupiter.api.Test;

class UsingNestedTests {

    private List<String> list;

    @BeforeEach
    void setup() {
        list = Arrays.asList("JUnit 5", "Mockito");
    }

    @Test
    void listTests() {
        assertEquals(2, list.size());
    }

    // TODO define inner class with @Nestled
    // write one tests named checkFirstElement() to check that the first list element is "JUnit 4"
    // write one tests named checkSecondElement() to check that the first list element is "JUnit 4"
    @DisplayName("Grouped tests for checking members")
    @Nested
    class CheckMembers {
        @Test
        void checkFirstElement() {
            assertEquals(("JUnit 5"), list.get(0));
        }

        @Test
        void checkSecondElement() {
            assertEquals(("Mockito"), list.get(1));
        }

    }

}
10.2. Solution
The following listing contains a possible implementation of the test.
Solution
package com.vogella.unittest.nested;
import static org.junit.jupiter.api.Assertions.assertEquals;

import java.util.Arrays;
import java.util.List;

import org.junit.jupiter.api.BeforeEach;
import org.junit.jupiter.api.DisplayName;
import org.junit.jupiter.api.Nested;
import org.junit.jupiter.api.Test;

class UsingNestedTests {

    private List<String> list;

    @BeforeEach
    void setup() {
        list = Arrays.asList("JUnit 5", "Mockito");
    }

    @Test
    void listTests() {
        assertEquals(2, list.size());
    }

}
10.3. Run tests
Run the test from your IDE and review how the grouped tests are displayed.
11. Exercise: Testing multiple parameter
11.1. Create class for testing
Create the com.vogella.unittest.converter package and copy and paste the following class on it.
package com.vogella.unittest.converter;

public class ConverterUtil {
    // converts to celsius
    public static float convertFahrenheitToCelsius(float fahrenheit) {
        return ((fahrenheit - 32) * 5 / 9);
    }

    // converts to fahrenheit
    public static float convertCelsiusToFahrenheit(float celsius) {
        return ((celsius * 9) / 5) + 32;
    }
}
11.2. Write a dynamic test
Create the following test class.
package com.vogella.unittest.converter;

import java.util.Arrays;
import java.util.stream.Stream;

import org.junit.jupiter.api.DynamicTest;
import org.junit.jupiter.api.TestFactory;

class ConverterUtilTest {

    int[][] celsiusFahrenheitMapping = new int[][] { { 10, 50 }, { 40, 104 }, { 0, 32 } };

    @TestFactory
    Stream<DynamicTest> ensureThatCelsiumConvertsToFahrenheit() {
        return Arrays.stream(celsiusFahrenheitMapping).map(entry -> {
            // access celcius and fahrenheit from entry
            int celsius = entry[0];
            int fahrenheit = entry[1];
            return null;
            // return a dynamicTest which checks that the convertion from celcius to
            // fahrenheit is correct
        });

    }

    Stream<DynamicTest> ensureThatFahrenheitToCelsiumConverts() {
        return null;
        // TODO Write a similar test fahrenheit to celsius
    }
}
Fix all the failing test, unfortunately the test specification is not good. Try to write reasonable tests which fit the method name.
Solution example
package com.vogella.unittest.converter;

import static org.junit.jupiter.api.Assertions.*;
import static org.junit.jupiter.api.DynamicTest.dynamicTest;

import java.util.Arrays;
import java.util.stream.Stream;

import org.junit.jupiter.api.AfterEach;
import org.junit.jupiter.api.BeforeEach;
import org.junit.jupiter.api.DynamicTest;
import org.junit.jupiter.api.Test;
import org.junit.jupiter.api.TestFactory;

class ConverterUtilTest {
     @TestFactory
     public Stream<DynamicTest> ensureThatCelsiumConvertsToFahrenheit() {
         ConverterUtil converter = new ConverterUtil();
            int[][] data = new int[][] { { 10,50 }, { 40, 104}, { 0, 32 } };
            return Arrays.stream(data).map(entry -> {
                int celsius = entry[0];
                int fahrenheit = entry[1];
                return dynamicTest(celsius + " Celsius are " + fahrenheit, () -> {
                    assertEquals(fahrenheit, converter.convertCelsiusToFahrenheit(celsius));
                });
            });
        }

     @TestFactory
     public Stream<DynamicTest> ensureThatFahrenheitConvertsToCelsius() {
         ConverterUtil converter = new ConverterUtil();
            int[][] data = new int[][] { { 10,50 }, { 40, 104}, { 0, 32 } };
            return Arrays.stream(data).map(entry -> {
                int celsius = entry[0];
                int fahrenheit = entry[1];
                return dynamicTest(celsius + " Celsius are " + fahrenheit, () -> {
                    assertEquals(celsius, converter.convertFahrenheitToCelsius(fahrenheit));
                });
            });
        }
}
11.3. Verify
Run your new test via the IDE and ensure that you have 6 tests running successfully.
Verify that your code compiles and your test are running via the command line either with ./gradlew test`or with the `mvn clean verify depending on your build system.
12. Exercise: Testing with multiple input parameter
Dynamic tests are included in the regular JUnit 5 library, which you already included. To use parameters in your tests, you have to add the junit-jupiter-params library.
12.1. Add dependency
If you are using Maven add the following dependency to junit-jupiter-params to your Maven pom file.
    org.junit.jupiter
    junit-jupiter-params
    5.11.4
    test
If you are using Gradle add the following to your build.gradle file
implementation 'org.junit.jupiter:junit-jupiter-params:5.11.4'12.2. Write a parameterized test
Review the following code:
package com.vogella.unittest.converter;
import static org.junit.jupiter.api.Assertions.assertEquals;

import org.junit.jupiter.params.ParameterizedTest;
import org.junit.jupiter.params.provider.MethodSource;

class ParameterizedExampleTest {

    static int[][] data() {
        return new int[][] { { 1 , 2, 2 }, { 5, 3, 15 }, { 121, 4, 484 } };
    }

    @ParameterizedTest(name = "{index} called with: {0}")
    @MethodSource(value =  "data")
    void testWithStringParameter(int[] data) {
        MyClass tester = new MyClass();
        int m1 = data[0];
        int m2 = data[1];
        int expected = data[2];
        assertEquals(expected, tester.multiply(m1, m2));
    }

    // class to be tested
    class MyClass {
        public int multiply(int i, int j) {
            return i * j;
        }
    }
}
Create a new test method in ConverterUtilTest which also uses a parameterized test.
12.3. Verify
Run your new test via the IDE.

Verify that your code compiles and your test are running via the command line with the ./gradlew test or mvn clean verify command based on your build system.
12.4. Add more options
ParameterizedTest are flexible in sense of their input.
The following lists a few more.
Add these to your test and run the tests again.
    @ParameterizedTest
    @ValueSource(strings = { "WINDOW", "Microsoft Windows [Version 10.?]" })
    void ensureWindowsStringContainWindow(String name) {
        assertTrue(name.toLowerCase().contains("window"));
    }

    @DisplayName("A negative value for year is not supported by the leap year computation.")
    @ParameterizedTest(name = "For example, year {0} is not supported.")
    @ValueSource(ints = { -1, -4 })
    void ensureYear(int year) {
        assertTrue(year < 0);
    }

    @ParameterizedTest(name = "{0} * {1} = {2}")
    @CsvSource({ "0,    1,   0", "1,    2,   2", "49,  50, 2450", "1,  100, 100" })
    void add(int first, int second, int expectedResult) {
        MyClass calculator = new MyClass();
        assertEquals(expectedResult, calculator.multiply(first, second),
                () -> first + " * " + second + " should equal " + expectedResult);
    }
13. Exercise: Use the @TempDir annotation to create temporary files and paths
In this exercise, you learn how to use the @TempDir annotation to let JUnit 5 create files and paths on request in your test and to automatically remove them after the test.
|
Java 11 API for creating files: |
13.1. Create class under test
Create the following class
package com.vogella.unittest.file;

import java.io.IOException;
import java.nio.charset.StandardCharsets;
import java.nio.file.Files;
import java.nio.file.Path;
import java.nio.file.StandardOpenOption;

public class FileWriter {
    private FileWriter() {

    }

    public static void createFile(Path path) {
        try {
            Files.write(path, "".getBytes(StandardCharsets.UTF_8), StandardOpenOption.CREATE,
                    StandardOpenOption.TRUNCATE_EXISTING);
        } catch (IOException e) {
            e.printStackTrace();
        }
    }

    public static void appendFile(Path path, String content) throws IOException {
        // imagine more logic here...
        Files.writeString(path, content, StandardOpenOption.APPEND);
    }
}
13.2. Write tests
Using the @TempDir annotation, create unit test named FileWriterTest for the following:
-
Ensure that the Path given to you by the @TempDir annotation is writable
-
Ensure that appending to a file with FileWriter.appendFile which has not yet been created with FileWriter.createFile throws an exception
-
Ensure that you can write to the file once you created it
HINT:
@Test
void ensureThatPathFromTempDirISWritable(@TempDir Path path) {
    // Check if the path created by the TempDir extension is writable
    // Check `Files` API for this
}
package com.vogella.unittest.file;
import static org.junit.jupiter.api.Assertions.assertThrows;
import static org.junit.jupiter.api.Assertions.assertTrue;
import java.io.IOException;
import java.nio.file.Files;
import java.nio.file.Path;
import org.junit.jupiter.api.Test;
import org.junit.jupiter.api.io.TempDir;
class FileWriterTest {
@Test
void ensureThatPathFromTempDirISWritable(@TempDir Path path) {
// Check if the path created by the TempDir extension is writable
assertTrue(Files.isWritable(path));
}
@Test
void ensureThatNonExistingFileThrowsAnException(@TempDir Path path) {
Path file = path.resolve("content.txt");
assertThrows(IOException.class, () -> {
FileWriter.appendFile(file, "Hello");
});
}
@Test
void ensureAppendingWorks(@TempDir Path path) throws IOException {
Path file = path.resolve("content.txt");
FileWriter.createFile(file);
FileWriter.appendFile(file, "Hello");
assertTrue(Files.isReadable(file));
// TODO check the content of the file
}
}14. Exercise: Testing for annotations
In this exercise, you write tests to check class under test for certain annotations.
14.1. Add dependency to @Inject
If you have not yet done this, add a dependency to javax.inject.
Maven:
<dependency>
  <groupId>javax.inject</groupId>
  <artifactId>javax.inject</artifactId>
  <version>1</version>
</dependency>
Gradle:
implementation 'javax.inject:javax.inject:1'14.2. Create class under test
Create the following class
package com.vogella.unittest.di;

import jakarta.inject.Inject;

public class Service {

    @Inject
    String s;

    @Inject
    public Service() {
    }

    @Inject
    public Service(String s) {
        this.s = s;
    }
}
14.3. Write tests
Write a test that validates that the Service class only has one constructor annotated with @Inject.
HINT:
-
The class has a
getConstructorsmethod. -
The
Constructorhas a methodgetAnnotation
package com.vogella.unittest.di;

import static org.junit.jupiter.api.Assertions.assertEquals;

import java.lang.reflect.Constructor;

import jakarta.inject.Inject;

import org.junit.jupiter.api.Test;

class ServiceTest {

    @Test
    void ensureJSR 330Constructor() {
        int count = 0;
        Constructor<?>[] constructors = Service.class.getConstructors();
        for (Constructor<?> constructor : constructors) {
            Inject annotation = constructor.getAnnotation(Inject.class);
            if (annotation != null) {
                count++;
            }
        }
        assertEquals(1, count);
    }

}
15. Exercise: Create test reports
Both Maven and Gradle allow to generate HTML report for unit tests.
Gradle creates these automatically, if you run the ./gradlew build command and with Maven
you run the mvn clean verify surefire-report:report command.
Run this for your project and check the build folder for the generated test reports.
16. Exercise: Clone the JUnit 5 GitHub repo and review tests
Open JUnit 5 GitHub page in your browser and clone the repo.
Import the project into your favorite IDE and review some of the tests, e.g., the platform-tests contains a lot of useful tests.
17. JUnit 5 annotations reference
JUnit 5 provides a comprehensive set of annotations to configure and control test execution.
These annotations from the org.junit.jupiter.api package give you fine-grained control over test behavior and lifecycle.
17.1. Core test annotations
| Annotation | Description and usage |
|---|---|
|
Marks a method as a test method. This is the fundamental annotation for defining individual test cases. |
|
Provides a custom display name for tests that appears in test reports and IDEs. Supports spaces and special characters for better readability. |
|
Disables a test method or test class. Always include a meaningful reason to help other developers understand why the test is disabled. |
|
Repeats the test method the specified number of times. Useful for testing intermittent issues or performance characteristics. |
|
Marks a method as a parameterized test that runs multiple times with different arguments. Must be combined with a parameter source annotation. |
|
Marks a method as a test factory for dynamic tests. The method must return a Stream, Collection, Iterable, or Iterator of DynamicTest instances. |
17.2. Test lifecycle annotations
| Annotation | Description and usage |
|---|---|
|
Executed before each test method in the current class. Used to set up test fixtures and prepare the test environment. Must be non-static. |
|
Executed after each test method in the current class. Used for cleanup activities like closing resources or resetting state. Must be non-static. |
|
Executed once before all test methods in the class. Used for expensive setup operations like database connections. Must be static unless using |
|
Executed once after all test methods in the class. Used for expensive cleanup operations. Must be static unless using |
17.3. Test organization annotations
| Annotation | Description and usage |
|---|---|
|
Marks an inner class as a nested test class, allowing hierarchical test organization with additional lifecycle methods. |
|
Tags tests for filtering during execution. Examples: |
|
Changes test instance lifecycle. By default, JUnit creates a new instance for each test method. This annotation creates one instance per class. |
|
Controls the order of test method execution. Can be combined with |
17.4. Advanced testing annotations
| Annotation | Description and usage |
|---|---|
|
Registers one or more extensions to enhance test functionality. Extensions can provide dependency injection, temporary resources, or custom behavior. |
|
Sets a timeout for test execution. The test fails if it doesn’t complete within the specified time. |
|
Conditionally enables tests based on system properties, environment variables, or custom conditions. |
|
Conditionally disables tests based on specified conditions. |
|
Enables tests only on specified operating systems. |
|
Enables tests only on specified Java versions. |
17.5. Parameter source annotations
| Annotation | Description and usage |
|---|---|
|
Provides simple parameter values. Supports strings, ints, longs, doubles, floats, shorts, bytes, chars, booleans, and classes. |
|
Provides enum constants as parameters. Use |
|
References static methods that return parameter streams. Methods must return Stream, Iterable, Iterator, or array. |
|
Provides CSV-formatted parameter data inline. |
|
Reads parameter data from CSV files. |
|
References custom argument providers that implement ArgumentsProvider interface. |
|
Provides null or empty values for testing edge cases with strings and collections. |
18. Conclusion
JUnit 5 represents a significant evolution in Java testing, offering modern features that make writing and maintaining tests more efficient and enjoyable. With its modular architecture, powerful assertion methods, and extensive extension capabilities, JUnit 5 empowers developers to create comprehensive test suites that improve code quality and confidence.
Key benefits of adopting JUnit 5 include:
-
Modern Java integration - Leverage lambda expressions, streams, and other Java 8+ features
-
Flexible test organization - Use nested tests, dynamic tests, and display names for better structure
-
Powerful assertions - Comprehensive set of assertion methods with clear failure messages
-
Extensible architecture - Rich extension model for custom functionality
-
Improved tooling support - Better integration with IDEs and build tools
The implementation of all examples and code snippets in this tutorial can be found in the vogella tutorials repository. Maven examples are available in the JUnit with Maven folder, and Gradle examples are in the JUnit 5 with Gradle folder.
19. JUnit 5 resources and further reading
19.1. Official documentation
-
JUnit 5 Homepage - Official homepage with latest news and announcements
-
JUnit 5 User Guide - Comprehensive official documentation
-
JUnit 5 API Documentation - Complete API reference
-
JUnit 5 GitHub Repository - Source code and issue tracking
19.2. Additional learning resources
-
Writing Tests - Official guide to writing tests
-
JUnit 5 Extensions - Guide to extending JUnit 5
-
Migration from JUnit 4 - Migration guide for JUnit 4 users
19.3. Testing frameworks and tools
-
Hamcrest - Matcher library for more expressive assertions
-
AssertJ - Fluent assertion library for Java
-
Mockito - Mocking framework for unit tests
-
Testcontainers - Integration testing with Docker containers
19.4. vogella Java example code
If you need more assistance we offer Online Training and Onsite training as well as consulting