Using the Eclipse IDE
This tutorial explains how to use the Eclipse IDE for Java development.
1. The Eclipse IDE for Java development
The Eclipse IDE (integrated development environment) provides strong support for Java developers. In 2022, the Eclipse IDE had approximately one million downloads per month, which makes it one of the leading IDEs for Java development.
Eclipse can be extended with additional software components called plug-ins. Pre-packaged Eclipse distributions provide a consistent set of functionality.
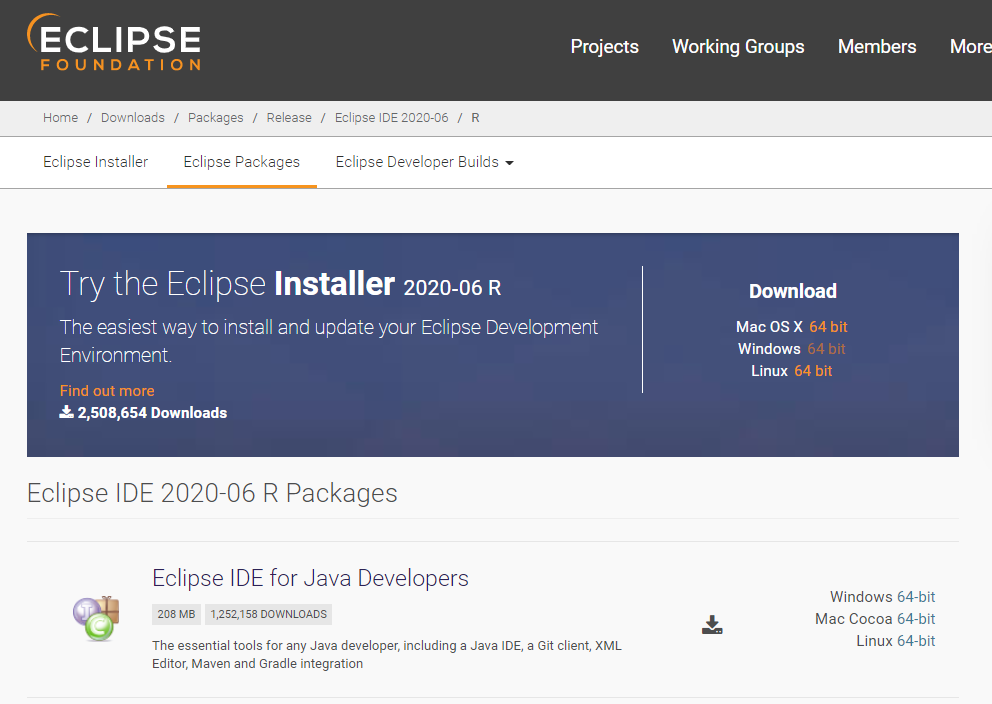
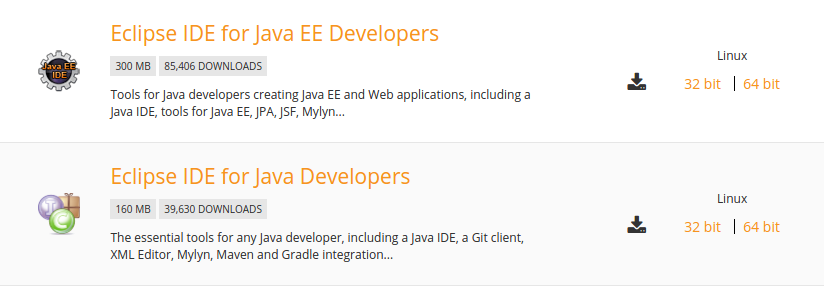
The Eclipse IDE downloads page provides Eclipse distributions for different use cases.
The Eclipse IDE for Java Developers distribution is designed to support standard Java development. It includes support for the Maven and Gradle build systems and the Git version control system.
Other IDEs reuse components from Eclipse. For example, Microsoft’s Visual Studio Code (VS Code) uses the Eclipse Java compiler for its Java support. Also, the Eclipse IDE reuses tools designed for VS Code based on the Language Server Protocol defined by Microsoft.
2. Install the Eclipse Java IDE
You can install the Eclipse Java IDE via an installer or via a packaged download. Both approaches are described here; using the installer is typically faster and easier.
2.1. Using the installer
Download the installer via https://eclipse.org/downloads/packages/.
On Linux, you have to unzip it before you can start it. On macOS, the installer is delivered as a packaged application and can be installed and started via regular Mac installation procedures. On Windows and macOS, you can run it directly via the delivered executable or packaged application.
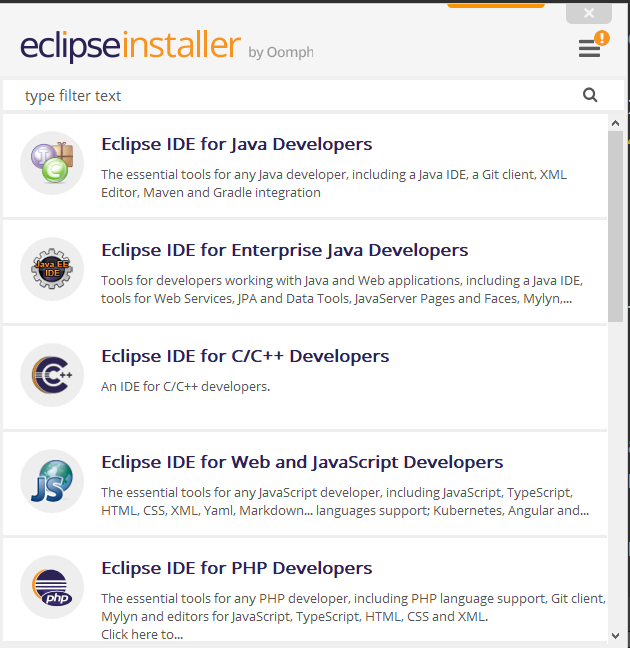
Pick Eclipse IDE for Java Developers from the list and perform the installation.
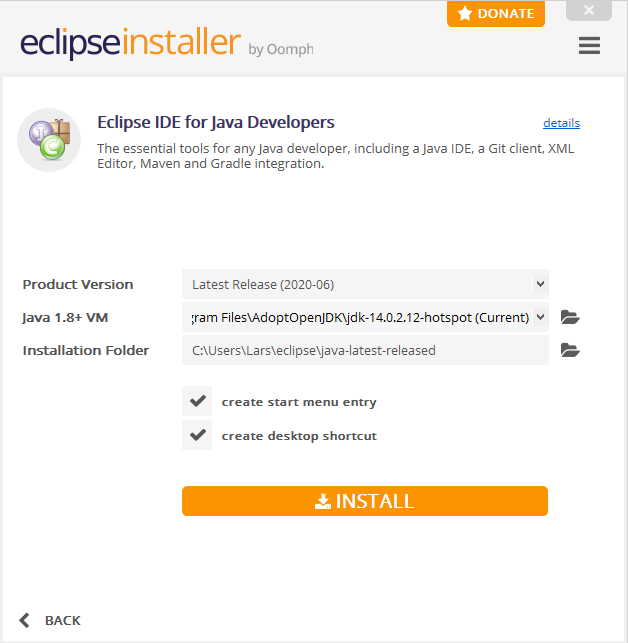
You may have to confirm some license agreements.

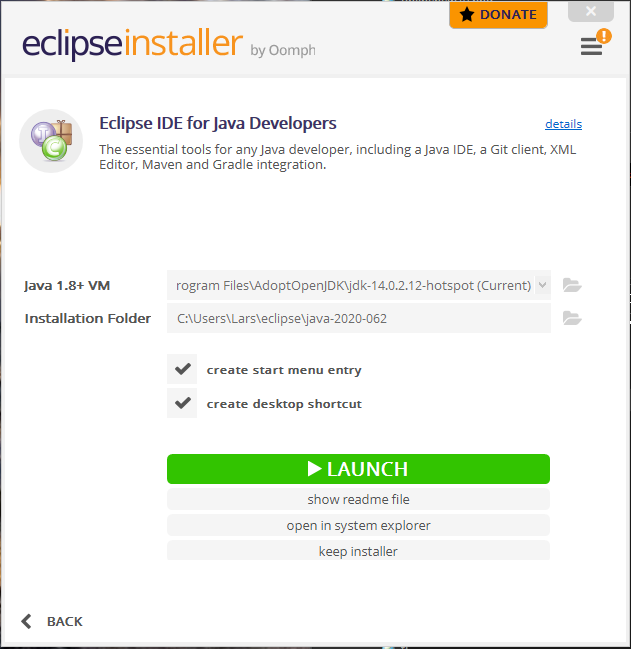
After the installation, you can start the IDE directly. Remember the installation folder, as this folder contains the Eclipse installation to start it again.
2.2. Using a packaged download
If you do not want to use the installer, you can download the Eclipse IDE for Java Developers package directly from: https://www.eclipse.org/downloads/packages/
Click the link next to the package description, for example, Linux 64-Bit, to start the download. The displayed links depend on your operating system.
The download is platform-dependent; it is either a compressed archive of multiple files or a packaged application (macOS).
After you have downloaded the Eclipse distribution, unpack it to a local directory or follow the installation procedure on macOS.
|
As a developer, you probably know how to extract a compressed file or how to install apps on macOS. If in doubt, search on Google for "How to extract a zip on Windows", "How to unzip a file on Linux", or "How to install a dmg file on macOS". |
3. Starting to use the Eclipse IDE
Double-click the eclipse.exe (Microsoft Windows) or eclipse (Linux/Mac) file from your installation directory to start the Eclipse IDE.
|
What to do if the Eclipse IDE does not start
The 2025-06 release of the Eclipse IDE requires Java 21 to run. Ensure that your Java runtime meets the minimum required version. |
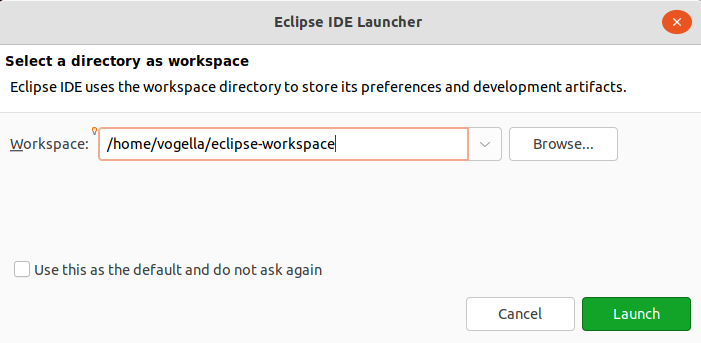
3.1. Picking a workspace
The Eclipse IDE prompts you to select a workspace to store its configuration.
If you already use the Eclipse IDE, select a new workspace. This avoids unintended side effects when working with existing projects.
To get started, choose an empty directory and click the Launch button.
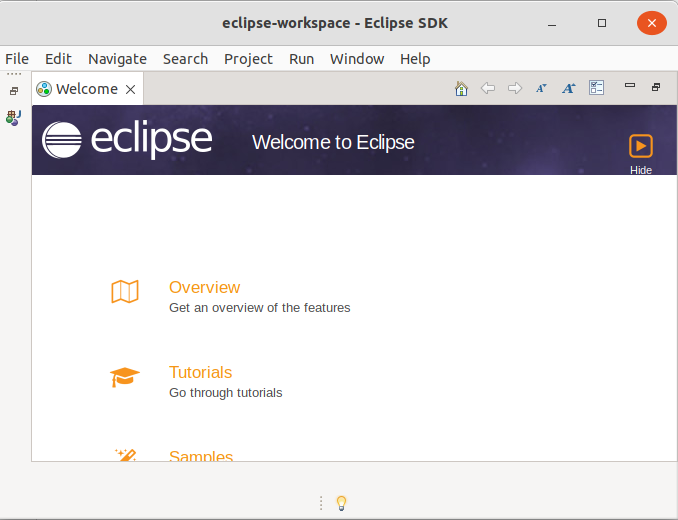
The Eclipse IDE starts and shows the Welcome page. Close this page by clicking the x next to the Welcome tab.
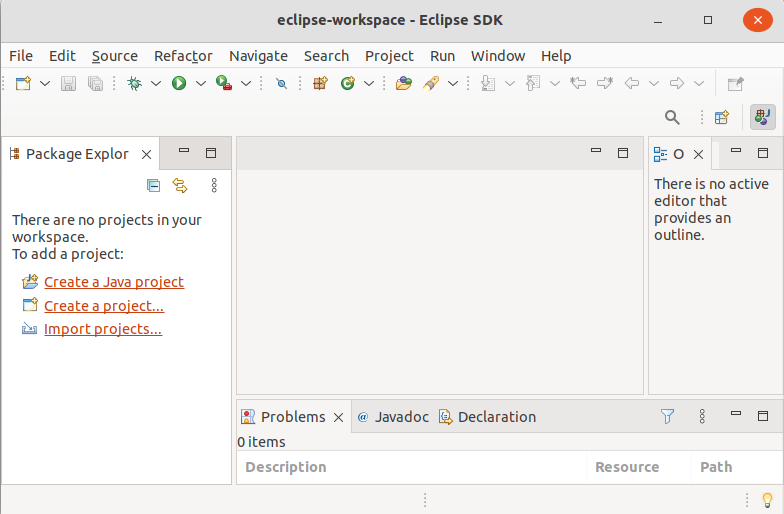
After closing the welcome screen, the IDE should look similar to the following screenshot.
3.2. Appearance
By default, Eclipse ships with a light theme. If you prefer, you can switch to a dark theme via the menu. The Theme selection allows you to switch to the Dark theme of Eclipse.
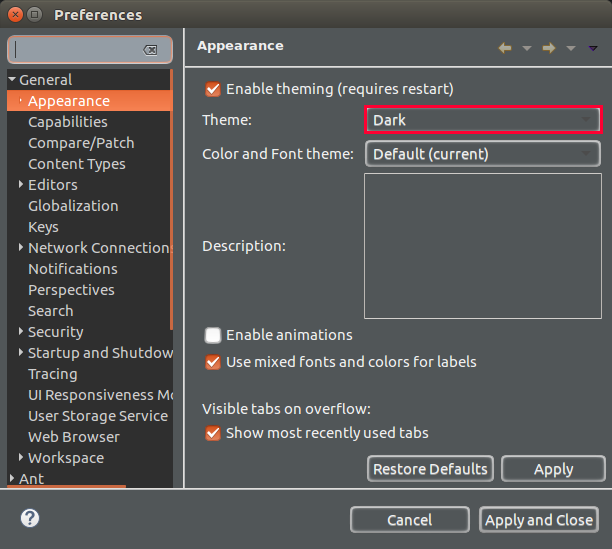
| You need to restart your IDE after changing the theme, as some native OS styling features require a restart. |
4. Important Eclipse terminology
4.1. Workspace and projects
The workspace is the physical location (file path) for storing metadata and (optional) your development artifacts. The metadata stored for the workspace contains preference settings, plug-in-specific metadata, logs, etc.
You can choose the workspace during startup of Eclipse or via the menu entry.
Your projects, source files, images, and other artifacts can be stored inside or outside your workspace. For example, if you use Git as a version control system, you typically would store the Git repositories outside the workspace.
4.2. Overview of the user interface
Eclipse provides views and editors to navigate and change content. Views and editors can be grouped into perspectives.
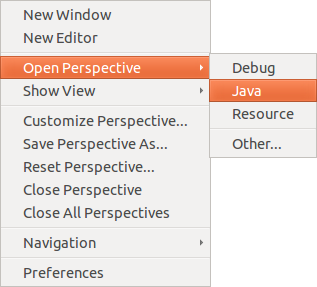
Eclipse provides different perspectives for different tasks. The available perspectives depend on your installation. For Java development, you usually use the Java Perspective, but Eclipse has many more predefined perspectives, e.g., the Debug perspective.
Eclipse allows you to switch to another perspective via the menu entry.
Open editors are typically shared between perspectives, i.e., if you have an editor open in the Java perspective for a certain class and switch to the Debug perspective, this editor stays open.
You can switch perspectives via the menu entry.
The main perspectives used for Java development are the Java perspective and the Debug perspective.
The Java perspective can be opened via .
On the left-hand side, this perspective shows the Package Explorer view, which allows you to browse your projects and select the components you want to open in an editor via a double-click.
For example, to open a Java source file, open the tree under src, select the corresponding .java file and double-click it.
This will open the file in the default Java editor.
The following image shows the default Java perspective. The Package Explorer view is on the left. In the middle, you see the open editors. Several editors are stacked in the same container and you can switch between them by clicking on the corresponding tab. You can move an editor to a new position in the Eclipse IDE via drag and drop.
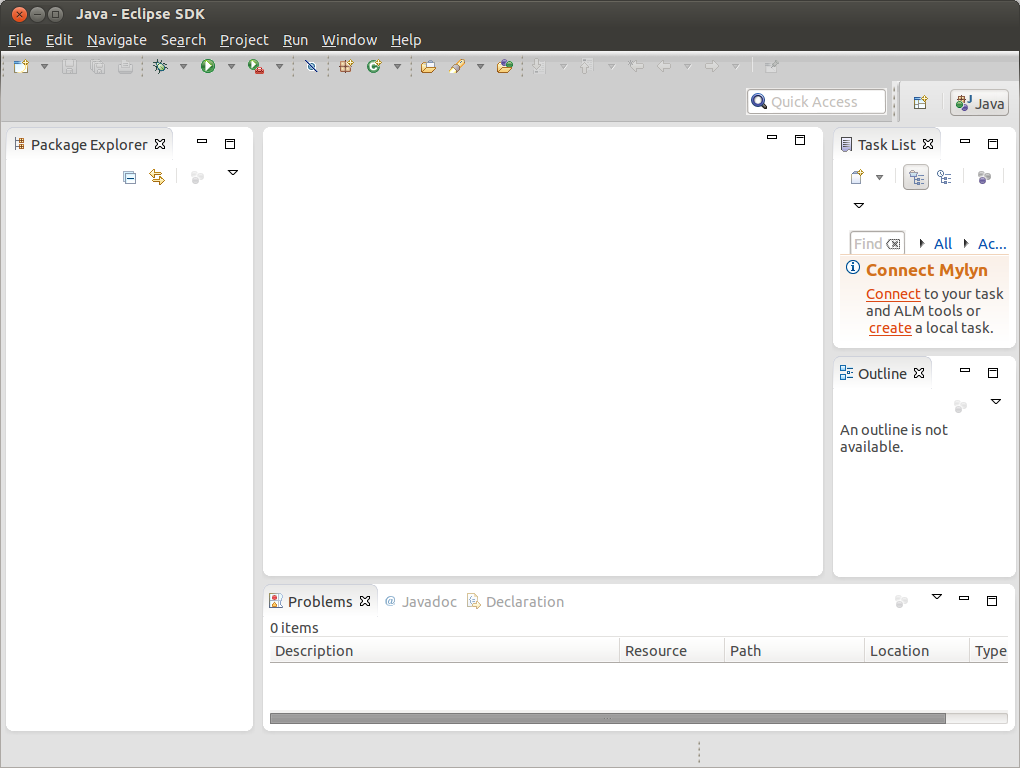
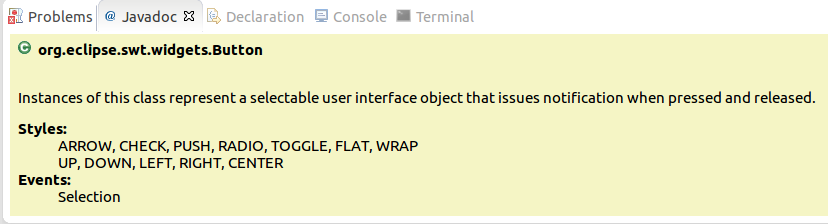
To the right and below the editor area, you find more views that were considered useful by the developer of the perspective. For example, the Javadoc view shows the Javadoc of the selected class or method.
4.3. Resetting and customizing a perspective
A common problem is that you have changed the arrangement of views and editors in your perspective and want to restore its original state. For example, you might have closed a view. You can reset a perspective to its original state via the menu entry.
You can change the layout and content within a perspective by opening or closing parts and rearranging them.
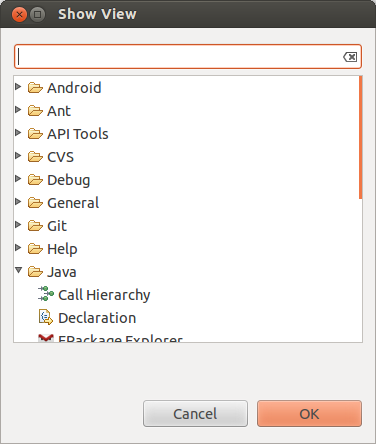
To open a new part in your current perspective, use the menu entry. This opens the Show View dialog, which allows you to search for certain parts.
If you want to reset your current perspective to its default, use the menu entry.
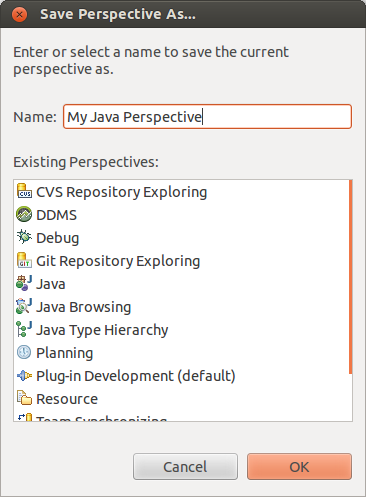
You can save the currently selected perspective via .
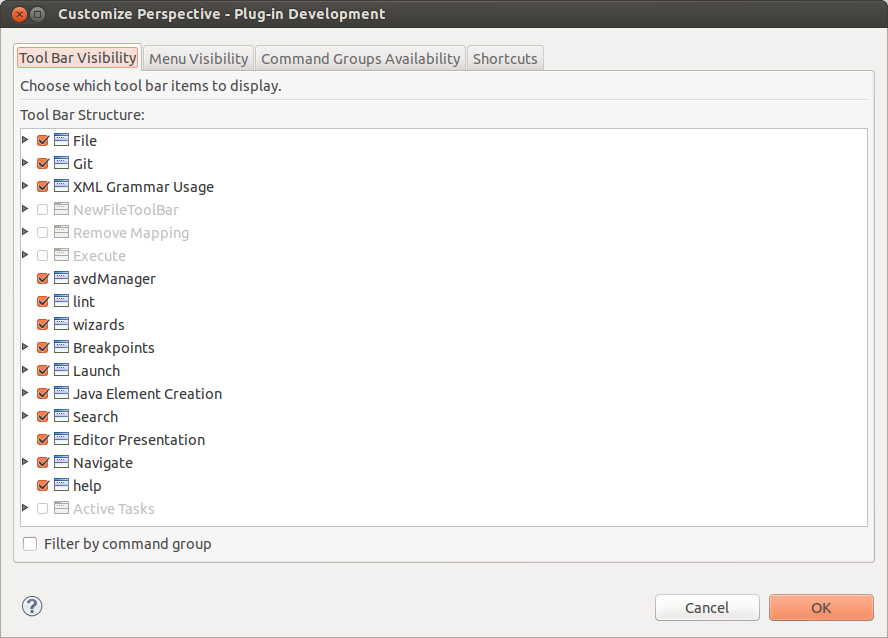
The menu entry allows you to adjust the selected perspective. For example, you can hide or show toolbar and menu entries.
A view is typically used to display and modify structured data directly.
For example, the Project Explorer view allows you to browse and modify files of Eclipse projects. If you rename a file via the Project Explorer, the file name is changed directly without having to save.
Editors are typically used to modify a single data element, for example a text file. To apply these changes to the underlying data model, you need to select Save from the menu or the toolbar. An editor with unsaved data (a dirty editor) is marked with an asterisk to the left of the name of the modified file.

4.4. Eclipse projects
An Eclipse project contains source, configuration, and binary files related to a certain task. It groups them into buildable and reusable units. An Eclipse project can have natures assigned to it, which describe the purpose of this project. For example, the Java nature defines a project as a Java project. Projects can have multiple natures combined to model different technical aspects.
Natures for a project are defined via the .project file in the project directory.
5. Auto-save in Eclipse IDE
While Eclipse compiles source code automatically, it does not save your changes by default.
You have to save your changes manually via the menu entry or via the keyboard shortcut Ctrl+S (Cmd+S on macOS).
As a convenience, Eclipse provides an auto-save feature that saves all dirty editors automatically after a certain period of inactivity. You can enable this feature in the Eclipse Preferences via menu.

| This setting is recommended for beginners as some changes are not applied until you save the corresponding editor. |
6. The Eclipse Java perspective
The following is a brief introduction to the important elements of the Java perspective. Feel free to skip this chapter, as it is only intended as a reference.
6.1. Package Explorer view
The Package Explorer view allows you to browse the structure of your projects and to open files in an editor via a double-click on the file.
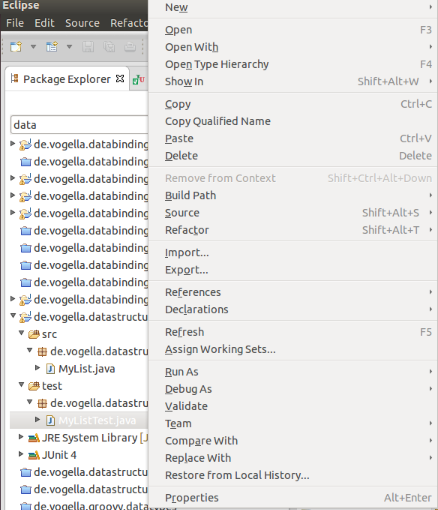
It is used to change the structure of your project. For example, you can rename files or move files and folders via drag and drop. A right-click on a file or folder shows you the available options.
For more information on the Package Explorer, see the chapters Source Navigation and Link Package Explorer with editor.
6.3. Problems view
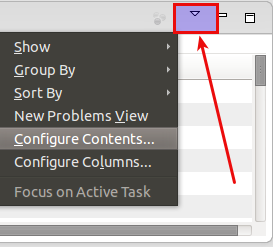
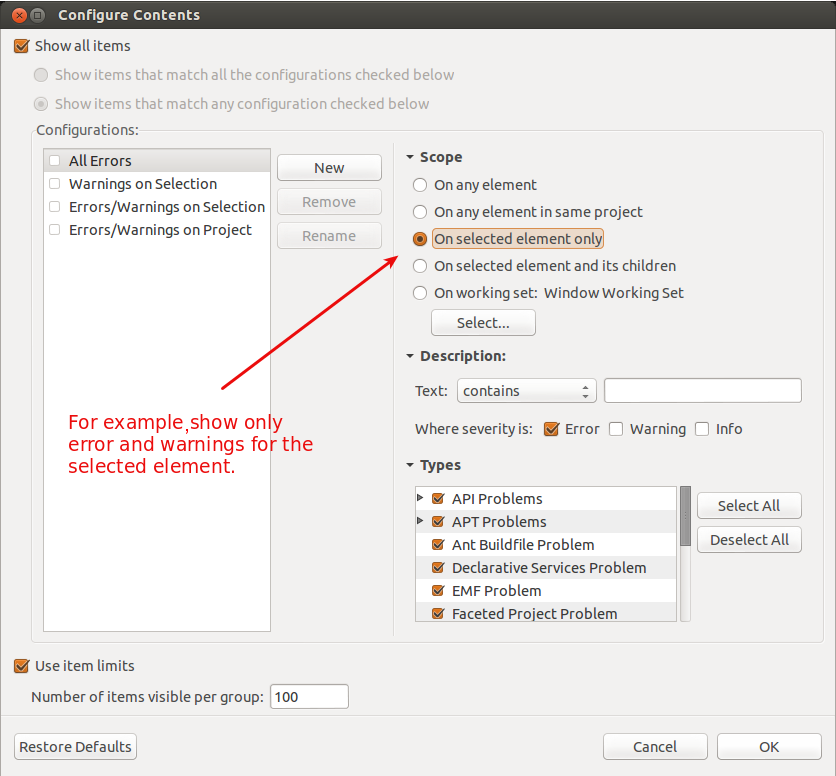
The Problems view shows errors and warning messages. Sooner or later, you will run into problems with your code or your project setup. To view the problems in your project, you can use the Problems view, which is part of the standard Java perspective. If this view is closed, you can open it via .

The messages displayed in the Problems view can be configured via the view’s drop-down menu. For example, to display the problems from the currently selected project, select Configure Contents and set the Scope to On any element in the same project.
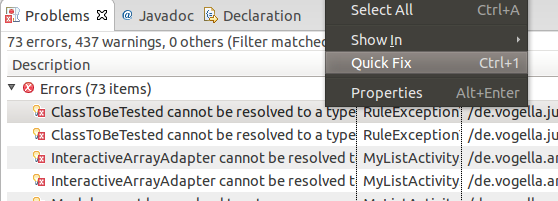
The Problems view allows you to trigger a Quick Fix by right-clicking on one or more selected messages. See the Quick Fix chapter for details on the Quick Fix functionality.
6.4. Javadoc view
The Javadoc view shows the documentation of the selected element in the Java editor.
6.5. Java editor
The Java editor is used to modify the Java source code. Each Java source file is opened in a separate editor.

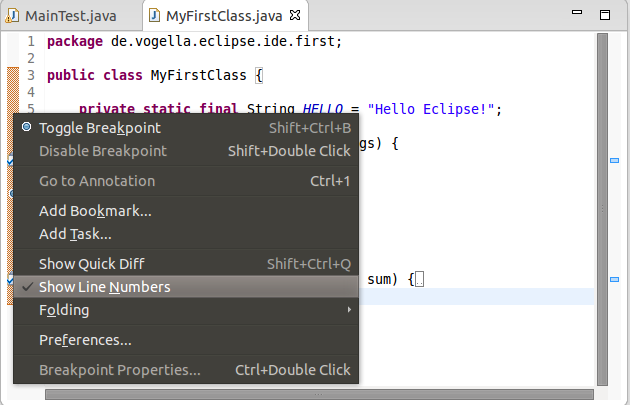
If you click in the left column of the editor, you can configure its properties, for example, to display line numbers.
7. Create your first Java program
The following section describes how to create a minimal Java application using the Eclipse IDE.
7.1. Create project
Select from the menu.
Enter com.vogella.eclipse.ide.first as the project name and click the Finish button to create the project.
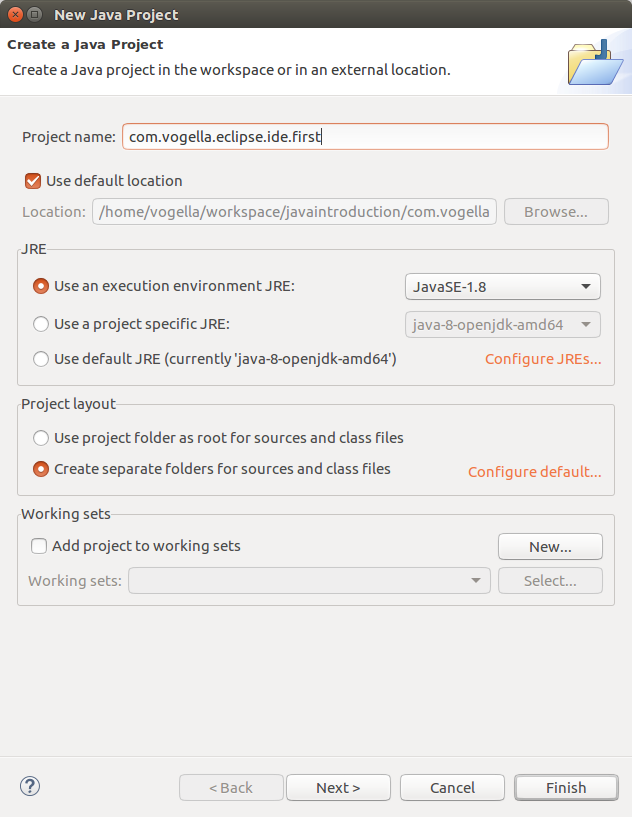
A new project is created and displayed as a folder.
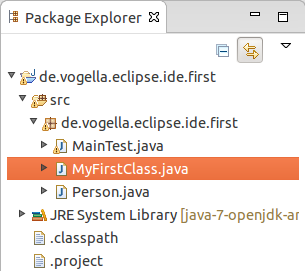
Open the com.vogella.eclipse.ide.first folder and explore its contents.
|
In this tutorial, the project is typically named the same as the top-level Java package in the project. This makes it easier to find a project related to a piece of code. |
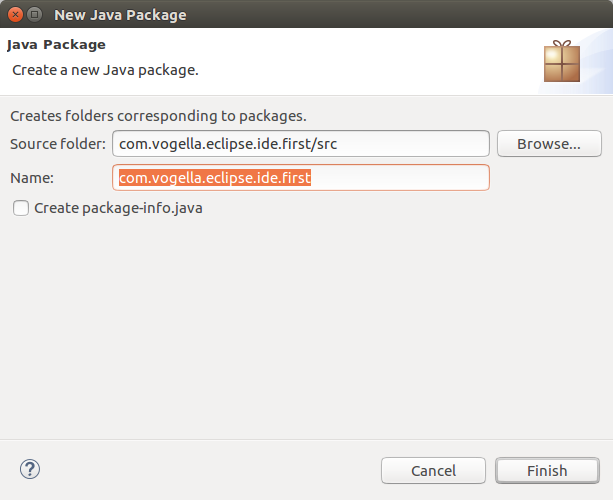
7.2. Create package
|
A good naming convention is to use the same name for the top-level package and the project.
For example, if you name your project |
Create the com.vogella.eclipse.ide.first package by selecting the src folder, right-clicking on it, and selecting .
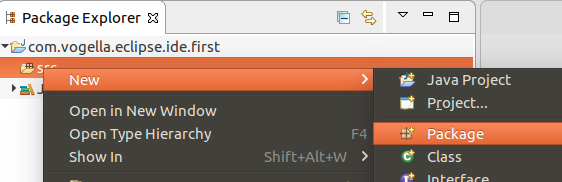
Click the Finish button.
7.3. Create Java class
Right-click on your package and select to create a Java class.
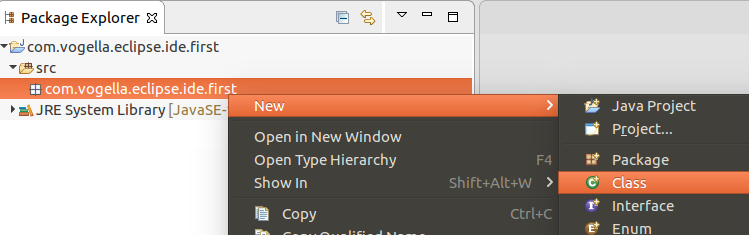
Enter MyFirstClass as the class name and select the public static void main(String[] args) checkbox.
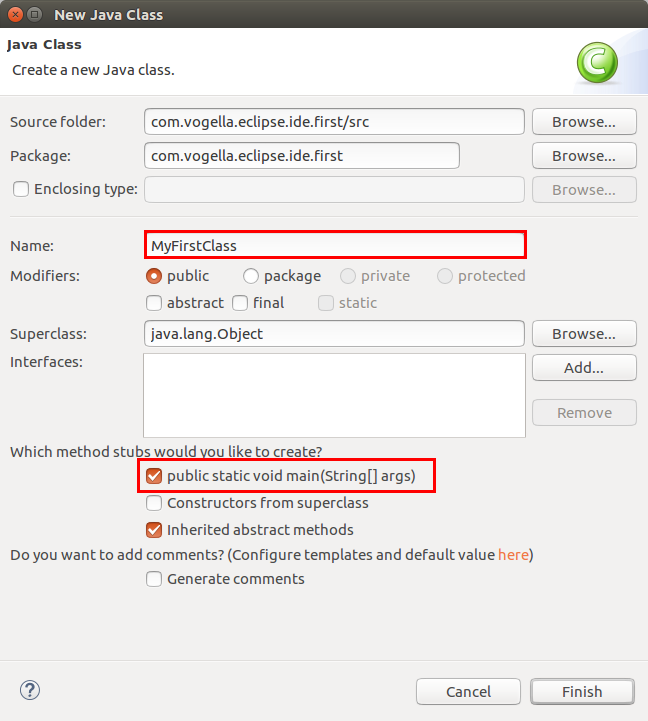
Click the Finish button.
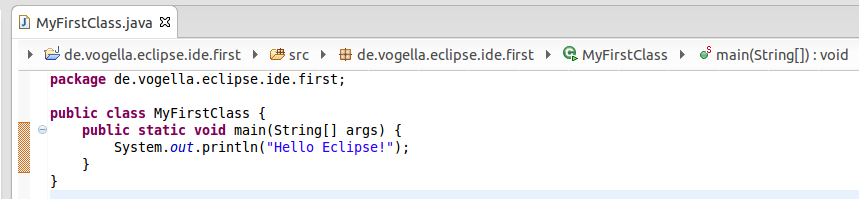
This action creates a new file and opens the Java editor. Change the class based on the following listing.
package com.vogella.eclipse.ide.first;

public class MyFirstClass {

  public static void main(String[] args) {
    System.out.println("Hello Eclipse!");
  }

}
You can also create new packages directly via this dialog. If you enter a new package in this dialog, it is created automatically.
7.4. Run your application code from the IDE
Now, run your code. Either right-click on your Java class in the Package Explorer or right-click in the Java class and select .
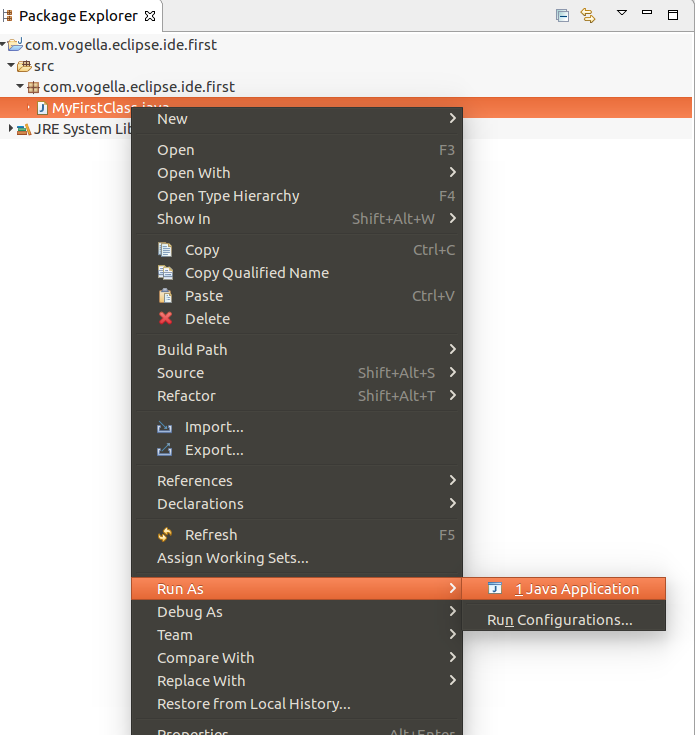
Eclipse runs your Java program. You should see the output in the Console view.

You have created your first Java project, a package, and a Java class, and you have run this program inside Eclipse.
8. Run Java program outside Eclipse
8.1. Create JAR file
To run the Java program outside the Eclipse IDE, you need to export it as a JAR file. A JAR file is the standard distribution format for Java applications.
Select your project, right-click it, and select the Export menu entry.
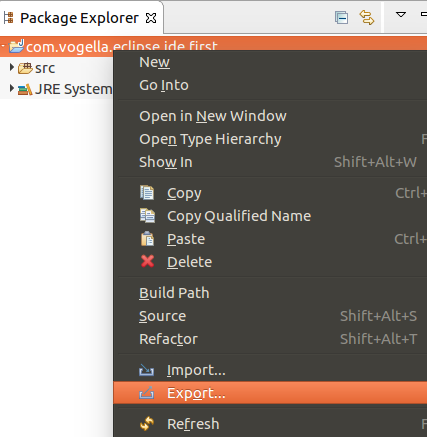
Select JAR file and click the Next button.
Select your project, enter the export destination, and a name for the JAR file, for example, myprogram.jar.
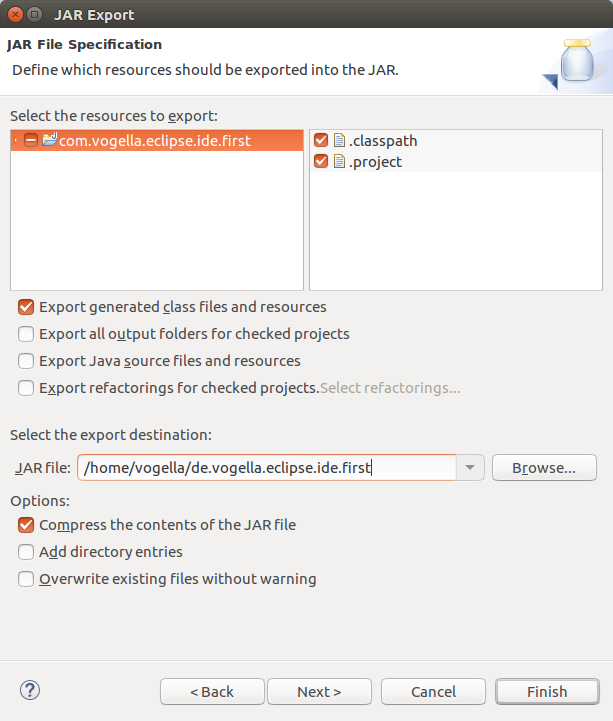

Click the Finish button. This creates a JAR file in your selected output directory.
8.2. Run your program outside Eclipse
Open a command shell, e.g., on Microsoft Windows, select , type cmd, and press the Enter key.
This should open a console window.
Switch to the directory that contains the JAR file by typing cd path.
For example, if your JAR is located in c:\temp, use the following command.
cd c:\tempTo run this program, include the JAR file in your classpath.
The classpath defines which Java classes are available to the Java runtime.
You can add a JAR file to the classpath with the -classpath option.
java -classpath myprogram.jar de.vogella.eclipse.ide.first.MyFirstClassType the above command in the directory you used for the export, and you will see the "Hello Eclipse!" output in your command shell.

9. Exercise: Java project, packages, and import statements
9.1. Create project
Create a new Java project called com.vogella.ide.counter.
Create the following packages:
-
com.vogella.ide.counter.util -
com.vogella.ide.counter.main
9.2. Create classes
Create the following Counter class in the com.vogella.ide.counter.util package.
package com.vogella.ide.counter.util;

public class Counter {
  public int count (int x){
    // TODO check that x > 0 and <= 255
    // if not throw a new RuntimeException
    // Example for a RuntimeException:

    // throw new RuntimeException("x should be between 1 and 255");

    // TODO calculate the numbers from 1 to x
    // for example if x is 5, calculate
    // 1 + 2 + 3 + 4 + 5


    // TODO return your calculated value
    // instead of 0
    return 0;
  }
}
Create the following Tester class in the com.vogella.ide.counter.main package.
This is a simple class that does not use a unit testing framework like JUnit.
The Eclipse editor should mark the created class with an error because the required import statements are missing.
package com.vogella.ide.counter.main;

public class Tester {

  public static void main(String[] args) {
    Counter counter = new Counter();
  }

}
Right-click in your Java editor and select to add the required import statements to your Java class.
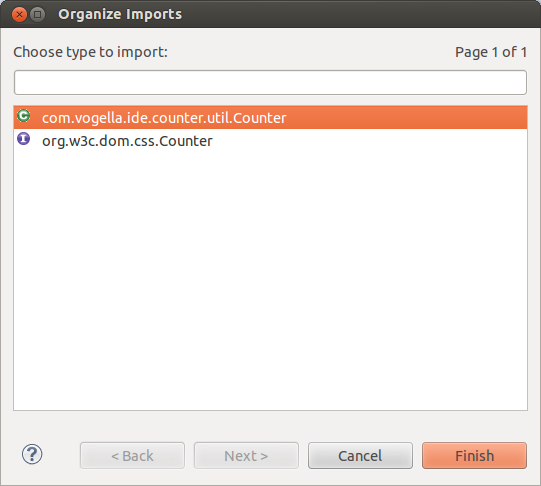
This should remove the syntax error.
Finish the implementation for the Tester class based on the following code.
package com.vogella.ide.counter.main;

import com.vogella.ide.counter.util.Counter;

public class Tester {

  public static void main(String[] args) {
    Counter counter = new Counter();
    int result = counter.count(5);
    if (result == 15) {
      System.out.println("Correct");
    } else {
      System.out.println("False");
    }
    try {
      counter.count(256);
    } catch (RuntimeException e) {
      System.out.println("Works as exepected");
    }
  }

}
The Counter class has a comment in its source code starting with TODO.
Finish the source code and calculate the correct values.
Run the Tester class and validate that your implementation is correct.
The Tester class checks for an example value, but the method should work for different input values.
10. Exporting and importing projects
10.1. Exporting projects
You can export and import Eclipse projects. This allows you to share projects with other people and to import existing projects.
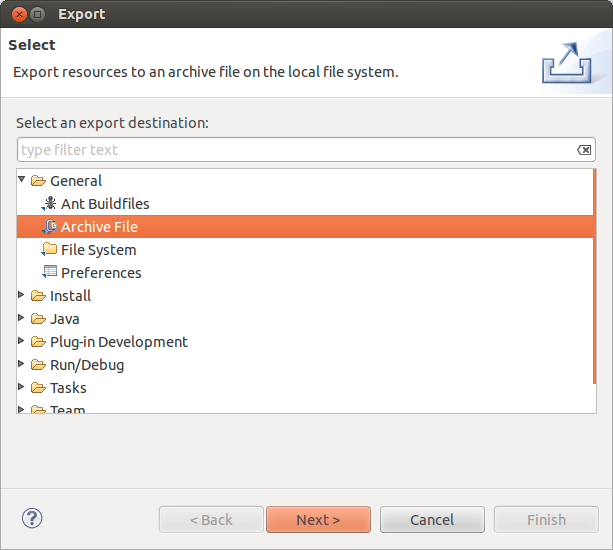
To export Eclipse projects, select and select the projects you want to export.

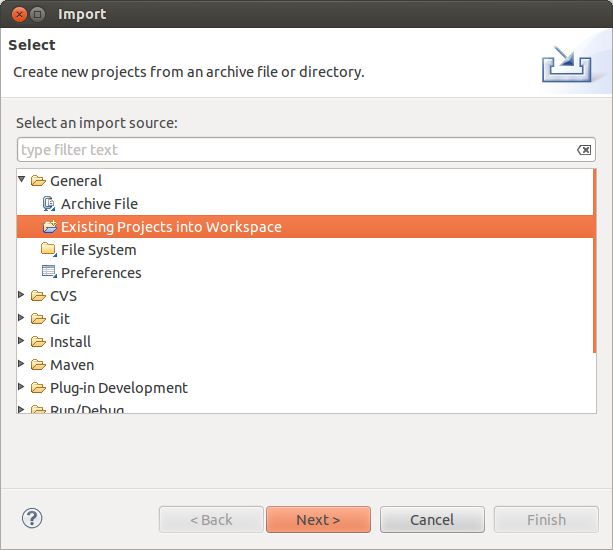
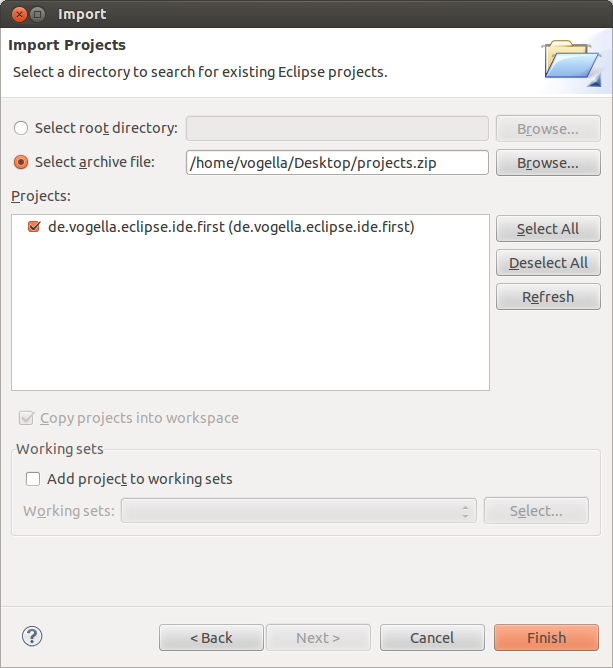
10.2. Importing projects
To import projects, select . You can import from an archive file (i.e., a zip file) or directly import the projects if you have extracted the zip file.
10.3. Exercise: Export and import projects
Export one of your projects to a zip file. Switch to a new workspace and import the project into your new workspace from the zip file you exported.
11. Source navigation in the Eclipse IDE
11.1. Package Explorer or Project Explorer
The primary way of navigating through your project is the Package Explorer or, alternatively, the Project Explorer view. You can open nodes in the tree and open a file in an editor by double-clicking the corresponding entry in the tree hierarchy.
The drop-down menu in the Package Explorer allows you to filter the resources that should be displayed or hidden.

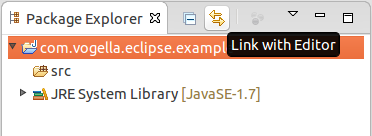
11.2. Link Package Explorer with editor
The Package Explorer view allows you to display the file associated with the currently selected editor.
For example, if you are working on the Foo.java file in the Java editor and switch to the Java editor of the Var.java file, the corresponding file is selected in the Package Explorer view.
To activate this behavior, click the Link with Editor button in the Package Explorer view, as depicted in the following screenshot.
11.3. Opening a class
You can navigate between the classes in your project via the Package Explorer view, as described before. You can navigate the tree and open a file via a double-click.
In addition, you can open any class by positioning the cursor on the class in an editor and pressing F3. Alternatively, you can press Ctrl+Shift+T. This shows the following dialog, in which you can enter the class name to open it.
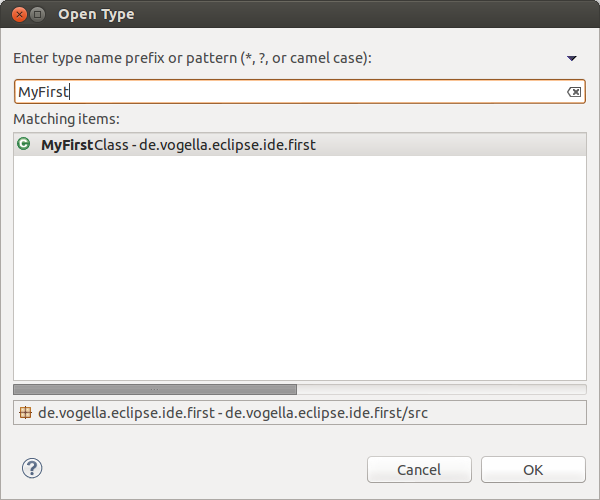
You can search for package names.
Each part of the package name must end with a . (the dot character) so that the Open Type Dialog can identify it as a package.
You only need to specify part of each segment of the package name.
Assume, for example, that you are searching for the org.eclipse.swt.widgets.Button class.
To find this class, you can use the search term org.eclipse.swt.widgets.Button, o.e.s.w.Button, or o.Button.
|
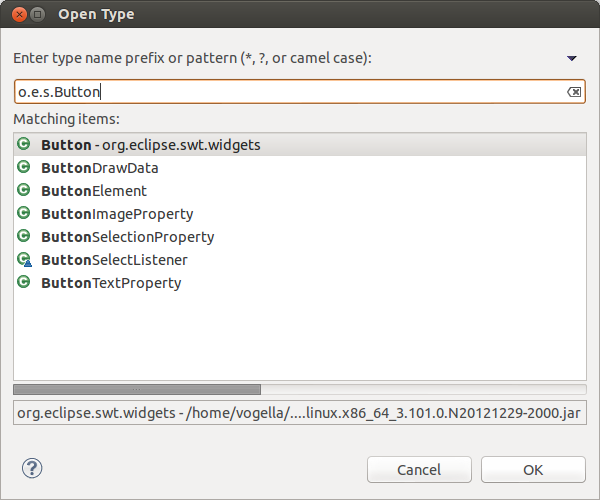
The Open Type Dialog supports camel case search, e.g., it matches capital letters in the class name.
For example, if you were to search for the OnTouchListener class, you could use OTL or OToList as a search term.
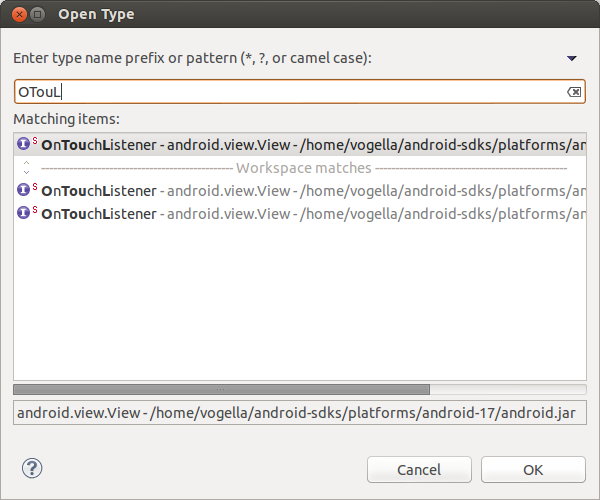
To avoid suffix matching, you can add a space after the class name.
For example, you can type "Selection " (with a space after "Selection") to match the Selection class but not the SelectionListener class.
Wildcards like * are also supported.
|
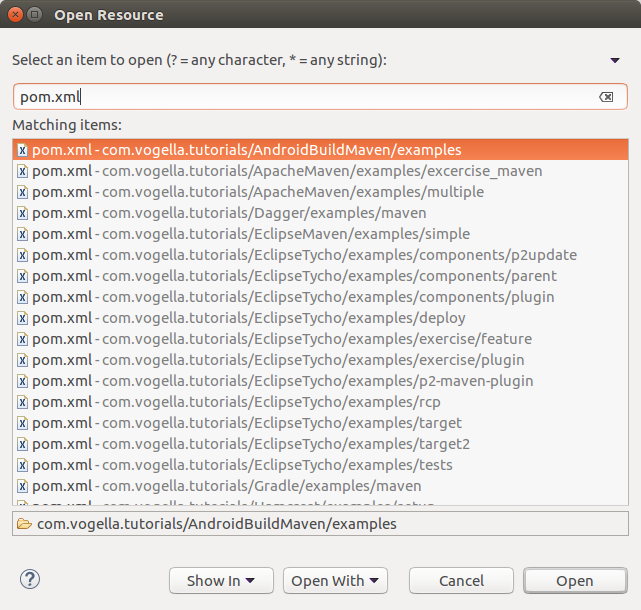
11.4. Open Resource dialog to open arbitrary files
You can open any file from your open projects via the Open Resource dialog.
You can open this dialog via the Ctrl+Shift+R shortcut.
This dialog allows you to enter the file name and to open or show it in a selected view.
The following screenshot demonstrates its usage to open a pom.xml file from your workspace.
11.5. Quick Outline
Quick Outline shows you a structured overview of the file you are editing. For example, for a Java class, you see its methods with the option to filter. The shortcut for opening the Quick Outline is Ctrl+O. You can access this option by right-clicking in an editor and selecting the Quick Outline option.
By default, Quick Outline shows only the direct members and fields of the Java class. Press Ctrl+O again to show the inherited members and fields.
The default look of the Quick Outline option is similar to the Outline view of the Java perspective.
11.6. Open Type Hierarchy
The type hierarchy of a class shows you which classes it extends and which interfaces it implements. You can use the type hierarchy to navigate to one of these elements.
To open the type hierarchy of the selected class, right-click in the editor and select Open Type Hierarchy (shortcut: F4) or Quick Type Hierarchy (shortcut: Ctrl+T).
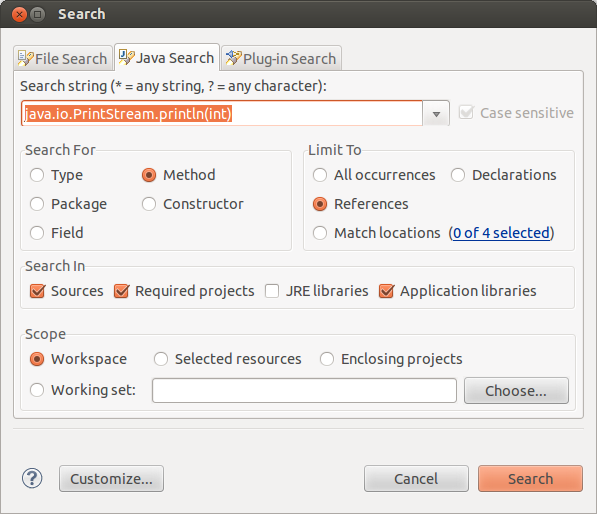
11.7. Full text search
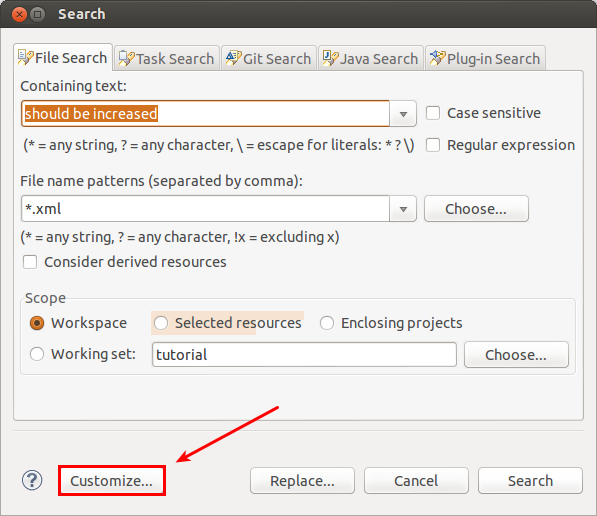
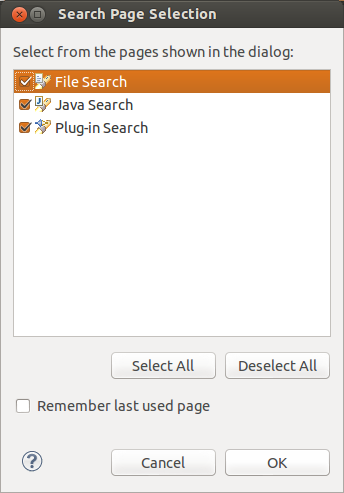
You frequently need to find files containing certain text or other metadata. Via the (shortcut: Ctrl+H), you can open the search dialog of Eclipse. Use the File Search tab to search for text, with the option to use regular expressions and replace matching entries.
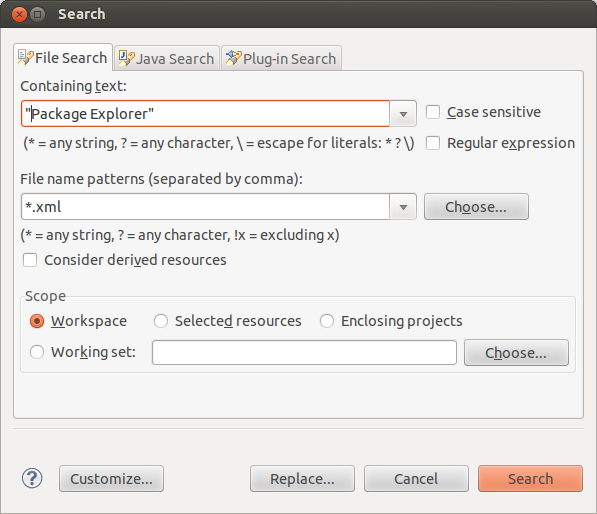
Eclipse associates file extensions with the default tab. You can customize the available search tabs via the Customize button in the Search dialog. Via the Remember the last used page option, you can configure Eclipse to use your last tab as the default.
11.8. Java search and other specialized searches
The Search functionality (Ctrl+H) offers specialized searches for more complex use cases. For example, use the Java Search tab to search for Java elements, e.g., methods.
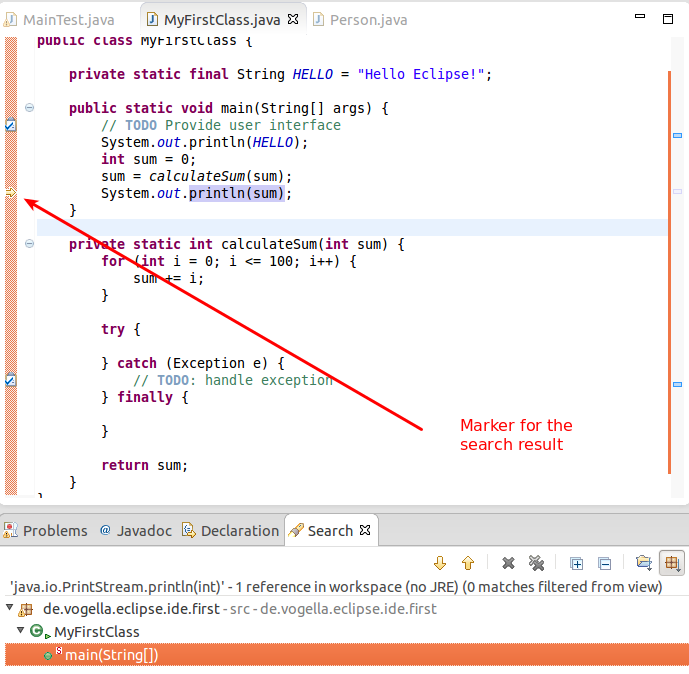
The Search view shows the search results for the selected scope. You can double-click a search entry to navigate to the corresponding position in the editor. The currently selected search result is indicated by an arrow in the left border of the editor.
11.9. Inline search in an editor
You can use the Ctrl+J shortcut to activate Incremental Find. This allows you to search in the currently active editor for text, which is displayed in the status line, as depicted in the following screenshot. Repeat Ctrl+J to move to the next occurrence of the current search term.
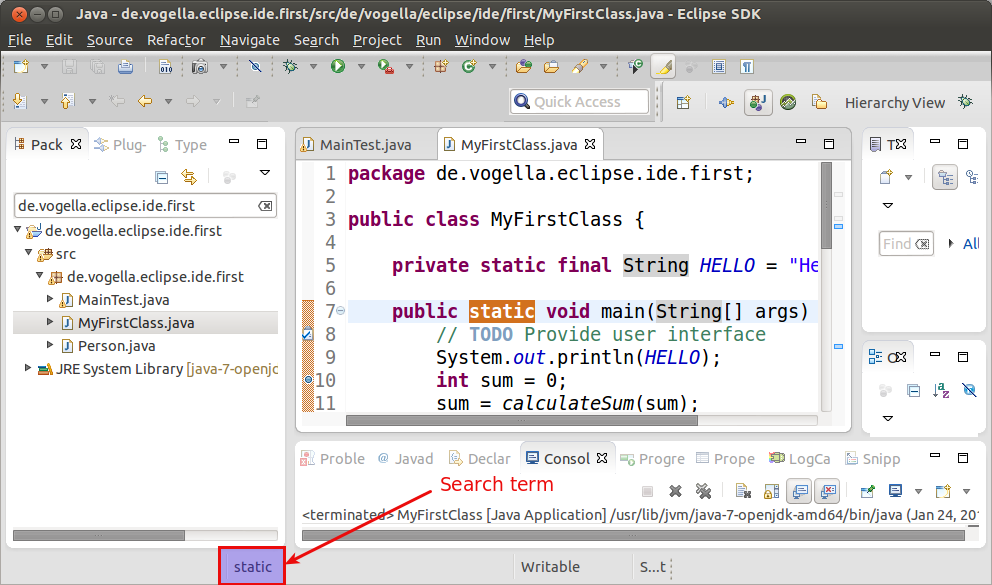
The advantage of this search is that no pop-up dialog is opened, which would block other elements in the Eclipse IDE.
If you have selected an element in the editor, you can use the Ctrl+K shortcut to search for the next occurrence of the selected text and Ctrl+Shift+K for the previous one.
11.10. Annotation navigations
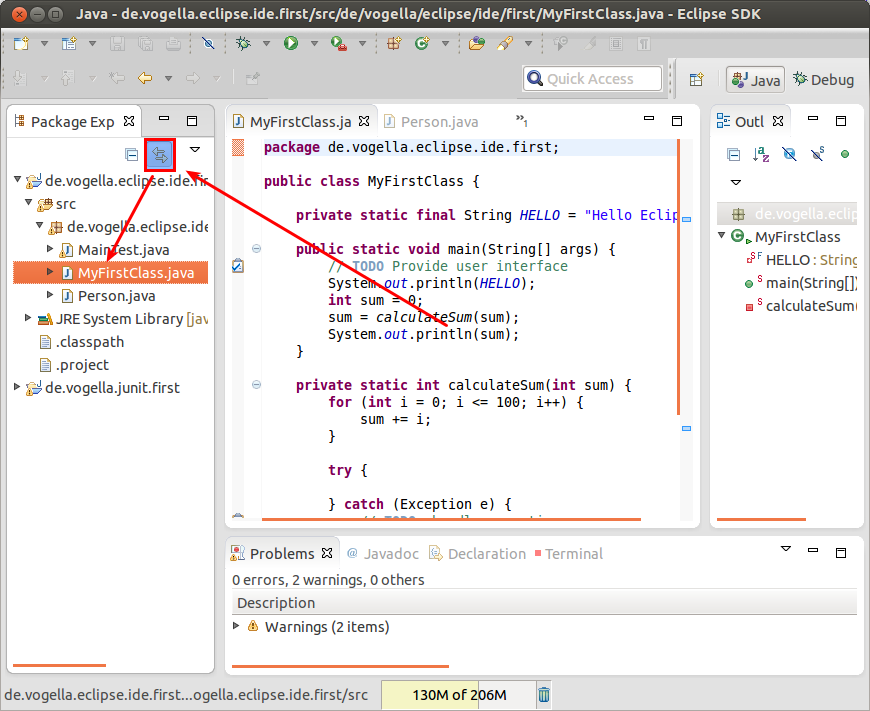
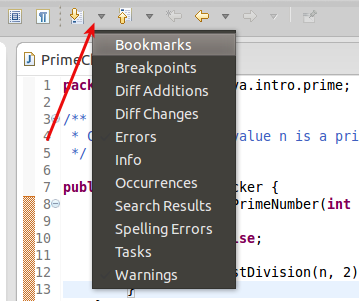
You can navigate via the annotation buttons, e.g., to jump to the next error or warning in your source code.

By clicking the buttons, you can navigate to the related annotations. You can use the keyboard shortcut Ctrl+. (Ctrl plus the dot sign) to select the next annotation or Ctrl+, (Ctrl plus the comma sign) to select the previous annotation.
The following screenshot shows source code with two warnings and one error, and you can navigate between the corresponding code via the annotation buttons.
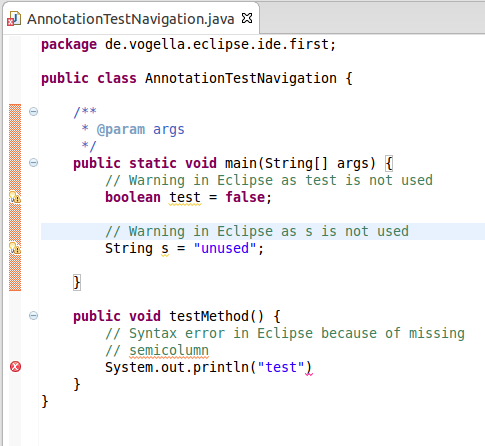
Which annotations are relevant for navigation can be configured via the drop-down menu of the toolbar. This option is highlighted in the screenshot below.
11.11. Mouse and keyboard navigation
In many cases, you can use the mouse to navigate to or into an element if you press the Ctrl key. For example, press the Ctrl key and left-click the name of a class to jump to the class declaration.
Similar to a left-click combined with the Ctrl key, you can use the F3 key to go into a class.
11.12. Show in Breadcrumb
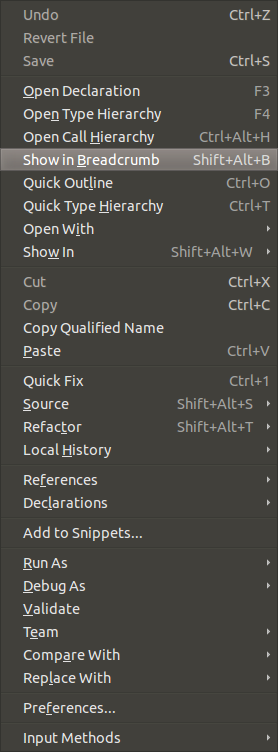
You can activate the breadcrumb mode for the Java editor, which allows you to navigate the source code directly from the Java editor.
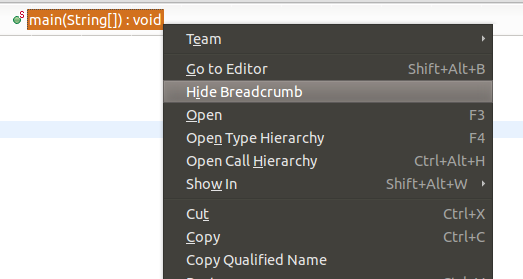
You can activate this mode by right-clicking in the editor and selecting the Show in Breadcrumb entry.
This allows you to navigate the source code from the editor, as depicted in the following screenshot.
To hide it again, right-click a breadcrumb entry and select Hide Breadcrumb.
11.13. Shortcuts
Many shortcuts are available for navigation. Please check the appendix of this tutorial for these shortcuts, or open to find and redefine shortcuts at runtime.
11.14. Closing and opening projects
Closing projects saves memory in Eclipse and can reduce the build time. Eclipse ignores closed projects; e.g., all searches ignore files from closed projects. Also, the Problems view only shows errors of open projects. This typically helps you focus your attention on the project. You can close a project by right-clicking on it and selecting the Close Project menu entry. Alternatively, if you are working on a project, you can close all unrelated projects by right-clicking on it and selecting the Close Unrelated Projects menu entry.
To open a closed project, double-click it, or right-click it and select Open Project.
You can use the filter functionality of the Package Explorer view to hide closed projects.
12. Content Assist and Quick Fix
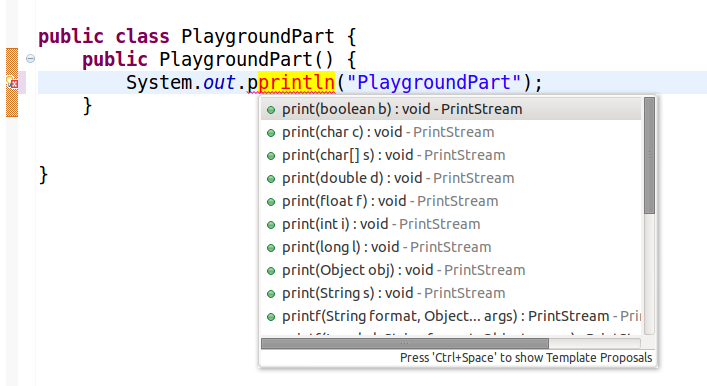
12.1. Content assist for writing faster code
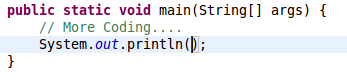
Content assist is a functionality in Eclipse that provides context-sensitive code completion in an editor upon user request.
It can be invoked by pressing Ctrl+Space.
For example, type syso in the editor of a Java source file and then press Ctrl+Space.
This replaces syso with System.out.println("").
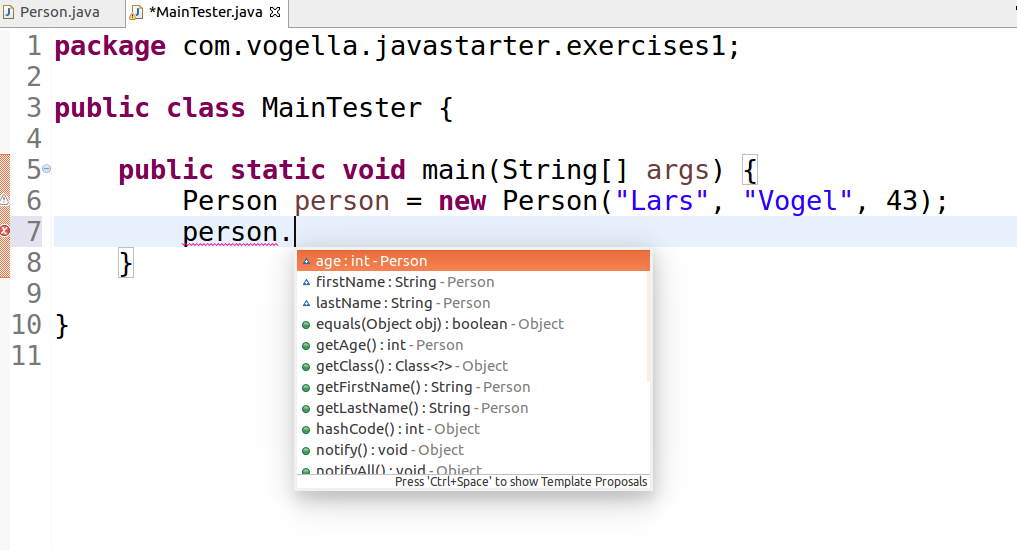
If you have a reference to an object, for example, the object person of the type Person, and need to see its methods, type person. and press Ctrl+Space.
12.2. Using Quick Fix for fixing issues in your code
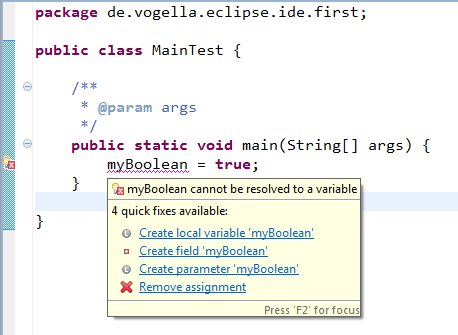
Whenever the Eclipse Java tooling detects a problem in your code, it underlines the problematic text in the editor and creates a problem marker. The problem marker is visible in the Problems View and in the editor via markers on the left side of the editor. Select the underlined text and press Ctrl+1 to see suggestions for correcting the problem. This functionality is called Quick Fix.
For example, type myBoolean = true;.
If myBoolean is not yet defined as a field, Eclipse highlights this statement as an error.
Select the variable and press Ctrl+1.
Eclipse suggests creating a field or a local variable.
Quick Fix is extremely powerful.
For example, it allows you to create new local variables and fields, as well as new methods and new classes.
It can also put try-catch statements around your exceptions.
It can assign a statement to a variable and much more.
Quick Fix also provides several options for code changes on code that does not contain errors, e.g., it allows you to convert a local variable to a field.
12.3. Exercise: Convert anonymous inner classes to lambda expressions and vice versa
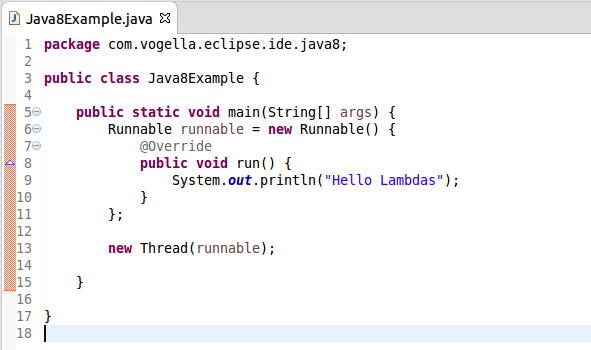
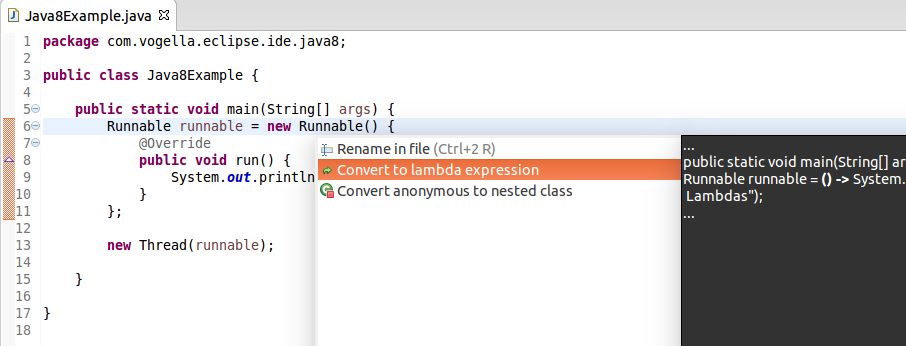
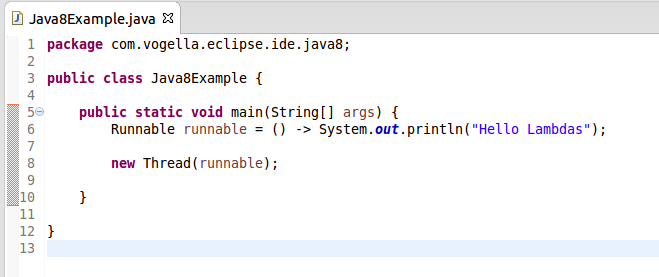
The Eclipse IDE has full support for modern Java versions. This section demonstrates the quick fix for converting anonymous inner classes to lambda expressions.
package com.vogella.eclipse.ide.java8;

public class Java8Example {

    public static void main(String[] args) {
        Runnable runnable = new Runnable() {
            @Override
            public void run() {
                System.out.println("Hello Lambdas");
            }
        };

        new Thread(runnable);
    }
}
You can use a quick fix for the conversion as demonstrated via the following screenshots.
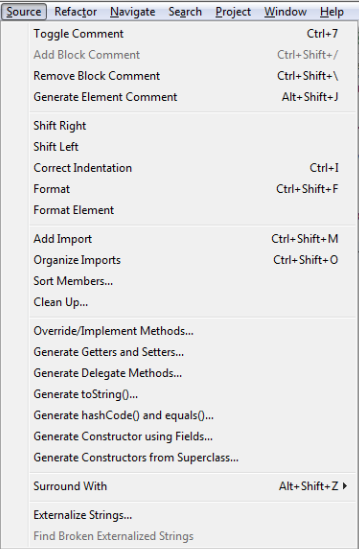
13. Generating code
Eclipse has several options to generate code for you. This can save significant time during development.
For example, Eclipse can override methods from superclasses and generate the toString(), hashCode(), and equals() methods.
It can also generate getter and setter methods for the attributes of your Java class.
You can find these options in the Source menu.
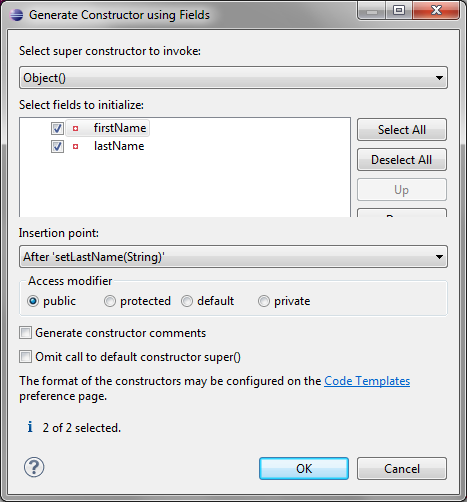
To test the source generation, create the following class in your com.vogella.eclipse.ide.first project.
package com.vogella.eclipse.ide.first;

public class Person {
  private String firstName;
  private String lastName;

}
Select , select both fields, and click the OK button.
Select , select all fields, and then click the OK button.
Select , select all fields again, and click the OK button.
You have created the following class:
package com.vogella.eclipse.ide.first;

public class Person {
  private String firstName;
  private String lastName;

  public Person(String firstName, String lastName) {
    super();
    this.firstName = firstName;
    this.lastName = lastName;
  }

  public String getFirstName() {
    return firstName;
  }

  public void setFirstName(String firstName) {
    this.firstName = firstName;
  }

  public String getLastName() {
    return lastName;
  }

  public void setLastName(String lastName) {
    this.lastName = lastName;
  }

  @Override
  public String toString() {
    return "Person [firstName=" + firstName + ", lastName=" + lastName
        + "]";
  }

}
14. Exercise: code generation and content assists
14.1. Introduction
In this exercise, you practice the usage of code generation and the usage of the Content Assists functionality.
14.2. Create project
Create a project called com.vogella.ide.todo.
14.3. Create class
Create the com.vogella.ide.todo package and the following class.
package com.vogella.ide.todo;

import java.util.Date;

public class Todo {

  private long id;
  private String summary = "";
  private String description = "";
  private boolean done = false;
  private Date dueDate;

}
Select to generate a constructor using all fields.
Use the to create getters and setters for all fields.
The resulting class should look like the following listing.
package com.vogella.ide.todo;

import java.util.Date;

public class Todo {

  private long id;
  private String summary = "";
  private String description = "";
  private boolean done = false;
  private Date dueDate = new Date();

  public Todo(long id, String summary, String description, boolean done, Date dueDate) {
    this.id = id;
    this.summary = summary;
    this.description = description;
    this.done = done;
    setDueDate(dueDate);
  }

  public long getId() {
    return id;
  }

  public void setId(long id) {
    this.id = id;
  }

  public String getSummary() {
    return summary;
  }

  public void setSummary(String summary) {
    this.summary = summary;
  }

  public String getDescription() {
    return description;
  }

  public void setDescription(String description) {
    this.description = description;
  }

  public boolean isDone() {
    return done;
  }

  public void setDone(boolean done) {
    this.done = done;
  }

  public Date getDueDate() {
    return dueDate;
  }

  public void setDueDate(Date dueDate) {
        this.dueDate = new Date(dueDate.getTime());
    }

}
Use Eclipse to generate a toString() method for the Task class based on the id and summary field.
This can be done via the Eclipse menu entry.
Also generate a hashCode() and equals() method based on the id field.
This can be done via the menu entry.
14.4. Create instances
Create a new class called TodoProvider.
Create the following static method in your TodoProvider class.
package com.vogella.ide.todo;

import java.util.ArrayList;
import java.util.Date;
import java.util.List;

public class TodoProvider {
    private static int current = 0;

    // example data, change if you like
    public static List<Todo> createInitialModel() {
        ArrayList<Todo> list = new ArrayList<Todo>();
        list.add(createTodo("SWT", "Learn Widgets"));
        list.add(createTodo("JFace", "Especially Viewers!"));
        list.add(createTodo("DI", "@Inject looks interesting"));
        list.add(createTodo("OSGi", "Services"));
        list.add(createTodo("Compatibility Layer", "Run Eclipse 3.x"));
        return list;
    }

    private static Todo createTodo(String summary, String description) {
        return new Todo(current++, summary, description, false, new Date());
    }
}
14.5. Write a test class
Write another TodoProviderTest class with a public static void main (String[] args) method.
In your main method call the createInitialModel method and validate that the returned number of items is 5.
If another number than 5 is returned, throw a RuntimeException.
If the correct number is returned, write the String "Correct" to the Console view.
Use Content assist to create the System.out.println() based on syso for you.
14.6. Example implementation of TodoProviderTest
While this exercise was about code generation and content assists, you might be interested in a potential solution for this exercise. The following listing contains a potential solution.
package com.vogella.ide.todo;

import java.util.List;

public class TodoProviderTest {

    public static void main(String[] args) {
        List<Todo> model = TodoProvider.createInitialModel();
        if (model.size()!=5){
            throw new RuntimeException("size should be 5");
        } else {
            System.out.println("Correct");
        }
    }

}
15. Refactoring
This section covers the refactoring facilities of Eclipse that allow you to improve the structure of your source code.
15.1. Refactoring
Refactoring is the process of restructuring the code without changing its behavior. For example, renaming a Java class or method is a refactoring activity.
15.2. Refactoring in Eclipse
Eclipse supports several refactoring activities, for example, renaming or moving.
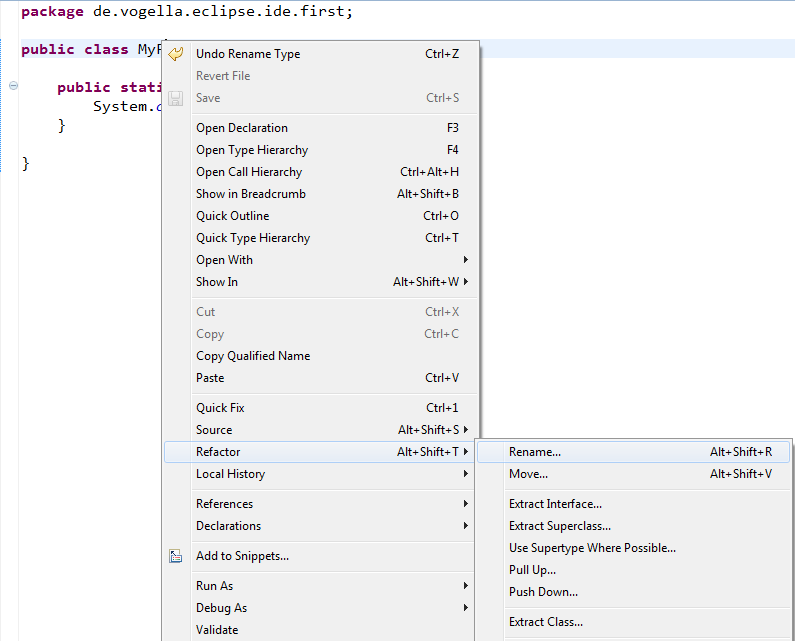
For example, to use the Rename refactoring, you can right-click on your class (in the editor or Package Explorer) and select to rename your class. Eclipse will make sure that all calls in your Workspace to your class or method are renamed.
The following screenshot shows how to call the Rename refactoring for a class. The cursor is positioned on the class and the context menu is activated via a right-click on the class.
The most important refactorings are listed in the following table.
| Refactoring | Description |
|---|---|
Rename |
Rename a variable or class |
Extract Method |
Creates a method based on the selected code in the editor |
Extract Constant |
Gives magic numbers or hard-coded strings a descriptive constant name and replaces all occurrences. |
|
Lots of refactorings are available via the Ctrl+1 shortcut (quick fix). Select a certain part of your code and press Ctrl+1 to see possible refactorings for the selected position. |
Eclipse has many more refactorings. The available options depend on the selection in the Java editor. In most cases you should get an idea of the performed action by the naming of the refactoring operation.
16. Exercise: Refactoring
16.1. Preparation
For the next examples change the MyFirstClass class to the following code.
package com.vogella.eclipse.ide.first;

public class MyFirstClass {

  public static void main(String[] args) {
    System.out.println("Hello Eclipse!");
    int sum = 0;
    for (int i = 1; i <= 100; i++) {
      sum += i;
    }
    System.out.println(sum);
  }
}
16.2. Extract method
A useful refactoring is to mark code and create a method from the selected code. Mark now the code of the "for" loop, right-click on the selection and select . Use calculateSum as the name of the new method.
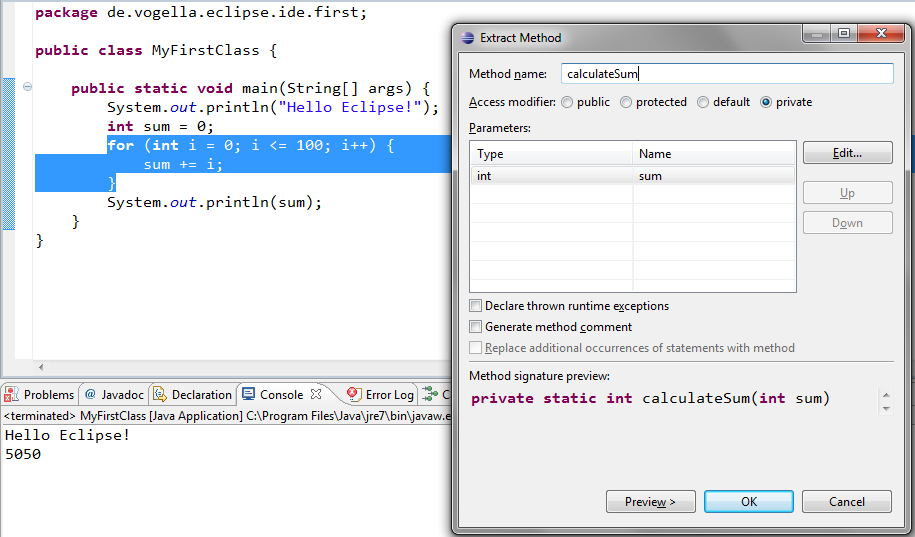
After this refactoring, the class should look like the following code.
package com.vogella.eclipse.ide.first;

public class MyFirstClass {

  public static void main(String[] args) {
    System.out.println("Hello Eclipse!");
    int sum = 0;
    sum = calculateSum(sum);
    System.out.println(sum);
  }

  private static int calculateSum(int sum) {
    for (int i = 1; i <= 100; i++) {
      sum += i;
    }
    return sum;
  }
}
16.3. Extract Constant
You can extract strings and create constants based on the strings.
Mark for this example the "Hello Eclipse!" string in your source code, right-click on it and select .
Name your new constant HELLO.
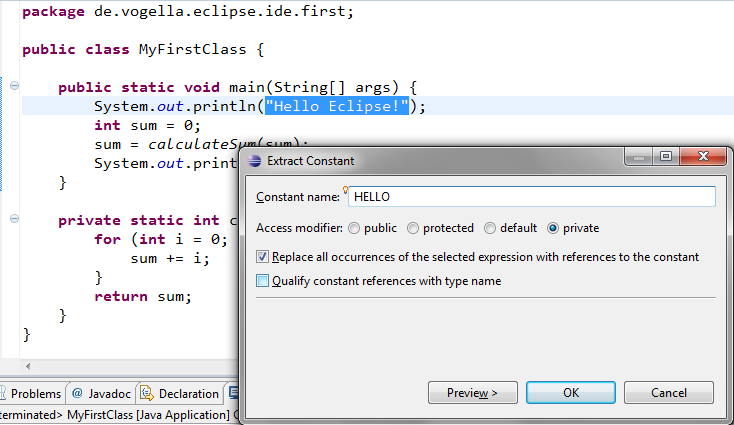
The string is now defined as a constant.
package com.vogella.eclipse.ide.first;

public class MyFirstClass {

  private static final String HELLO = "Hello Eclipse!";

  public static void main(String[] args) {
    System.out.println(HELLO);
    int sum = 0;
    sum = calculateSum(sum);
    System.out.println(sum);
  }

  private static int calculateSum(int sum) {
    for (int i = 1; i <= 100; i++) {
      sum += i;
    }
    return sum;
  }
}
17. Eclipse Shortcuts
Eclipse provides a lot of shortcuts to work efficiently with the IDE. For a list of the most important Eclipse shortcuts please see Eclipse Shortcuts
18. Using JARs (libraries) in Eclipse
18.1. Adding a Java library to the project classpath
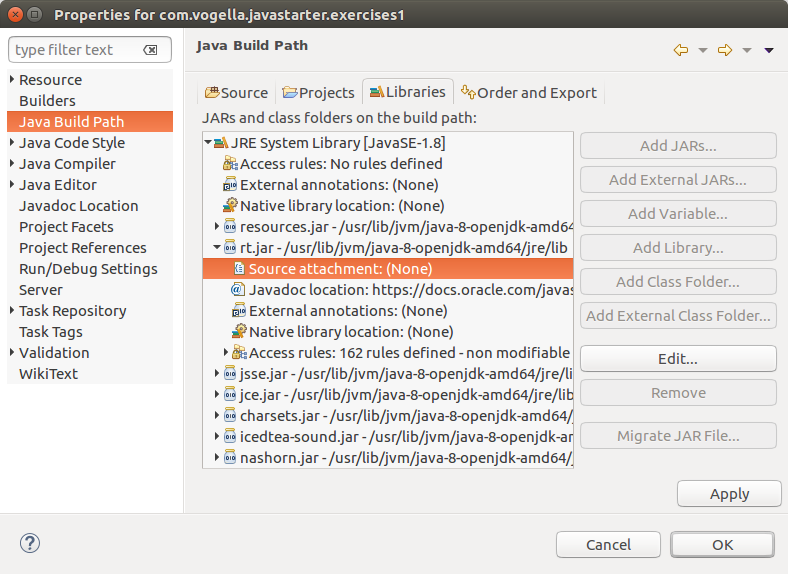
You can store JAR files directly in your project, and add them to the classpath which the Java compiler of Eclipse is using. To manage the classpath for your Eclipse, right-click on your project and select Properties. Under you can review and change your current classpath as depicted in the following screenshot.
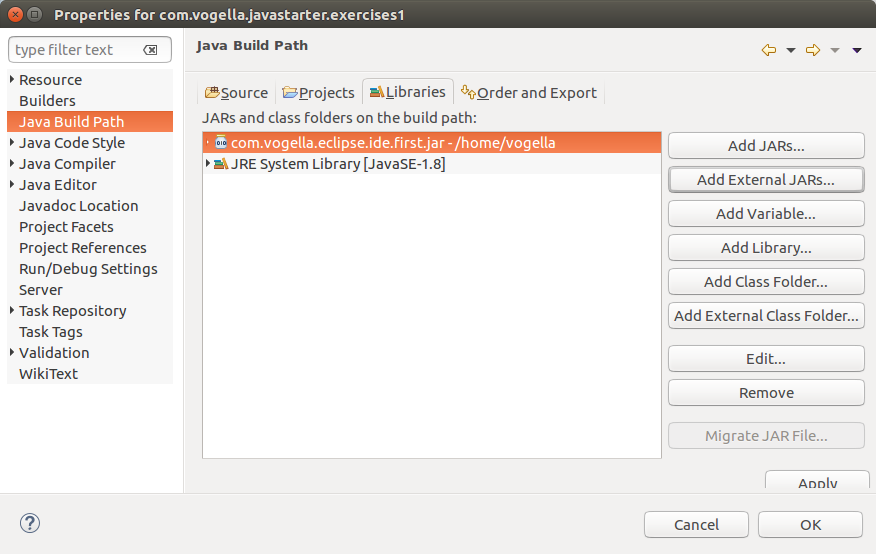
JAR files can be stored outside your project or inside. To import a JAR into an existing folder, select . Select the Java library you want to import and select the folder, e.g.,lib, as target. To add JAR file located in the project to its classpath, right-click on the JAR file and select .
|
Alternatively, to the import approach via the menu, you can copy and paste the |
|
Outside of the Eclipse IDE you need to configure your classpath for your project. |
18.2. Using project dependencies
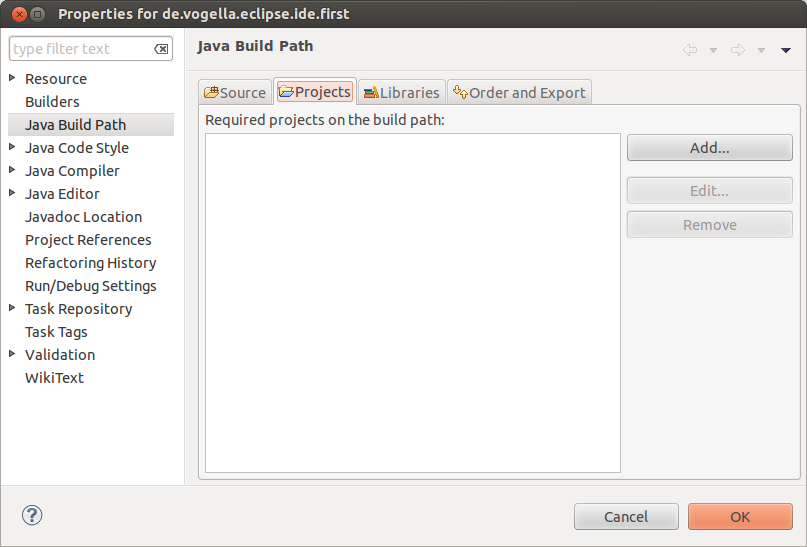
You can define in Eclipse that a project is dependent on another project. If you do this, you can use its classes in the project defining the dependency. To do this select your project, right-click on it and select Properties. Select Java Build Path and the Projects tab.
This only works within Eclipse, it allows you to develop several projects which will later be exported as JAR files together. Outside of the Eclipse IDE you need to create Java libraries for the projects and add them to the classpath.
18.3. Attach source code to a Java library
You can open any class by positioning the cursor on the class in an editor and pressing F3. Alternatively, you can press Ctrl+Shift+T. This shows a dialog in which you can enter the class name to open it.
If the source code is not available, the editor shows the bytecode of that class.
This happens, for example, if you open a class from the standard Java library without attaching the source code.
To see the source code of such a class, you can attach a source archive or source folder to a Java library. Afterwards, the editor shows the source instead of the bytecode.
Attaching the source code to a library allows you to debug this source code.
The Source Attachment dialog can be reached in the Java Build Path page of a project. To open this page, right-click on a project and select . On the Libraries tab, expand the library’s node, select the Source Attachment attribute and click the Edit button.
In the Location path field, enter the path of an archive or a folder containing the source.
The following screenshot shows this setting for the standard Java library. If you have the Java Development Kit (JDK) installed, you should find the source in the JDK installation folder. The file is typically called src.zip.
18.4. Add Javadoc to a Java library
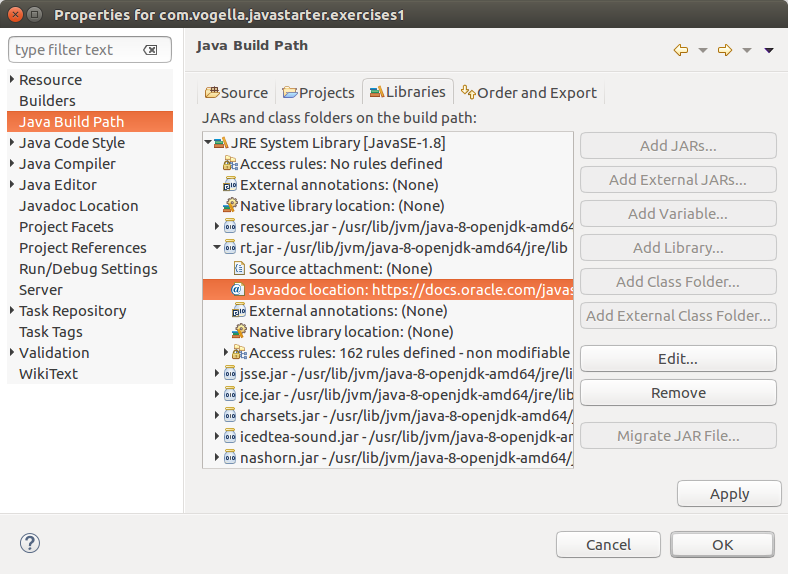
You can add Javadoc to a library you use. For this you need to have the Javadoc somewhere in your filesystem. To configure the location of the Javadoc for the JAR File, open the Java Build Path via a right-click on a project. Select . On the Libraries tab expand the library’s node, select the Javadoc location attribute and press the Edit button.
Enter the location to the file that contains the Javadoc.
19. Updates and installation of plug-ins
19.1. Eclipse update manager
The Eclipse IDE allows you to install and update software components. The Eclipse update functionality only downloads new or updated components.
Installable software components are located in update sites. Update sites can be located on a web server or on the file system.
19.2. Performing an update
|
If you are behind a network proxy, you have to configure your proxy via the preference setting. Otherwise, Eclipse may not be able to reach the update sites. |
To update your Eclipse installation, select . The system searches for updates in the configured update sites for the installed software components. If it finds updated components, it will ask you to approve the update.
19.3. Install new functionality
To install a new functionality, select .
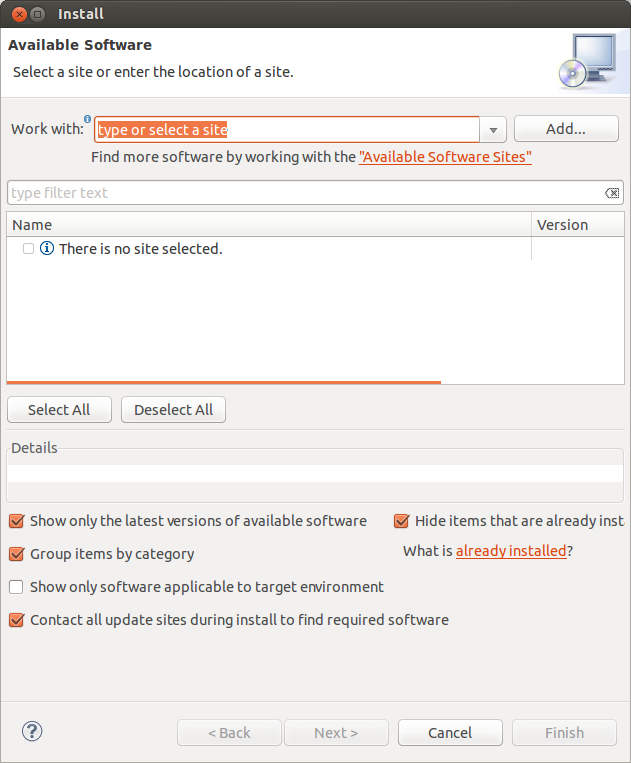
From the Work with list, select or enter a URL for the update site you want to use. Entering a new URL adds this URL automatically to the list of available update sites.
To explicitly add a new update site, press the Add… button and enter the new URL as well as a name for the new update site.
The following update sites contain the official Eclipse components.
# Release specific update site, e.g., for the 2020-09 release
https://download.eclipse.org/releases/2020-09

# Update site for the latest release
https://download.eclipse.org/releases/latest
If you select a valid update site, Eclipse allows you to select components and install them.

If you cannot find a certain component, uncheck the _Group items by category _ checkbox because not all available plug-ins are categorized. Uncategorized items are only displayed if the grouping is disabled.
19.5. Uninstalling components
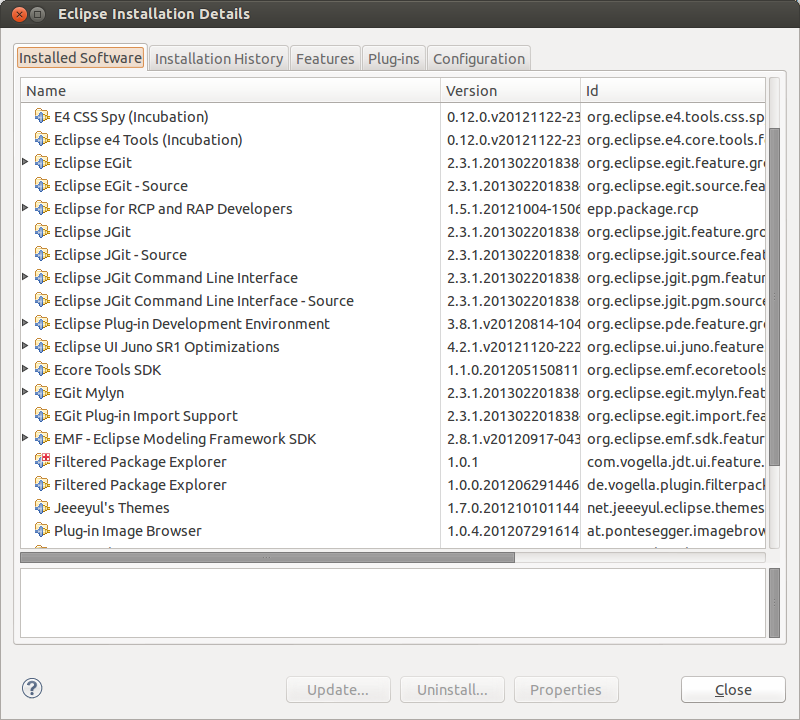
If you select and then the Installation Details button, you can uninstall components from your Eclipse IDE.
19.6. Restarting Eclipse
After an update or an installation of a new software component, you should restart Eclipse to make sure that the changes are applied.
20. Eclipse Marketplace
20.1. Using the Marketplace client
Eclipse contains a client that allows installing software components from the Eclipse marketplace. The advantage of this client is that you can search for components, discover popular extensions and see descriptions and ratings.
Compared to the update manager, you do not have to know the URL for the software site that contains the installable software components.
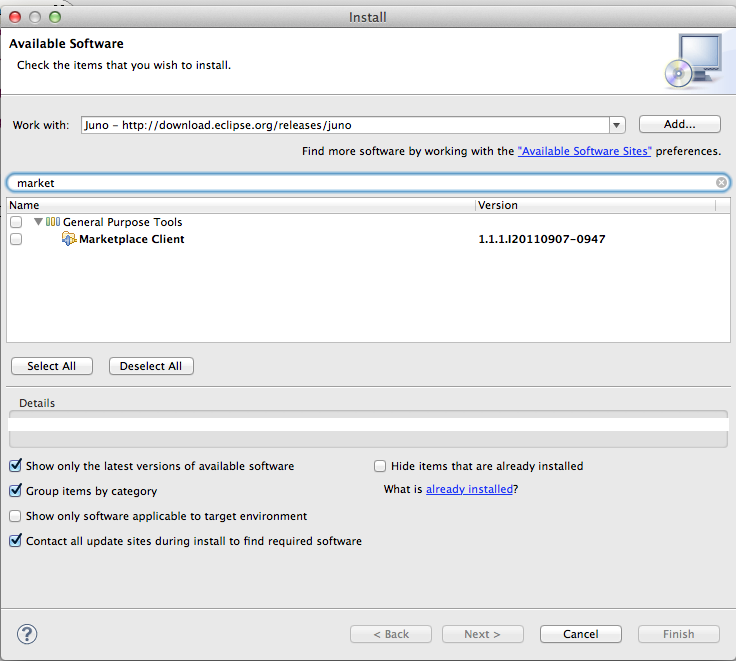
Most Eclipse distributions contain the Marketplace client by default. You may need to install the Marketplace client software component into Eclipse before you can use it. The following screenshot shows how to install it from one of the official Eclipse update sites, via the dialog.
To open the Eclipse Marketplace, select .
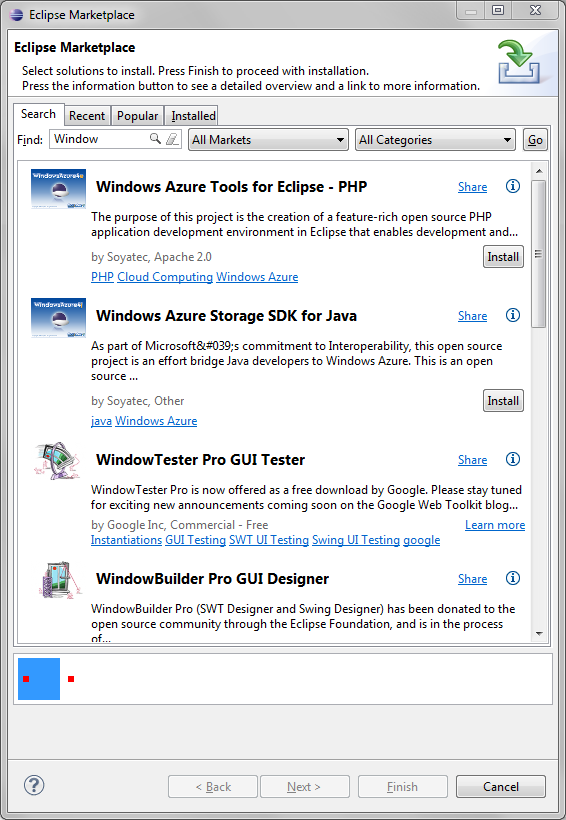
You can use the Find box to search for components. Pressing the Install button starts the installation process.
20.2. Maintaining your Favorites
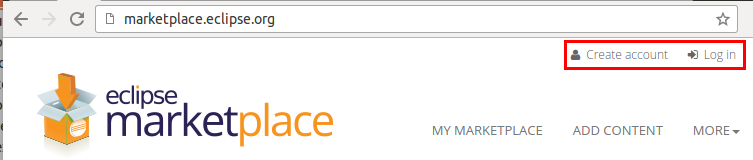
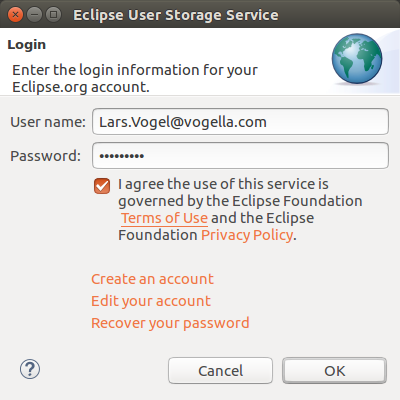
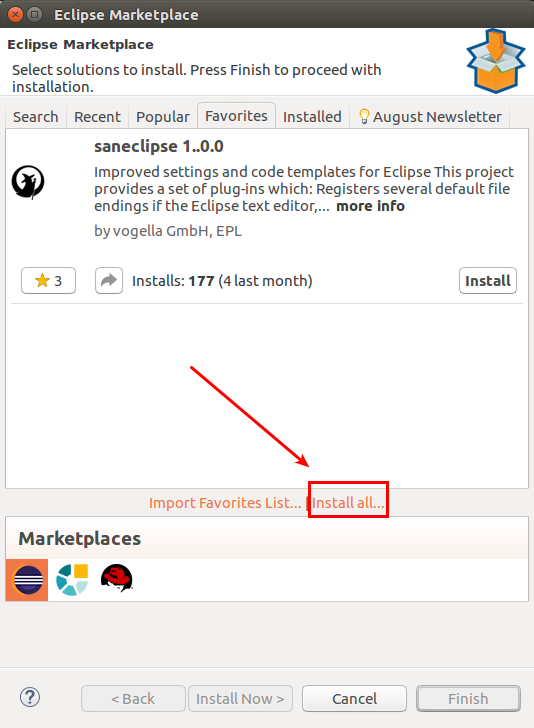
The marketplace client allows to install your favorite plug-ins directly. For this, go to the Eclipse Marketplace website and login with your Eclipse.org account.
Now search on the website for your favorite and press the * sign.
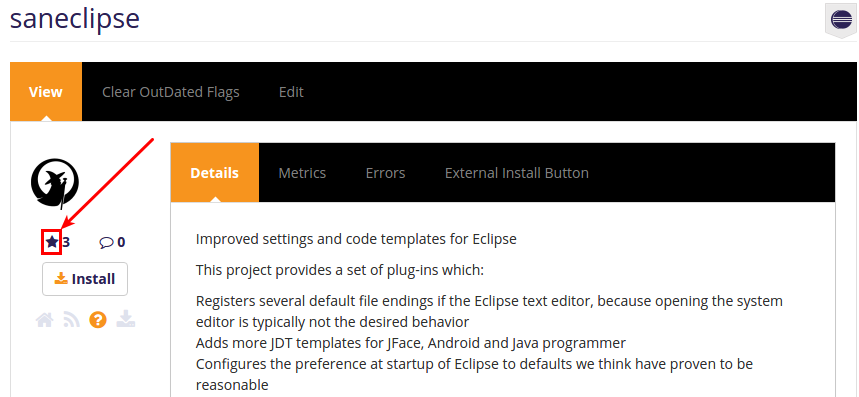
Afterwards, select the Favorites tab in the Eclipse Marketplace client and login to be able to install your favorites.

21. Advanced Eclipse Update manager options
21.1. Manual installation of plug-ins (dropins folder)
Eclipse plug-ins are distributed as jar files. If you want to use an Eclipse plug-in directly or do not know the update site for it, you can place it in the dropins folder of your Eclipse installation directory. Eclipse monitors this directory and during a (re-)start of your IDE, the Eclipse update manager installs and removes plug-ins based on the files contained in this directory.
You should not modify the content of the Eclipse plugins directory directly. If you want to install plug-ins, put them into the dropins folder. If you want to remove it, delete the JAR from this folder.
Plug-ins are typically distributed as jar files. To add a plug-in to your Eclipse installation, put the plug-in .jar file into the Eclipse dropins folder and restart Eclipse. Eclipse should detect the new plug-in and install it for you.
If you remove plug-ins from the dropins folder and restart Eclipse, these plug-ins are automatically removed from your Eclipse installation.
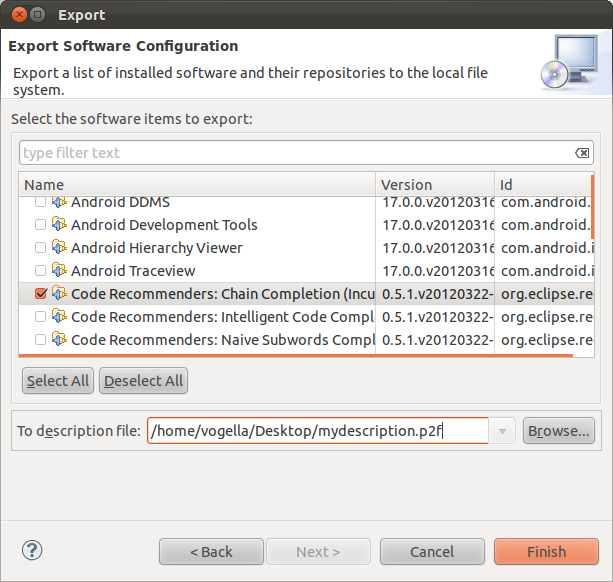
21.2. Exporting and importing the installed components
Eclipse allows you to export a file that describes the installed Eclipse components. During the export the user can select which components should be included in this description file.
Other users can import this description file into their Eclipse installation and install the components based on this file.
This way, Eclipse installations can be kept in sync with each other.
To export a description file, select . Select the components which should be included in your description file.
To install the described components in another Eclipse installation, open the exported file with and follow the wizard. The wizard allows you to specify the components which should be installed.
21.3. Installing features via the command line
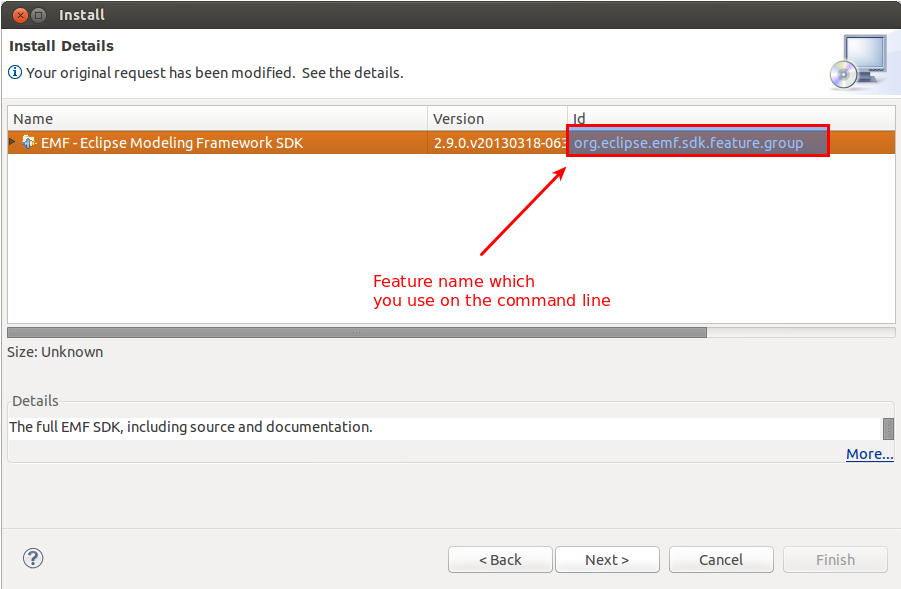
The Eclipse update manager has a component called director that allows you to install new features via the command line.
For example, the following command will install the components EGit, Mylyn and EMF into an Eclipse instance. You need to start this command in the command line and it assumes that you are in a directory that contains your Eclipse installation in a folder called eclipse.
eclipse/eclipse \
-application org.eclipse.equinox.p2.director \
-noSplash \
-repository \
https://download.eclipse.org/releases/luna \
-installIUs \
org.eclipse.egit.feature.group,\
org.eclipse.jgit.feature.group,\
org.eclipse.emf.sdk.feature.group,\
org.eclipse.mylyn_feature.feature.group,\
org.eclipse.wst.xml_ui.feature.feature.group,\
org.eclipse.mylyn.java_feature.feature.group,\
org.eclipse.mylyn.pde_feature.feature.group
The feature names which you need for this operation can be seen on the second page of the standard installation dialog of the Eclipse update manager.
22. Eclipse preference settings
22.1. What are preferences?
The behavior of the Eclipse IDE can be controlled via key value pairs stored as preference settings. Each Eclipse software component can define such preferences and use the values to configure itself. This allows you to configure, for example, how long Eclipse waits before showing code completion or whether the import statements should be automatically adjusted when you save your source code.
While preferences are key values stored on the file system, the Eclipse IDE allows you to configure these values via the preference dialog.
22.2. Opening the preference dialog
Select to open the preference dialog. You can use the filter box to search for specific settings.

Correctly configuring Eclipse to your needs can greatly improve your productivity. Most of these preference settings are specific to your workspace but some are valid for all workspaces.
22.3. Configuring the preference values via the plugin_customization.ini file
You can specify default values for preferences via a file that is typically called plugin_customization.ini.
In this file you enter default values for preference settings.
For example, the following will set up a default type filter for the java.awt and javax.swing package.
org.eclipse.jdt.ui/org.eclipse.jdt.ui.typefilter.enabled=java.awt.*;javax.swing.*;You link to this file via your eclipse.ini file in your Eclipse installation directory.
The following example eclipse.ini links to the file and it assumes that you created the plugin_customization.ini file in the Eclipse installation directory.
-pluginCustomization
plugin_customization.ini
-startup
plugins/org.eclipse.equinox.launcher_1.3.200.v20160318-1642.jar
--launcher.library
plugins/org.eclipse.equinox.launcher.gtk.linux.x86_64_1.1.400.v20160504-1419
-showsplash
org.eclipse.platform
--launcher.XXMaxPermSize
256m
--launcher.defaultAction
openFile
--launcher.appendVmargs
-vmargs
-Dosgi.requiredJavaVersion=1.8
-Xms256m
-Xmx1024m
-XX:+UseG1GC
-XX:+UseStringDeduplication
22.4. Identifying preference setting values
To identify a key for a certain preference setting you can export existing preference settings via the following approach.
-
start a new workspace
-
change the preference
-
export all preferences
-
search the key in the exported file
| You need to remove the scope (e.g., /instance/) before copying it into the plugin_customization.ini file. |
23. Exercise: Optimizing the Eclipse IDE settings
The Eclipse IDE is relatively conservatively configured to avoid surprises during development. Certain settings in the Eclipse IDE allow you to use it more efficiently. In this exercise, you make changes to the default Eclipse IDE settings to improve your personal usability with the Eclipse IDE.
|
If you find a setting in this exercise not working for you, you can always skip that setting. |
23.1. Link Java editor with the Project Explorer or Package Explorer view
You can synchronize the currently selected Java editor with the selection in the Project Explorer or the Package Explorer view. This gives you a clearer view of which object you are currently editing.
Enable this by selecting the corresponding button in the view.
23.2. Automatic placement of semicolon
Eclipse can make typing more efficient by placing semicolons at the correct position in your source code.
In the Preference setting select . In the Automatically insert at correct position selection enable the Semicolons checkbox.
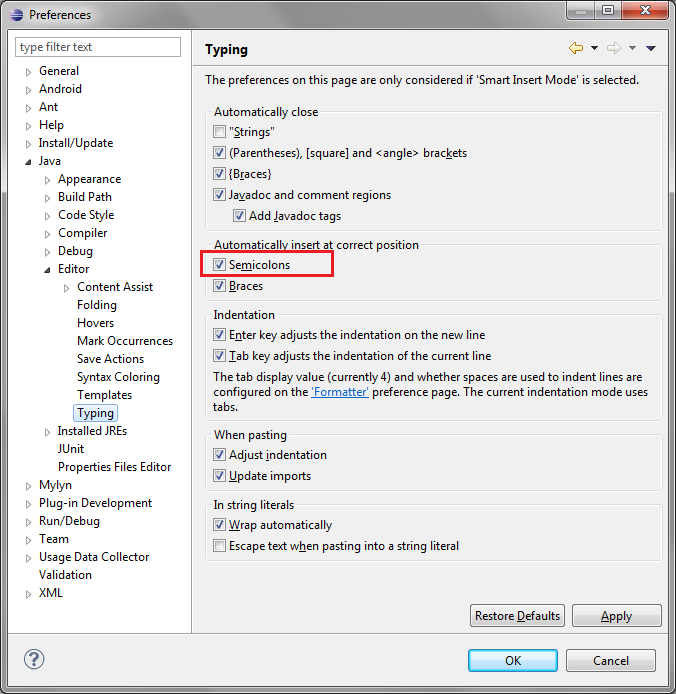
Afterwards, you can type a semicolon in the middle of your code and Eclipse positions it at the end of the current statement.
23.3. Auto-escape text pasted into Strings
Eclipse allows you to escape text automatically if it is pasted into a String literal. For example, you can copy HTML code and paste it into a String in your Java source. Eclipse would escape the text automatically for you.
Activate this setting via
Now you can paste text that should be escaped. The following code snippet shows an example for the resulting code if you paste HTML code containing a link into a string literal.
# paste <a href="tutorials/index.html">Tutorials</a>
# between "" of String s = ""

# results in:
String s = "<a href=\"tutorials/index.html\">Tutorials</a>";
23.4. Bracket highlighting
You can configure Eclipse to highlight the matching brackets of a code block in the source code editor.
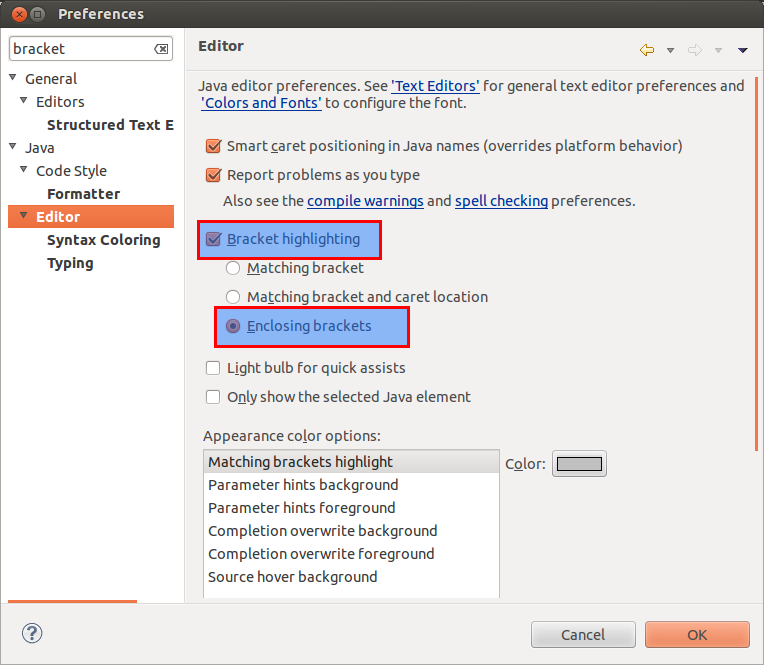
Before the change you would not see the enclosing brackets. Afterwards, they will be slightly highlighted. This helps you to see in which block you are.
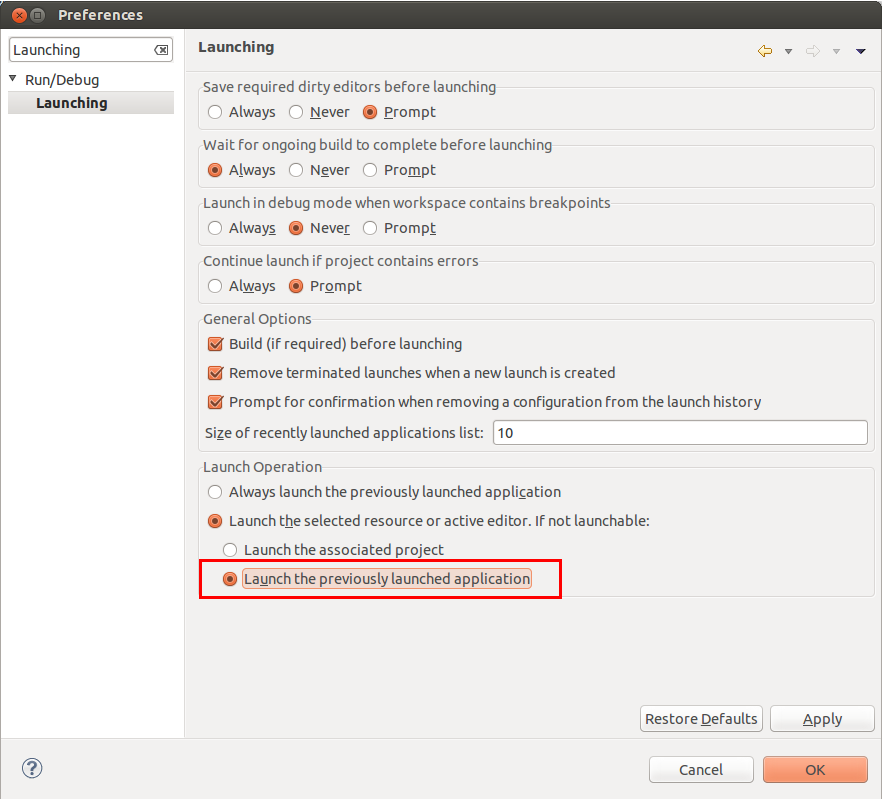
23.5. Always start previous launched application
Eclipse allows you to start an application via the Run button in the menu or via the Ctrl+F11 shortcut. By default, Eclipse determines if the currently selected file is executable and tries to start that. This is sometimes confusing. You can configure the Eclipse IDE to always start the last started program.
To configure this, select . In the Eclipse preferences dialog select the Launch the previously launched application option in the setting.
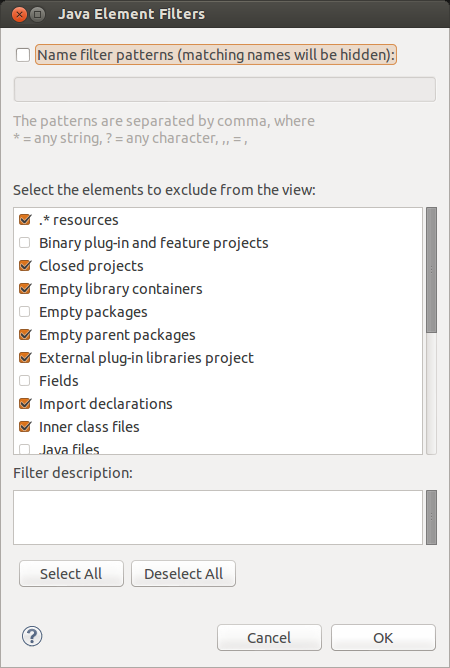
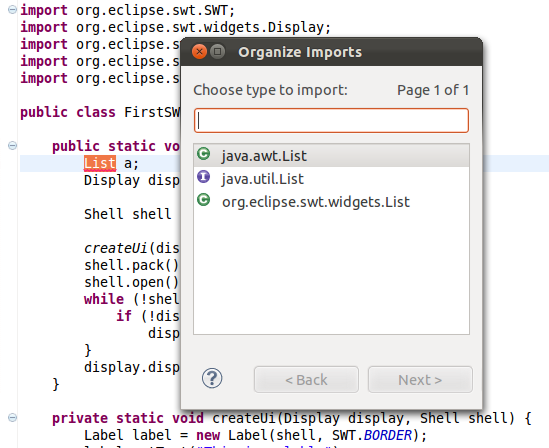
23.6. Filtering out certain Java packages via Type filters
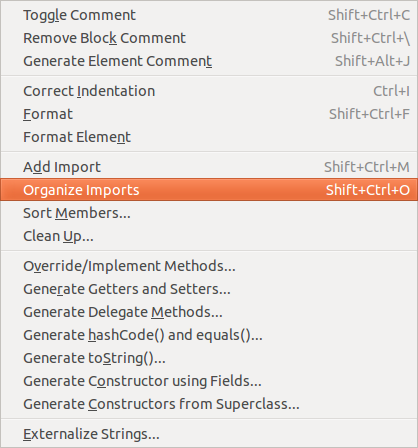
To add import statements to your code, you can use the Organize Imports action (shortcut: Ctrl+Shift+O). If there are several alternatives, Eclipse suggests all available packages and the user has to select the right one.
|
The Save Actions setting can automatically organize import statements. It adds import statements automatically if there is only one possible import and removes unused ones. |
The following shows the available packages for the List class in the Organize Imports dialog.
If you never use certain packages, for example AWT or Swing, you can exclude these packages from Eclipse via the setting.
Press the Add packages button to add a specific package or the Add… button to use wildcards.
The setting in the following screenshot excludes the java.awt and java.swing packages from the possible imports and other Java search functionality.
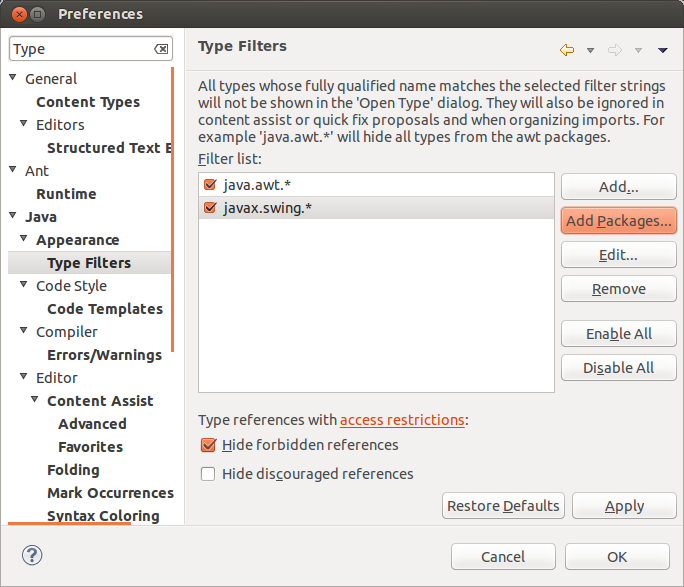
|
Please note that Eclipse shows (in its default configuration) only the packages that are used in the current workspace. If you want to exclude standard Java packages, you have to create at least one Java project. |
23.7. Format source code, organize imports and code cleanup on save
Eclipse can perform actions during the save operation (shortcut: Ctrl+S), e.g., format your source code, organize your imports, etc. You can find the corresponding settings under .
Select that the source code should be formatted and that the imports should be organized at every save action.
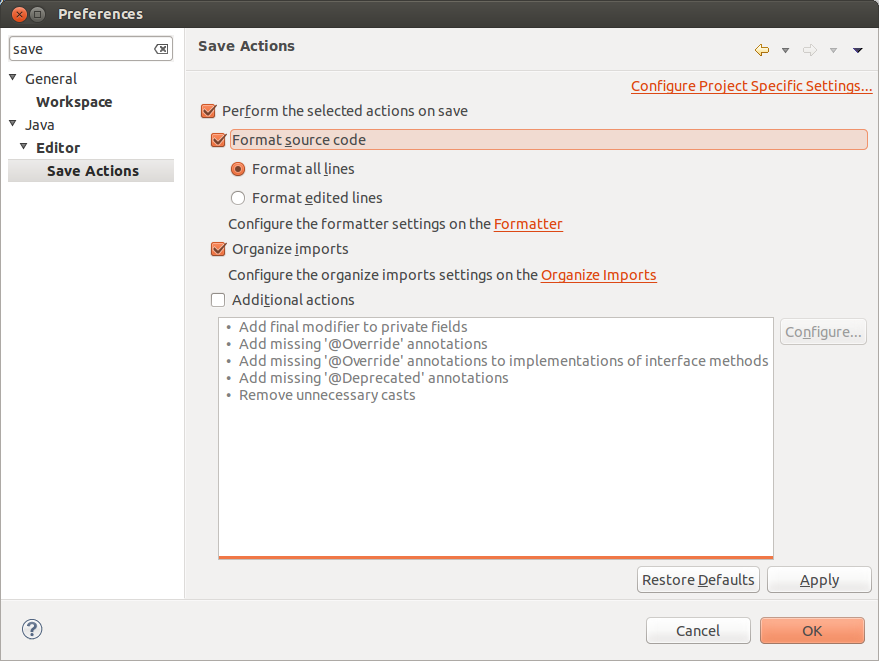
|
Import statements are only automatically created if there is one valid import. If Eclipse determines more than one valid import, it will not add import statements automatically. In this case, you still need to right-click in your editor and select (shortcut: Shift+Ctrl+O). You can improve this with type filters, as this reduces the list of possible imports. |
You can define the additional actions that are performed during save. Via the Configure… button you can select which one you want to activate.
23.8. Completion overwrites and insert guessed method arguments
Eclipse can override existing method calls, in case you trigger a code completion in an existing statement. Eclipse can try to guess the correct actual parameters for a method call.
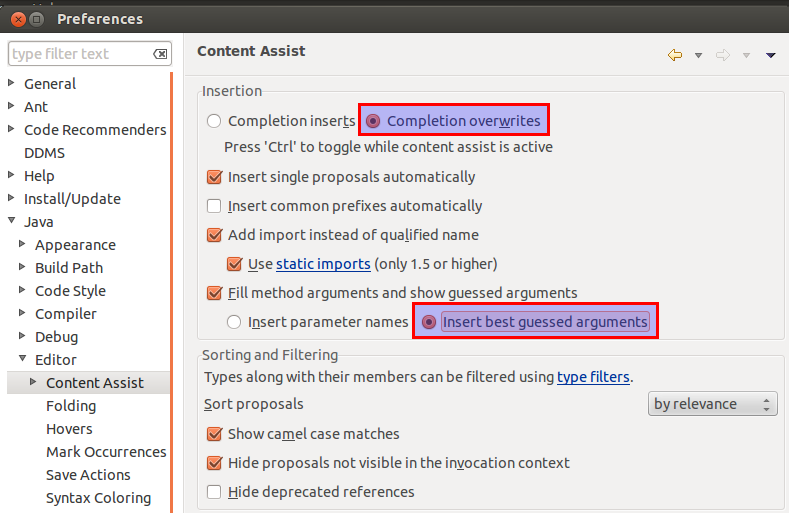
With the first setting you can override methods in the middle of a statement via the Ctrl+Space code assist shortcut.
Without this setting you would get the following result, which results in a syntax error.

With this setting you get the following result.

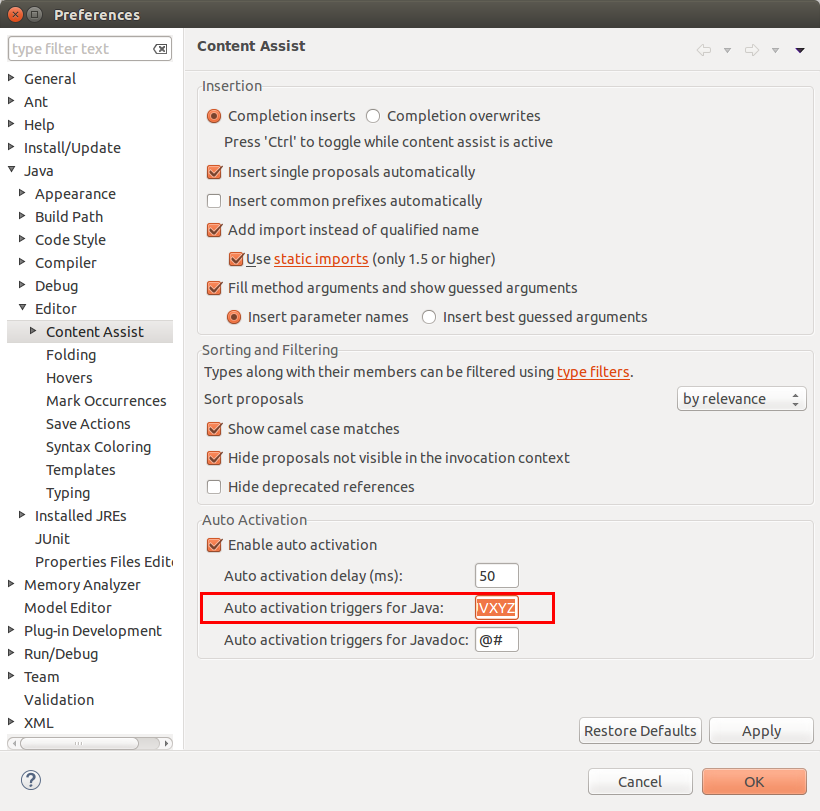
23.9. Auto activation key for code completion
|
Due to Bug 348857 this setting is not usable at the moment. |
The Eclipse IDE is configured to give you automatic code completion suggestions only after the . sign. You can configure Eclipse to get code completion on every character. Open again the preference setting and enter .abcdefghijklmnopqrstuvwxyzABCDEFGHIJKLMNOPQRSTUVXYZ in the Auto activation trigger for Java.
24. Eclipse code checks and cleanup
You can define how the Java compiler should react to certain common programming problems.
For example, you can define that an assignment of a variable that has no effect, e.g., x=x, causes an error in Eclipse.
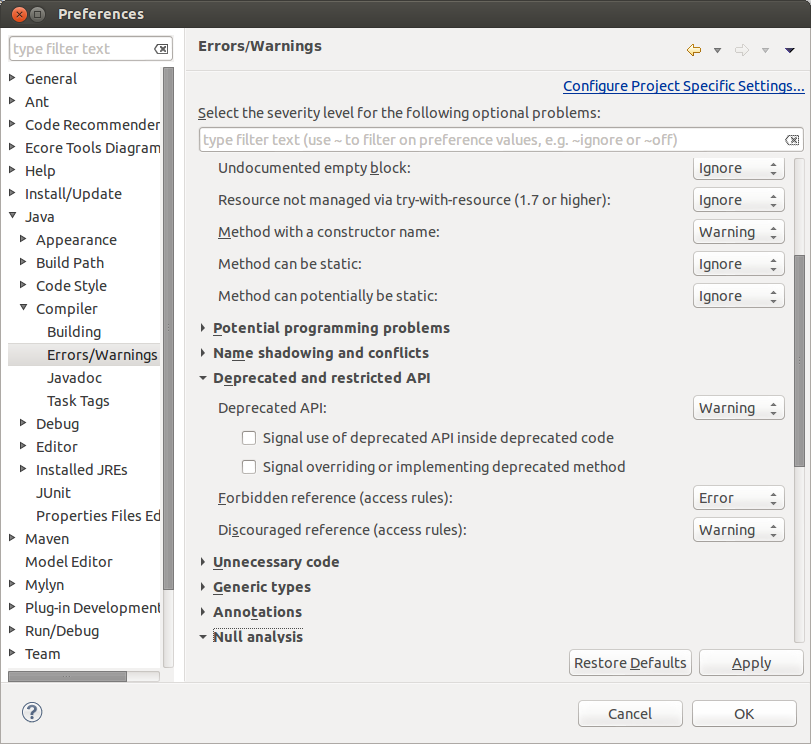
24.1. Configuring the code settings
You can configure these checks in the Eclipse preferences settings via the entry.
24.2. Annotation-based Null analysis
You can enable annotation-based null checks in Eclipse via the setting highlighted in the following screenshot.
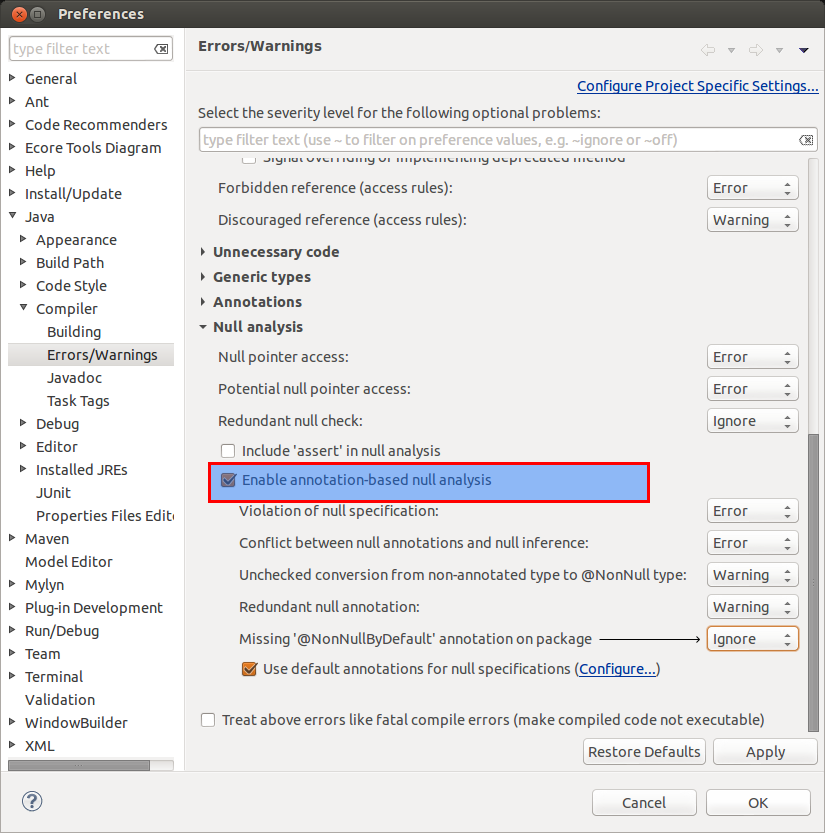
After enabling this setting, you can use the @NonNull annotation on method parameters or variable definitions to indicate that these are not allowed to be null.
You can use the @Nullable annotation to define that a variable can be null.
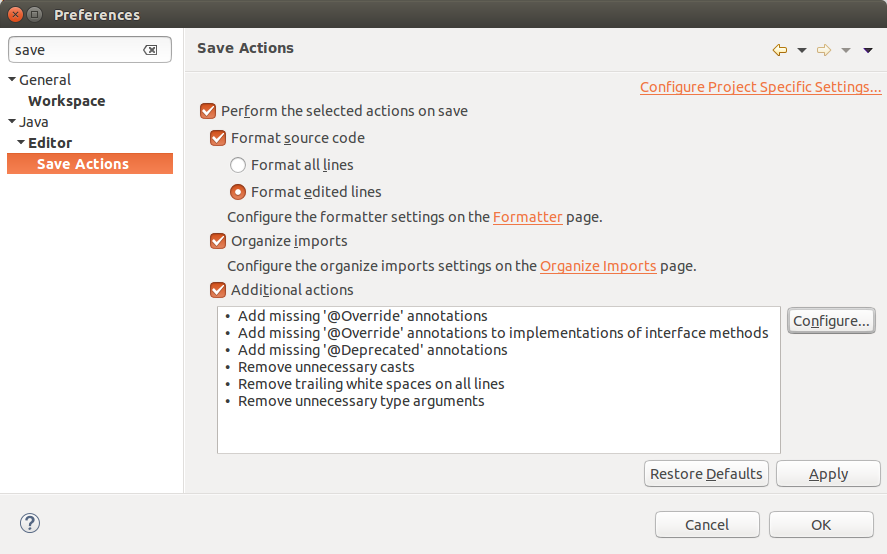
24.3. Running a code cleanup and removal of trailing whitespace
Eclipse has the option to perform cleanup actions on existing code. This includes the removal of trailing whitespace, the addition of missing annotations and advanced cleanups like the conversion of code to Java lambda expressions.
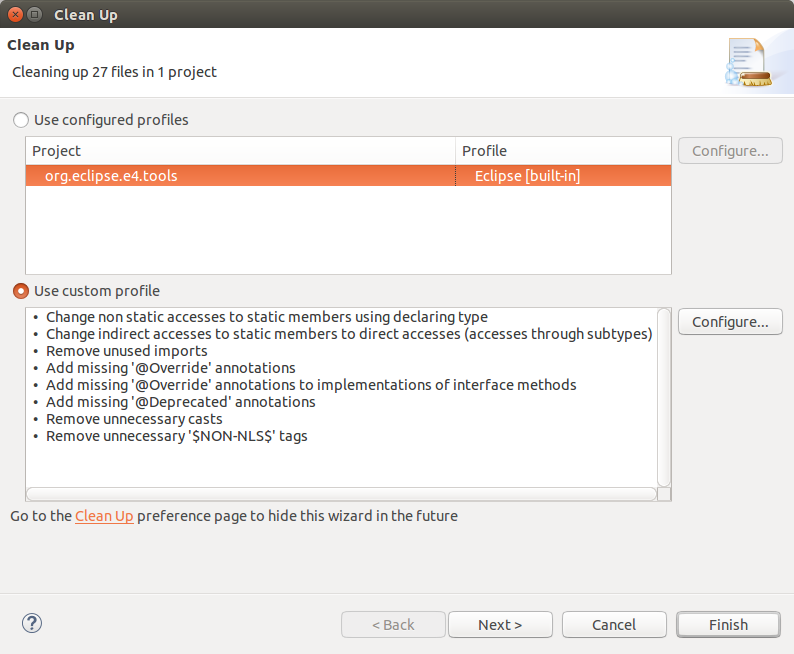
To trigger this cleanup, select the Java source file, package or project and select from the context menu.
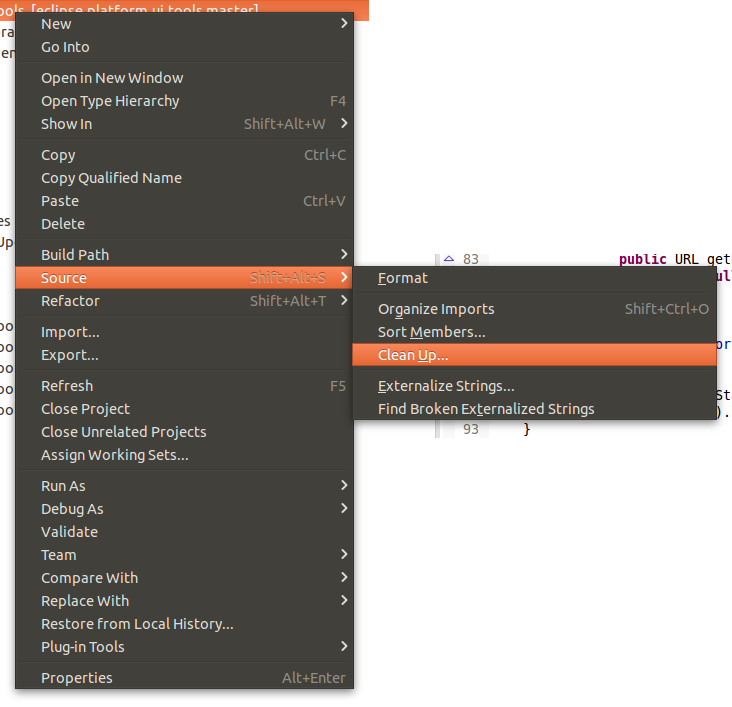
Select Use custom profile and press Configure… to configure the actions which should be performed on your code.
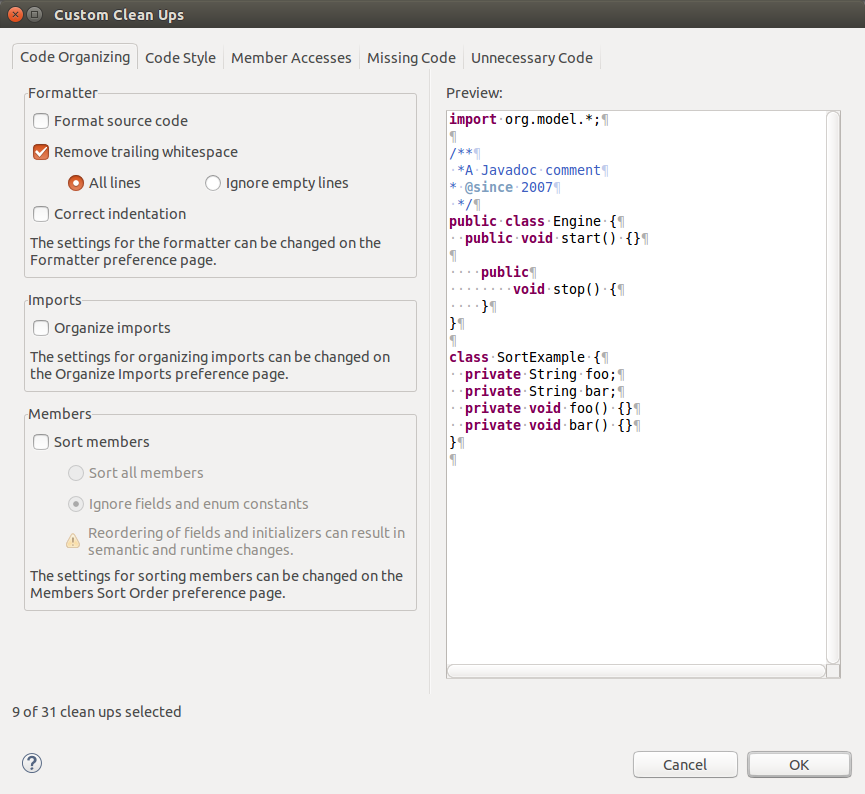
| Ensure to unselect any cleanup action which you do not want to perform. |
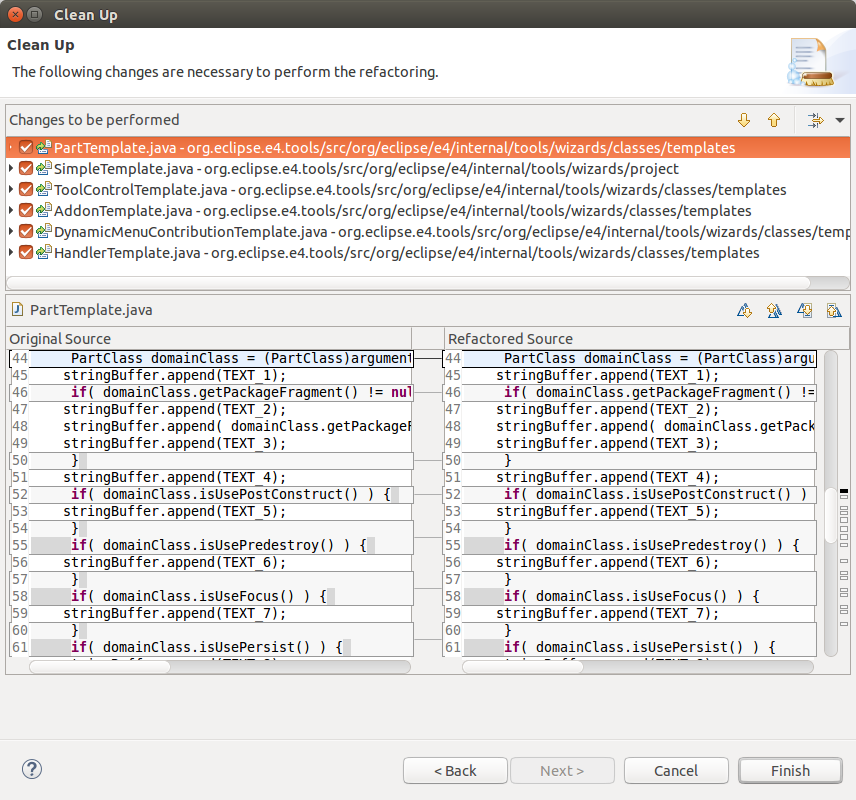
After finishing the configuration, press OK and the Next button in the cleanup wizard to get a preview of the changes.
25. Exercise: Configure save actions and perform code cleanup
In this exercise, you first configure the Java save actions to clean up your code during save. Afterwards, you learn how you can perform a mass cleanup of your codebase.
|
Careful here, ensure you have committed the latest version of your code so that you can revert any automatic change you dislike. |
25.1. Format source code, organize imports and code cleanup on save
Open .
Select that the source code should be formatted and that the imports should be organized at every save action.
|
Import statements are only automatically created if there is one valid import. If Eclipse determines more than one valid import, it will not add import statements automatically. In this case, you still need to right-click in your editor and select (shortcut: Shift+Ctrl+O). You can improve this with type filters in the preference. Type filters allow you to ignore certain packages. |
You can define the additional actions that are performed during save. Via the Configure… button you can select which one you want to activate.
You can define how the Java compiler should react to certain common programming problems.
For example, you can define that an assignment of a variable that has no effect, e.g., x=x, causes an error in Eclipse.
25.2. Running a batch code cleanup and removal of trailing whitespace
Eclipse has the option to perform batch cleanup on existing code. This includes simple things like the removal of trailing whitespace, the addition of missing annotations and advanced cleanups like the conversion of code to Java lambda expressions. The cleanups contain lots of options to improve the performance of your code.
To trigger this cleanup, select the Java source file, package or project, right-click on it and select from the context menu.
Select Use custom profile and press Configure… to configure the actions which should be performed on your code.
| Ensure to unselect any cleanup action which you do not want to perform. |
After finishing the configuration, press OK and the Next button in the cleanup wizard to get a preview of the changes.
26. More on preference settings
This chapter lists other useful Eclipse settings that are not directly related to Java development. It explains how to export and import your preference settings from one workspace to another.
26.1. Configuring the editors for a file extension
The Editors that are available to open a file can be configured via .
The Default button in this preference dialog allows you to set the default editor for a certain file extension. This editor is used by default, if you open a new file with this extension.
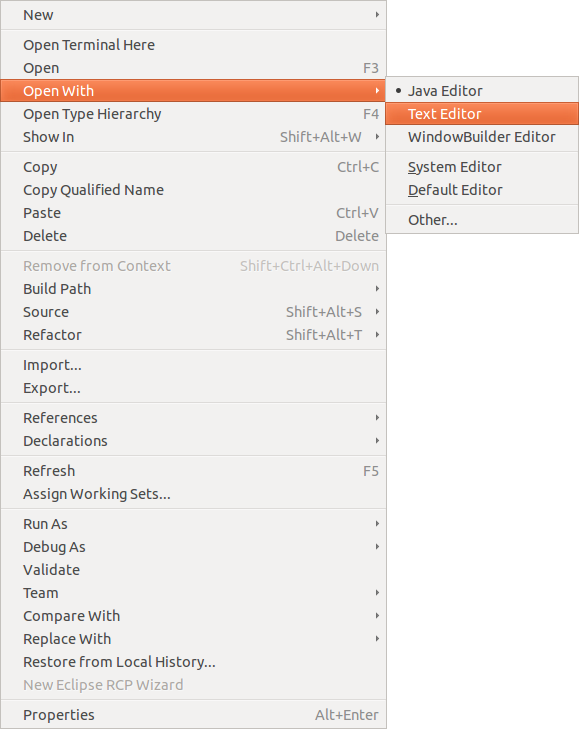
The other configured editors can be selected if you right-click on a file and by selecting the Open With menu. In the sub-menu you see the available editors. The available editors depend on your Eclipse installation.
Eclipse remembers the last editor used to open a file. It uses this editor again the next time you open the file.
26.2. Export and import preference settings
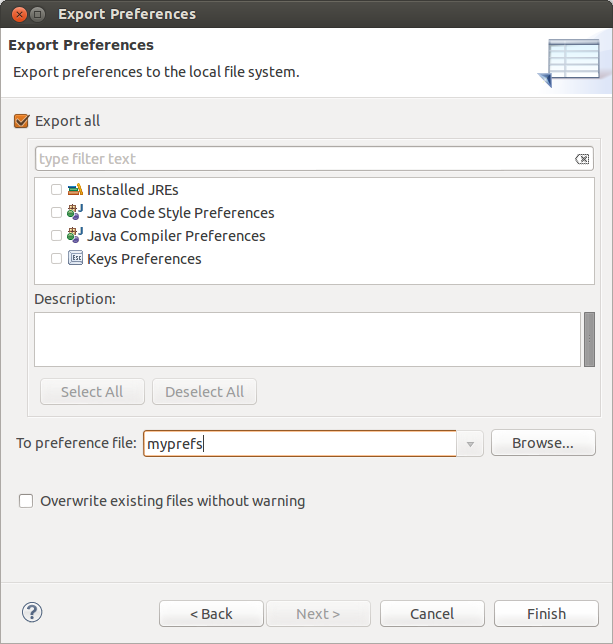
You can export your preference settings from one workspace via .
Eclipse allows you to export some preference settings separately, but for the majority of them you have to select the Export all flag.
Similarly, you can import them again into another workspace via .
26.3. Preference settings per project
You can configure certain preference settings on a per project basis. To do this, select your project, right-click on it and select Properties. For example, on the you can select the Enable project specific settings checkbox to configure the save action for the current project only.
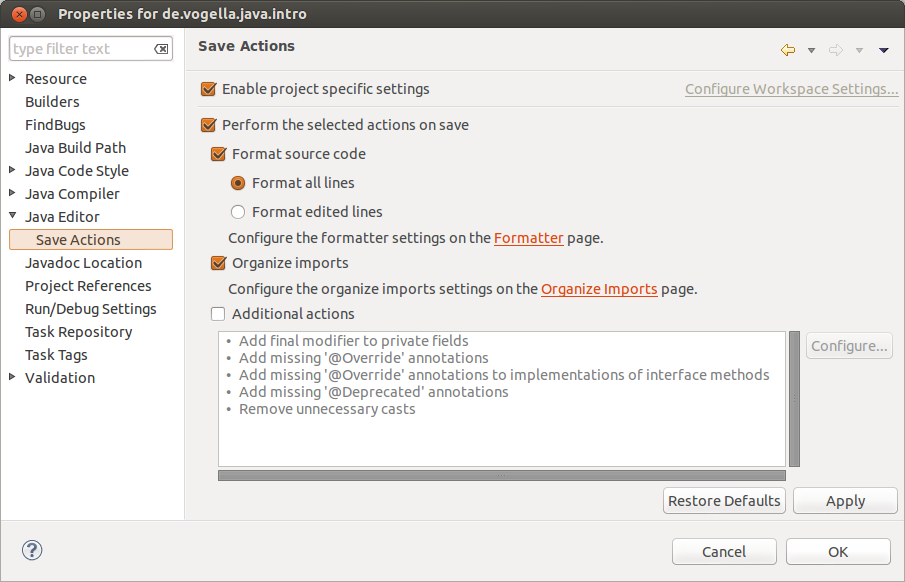
This creates a .settings folder. You can add this folder to your version control system to ensure that every developer uses the same settings.
27. Using templates and code formatters
27.1. Templates
You can create templates for Java code snippets which you can insert via autocomplete (Ctrl+Space) in the Java code editor.
For example, assume that you are frequently creating public void name(){} methods.
You could define a template which creates the method body for you
To create a new template, select the menu.
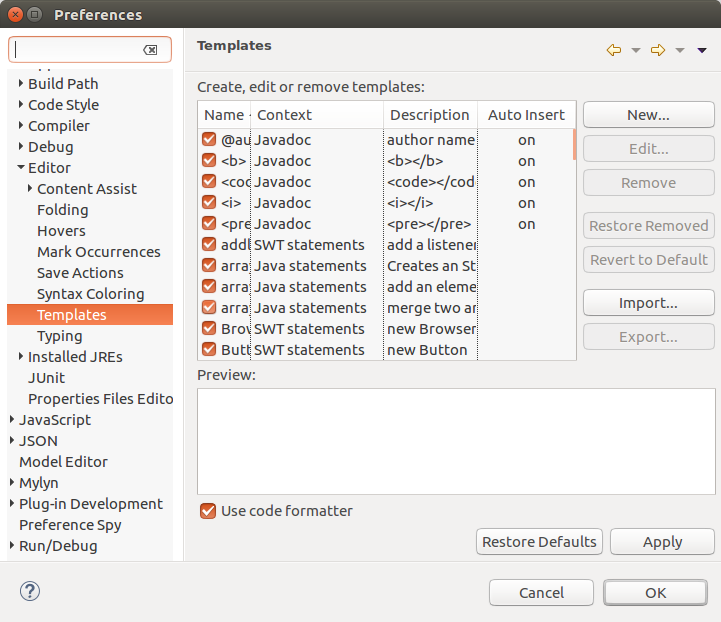
Press the New button. Create the following template.
public void ${cursor} () {
}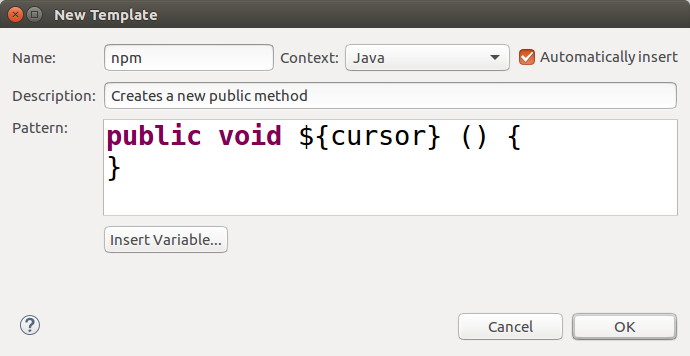
${cursor} indicates that the cursor should be placed at this position after applying the template.
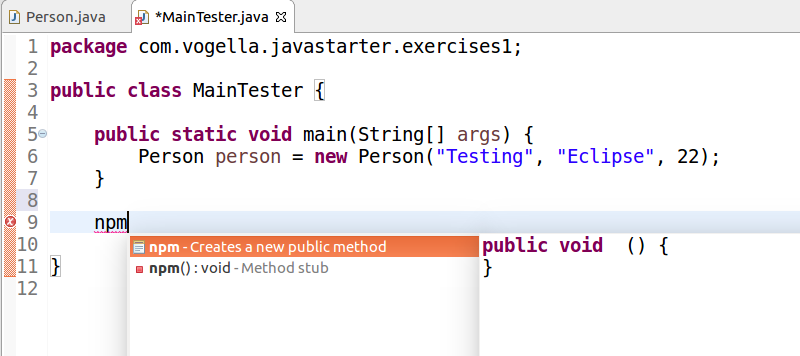
In this example, the name npm is your keyword for code completion.
Now, if you type npm in the Java editor and press Ctrl+Space, you can insert your template.
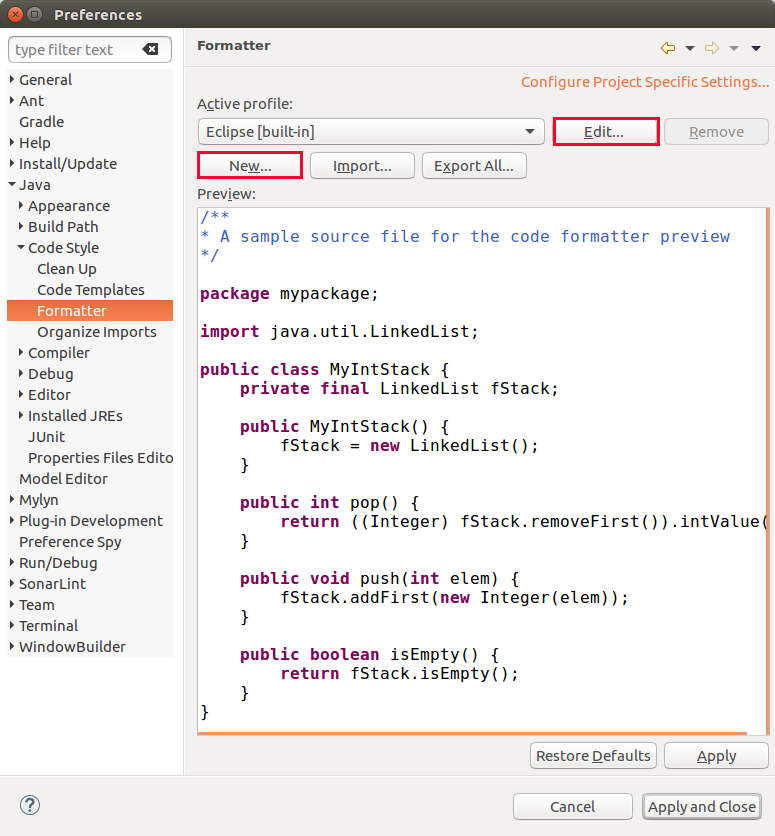
27.2. Code Formatter
Eclipse allows you to specify the settings for formatting the source code. These rules are used by Eclipse if you automatically format your source code.
You find the settings under .
Press the New button to create a new set of formatting rules or press the Edit button to adjust an existing profile.
|
You can set the code formatter specific for a project via . This way you can ensure that everyone is using the same formatter while working on this project. 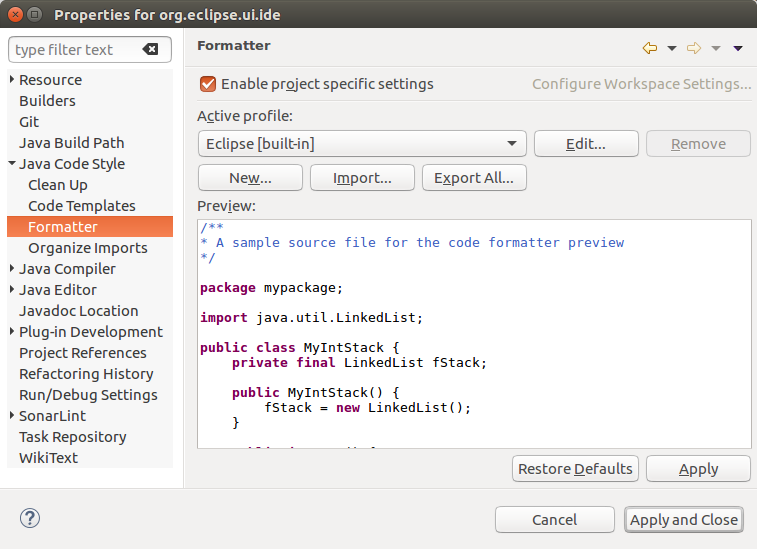 |
27.3. Code Templates
Eclipse can generate source code automatically. In several cases comments are added to the source code.
Select to change the code-generation templates.
In the code tree you have the templates. Select, for example, menu:Code [Method Body] and press the Edit button to edit this template and to remove the "todo" comment.

28. Exercise: Custom code template usage
28.1. Create template for try/catch/finally
Create a template which creates the following block.
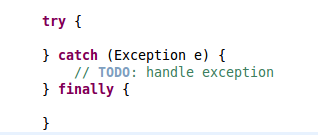
Place the cursor after the first bracket after the try statement.
28.2. Use template
Test your template in the Java editor and ensure that it works as expected.
29. Eclipse command line configuration
29.1. Eclipse memory and performance settings
Your Eclipse installation contains a file called eclipse.ini that allows you to configure the memory parameters for the Java Virtual Machine that runs the Eclipse IDE. For example, the -Xmx parameter can be used to define how large the Java heap size can get. -Xms defines the initial heap size of the Java Virtual Machine.
The following listing shows an example eclipse.ini file. The parameters after -vmargs configure the Java Virtual Machine. On a modern machine (with at least 32 Gigabyte available memory) assigning 4096 MB or more to the Java Virtual Machine is a good practice to run Eclipse faster.
-startup
plugins/org.eclipse.equinox.launcher_1.7.0.v20250315-1200.jar
--launcher.library
plugins/org.eclipse.equinox.launcher.gtk.linux.x86_64_1.3.0.v20250220-1500
-product
org.eclipse.epp.package.jee.product
--launcher.defaultAction
openFile
--launcher.appendVmargs
-vmargs
-Dosgi.requiredJavaVersion=21
-Dosgi.instance.area.default=@user.home/eclipse-workspace
-Dosgi.configuration.cascaded=false
-Xms1g
-Xmx8g
-XX:+UseG1GC
-XX:+UseStringDeduplication
-XX:MaxGCPauseMillis=200
-XX:+UnlockExperimentalVMOptions
-XX:+UseZGC
--add-opens=java.base/java.lang=ALL-UNNAMED
--add-opens=java.base/java.nio=ALL-UNNAMED
--add-opens=java.base/java.io=ALL-UNNAMED
--add-opens=java.base/java.util=ALL-UNNAMED
--add-opens=java.base/sun.nio.ch=ALL-UNNAMED
--add-opens=java.desktop/sun.awt=ALL-UNNAMED
--add-opens=java.desktop/sun.swing=ALL-UNNAMED
--add-modules=ALL-SYSTEM
You can also turn off class verification in the JVM. This prevents the JVM from checking whether the class data that is loaded is corrupt or invalid. This check is only important if bytecode is manipulated, and it adds 10-20% additional startup time. To disable this check, add -Xverify:none to your JVM.
| These options can be specified per invocation of the Eclipse IDE, e.g., for desktop shortcuts. For example, to start Eclipse with 4 GB of memory, use the following command line: |
./eclipse -vmargs -Xmx4096m.
29.2. Eclipse startup parameters
Eclipse allows you to configure it via startup parameters. This requires that you start Eclipse from the command line or that you configure your launcher links to include these parameters.
The following table shows important parameters.
| Parameter | Description |
|---|---|
-data workspace_path |
Predefine the Eclipse workspace |
-showLocation |
Enables the display of the current workspace directory in the header of the running IDE |
For example, if you want to start Eclipse under Microsoft Windows using the c:\temp directory as workspace, you can start Eclipse via the following command from the command line.
c:\eclipse.exe -data "c:\temp"Depending on your platform, you may have to put the path name into double quotes.
| You find all available runtime options in the Eclipse help if you search for the "Eclipse runtime options" term. |
30. Local history for files
30.1. Local history
Eclipse keeps a local history of files that have changed. Every time an editable file is saved, the Eclipse runtime updates the local history of that file and logs the changes that have been made. This local history can then be accessed and used to revert the file changes or to compare against a previous version.
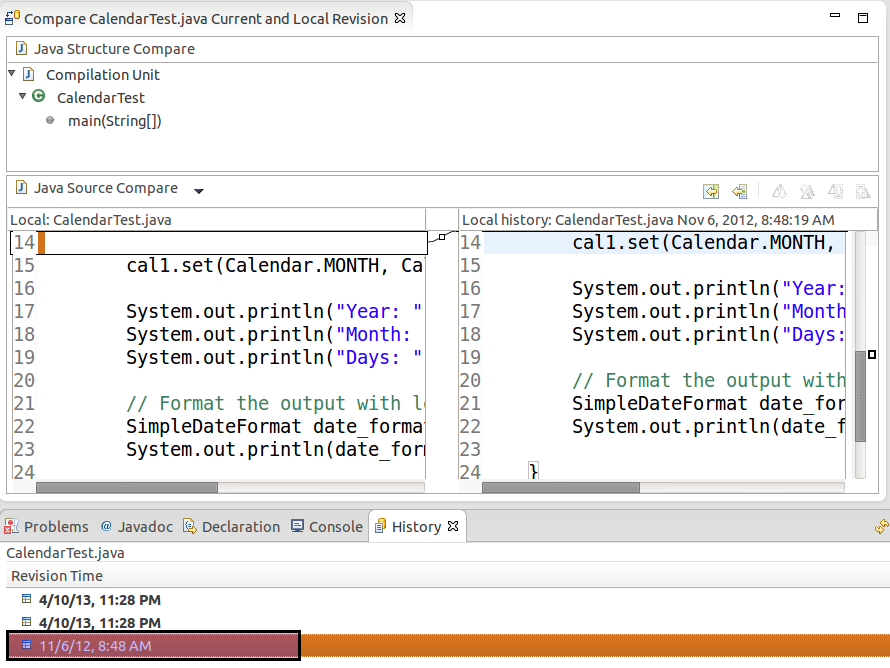
30.2. Compare files based on local history
To compare the current version of a file with a local version stored by Eclipse, right-click on the file and select from the context menu. Eclipse opens the History view.
If you double-click on an older version of the file, the Compare view shows the differences as depicted in the following screenshot.
30.3. Replace files based on local history
You can replace files based on the local history. Right-click on the file and select to start this action.
31. Organizing your workspace with working sets
You will create more and more projects in your development career. Therefore, the data in your workspace grows and it is hard to find the right information. The Eclipse IDE allows you to organize your project into working sets so that you can hide certain resources.
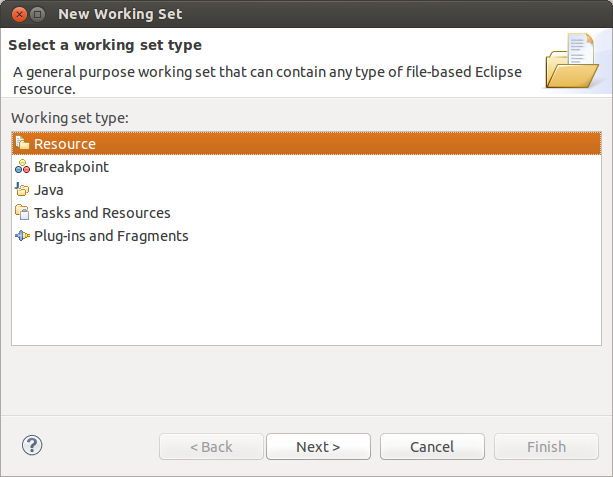
You can use working sets to organize your displayed projects / data. To set up your working set, select the
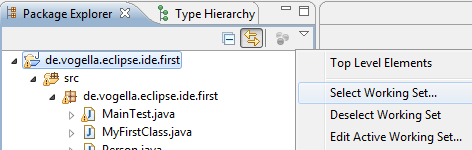
Press the New button on the following dialog to create a working set.
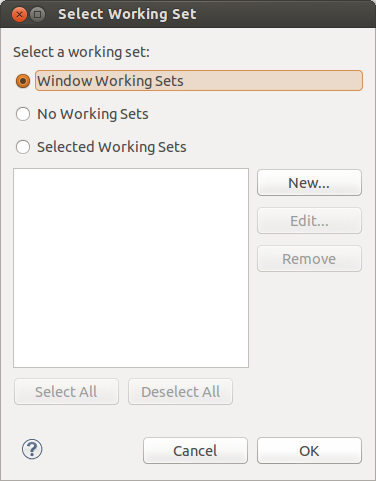
On the next dialog select Resource, press the Next button. Select the projects you would like to see and give it a name.
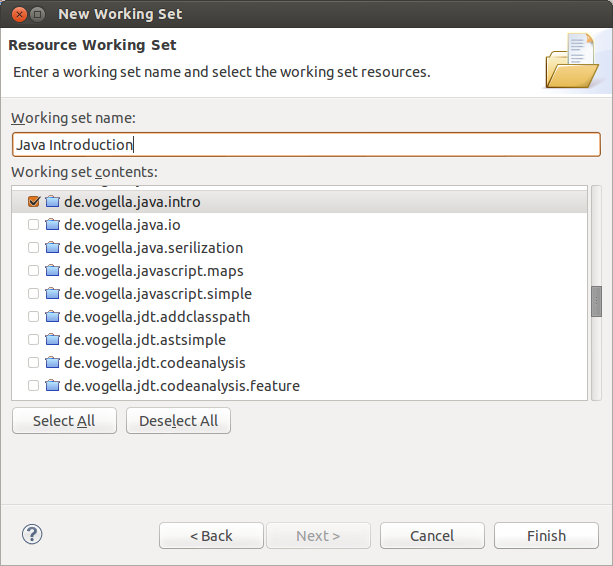
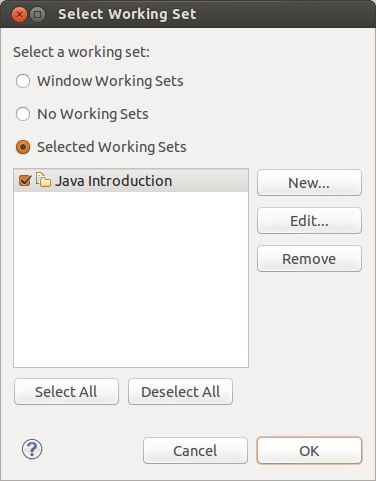
You can now filter the displayed files in the Package Explorer based on the created working set.
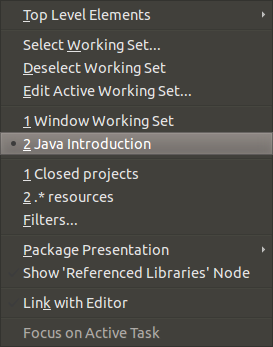
|
You can use the working set to structure your projects in your workspace. For this, select Working Sets from the context menu of the Package Explorer view. 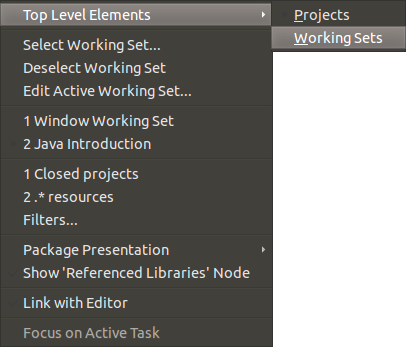 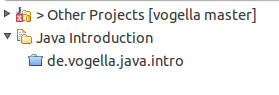 |
32. Tasks
32.1. Task management
You can place markers in the code which you can later access via the Task view.
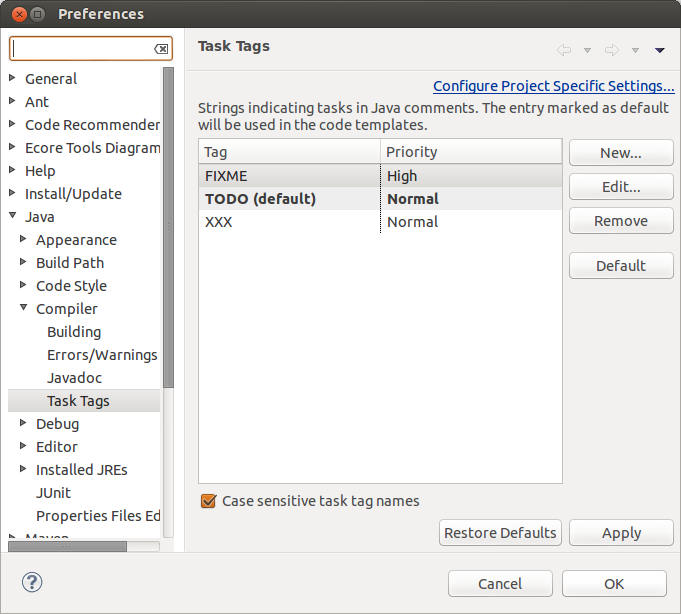
You can use // TODO, // FIXME or // XXX tags in your code to add task reminders.
This indicates a task for Eclipse. You find those in the Task view of Eclipse. Via double-clicking on the task, you can navigate to the corresponding code.
You can open this view via .
For example, add a TODO to your MyFirstClass class to see it in the Tasks view.
package com.vogella.eclipse.ide.first;

public class MyFirstClass {

  private static final String HELLO = "Hello Eclipse!";

  public static void main(String[] args) {
    // TODO Provide user interface
    System.out.println(HELLO);
    int sum = 0;
    sum = calculateSum(sum);
    System.out.println(sum);
  }

  private static int calculateSum(int sum) {
    for (int i = 0; i <= 100; i++) {
      sum += i;
    }
    return sum;
  }
}
Close the editor for the MyFirstClass class.
If you now double-click on the tasks, the Java editor opens again and the TODO comment is selected.
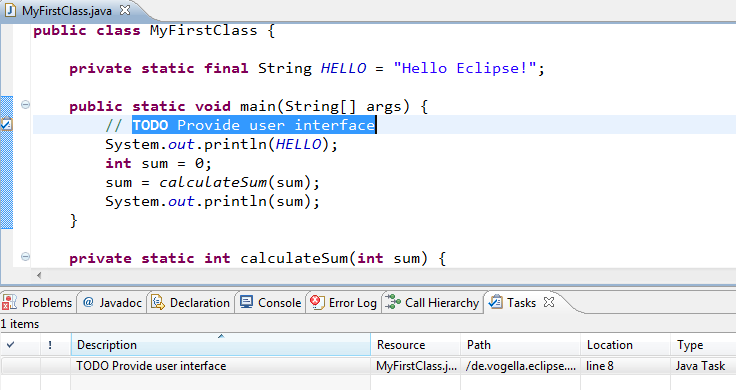
TIP:The Task view shows only the tasks from the currently open projects.
32.3. Mylyn
A more advanced task management system is available with the Mylyn plug-in.
33. Eclipse online resources
33.1. Online documentations
The Eclipse help system is available from within your Eclipse installation as well as online.
With your running Eclipse IDE you can access the online help via . This will start a new window which shows you the help topics for your currently installed components.
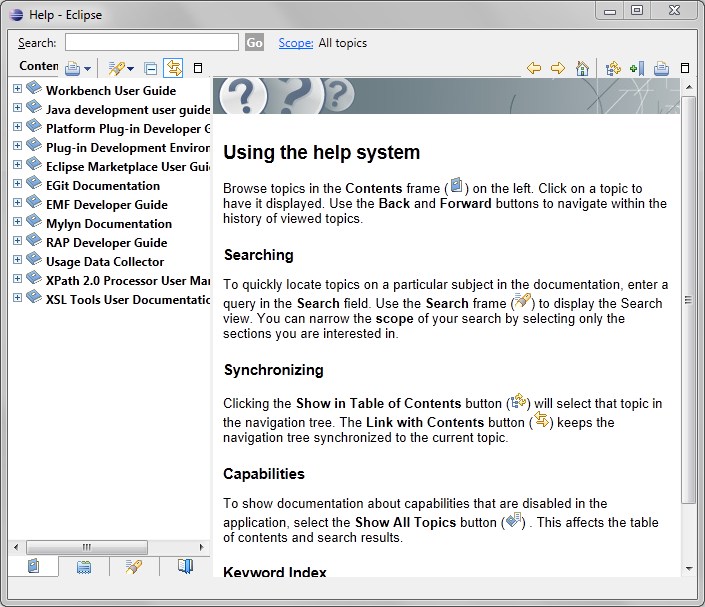
You find the online help for the current release of the Eclipse IDE under the following URL: Eclipse online help. The online help is version-dependent and contains the help for all Eclipse projects of the simultaneous release.
33.2. Web resources
The Eclipse webpage contains a list of relevant resources about Eclipse and Eclipse programming. You find these resources under the following link: Eclipse resources.
You find lots of tutorials about the usage of the Eclipse IDE from the vogella GmbH on the following webpage: vogella Eclipse IDE tutorials.
Information about Eclipse plug-in and RCP development from the vogella GmbH can be found on the following webpage: Eclipse plug-in and RCP tutorials.
35. Asking (and answering) questions
Due to the complexity and extensibility of Eclipse, you will need additional resources to help you solve your specific problems. Fortunately, the web contains several resources that can help you with your Eclipse problems.
Currently, the best places to find, ask and answer questions are the Eclipse forums and Stack Overflow. Try to stay polite with your postings, as the Eclipse community values polite behavior.
The Eclipse forums offer several topic-specific forums in which you can post and answer questions. To post or to answer questions in the Eclipse forums, you need a valid user account in the Eclipse bug tracker. Stack Overflow requires a user account and its community is active. Stack Overflow allows to tag questions with the relevant keyword, e.g., Eclipse and people search for them or subscribe to them.
|
Ensure that you search the forums and mailing lists for solutions for your problem. Somebody else might have asked the same question earlier and the answer is already available. |
36. Eclipse bug reports and feature requests
If you encounter a problem with the Eclipse framework or the IDE or think about a potential improvement for it, you should report this to the Eclipse project. The Eclipse project uses GitHub issues as the primary issue tracker for its projects. To participate actively, you need to have a GitHub account.
These issues are specific for the GitHub repository. Here you can search for existing issues and review them.
Here is a list of the Eclipse projects that use GitHub issues:
-
Eclipse Platform (Main repo)
-
Eclipse Platform UI
-
Eclipse Platform SWT (Standard Widget Toolkit)
Other repositories can be found at https://github.com/eclipse-equinox, https://github.com/eclipse-pde and https://github.com/eclipse-jdt.
37. Next steps
To learn how to debug Eclipse Java programs, you can use https://www.vogella.com/tutorials/EclipseDebugging/article.html - Eclipse Debugging.
To learn Java Web development, you can use https://www.vogella.com/tutorials/EclipseWTP/article.html - Servlet and JSP development. If you want to develop rich standalone Java clients, you can use https://www.vogella.com/tutorials/RichClientPlatform/article.html - Eclipse RCP. You can extend Eclipse with https://www.vogella.com/tutorials/EclipsePlugin/article.html - Eclipse plug-ins.
Good luck in your journey of learning Java.
38. Eclipse Resources
38.2. Eclipse Bug Tracker and Eclipse forum
Eclipse Forum for asking questions and providing feedback
Eclipse Bug Tracker for reporting errors or feature requests
38.3. vogella Java example code
If you need more assistance we offer Online Training and Onsite training as well as consulting