This Tutorial describes how to extend the Eclipse IDE with custom plug-ins.
1. Extending the Eclipse IDE
The Eclipse platform is an extensible framework that allows you to add, remove, or customize existing functionality.
Any download of the Eclipse IDE can be viewed as a specialized Eclipse application focused on supporting software development. An Eclipse application is composed of individual software components called plug-ins. For example, the Eclipse Java IDE provides the functionality to develop Java applications through the JDT plug-ins.
Since Eclipse is built as an extensible framework, plug-ins can use and extend other plug-ins.
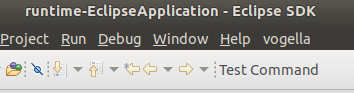
During development, you can start a new instance of the Eclipse IDE, similar to any Java program, to test and debug your work. This instance is called a runtime Eclipse.
An easy way to start a runtime Eclipse is by selecting from the context menu of a plug-in or its manifest file. By default, this includes all the plug-ins from the workspace and the target environment, launching a runtime Eclipse with these plug-ins. If a plug-in is available both in the workspace and the target environment, the one from the workspace is used.
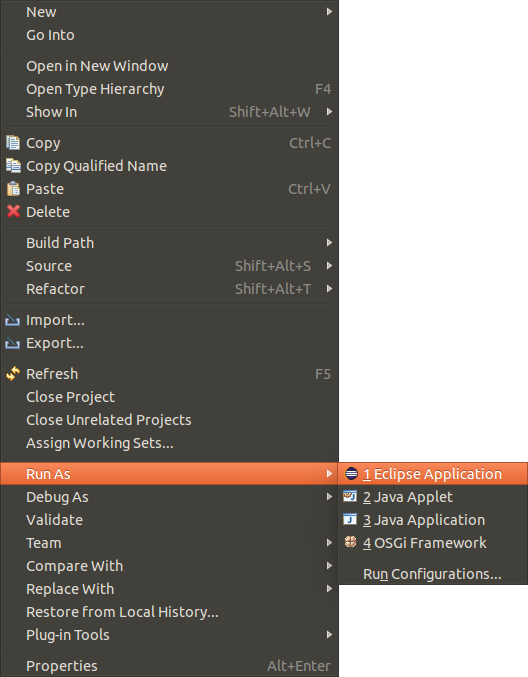
Similar to a regular Java program, you can debug the runtime Eclipse. Set a breakpoint in the source code line you want to inspect, right-click your plug-in, and select .
When the execution reaches a statement marked with a breakpoint, the execution stops, allowing you to debug the statement and inspect the current data.
2. Pre-requisites
This tutorial assumes that you are already familiar with standard Java development as well as the Eclipse IDE.
3. Download the Eclipse IDE
To develop Eclipse plug-ins and applications, you need to download an Eclipse IDE suitable for this task. The Eclipse project offers multiple downloads specifically for this purpose. The most commonly used options are:
-
The Eclipse SDK - minimal functionality needed for Eclipse-based development, SDK stands for Software Development Kit
-
The Eclipse IDE for Eclipse Committers package provides additional functionality such as Git support
Download one of these. The Eclipse IDE for Eclipse Committers package includes a Java runtime; no additional download is needed.
We describe two alternatives:
-
the SDK download (recommended)
-
Eclipse IDE for Eclipse Committers
| The appearance of the download page may change over time. |
3.1. Alternative 1: Download the Eclipse SDK
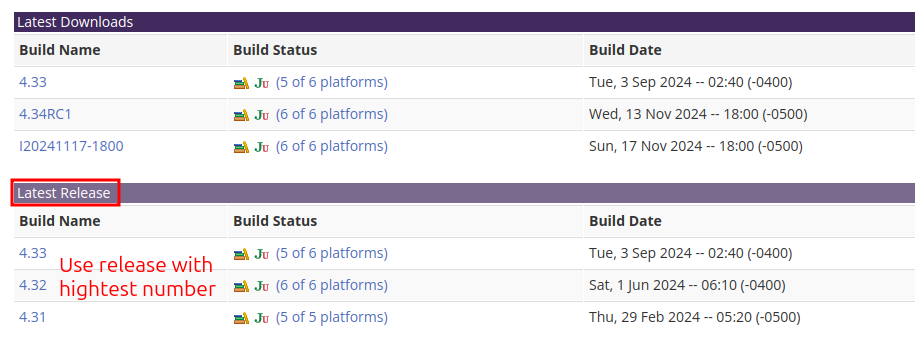
Download the latest version from https://download.eclipse.org/eclipse/downloads/ by clicking the link for the most recent release (the version with the highest number) on the SDK download page. The download section will look similar to the screenshot below.
The download is a compressed archive containing multiple files. The format depends on your platform:
-
Windows uses the zip format
-
Linux uses the tar.gz format
-
macOS uses the DMG (Disk Image) format.
The Eclipse SDK does not include a Java runtime; you need to provide this separately.
3.2. Alternative 2: Download the Eclipse IDE for Eclipse Committers package
Eclipse provides pre-built packages that can be used.
Download the installer for the Eclipse IDE for Eclipse Committers package from the Eclipse packages website.

This download includes a Java runtime; you do not need to install one separately.
You can use the Eclipse installer to install this package. The installer is useful if you want to download several versions of Eclipse. It uses a shared installation pool for common plug-ins, which reduces the required space.
4. Run Configurations
4.1. What Are Run Configurations?
The runtime Eclipse is based on a selected set of plug-ins. These plug-ins are specified via a runtime configuration that can be defined by:
-
A set of plug-ins or features, or
-
A product used to create or update a run configuration.
A run configuration defines the environment used to execute a generic launch. For example, it specifies arguments for the Java Virtual Machine (VM), plug-in (classpath) dependencies, and more.
| If you start an Eclipse runtime IDE for testing and clear the workspace location, the next run will prompt you to choose a workspace. |
To review and edit your run configurations, select from the Eclipse menu.
On the Main tab, in the field Location, specify where the configuration files will be created.

4.2. Defining Arguments
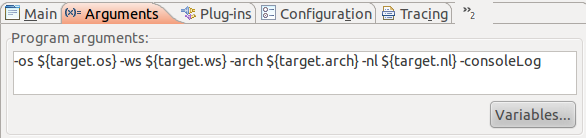
The run configuration allows you to add additional start arguments for your application on the Arguments tab. By default, Eclipse includes several parameters, such as -os, -ws, and -arch to specify the architecture on which the application is running.
|
To pass system properties to your Eclipse application, you can add launch parameters using the -D switch.
For example, if you add the argument -Dmy.product.loglevel=INFO, you can retrieve the "INFO" value with |
The following table lists several useful launch arguments.
| Parameter | Description |
|---|---|
consoleLog |
Error messages from the running Eclipse application are written to standard output ( |
nl |
Specifies the locale used for your application. The locale defines language-specific settings, such as which translation is used and the formatting of numbers, dates, and currency. For example, -nl en starts your application using the English language, which is useful for testing translations. |
console |
Provides access to an OSGi console, where you can check the status of your application. |
noExit |
Keeps the OSGi console open even if the application crashes, allowing you to analyze application dependencies even if the application fails during startup. |
clearPersistedState |
Deletes cached runtime changes of the Eclipse 4 application model. |
4.3. Launch Configuration and Eclipse Products
If you are developing Eclipse applications, the launch configuration is created based on the product configuration file. The launch configuration is updated each time you start your application using the product.
You can directly use the created run configuration to start the application again. In this case, changes in the product configuration file will not be considered.
|
Using an existing run configuration is a common source of frustration and time-consuming error analysis. To ensure you use the latest configuration from your product, start your application using the product file. |
4.4. Checklist for Common Launch Problems
Errors in the run configurations of Eclipse applications are frequently the source of issues. This chapter describes common problems related to the startup of Eclipse applications and serves as a reference for troubleshooting startup issues.
The most common problem is that some required plug-ins are missing in your run configuration.
In this case ensure that all plug-ins referred to in the MANIFEST.MF file are available at runtime.
This error is typically reported in the Console view, often as one of the first error messages; you may need to scroll up to see it.
The following listing shows how this message typically appears (formatting adjusted for clarity):
org.osgi.framework.BundleException:
   Could not resolve module: com.vogella.tasks.services [9]
      Unresolved requirement:
         Require-Bundle: com.vogella.tasks.events;
            bundle-version="1.0.0"
After identifying the missing plug-ins, ensure that you add them to your runtime. In the case of using a product you have to:
-
add the plug-in to your product or one of the features which the product uses
-
start the application again via the product to update the run configuration
|
Eclipse can automatically check for missing dependencies before you run the launch configuration. On the Plug-ins tab, press the Validate Plug-ins button or select the Validate plug-ins automatically prior to launching option. This will check if you have all the required plug-ins in your run configuration. 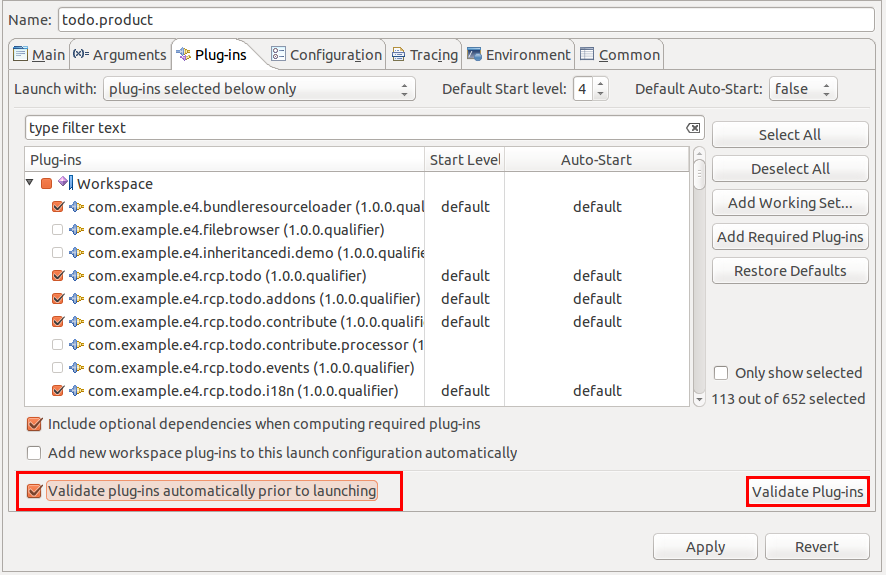 |
Avoid fixing dependency issues in the run configuration itself, as it is created and updated based on the product configuration file. Always ensure that the product file is correctly configured instead of modifying derived information. The product configuration is used during a build to generate the application which you deploy to your users. Therefore, errors in product dependencies result in an exported application that cannot be started.
The following table lists potential problems and solutions.
| Problem | Investigate |
|---|---|
"Could not resolve module" message during startup. |
Check that all required plug-ins are included in your product configuration. Ensure that your product defines dependencies for all required plug-ins or features. See the beginning of this section for guidance on resolving the issue. Bundles may require a specific version of the Java Virtual Machine.
For example, a bundle may require Java 25 and will therefore not load in a Java 21 runtime.
Check the |
|
Refer to the "Could not resolve module" message during startup. This is typically triggered by a missing plug-in dependency. |
Strange behavior but no error message. |
Check if your run configuration includes the -consoleLog parameter. This option allows you to see errors from Eclipse-based applications in the Console view of the Eclipse IDE. |
Runtime configuration frequently missing required plug-ins. |
Ensure that your product or your features include all required dependencies. |
A change in the product Dependencies tab is not reflected in the run configuration (e.g., a new plug-in is added but is not included in the run configuration). |
A product updates an existing run configuration when you start the product directly from the product definition file. If you select the run configuration directly, it will not be updated. |
Application model changes are not reflected in the Eclipse application. |
Eclipse persists user changes in the application in a delta file that is restored at startup. During development, this may lead to situations where model changes are not correctly applied to the runtime model. For instance, if you define a new menu entry, it may not display in your application. Either set the Clear flag on the Main tab in your run configuration or add the clearPersistedState parameter to your product configuration file or run configuration. |
Menu entries are disabled in the Eclipse application. |
Ensure that the |
Application "org.eclipse.ant.core.antRunner" could not be found in the registry, or Application could not be found in the registry. |
Ensure that you have pressed the New… button in the product configuration file and selected the |
"Unresolved requirement: Require-Capability: osgi.extender; filter:='(&(osgi.extender=osgi.component)(version>=1.2)(!(version>=2.0)))'" message during startup or validation. |
Add |
"Event Admin service is not available; unable to publish event org.osgi.service.event.Event" message during startup. |
Add |
5. Exercise: Create and use your first plug-in
In this exercise, you create an extension to the Eclipse IDE using a wizard.
5.1. Create a new plug-in project
Select to create a new plug-in.
Enter com.vogella.ide.first as name of the project.
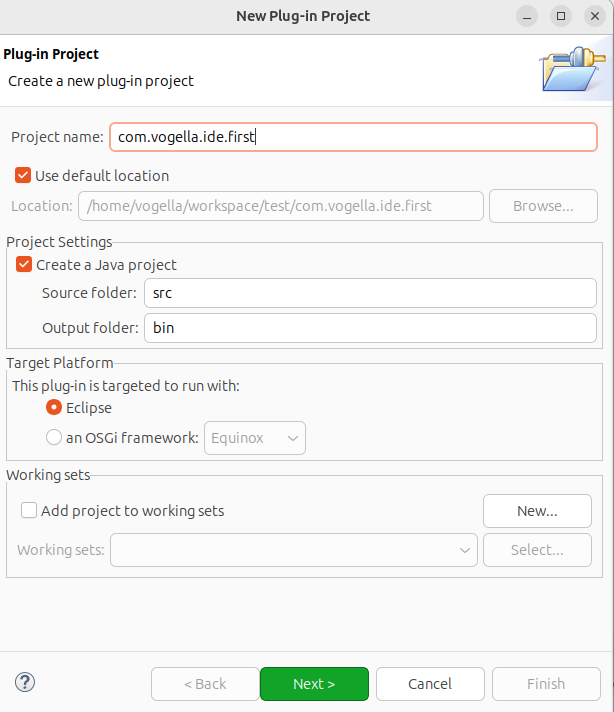
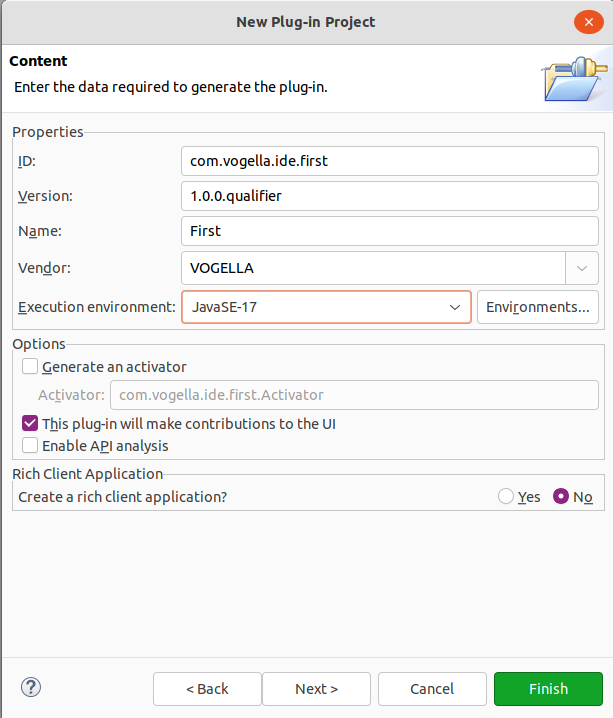
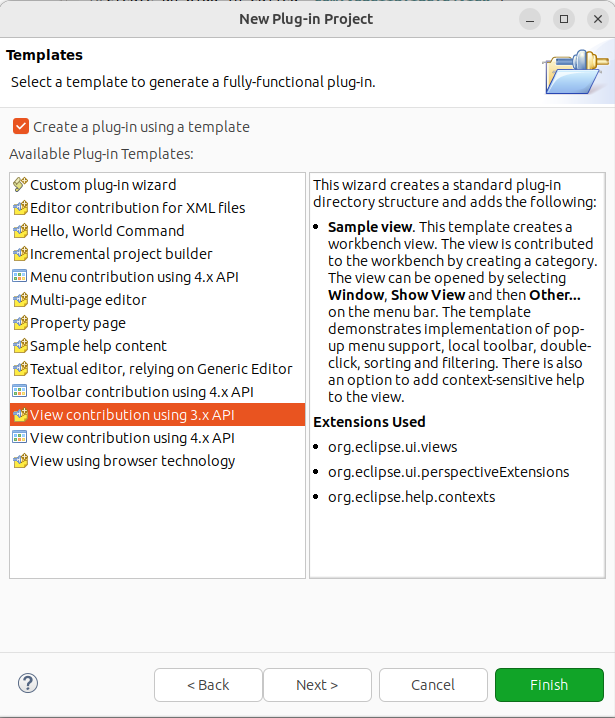
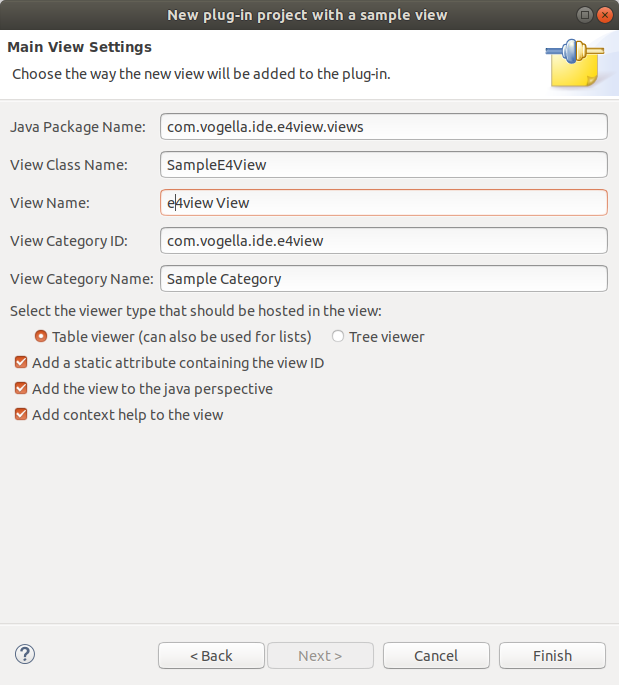
Press the Next button. On the next page enter the value as depicted on the following screenshot. Press the Next button.
On the next page enable the Create a plug-in using one of the templates checkbox. Select the View contribution using 4.x API templates.
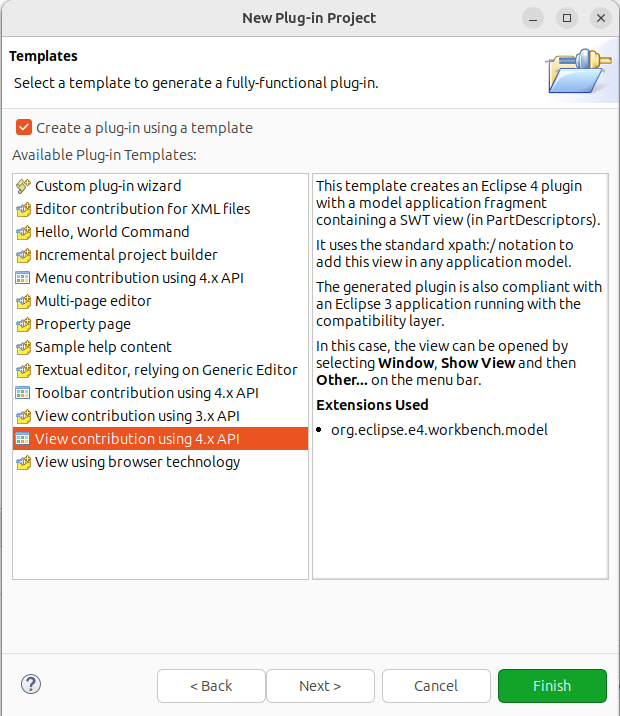
Afterwards, press the Next button or the Finish button.
If you pressed the Next, now press Finish, otherwise the following page is not shown.
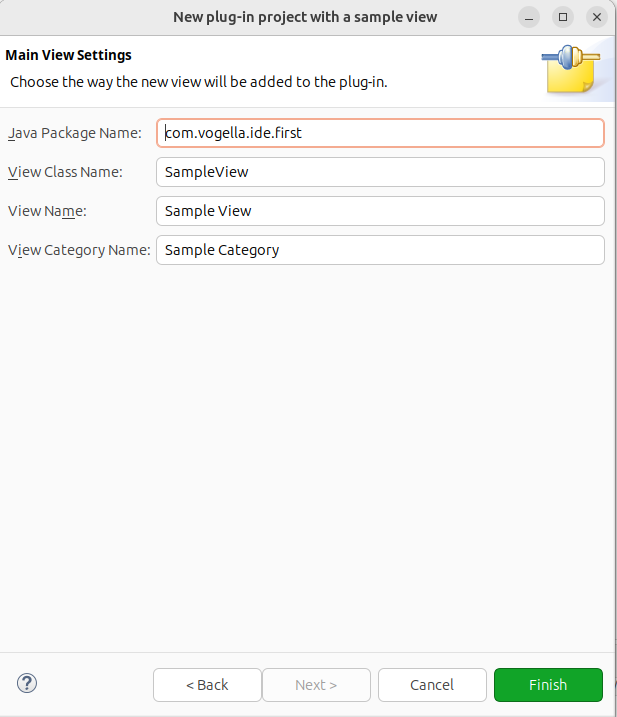
The wizard creates now a new plug-in using the selected template. Use the Project Explorer to review the generated files.
5.2. Start runtime Eclipse with your new plug-in
You now start a runtime Eclipse with your generated plug-in.
Start a runtime Eclipse with all plug-ins from your current target (your IDE) and your own plug-in. For this, right-click on your project and select .
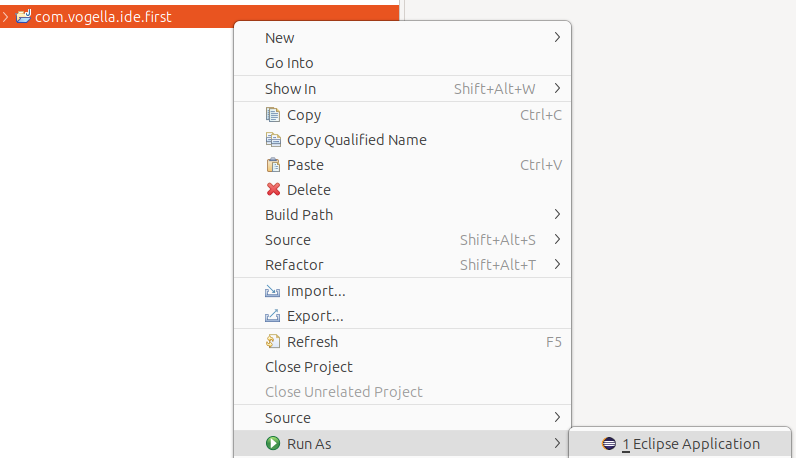
This starts a new runtime Eclipse that contains a new example view.
5.3. Validate result
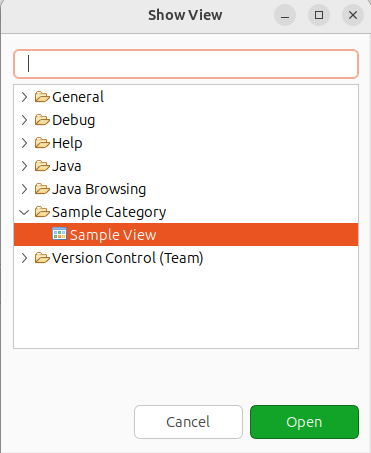
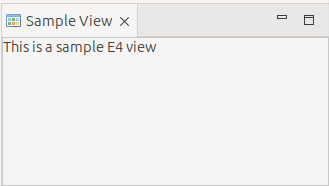
You should be able to open your Sample View view via the menu in your runtime IDE.
6. Setting up a target platform
To define the set of plug-ins you develop against, use a target platform.
7. Using a product to define your custom IDE
In this exercise, you will learn how to create features and products to configure and select the plug-ins for your runtime Eclipse environment. This is not strictly necessary for IDE enhancements but a convenient way to manage your run configurations.
7.1. Creating the feature
Create a new feature project named com.vogella.ide.feature via .
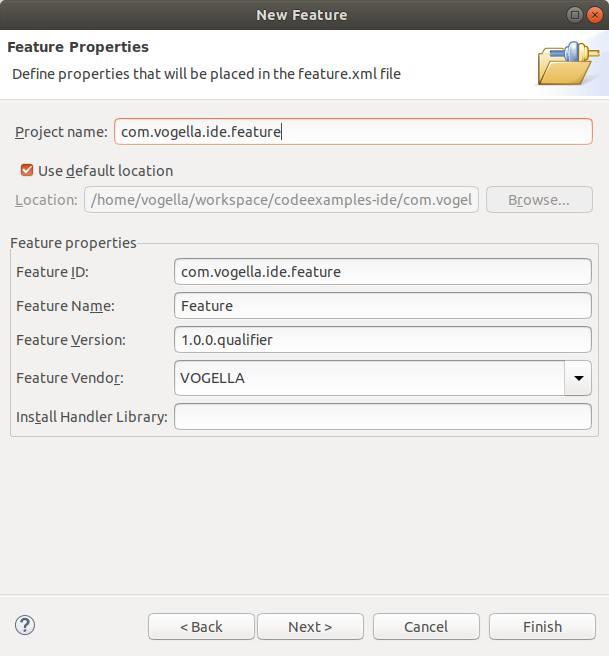
Press Next. On the second page of the wizard, select the plug-in you want to add to the feature.
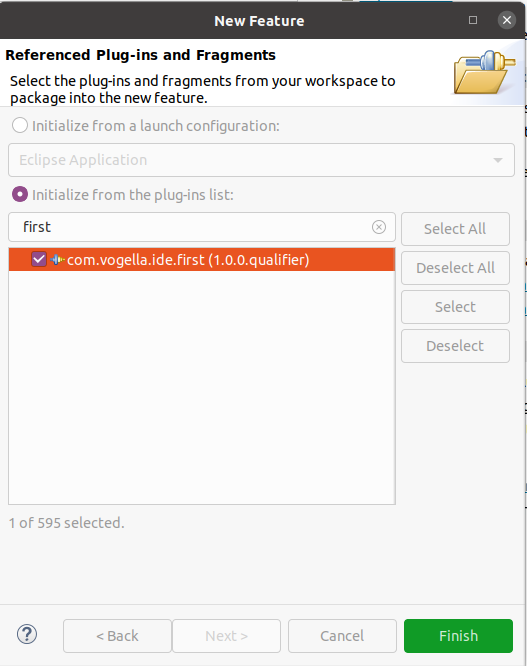
Press the Finish button.
7.2. Validate the content of the feature
-
Open the feature.xml file in your new com.vogella.ide.feature project.
-
Select the Included Plug-ins tab in the editor and ensure that the selected plug-in is included in this feature.
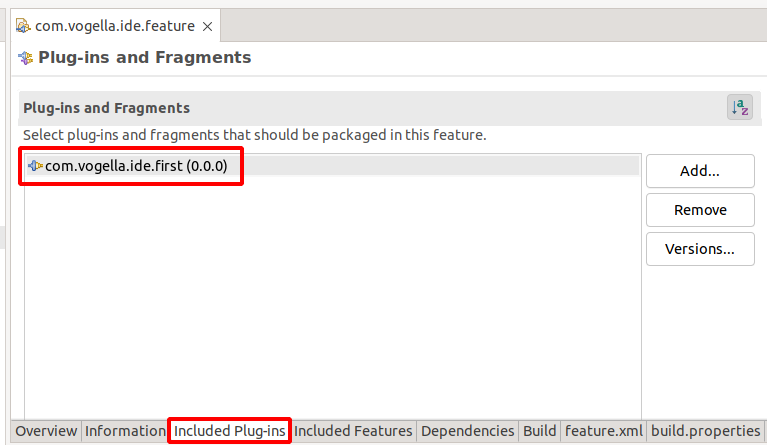
|
Ensure you have added the plug-in using the Included Plug-ins tab to include it in your feature. Using the Dependencies tab is incorrect for this exercise. |
7.3. Create a project to host the product configuration file
Create a new project named com.vogella.ide.product via .
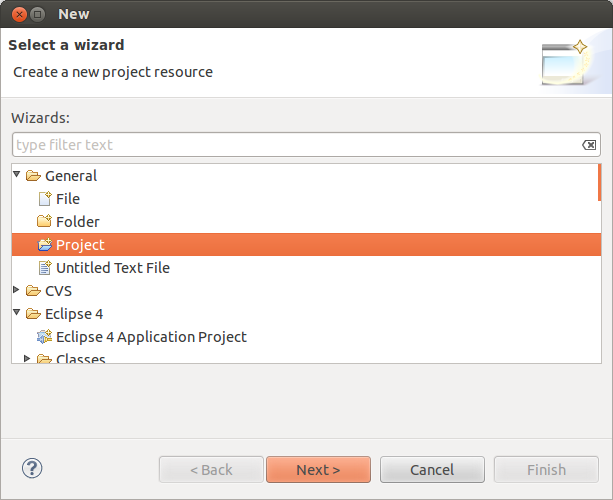
Enter the project name.
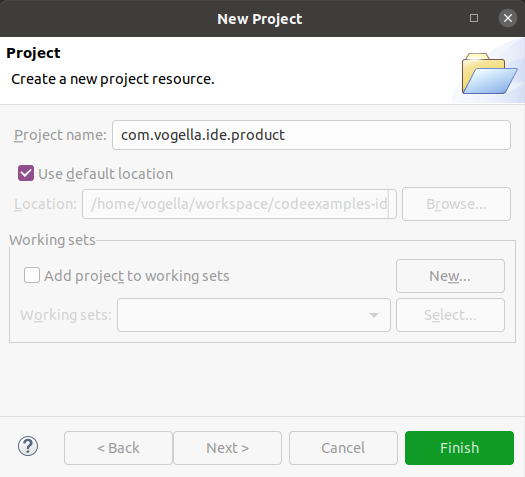
Press Finish.
7.4. Create a product configuration file
Right-click on this project and select .
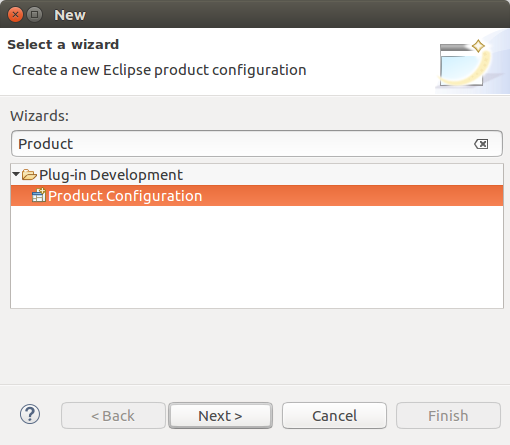
Create a product configuration file named ide.product inside your com.vogella.ide.product project folder.
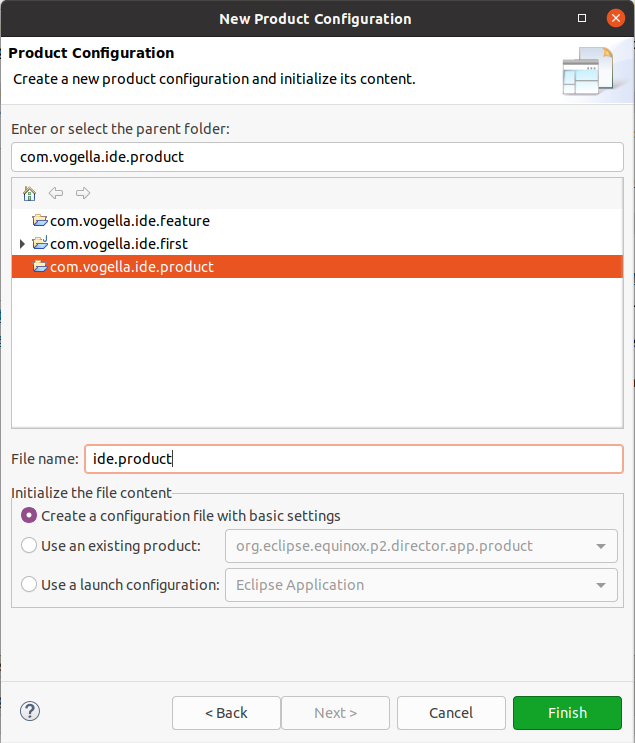
Press the Finish button.
A new product file is created and opened in an editor.
7.5. Configure your product
Ensure you have the product editor open for your new file.
Select that your product is based on plug-ins and features.
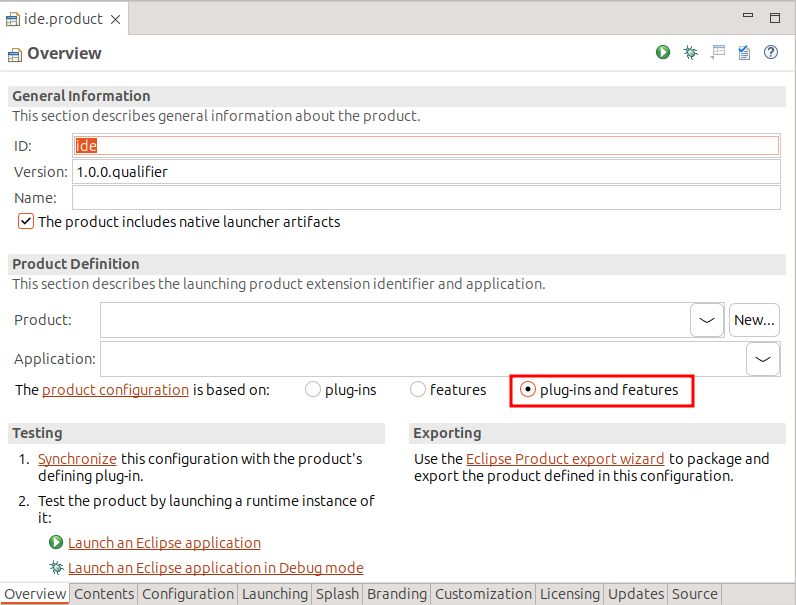
On the Overview tab of the product editor, press the New… button.
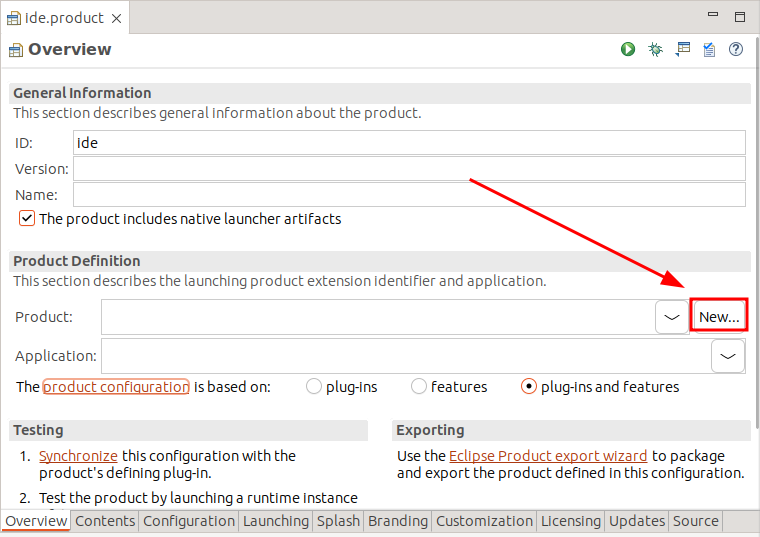
Enter the com.vogella.ide.first plug-in as the Defining Plug-in.
Use org.eclipse.ui.ide.workbench as the application.
In addition, use a name and an id similar to the following screenshot.
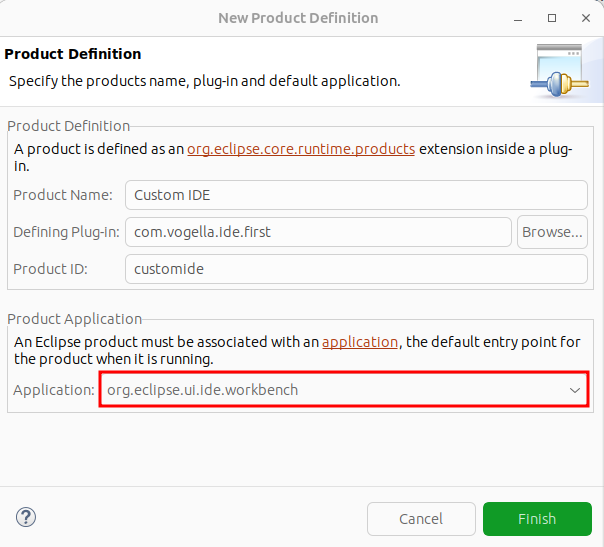
| This action creates an entry in the plugin.xml file and creates the plugin.xml file if it does not yet exist. To undo this configuration, you can delete the created extension in the plugin.xml file via the Extensions tab in the corresponding editor. You could delete the plugin.xml file, but since it can be used for additional configuration, deletion of this file might affect your application. |
Also ensure that a version number like 1.0.0.qualifier is entered in the product.
7.6. Enter included features
You configured that your product is based on plug-ins and features.
Select the Contents tab of the product editor and add the following features via the Add Feature… button:
-
com.vogella.ide.feature -
org.eclipse.platform
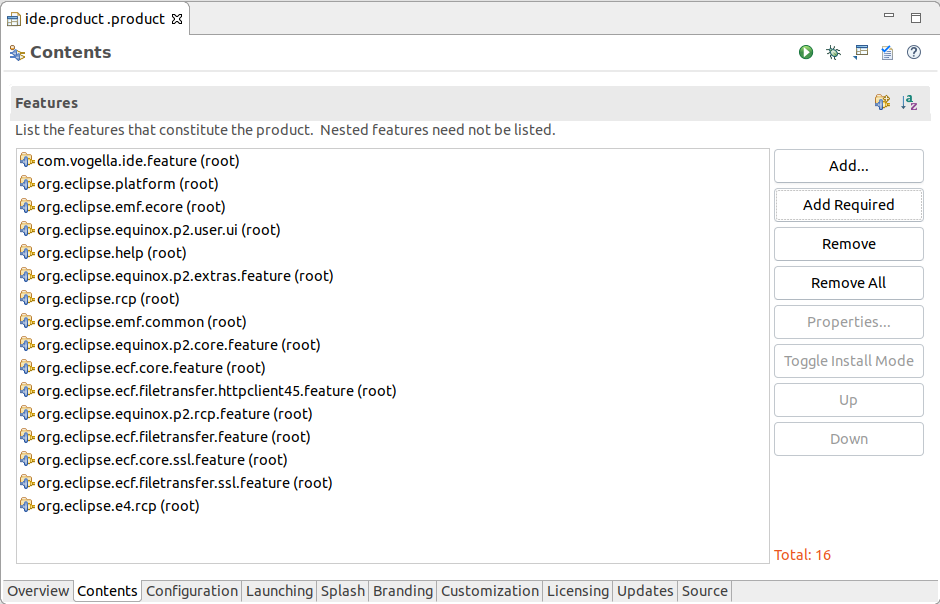
| The Include required Features and Plug-ins automatically option automatically includes required dependencies. |
Save the ide.product file by pressing Ctrl S.
|
If you cannot add one of the listed features to your product, ensure that your product configuration is based on features. |
7.7. Validate your setup by starting a runtime Eclipse
Select your product file and start the Eclipse IDE via the Run button.

As a result, a runtime Eclipse IDE should start. It should contain only the features that you have added to your product. For example, you should currently not be able to create a new Java project.
7.8. Add Java tooling to your IDE
Add org.eclipse.jdt.feature.group to your target platform.
The target platform should look similar to the following listing.
<?xml version="1.0" encoding="UTF-8" standalone="no"?>
<?pde version="3.8"?>
<target name="target-platform">
    <!-- EXISTING ENTRIES, DO NOT DELETE THESE ENTRIES-->

    <!-- THIS ENTRY IS NEW -->

    <locations>
        <location includeAllPlatforms="false" includeConfigurePhase="true" includeMode="planner" includeSource="true" type="InstallableUnit">
            <repository location="https://download.eclipse.org/releases/2026-06"/>
            <unit id="org.eclipse.jdt.feature.group"/>
        </location>
    </locations>
</target>
Reload your target platform via the Definition tab.
Afterwards, add the org.eclipse.jdt feature to your product and start a new runtime IDE via the product.
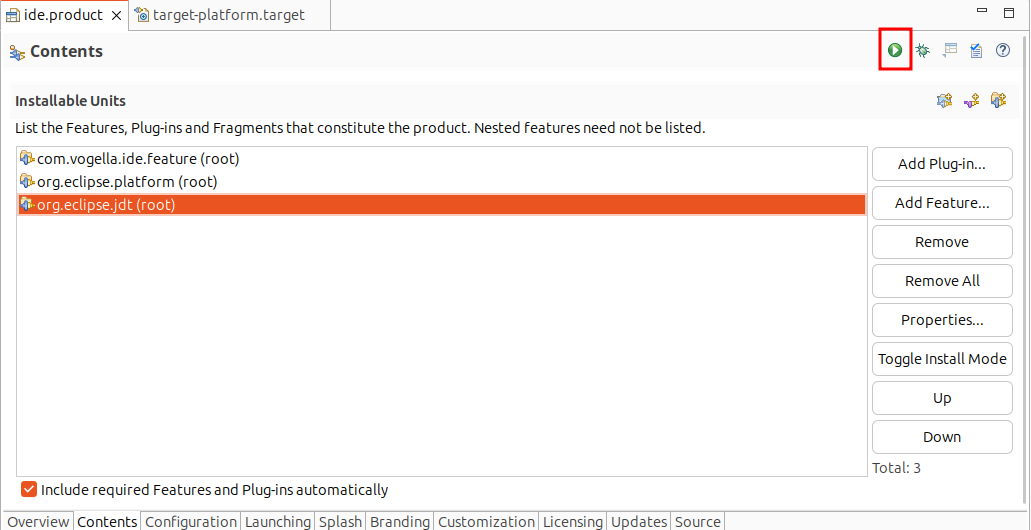
Ensure that you now have the Java tooling installed; for example, check via the new wizard that you can create Java projects.
8. Exercise: Adding e4 part descriptors to 3.x based applications
In this exercise, you add a model based part contribution to an Eclipse 3.x RCP application.
8.1. Adding a part descriptor
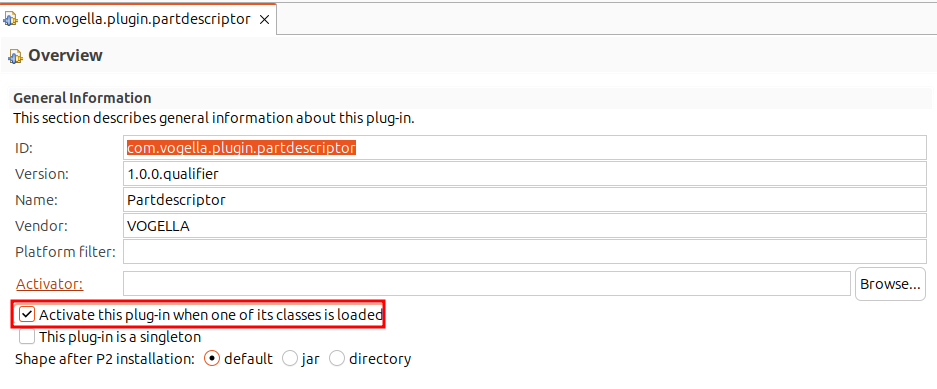
Create a simple plug-in named com.vogella.plugin.partdescriptor.
Select the Activate this plug-in when one of its classes is loaded flag via its manifest.
Add the following plug-in dependencies to your manifest file.
-
org.eclipse.core.runtime
-
org.eclipse.jface
-
org.eclipse.e4.ui.model.workbench
-
org.eclipse.e4.ui.di
Also add the jakarta.annotation package to the Imported Packages section of your manifest file.
The manifest file should look similar to (version number constraints have been removed):
Manifest-Version: 1.0
Bundle-ManifestVersion: 2
Bundle-Name: Partdescriptor
Bundle-SymbolicName: com.vogella.plugin.partdescriptor
Bundle-Version: 1.0.0.qualifier
Bundle-Vendor: VOGELLA
Require-Bundle: org.eclipse.core.runtime,
 org.eclipse.jface,
 org.eclipse.e4.ui.model.workbench,
 org.eclipse.e4.ui.di
Model-Fragment: fragment.e4xmi
Bundle-RequiredExecutionEnvironment: JavaSE-21
Automatic-Module-Name: com.vogella.plugin.partdescriptor
Bundle-ActivationPolicy: lazy
Import-Package: jakarta.annotation
Create the following class
package com.vogella.ide.ui;
import jakarta.annotation.PostConstruct;
import org.eclipse.e4.ui.di.Focus;
import org.eclipse.jface.viewers.ArrayContentProvider;
import org.eclipse.jface.viewers.LabelProvider;
import org.eclipse.jface.viewers.TableViewer;
import org.eclipse.swt.SWT;
import org.eclipse.swt.widgets.Composite;
public class PartEclipse4x {
private TableViewer viewer;
@PostConstruct
public void createPartControl(Composite parent) {
viewer = new TableViewer(parent, SWT.MULTI | SWT.H_SCROLL
| SWT.V_SCROLL);
viewer.setContentProvider(ArrayContentProvider.getInstance());
viewer.setLabelProvider(new LabelProvider());
viewer.setInput(new String[] {"One", "Two", "Three"});
}
@Focus
public void setFocus() {
viewer.getControl().setFocus();
}
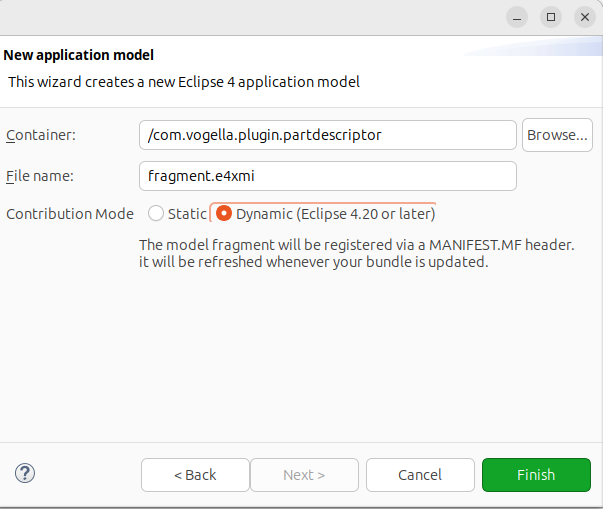
}Add a new model fragment to this plug-in via . We use the dynamic one that requires the Activate this plug-in when one of its classes is loaded option and allows only one fragment to be registered. If you need to register multiple fragments, you have to use the static approach that places a file link in the manifest.
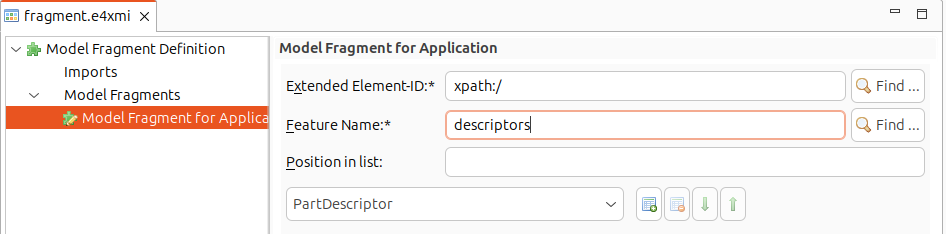
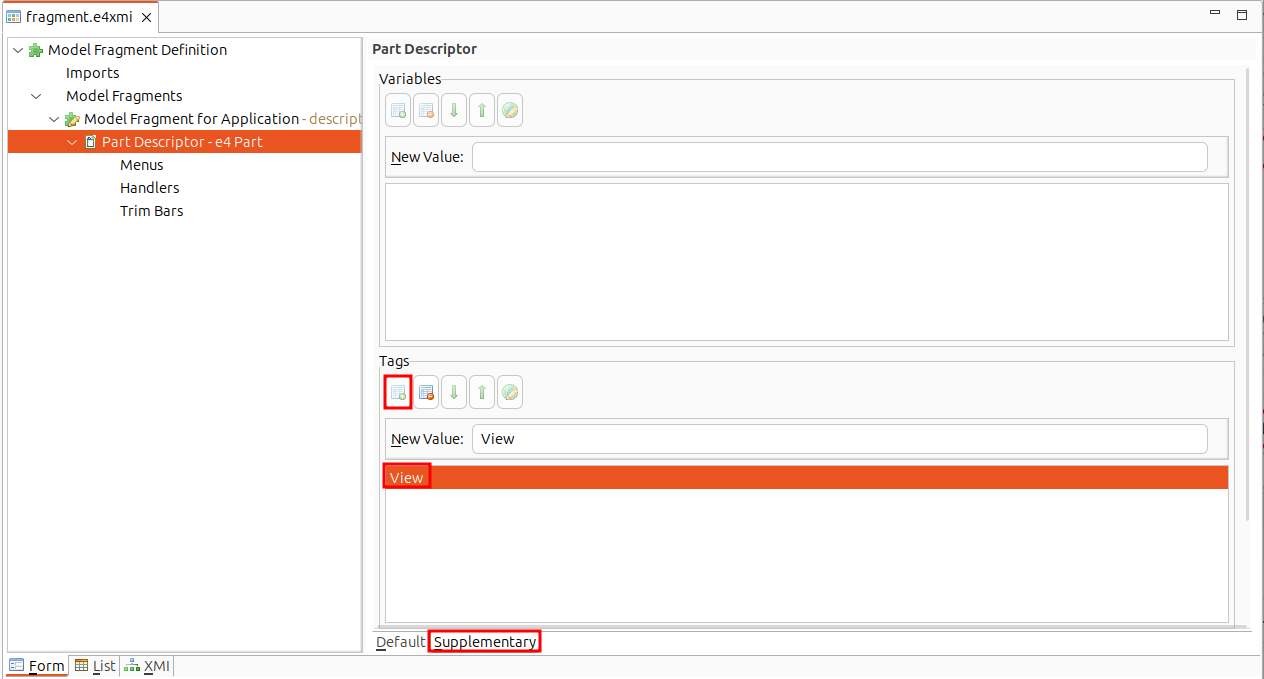
Add a part descriptor to your fragment, with a reference to your Java class and a category.
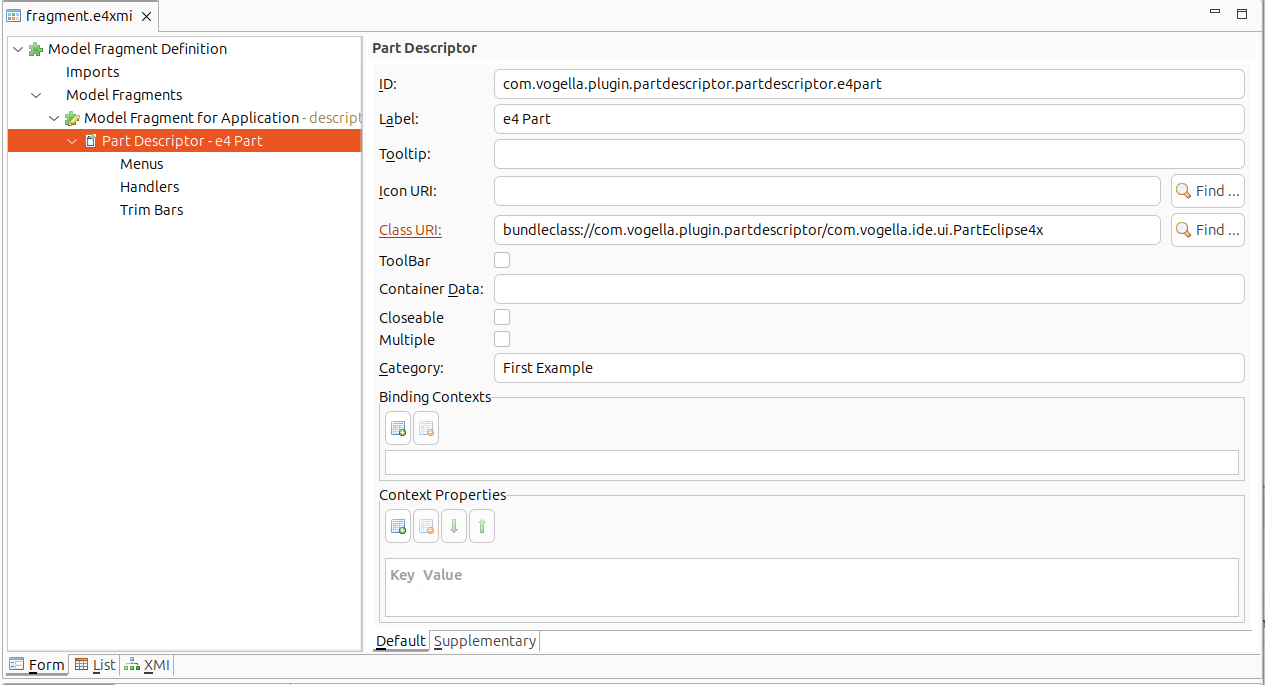
Also add the View tag to the new model element, via the Supplementary tab.
8.2. Add plug-in to your product
Add your new plug-in to your product, either by adding it to your feature or directly as an additional plug-in.
8.3. Validate
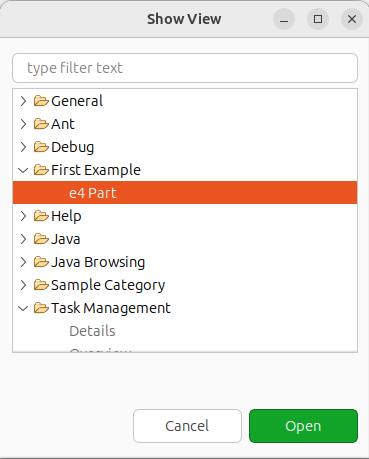
Start an instance of the Eclipse IDE and validate that you can open the parts via the Quick Access box (shortcut Ctrl+3).
You can open the part via the menu entry.
9. Accessing the IEclipseContext from 3.x API
The Eclipse IDE uses the IEclipseContext data structure to store central information about the IDE.
You can access this information via the Eclipse 3.x API.
For example, to access the context from an Eclipse 3.x API view, you can use the following snippet.
// get the context of a part
IEclipseContext partContext = getViewSite().getService(IEclipseContext.class);

// or access directly a value in the context based on its key
EModelService service =  getViewSite().getService(EModelService.class);
This snippet demonstrates the access via an Eclipse 3.x API handler.
// the following example assumes you are in a handler

// get context from active window
IEclipseContext windowCtx =
    HandlerUtil.getActiveWorkbenchWindow(event).getService(IEclipseContext.class);

// get context from active part
IEclipseContext ctx =
    HandlerUtil.getActivePart(event).getSite().getService(IEclipseContext.class);
10. Contributing model elements to the Eclipse IDE or 3.x RCP applications
10.1. Adding model based parts to Eclipse 3.x applications via the org.eclipse.ui.views extension point
You can use an e4 part in an extension for the org.eclipse.ui.views extension point.
Use the e4view entry in the context menu of the extension to achieve this.
The resulting object is created via dependency injection.
|
For such a view the existing toolbar and view extension point contributions do not work.
To add for example a toolbar to your e4view, get the |
10.2. Adding e4 menu entries
Menus, handlers and commands can be contributed to an Eclipse application via model fragments.
|
You can use the model spy from the e4 tools project to identify the ID of the element you want to contribute to. |
With the correct ID you can create model fragments that contribute to the corresponding application model element. The following screenshots demonstrate how to contribute to the menuContributions feature of the Eclipse IDE.
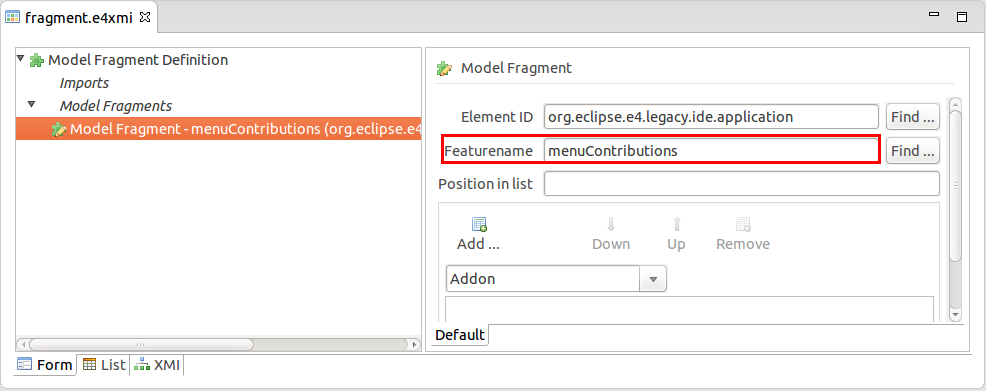
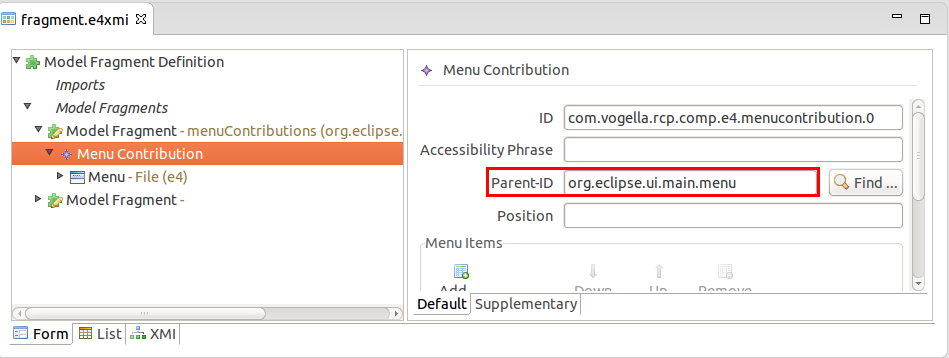
After you added a MenuContribution item you can contribute a menu.
The Parent-ID must be the ID of the menu you are contributing to.
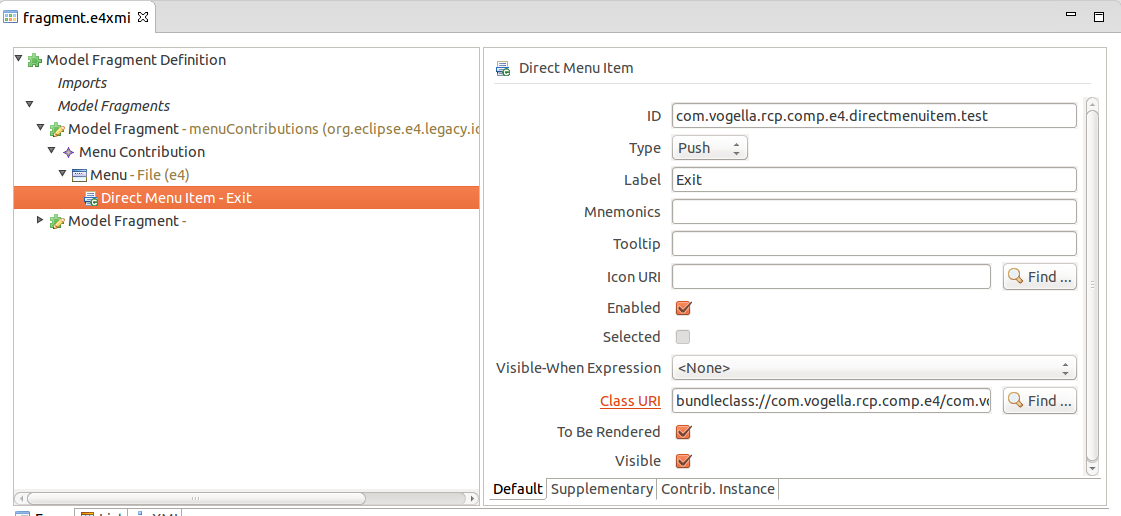
The model fragment must be registered in the plugin.xml file via an extension to the org.eclipse.e4.workbench.model extension point, as demonstrated in the following listing.
<?xml version="1.0" encoding="utf-8"?>
<plugin>
   <extension
         id="id1"
         point="org.eclipse.e4.workbench.model">
      <fragment
            apply="notexists"
            uri="fragment.e4xmi">
      </fragment>
   </extension>

</plugin>
10.3. Error analysis
In case of problems, check the source code of plugin.xml and validate that your model fragment is included. Verify the name of the referred model fragment and ensure all the defined ID are available in the running configuration.
10.4. Adding e4 toolbar entries to the application window
Similar to menus you can contribute toolbar contributions.
| This approach does currently not work for view toolbars. |
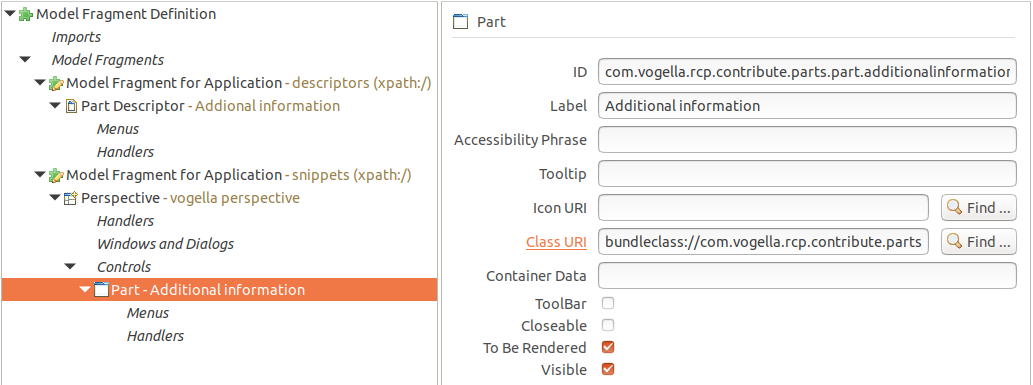
10.5. Supporting part descriptors in an Eclipse IDE
The Eclipse IDE supports the contribution of part descriptor model elements via fragments or processors.
If you use the org.eclipse.e4.legacy.ide.application ID to contribute your part descriptors, the views can be opened via the dialog or via the Quick Access. This requires that you add the View tag to such a part descriptor.
| Eclipse 3.x API based RCP applications can use the same approach. |
10.6. Adding perspectives to the Eclipse IDE via model snippets
Your model fragment or processor can contribute a perspective to the Eclipse IDE.
For this add a perspective via a snippet.
The extended element id can be generic with xpath:/ and the Feature name is snippets.
The same approach works for Eclipse 3.x API based RCP applications.
11. Exercise: Add a new perspective to the Eclipse IDE
In this exercise, you contribute a new perspective to the Eclipse IDE.
11.1. Create model elements
In your com.vogella.plugin.partdescriptor plug-in, create the following model fragment.

Add at least one part to the perspective.
11.2. Validate
Start the Eclipse IDE and validate that you can open the new perspective via the perspective switcher dialog.
12. Adding views via extension points
In this exercise, you add a view extension via a separate plug-in.
This extension can be contributed to the Eclipse IDE (or another Eclipse 3.x API based RCP application).
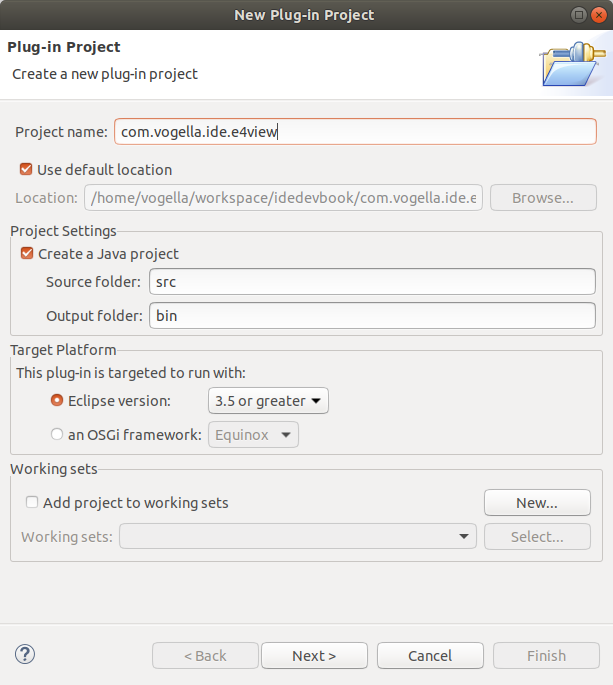
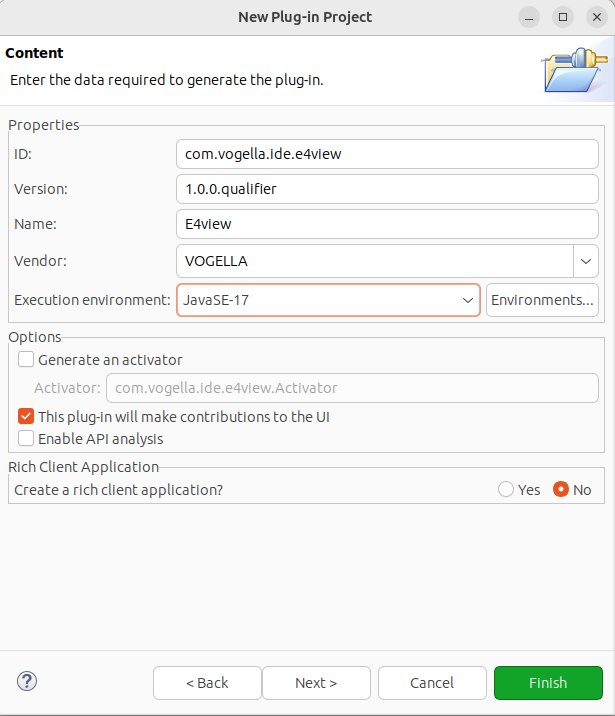
12.1. Create a plug-in
Create a plug-in named com.vogella.ide.e4view.
Use the menu entry.
Call the project com.vogella.ide.e4view and select the options similar to the following screenshots.
12.2. Add your new plug-in to your product
Add your new plug-in to your product, either via adding it to your feature or directly as an additional plug-in.
Start via your product to take the new plug-in into consideration.
12.3. Add the view to a perspective extension
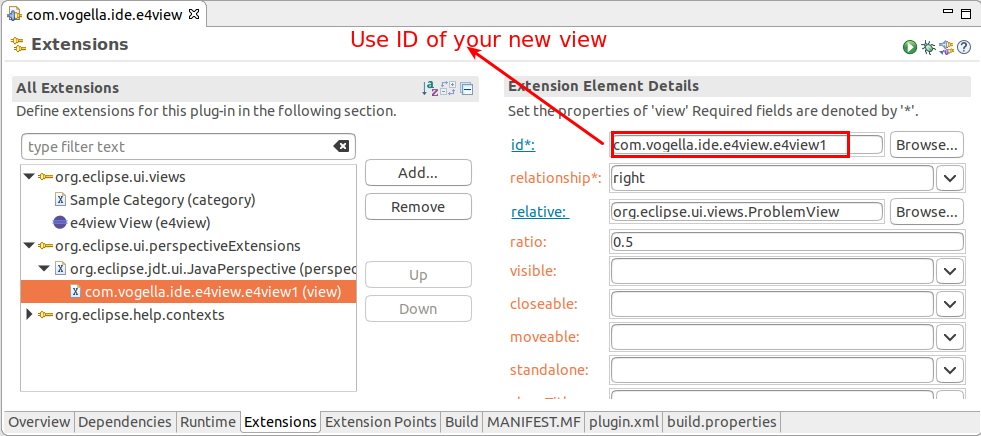
The template added the view to the Java perspective, check the existing org.eclipse.ui.perspectiveExtensions entry as depicted in the following screenshot.
12.4. Use new icons
Download the following icons (via right-mouse click and selecting the save functionality in the browser).


Add them to the icons folder in your com.vogella.ide.e4view project.
Open the plugin.xml file and select the Extensions tab. Select your Sample View and point to your new icon.

Restart your runtime IDE and check that the new icon is used.
| The @2x version of your icon is automatically used on HDPI screens. |
13. Exercise: Convert the ViewPart to a Java POJO
The created example code uses inheritance of Eclipse framework classes to provide a view. It is possible to convert this code to a Java POJO (plain old Java object) which is easier to test and maintain.
In this exercise, you convert the created view to a POJO.
For this you use e4view element of the org.eclipse.ui.views extension point.
13.1. Adjust Plug-in dependencies
Open the MANIFEST.MF file.
Select the Dependencies tab.
Add org.eclipse.e4.ui.di via the Add button in the Required Plug-ins section.
Add jakarta.annotation via the Add button in the Imported Packages section.
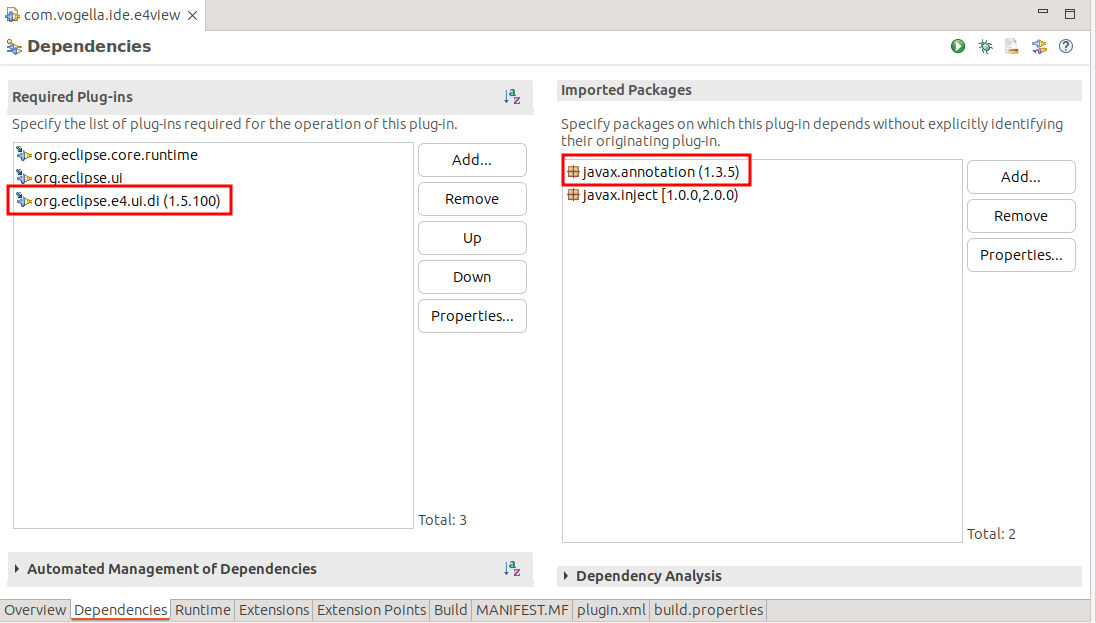
This allows you to use classes from the org.eclipse.e4.ui.di plug-in in your source code of your plug-in.
|
13.2. Change your view implementation
Adjust the created implementation of SampleView to the following.
package com.vogella.ide.e4view.views;

import jakarta.annotation.PostConstruct;
import jakarta.inject.Inject;

import org.eclipse.e4.ui.di.Focus;
import org.eclipse.jface.action.Action;
import org.eclipse.jface.action.IMenuListener;
import org.eclipse.jface.action.IMenuManager;
import org.eclipse.jface.action.MenuManager;
import org.eclipse.jface.action.Separator;
import org.eclipse.jface.dialogs.MessageDialog;
import org.eclipse.jface.viewers.ArrayContentProvider;
import org.eclipse.jface.viewers.DoubleClickEvent;
import org.eclipse.jface.viewers.IDoubleClickListener;
import org.eclipse.jface.viewers.IStructuredSelection;
import org.eclipse.jface.viewers.ITableLabelProvider;
import org.eclipse.jface.viewers.LabelProvider;
import org.eclipse.jface.viewers.TableViewer;
import org.eclipse.swt.SWT;
import org.eclipse.swt.graphics.Image;
import org.eclipse.swt.widgets.Composite;
import org.eclipse.swt.widgets.Menu;
import org.eclipse.ui.ISharedImages;
import org.eclipse.ui.IWorkbench;
import org.eclipse.ui.IWorkbenchActionConstants;

public class SampleView {

    /**
     * The ID of the view as specified by the extension.
     */
    public static final String ID = "com.vogella.ide.e4view.views.SampleView";

    @Inject
    IWorkbench workbench;

    private TableViewer viewer;
    private Action action1;
    private Action action2;
    private Action doubleClickAction;

    class ViewLabelProvider extends LabelProvider implements ITableLabelProvider {
        @Override
        public String getColumnText(Object obj, int index) {
            return getText(obj);
        }

        @Override
        public Image getColumnImage(Object obj, int index) {
            return getImage(obj);
        }

        @Override
        public Image getImage(Object obj) {
            return workbench.getSharedImages().getImage(ISharedImages.IMG_OBJ_ELEMENT);
        }
    }

    @PostConstruct
    public void createPartControl(Composite parent) {
        viewer = new TableViewer(parent, SWT.MULTI | SWT.H_SCROLL | SWT.V_SCROLL);

        viewer.setContentProvider(ArrayContentProvider.getInstance());
        viewer.setInput(new String[] { "One", "Two", "Three" });
        viewer.setLabelProvider(new ViewLabelProvider());

        // Create the help context id for the viewer's control
        workbench.getHelpSystem().setHelp(viewer.getControl(), "com.vogella.ide.e4view.viewer");
        makeActions();
        hookContextMenu();
        hookDoubleClickAction();
    }

    private void hookContextMenu() {
        MenuManager menuMgr = new MenuManager("#PopupMenu");
        menuMgr.setRemoveAllWhenShown(true);
        menuMgr.addMenuListener(new IMenuListener() {
            @Override
            public void menuAboutToShow(IMenuManager manager) {
                SampleView.this.fillContextMenu(manager);
            }
        });
        Menu menu = menuMgr.createContextMenu(viewer.getControl());
        viewer.getControl().setMenu(menu);
    }

    private void fillContextMenu(IMenuManager manager) {
        manager.add(action1);
        manager.add(action2);
        // Other plug-ins can contribute their actions here
        manager.add(new Separator(IWorkbenchActionConstants.MB_ADDITIONS));
    }

    private void makeActions() {
        action1 = new Action() {
            @Override
            public void run() {
                showMessage("Action 1 executed");
            }
        };
        action1.setText("Action 1");
        action1.setToolTipText("Action 1 tooltip");
        action1.setImageDescriptor(workbench.getSharedImages().getImageDescriptor(ISharedImages.IMG_OBJS_INFO_TSK));

        action2 = new Action() {
            @Override
            public void run() {
                showMessage("Action 2 executed");
            }
        };
        action2.setText("Action 2");
        action2.setToolTipText("Action 2 tooltip");
        action2.setImageDescriptor(workbench.getSharedImages().getImageDescriptor(ISharedImages.IMG_OBJS_INFO_TSK));
        doubleClickAction = new Action() {
            @Override
            public void run() {
                IStructuredSelection selection = viewer.getStructuredSelection();
                Object obj = selection.getFirstElement();
                showMessage("Double-click detected on " + obj.toString());
            }
        };
    }

    private void hookDoubleClickAction() {
        viewer.addDoubleClickListener(new IDoubleClickListener() {
            @Override
            public void doubleClick(DoubleClickEvent event) {
                doubleClickAction.run();
            }
        });
    }

    private void showMessage(String message) {
        MessageDialog.openInformation(viewer.getControl().getShell(), "e4view View", message);
    }

    @Focus
    public void setFocus() {
        viewer.getControl().setFocus();
    }
}|
If you now start this plug-in and open your view, you receive the |
13.3. Adjust the entries in the extension point
Replace the view attribute with an e4view attribute for the org.eclipse.ui.views extension point.
For this use the plugin.xml tab of the plugin.xml editor and change the view entry in the XML.
<?xml version="1.0" encoding="UTF-8"?>
<?eclipse version="3.4"?>
<plugin>

   <extension
         point="org.eclipse.ui.views">
      <category
            name="Sample Category"
            id="com.vogella.ide.e4view">
      </category>
   <e4view
            id="com.vogella.ide.e4view.views.SampleView"
            name="Sample View"
            icon="icons/default_folder.png"
            class="com.vogella.ide.e4view.views.SampleView"
            category="com.vogella.ide.e4view"
            >
      </e4view>
   </extension>
  <!-- MORE ENTRIES, LEFT OUT FOR BREVITY -->

</plugin>
13.4. Validate the usage of the view
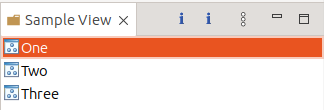
Start your plug-in in the Eclipse IDE and validate that you can open the view via the menu entry. The view should look similar to the following and should provide a context menu on the items.

|
To avoid seeing model persisted data, ensure that the 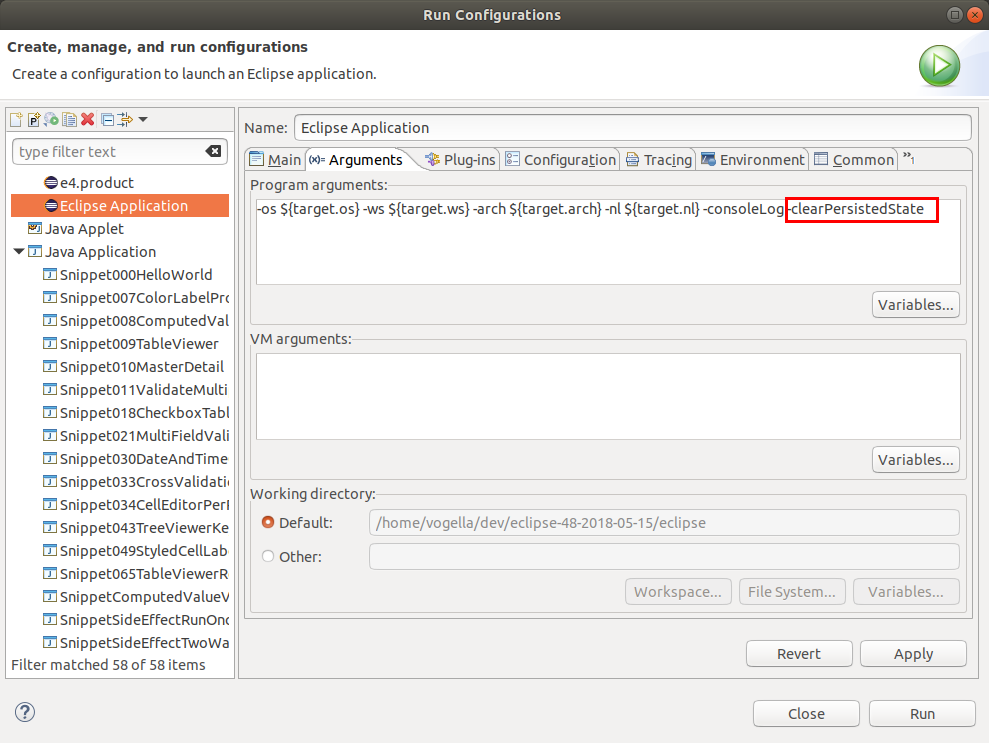 |
14. Exercise: Add a e4 menu to the Eclipse IDE
In this exercise, you will add a menu and a toolbar contribution to the IDE via the com.vogella.tasks.ui plug-in.
14.1. Adding the plug-in dependencies
Ensure that the following dependencies are in the manifest file of com.vogella.tasks.ui.
-
org.eclipse.e4.core.di, -
org.eclipse.jface
14.2. Creating the handler class
Create the following class based on the generated handler class.
package com.vogella.tasks.ui.handlers;

import org.eclipse.e4.core.di.annotations.Execute;
import org.eclipse.jface.dialogs.MessageDialog;
import org.eclipse.swt.widgets.Shell;

public class TestHandler {

    @Execute
    public void execute(Shell shell) {
        MessageDialog.openInformation(shell, "First", "Hello, e4 API world");
    }
}
14.3. Create a model fragment for your contributions
Create a new model fragment via from the context menu of the plug-in project.
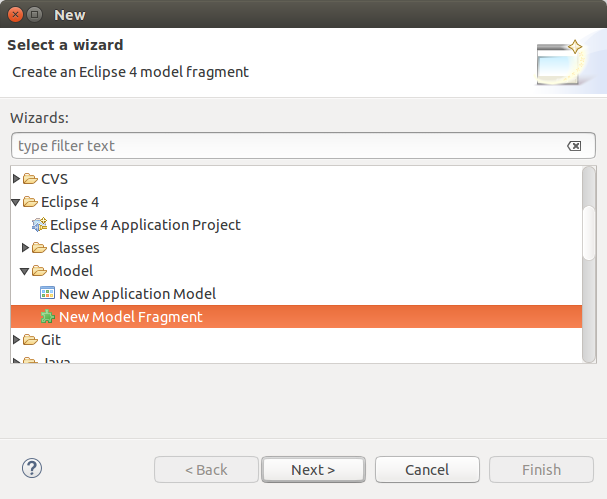
The file should be called commands.e4xmi.
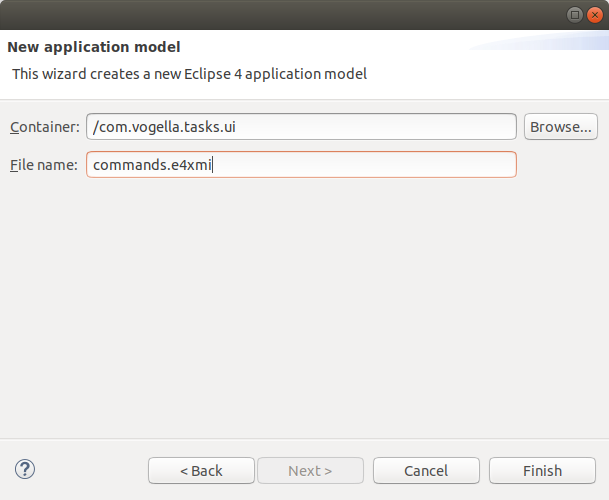
Press the Finish button.
Ensure that the new fragment is correctly registered in the plugin.xml as extension.
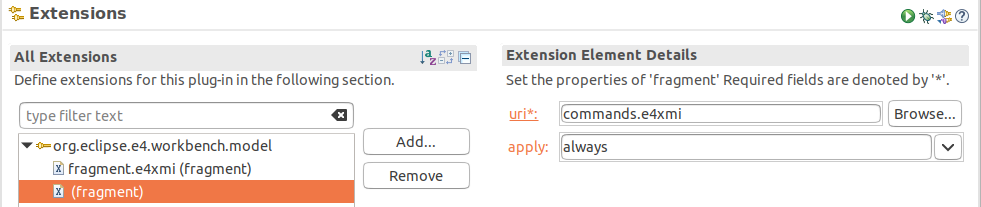
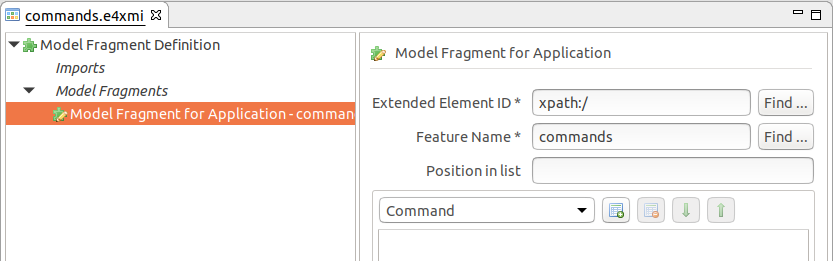
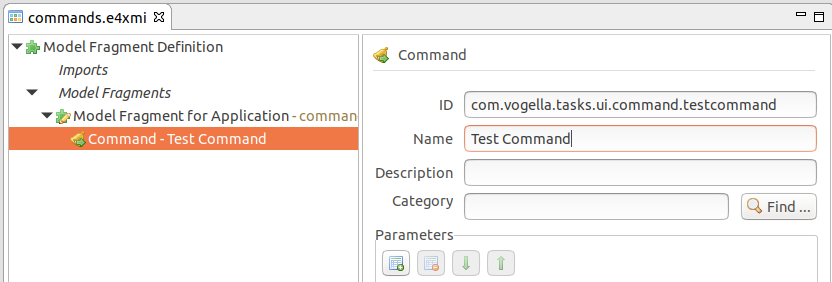
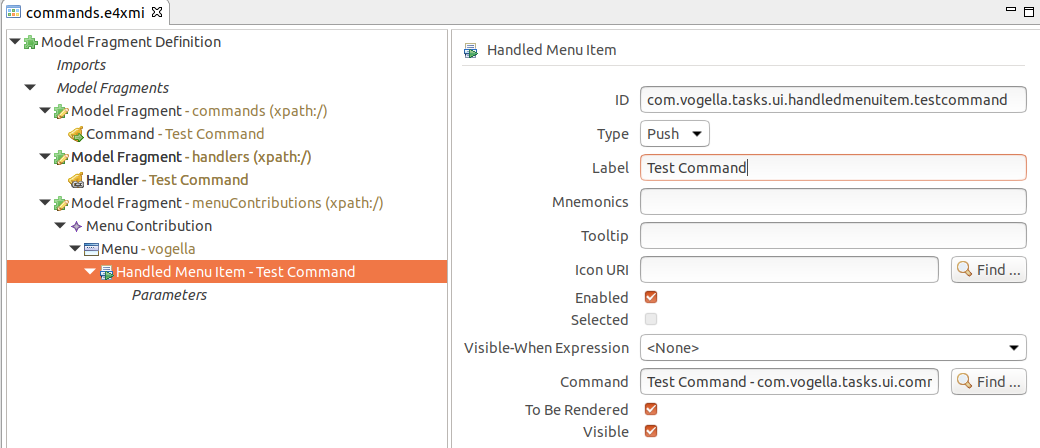
14.4. Define a command contribution
Create a model fragment contributing a command to the commands of the top-level element using the xpath:/ element id.
Use the following screenshots to define the new contribution.
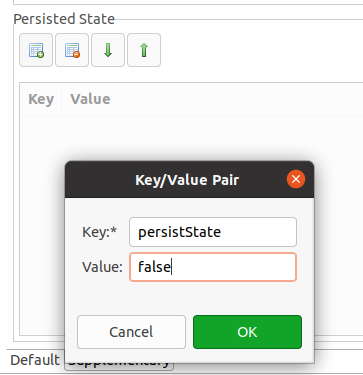
Ensure to set the persistState flag to false.
This ensures that the element is not available if the plug-in is not installed.
14.5. Define a handler contribution
Add a handler for the defined command and use your TestHandler as implementation.

Ensure to set the persistState flag to false.
This ensures that the element is not available if the plug-in is not installed.
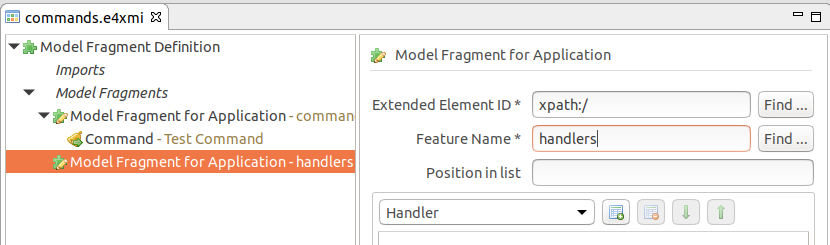
14.6. Define a menuContributions contribution
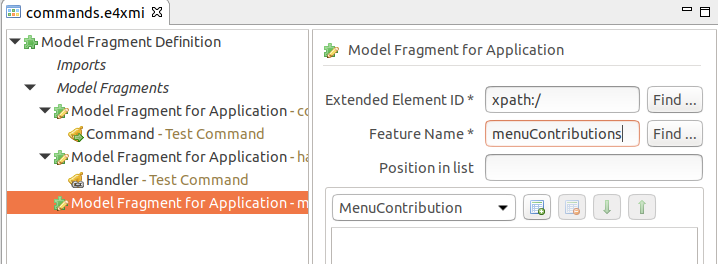
Ensure to set the persistState flag to false.
This ensures that the element is not available if the plug-in is not installed.
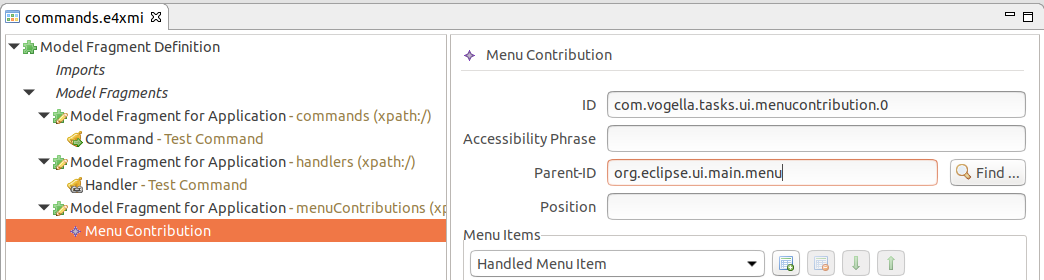
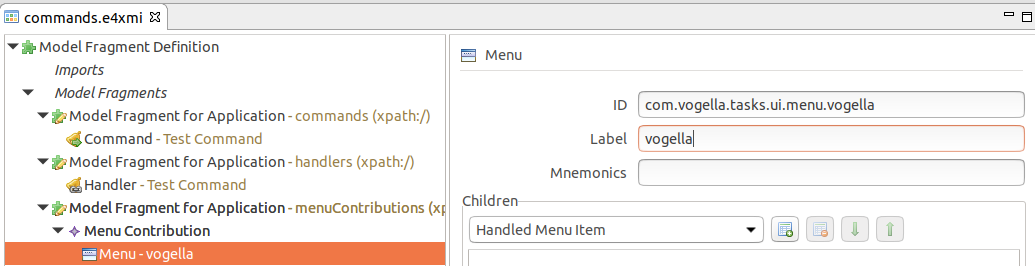
Add at least one menu entry to your menu, otherwise it will not be displayed.
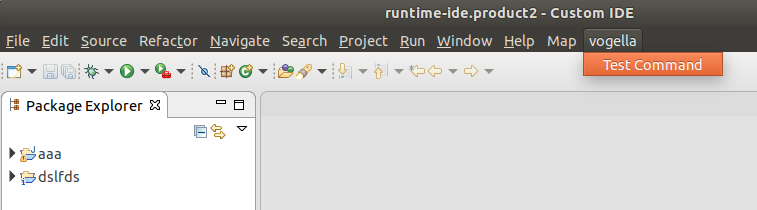
14.7. Validate the presence of the menu
Start a new instance of the Eclipse IDE and validate that your menu is visible and working. If it is not visible, check via the model spy for potential issues.
15. Exercise: Add a trimbar to the Eclipse IDE
15.1. Adding a trimbar contribution
Also add a trimbar contribution for the same command.


Ensure to set the persistState flag to false.
This ensures that the element is not available if the plug-in is not installed.
Add a toolbar to your trimbar.
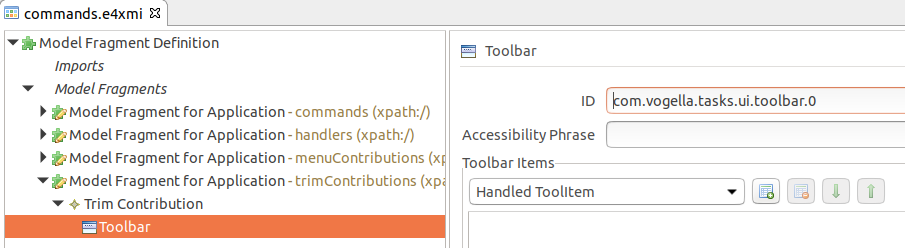
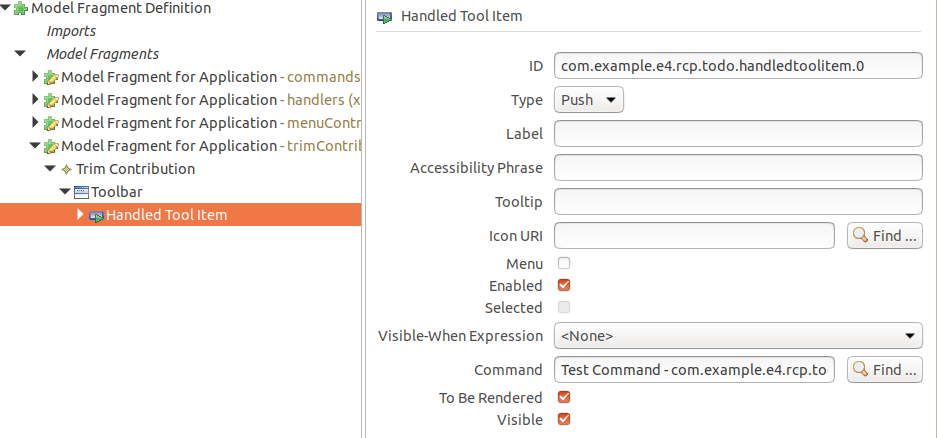
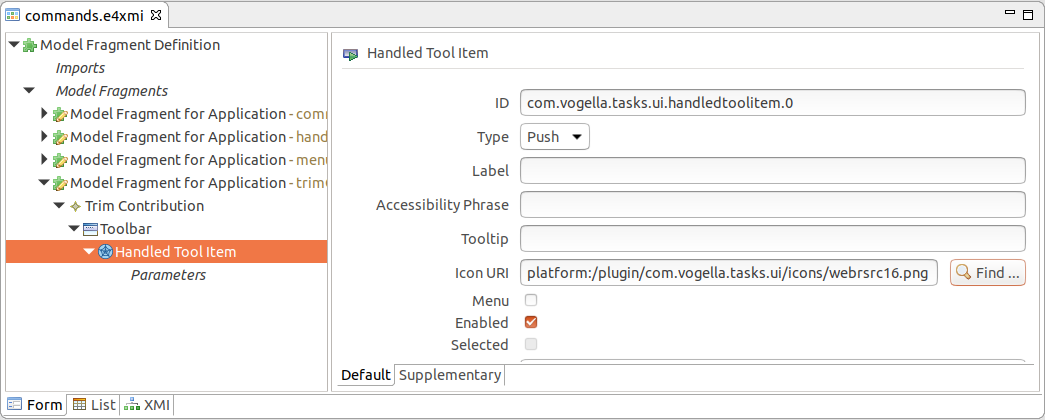
Add a handled tool item to your contribution.
15.2. Validate the presence of the toolbar contribution
Start a new instance of the Eclipse IDE and validate that your new toolbar is available. If they are not visible in the window, check via the model spy for potential issues.
16. Optional exercise: Add an icon to your toolbar entry
Create an icons folder.
Use the Plug-in Image Browser to save an icon in your project.
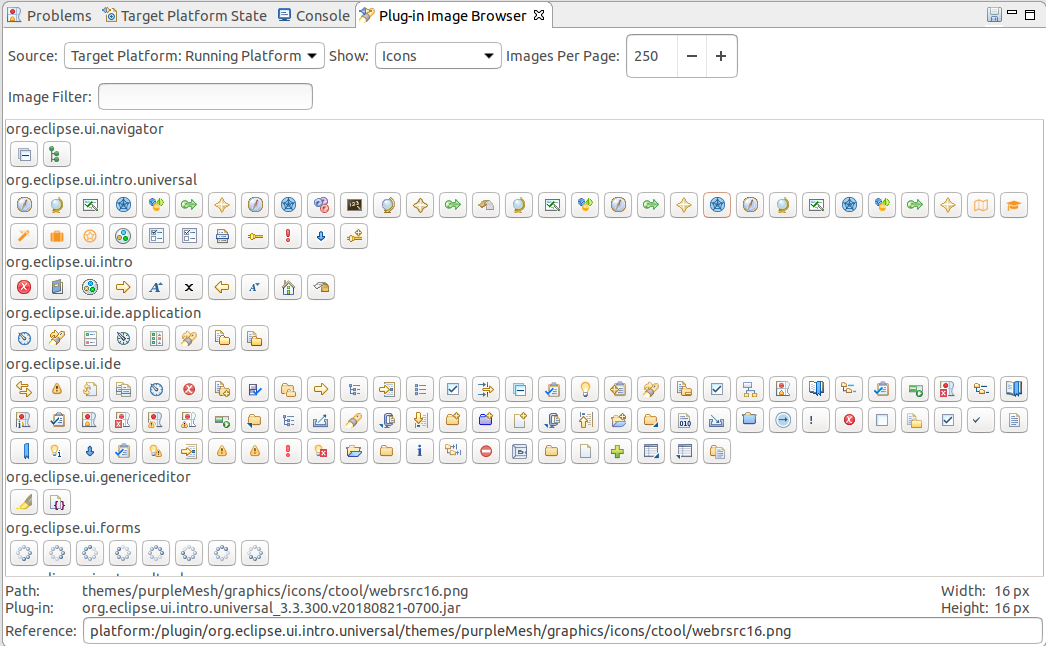
Assign this icon to your toolbar entry.
17. Resources and Marker
Eclipse represents resources like Projects, Files, Folders and Packages as IResource.
Markers represent additional information for resources, e.g., an error marker. This information is not stored within the resource (file) but as additional information in the workspace metadata.
Every marker can have attributes (key-value combinations). Markers can be displayed in the standard views, e.g., the Tasks, Bookmarks or the Problems view. To be displayed in these views, you have to use predefined attributes.
18. Exercise: Create Markers for resources
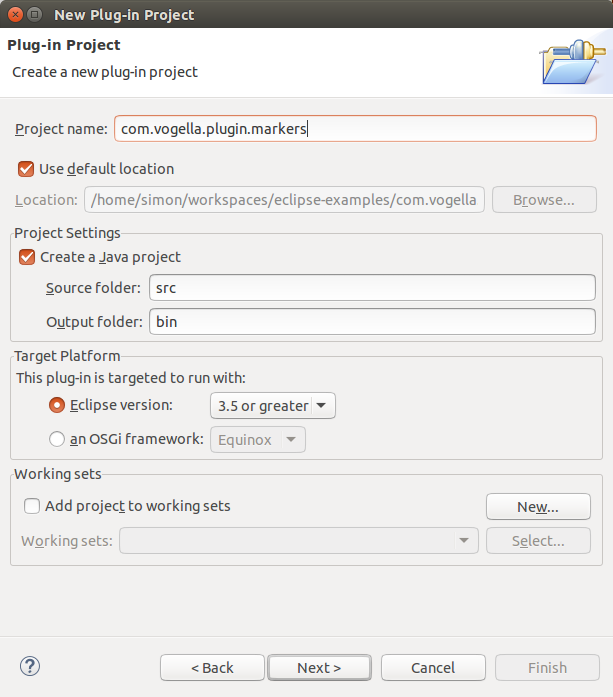
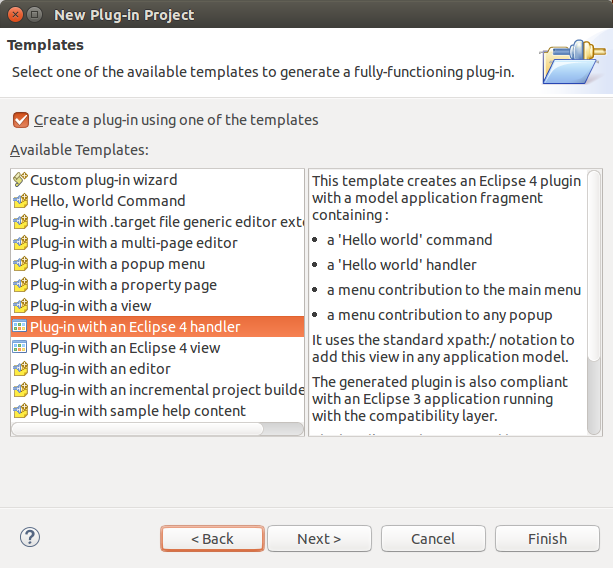
Create a plug-in project com.vogella.plugin.markers based on the e4 handler template.
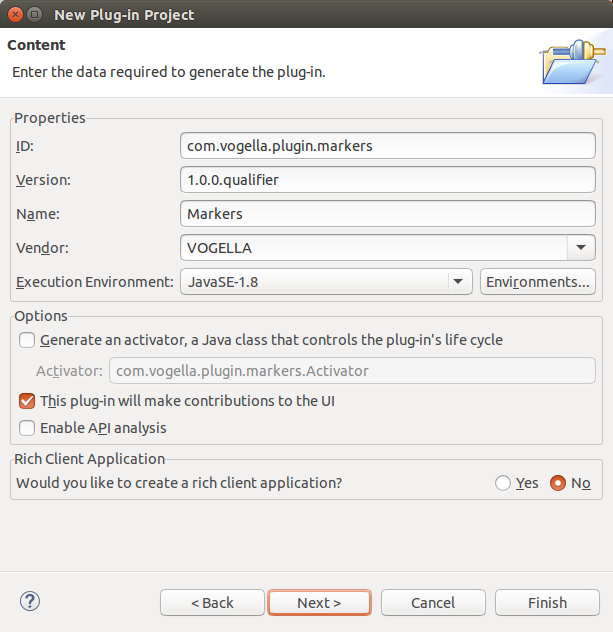
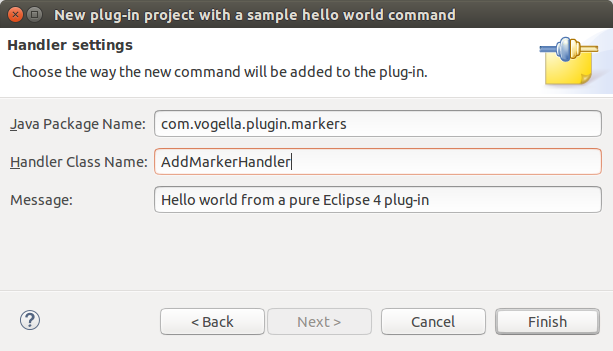
This template will create a AddMarkerHandler handler, which should be used to create an IMarker for a selected resource.
Add the following dependencies:
-
org.eclipse.jface
-
org.eclipse.e4.ui.services
-
org.eclipse.e4.core.di
-
org.eclipse.core.resources
-
org.eclipse.core.runtime
-
org.eclipse.e4.core.services
Modify the AddMarkerHandler code to the following:
package com.vogella.plugin.markers.handlers;

import jakarta.inject.Named;
import org.eclipse.core.resources.IMarker;
import org.eclipse.core.resources.IResource;
import org.eclipse.e4.core.di.annotations.Execute;
import org.eclipse.e4.core.services.adapter.Adapter;
import org.eclipse.e4.ui.services.IServiceConstants;
import org.eclipse.jface.viewers.IStructuredSelection;


public class AddMarkerHandler {

    @Execute
    public void execute(@Named(IServiceConstants.ACTIVE_SELECTION) IStructuredSelection selection, Adapter adapter) {

        if (selection == null || selection.isEmpty()) {
            return;
        }

        Object firstElement = selection.getFirstElement();
        IResource resource = adapter.adapt(firstElement, IResource.class);

        if (resource != null) {
            writeMarkers(resource);
        }

    }

    private void writeMarkers(IResource resource) {
        try {
            IMarker marker = resource.createMarker(IMarker.TASK);
            marker.setAttribute(IMarker.MESSAGE, "This is a task");
            marker.setAttribute(IMarker.PRIORITY, IMarker.PRIORITY_HIGH);
        } catch (Exception e) {
            e.printStackTrace();
        }
    }

}
In the fragment.e4xmi file the command’s name should be changed from "Hello World" to Add Task Marker.
If you run your plug-in, you can create a marker in the Tasks view by selecting a Java project or any other IResource and clicking the menu entry.

19. Adapters
Adapters help to display information about objects in views without having to adjust the existing views.
Adapters are used in several places, for example, you can use an adapter to display your data in the outline view. See FAQ How do I create an Outline view for my own language editor for an example.
20. Exercise - Adapters for the Properties view
In this exercise, you use an adapter to show your data in the Properties view.
The Properties view listens to the selection of the active workbench part.
For every selected object it asks the adapter framework for an IPropertySource adapter and uses it to display the properties of the object.
|
The view in this exercise is implemented as a classic |
20.1. Create the plug-in and the data model
Create a new plug-in project de.vogella.plugin.adapter.
Add the following dependencies on the Dependencies tab of the MANIFEST.MF file:
-
org.eclipse.core.runtime
-
org.eclipse.ui
-
org.eclipse.ui.views
Create the following Task class as data model.
package de.vogella.plugin.adapter.model;

public class Task {

    private String summary;
    private String description;
    private boolean done;

    public String getSummary() {
        return summary;
    }

    public void setSummary(String summary) {
        this.summary = summary;
    }

    public String getDescription() {
        return description;
    }

    public void setDescription(String description) {
        this.description = description;
    }

    public boolean isDone() {
        return done;
    }

    public void setDone(boolean done) {
        this.done = done;
    }

}
20.2. Create a view which provides its selection
Add an extension for the org.eclipse.ui.views extension point to your plugin.xml file.
Register a category named Sample Category and a view named Sample View with the class de.vogella.plugin.adapter.views.SampleView.
<extension
      point="org.eclipse.ui.views">
   <category
         id="de.vogella.plugin.adapter.category"
         name="Sample Category">
   </category>
   <view
         id="de.vogella.plugin.adapter.views.sampleview"
         name="Sample View"
         category="de.vogella.plugin.adapter.category"
         class="de.vogella.plugin.adapter.views.SampleView">
   </view>
</extension>
Create the SampleView class.
Via getSite().setSelectionProvider(viewer) the selection of the viewer is published to the workbench selection service.
package de.vogella.plugin.adapter.views;

import java.util.ArrayList;
import java.util.List;

import org.eclipse.jface.viewers.ArrayContentProvider;
import org.eclipse.jface.viewers.ColumnLabelProvider;
import org.eclipse.jface.viewers.TableViewer;
import org.eclipse.swt.SWT;
import org.eclipse.swt.widgets.Composite;
import org.eclipse.ui.part.ViewPart;

import de.vogella.plugin.adapter.model.Task;

public class SampleView extends ViewPart {

    private TableViewer viewer;

    @Override
    public void createPartControl(Composite parent) {
        viewer = new TableViewer(parent, SWT.MULTI | SWT.H_SCROLL | SWT.V_SCROLL);
        viewer.setContentProvider(ArrayContentProvider.getInstance());
        viewer.setLabelProvider(new ColumnLabelProvider() {
            @Override
            public String getText(Object element) {
                if (element instanceof Task task) {
                    return task.getSummary();
                }
                return super.getText(element);
            }
        });
        viewer.setInput(getElements());

        // publish the viewer selection to the workbench selection service,
        // this allows the Properties view to see the selected objects
        getSite().setSelectionProvider(viewer);
    }

    @Override
    public void setFocus() {
        viewer.getControl().setFocus();
    }

    // build up a simple data model
    private List<Task> getElements() {
        List<Task> tasks = new ArrayList<>();
        Task task = new Task();
        task.setSummary("First Task");
        task.setDescription("A very good description");
        task.setDone(true);
        tasks.add(task);
        task = new Task();
        task.setSummary("Second Task");
        task.setDescription("Second super description");
        tasks.add(task);

        return tasks;
    }
}
After this change, you should be able to run your project, open your view via and see your task items.
20.3. Provide an IPropertySource adapter
To display the Task values in the Properties view, add the extension point org.eclipse.core.runtime.adapters to your project.
The data of the extension point should be like the following:
<extension
         point="org.eclipse.core.runtime.adapters">
      <factory
            adaptableType="de.vogella.plugin.adapter.model.Task"
            class="de.vogella.plugin.adapter.TaskAdapterFactory">
         <adapter
               type="org.eclipse.ui.views.properties.IPropertySource">
         </adapter>
      </factory>
</extension>
Implement the IPropertySource interface to provide the properties for the Properties view.
package de.vogella.plugin.adapter;

import org.eclipse.ui.views.properties.IPropertyDescriptor;
import org.eclipse.ui.views.properties.IPropertySource;
import org.eclipse.ui.views.properties.TextPropertyDescriptor;

import de.vogella.plugin.adapter.model.Task;

public class TaskPropertySource implements IPropertySource {

    private final Task task;

    public TaskPropertySource(Task task) {
        this.task = task;
    }

    @Override
    public boolean isPropertySet(Object id) {
        return false;
    }

    @Override
    public Object getEditableValue() {
        return this;
    }

    @Override
    public IPropertyDescriptor[] getPropertyDescriptors() {
        return new IPropertyDescriptor[] {
                new TextPropertyDescriptor("summary", "Summary"),
                new TextPropertyDescriptor("description", "Description") };
    }

    @Override
    public Object getPropertyValue(Object id) {
        if (id.equals("summary")) {
            return task.getSummary();
        }
        if (id.equals("description")) {
            return task.getDescription();
        }
        return null;
    }

    @Override
    public void resetPropertyValue(Object id) {
    }

    @Override
    public void setPropertyValue(Object id, Object value) {
        String s = (String) value;
        if (id.equals("summary")) {
            task.setSummary(s);
        }
        if (id.equals("description")) {
            task.setDescription(s);
        }
    }

}
Implement the TaskAdapterFactory factory which creates the TaskPropertySource instances.
package de.vogella.plugin.adapter;

import org.eclipse.core.runtime.IAdapterFactory;
import org.eclipse.ui.views.properties.IPropertySource;

import de.vogella.plugin.adapter.model.Task;

public class TaskAdapterFactory implements IAdapterFactory {

    // use a static final field so that the adapterList is only instantiated once
    private static final Class<?>[] adapterList = new Class<?>[] { IPropertySource.class };

    @Override
    public <T> T getAdapter(Object adaptableObject, Class<T> adapterType) {
        if (adapterType == IPropertySource.class && adaptableObject instanceof Task task) {
            return adapterType.cast(new TaskPropertySource(task));
        }
        return null;
    }

    @Override
    public Class<?>[] getAdapterList() {
        return adapterList;
    }

}
20.4. Validate
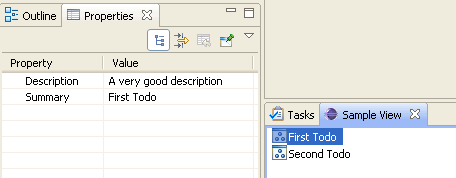
Run your workbench and open your view. Also open the Properties view via . If you select a task item in your view, its data is shown in the Properties view.
21. Exercise - Adapters and the WorkbenchLabelProvider
In this exercise, you reuse the de.vogella.plugin.adapter plug-in from the previous exercise.
You add a second view whose viewer uses the generic WorkbenchLabelProvider, which determines the appearance of the objects via the adapter framework.
21.1. Add the required dependencies
This view is contributed as an e4 part descriptor and implemented as a POJO.
Add the following dependencies on the Dependencies tab of the MANIFEST.MF file:
-
org.eclipse.jface
-
org.eclipse.e4.ui.model.workbench
Also add the jakarta.annotation package to the Imported Packages section.
21.2. Create the part descriptor and the part implementation
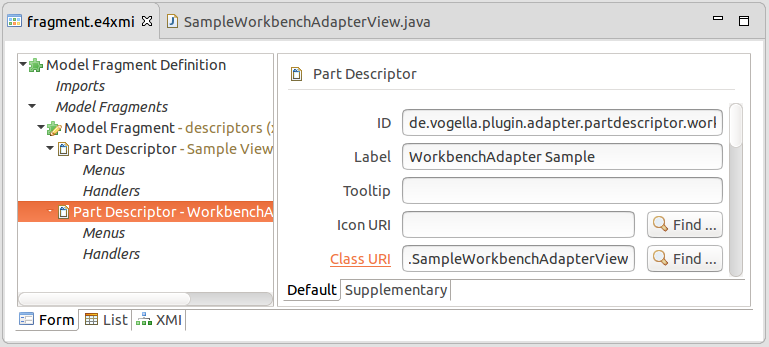
Create a model fragment (fragment.e4xmi) and add a PartDescriptor called WorkbenchAdapter Sample with the Sample Category category. Also add the View tag to the part descriptor via the Supplementary tab.
Create SampleWorkbenchAdapterView.java as implementation of the part.
It uses a DelegatingStyledCellLabelProvider as label provider that takes the WorkbenchLabelProvider as IStyledLabelProvider implementation.
package de.vogella.plugin.adapter.views;

import java.util.ArrayList;
import java.util.List;

import jakarta.annotation.PostConstruct;

import org.eclipse.jface.viewers.ArrayContentProvider;
import org.eclipse.jface.viewers.DelegatingStyledCellLabelProvider;
import org.eclipse.jface.viewers.TableViewer;
import org.eclipse.swt.SWT;
import org.eclipse.swt.widgets.Composite;
import org.eclipse.ui.model.WorkbenchLabelProvider;

import de.vogella.plugin.adapter.model.Task;

public class SampleWorkbenchAdapterView {

    private TableViewer viewer;

    @PostConstruct
    public void createPartControl(Composite parent) {
        viewer = new TableViewer(parent, SWT.MULTI | SWT.H_SCROLL | SWT.V_SCROLL);
        viewer.setContentProvider(ArrayContentProvider.getInstance());

        // use the WorkbenchLabelProvider as IStyledLabelProvider implementation
        viewer.setLabelProvider(new DelegatingStyledCellLabelProvider(new WorkbenchLabelProvider()));

        viewer.setInput(getElements());
    }

    // build up a simple data model
    private List<Task> getElements() {
        List<Task> tasks = new ArrayList<>();
        Task task = new Task();
        task.setSummary("First Task");
        task.setDescription("A very good description");
        task.setDone(true);
        tasks.add(task);
        task = new Task();
        task.setSummary("Second Task");
        task.setDescription("Second super description");
        tasks.add(task);

        return tasks;
    }
}
21.3. Provide workbench adapters
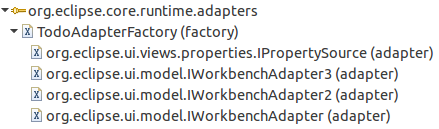
The WorkbenchLabelProvider asks the objects shown in the Viewer for an adapter of the IWorkbenchAdapter, IWorkbenchAdapter2 and IWorkbenchAdapter3 interfaces.
These interfaces determine how the objects are visualized.
To provide these adapters, create the following TaskWorkbenchAdapter.
It derives from WorkbenchAdapter, which is an abstract class that implements all three interfaces.
It defines a default image for Task objects and styles a Task green in case it is done.
package de.vogella.plugin.adapter;

import org.eclipse.jface.resource.ImageDescriptor;
import org.eclipse.jface.viewers.StyledString;
import org.eclipse.jface.viewers.StyledString.Styler;
import org.eclipse.swt.SWT;
import org.eclipse.swt.graphics.TextStyle;
import org.eclipse.swt.widgets.Display;
import org.eclipse.ui.ISharedImages;
import org.eclipse.ui.PlatformUI;
import org.eclipse.ui.model.WorkbenchAdapter;

import de.vogella.plugin.adapter.model.Task;

public class TaskWorkbenchAdapter extends WorkbenchAdapter {

    @Override
    public ImageDescriptor getImageDescriptor(Object object) {
        return PlatformUI.getWorkbench().getSharedImages().getImageDescriptor(ISharedImages.IMG_OBJ_ELEMENT);
    }

    @Override
    public StyledString getStyledText(Object object) {
        if (object instanceof Task task) {
            StyledString styledString = new StyledString(task.getSummary());
            if (task.isDone()) {
                Styler styler = new Styler() {

                    @Override
                    public void applyStyles(TextStyle textStyle) {
                        // tasks which are done should have a green background
                        textStyle.background = Display.getCurrent().getSystemColor(SWT.COLOR_GREEN);
                    }
                };
                styledString.setStyle(0, task.getSummary().length(), styler);
            }
            return styledString;
        }
        return super.getStyledText(object);
    }

}
Extend the TaskAdapterFactory to also provide the TaskWorkbenchAdapter.
package de.vogella.plugin.adapter;

import org.eclipse.core.runtime.IAdapterFactory;
import org.eclipse.ui.model.IWorkbenchAdapter;
import org.eclipse.ui.model.IWorkbenchAdapter2;
import org.eclipse.ui.model.IWorkbenchAdapter3;
import org.eclipse.ui.views.properties.IPropertySource;

import de.vogella.plugin.adapter.model.Task;

public class TaskAdapterFactory implements IAdapterFactory {

    // use a static final field so that the adapterList is only instantiated once
    private static final Class<?>[] adapterList = new Class<?>[] { IPropertySource.class, IWorkbenchAdapter.class,
            IWorkbenchAdapter2.class, IWorkbenchAdapter3.class };

    @Override
    public <T> T getAdapter(Object adaptableObject, Class<T> adapterType) {
        if (!(adaptableObject instanceof Task)) {
            return null;
        }
        if (adapterType == IPropertySource.class) {
            return adapterType.cast(new TaskPropertySource((Task) adaptableObject));
        }
        if (adapterType == IWorkbenchAdapter.class || adapterType == IWorkbenchAdapter2.class
                || adapterType == IWorkbenchAdapter3.class) {
            return adapterType.cast(new TaskWorkbenchAdapter());
        }
        return null;
    }

    @Override
    public Class<?>[] getAdapterList() {
        return adapterList;
    }

}
Register the workbench adapter interfaces for your factory in the org.eclipse.core.runtime.adapters extension point.
21.4. Validate
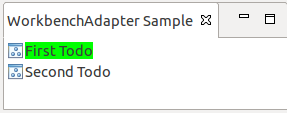
Run your workbench and open the WorkbenchAdapter Sample view. The result should look similar to this:
22. Eclipse Resources
You can register IResourceChangeListener on resources in Eclipse.
For example, if you have a project, you can add or remove a resource listener to or from it.
// add listener
project.getWorkspace().addResourceChangeListener(listener);

// Remove listener
project.getWorkspace().removeResourceChangeListener(listener);

// Example resource listener
private IResourceChangeListener listener = new IResourceChangeListener() {
        public void resourceChanged(IResourceChangeEvent event) {

        if (event.getType() == IResourceChangeEvent.PRE_CLOSE || event.getType() == IResourceChangeEvent.PRE_DELETE) {
                if (event.getResource().equals(project)) {
                    // Project deleted or closed
                    // do something
                }
                return;
            }

            if (resource == null)
                return;

            IResourceDelta delta = event.getDelta().findMember(new Path(resource.getURI().toPlatformString(false)));
            if (delta == null) {
                return;
            }

            if (delta.getKind() == IResourceDelta.REMOVED) {
                // Resource delete
                // do something
            }
        }

    };
23. Exercise: Create a feature for your plug-in
23.1. Create a feature project
Create a feature project for your plug-in and add your plug-in to this feature. You create a feature project via .
Create the feature project according to the following screenshots.

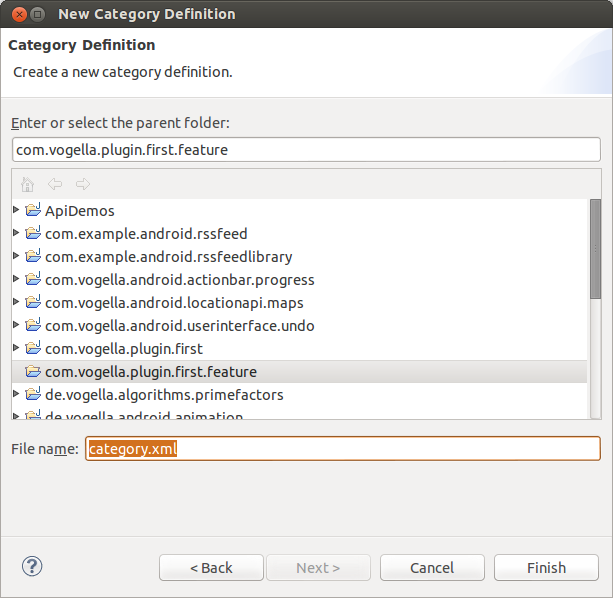
23.2. Create a category definition
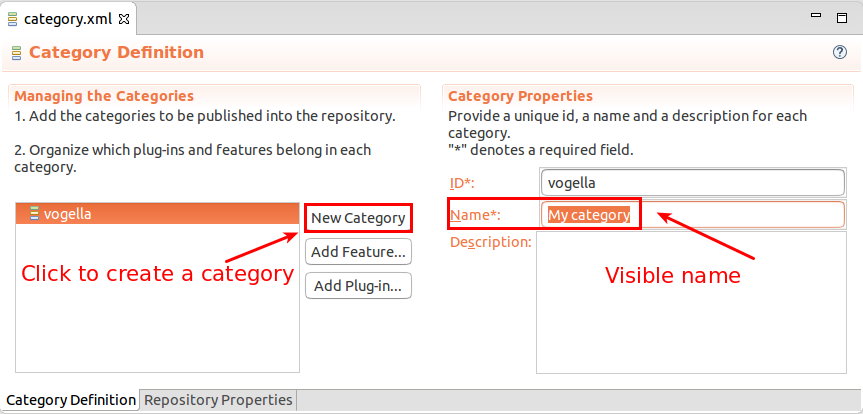
In your feature project create a new category definition, via the menu entry .
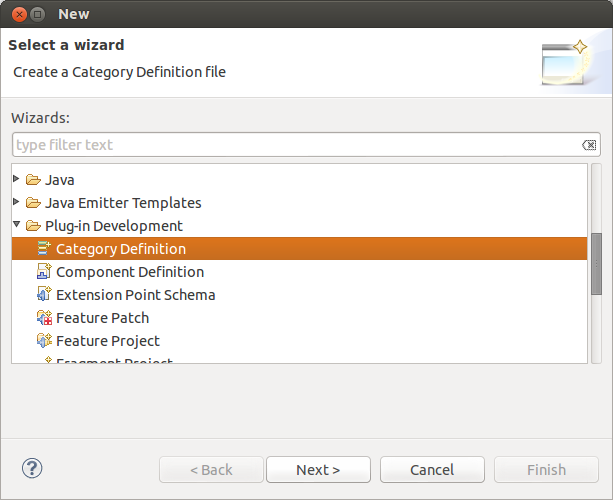
Press the New Category button and create a category with a name which describes your functionality. Add your feature to this category.
24. Exercise: Create an update site for your plug-in
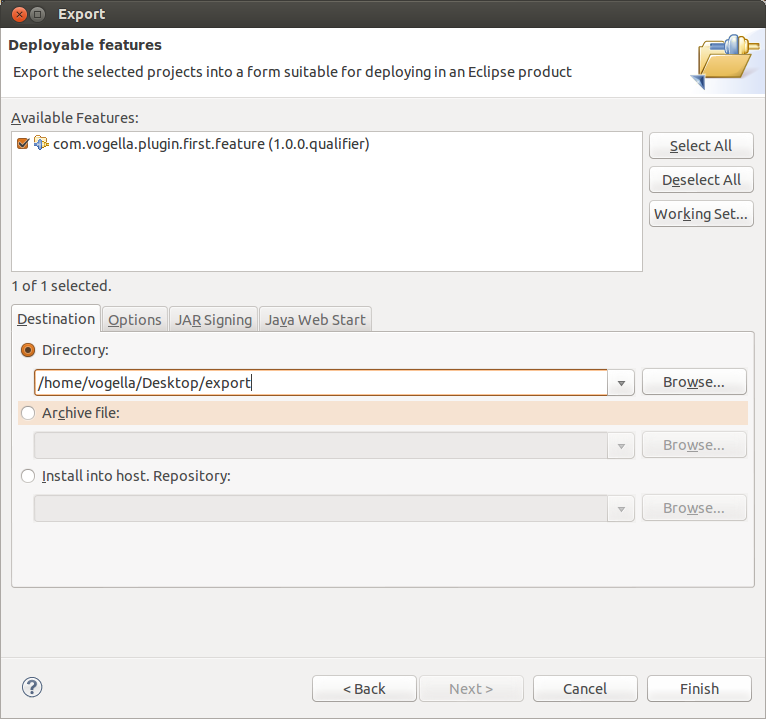
24.1. Create an update site
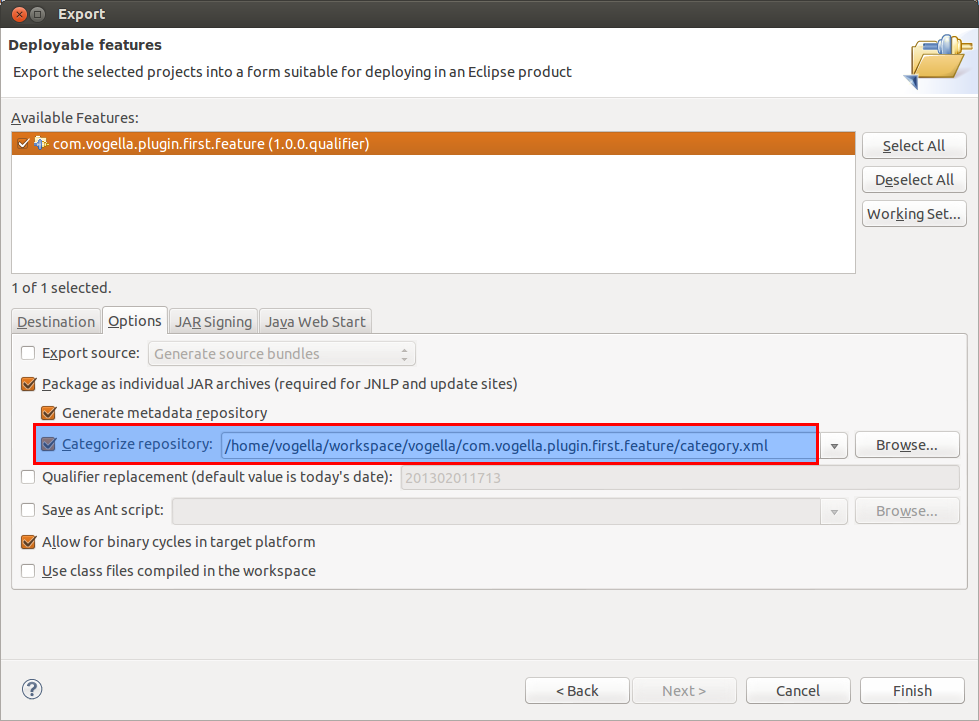
You can create an update site for your feature in a local directory on your machine. For this, select .
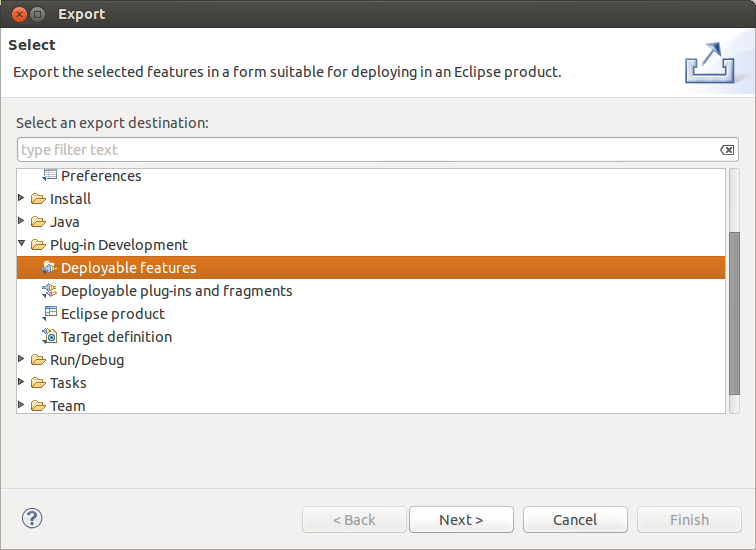
To use your category, switch to the Options tab and select the path to your category.xml file in the Categorize repository option.
24.2. Install feature via the Eclipse update manager
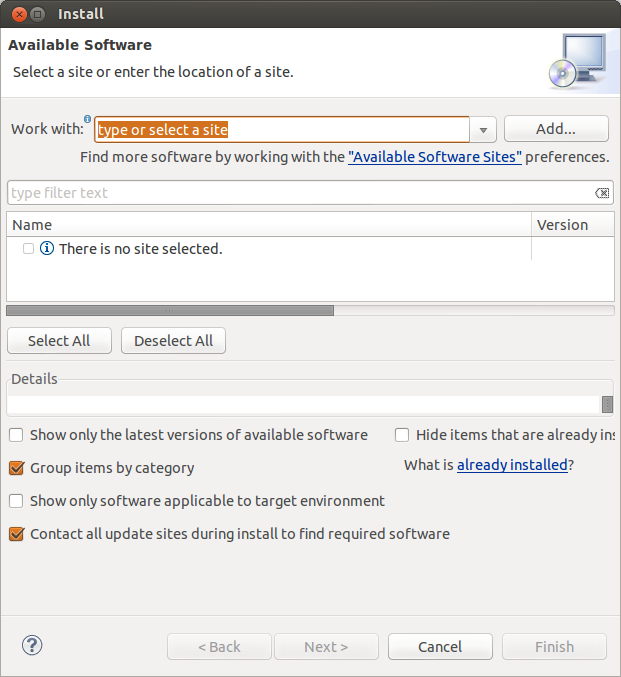
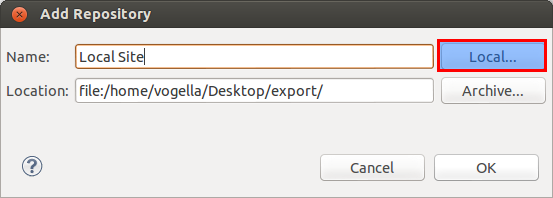
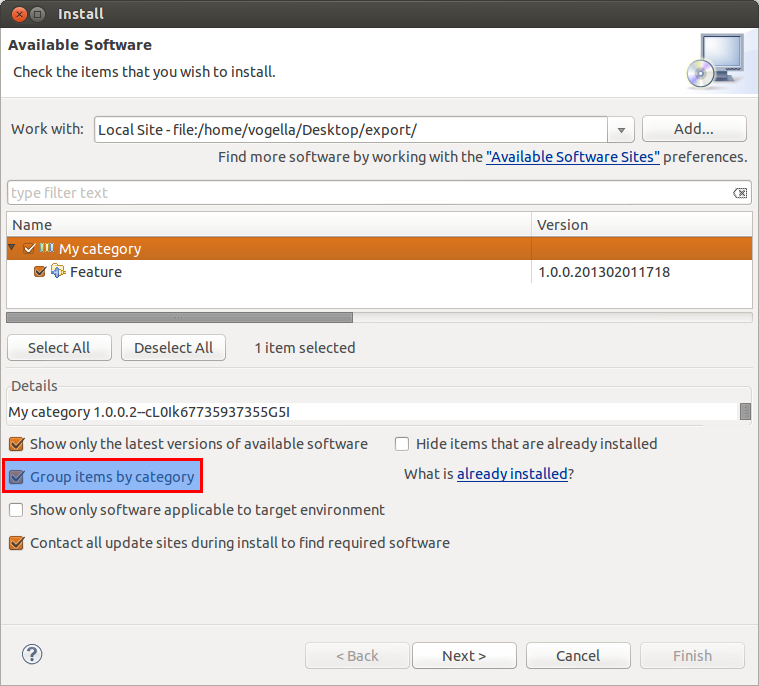
Use the Eclipse update manager via to install this new feature into your Eclipse IDE.
Use the update manager to point to your local directory. Then select and install your feature. In case you do not see your feature, try deselecting the Group items by category flag. In this case, you have forgotten to set your category during the export.
| If you put the resulting files on a webserver under a public accessible URL, your users could install your features from this URL. |
24.3. Validate installation
Restart the Eclipse IDE after the installation. Ensure that your plug-in is available in your Eclipse installation and can be used.

25. Eclipse plug-in development resources
25.1. vogella Java example code
If you need more assistance we offer Online Training and Onsite training as well as consulting