In this tutorial you create an example Flutter app to interact with Stackoverflow.
1. Prerequisite for this exercise
This exercise assumes that you have already a working Flutter installation.
See https://www.vogella.com/tutorials/Flutter/article.html for instructions.
2. Building a Flutter app to interact with Stackoverflow
In this exercise, you will develop a small "real" application that allows you to access StackOverflow questions from it. https://stackoverflow.com/ is a popular site for asking and answering questions about programming.
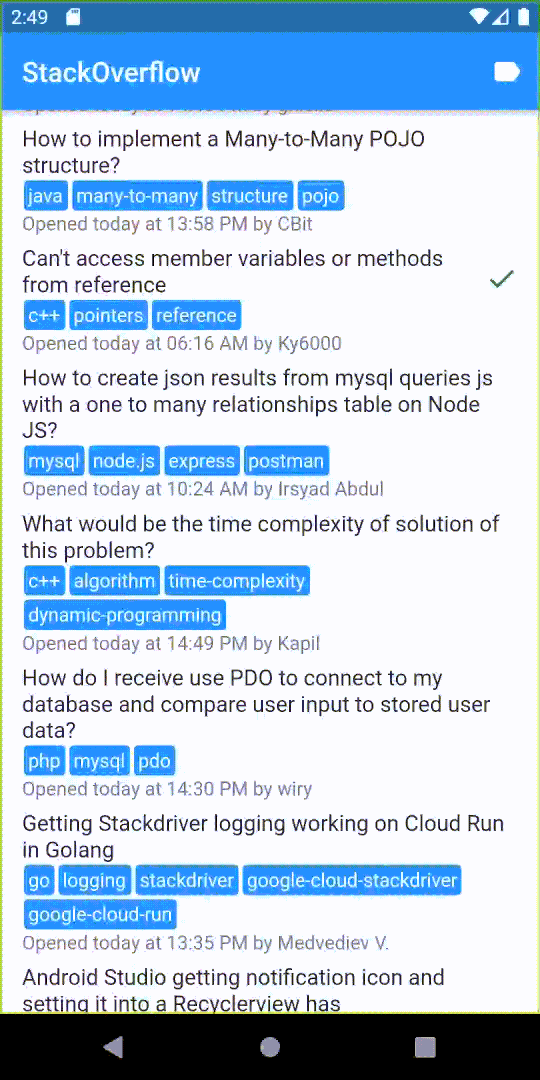
The application will look similar to the following screencast.
In this and the following exercises you learn:
-
How to read and parse JSON
-
How to access a REST API
-
How to build an overview screen and how to navigate to a detailed screen
2.1. Create a new application
Create a new flutter app called "flutter_stackoverflow" either via the following command line.
flutter create -a java --org com.vogella flutter_overflow (1)
| 1 | Specifies to use Java as the native Android language (instead of the default "kotlin") and sets the application base package to com.vogella. |
2.2. Dependencies
Change the dependency section in the pubspec.yaml file of your app to the following.
dependencies:
  flutter:
    sdk: flutter
  cupertino_icons: ^0.1.2
  json_annotation: ^2.0.0
  http: ^0.12.0+2
  provider: ^2.0.0
  flutter_markdown: ^0.3.0
  html_unescape: ^1.0.1+3
  intl: ^0.16.0
Also adjust the dev_dependencies to use later the json_annotation package during development.
dev_dependencies:
  flutter_test:
    sdk: flutter
  build_runner: ^1.0.0
  json_serializable: ^2.0.0
Additionally: Ensure that the minimum sdk version is at least >=2.7.0 in the environment field.
If your minimum version is higher, this is also fine.
If the dependencies are not automatically synchronized, run $ flutter pub get.
2.3. Directory Structure
Create the following directories inside the lib/ folder of your app.
-
components/ - Contains any reusable widgets
-
data/ - Contains data models of the JSON API
-
pages/ - Contains the different pages of the app
-
services/ - Contains service components
2.4. Create a Dart File for Utility Methods
Create a util.dart file in the lib/ folder with the following utility functions.
import 'package:html_unescape/html_unescape.dart';
import 'package:intl/intl.dart';

/// Converts a Unix Timestamp since epoch in seconds to [DateTime]
DateTime creationDateFromJson(int date) {
  return DateTime.fromMillisecondsSinceEpoch(date * 1000);
}

final HtmlUnescape htmlUnescape = HtmlUnescape();

/// Unescapes HTML in a string
String unescapeHtml(String source) {
  var convert = htmlUnescape.convert(source);
  return convert;
}

/// Formats a [DateTime]
///
/// If the supplied [DateTime]
/// - is on the same day as [DateTime.now()], return "today at HH:mm" = "today at 19:39"
/// - is yesterday relative to [DateTime.now()] return "yesterday at HH:mm" = "yesterday at 19:39"
/// - is in the current year return "MMM dd at HH:mm" = "Nov 11 at 19:39"
/// - "MMM dd yyyy at HH:mm" = "Nov 11 2018 at 19:39"
String formatDate(DateTime date) {
  var now = DateTime.now();
  if (date.year == now.year) {
    if (date.month == now.month) {
      if (date.day == now.day) {
        return 'today at ' + DateFormat('HH:mm').format(date);
      } else if (date.day == now.day - 1) {
        return 'yesterday at ' + DateFormat('HH:mm').format(date);
      }
    }
    // Using ' to escape the "at" portion of the output
    return DateFormat("MMM dd 'a't HH:mm").format(date);
  } else {
    return DateFormat("MMM dd yyyy 'a't HH:mm").format(date);
  }
}
2.5. Run Application
To ensure that your changes are consistent, start your application. It should start without errors, as we have not yet modified the application logic. That will be done in the next exercise.
3. Create your data model to communicate with a rest API
3.1. StackOverflow API explanation
The base URL for the Stackoverflow API is https://api.stackexchange.com/2.2. The relevant endpoints for your application are the following:
| Endpoint | Description | Documentation |
|---|---|---|
/questions |
Returns all questions |
|
/questions/{id}/answers |
Returns all answers to the supplied question |
|
StackExchange is the parent network of the StackOverflow and many more sites.
The specific community can be specified with the |
3.2. Create data models for user data and questions
Create a models.dart file in the lib/data/ folder. This file will contain data classes corresponding to the endpoints from above.
The following classes will not compile, we use a code generator in the next step to generate some code via the json_annotation library.
Create the following 'User` class in your data/models.dart file. It will be used to contain the user information from Stackoverflow.
import '../util.dart';
import 'package:json_annotation/json_annotation.dart';(1)

part 'models.g.dart'; (2)

@JsonSerializable(fieldRename: FieldRename.snake) (3)
class User {
  int reputation;
  int userId;
  String displayName;

  User(this.reputation, this.userId, this.displayName);

  factory User.fromJson(Map<String, dynamic> json) => _$UserFromJson(json); (4)
}| 1 | If the setup of the dependencies went well, the json_annotation package should be available |
| 2 | This file will be generated in the next step, part means that this file becomes part of the current file at runtime |
| 3 | Defines that the JSON uses snake case and that this mapping should be automatically done instead of using a rename in '@JsonKey(name: 'user_id')' |
| 4 | This method is generated |
Add the following Question class to your lib/data/models.dart file.
This will be used to store information about the question entity on StackOverflow.
@JsonSerializable(fieldRename: FieldRename.snake)
class Question {
  List<String> tags;
  User owner;
  @JsonKey(fromJson: unescapeHtml)
  String title;
  int questionId;
  @JsonKey(fromJson: creationDateFromJson)
  DateTime creationDate;
  bool isAnswered;
  int score;
  @JsonKey(fromJson: unescapeHtml)
  String bodyMarkdown;

  Question(
    this.tags,
    this.owner,
    this.title,
    this.questionId,
    this.creationDate,
    this.isAnswered,
    this.score,
    this.bodyMarkdown,
  );

  factory Question.fromJson(Map<String, dynamic> json) =>
      _$QuestionFromJson(json); (1)

  @override
  String toString() { (2)
    return "Title:" + title;
  }
}| 1 | This is a references to the functions you declared before and should resolve thanks to the import statement on top |
| 2 | The toString method will be used for debugging and testing |
3.3. Generating the files that handles the JSON response
Our above data model require some generate file for handling the JSON reponse.
The build_runner dev dependency added the $flutter pub run build_runner command.
It has two modes: build, which runs the generator once and watch, which watches for changes and regenerates changes automatically.
As there are more classes that need to be added, run the watch version.
flutter pub run build_runner watch (1)
| 1 | Generates the models.g.dart file and continues to watch the file system for changes and runs the generate command again if necessary. |
The first run takes a few seconds, after it finishes you should see a Succeeded message on the command line.
Afterwards, there should be a file called models.g.dart in the data/ directory.
As you used the watch mode, any changes you make to the models.dart file should automatically trigger a rebuild of the models.g.dart file.
|
In case the Then the build should run successfully. |
3.4. Create a data model class for answers
The answers on StackOverflow come in the following format:
{
    "owner": {
        "reputation": 33,
        "user_id": 9206337,
        "user_type": "registered",
        "profile_image": "<img_url>",
        "display_name": "Fardeen Khan",
        "link": "https://stackoverflow.com/users/9206337/fardeen-khan"
    },
    "is_accepted": false,
    "score": 3,
    "last_activity_date": 1554812926,
    "creation_date": 1554812926,
    "answer_id": 55592909,
    "question_id": 51901002,
    "body_markdown": "Some body"
}
Create a data model class Answer with the relevant fields in the models.dart file.
Keep in mind that the owner object is of type User which you created earlier
|
Solution example
@JsonSerializable(fieldRename: FieldRename.snake)
class Answer {
  User owner;
  bool isAccepted;
  int score;
  @JsonKey(fromJson: creationDateFromJson)
  DateTime creationDate;
  int answerId;
  @JsonKey(fromJson: unescapeHtml)
  String bodyMarkdown;

  Answer(
    this.owner,
    this.isAccepted,
    this.score,
    this.creationDate,
    this.answerId,
    this.bodyMarkdown,
  );

  factory Answer.fromJson(Map<String, dynamic> json) => _$AnswerFromJson(json);
}
If you started the build_runner command in watch mode it should automatically generate the missing constructor after you save the file.
3.5. Create a data class to handle errors
Sometimes, the API might return an error.
Create a data model class APIError with the relevant fields in the models.dart file to handle these error messages.
using the following JSON as a base structure:
{
  "error_id": 503,
  "error_message": "simulated",
  "error_name": "temporarily_unavailable"
}
Solution example
@JsonSerializable(fieldRename: FieldRename.snake)
class ApiError {
  @JsonKey(name: 'error_id')
  int statusCode;
  String errorMessage;
  String errorName;

  ApiError(this.statusCode, this.errorMessage, this.errorName);

  factory ApiError.fromJson(Map<String, dynamic> json) =>
      _$ApiErrorFromJson(json);
}
3.6. Check your code
Your code should be error free. Have a look at the generated code and try to understand it. It reads reasonable well for generated code, but keep in mind that it should not be modified by hand at any point.
Again, the app should look the same if you start it, as you did not modify any UI code.
4. Build the initial user interface of the StackOverflow application
The initial version of the application will not access the network. You will use dummy data objects in the UI. The network access is added in a later step.
4.1. Homepage
Create a new lib/pages/homepage.dart file.
In this file, create a new Homepage widget that extends StatefulWidget.
This widget should display an AppBar with the title "StackOverflow" and an IconButton action on the right that will later open a dialog to change the tags of the questions displayed on the homepage.
Its icon should be a Icons.label.
Use a Placeholder widget for the body attribute.
Solution example
import 'dart:async';

import 'package:flutter/material.dart';

class Homepage extends StatefulWidget {
  Homepage({Key key}) : super(key: key);

  @override
  _HomepageState createState() => _HomepageState();
}

class _HomepageState extends State<Homepage> {

  @override
  Widget build(BuildContext context) {
    return Scaffold(
      appBar: AppBar(
        actions: <Widget>[
          IconButton(
            icon: Icon(Icons.label),
            onPressed: () {},
          )
        ],
        title: Text('StackOverflow'),
      ),
      body: Placeholder(),
    );
  }
}
4.2. Create a widget to display tags
On StackOverflow nearly all questions have "tags". These describe what the topic of the question is. As there are multiple places where these should be displayed, we will create a separate UI component for that.
Create a new file in the components/ directory named tag.dart.
Afterwards, create a StatelessWidget called Tag.
Combine different widgets so that is looks similar to the following screenshot.

To build this widget, you can use the following tips.
Use Container with its decoration property and a BoxDecoration widget.
|
| If you have no idea how to design this, use a Text widget |
Solution example
import 'package:flutter/material.dart';

class Tag extends StatelessWidget {
  final String _text;

  const Tag(this._text, {Key key}) : super(key: key);

  @override
  Widget build(BuildContext context) {
    return Container(
      padding: EdgeInsets.all(3.0),
      decoration: BoxDecoration(
        color: Colors.blue,
        borderRadius: BorderRadius.circular(3.0),
      ),
      child: Text(
        _text,
        style: TextStyle(color: Colors.white),
      ),
      margin: EdgeInsets.all(1.5),
    );
  }
}
Frequently StackOverflow questions are tagged with multiple tags, and the API returns these as a list of strings.
Therefore, add a static helper method to the Tag class that receives a List<String> and returns a List<Widget>.
Use the map(…) method of Dart lists to return a Widget for every entry in the list.
|
Solution example
static List<Widget> fromTags(List<String> tags) {
  return tags.map((String tag) {
    return Tag(tag);
  }).toList();
}
4.3. Add imports to homepage.dart
Ensure the following imports are present in homepage.dart:
import 'package:flutter/material.dart';
import 'package:flutter_stackoverflow/data/models.dart';
import 'package:flutter_stackoverflow/util.dart';
import 'package:flutter_stackoverflow/components/tag.dart';
4.4. Create a new private QuestionTile widget
Back in homepage.dart file create a new StatelessWidget called _QuestionTile.
This class will be used to display one question on the homepage.
The _ means that this is a private class that can only be used in homepage.dart.
|
The following code can be used as template:
class _QuestionTile extends StatelessWidget {
  final Question _question; (1)

  _QuestionTile(this._question, {Key key}) : super(key: key);

  @override
  Widget build(BuildContext context) {
    return ListTile(
      title: Text(_question.title),
      subtitle: Column(
        crossAxisAlignment: CrossAxisAlignment.start,
        children: <Widget>[
          Wrap(children: Tag.fromTags(_question.tags)), (2)
          Text(
            'Opened ${formatDate(_question.creationDate)} by ${_question.owner.displayName}',
          )
        ],
      ),
      trailing: _question.isAnswered
          ? Icon(Icons.check, color: Colors.green[800])
          : null,
      onTap: () {
        // TODO: Add navigation logic to navigate to the question page
      },
    );
  }
}| 1 | This class is the Question class from models.dart file you created earlier.
If it does not resolve, make sure to import your internal files at the top of homepage.dart. |
| 2 | The Wrap widget makes sure that its contents are broken over to the next line, should they not fit on the screen. |
4.4.1. Create some example test data
In your _HomepageState class instantiate a instance of the Question data class which we will use to test our UI.
lass _HomepageState extends State<Homepage> {
  var question = Question(
    ["Flutter"],
    User(1, 1, "Jonas"),
    "What about a REST API?",
    1,
    DateTime.now(),
    true,
    100,
    "# Some Markdown?",
  );

  @override
  Widget build(BuildContext context) {
   // AS BEFORE, LEFT OUT FOR BREVITY
  }
}-
Use the
_QuestionTilewidget instead of thePlaceholder`widget in the `bodyof the scaffold on the homepage -
Pass the dummy
Questioninstance from the first step to the constructor of the_QuestionTile.
4.5. QuestionPage
Create a new file named question_page.dart in the lib/pages/ directory.
Inside it, create a StatefulWidget called QuestionPage and the required State class.
This widget will be used to display the body of a Question data element.
The QuestionPage should receive a parameter _question that initializes a private, final field _question of type Question.
This will be the question that is displayed.
The _QuestionPageState should return a Scaffold with an AppBar that displays the questions title field as its title.
The body should be a LinearProgressIndicator for now.
You can access private properties in your StatefulWidget from the State via the widget property, e.g., widget._question to access the field in your StatefulWidget.
|
Solution example
import 'package:flutter/material.dart';
import 'package:flutter_stackoverflow/data/models.dart';

class QuestionPage extends StatefulWidget {
  final Question _question;

  QuestionPage(this._question, {Key key}) : super(key: key);

  @override
  _QuestionPageState createState() => _QuestionPageState();
}

class _QuestionPageState extends State<QuestionPage> {
  _QuestionPageState();

  @override
  Widget build(BuildContext context) {
    return Scaffold(
      appBar: AppBar(
        title: Text(widget._question.title),
      ),
      body: LinearProgressIndicator(),
    );
  }
}
4.5.1. Display QuestionPage on Tap
Implement that the QuestionPage is displayed if the user selects an item in the homepage.
onTap: () {
  Navigator.push(
    context,
    MaterialPageRoute(builder: (context) => QuestionPage(this._question)),
  );
  // TODO: Add navigation logic to navigate to the question page
},
In your application, test that the user, sees the progress indicator if they tap on the dummy question entry.

4.6. _QuestionPart
In the same file, create another StatelessWidget called _QuestionPart.
This will display the body, title, tags and other metadata of the question at the top of the screen.

Solution example
class _QuestionPart extends StatelessWidget {
  final Question _question;

  _QuestionPart(this._question, {Key key}) : super(key: key);

  @override
  Widget build(BuildContext context) {
    return Container(
      padding: EdgeInsets.symmetric(horizontal: 3.0, vertical: 8.0),
      child: Column(
        children: <Widget>[
          Row(
            children: <Widget>[
              Flexible(
                fit: FlexFit.tight,
                flex: 2,
                child: Container(
                  child: Text(
                    '${_question.score}',
                    style: TextStyle(fontSize: 25),
                    textAlign: TextAlign.center,
                  ),
                ),
              ),
              Flexible(
                fit: FlexFit.loose,
                flex: 8,
                child: Column(
                  crossAxisAlignment: CrossAxisAlignment.start,
                  children: <Widget>[
                    Text('${_question.title}', style: TextStyle(fontSize: 20)),
                    Wrap(children: Tag.fromTags(_question.tags)),
                    Text(
                      'Opened ${formatDate(_question.creationDate)} by ${_question.owner.displayName}',
                    ),
                  ],
                ),
              ),
            ],
          ),
          Divider(
            color: Colors.black,
            height: 10.0,
          ),
          MarkdownBody(data: _question.bodyMarkdown),
          Divider(
            color: Colors.black,
            height: 10.0,
          ),
        ],
      ),
    );
  }
}
Now instead of creating a LinearProgressIndicator, create an instance of your _QuestionPart in your _QuestionPageState.
Later, you will also add the answers to the body of the _QuestionPageState and to prevent an overflow error, you should wrap the _QuestionPart in a ListView.
|

5. Links and Literature
5.2. vogella Flutter and Dart example code
If you need more assistance we offer Online Training and Onsite training as well as consulting