This tutorial follows the General Flutter tutorial and gives an introduction into developing a flutter application with hands-on projects.
1. Exercise: Build a simple, interactive Flutter app
This exercise assumes that you have a newly created Flutter app, called flutterui. This is also the folder in which this app is located.
See Creating a new Flutter project with VSCode for creating this application.
This should look similar to the following:
In this exercise, you modify the generated flutterui Flutter app.
You will learn:
-
How to import a Dart file into another Dart file
-
How to implement a button and how to show a dialog
1.1. Remove generated test class
The template has generated a test class, which is good but for the purpose of this exercise not helpful, as it will give us errors if we change the application without adjusting the test.
To continue learning basic app development, delete the test\widget_test.dart file.
| Of course, software testing is important but it is also good to focus on learning basic application development. |
1.2. Change generated application
As a first step, let’s change the generated application.
Open the lib/main.dart file, delete the whole content and replace it with the following code.
import 'package:flutter/material.dart';

void main() => runApp(MyApp());

class MyApp extends StatelessWidget {
  @override
  Widget build(BuildContext context) {
    return MaterialApp(
      title: 'Welcome to Flutter',
      home: Scaffold(
        appBar: AppBar(
          title: Text('Welcome to Flutter'),
        ),
        body: Center(
          child: Text('Hello World'),
        ),
      ),
    );
  }
}
Run this application and ensure that the text is displayed on the emulator.
2. Exercise: Hide unwanted warnings
The Flutter tooling checks during development for bad programming patterns. Certain checks depend on the code and as we modify during development this code constantly, certain warnings make it harder to modify the code.
Therefore, while you are learning Flutter and constantly changing your code, you may want to turn off a few of these warnings. During the final touches of app development (before publishing it), you would enable these warnings again and fix them.
To ignore a few warnings which show a lot of warnings during development, you can open the analysis_options.yaml file and replace its content with the following:
include: package:flutter_lints/flutter.yaml

linter:
  rules:
    prefer_const_constructors: false
    prefer_const_constructors_in_immutables: false
    prefer_const_literals_to_create_immutables: false
2.1. Splitting up the code in multiple dart files
Splitting up your code in multiple files helps keep an overview of your code.
Therefore, in the lib folder, create a new file named homepage.dart with the following content.
import 'package:flutter/material.dart';
class MyHomePage extends StatelessWidget {
final String title;
MyHomePage(this.title); (1)
@override
Widget build(BuildContext context) {
return Scaffold(
appBar: AppBar(
title: Text(title),
),
body: Center(
child: Column(
mainAxisAlignment: MainAxisAlignment.center,
children: [
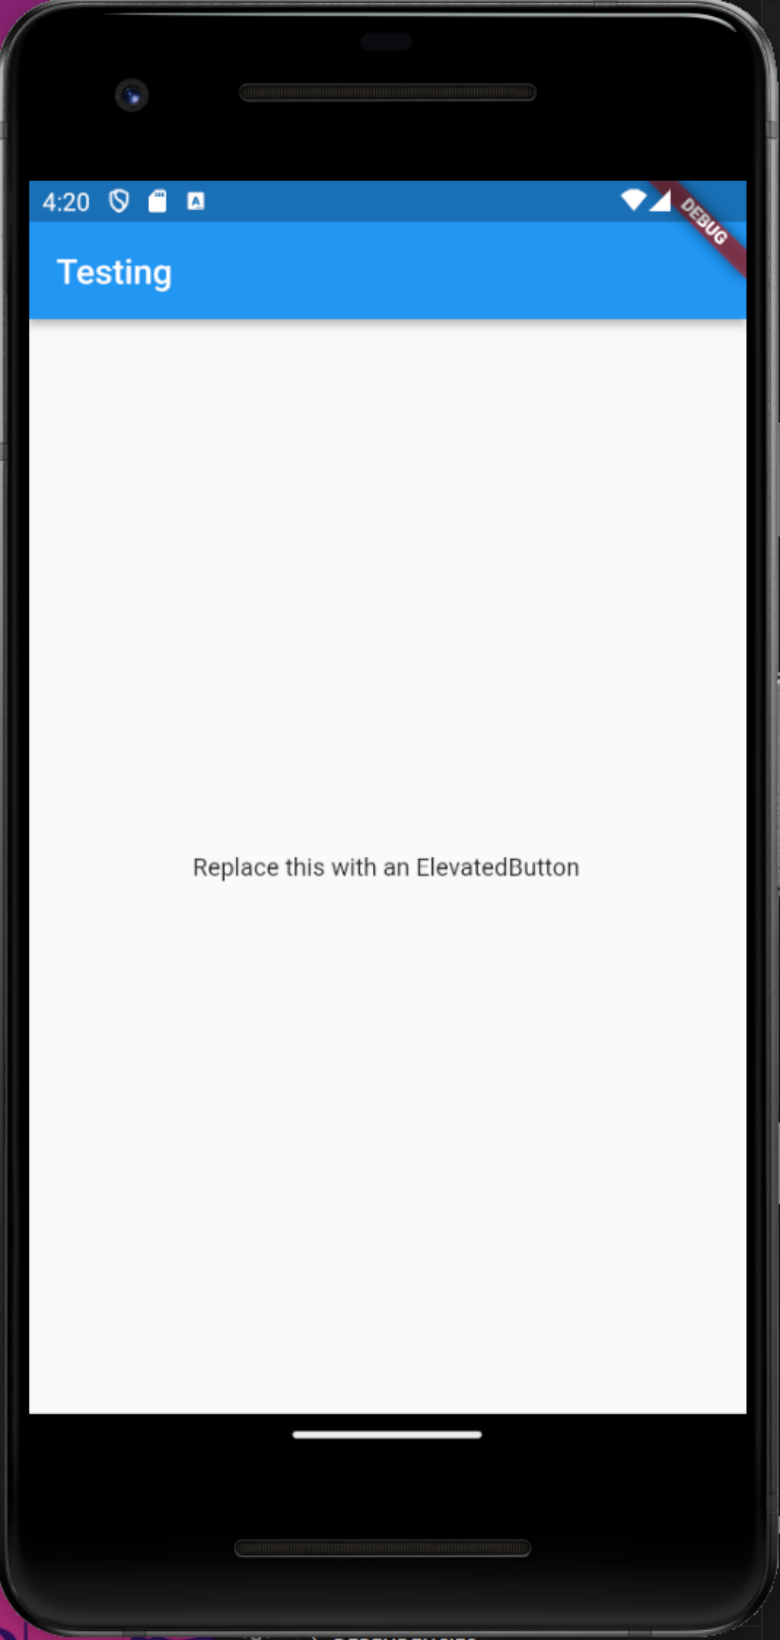
Text('Replace this with an ElevatedButton'),
],
),
),
);
}
}| 1 | Constructor parameter so that you can set the title in the application bar. |
Change the code in the main.dart file to use the new MyHomePage widget.
First, you need to import the homepage.dart file, this gives you access to the widgets in this file.
Afterwards, change the code to the following
import 'package:flutter/material.dart';
import 'package:flutterui/homepage.dart';

void main() => runApp(MyApp());

class MyApp extends StatelessWidget {
  @override
  Widget build(BuildContext context) {
    return MaterialApp(
      title: 'Welcome to Flutter',
      home: MyHomePage("Testing"),    (1)
    );
  }
}| 1 | This uses your new widget MyHomePage as property of the home key for the material app. |
Start your app. You may have to restart your application, hot reload does not always work if you make bigger changes to your application.
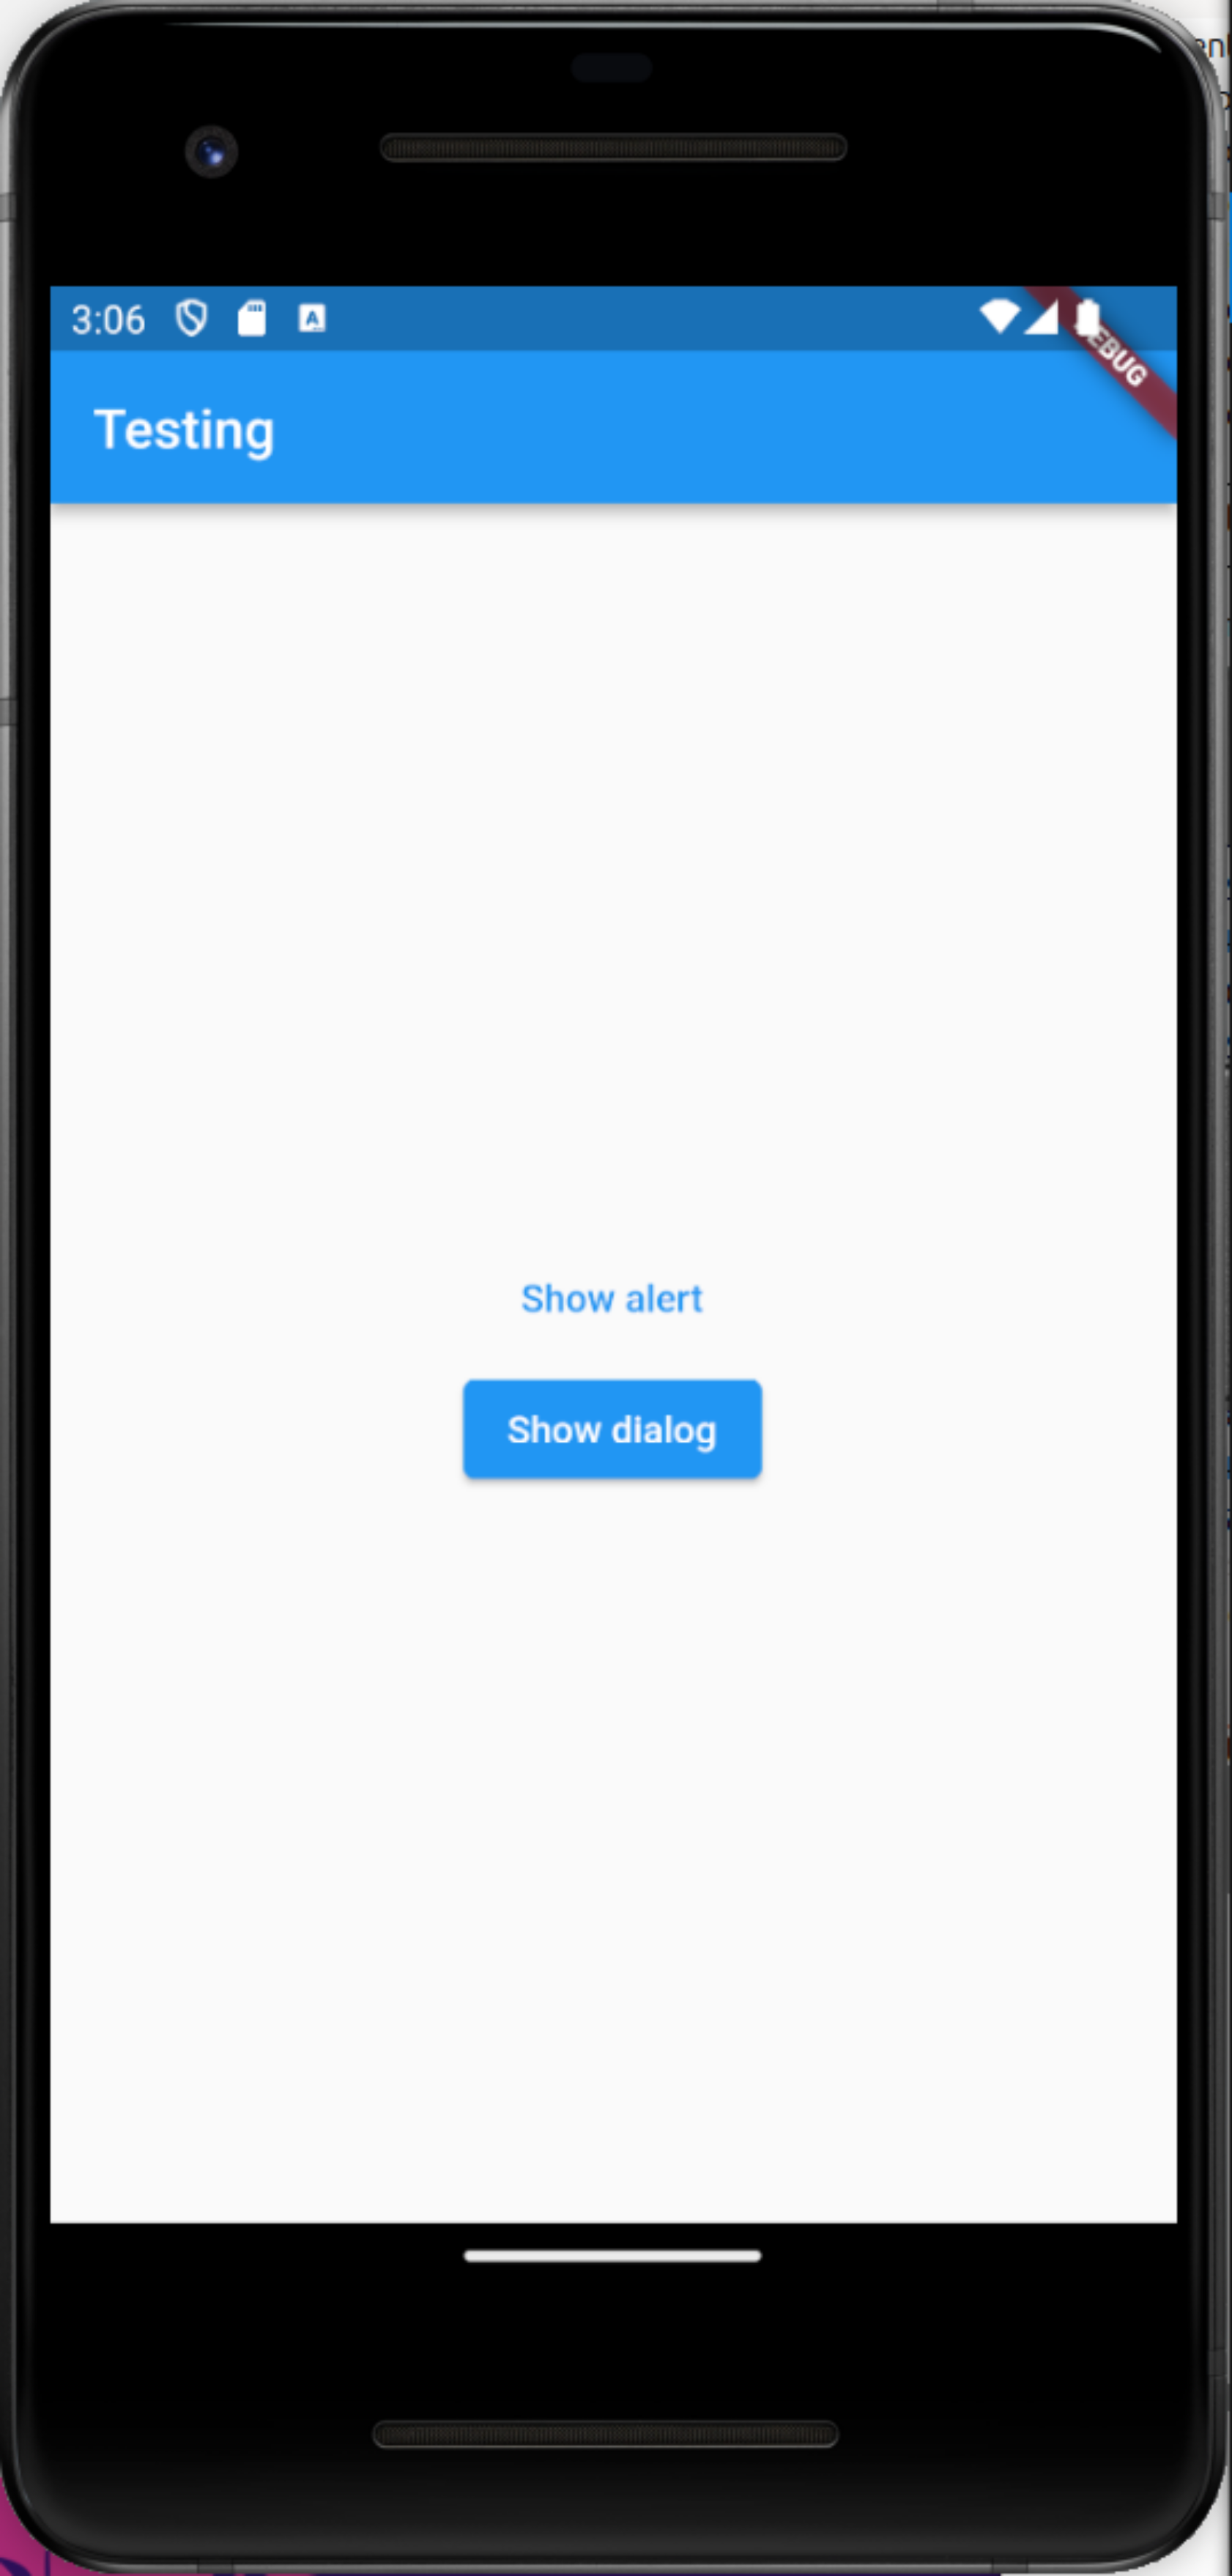
Run your application afterwards and ensure you see the Replace this with an ElevatedButton.
2.2. Use an ElevatedButton
Replace the Text widget in your MyHomePage widget with an ElevatedButton.
ElevatedButton(
    onPressed: () {
        print("hello");
    },
    child: Text('Show dialog'),      (1)
),| 1 | trailing comma for consistent formatting. It is recommended to always use a trailing comma after setting attributes or widgets. This leads to a consistent and readable formatting. |
The full code in main.dart should look like the following:
import 'package:flutter/material.dart';

class MyHomePage extends StatelessWidget {
  final String title;
  MyHomePage(this.title); (1)

  @override
  Widget build(BuildContext context) {
    return Scaffold(
      appBar: AppBar(
        title: Text(title),
      ),
      body: Center(
        child: Column(
          mainAxisAlignment: MainAxisAlignment.center,
          children: <Widget>[
            ElevatedButton(
              onPressed: () {
                print("hello");
              },
              child: Text('Show dialog'),
            ), (2)
          ],
        ),
      ),
    );
  }
}
2.3. Run the application
Do a hot reload and ensure you see now the button on the emulator. If you are using an IDE you need to save to trigger a hot reload.

If you press the button, you should see the output in your DEBUG CONSOLE in VsCode.
2.4. Wrap your body widget into a new widget
Open your homepage.dart`file and check the `body property.
The body property of the MyHomePage widget defines a Center widget as a value.
This child widget contains several other widgets.
Extract this widgets so that the code is easier to read.
Therefore, move the widget assigned to the body property into a custom widget called MyContent.
Put this widget in the homepage.dart file, Dart does not require that every widget is in its own file.
Solution example
class MyContent extends StatelessWidget {
  @override
  Widget build(BuildContext context) {
    return Center(
      child: Column(
        mainAxisAlignment: MainAxisAlignment.center,
        children: <Widget>[
          ElevatedButton(
            onPressed: () {
              print("hello");
            },
            child: Text('Show dialog'),
          ),
        ],
      ),
    );
  }
Use your new widget in your MyHomepage widget.
Solution example
class MyHomePage extends StatelessWidget {
  final String title;
  MyHomePage(this.title);

  @override
  Widget build(BuildContext context) {
    return Scaffold(
      appBar: AppBar(
        title: Text(title),
      ),
      body: MyContent(),
    );
  }
}
2.5. Show a message (snackbar) once the button is pressed
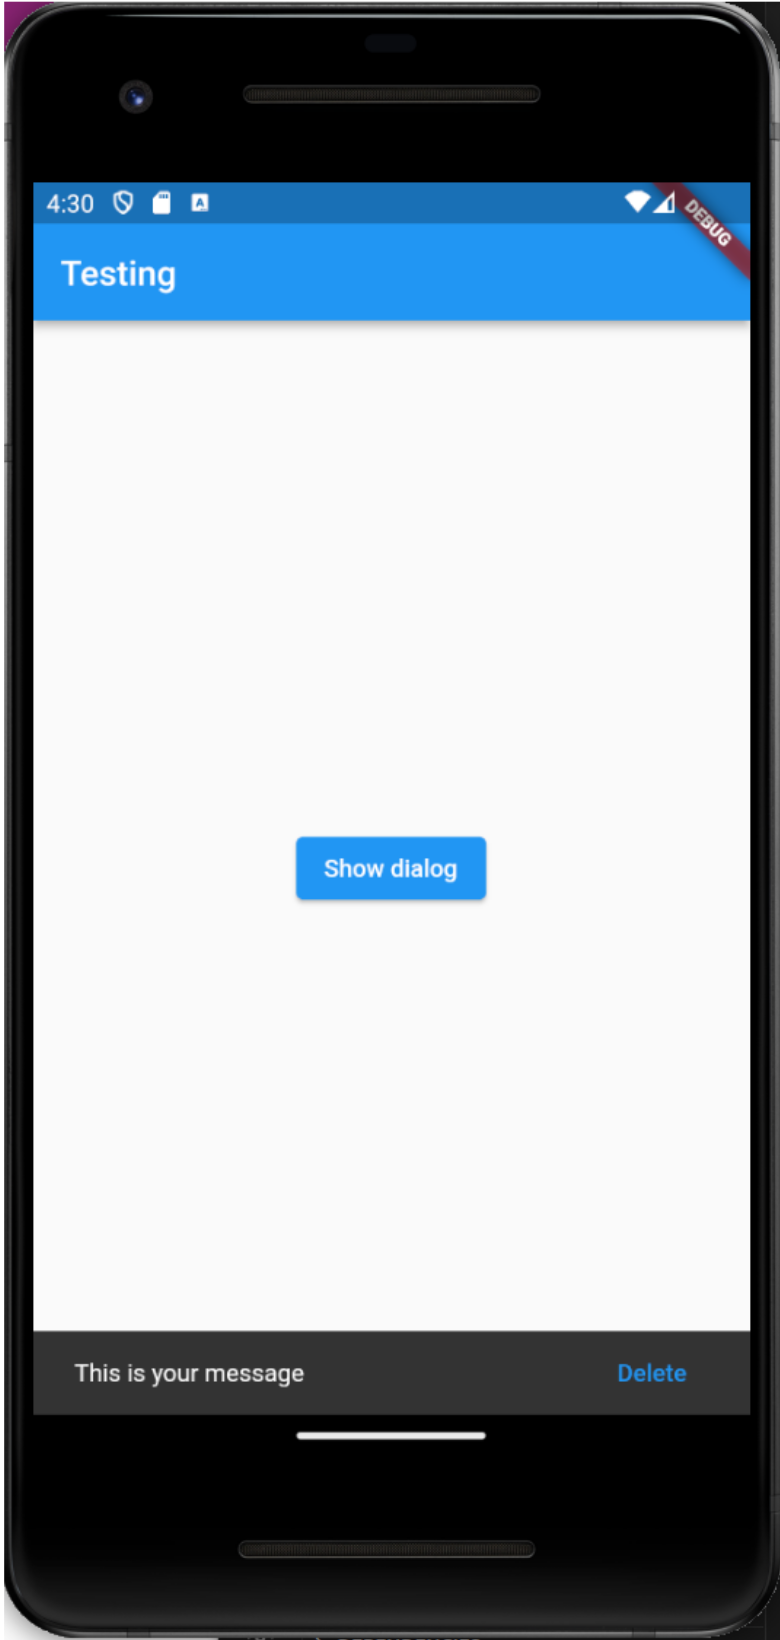
Now you want to display a message once the ElevatedButton is clicked.
According to the material design specification a snackbar is a brief message about app processes at the bottom of the screen.
Have a short look at https://material.io/components/snackbars/ to get a visual impression about the usage.
Use the following private method in your MyContent widget.
This method allows to show a snackbar.
SnackBar _createSnackBar() {
  var snackbar = SnackBar(
    content: Text('This is your message'),
    action: SnackBarAction(
      label: 'Delete',
      onPressed: () {},
    ),
  );
  return snackbar;
}
Show this snackbar if the ElevatedButton is pressed.
ElevatedButton(
  onPressed: () {
    var snackebar = _createSnackBar();
    ScaffoldMessenger.of(context).showSnackBar(snackebar);
  },
  child: Text('Show dialog'),
),
Solution example
class MyContent extends StatelessWidget {
  @override
  Widget build(BuildContext context) {
    return Center(
      child: Column(
        mainAxisAlignment: MainAxisAlignment.center,
        children: <Widget>[
          ElevatedButton(
              onPressed: () {
                var snackbar = _createSnackBar();
                ScaffoldMessenger.of(context).showSnackBar(snackbar);
              },
              child: Text('Show dialog'),
          ),
        ],
      ),
    );
  }

  SnackBar _createSnackBar() {
    var snackbar = SnackBar(
      content: Text('This is your message'),
      action: SnackBarAction(
        label: 'Delete',
        onPressed: () {},
      ),
    );
    return snackbar;
  }
}
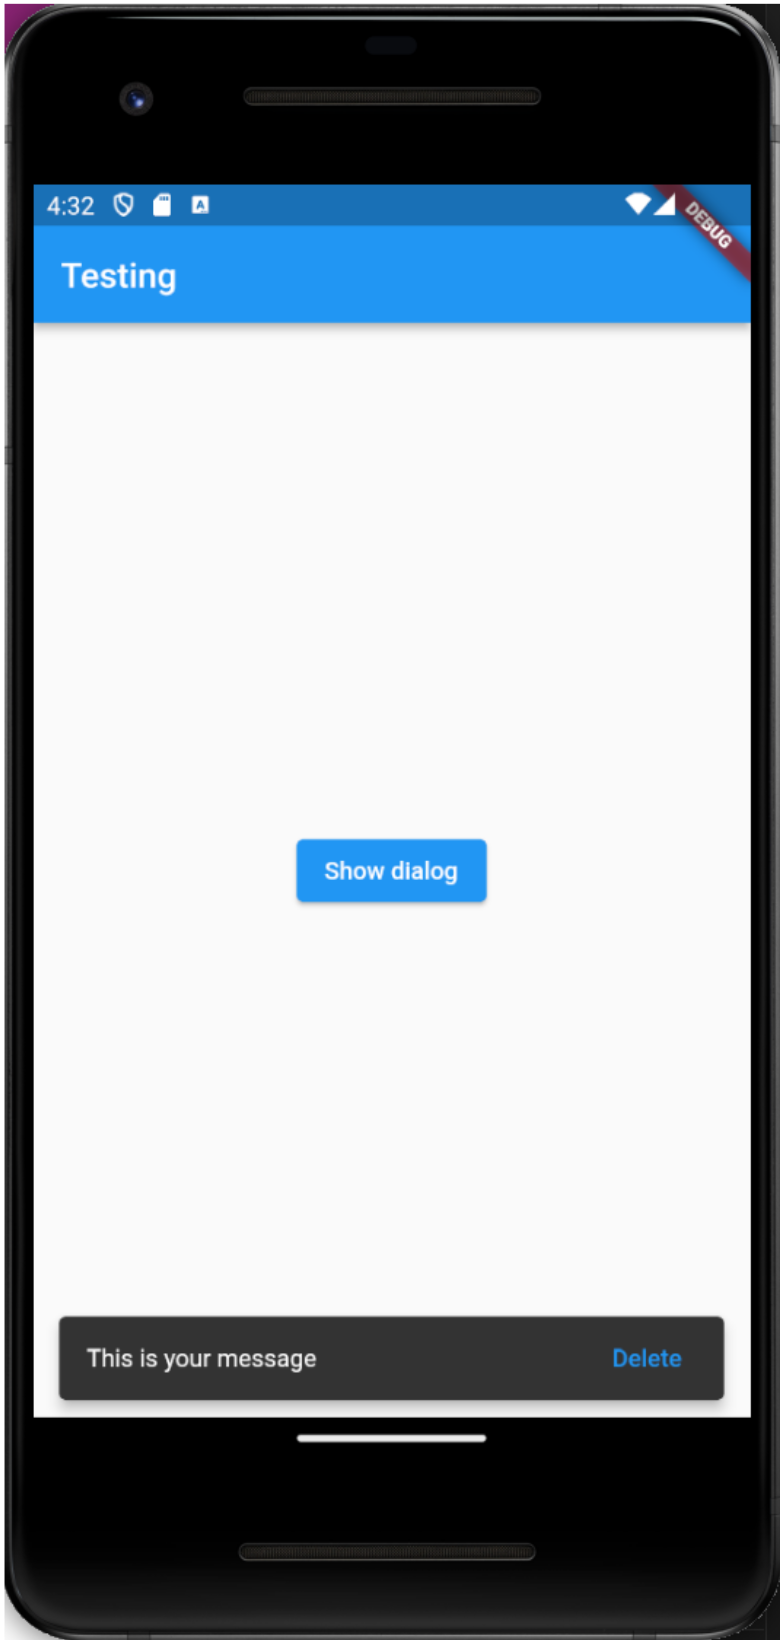
The created Snackbar is not floating so it doesn’t looks like the material design specification.
Set the behavior: SnackBarBehavior.floating property on your snackbar to get the material design look and feel.
 SnackBar _createSnackBar() {
    var snackbar = SnackBar(
      behavior: SnackBarBehavior.floating,
      content: Text('This is your message'),
      action: SnackBarAction(
        label: 'Delete',
        onPressed: () {},
      ),
    );
    return snackbar;
  }
2.6. Showing an alert after the button click
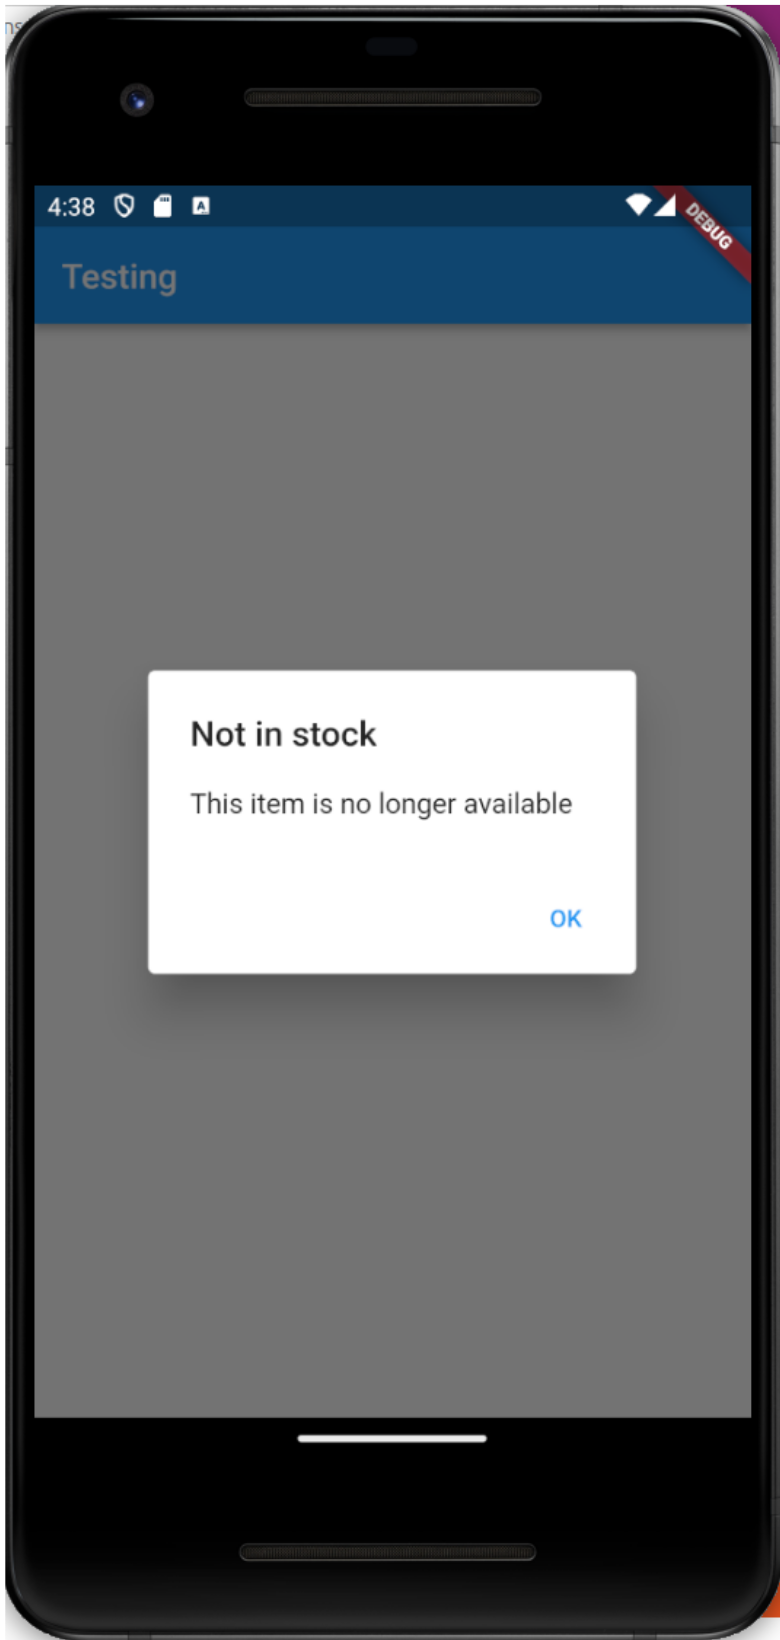
You now want to show a custom dialog (alert) to your users.
Create the following private function in the homepage.dart file to your MyContent widget.
Future<void> _ackAlert(BuildContext context) {
  return showDialog<void>(
    context: context,
    builder: (BuildContext context) {
      return AlertDialog(
        title: Text('Not in stock'),
        content: const Text('This item is no longer available'),
        actions: <Widget>[
          TextButton(
            child: Text('OK'),
            onPressed: () {
              Navigator.of(context).pop();
            },
          ),
        ],
      );
    },
  );
}
Add a TextButton before the ElevatedButton as child to the Column of your MyContent widget.
Call the _ackAlert function if the user presses the TextButton.
Solution example
import 'package:flutter/material.dart';

class MyHomePage extends StatelessWidget {
  final String title;
  MyHomePage(this.title); (1)

  @override
  Widget build(BuildContext context) {
    return Scaffold(
      appBar: AppBar(
        title: Text(title),
      ),
      body: MyContent(),
    );
  }
}

class MyContent extends StatelessWidget {
  @override
  Widget build(BuildContext context) {
    return Center(
      child: Column(
        mainAxisAlignment: MainAxisAlignment.center,
        children: <Widget>[
          TextButton(
            onPressed: () {
              _ackAlert(context);
            },
            child: Text('Show alert'),
          ),
          ElevatedButton(
            onPressed: () {
              var snackbar = _createSnackBar();
              ScaffoldMessenger.of(context).showSnackBar(snackbar);
            },
            child: Text('Show dialog'),
          ),
        ],
      ),
    );
  }

  SnackBar _createSnackBar() {
    var snackbar = SnackBar(
      content: Text('This is your message'),
      action: SnackBarAction(
        label: 'Delete',
        onPressed: () {},
      ),
    );
    return snackbar;
  }

  Future<void> _ackAlert(BuildContext context) {
    return showDialog<void>(
      context: context,
      builder: (BuildContext context) {
        return AlertDialog(
          title: Text('Not in stock'),
          content: const Text('This item is no longer available'),
          actions: <Widget>[
            TextButton(
              child: Text('OK'),
              onPressed: () {
                Navigator.of(context).pop();
              },
            ),
          ],
        );
      },
    );
  }
}
2.7. Cleanup your implementation
The MyContent widget has grown in size.
Move it to its own file called content.dart and import this file in your homepage.dart file to use it there.
content.dart should look like this:
import 'package:flutter/material.dart';

class MyContent extends StatelessWidget {
  @override
  Widget build(BuildContext context) {
    return Center(
      child: Column(
        mainAxisAlignment: MainAxisAlignment.center,
        children: <Widget>[
          TextButton(
            onPressed: () {
              _ackAlert(context);
            },
            child: Text('Show alert'),
          ),
          ElevatedButton(
            onPressed: () {
              var snackebar = _createSnackBar();
              ScaffoldMessenger.of(context).showSnackBar(snackebar);
            },
            child: Text('Show dialog'),
          ),
        ],
      ),
    );
  }

  SnackBar _createSnackBar() {
    var snackbar = SnackBar(
      behavior: SnackBarBehavior.floating,
      content: Text('This is your message'),
      action: SnackBarAction(
        label: 'Delete',
        onPressed: () {},
      ),
    );
    return snackbar;
  }

  Future<void> _ackAlert(BuildContext context) {
    return showDialog<void>(
      context: context,
      builder: (BuildContext context) {
        return AlertDialog(
          title: Text('Not in stock'),
          content: const Text('This item is no longer available'),
          actions: <Widget>[
            TextButton(
              child: Text('OK'),
              onPressed: () {
                Navigator.of(context).pop();
              },
            ),
          ],
        );
      },
    );
  }
}
homepage.dart should look like this:
import 'package:flutter/material.dart';
import 'package:flutterui/content.dart';

class MyHomePage extends StatelessWidget {
  final String title;
  MyHomePage(this.title);

  @override
  Widget build(BuildContext context) {
    return Scaffold(
      appBar: AppBar(
        title: Text(title),
      ),
      body: MyContent(),
    );
  }
}
2.8. Wrap your buttons
What happens, if you add 20 more buttons to your MyContent widget?
Now you can use a for loop to generate widgets as additional child.
  for (int i = 1; i < 20; i++)
    ElevatedButton(
      onPressed: () {},
      child: Text(i.toString()),
  ),
Solution example
class MyContent extends StatelessWidget {
  @override
  Widget build(BuildContext context) {
    return Center(
      child: Column(
        mainAxisAlignment: MainAxisAlignment.center,
        children: <Widget>[
          TextButton(
              onPressed: () {
                _ackAlert(context);
              },
              child: Text('Show alert')),
          ElevatedButton(
              onPressed: () {
                var snackebar = _createSnackBar();
                ScaffoldMessenger.of(context).showSnackBar(snackebar);
              },
              child: Text('Show dialog'),
             ),
          for (int i = 1; i < 20; i++)
            ElevatedButton(
              onPressed: () {},
              child: Text(i.toString()),
            ),
        ],
      ),
    );
  }
    // the methods for snakebar and dialog
}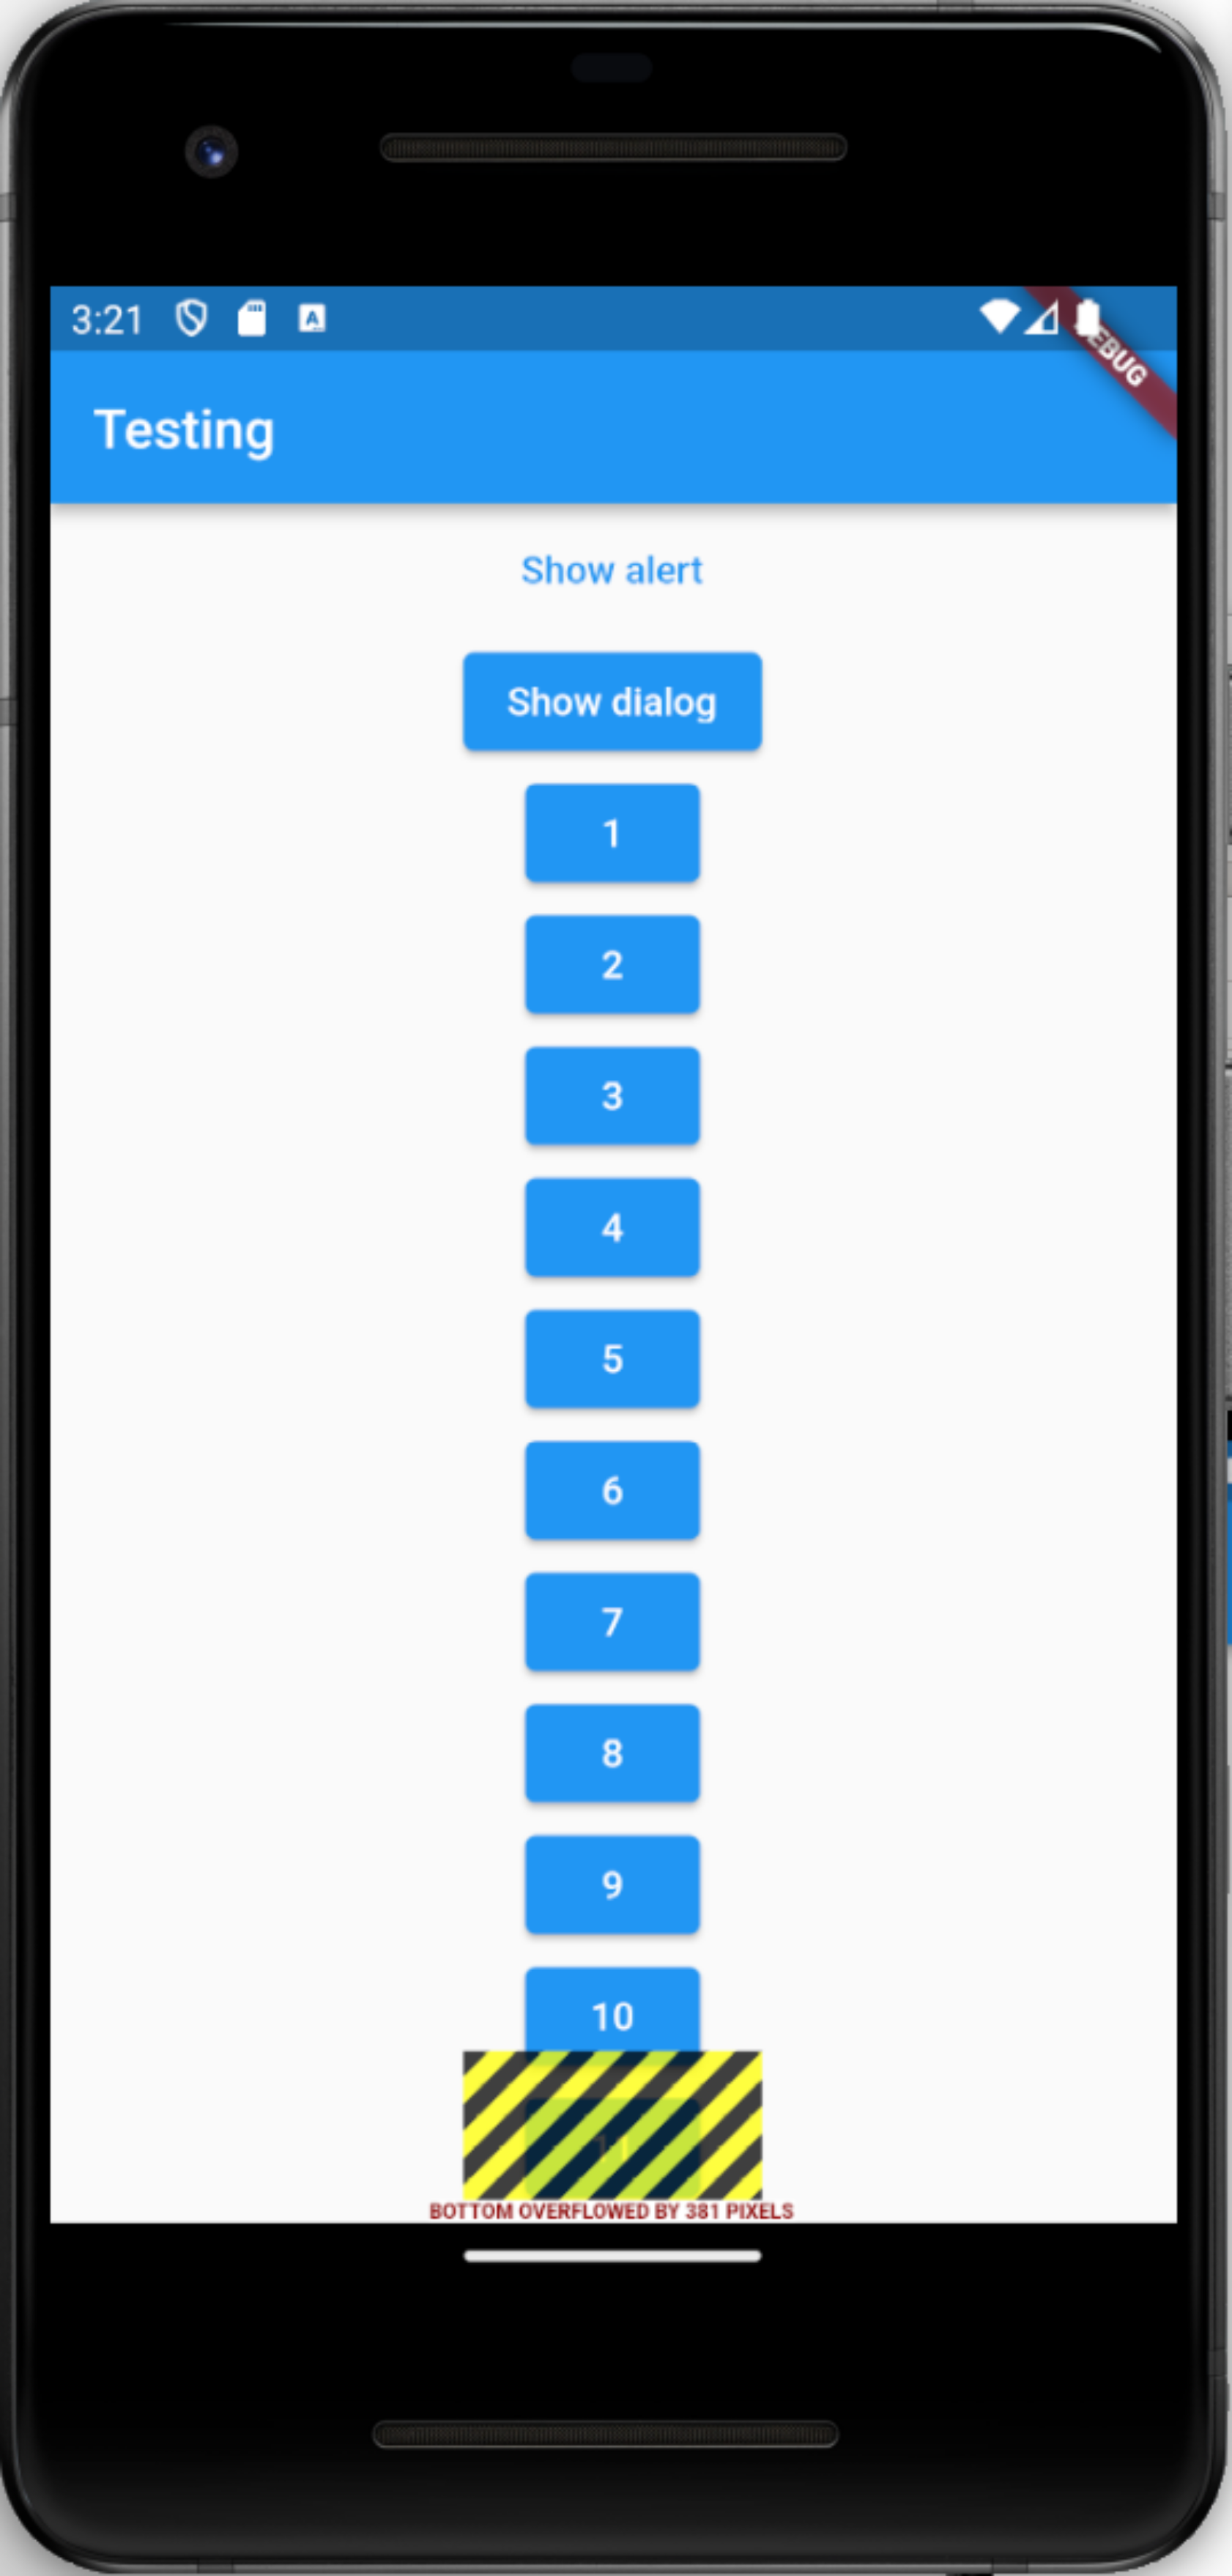
Column does not allow to scroll nor does it wrap.
Flutter provides other widgets for this purpose.
For example, use the Wrap widget, instead of the Column widget as container.
In a Wrap container the attribute 'mainAxisAlignment: MainAxisAlignment.center' cannot be used, so remove it.
class MyContent extends StatelessWidget {
  @override
  Widget build(BuildContext context) {
    return Center(
      child: Wrap(
        //mainAxisAlignment: MainAxisAlignment.center,
        children: <Widget>[
          TextButton(
              onPressed: () {
                _ackAlert(context);
              },
              child: Text('Show alert')),
          ElevatedButton(
              onPressed: () {
                var snackebar = _createSnackBar();
                ScaffoldMessenger.of(context).showSnackBar(snackebar);
              },
              child: Text('Show dialog'),
            ),
          for (int i = 1; i < 20; i++)
            ElevatedButton(
              onPressed: () {},
              child: Text(i.toString(),
             ),
            ),
        ],
      ),
    );
  }
  // the methods for snakebar and dialog
}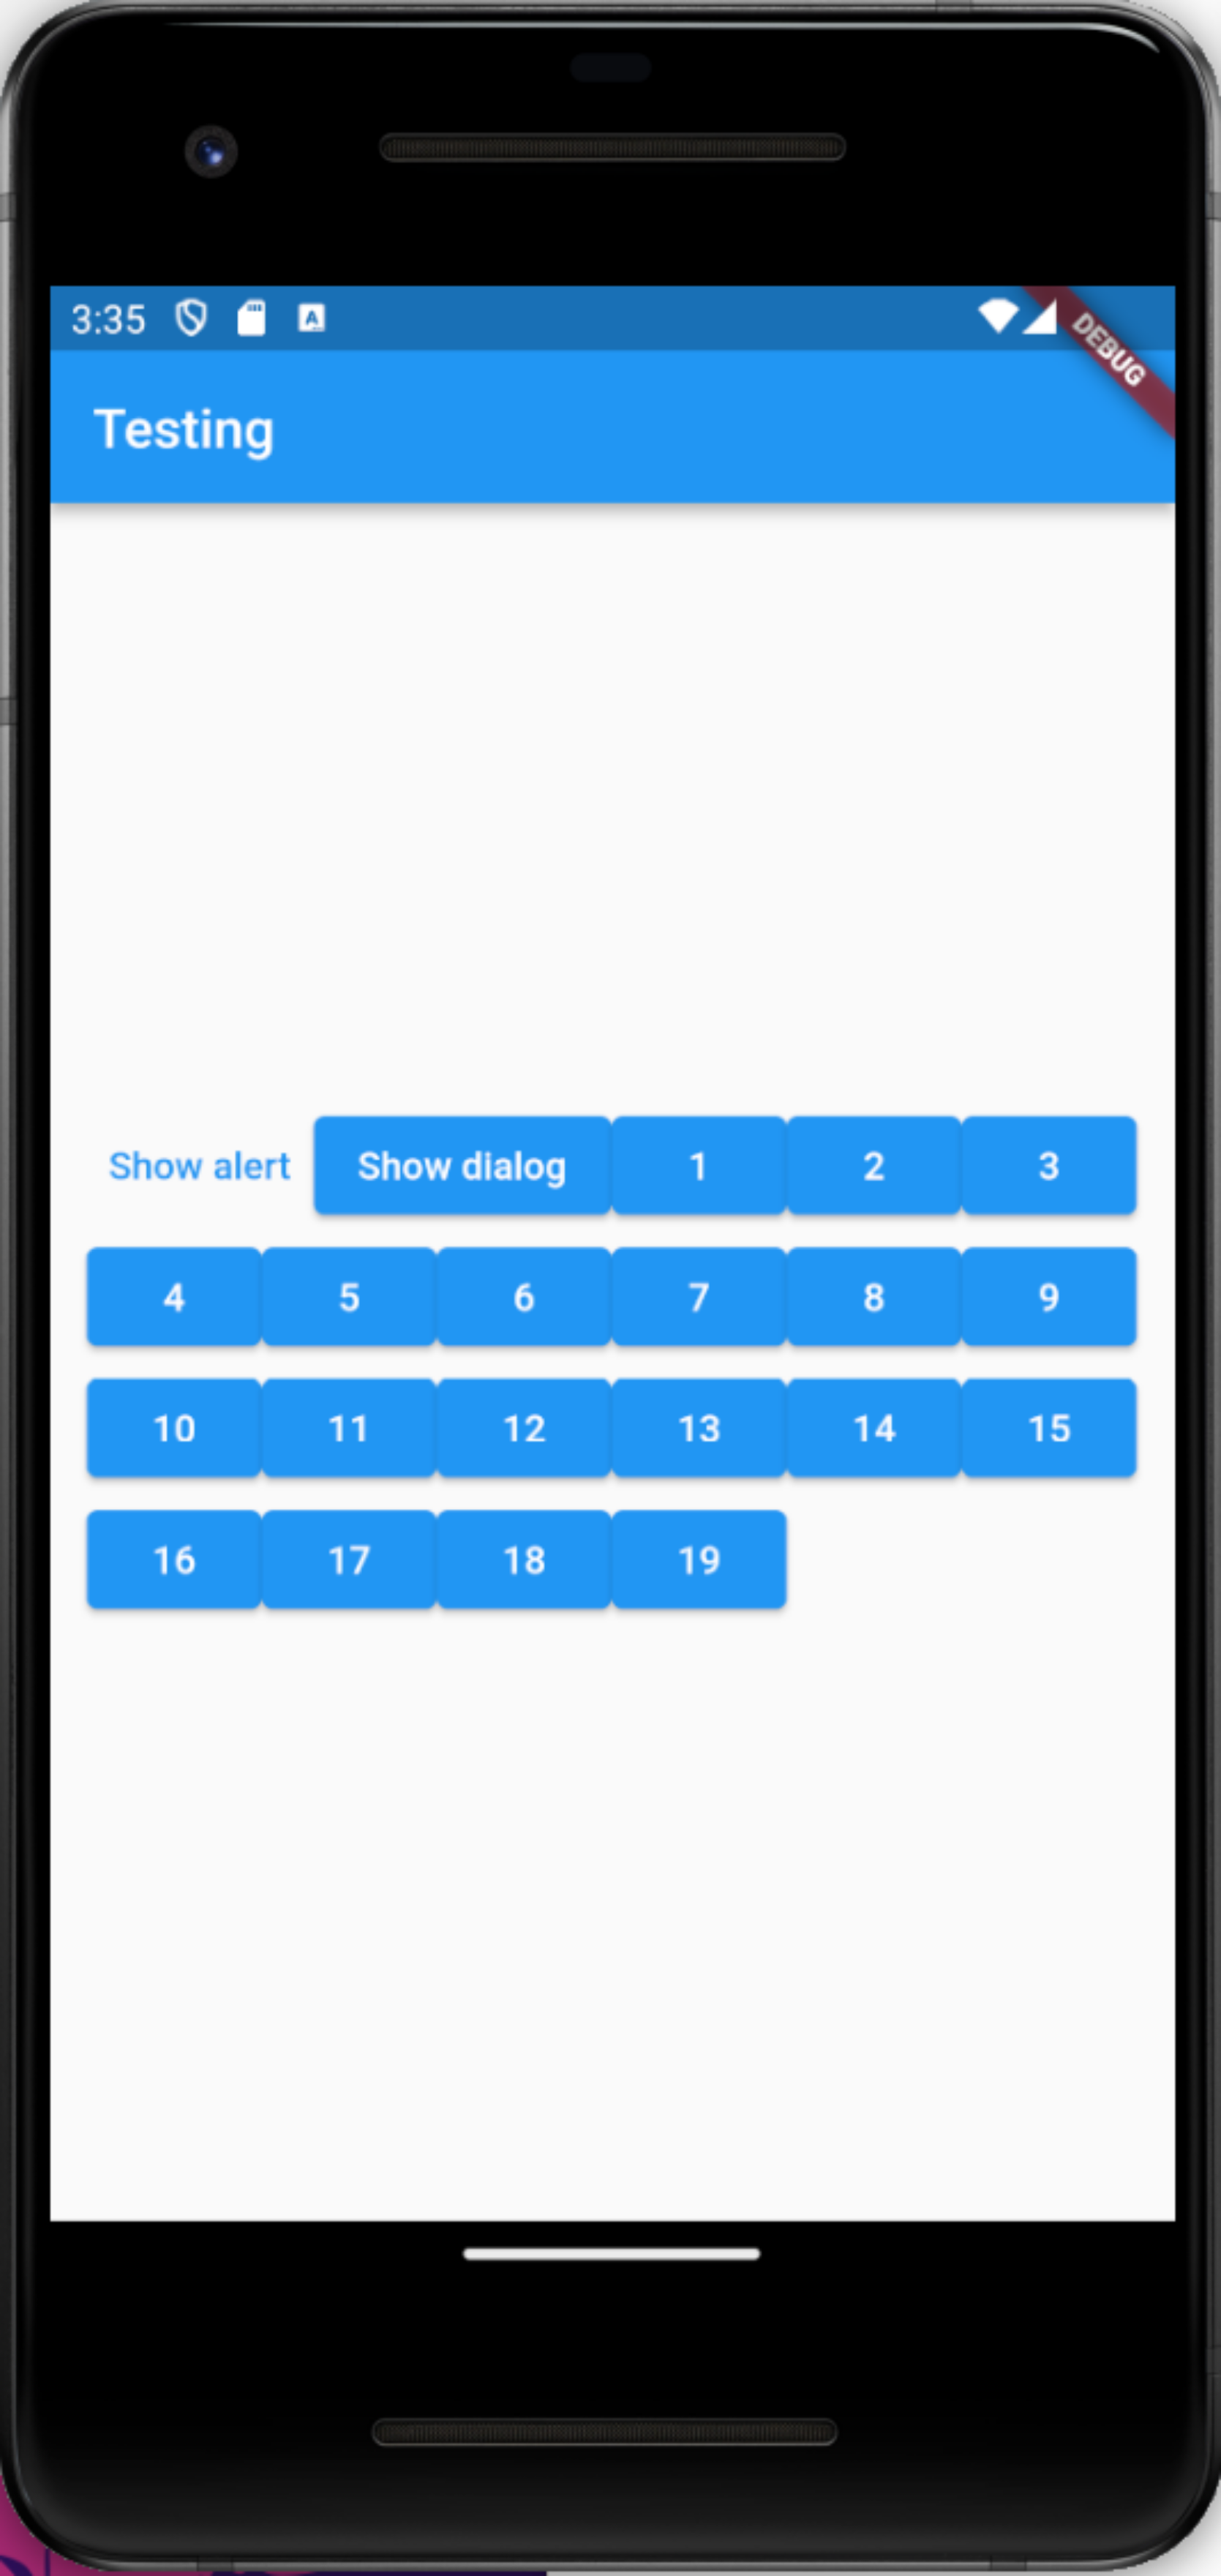
Now increase the number of buttons to 200, even with wrap not all buttons can be displayed.
Put the Wrap widget into a SingleChildScrollView to make it scrollable.
Solution example
import 'package:flutter/material.dart';

class MyContent extends StatelessWidget {
  @override
  Widget build(BuildContext context) {
    return Center(
      child: SingleChildScrollView(
        child: Wrap(
          children: <Widget>[
            TextButton(
                onPressed: () {
                  _ackAlert(context);
                },
                child: Text('Show alert')),
            ElevatedButton(
                onPressed: () {
                  var snackebar = _createSnackBar();
                  ScaffoldMessenger.of(context).showSnackBar(snackebar);
                },
                child: Text('Show dialog'),
             ),
            for (int i = 1; i < 200; i++)
              ElevatedButton(
                onPressed: () {},
                child: Text(i.toString()),
              ),
          ],
        ),
      ),
    );
  }

  SnackBar _createSnackBar() {
    var snackbar = SnackBar(
      behavior: SnackBarBehavior.floating,
      content: Text('This is your message'),
      action: SnackBarAction(
        label: 'Delete',
        onPressed: () {},
      ),
    );
    return snackbar;
  }

  Future<void> _ackAlert(BuildContext context) {
    return showDialog<void>(
      context: context,
      builder: (BuildContext context) {
        return AlertDialog(
          title: Text('Not in stock'),
          content: const Text('This item is no longer available'),
          actions: <Widget>[
            TextButton(
              child: Text('OK'),
              onPressed: () {
                Navigator.of(context).pop();
              },
            ),
          ],
        );
      },
    );
  }
}
3. Exercise: Create the basic structure for a GitHub issue application
In this exercise, you create the build blocks for an extended application which you will extend in other exercises. It will become a full featured GitHub client to view issues.
3.1. Create the App
Create a new Flutter application github_viewer.
3.2. Create the Homepage
The Widget defined via the home in your material app is the page the user sees when they start the app.
Generally it should contain all necessary navigation elements to let the user navigate to other screens.
Create a new file page/homepage.dart in the lib directory. (Also create the page directory if it does not exist yet.)
Create the following class inside this new file.
import 'package:flutter/material.dart';

class Homepage extends StatefulWidget {
  @override
  _HomepageState createState() => _HomepageState();
}

class _HomepageState extends State<Homepage> {
  @override
  Widget build(BuildContext context) {
    return Scaffold(
      appBar: AppBar(
        title: Text('GitHub Issue Viewer'),
        actions: <Widget>[
          IconButton(
            onPressed: () {
              print('AppBar action pressed'); (1)
            },
            icon: Icon(Icons.settings),
          )
        ],
      ),
      body: Text('Welcome to the homepage'), (1)
    );
  }
}| 1 | These are placeholders which will be replaced in a later exercise |
3.3. Adjust the main.dart File
Navigate back to the main.dart file and change it to the following.
import 'package:flutter/cupertino.dart';
import 'package:flutter/material.dart';
import 'page/homepage.dart';

void main() => runApp(App());

class App extends StatelessWidget {
  @override
  Widget build(BuildContext context) {
    return MaterialApp(
      home: Homepage(),
    );
  }
}
3.4. Start the Application
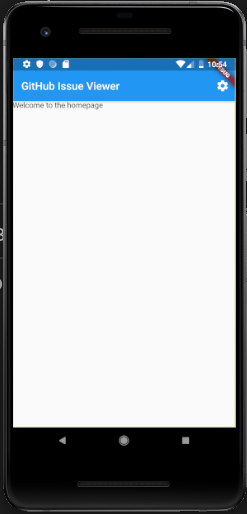
Start the app (if it is not started already). It should display the text Welcome to the homepage and have a blue app bar on top displaying GitHub Issue Viewer. On the right there should be a Settings icon and if pressed it should display the text AppBar action pressed in the console.
4. Exercise: Building your own Widget
In this exercise, you are going to extend the GitHub Issue Viewer application.
By now you should have the following file structure:
lib/
  page/
    homepage.dart
  main.dart
You will now build a reusable Widget that represents an entry in the overview of issues in a repository.
To make the development easier create the data model for the issue data. This is a basic data class that will later be used to fill it with data returned by the GitHub API.
Open the page/homepage.dart file and add the following at the bottom of the file:
// ...
class Issue { (1)
  int number = 1;
  String state = 'open';
  String title = 'Issue title';
  String body = 'Issue body';
  String userName = 'userName';
  DateTime createdAt = DateTime.now();
}

class _IssueCard extends StatelessWidget {
  final Issue issue;

  _IssueCard(this.issue);

  @override
  Widget build(BuildContext context) {
    return Card(
      child: Padding(
        padding: const EdgeInsets.symmetric(vertical: 8.0),
        child: ListTile(
          title: Text('${issue.title} #${issue.number}'),
          subtitle: Text(
              '${issue.userName} opened on ${issue.createdAt}'),
          trailing: Icon(Icons.arrow_forward),
          onTap: () {
            print('Issue tile tapped');
          },
        ),
      ),
    );
  }
}| 1 | The data model is currently statically initialized with default data. That will change later. |
To use the class go back to the _HomepageState class definition.
Replace the body: Text(…) line with the following content:
      body: ListView.builder((1)
        itemCount: 4,
        itemBuilder: (context, index) {
          return _IssueCard(Issue());
        },
),| 1 | A ListView.builder is a special constructor in the ListView class that calls the method that is passed to its itemBuilder parameter for the number of times passed to its itemCount parameter.
In this case it will call the method 4 times.
The current index is the second parameter of the method. |
The _HomepageState class should now look like this:
class _HomepageState extends State<Homepage> {
@override
Widget build(BuildContext context) {
return Scaffold(
appBar: AppBar(
title: Text('GitHub Issue Viewer'),
actions: <Widget>[
IconButton(
onPressed: () {
print('AppBar action pressed');
},
icon: Icon(Icons.settings),
)
],
),
body: ListView.builder(
itemCount: 4,
itemBuilder: (context, index) {
return _IssueCard(Issue());
},
),
);
}
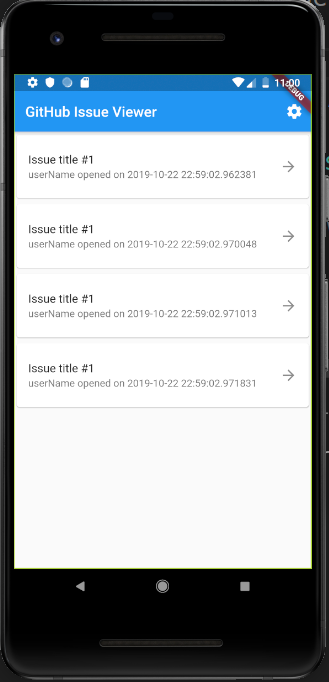
}The resulting app should look like this:
5. Exercise: Use the FutureBuilder
In this exercise the FutureBuilder is used to add issues from a GitHub repository to the HomePage widget.
Your app’s folder structure should look like this:
lib/
  page/
      homepage.dart
    main.dart
Add the http library dependency to the pubspec.yaml:
dependencies:
  flutter:
    sdk: flutter

# ... potentially more dependencies
  http: 0.12.0+2 (1)
# ... potentially more dependencies| 1 | Use the same indent as the flutter entry |
5.1. Building the Skeleton
| As GitHub’s API is a little bit restrictive with usage limitations it is best to start by using some dummy data, before making the actual requests to the API. You might run out of quota pretty soon. |
Open the page/homepage.dart file.
Go to the _HomepageState class and add a basic function that returns a List of Issue:
class _HomepageState extends State<Homepage> {

    Future<List<Issue>> getIssues() async {
        return [Issue(), Issue(), Issue()]; (1)
    }

// ...more| 1 | The Issue class is the data class from before.
For now just use three of its instances with the default "dummy" data. |
5.2. FutureBuilder
The next step is to add the FutureBuilder to the app.
The body of the Scaffold created in the _HomepageState class will be dynamically created.
Therefore, remove the current value of the body attribute of the Scaffold of the _HomepageState and replace it with the following snippet:
FutureBuilder(
    future: getIssues(),
    builder: (BuildContext context, AsyncSnapshot<List<Issue>> snapshot) {
        if (snapshot.hasData) {
            return ListView.builder(
                itemCount: snapshot.data.length, (1)
                itemBuilder: (BuildContext context, int index) {
                    return _IssueCard(snapshot.data[index]); (2)
                },
            );
        } else if (snapshot.hasError) {
            return Text(snapshot.error.toString());
        } else {
            return CircularProgressIndicator();
        }
    },
),| 1 | We use the same ListView here as before, but now its itemCount is set to the length of issues returned by the API |
| 2 | As we use the builder we have access to the index of the current iteration and can use it to access the issue at the current index.
We can be sure that no RangeError (e.g., index out of bounds) will occur because we set the itemCount of the ListView.builder. |
One thing to keep in mind with this snippet is that, it calls getIssues() every time it is built.
This will lead to many calls to the API and might lock you out of the GitHub API in the next step.
A solution to this is the AsyncMemoizer which stores a value and keeps it in state.
This means that the value is kept even through hot-reloads.
|
5.3. Fetching the Data
| GitHub’s API is pretty straightforward to use but a little bit restrictive on usage limitations. |
The next step is to add the actual fetching of data from the API. For this it is required to import the following packages at the top of the homepage.dart file:
import 'package:http/http.dart' as http;
import 'dart:convert';
Next, adapt the getIssues() function:
Future<List<Issue>> getIssues() async {
const url = 'https://api.github.com/repos/flutter/flutter/issues';
var response = await http.get(url);
var data = jsonDecode(response.body);
if (response.statusCode != 200) {
print('The API fetch failed: $data');
return Future.error(data);
}
return data
.map<Issue>((entry) => Issue()
..number = entry['number']
..state = entry['state']
..title = entry['title']
..body = entry['body']
..userName = entry['user']['login']
..createdAt = DateTime.parse(entry['created_at']))
.toList();
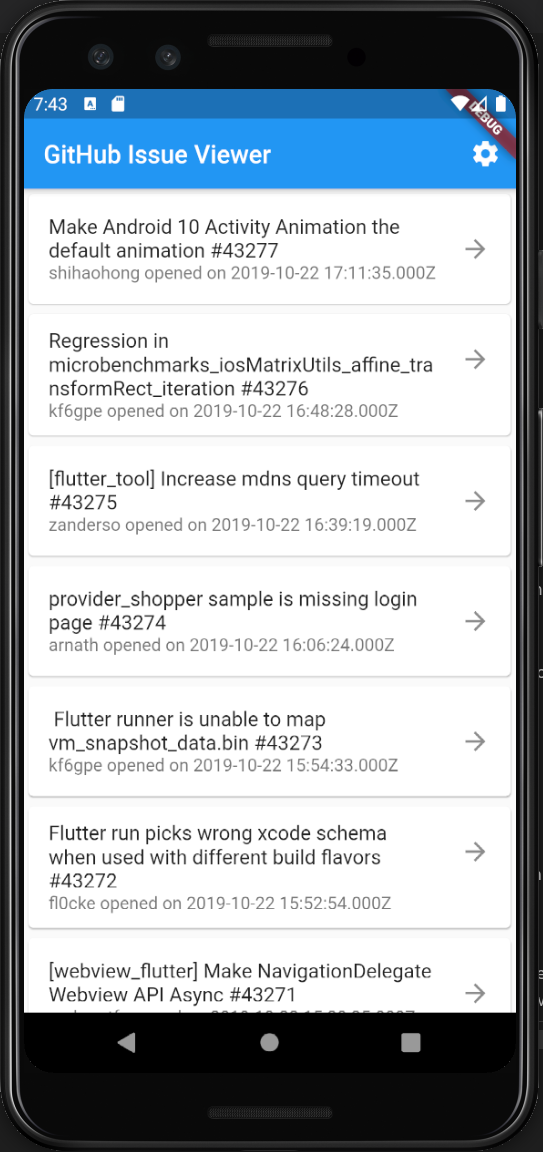
}After the next reload the homepage should look like this:
5.4. Optional: Switch to Stackoverflow API
GitHub API currently only allows 60 calls per IP, so you may run during testing into this limitation.
It is pretty easy to switch with your client to another API, let’s say Stackoverflow.
6. Exercise: Calling native Android code
Execute the exercise from Google for integrating native code. For this exercise it is easier to do this step in Android Studio, as you are modifying also Java code and Java code assist is helpful for this step.
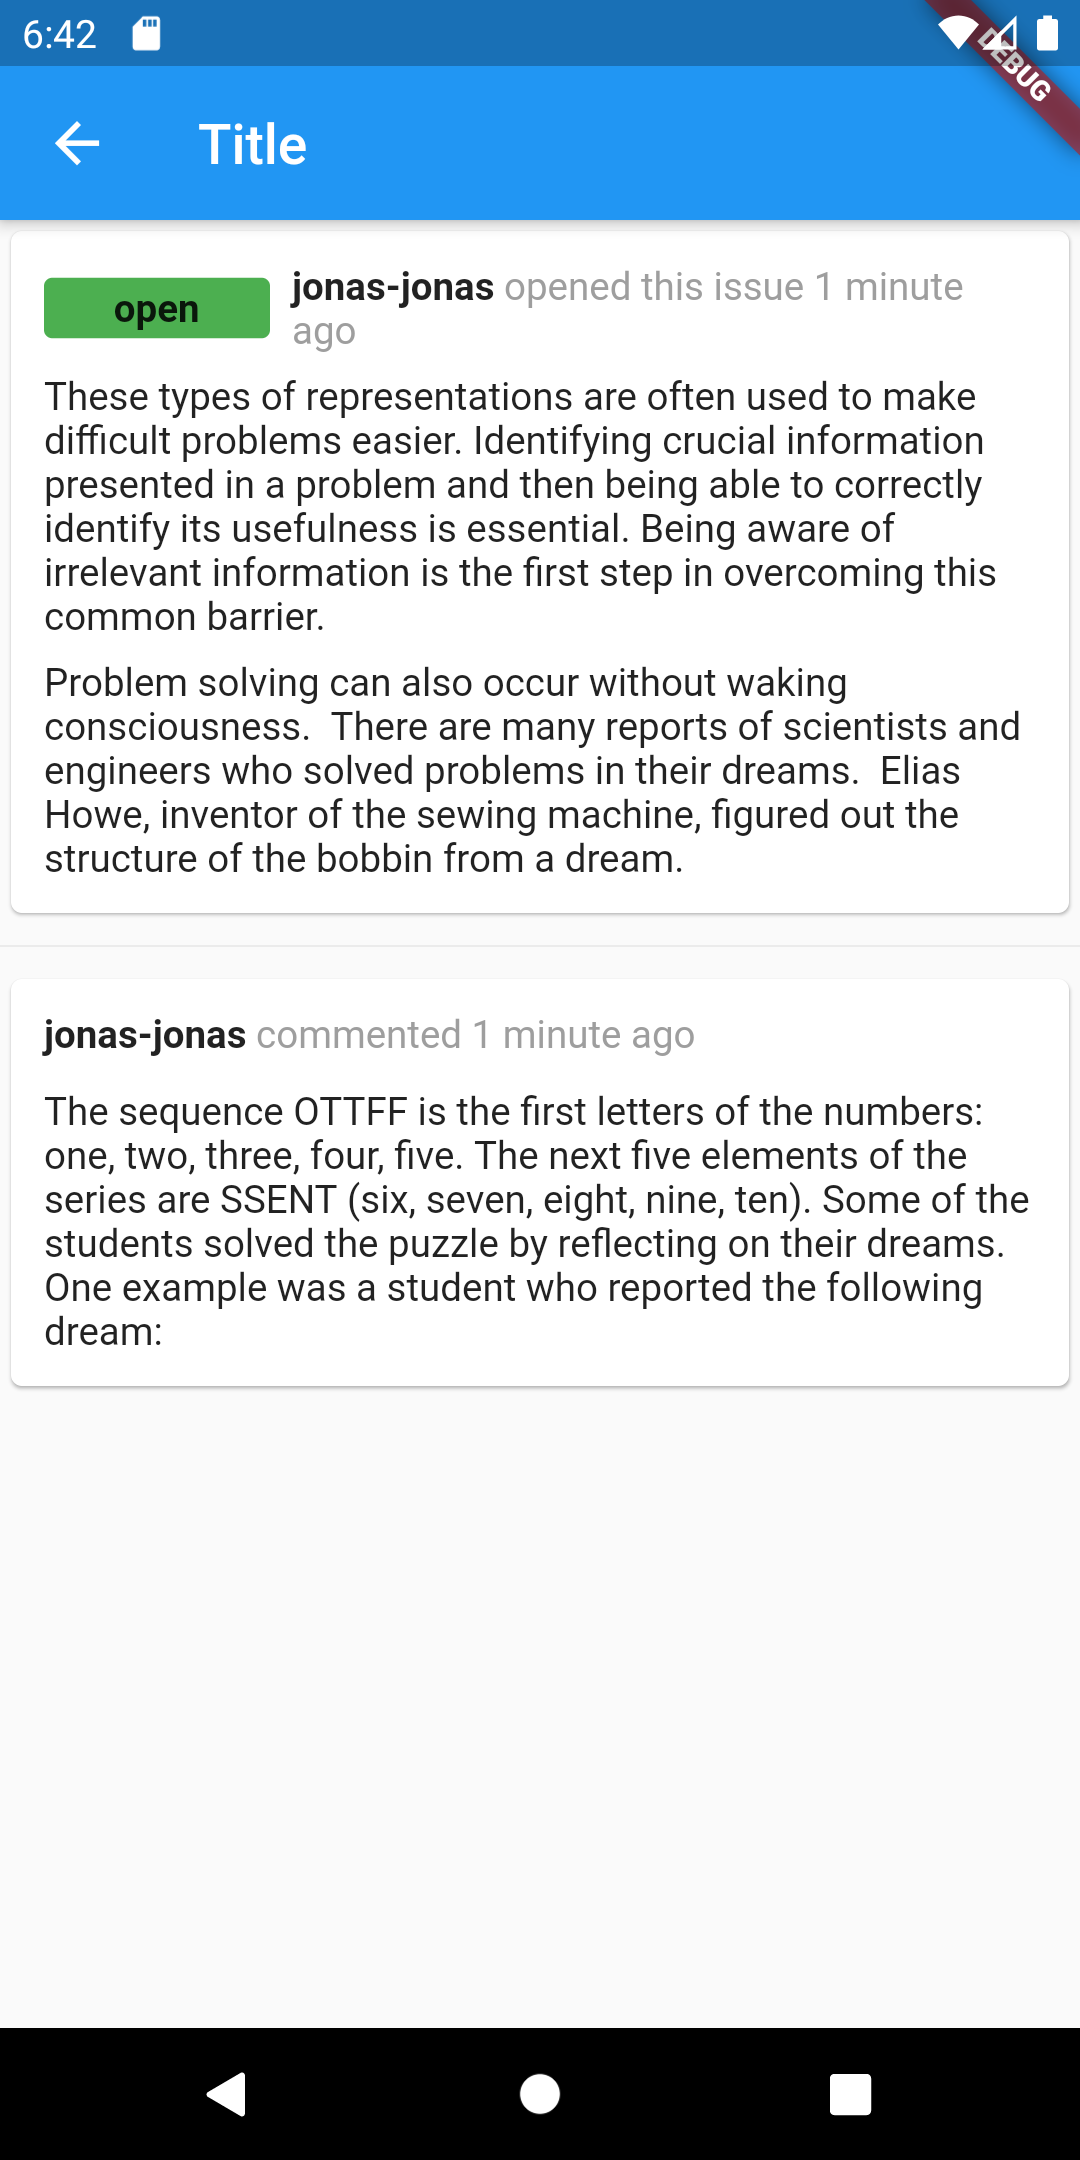
7. Optional exercise: Add IssueDetail page
In the next step, add a detail page to display the details about an issue. These are the requirements:
-
The page should open after a click on one of the ListTiles on the home page
-
The detail page should receive the clicked issue as a constructor parameter
-
It should display the issue’s body and its comments
-
Optional: The issues on GitHub support markdown formatting. Use the markdown package to render the body of the issue.
The full page should look similar to this:
7.1. Resources
Use the Navigator class to open a new route in the onTap function of the IssueCard.
Navigator.push(
        context,
        MaterialPageRoute(builder: (context) => IssuePage(issue)),
    );
Use the FutureBuilder to render the fetched comments only after you got them.
See the full source code at: https://github.com/vogellacompany/codeexamples-flutter/tree/master/github_viewer
8. Activate code checks
It is time to adhere to Dart conventions by activating automatic checks for it via the Dart linter.
Create the analysis_options.yaml file in your top-level folder.
Add the following content.
linter:
  rules:
    - avoid_empty_else
    - avoid_init_to_null
    - avoid_relative_lib_imports
    - avoid_return_types_on_setters
    - avoid_shadowing_type_parameters
    - avoid_types_as_parameter_names
    - curly_braces_in_flow_control_structures
    - empty_catches
    - empty_constructor_bodies
    - library_names
    - library_prefixes
    - no_duplicate_case_values
    - null_closures
    - prefer_contains
    - prefer_equal_for_default_values
    - prefer_is_empty
    - prefer_is_not_empty
    - prefer_iterable_whereType
    - recursive_getters
    - slash_for_doc_comments
    - type_init_formals
    - unawaited_futures
    - unnecessary_const
    - unnecessary_new
    - unnecessary_null_in_if_null_operators
    - unrelated_type_equality_checks
    - use_rethrow_when_possible
    - valid_regexps
The Flutter and Dart compiler should start complaining about violations against this standard.
Fix them until you have no more errors.
If you see no errors / warnings, try adding the new keyword in front of your widgets and ensure that you see a warning.
9. Exercise: Build a Web Monitor to track the status
In this exercise, you are going to build one app to monitor the status of one input URL.
9.1. Setup
To properly set up the project environment, you need to add 'Network' module to our dependency. To add 'Network', put the following code in 'pubspec.yaml'.
dependencies:
  flutter:
    sdk: flutter
  http: ^0.12.1
9.2. My Main Page
In the Main section, you used a widget called MyMainPage as the widget for the main page layout.
First develop the MyMainPage extended from StatefulWidget, since you will interact with users to get the input.
import 'package:flutter/material.dart';

import 'input_page.dart';
import 'section.dart';
import 'data.dart';

class MyMainPage extends StatefulWidget {
  @override
  _MyMainPageSate createState() => new _MyMainPageSate();
}

class _MyMainPageSate extends State<MyMainPage> {
  var urls = new List<Data>();

 ...
'Scaffold' is used as the main container for the whole structure. Then you use AppBar to add your label for the page, also one + sign for the button to make input.
AppBar is used here to allow us to interact with its button. It is 'IconButton' you used below. Widget with similar function is also possible. You can add one 'Button' widget in the corner. For simplicity, you use AppBar here.
By clicking the AppBar, app will be directed to the second page, where you can type in our input.
In the body section, you will create a list of Sections added by user. This will use the 'ListView' function, which is explained in previous tutorials.
 return new Scaffold(
        appBar: AppBar(
          title: const Text('Web Monitor'),
          backgroundColor: Colors.blueGrey[900],
          actions: <Widget>[
            IconButton(
                icon: Icon(Icons.add),
                onPressed: () {
                  //TODO create a input page to parse input
                },
          )
          ]
        ),
        body: Center(
          child: new ListView(
            children: sections,
            scrollDirection: Axis.vertical,
          ),
        ),
      );
And since you need to get the input from the second page.
You need to use the future function in Flutter.
So you push one context into the second page. And the context will pop up later with the input data you get from the second page.
inputPage(BuildContext context, Widget page) async {
    final dataFromInputPage = await Navigator.push(
    context,
    MaterialPageRoute(builder: (context) => page),
    ) as Data;

    var data = new Data(seconds: dataFromInputPage.seconds, text: dataFromInputPage.text);

    if(data.text!="null"){
      //TODO add new section for the corresponding data you have
    }
  }
Now let’s examine the second page to see how to handle the input. Then you return here to see how you make use of the input you get.
9.3. Main
Change the main.dart to the following:
import 'package:flutter/material.dart';

import 'my_main_page.dart';

void main() {
  runApp(MyApp());
}

class MyApp extends StatelessWidget{
  @override
  Widget build(BuildContext context) {
    return MaterialApp(
      home: MyMainPage(),
    );
  }
}
9.4. Input Page
In this section, you mainly focus on how to get input from user and pass back to previous class.
First, in one stateful widget, you have our main layout designed as follows. Two textfield with text controller to get the input, one for url. And the other one for the time interval at which the app is going to make request.
new Scaffold(
        appBar: AppBar(
          title: const Text('Type In'),
          backgroundColor: Colors.blueGrey[900],
        ),
        body: Center(
          child: Container(
            height: 300,
              child: Column(
              children: <Widget>[
                    TextField(
                          autofocus: true,
                          decoration: new InputDecoration(
                            focusedBorder: OutlineInputBorder(
                            borderSide: BorderSide(color: Colors.greenAccent, width: 5.0),
                          ),
                          enabledBorder: OutlineInputBorder(
                            borderSide: BorderSide(color: Colors.red, width: 5.0),
                          ),
                          labelText: 'Enter Valid URL', hintText: 'https://www.vogella.com'),
                          controller: myController,
                    ),
                    TextField(
                          autofocus: true,
                          decoration: new InputDecoration(
                            focusedBorder: OutlineInputBorder(
                            borderSide: BorderSide(color: Colors.greenAccent, width: 5.0),
                          ),
                          enabledBorder: OutlineInputBorder(
                            borderSide: BorderSide(color: Colors.red, width: 5.0),
                          ),
                          labelText: 'Enter the Time Interval', hintText: 'e.g., 10'),
                          controller: myTimeController,
                    ),
                new FlatButton(
                  child: const Text('CANCEL'),
                  onPressed: () {
                    Navigator.pop(context, d);
                  }),
                new FlatButton(
                  child: const Text('OK'),
                  onPressed: () {
                    //TODO logic to pop the current context and go back
                  }),
                ],
              ),
            ),
        ),
      );
The text editing controller allows us to dynamically get the input from the textfield widget.
And its implementations are as follows
var myController = TextEditingController();
  var myTimeController = TextEditingController();
  var url = "null";
  var d = Data(text: "null", seconds: 0);

  @override
  void initState() {
    super.initState();
  }

  @override
  void dispose() {
    myController.dispose();
    super.dispose();
  }
In the above code piece, there is one variable data. It is a self-defined variable to contain our data.
class Data {
  String text;
  int seconds;
  Data({this.text, this.seconds});
}
By setting up this, you get a controller that listen to the input in TextField. And you can get the text/input by 'myController.text'.
In the button above, you used 'handleUrl()', to handle the input url when user clicked ok.
handleUrl() async {
var urlPattern = r"(https?|ftp)://([-A-Z0-9.]+)(/[-A-Z0-9+&@#/%=~_|!:,.;]*)?(\?[A-Z0-9+&@#/%=~_|!:,.;]*)?";
RegExp regExp = new RegExp(urlPattern, caseSensitive: false, multiLine: false,);
var result = regExp.hasMatch(myController.text);
if(!result){
Navigator.pop(context);
return showDialog<void>(
context: context,
barrierDismissible: false, // user must tap button!
builder: (BuildContext context) {
return AlertDialog(
title: Text('Invalid URL'),
content: SingleChildScrollView(
child: ListBody(
children: <Widget>[
Text('Please enter a new one'),
],
),
),
actions: <Widget>[
FlatButton(
child: Text('OK'),
onPressed: () {
Navigator.pop(context, d);
},
),
],
);
},
);
}
else{
url = myController.text;
d.text = url;
int timeInterval = int.parse(myTimeController.text);
d.seconds = timeInterval;
Navigator.pop(context, d);
}
}Since for handling button clicking is waiting for the future: onPressed, it is a async function.
In handle url, you used RegExp to first verify if the input is in correct format.
If not correct, you show up a alertdialog, stating the error and nothing happens.
Otherwise, you put the input, the url and time interval that you got from user, into the class member d, which in the type Data as implemented below.
Passing the input data to d allows the MyMainPage class to retrieve user input by calling the getUserInput() function, which gets the state class member 'd'.
And now you return to the MyMainPage, with input obtained from the alertDialog.
9.5. MyMainPage, Creating Section
In the async function you used above, after you get the input data, you pass it to another function. The function changes the state of the Main Page Widget. This will trigger the main page to recompile with the updated data. Then, you can add one section for the input data into the list view, while waiting for more data and more section.
var urls = new List<Data>();

inputPage(BuildContext context, Widget page) async {
    final dataFromInputPage = await Navigator.push(
    context,
    MaterialPageRoute(builder: (context) => page),
    ) as Data;

    var data = new Data(seconds: dataFromInputPage.seconds, text: dataFromInputPage.text);

    if(data.text!="null"){
      addNewSection(data);
    }
  }

  addNewSection(Data input){
    setState(() {
      //pass Data and add input
      urls.add(input);
      });
  }
So after the data is added, the following code will run again. This way, the listview in our main page get updated.
@override
  Widget build(BuildContext context) {
     var sections =
        new List.generate(urls.length, (int i) => new Section(input: urls[i]));
9.6. Section
And finally, here you will focus on the main part: For one url in one section, how you interact with the server and show the corresponding results.
First and foremost, Section is a stateful widget that you need to create with specific parameter.
Therefore, you put a self-defined constructor for it.
class Section extends StatefulWidget{
  final Data input;

  const Section ({ Key key, this.input }): super(key: key);

  @override
  _SectionState createState() => new _SectionState();
}

class _SectionState extends State<Section> {
...
And the main layout for the section will be as follows.
Here you used one button for the starter of the function.
Once clicked, it calls _press() function to start the interaction with the server.
  Widget build(BuildContext context) {
    return new Container(
      color: Colors.blueGrey,
      child: Column(
        children: <Widget>[
        Text(
          widget.input.text,
          style: TextStyle(fontSize: 20),
        ),
        new Row(
          children: <Widget>[
            new Container(
            padding: new EdgeInsets.all(0.0),
            child: new IconButton(
              icon: (_isOnline
                  ? new Icon(Icons.star)
                  : new Icon(Icons.star_border)),
              color: Colors.red[500],
              onPressed: () => _press(widget.input.text),
            ),
          ),
          new AnimatedContainer(
            height: 20,
            color: Colors.blueGrey,
            duration: Duration(seconds:10),
            child: Text(
              (_totalOnline).toString()+'/'+_totalCheck.toString(),
            style: TextStyle(fontSize: 20),),
            ),
          ],),
        ],),
    );
When _press() is called, it starts this function, fetchStatus() under the timer.
The timer is set using Flutter’s Timer.periodic function that allows one function to be executed continuously.
And for fetchStatus function, you use HTTP package from flutter.
And for each response, you call respective function that changes the state of the Section Widget, updating the data.
_press(String url){
  if(!_on){
  _on = true;
  Duration secin = Duration(seconds: widget.input.seconds);
  new Timer.periodic(secin, (Timer t) {
    fetchStatus(url);
    });
  }
}

Future fetchStatus(String url) async {
  final response = await http.get(url);
  if(response.statusCode ==  200){
    _online();
  }
  else{
    _offline();
  }
}
Eventually, you get one functioning app where users can see the status of the servers connected to the input urls.
10. Links and Literature
10.3. vogella Flutter and Dart example code
If you need more assistance we offer Online Training and Onsite training as well as consulting