This tutorial explains how to create new Flutter projects.
1. What you will learn
In this tutorial you learn:
-
How to create new Flutter applications from the command line and Visual Studio Code
-
Basic structure of a Flutter app
-
How to start a Flutter app
-
Using hot reload to see the changes in your Flutter app immediately
-
How to debug your Flutter app
2. Summary
The following is a summary of the most important commands for creating and starting Flutter apps.
Create a new Flutter project in the directory project_name
flutter create project_nameCreate a new minimal (empty) Flutter project in the directory project_name
flutter create -e project_nameRun a Flutter app
flutter run3. Exercise: Create a Flutter app from the command line
In this exercise, you create and run a Flutter app via the command line. In the next exercise you will do the same via Visual Studio Code.
3.1. Create the Flutter app
On the command line create a new folder and switch to this folder. Create a new Flutter project named hello_world with the following command.
flutter create hello_worldOpen for learn more options about the project creation
By default, Flutter uses Kotlin for the Android native code.
Use -a java to use Java.
This is only important for more advanced tasks that are not available in the Flutter SDK.
However, complex apps can be developed without ever touching Java or Swift code.
flutter create -i swift -a java testing3.2. Run the app
cd hello_world
flutter run
Depending on your OS and your installation, Flutter will ask you which target you want to use.
If you open a Chrome browser, the app runs in the browser. If you already started a virtual Android device or connected a device to your machine this device is used.

3.3. Review the code and change the application logic
Open the main.dart file located in the lib folder in a text editor or Visual Studio Code.
Change the application logic to increase the counter by 2 instead of 1 if you click the button.
Solution
Search for the MyHomePage in the code and adjust the incrementCounter method.
class _MyHomePageState extends State<MyHomePage> {
  int _counter = 0;

  void _incrementCounter() {
    setState(() {
      _counter++;
      _counter++;
    });
  }
// more code
4. Optional Exercise: Create and review some of the sample applications
The Flutter command line tooling allows you to create sample applications that demonstrate certain behavior. Use the following command to create a file containing a description of the available templates.
flutter create --list-samples test.jsonTo create one of these samples, use
flutter create --sample=widgets.SingleChildScrollView.1 mysample5. Exercise: Create a new Flutter app in Visual Studio Code
In this exercise, you create and run a Flutter app via Visual Studio Code.
5.1. Creating the app
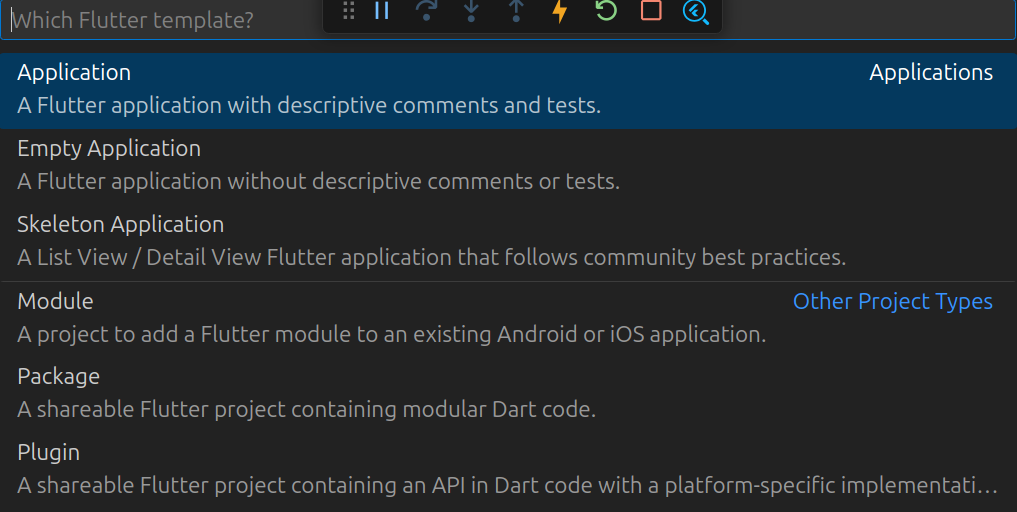
Open VSCode and invoke the command palette via or Ctrl + Shift + P. Select Flutter: New Project.

Then select Application.
| This creates an application with example code and a test. Empty application would create a minimal application. |
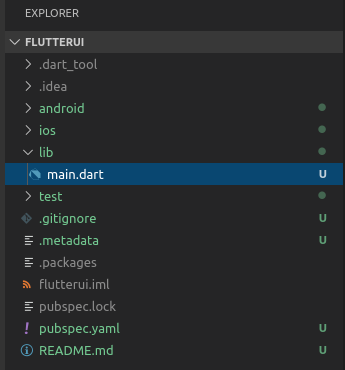
Use flutterui as the name for your project.

Select a folder where the project should be saved. VSCode creates the new Flutter app and opens a new instance for the project location.
Your explorer on the left should look similar to the following screenshot.
If the project is not automatically created, make sure the Dart and Flutter extensions are installed and enabled.
|
5.2. Ensure you have a device available
On the right side of the status bar at the bottom of VSCode you see multiple information about your development environment. One of these indicators shows the current status of the target device (or emulator):
If no device is currently available you can click on the No Devices button.

A pop up opens that lets you choose which device you want to develop on. The list contains the emulators as well as any real device you have configured for development.
Choose one of the listed devices. If the target device is an emulator wait for it to fully start.
5.3. Run the application
To build, deploy, and start the application, you can select , use the F5 shortcut, or use flutter run on the command line.
|
Depending on your Internet connection and host device speed the initial build could take several minutes.
You can see the current step/progress in the built-in DEBUG CONSOLE of VSCode.
If it did not open automatically you can open it using the command |
After the build process finished the app appears on your target device:
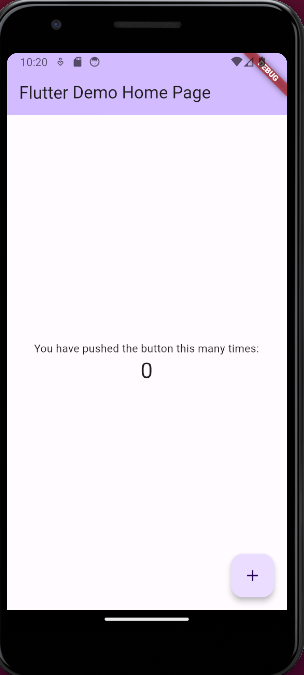
| This visual appearance may change over time, if Google decides to change the template. |
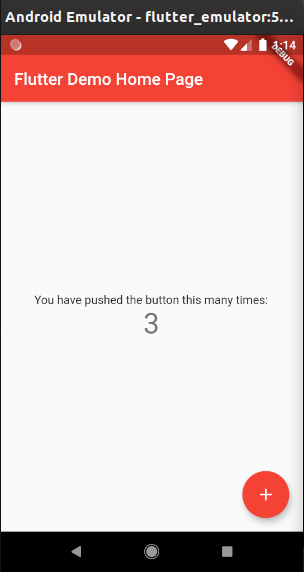
Tap 3 times on the + in the bottom right.
Now search for the primarySwatch color setting in the source code and switch the color to yellow. Notice how the number of times you clicked the button stayed the same but the color changed. This is a feature of the Flutter toolkit that allows state to be persisted between hot reloads.
You can trigger a hot reload manually by using the respective button in the debug toolkit at the top of your VSCode instance:

5.4. Review the code
Have a look at the generated code. Press the Control key and click on the Scaffold widget. This navigates into the Dart source code and allows you to review the documentation of this class.
6. Exercise: Test hot reload by changing the styling of the application
In the ThemeData of your main.dart file change Colors.deepPurple to Colors.red.
Save and see that the emulator switches the color immediately while it preserves its state (the count).
7. Links and literature
7.3. vogella Flutter and Dart example code
If you need more assistance we offer Online Training and Onsite training as well as consulting