This tutorial explains how to contribute to the Eclipse IDE. This tutorial assumes that you have already Eclipse plug-in development experience. See the Eclipse plug-in development tutorial for details.
1. Contributing to the Eclipse IDE and the Eclipse framework
The Eclipse IDE is an open-source project in which companies and individuals advance the code. Everyone has read access to the code repositories. You can clone the source code, modify it and provide the change back to the project. Most Eclipse projects use a code review process based on GitHub pull requests. Some use Gitlab, which offers a similar workflow.
Contributing to an Eclipse project allows developers and organizations to fix bugs which affect them and to drive the project in a desired direction.
Especially Eclipse plug-in and Eclipse RCP developers have the advantage that they already know the technology to change the framework. As the Eclipse framework is developed using a workflow which is common, it is increasingly simple to contribute to the framework.
Every pull request is automatically verified via GitHub build actions and Jenkins build server, in most cases on multiple platforms and with multiple Java versions. The huge test suite of the Eclipse framework will automatically run against every change before it is merged and provide a green or red light to the contributor.
Currently the project uses a Jenkins build server and Github actions to validate changes on multiple operating systems. This makes it easier for contributors to spot potential issues in their contributions and allows committers to review only the critical part of the code.
2. Exercise: Install the latest Eclipse integration build
Eclipse platform and Java tool development usually works best with using the latest integration build, a build created daily based on the master branch of the repositories.
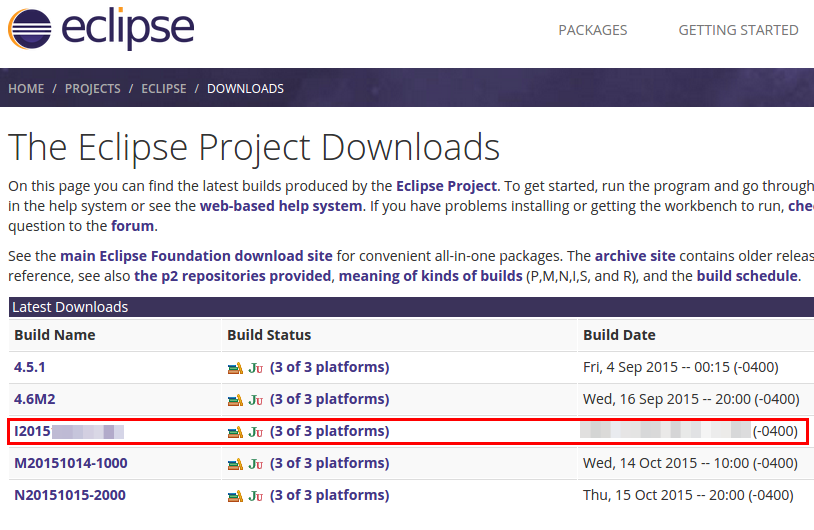
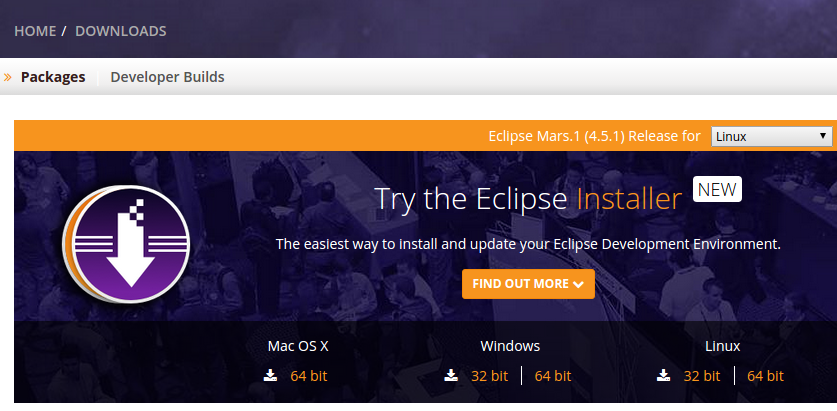
Download the latest integration build from the Eclipse developer builds webpage. This is necessary to use, test and enhance the latest features and API.
This webpage is highlighted in the following screenshot.
Afterwards, install the Eclipse Git tooling.
|
You can use the Eclipse installer, see https://www.vogella.com/tutorials/EclipseGit/article.html#usingoomph for most projects to setup an IDE and workspace. This setup automates multiple steps but might sometimes be outdated. |
3. Approach in this tutorial
In the following exercises, you:
-
Create an Eclipse user
-
Create a GitHub user
-
Clone an Eclipse repository and set it up for code contributions
4. Exercise: Configuring your user
To contribute to the Eclipse IDE you need two users:
-
A user on Eclipse.org to ensure that you are allowed to contribute code to the project
-
A user on GitHub to provide your changes to the project via pull requests
4.1. Create user for Eclipse.org
To contribute code to Eclipse, you need to have a valid user for the Eclipse website. If you do not have yet a user, create now a Eclipse.org user account.
You need to confirm that you have the right to contribute your code to the Eclipse project. For this, sign the Eclipse license agreement (ELA) via a web interface of your user you created. Eclipse.org user account and click on the Eclipse Contributor Agreement link.
4.2. Create a user for GitHub
See GitHub user creation to learn how to create a user and an access token.
5. Exercise: Fork and clone the platform UI repository
5.1. Finding the correct Git repository
The Eclipse SDK uses four projects with multiple repositories for its content:
Here you can search for the project you want to contribute to. In our example we want to contribute to the platform.ui project which is located https://github.com/eclipse-platform/eclipse.platform.ui. Eclipse uses the GitHub standard process of contributing, you fork a repository on the server, clone it locally, push to your fork and create a pull request.
5.2. Fork the repository on GitHub
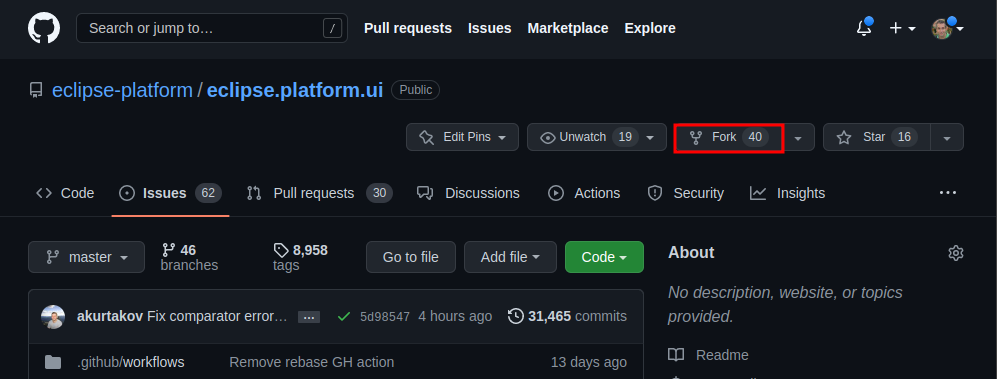
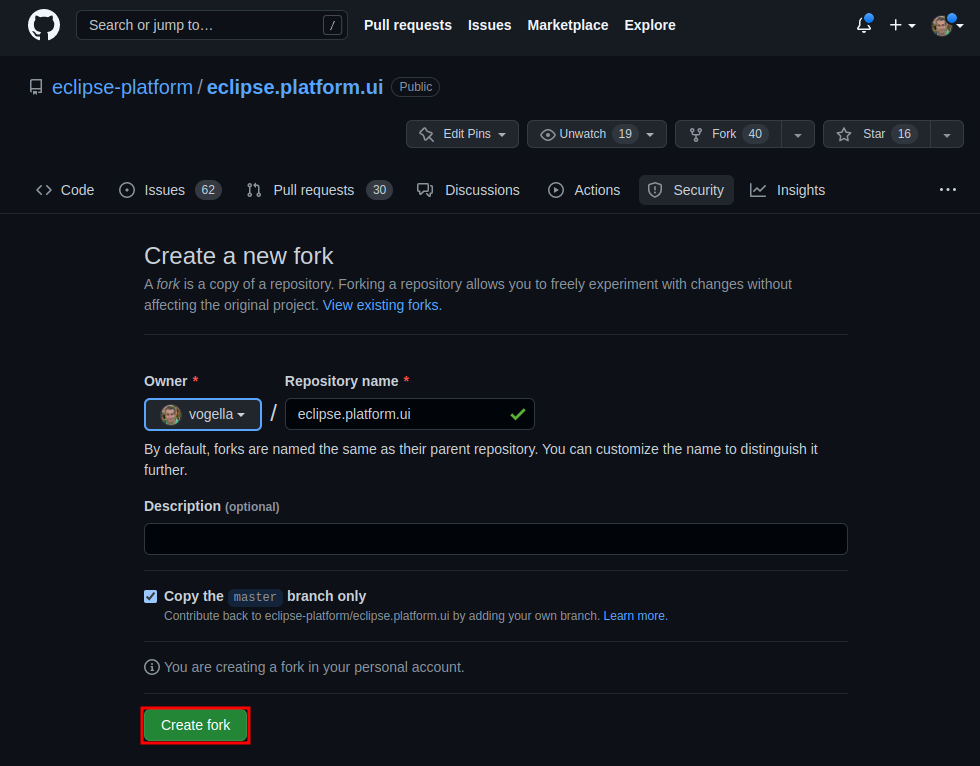
Forking is the process of making a copy on GitHub of a repo to which you have access. Go to https://github.com/eclipse-platform/eclipse.platform.ui and press the Fork button.
5.3. Clone the repository via the Eclipse IDE
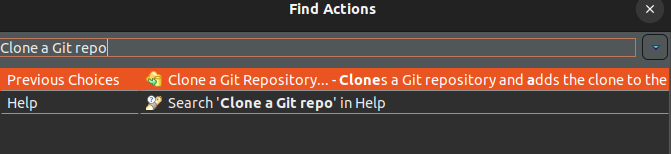
Use Ctrl+3 (or Cmd+3 on macOS) and type Clone a Git repository in the dialog.
Enter the URL to your GitHub fork in the first line of the wizard.
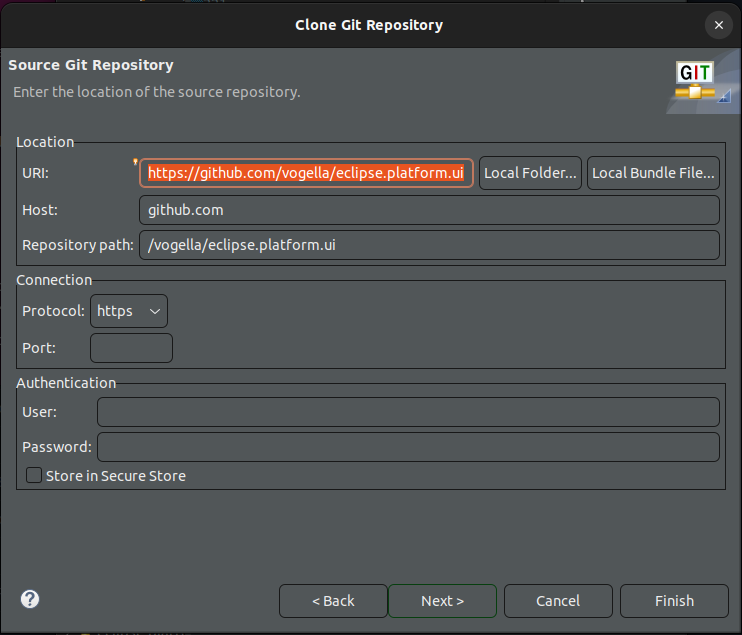
On the next wizard page you can select to clone all branches.
The Eclipse platform project uses the master branch for all bug fixes and feature work.
Individual bug fixes are backported to maintenance branches, but you should always first fix the issue in the master branch.
Finish this wizard by selecting the Next button until you the option Finish option becomes available. You end up with the projects from the repository imported into your workspace.
5.4. Install test feature
Install the test feature via as the test plug-ins require s plug-ins. To get the latest test bundle, use the https://download.eclipse.org/eclipse/updates/I-builds update site.
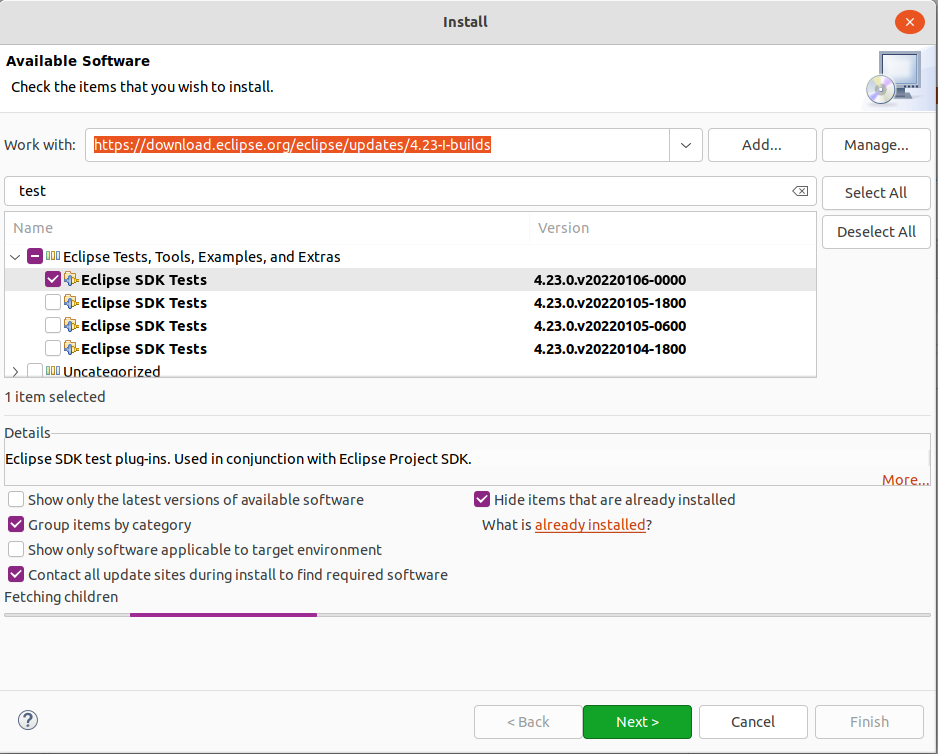
Restart your IDE afterwards.
5.5. Import project from the Git Repositories view
Use Ctrl+3 (or Cmd+3 on macOS) and type Git Repositories in the dialog to open the corresponding view. Select your clone GitHub repository, right-click on it and select Import Projects to import the projects.
5.6. Closing projects
Sometimes a plug-in gives you error messages, which you cannot solve. For example, if the plug-in is specific to the Windows operating system API and you are using Linux, you get compiler errors for it.
In this case, right-click on the project and select Close Project from the context menu. This instructs the Eclipse IDE to ignore this plug-in in your workspace.
5.7. Start a runtime Eclipse
Pick one of the imported projects and error free projects in your workspace and select . This should start a runtime Eclipse.
You can now modify your code, start the runtime Eclipse again and test the runtime behavior in the new runtime Eclipse.
Exercise: Configuring the API baseline
The Eclipse platform project avoids unplanned API changes. To avoid API breakage the API tooling is used that requires an API baseline which is used for comparison.
To define API baseline, you download and extract the latest released version of Eclipse from https://download.eclipse.org/eclipse/downloads/. For example, let us assume we are in May 2025. As you are developing now for the 2025-06, select the 2025-06 release as API baseline.
If your workspace, which you are using to change the Eclipse platform code, you need to point the API tooling to this download. For this, select the menu entry. With this setting, Eclipse compares the API in your workspace with the API in the official release and can report API breakage.
This way the Eclipse API baseline tooling can check if you break the existing API and if you do this adds error or warning markers to your code. The tooling can propose quickfixes for such violations.
The following screenshots demonstrates how to configure a API baseline for a workspace.
Open and search for API Baselines. In the corresponding preference page, press the Add Baseline… button.
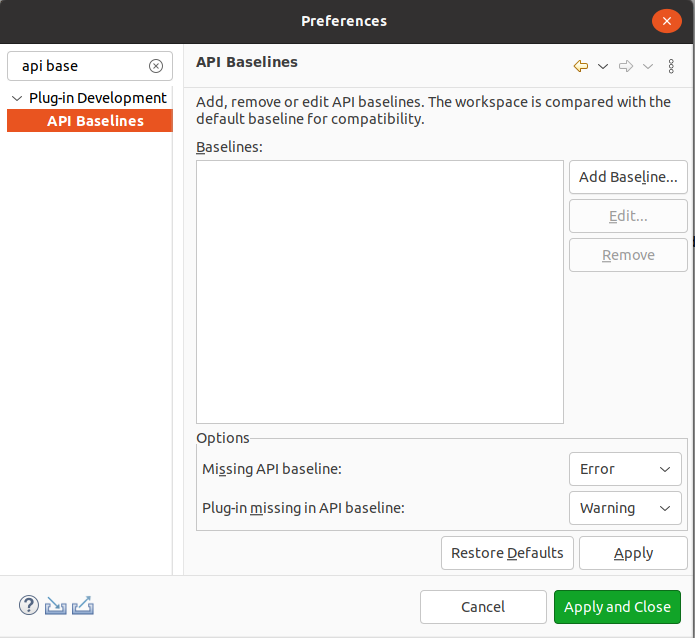
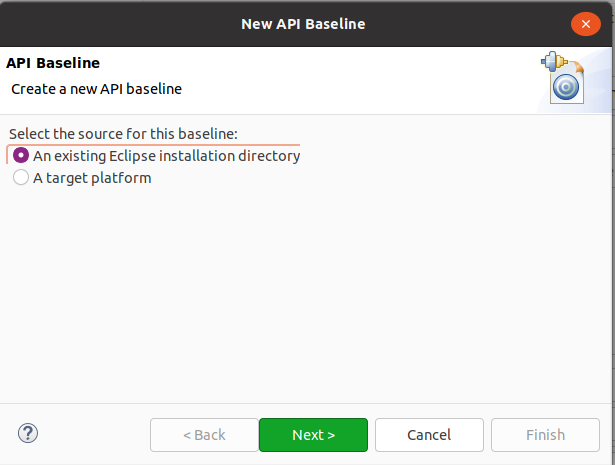
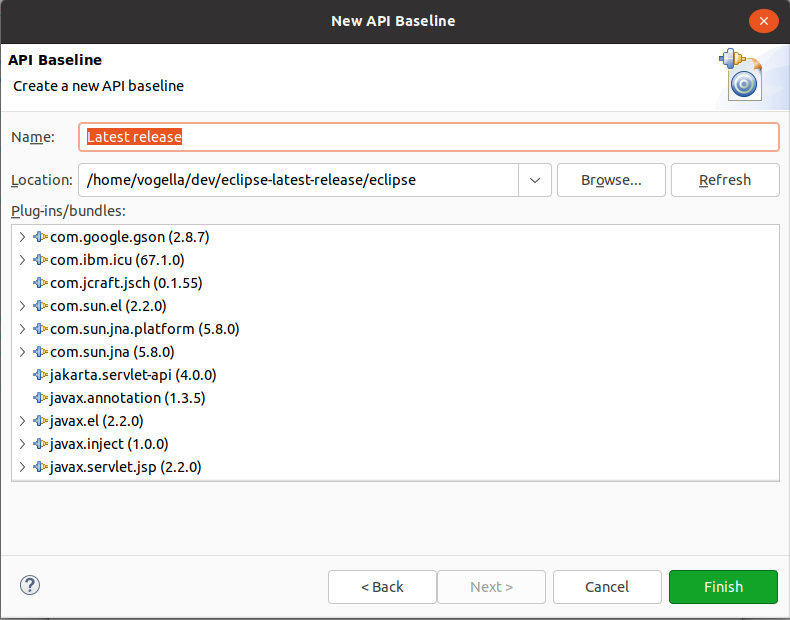
Select the folder that contains the official Eclipse release, and define a fitting name. Afterwards, press the Refresh button to use this installation as baseline.
For detailed information about the usage of the API baseline, see Eclipse Version Numbering Wiki and API Tools.
|
Handling baseline issues and API is something which the core committers can help with. New contributors can set this error message to warning to have an easy start. This option is highlighted in the screenshot below 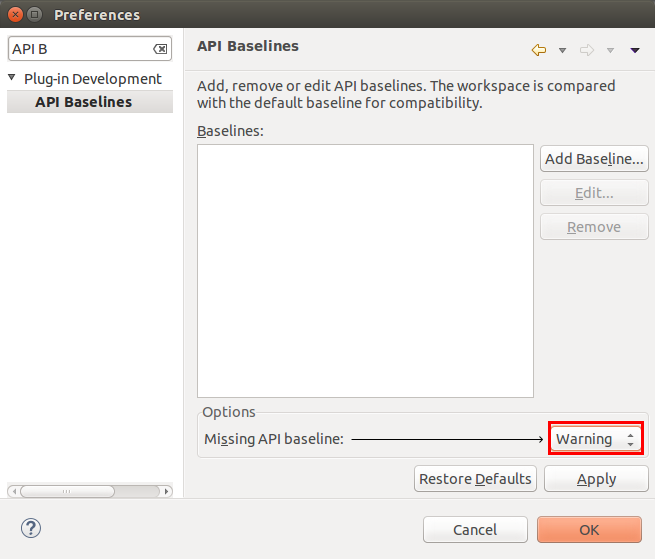 |
6. Exercise: make a change and push a review
6.1. Make a code change
Find a simple change for your first contribution. For example, fix a typo or a compiler warning. Eclipse projects frequently tag bugs with the keyword bugday or helpwanted. These bugs are good candidates for initial contributions.
6.2. Push to your Git fork
Use the Git Staging view to commit your change and to push it to your fork on GitHub. Push to branch name of your choice. Now go to the GitHub web page and create a pull request for your change.
6.3. Updating the pull request
You may get review comments asking to improve the change. Or you find a better way of doing the change. You can update an existing branch on your for by force pushing to it. The easiest way of doing this is to amend the last commit and force push this commit again to the same branch on your fork.
6.4. Verification failures due to missing version update
For every Eclipse release the version number of the plug-in needs to be increased, as Eclipse follows sema ntic versioning.
The x.y.z.build version of the MANIFEST.MF follows the following pattern:
-
major - increase if you break consumer and implemetors of the API
-
minor - increase if you break implementors for the API
-
service - if you change internal stuff, e.g., non API or Javadoc
-
build qualifier - will be filled in by the build system
The verfication build of the platform will verify if an increase of the version is necessary. If this is necessary you see the following error message:
[ERROR] Failed to execute goal org.eclipse.tycho.extras:tycho-p2-extras-plugin:1.3.0-SNAPSHOT:compare-ver
sion-with-baselines (compare-attached-artifacts-with-release) on project org.eclipse.ltk.core.refactoring:
 Only qualifier changed for (org.eclipse.ltk.core.refactoring/3.9.100.v20181024-1316). Expected to have bi
gger x.y.z than what is available in baseline (3.9.100.v20180828-0626) → [Help 1]
If you see this error you need to update at least the service version by 100 for any platform project.
This involves:
-
Changing the
Bundle-Versionin the MANIFEST.MF file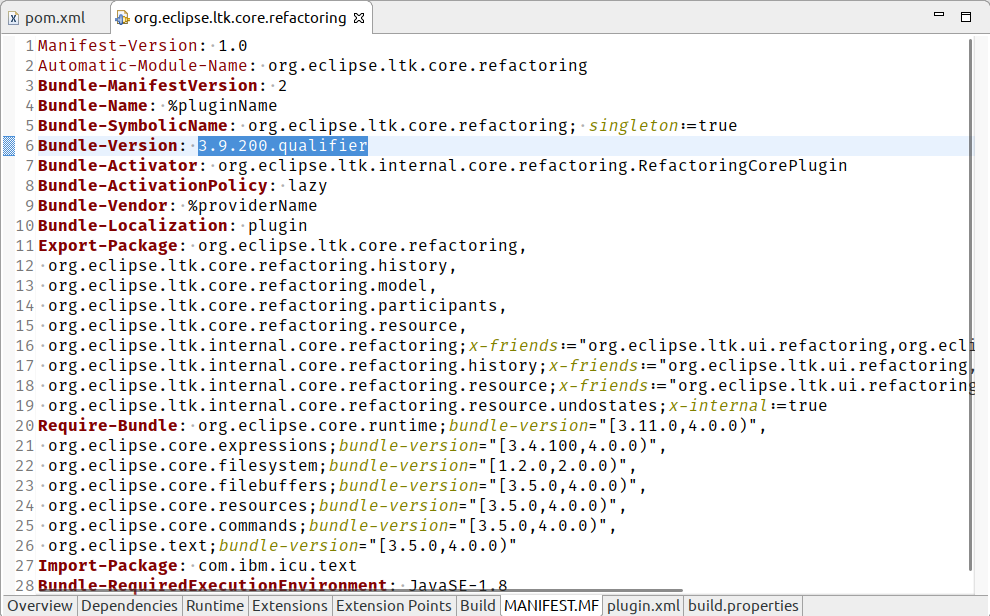
-
Changing the
<version>in the pom.xml file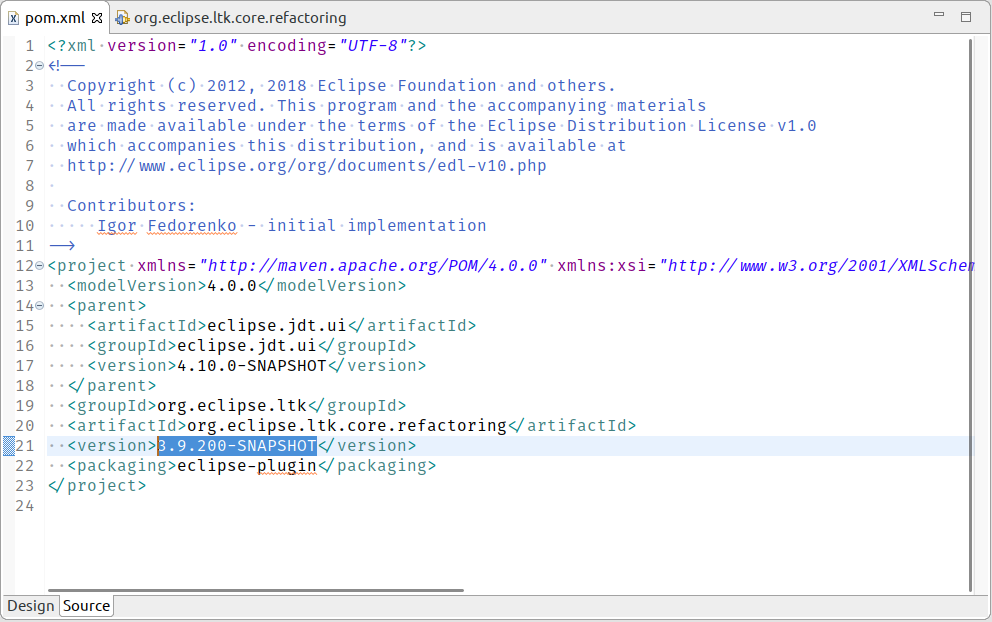
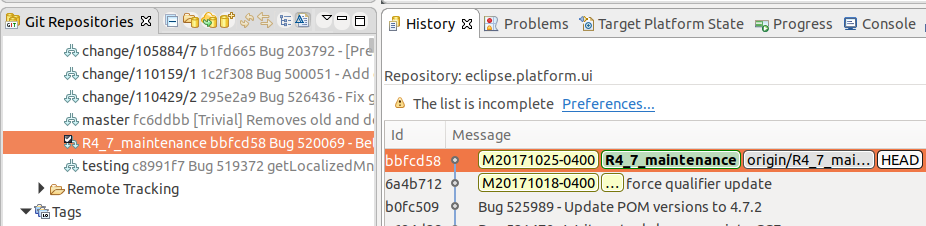
6.5. Providing backports to maintenance releases
The Eclipse platform project is currently developing in the master branch. If a bugfix or feature should be provided via a maintenance release, it is backported.
To backport, you:
-
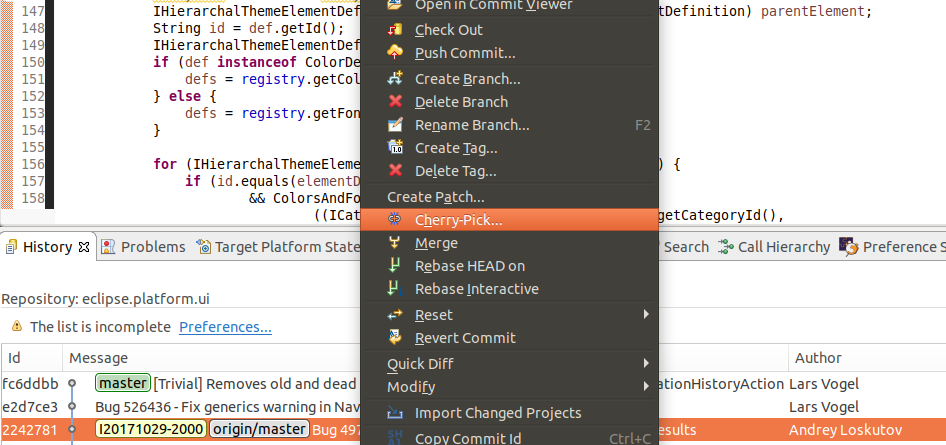
Cherry-pick the commit onto a branch which is based on the current maintenance branch.
-
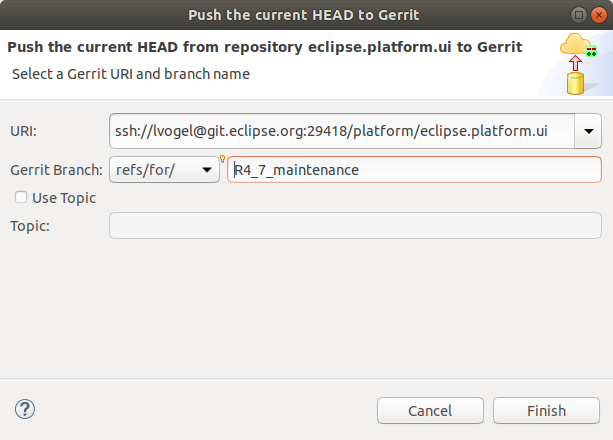
Push the Gerrit review to the maintenance branch via the
refs/for/your_maintenance_branchrefspec.
This is demonstrated by the following screenshots.
7. Tools to analysis Eclipse code and behavior
7.1. Plug-in Spy for UI parts
You can activate the Plug-in Spy by pressing Alt+Shift+F1 in the Eclipse IDE. It gives you information about the currently selected user interface component. This way you can get immediate access to the plug-in which is currently running.
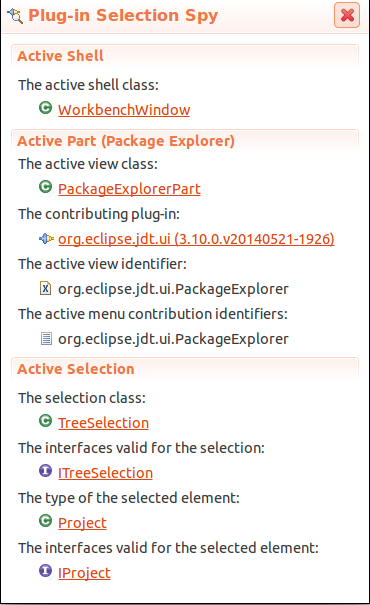
Click on any of the linked elements to obtain more information about that element. For example, if you click on the contributing plug-in the tool opens the manifest editor for this plug-in.
7.2. Menu spy for information about menu items
Press Alt+Shift+F2 and select a menu entry or click a toolbar entry to see information about this element.

7.3. SWT Spy for widget information
SWT Spy for Eclipse is a tool that prints out information about the widget under the cursor. Currently, this includes style, layout and parent information. See SWT Development Tools homepage for more information.
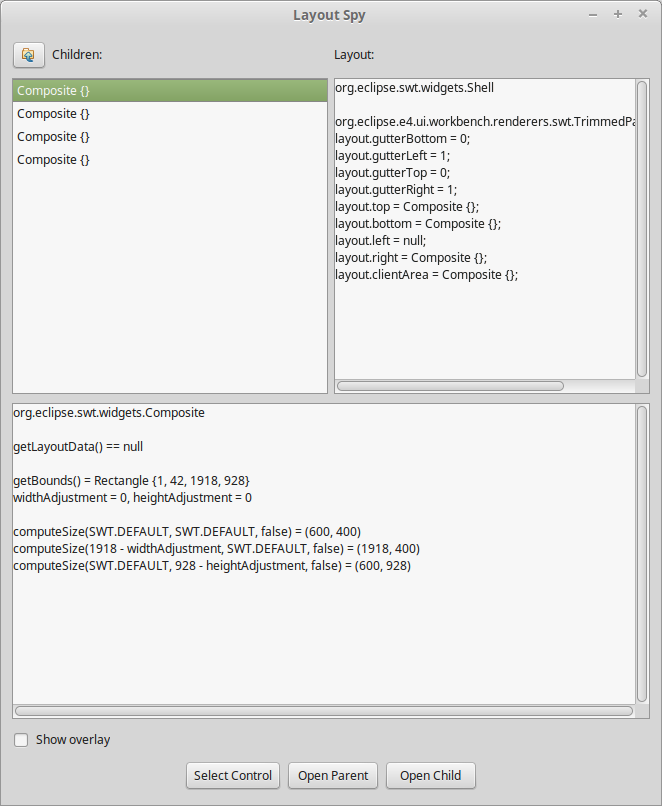
7.4. Layout Spy for layout information
As of Eclipse 4.7 you have an SWT Layout Spy. Press Ctrl+Alt+Shift+F9 on any window to activate it.
Press Select Control to pick a control to inspect.
With Show Overlay you activate an overlay that shows an outline around the selected control (red rectangle) and its child (yellow rectangle).
You can navigate the controls with Open Child and Open Parent.
To find a control which boundary is misaligned now navigate to a control that has correct outline but its child does not. Check the value of computeSize. If the result of computeSize is correct, the problem is in the parent layout or its attributes. Otherwise, the problem is in the child widget.
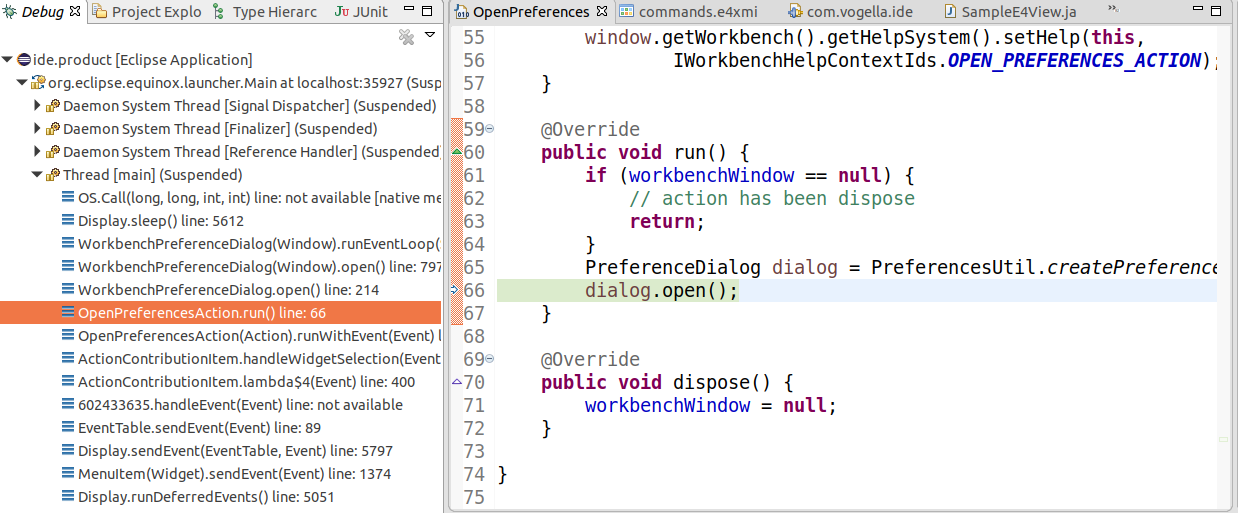
7.5. Access the current call stack to find the relevant code
To see the call stack of a runtime Eclipse, you start an runtime Eclipse in the debug mode. Once you reach the relevant state, press the Suspend button. Afterwards, you can expand the call stack and see the code you are looking for.
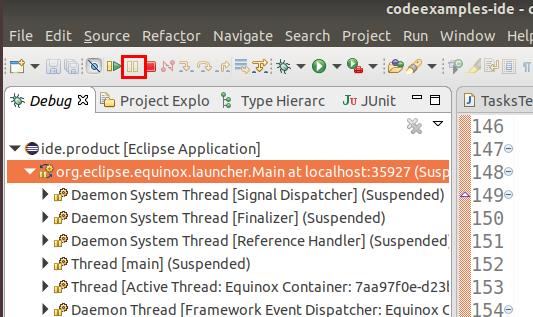
This makes it easy for example to find the code which opened a dialog.
7.6. Debugging GTK elements with Gtk inspector
GtkInspector is a tool that allows you to debug GTK+ applications.
It was introduced in GTK+ 3.14.
To start Eclipse with the GtkInspector start it with an environment variable set.
GTK_DEBUG=interactive ./eclipseYou can start the GtkInspector for an already running program. To do this you have to enable the inspector key bindings. Under ubuntu you might have to install an additional package to make this option available.
sudo apt install libgtk-3-devRun this command in your terminal to activate the setting.
gsettings set org.gtk.Settings.Debug enable-inspector-keybinding trueAfter this the key binding are activated.
| Shortcut | Purpose |
|---|---|
Ctrl+Shift+D |
Start GtkInspector |
Ctrl+Shift+I |
Start GtkInspector |
See CSS for GTK and Gtk inspector for more information.
8. Eclipse spies
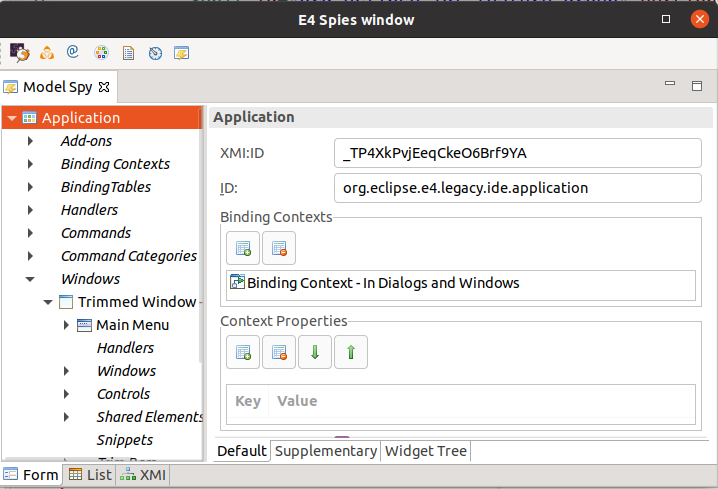
8.1. Model spy for the application model
The application model of an Eclipse application is available at runtime. The application can access the model and change it via a defined API.
To analyze and modify the runtime model, you can use the model spy, which allows you to modify the application model interactively. This tool is called Model Spy and can be integrated into your RCP application. Most changes are directly applied, e.g., if you change the orientation of a part sash container, your user interface is updated automatically.
In the model spy, you can select a part in the application model, right-click on it and select Show Control to get the part highlighted.
|
Model spy and the Eclipse IDE
If installed, you can use the model spy to see the application model of the running Eclipse IDE itself. You can open it via the Alt+Shift+F9 shortcut. |
|
If you modify the Eclipse IDE model, you should be careful as this might put the running Eclipse IDE into a bad state. To fix such issues, start the Eclipse IDE from the command line with the -clearPersistedState parameter. |
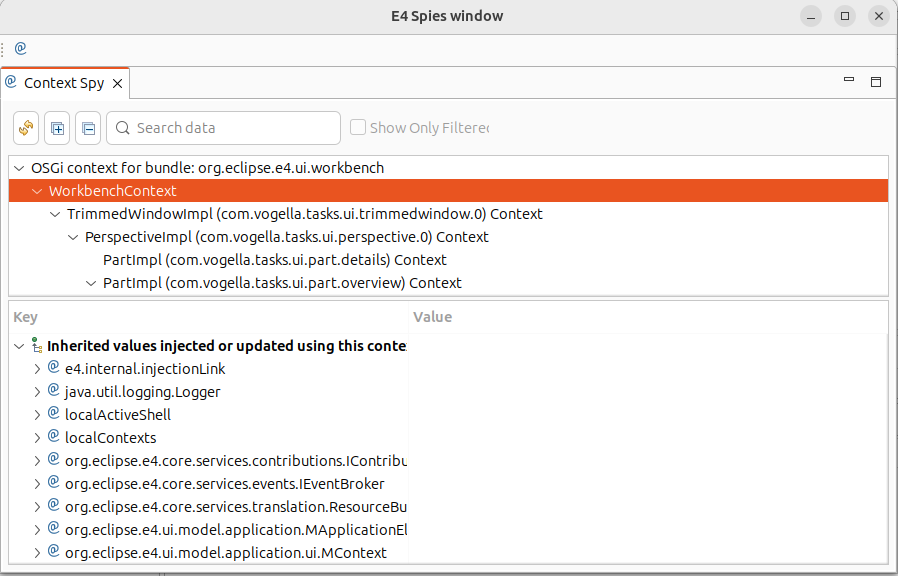
8.2. Context spy
The context spy allows you to see the key-value pairs that are available for dependency injection.
Therefore, you can use it to see the content of the IEclipseContext.
8.3. Preference Spy for tracing preference changes
The Preference Spy provides a way to trace preference value changes. The Preference Spy is part of the PDE tools.
You can open the Preference Spy with the Shift+Alt+F11 shortcut or via .
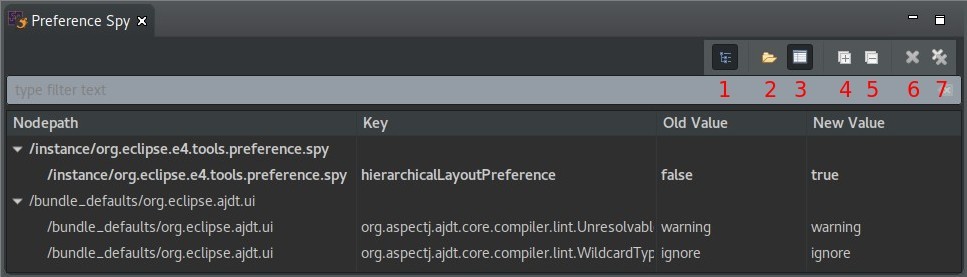
In the upper right corner, you see the controls for the Preference Spy. They can be used to:
-
toggle between flat and hierarchical layout
-
show all preferences
-
toggle tracing preferences changes
-
expand all preferences
-
collapse all preferences
-
remove entry from view
-
remove all entries from view
On the picture you see the hierarchical layout. Furthermore, tracing of preferences changes is enabled. The bold entries depict the recently changed preferences with the old and new value. The non bold entries are any other preferences that can be shown by pressing the button to show all preferences (2).
9. Optional exercise: Use the model spy
In this exercise, you will add the model spy to your Eclipse application. The model spy is a development tool to see your current application model and to modify it at runtime.
|
The spies are debugging tools and are not intended for use in a production application. As a result, this exercise might not work, or you may see additional exceptions in your log file caused by the tool. |
9.1. Add the spies to the target platform
Add the spy feature to your target platform so that you can add this feature to your application. Add new entries to your target platform to make the spies available.
|
You may have multiple additional entries in this file, for example if you added the JDT tools to your target file, you would see an entry for |
<?xml version="1.0" encoding="UTF-8" standalone="no"?>
<?pde version="3.8"?>
<target name="target-platform">
    <locations>
        <!-- all your old entries should stay here -->

        <!-- add these new entries. We use a new location entry but you could add them to the existing entry-->
        <location includeAllPlatforms="false" includeConfigurePhase="true" includeMode="planner" includeSource="true" type="InstallableUnit">
            <repository location="https://download.eclipse.org/releases/latest"/>
                 <unit id="org.eclipse.pde.spies.feature.group"/>
        </location>
    </locations>
</target>
Reload the target platform after this change by clicking the Reload Target Platform button on the Definition tab of the target definition editor.
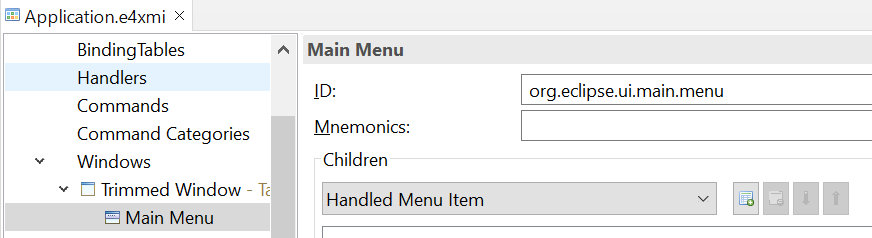
9.2. Add a top level menu entry to the window
Add a main menu to your window.
This can be done via the Main Menu property on the window application model.
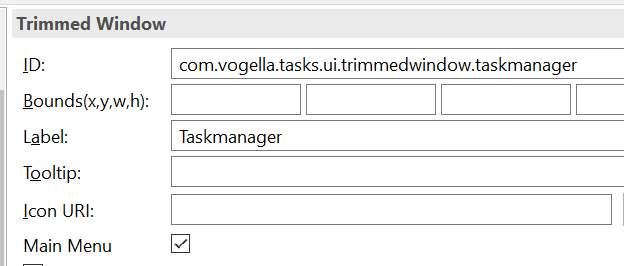
|
Ensure that the menu ID is set to |
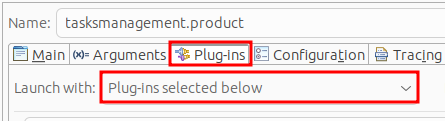
9.3. Add the model spy to the runtime configuration
Open the run configuration of your product via the menu entry.
Switch to the plug-ins tab and select the Launch with: Plug-ins selected below option.
Add the org.eclipse.pde.spy.model plug-in.
Press the Validate Plug-ins button to ensure that all dependencies are included. If something is reported as missing, you can add the missing plug-ins via the Select Required button.
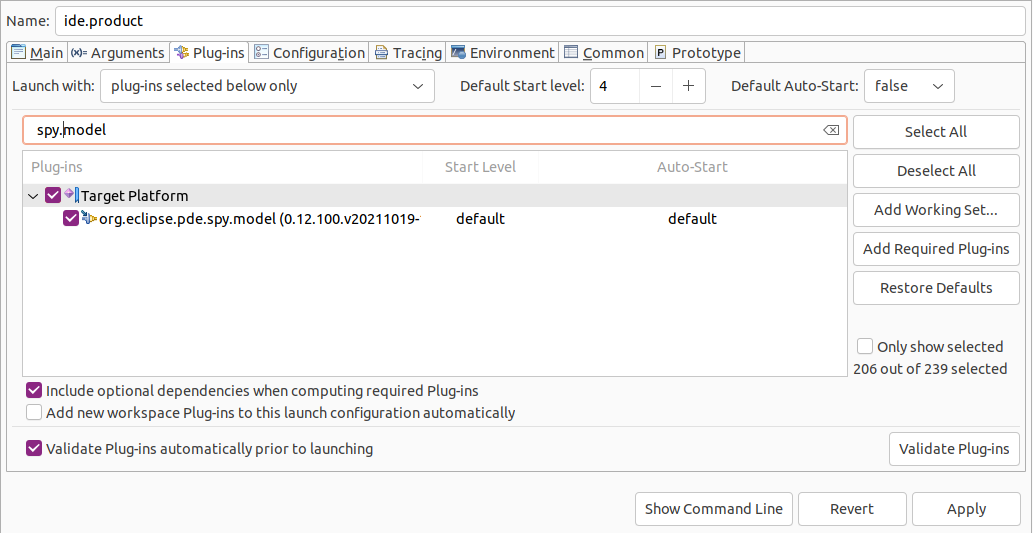
Then, click Apply and Run.
9.4. Opening the model spy in the application
After you have added the new plug-ins to your run configuration press the Run button in the run configuration you just added.
|
Do not start the application now via the product. Starting via the product resets your changes in the runtime configuration. |
INFO: See the next section for possible errors in case you cannot open the model spy in your application.
To display the model spy, use the menu entry.

Use the model spy to change the runtime application model.
|
Setting the |
For example, add a part (with a label) or change the size of the window. All changes should become immediately visible (except changes for new menu entries, due to a bug).
9.5. Remove model spy from the run configuration
After testing with the tool enabled, start your application again from your product configuration file to remove the model spy plug-in from your run configuration.
|
If you leave the model spy included in your run configuration, it might cause side effects. For example, in the past it created exceptions if key bindings were present in the application. |
10. Optional exercise: Use the context spy
In this exercise, you add the context spy to your application.
The spies are debugging tools and are not intended to be used in a production application. It might happen that this exercise does not work, or that you see additional exceptions in your log file, caused by the tool.
10.1. Ensure that spies are available in the target platform
If you skipped the previous exercise, you need to add the spies to your target platform. Your target platform file should contain the following entry.
<unit id="org.eclipse.pde.spies.feature.group"/>10.2. Add the context spy to the runtime
Add org.eclipse.pde.spy.context to your launch configuration via and the Plug-ins tab.
Start your application with this launch configuration.
If something is reported as missing, you can add the missing plug-ins via the Select Required button. Press the Validate Plug-ins button to ensure that all dependencies are included.
10.3. Opening the context spy in the application
In your RCP application, you can open the context spy via the menu entry. Select one of the tree entries in the context spy view to see the key-value pairs provided by the context.
|
After you finish testing with the context spy, please remove it again from the launch configuration. The spies are debugging tools which may result in strange side effects if you include them in your product. |
11. Enable access to plug-ins
The Java tools limit the scope of search-related activities based on the libraries used in your Java projects. By default, Eclipse includes elements from open projects including their dependencies as well as elements from the standard Java library.
For example, the Open Type dialog Ctrl+Shift+T does not find the ISources interface unless it is referenced by a project in your workspace.
As a plug-in developer, you want to have access to all classes in your current target platform. The target platform is the set of plug-ins against which you develop. By default, the target platform consists of the plug-ins from the Eclipse IDE installation.
You can configure the Eclipse Java tools to include all classes from the current target platform by adjusting the setting.
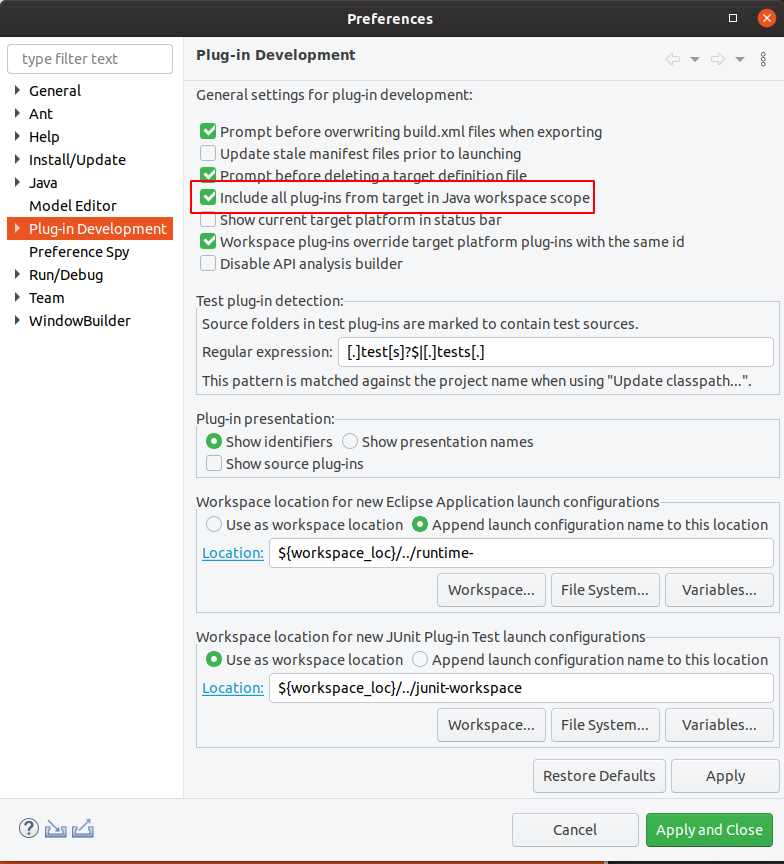
| If you skipped the above text, ensure at least that you have configured the setting from the above screenshot in your preferences. |
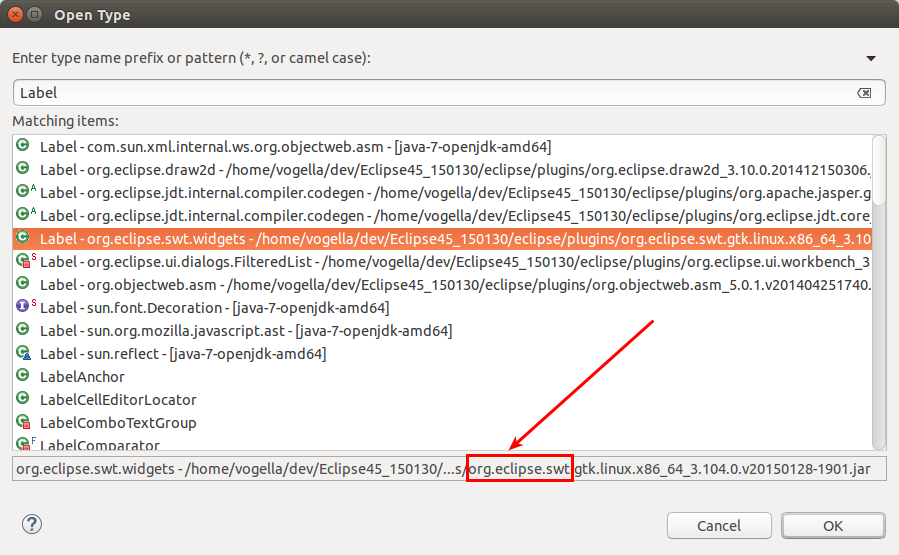
12. Find the plug-in for a certain class
You frequently have to find the plug-in for a given class. The Eclipse IDE makes it easy to find the plug-in for a class. Enabling the Include all plug-ins from target into Java Search setting in the Eclipse IDE preferences. Now you can use the Open Type Dialog Ctrl+Shift+T to find the plug-in for a class. The JAR file is shown in this dialog and the prefix of the JAR file is typically the plug-in that contains this class.

13. Finding classes and plug-ins
13.1. Open Plug-in artifact
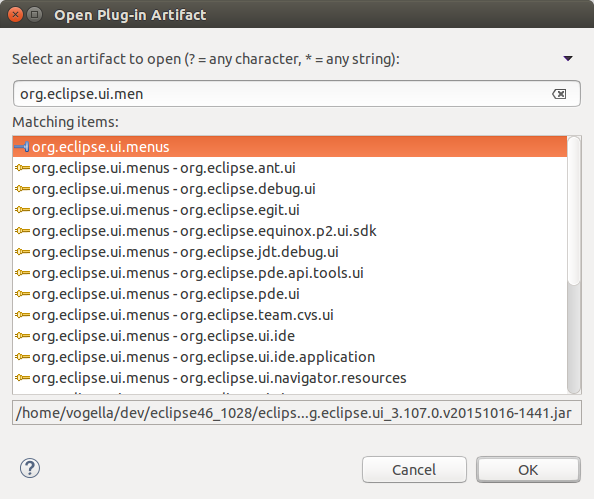
Use the Ctrl+Shift+A shortcut to search for an extension point.
Definition and usage of an extension point have different icons.
For example, to see which plug-in defines the org.eclipse.menu.ui extension point, enter it in the dialog and select the entry with the blue icon.
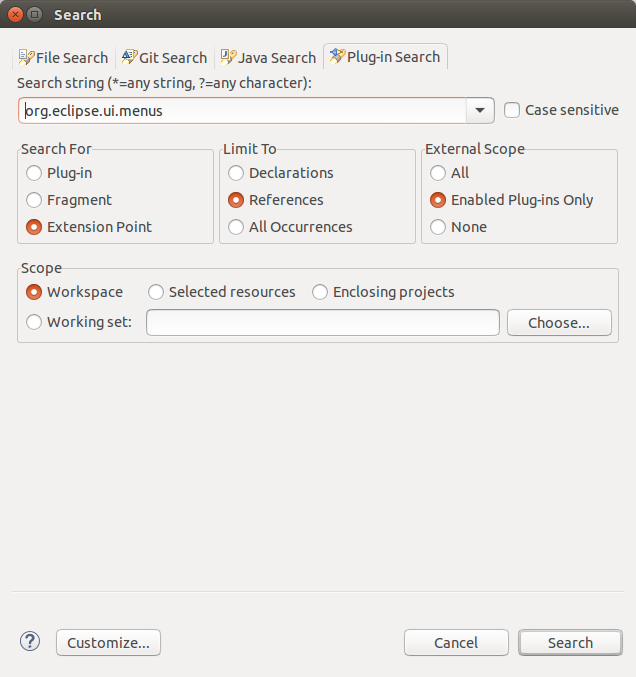
13.2. Plug-in search
Plug-in Search allows you to perform a detailed search for extension points. Select the menu. You can specify what you are searching for as demonstrated in the following screenshot.
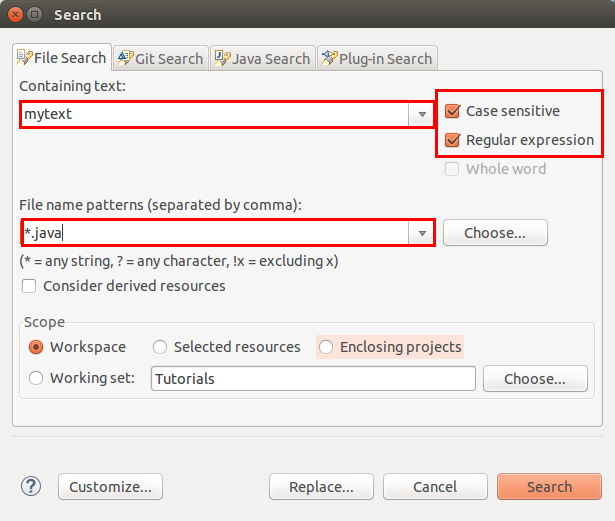
13.3. Plain text search
In case you have imported the source code of an Eclipse project into your workspace you can use the plain text search. Select the menu entry and switch to the File Search tab.
As indicated in the following screenshot you can search for a text, use regular expressions and restrict which files to search by specifying a file name pattern. This is a flexible way to search and allows you to find almost everything.
14. Eclipse projects responsible for the Java IDE
14.1. The Eclipse project
The Eclipse IDE is an open-source project. Eclipse.org hosts lots of projects with different purposes. The foundation of the whole Eclipse IDE is delivered by the Eclipse platform, the Java development tools (JDT) and the Plug-in Development Environment (PDE) project.
All these projects belong to the project called Eclipse project. The name is a bit strange since nowadays there are many Eclipse projects. It originates from the fact that these projects were at the beginning the only available Eclipse projects.
These components are bundled together as the Eclipse Standard Development Kit (SDK) release. This is known as the Eclipse standard distribution. The Eclipse SDK contains all tools to develop Eclipse plug-ins.
In addition to these projects, the platform has an incubator project called e4 that provides new tools for Eclipse 4 developments. It serves as a testing ground for new ideas.
14.2. The Eclipse platform projects home pages and Git repositories
The following table lists the home pages of these projects along with the developer pages, which list the Git (and Gerrit) repositories.
| Project | Home page | Developer pages with Git repositories |
|---|---|---|
Platform |
Not relevant, as platform is only the top project |
|
Platform UI |
https://projects.eclipse.org/projects/eclipse.platform.ui/developer |
|
Java development tools (JDT) |
https://projects.eclipse.org/projects/eclipse.jdt.ui/developer https://projects.eclipse.org/projects/eclipse.jdt.core/developer |
|
Plug-in Development Environment (PDE) |
15. Eclipse and tests
15.1. Eclipse projects and their test suite
Eclipse projects typical provide a test suite which is used to validate if changes breaking existing functionality. The Gerrit build validation uses these to validate proposed changes. If changes in the tests are required, you should adjust the tests with the same Gerrit change.
|
The target of most projects is to run 100% of the test suite during the Gerrit build validation. Due to history reasons that is not yet the case for some projects. |
At the time of this writing, most Eclipse tests are based on JUnit 4.x, some are still based on JUnit 5.x.
15.2. Running the Eclipse platform unit tests
15.2.1. Repositories for platform tests
Clone the following Git repositories as these contain the existing unit tests. The clone URLs (these are not URLs for the browser!) are listed below.
-
git://git.eclipse.org/gitroot/platform/eclipse.platform.releng.git
-
git://git.eclipse.org/gitroot/platform/eclipse.platform.ui.git
-
git://git.eclipse.org/gitroot/platform/eclipse.platform.runtime.git
Clone them via Eclipse from the Gerrit server. This makes Gerrit contributions to them easier.
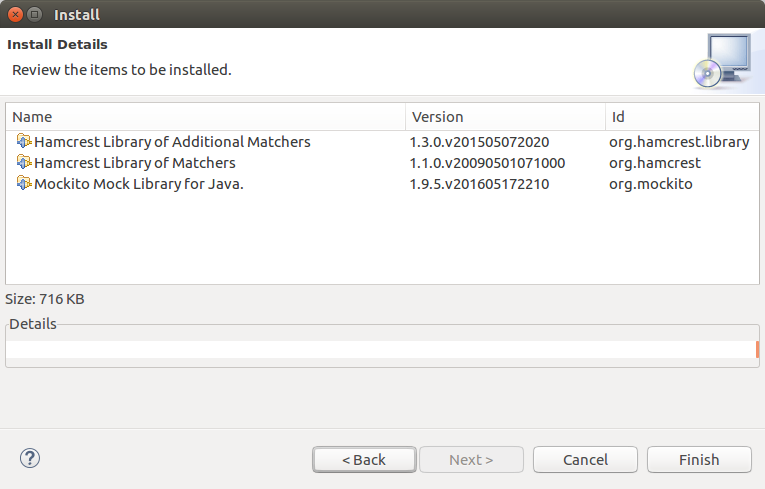
15.2.2. Installation requirements
Some tests are using Hamcrest and Mockito. You need to install them into Eclipse from one of the updates sides listed at: https://download.eclipse.org/tools/orbit/downloads/
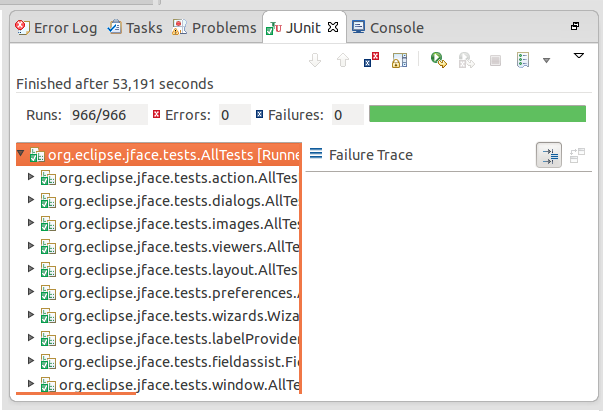
15.2.3. Example: JFace tests
In this section the procedure to run the unit tests of the JFace components is described as an example for running tests from an Eclipse project.
The unit tests for the JFace Bundle are placed in the org.eclipse.ui.tests plug-in. This plug-in includes several other tests for the Eclipse platform.ui component.
To run these tests, import the following required plug-ins:
-
org.eclipse.core.tests.harness from the eclipse.platform.runtime repository
-
org.eclipse.core.tests.runtime from the eclipse.platform.runtime repository
-
org.eclipse.test.performance from the eclipse.platform.releng repository
-
org.eclipse.ui.tests from the eclipse.platform.ui repository
-
org.eclipse.ui.tests.harness from the eclipse.platform.ui repository
To test the full JFace TestSuite, you only need to run the JFace-All Tests.launch run configuration from the org.eclipse.ui.tests plug-in.
15.3. Running the unit tests on a virtual server
The Eclipse platform unit tests start an Eclipse IDE and visually interact with it. This window activity (focus stealing, flickering) can be disruptive while you continue to work. On Linux you can redirect the tests to a virtual X display, so they run without touching your real screen. This is optional, but it lets the tests run in the background while you keep working on the same machine.
15.3.1. Install a VNC server
On Ubuntu/Debian install the virtual server and the viewer.
We recommend TigerVNC — the older tightvncserver package often fails to start on current distributions because of font path issues.
# Install the virtual server and viewer.
# TigerVNC is recommended over the older tightvncserver because
# tightvncserver frequently fails to start on modern distributions
# due to font path issues.
sudo apt-get install tigervnc-standalone-server x11-utils
sudo apt-get install tigervnc-viewer (1)
| 1 | The viewer is not required to run the unit tests but useful in case you want to watch the test execution on the virtual server. |
15.3.2. Start the virtual server
Start the server on a display number that is not already in use.
On most desktops display :1 is already taken by your native X or Wayland session (you can see this via the lock file /tmp/.X1-lock).
Use :2 (or higher) for VNC.
# Start the server on display :2.
# Do not use :1 — on most desktops it is already taken by the
# native X/Wayland session (check /tmp/.X*-lock).
vncserver :2 -name testing -depth 24 -geometry 1280x1024

# Verify the server is running and reachable
vncserver -list
xdpyinfo -display :2 | head -3
The first vncserver invocation asks you to set a VNC password.
After that, vncserver -list should show the running display and xdpyinfo -display :2 should print the screen dimensions without errors.
If either fails, the server did not start — fix that first before continuing.
15.3.3. Point Eclipse or Maven at the virtual display
In an Eclipse launch configuration add the DISPLAY environment variable on the Environment tab:
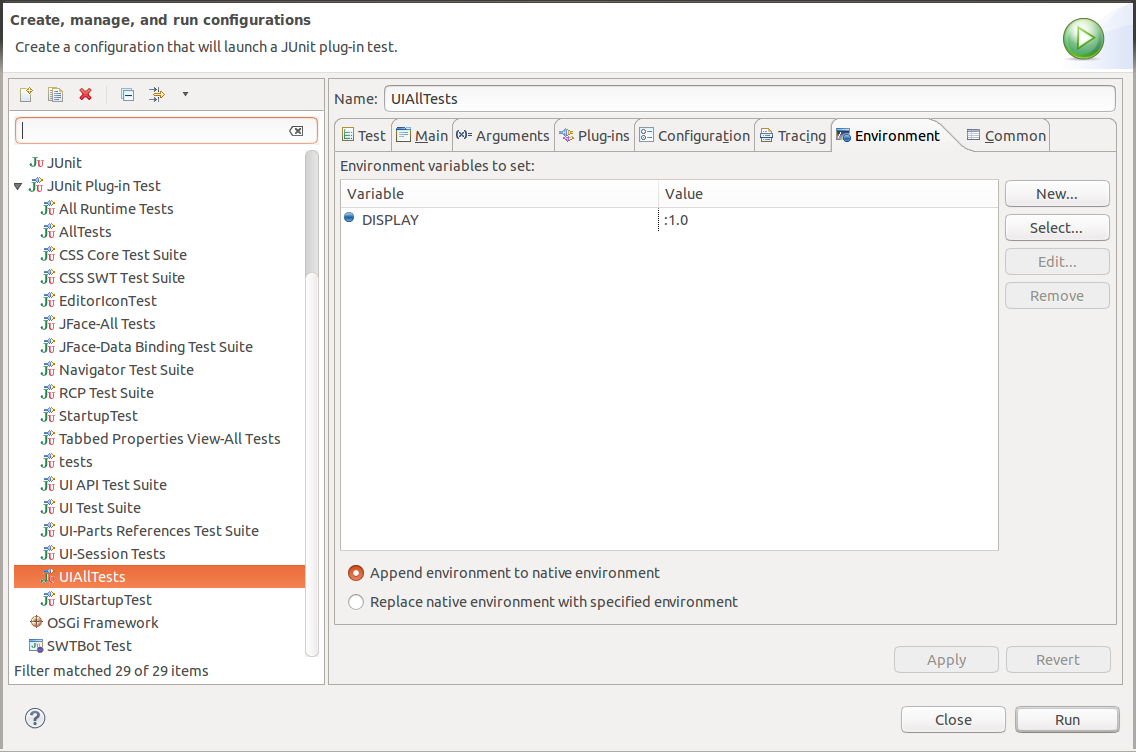
If you are running a Maven / Tycho build from the command line, export the display variable in the same shell that runs mvn.
A freshly opened terminal tab does not inherit the export, which is a common reason the tests still pop up on your real screen.
# Must be exported in the same shell that runs mvn / tycho
export DISPLAY=:2
Verify it is set before launching Maven:
echo $DISPLAY      # must print :2
xdpyinfo | head -3 # must succeed|
On Wayland sessions SWT/GTK may prefer the Wayland socket over |
15.3.4. Watch the tests (optional)
If you want to watch the unit tests, connect to the virtual server with the VNC viewer.
# Connect to the virtual server (use the same display you started)
vncviewer :2
15.3.5. Stopping the server
When you are done, stop the VNC server to free the display:
vncserver -kill :216. Creating a custom Eclipse IDE build
16.1. Building the Eclipse IDE
Eclipse uses a Maven based build system for automated builds using the Maven Tycho plug-in. Using this build system, you can create your custom build of the Eclipse IDE. This approach allows you to add tests patches based on the latest developments of the Eclipse team. The results of the build are archive files for the different platforms, which include everything to run an Eclipse IDE.
The build procedure might change over time.
16.2. Requirements
The build of the Eclipse IDE takes around 2 hours on a Core i5 machine with SSD. Approximately 25 GB of free space and 4 GB of RAM are required on the hardware-side. Building of an Eclipse IDE is possible on Windows, OS X and Linux based distributions. The following description is based on Linux.
On the software-side the following software is required:
-
Git
-
Maven Version 3.9.11
-
Java runtime in version 21 or higher
16.3. Build instructions
Perform the following instructions to build the Eclipse IDE.
git clone -b master
   --recursive git://git.eclipse.org/gitroot/platform/eclipse.platform.releng.aggregator.git
mvn clean verify -fae
Alternatively, to the aggregated comment for cloning, you can split the commands:
git clone git://git.eclipse.org/gitroot/platform/eclipse.platform.releng.aggregator.git
git submodule init
git checkout master
git pull --recurse-submodules
git submodule update
mvn clean verify -fae
To ensure that the repository is reset to a clean state, you can use the following commands.
git submodule foreach git clean -f -d -x
git submodule foreach git reset --hard HEAD
git clean -f -d -x
git reset --hard HEAD|
To skip the tests use |
If you receive java.lang.OutOfMemoryError error during the Maven build, you should increase the memory which is available for the build.
export MAVEN_OPTS="-Xmx2048m"If the build is successful, the Eclipse SDK is packaged as archive files for all supported platforms. These packages can be found in the Git repository in the eclipse.platform.releng.tychoeclipsebuilder/sdk/target/products/* folder:
16.4. Additional infos about building the Eclipse platform
16.4.1. Eclipse platform Hudson builds
The Eclipse platform builds at Jenkins. See Releng builds and Platform builds. This releng build instance is used for the Eclipse SDK build, and the platform instance to validate Gerrit contributions.
16.4.2. Changing build ID
A normal CBI Build shows, "Build id: @build@" in the "About Eclipse SDK" window.
To define a custom build id use the buildId parameter and the update-branding-plugins profile.
mvn clean verify -DbuildId=foobar -Pupdate-branding-plugins|
To check which properties can be overridden check the properties fields in the eclipse-platform-parent/pom.xml file. |
16.4.3. Build single parts of the aggregator
It is possible to build just single parts of the aggregator repository, by passing the build-individual-bundles profile.
The following example shows how to build just the rt.equinox.framework.
cd rt.equinox.framework \
mvn -Pbuild-individual-bundles clean verify|
Unfortunately, while there are numerous bundles for which the build succeed with this method, there are a couple bundles / features that cannot be built using this method. |
16.4.4. Building natives (SWT binary files)
The CBI build does not build natives by default (SWT binary files). Instead, the CBI build copies pre-built native files from the swt.binaries repository.
For Windows/Mac/Linux it is possible to force the CBI build to build these natives by passing the -Dnative pointing to the build. For example, the -Dnative=gtk.linux.x86_64 parameter in the case of Linux.
17. Tips and tricks
17.1. "Out-of-office" for Gerrit and Bugzilla
A trick to show other committers and contributors that you are on vacation. Gerrit and Bugzilla do not offer that out of the box, but as a nice trick you can change your last name for Eclipse.org to show that.
Go to Eclipse user profile and click edit for your last name.

After you changed your last name, press btn[Update Account].
Here is an example how this looks like (using another user).

| Remember to reset your name, after you returned from vacation. |
To apply the change in your address data, you need to logoff and login into Bugzilla.
17.2. Updating the copyright header of a source file
The Eclipse project allows you optionally to update the last changed date in the copyright header, if you change the file. You can do this manually but the Eclipse releng project provides tooling for that.
| This used to be mandatory but become an optional step in 2016. |
You need to install the copyright header tool from the following update site: https://download.eclipse.org/eclipse/updates/4.6
Adjust the number "4.6" to the number matching your eclipse version.
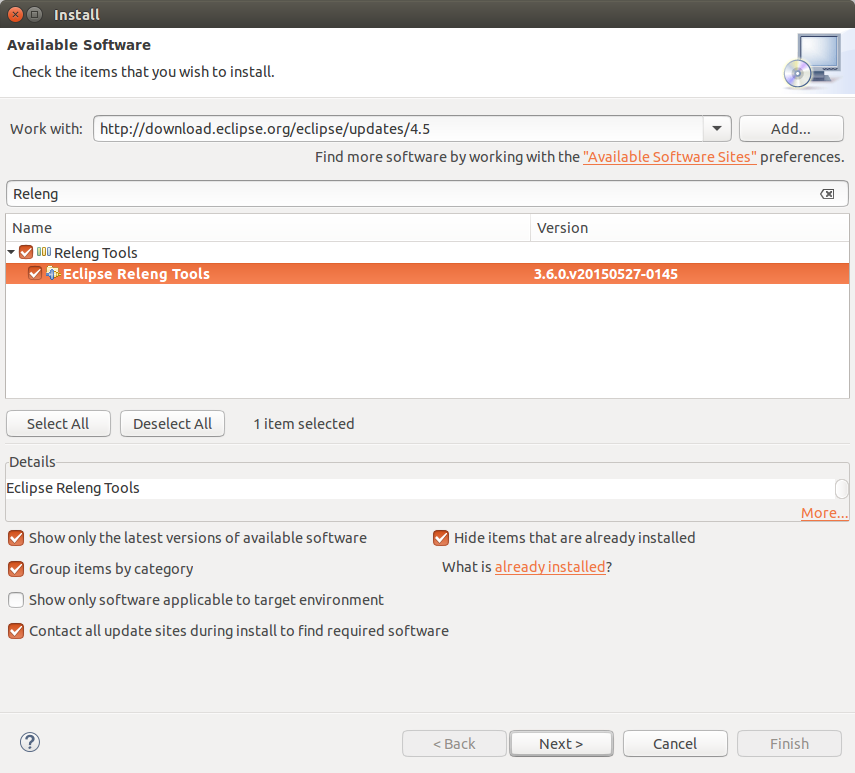
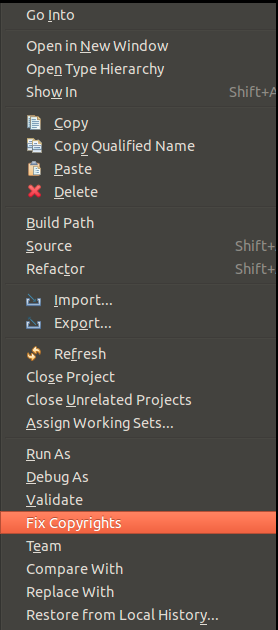
After the installation you can select the entry from the context menu of a project or source folder.
18. Appendix: Cloning from the Git server and adjusting the push URL
18.1. Overview
If you cloned an Eclipse Git repository directly from the Eclipse Git server instead of the Gerrit server, you have to adjust the push URL for the usage of Gerrit. For example, you may have found the clone URL on the Eclipse Git web interface.
It is far easier to clone from the Gerrit server via Eclipse, as this does not require you to change the push URL. In case you can use the Gerrit server, this section is not relevant for you.
The push configuration in the following dialog depends a bit if you want to use SSH or HTTPS. If you want to use SSH ensure to use the 29418 port and remove the "gitroot" string from the push-url.
The following screenshot demonstrates that for the Eclipse platform UI Git repository.

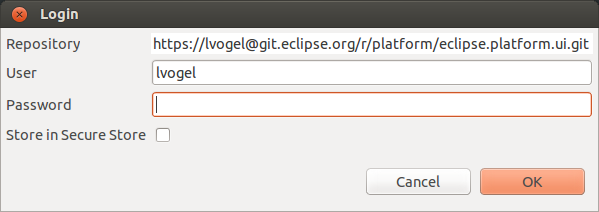
If you want to use HTTPS to push to the Gerrit server, you have to use a push URL with an "r" included. For example:
You need to provide in this case your Gerrit password to push to the Eclipse Git repository. This is depicted in the following screenshot.
18.2. Gerrit push configuration
The Gerrit server requires that you push using a predefined refspec, called HEAD:refs/for/master. A refspec allows you to configure which remote branch should be used for remote operations.
If you clone a Git repository managed by a Gerrit server, this push url is already correctly configured in most cases.
The icon for repository configured to be used for Gerrit uses a green icon.
Also Gerrit specific commands are added to the repository’s context menu, e.g., Push to Gerrit… and Fetch from Gerrit… ).
In addition, the repository is configured to always add a Change-ID to the commit message.
In the following screenshot the repositories configured for Gerrit are highlighted.
The eclipse.jdt repository in this screenshot is not configured for Gerrit.

If you have to configure the push URL manually, select your remote repository in the Git Repositories view, right-click on it and select Gerrit configuration .

If you select the origin entry, right-click on it and select Gerrit Configuration… the entry should look like the following screenshot.
| For HTTPS access the URL is different. |
To validate the push specification, select the highlighted node in the following screenshot and check the Remote Push Specification entry in the Properties view.

19. Using the Eclipse installer for code contributions
You can use the Eclipse installer (which is provided by the Eclipse Oomph project) to automate some of the steps of code contributions. Please note that the Eclipse installer is currently still under heavy development and the user interface might change significantly.
Download for this, the Eclipse installer from Eclipse installer. Depending your operating system you have to extract it, or you can just run the executable.
Start it and select the Advanced Mode.
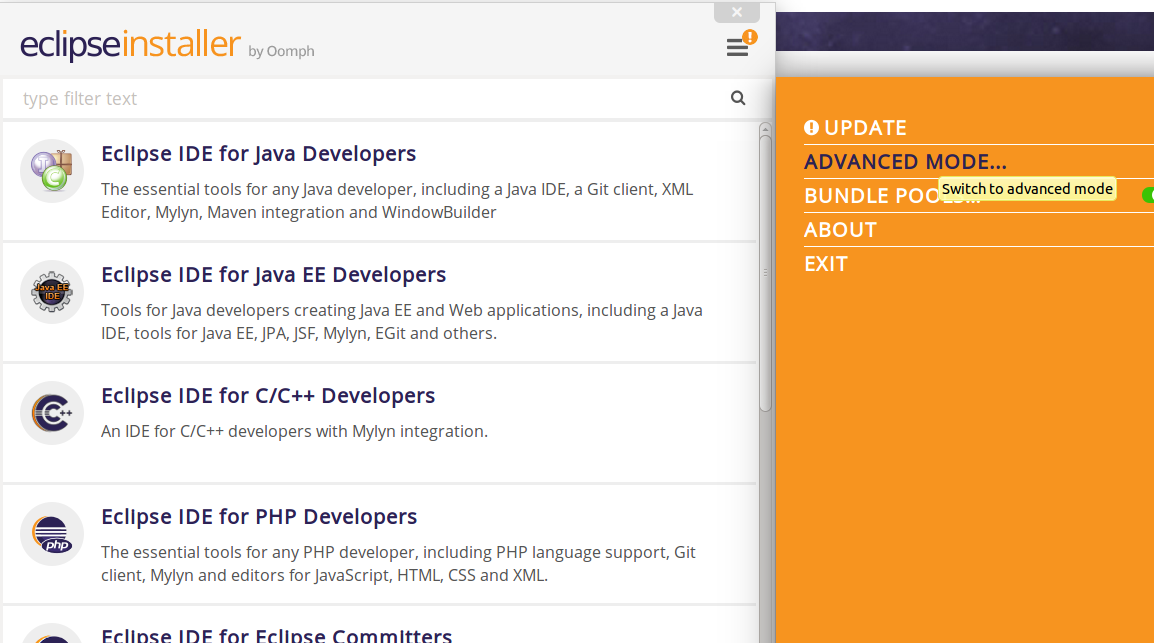
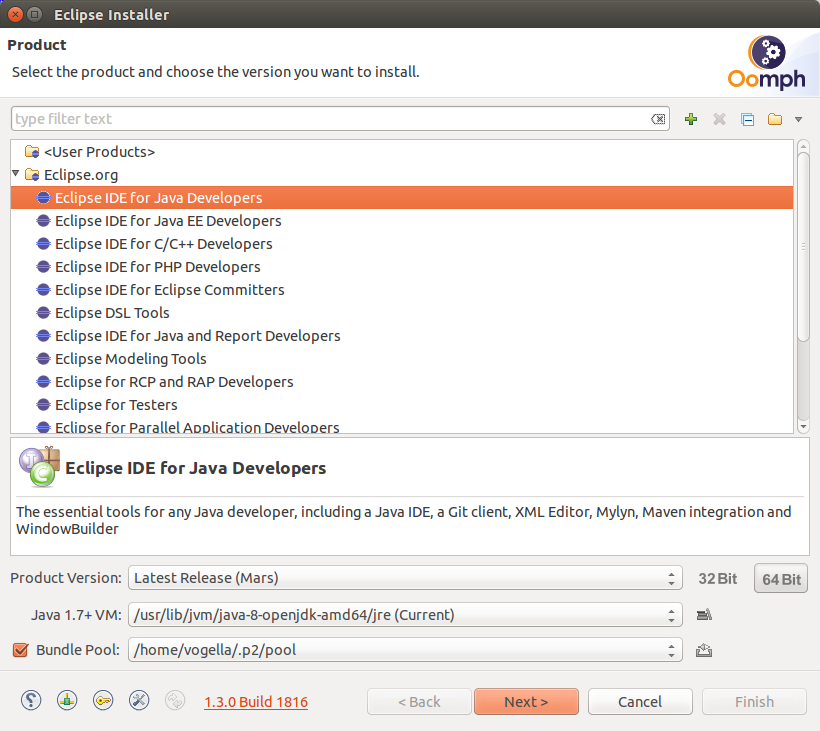
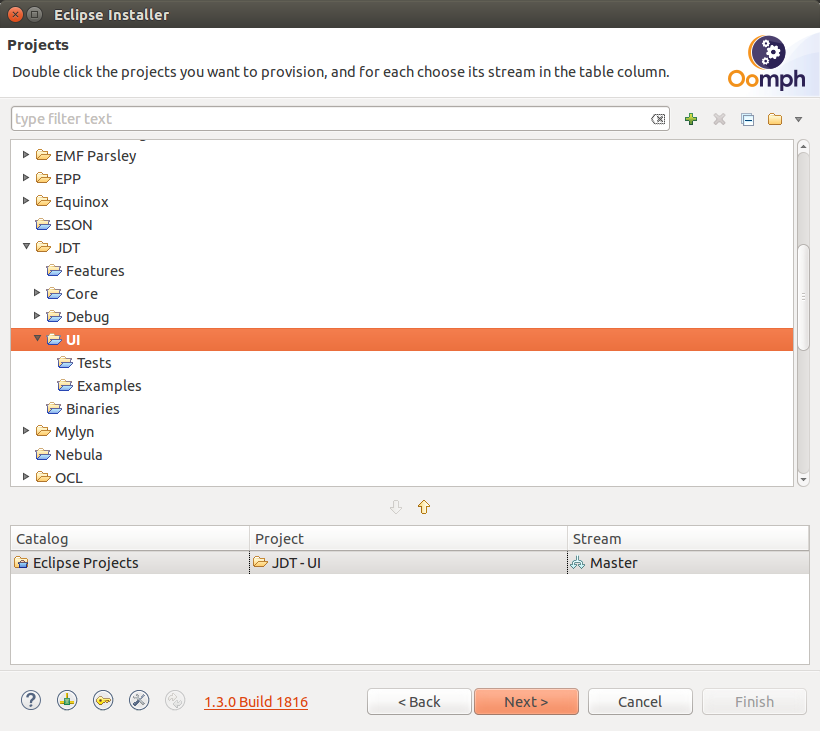
Select Eclipse IDE for Java Developers.
Afterwards, you can select the project you want to contribute to. If this project maintains a correct Oomph configuration will clone the corresponding repository and configure your workspace. The following screenshots are from JDT UI, for which the Eclipse installer configuration is valid as the time of this writing.
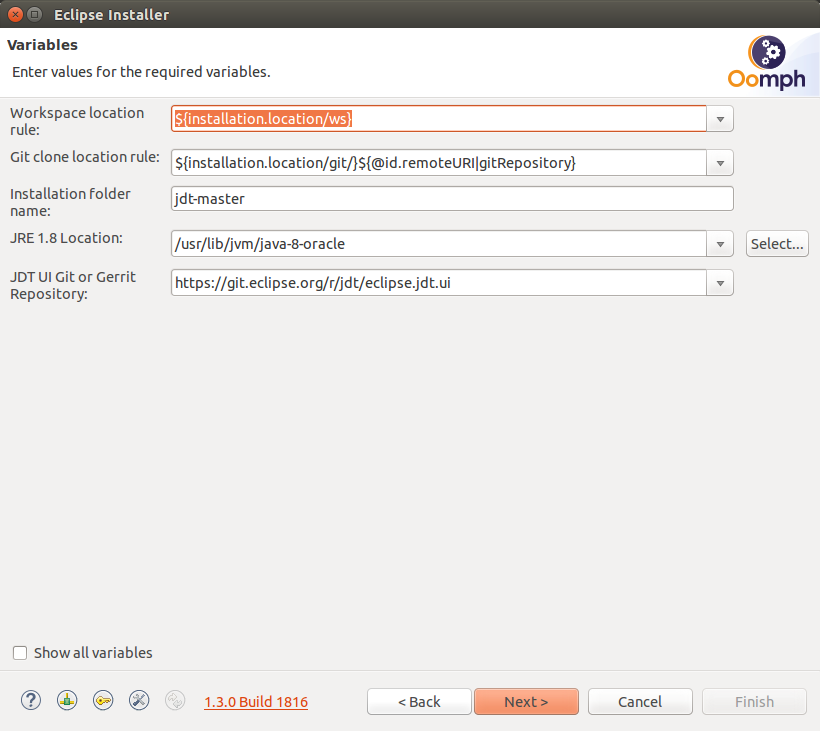

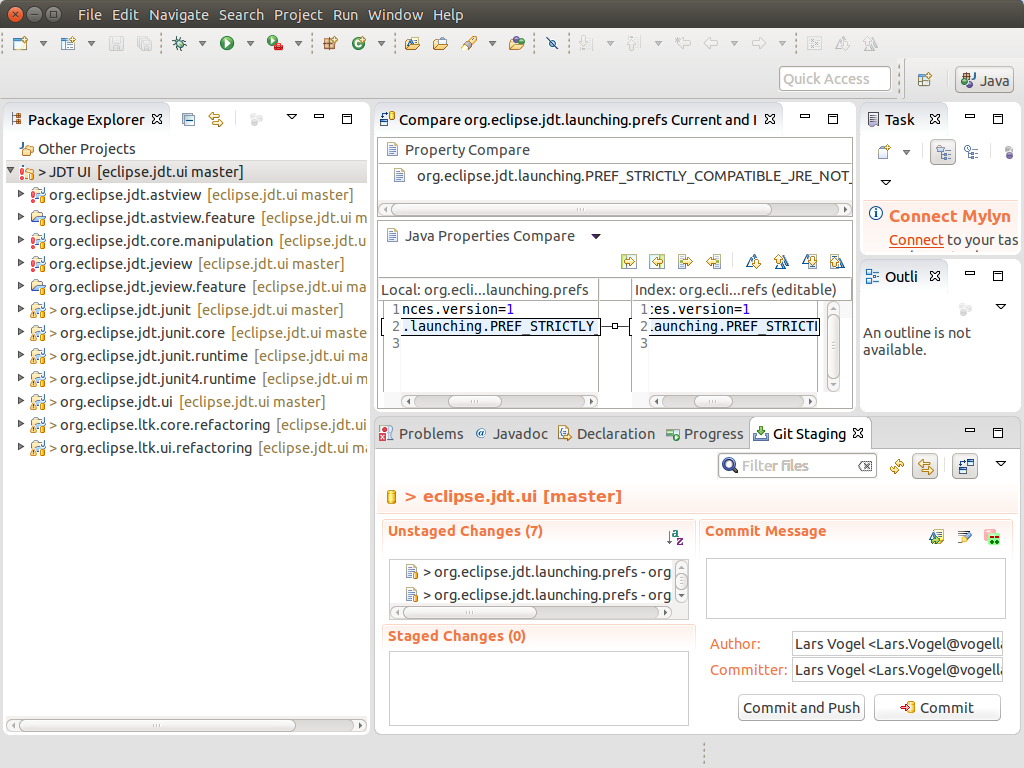
You end up with a workspace with the existing Git repositories. After this initial setup you should consult the contribution guide of the project to ensure you know their contribution guidelines.
20. Links and literature
20.1. vogella Java example code
If you need more assistance we offer Online Training and Onsite training as well as consulting