This tutorial describes how to use SWTBot to write user interface tests for Eclipse plug-ins and RCP applications. It covers writing tests for menus, JFace tables and JFace trees and explains how to execute the tests with Maven Tycho.
1. User interface testing with SWTBot
SWTBot is an Eclipse project for testing the user interface of SWT-based applications. It provides an API that drives the user interface and lets you assert on its state.
SWTBot launches the application under test and then issues clicks, key strokes and queries against the live widgets.
1.1. Key classes
-
SWTBotis the base class for any SWT application, including Eclipse RCP applications. -
SWTWorkbenchBotextendsSWTBotwith API for the legacy Eclipse 3.x workbench and is only required for 3.x RCP applications or IDE plug-in tests.
1.2. How tests are launched
An SWTBot test runs in the same JVM as the application under test. You launch it as a JUnit Plug-in Test, which boots the OSGi runtime and starts your product before the test methods execute.
Two run configuration options decide how the test interacts with the UI:
-
useUIHarness=trueboots the workbench. -
useUIThread=falseruns the test in a worker thread so it can post events to the UI thread.
Both flags must be set for SWTBot.
2. Installation of SWTBot
2.1. Install into the IDE
Install SWTBot via the Eclipse menu entry.
Enter the https://download.eclipse.org/technology/swtbot/releases/latest/ URL into the Work with: field.
Install the following features:
-
SWTBot for Eclipse Testing
-
SWTBot for SWT Testing
2.2. Add SWTBot to the target platform
For a command line build, add the following location to your target definition (.target) file so that SWTBot is available during the build.
<location includeAllPlatforms="false" includeConfigurePhase="true" includeMode="planner" includeSource="true" type="InstallableUnit">
    <repository location="https://download.eclipse.org/technology/swtbot/releases/latest/"/>
    <unit id="org.eclipse.swtbot.eclipse.feature.group"/>
    <unit id="org.eclipse.swtbot.e4.finder"/>
    <unit id="org.eclipse.swtbot.eclipse.test.junit.feature.group"/>
</location>
3. Prerequisites for this tutorial
This tutorial assumes that you have basic understanding of development for the Eclipse platform. Please see Eclipse RCP Tutorial or Eclipse plug-in Tutorial if you need any basic information.
4. Exercise: Create an RCP application using the Eclipse wizard
In the following exercise, you will create an Eclipse RCP application using a template and launch it via the IDE. The generated files are not yet explained, but this should enable you to see a running application and review the involved configuration files.
4.1. Create project
Create a project named com.example.e4.rcp using the menu entry.

Use the settings similar to the following screenshots.

Press Next.

Press Next.

Press Next.
On the last wizard page, select the Create sample content (parts, menu, etc.) flag. Via this flag, you configure that the generated application has example content, e.g., a view and some menu and toolbar entries.

|
The wizard adds the |
4.2. Launch the application using the product file
Open the generated product file by double-clicking on the product file.

Switch to the Overview tab in the editor and press the Launch an Eclipse application hyperlink to start your application. This option is highlighted in the screenshot below.

4.3. Validate
As a result, your Eclipse application should start. The application should look similar to the following screenshot.

4.4. Error analysis
If you see an empty window, it means you pressed the Finish button prematurely (after selecting the template) or forgot to select the Create sample content flag on the last tab.
To fix this, delete the generated plug-in and create it again, making sure to select the correct values as described in Exercise: Create an RCP application using the Eclipse wizard.
5. Exercise: Write an SWTBot test for a generated RCP application
In this exercise, you write an SWTBot test using JUnit 5 for the com.example.e4.rcp RCP application.
If you do not yet have such an application, create one.
It assumes that SWTBot is installed in your Eclipse IDE.
5.1. Create the test plug-in
Create a new plug-in named com.example.e4.swtbot.tests. Answer No when the wizard asks if you want to create a rich client application.
The .tests suffix lets Maven Tycho detect the project as a test plug-in.
|
Open the MANIFEST.MF file and add the following bundle dependencies:
-
org.eclipse.swt -
org.eclipse.jface -
org.eclipse.swtbot.swt.finder -
org.eclipse.swtbot.e4.finder -
org.slf4j.api -
com.example.e4.rcp
Also add the org.junit.jupiter.api package import.
The resulting MANIFEST.MF looks similar to the following.
Manifest-Version: 1.0
Bundle-ManifestVersion: 2
Bundle-Name: Swtbottests
Bundle-SymbolicName: com.example.e4.swtbot.tests
Bundle-Version: 1.0.0.qualifier
Import-Package: org.junit.jupiter.api;version="5.12.2"
Bundle-Vendor: EXAMPLE
Require-Bundle: org.eclipse.swt,
 org.eclipse.jface,
 org.eclipse.swtbot.e4.finder;bundle-version="4.3.0",
 org.eclipse.swtbot.swt.finder;bundle-version="4.3.0",
 org.slf4j.api;bundle-version="1.7.30",
 com.example.e4.rcp;bundle-version="1.0.0"
Automatic-Module-Name: com.example.e4.swtbottests
Bundle-RequiredExecutionEnvironment: JavaSE-21
5.2. Write the test
Create the following class. It clicks and verifies that the confirmation dialog appears, then dismisses it with Cancel.
package com.example.e4.swtbottests;

import static org.junit.Assert.assertNotNull;
import static org.junit.Assert.assertTrue;

import org.eclipse.swtbot.swt.finder.SWTBot;
import org.eclipse.swtbot.swt.finder.widgets.SWTBotButton;
import org.eclipse.swtbot.swt.finder.widgets.SWTBotMenu;
import org.eclipse.swtbot.swt.finder.widgets.SWTBotShell;
import org.junit.jupiter.api.BeforeEach;
import org.junit.jupiter.api.Test;

public class ExitHandlerTest {

    private static SWTBot bot;

    @BeforeEach
    public void beforeClass() throws Exception {
        // do not use SWTWorkbenchBot here which relies on Platform 3.x
        bot = new SWTBot();
    }

    @Test
    public void executeExit() {
        SWTBotMenu fileMenu = bot.menu("File");
        assertNotNull(fileMenu);
        SWTBotMenu exitMenu = fileMenu.menu("Quit");
        assertNotNull(exitMenu);
        exitMenu.click();

        SWTBotShell shell = bot.shell("Confirmation");
        SWTBot childBot = new SWTBot(shell.widget);
        SWTBotButton button = childBot.button("Cancel");
        assertTrue(button.isEnabled());
        button.click();
    }


//  @AfterEach
//  public void sleep() {
//      bot.sleep(2000);
//  }
}
5.3. Adjust the launch configuration
Right-click on the test class and select .
The first run typically fails, but it creates a launch configuration you can adjust. Open it via and select your test under JUnit Plug-in Test.
On the Main tab, choose your product under Run a product.
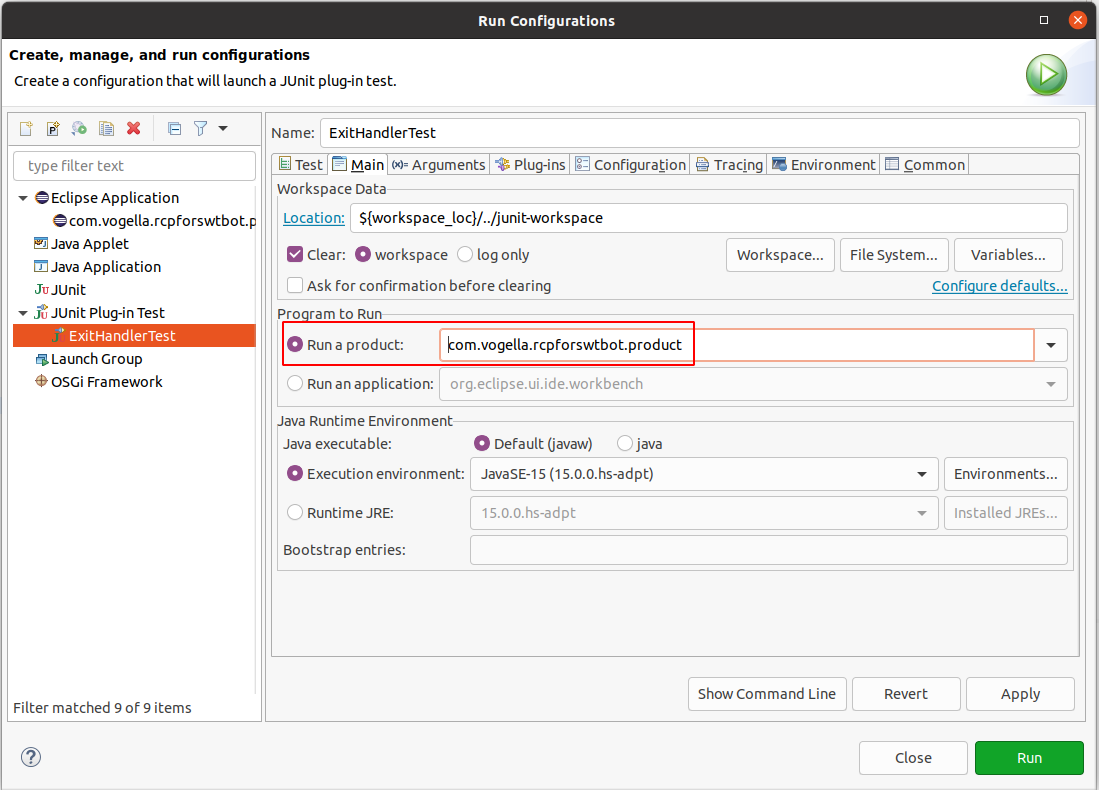
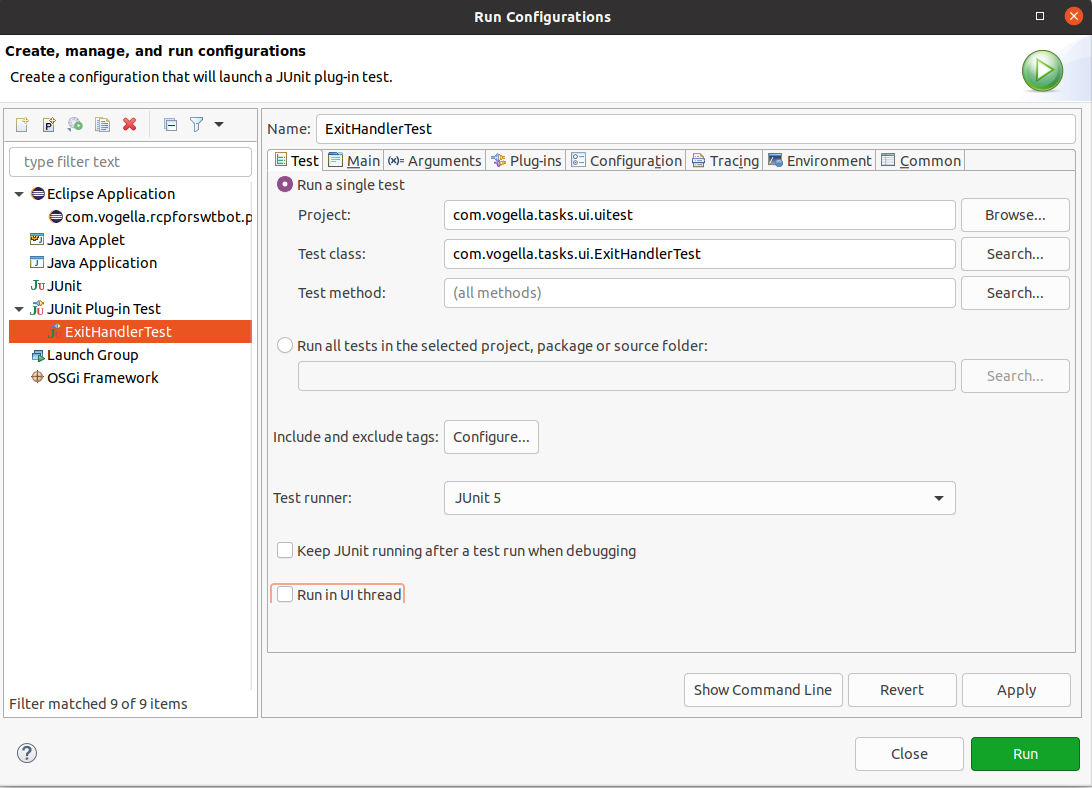
On the Test tab, configure SWTBot to run outside the UI thread.
5.4. Add build.properties entries for Tycho
Add the following entries to build.properties so that the same configuration is used during a Maven Tycho command line build.
pom.model.property.tycho.surefire.useUIHarness = true
pom.model.property.tycho.surefire.useUIThread = false
5.5. Validate
Run the test and verify that it passes. If your menu uses different text, adjust the strings in the test class until it runs successfully.
6. Exercise: Testing JFace tables and trees with SWTBot
JFace TableViewer and TreeViewer widgets are wrapped by SWTBotTable and SWTBotTree.
SWTBot can locate them by index, by header text or, much more robustly, by an SWTBot key set on the underlying widget.
This exercise extends the com.example.e4.rcp application with parts that show people in a table and teams in a tree, and then verifies them with SWTBot tests.
6.1. Why use an SWTBot widget key
Locating widgets by visible text breaks as soon as the UI text changes or another part on the same window shows a similar widget.
SWTBot supports a dedicated widget key, which is read by every *WithId finder method.
table.setData("org.eclipse.swtbot.widget.key", "personTable");You can then locate the table from a test via bot.tableWithId("personTable").
6.2. Add a JFace table part
Create a new part class PersonPart in com.example.e4.rcp and contribute it as part to your application model.
package com.example.e4.rcp.parts;

import java.util.List;

import jakarta.annotation.PostConstruct;

import org.eclipse.jface.viewers.ArrayContentProvider;
import org.eclipse.jface.viewers.ColumnLabelProvider;
import org.eclipse.jface.viewers.TableViewer;
import org.eclipse.jface.viewers.TableViewerColumn;
import org.eclipse.swt.SWT;
import org.eclipse.swt.layout.FillLayout;
import org.eclipse.swt.widgets.Composite;

public class PersonPart {

    public record Person(String firstName, String lastName) {}

    @PostConstruct
    public void createControls(Composite parent) {
        parent.setLayout(new FillLayout());

        TableViewer viewer = new TableViewer(parent,
                SWT.BORDER | SWT.FULL_SELECTION | SWT.H_SCROLL | SWT.V_SCROLL);
        viewer.getTable().setHeaderVisible(true);
        viewer.getTable().setLinesVisible(true);

        // SWTBot key so the test can locate this table reliably
        viewer.getTable().setData("org.eclipse.swtbot.widget.key", "personTable");

        createColumn(viewer, "First name", 150, Person::firstName);
        createColumn(viewer, "Last name", 150, Person::lastName);

        viewer.setContentProvider(ArrayContentProvider.getInstance());
        viewer.setInput(List.of(
                new Person("Lars", "Vogel"),
                new Person("Jonas", "Helming"),
                new Person("Dirk", "Fauth")));
    }

    private void createColumn(TableViewer viewer, String title, int width,
            java.util.function.Function<Person, String> mapper) {
        TableViewerColumn column = new TableViewerColumn(viewer, SWT.NONE);
        column.getColumn().setText(title);
        column.getColumn().setWidth(width);
        column.setLabelProvider(new ColumnLabelProvider() {
            @Override
            public String getText(Object element) {
                return mapper.apply((Person) element);
            }
        });
    }
}
6.3. Add the test for the table
Create the following test class in com.example.e4.swtbot.tests.
package com.example.e4.swtbot.tests;

import static org.junit.jupiter.api.Assertions.assertEquals;
import static org.junit.jupiter.api.Assertions.assertNotNull;

import org.eclipse.swtbot.swt.finder.SWTBot;
import org.eclipse.swtbot.swt.finder.widgets.SWTBotTable;
import org.eclipse.swtbot.swt.finder.widgets.SWTBotTableItem;
import org.junit.jupiter.api.BeforeEach;
import org.junit.jupiter.api.Test;

public class PersonTableTest {

    private SWTBot bot;

    @BeforeEach
    public void setUp() {
        bot = new SWTBot();
    }

    @Test
    public void tableContainsTheExpectedRows() {
        // locate the table by the SWTBot key set on the widget
        SWTBotTable table = bot.tableWithId("personTable");
        assertNotNull(table);
        assertEquals(3, table.rowCount(), "Person table should contain three rows");
        assertEquals("First name", table.columns().get(0));
        assertEquals("Last name", table.columns().get(1));
    }

    @Test
    public void canReadCellContent() {
        SWTBotTable table = bot.tableWithId("personTable");

        assertEquals("Lars", table.cell(0, 0));
        assertEquals("Vogel", table.cell(0, 1));
        assertEquals("Jonas", table.cell(1, "First name"));
    }

    @Test
    public void canSelectRowByLabel() {
        SWTBotTable table = bot.tableWithId("personTable");

        SWTBotTableItem item = table.getTableItem("Jonas");
        item.select();

        assertEquals(1, table.selectionCount());
        assertEquals("Jonas", table.selection().get(0, 0));
    }

    @Test
    public void doubleClickFiresOnTheCorrectRow() {
        SWTBotTable table = bot.tableWithId("personTable");

        table.doubleClick(2, 0);
        // assert here on the side effect of the double click in your part,
        // for example that a detail dialog opens via bot.shell("Person details").
    }
}
The test demonstrates the most common operations:
-
counting rows and column headers
-
reading cell values by column index or by header label
-
selecting a row by its first column text
-
triggering a double click on a specific cell
6.4. Add a JFace tree part
Create another part class TeamPart that shows teams and their members in a tree.
package com.example.e4.rcp.parts;

import java.util.List;

import jakarta.annotation.PostConstruct;

import org.eclipse.jface.viewers.ITreeContentProvider;
import org.eclipse.jface.viewers.LabelProvider;
import org.eclipse.jface.viewers.TreeViewer;
import org.eclipse.swt.SWT;
import org.eclipse.swt.layout.FillLayout;
import org.eclipse.swt.widgets.Composite;

public class TeamPart {

    public record Team(String name, List<String> members) {}

    @PostConstruct
    public void createControls(Composite parent) {
        parent.setLayout(new FillLayout());

        TreeViewer viewer = new TreeViewer(parent, SWT.BORDER | SWT.V_SCROLL);
        // SWTBot key so the test can locate this tree reliably
        viewer.getTree().setData("org.eclipse.swtbot.widget.key", "teamTree");

        viewer.setContentProvider(new ITreeContentProvider() {
            @Override
            public Object[] getElements(Object input) {
                return ((List<?>) input).toArray();
            }

            @Override
            public Object[] getChildren(Object parentElement) {
                if (parentElement instanceof Team team) {
                    return team.members().toArray();
                }
                return new Object[0];
            }

            @Override
            public Object getParent(Object element) {
                return null;
            }

            @Override
            public boolean hasChildren(Object element) {
                return element instanceof Team;
            }
        });

        viewer.setLabelProvider(new LabelProvider() {
            @Override
            public String getText(Object element) {
                if (element instanceof Team team) {
                    return team.name();
                }
                return String.valueOf(element);
            }
        });

        viewer.setInput(List.of(
                new Team("Platform", List.of("Lars", "Jonas")),
                new Team("Tycho", List.of("Christoph", "Mickael"))));
    }
}
6.5. Add the test for the tree
Create the following test class in com.example.e4.swtbot.tests.
package com.example.e4.swtbot.tests;

import static org.junit.jupiter.api.Assertions.assertEquals;
import static org.junit.jupiter.api.Assertions.assertNotNull;
import static org.junit.jupiter.api.Assertions.assertTrue;

import org.eclipse.swtbot.swt.finder.SWTBot;
import org.eclipse.swtbot.swt.finder.widgets.SWTBotTree;
import org.eclipse.swtbot.swt.finder.widgets.SWTBotTreeItem;
import org.junit.jupiter.api.BeforeEach;
import org.junit.jupiter.api.Test;

public class TeamTreeTest {

    private SWTBot bot;

    @BeforeEach
    public void setUp() {
        bot = new SWTBot();
    }

    @Test
    public void treeHasTwoTopLevelTeams() {
        SWTBotTree tree = bot.treeWithId("teamTree");
        assertNotNull(tree);
        assertEquals(2, tree.rowCount());
    }

    @Test
    public void canExpandTeamAndReadMembers() {
        SWTBotTree tree = bot.treeWithId("teamTree");

        SWTBotTreeItem platform = tree.expandNode("Platform");

        assertTrue(platform.isExpanded());
        assertEquals(2, platform.getItems().length);
        assertEquals("Lars", platform.getItems()[0].getText());
        assertEquals("Jonas", platform.getItems()[1].getText());
    }

    @Test
    public void canSelectChildNode() {
        SWTBotTree tree = bot.treeWithId("teamTree");

        tree.expandNode("Tycho").getNode("Mickael").select();

        assertEquals(1, tree.selectionCount());
        assertEquals("Mickael", tree.selection().get(0, 0));
    }
}
SWTBotTreeItem.expandNode expands the node and returns it for further navigation, so calls can be chained, for example tree.expandNode("Tycho").getNode("Mickael").select().
6.6. Validate
Add the new parts to the application model, run the application once manually to make sure the table and tree are visible, then execute the tests via .
7. More on SWTBot
7.1. Timeout
A UI interaction may take some time, for example when the application reads data. SWTBot waits 5 seconds by default before throwing an exception. You can change the timeout with the following snippet.
// Set the timeout to 6 seconds
SWTBotPreferences.TIMEOUT = 6000;
For details on the API see the SWTBot wiki.
| Testing an application with a login screen is not supported by SWTBot. See the SWTBot FAQ. |
7.2. Waiting for certain conditions
During UI tests some actions trigger long-running operations.
The test then needs to wait until the operation finishes.
For this case SWTBot provides the methods waitUntil, waitWhile and waitUntilWidgetAppears.
All these methods expect an instance of the ICondition interface that defines the condition to wait for.
The following snippet shows how to define a custom condition for waitUntil and waitWhile.
@Test
public void testPerspectiveChange() {

    final String adminPerspectiveId = "com.example.adminperspective";
    // wait until admin perspective becomes active
    bot.waitUntil(new DefaultCondition() {

        @Override
        public boolean test() throws Exception {
            return adminPerspectiveId.equals(this.modelService.getActivePerspective(this.window));
        }

        @Override
        public String getFailureMessage() {
            return adminPerspectiveId + " has not become active in time";
        }
    });

    final String mainPerspectiveId = "com.example.mainperspective";
    // alternatively wait as long as the main perspective is still active
    bot.waitWhile(new DefaultCondition() {

        @Override
        public boolean test() throws Exception {
            return mainPerspectiveId.equals(this.modelService.getActivePerspective(this.window));
        }

        @Override
        public String getFailureMessage() {
            return mainPerspectiveId + " remains active for too long";
        }
    });

    // ... continue testing the perspectives contents
}
Common conditions are predefined in the org.eclipse.swtbot.swt.finder.waits.Conditions class, for example to wait for a number of table rows.
@Test
public void testTableRowAmount() {

    SWTBotTable table = bot.table();
    int rowCount = 3;
    // choose a longer timeout than the default, because loading table contents takes longer
    int timeout = 10000;
    // check every second, if the condition is fulfilled
    int interval = 1000;
    bot.waitUntil(Conditions.tableHasRows(table, rowCount), timeout, interval);

    // ... continue working with the table rows
}
The Conditions class also provides methods that take an org.hamcrest.Matcher instance, for example to wait until a shell with a specific text opens.
@Test
public void testShellOpened() {
    // open a shell with "Shell text" as text...

    // create a shellMatcher to wait for the previously opened shell
    Matcher<Shell> shellMatcher = WithText.withTextIgnoringCase("Shell text");
    // wait until the shell is opened
    bot.waitUntil(Conditions.waitForShell(shellMatcher));
}
7.3. Opening views and switching perspectives (3.x and IDE)
When you test the Eclipse IDE or a classic 3.x RCP application, SWTWorkbenchBot exposes direct API for views and perspectives.
Both look up the registration in the active IWorkbenchPage, so any view declared via the org.eclipse.ui.views extension point and any perspective declared via org.eclipse.ui.perspectives is reachable by its id.
Open or activate a view by id:
SWTWorkbenchBot bot = new SWTWorkbenchBot();

SWTBotView view = bot.viewById("org.eclipse.ui.navigator.ProjectExplorer");
view.show();
The id must match the id attribute on the <view> element in plugin.xml, not the visible label.
The method throws WidgetNotFoundException if no view with that id is registered.
If the view is not currently open, show() opens it; if it is already open, show() activates it.
Alternatively, locate a view by its visible part name:
bot.viewByPartName("Project Explorer").show();Switch the active perspective by id or by label:
bot.perspectiveById("org.eclipse.jdt.ui.JavaPerspective").activate();
// or, when the id is not stable across releases
bot.perspectiveByLabel("Java").activate();
activate() performs the switch and opens the perspective if it is not yet open in the current window.
To restore the perspective to its initial layout between tests, use:
bot.resetActivePerspective();7.4. Opening views and switching perspectives (Eclipse 4 RCP)
Eclipse 4 RCP applications have no IWorkbenchPage, and SWTBot (the E4 base class) therefore offers no viewById or perspectiveById.
Views and perspectives are entries in the application model (MPart, MPerspective), not extension point contributions.
For tests, there are two practical approaches.
Drive the application’s own menu. If the application contributes a menu that opens parts or switches perspectives, drive it like any other menu. The exact menu path depends on what is in the application model:
SWTBot bot = new SWTBot();
bot.menu("Window").menu("Show View").menu("Other...").click();
SWTBotShell shell = bot.shell("Show View");
shell.activate();
bot.tree().expandNode("General").select("Project Explorer");
bot.button("Open").click();
Use the E4 services directly.
For programmatic switching that does not depend on menus, inject EPartService, EModelService and MApplication into a test helper and call their API directly:
@Inject
EPartService partService;

@Inject
EModelService modelService;

@Inject
MApplication application;

// ... inside a method
partService.showPart("com.example.e4.rcp.part.person", PartState.ACTIVATE);

MPerspective perspective = modelService
        .findElements(application, "com.example.e4.rcp.perspective.main", MPerspective.class, null)
        .get(0);
partService.switchPerspective(perspective);
This is regular E4 platform API rather than SWTBot, but it composes well with SWTBot tests because both run in the same JVM as the application.
7.5. Locate widgets by SWTBot key
Locating widgets by visible text is fragile, because the text changes between languages and releases. Set a stable SWTBot key on the widget instead:
text.setData("org.eclipse.swtbot.widget.key", "username");In the test, use any of the *WithId finder methods:
SWTBotText username = bot.textWithId("username");This pattern works for every SWT widget that SWTBot supports, including tables and trees as shown in the table and tree exercise.
8. Possible pitfalls with SWTBot
This section contains possible pitfalls, which might come up when implementing SWTBot tests.
8.1. Accessing a Link and clicking on it
First of all define an org.eclipse.swt.widgets.Link to be tested in the UI code.
Link link = new Link(parent, SWT.NONE);
// add the <a> tags to visualize a underlined clickable blue hyperlink
link.setText("<a>www.vogella.com</a>");
link.addSelectionListener(new SelectionAdapter() {
    @Override
    public void widgetSelected(SelectionEvent e) {
        // ... open browser and go to vogella.com
    }
});
The text applied to the Link is <a>www.vogella.com</a>, but in the UI you will see this:

When this Link is accessed by SWTBot using the text of the Link, the literal <a>www.vogella.com</a> has to be used.
// even though only www.vogella.com is shown in the UI this won't work
SWTBotLink vogellaLink = bot.link("www.vogella.com");

// this is the valid way to access the Link
SWTBotLink vogellaLink = bot.link("<a>www.vogella.com</a>");
Another pitfall with SWTBotLink is that invoking click() might not work properly.
SWTBotLink therefore provides an overloaded click(String hyperlinkText) method that takes the hyperlink text as a parameter.
SWTBotLink vogellaLink = bot.link("<a>www.vogella.com</a>");
// explicitly specify where to click on
vogellaLink.click("www.vogella.com");
Always prefer click(String hyperlinkText) over the no-argument click() method.
9. Running SWTBot tests with Maven Tycho
Maven Tycho can run the SWTBot tests written in the previous exercises as part of a regular mvn verify build, both locally and on a CI server.
This section walks through the required configuration.
9.1. How Tycho runs SWTBot
Tycho discovers test plug-ins by the eclipse-test-plugin packaging and executes them with the tycho-surefire-plugin.
For SWTBot the plugin must be configured to start the workbench and to run the tests outside the UI thread, the same two settings that you set in the IDE launch configuration.
| Property | Required value | Reason |
|---|---|---|
|
|
Boots the workbench so widgets exist. |
|
|
Lets the test thread post events to the UI thread. |
|
your product id |
The product to start before the tests run. |
|
|
Required for Eclipse 4 RCP applications. |
9.2. Add SWTBot to the target platform
Reference the SWTBot p2 repository from your target file so that the test plug-in resolves at build time.
<?xml version="1.0" encoding="UTF-8" standalone="no"?>
<?pde version="3.8"?>
<target name="com.example.e4.target">
    <locations>
        <location includeAllPlatforms="false" includeConfigurePhase="true"
                  includeMode="planner" includeSource="true" type="InstallableUnit">
            <repository location="https://download.eclipse.org/releases/latest/"/>
            <unit id="org.eclipse.e4.rcp.feature.group" version="0.0.0"/>
            <unit id="org.eclipse.equinox.event" version="0.0.0"/>
        </location>

        <location includeAllPlatforms="false" includeConfigurePhase="true"
                  includeMode="planner" includeSource="true" type="InstallableUnit">
            <repository location="https://download.eclipse.org/technology/swtbot/releases/latest/"/>
            <unit id="org.eclipse.swtbot.eclipse.feature.group" version="0.0.0"/>
            <unit id="org.eclipse.swtbot.e4.finder" version="0.0.0"/>
            <unit id="org.eclipse.swtbot.eclipse.test.junit.feature.group" version="0.0.0"/>
        </location>
    </locations>
</target>
The org.eclipse.equinox.event unit is included because Eclipse 4 needs it at runtime, but it is sometimes not pulled in automatically by SWTBot tests.
9.3. Parent pom
The parent pom enables Tycho, declares the target platform and adds org.eclipse.equinox.event as an extra requirement during dependency resolution.
<?xml version="1.0" encoding="UTF-8"?>
<project xmlns="http://maven.apache.org/POM/4.0.0"
         xmlns:xsi="http://www.w3.org/2001/XMLSchema-instance"
         xsi:schemaLocation="http://maven.apache.org/POM/4.0.0 http://maven.apache.org/xsd/maven-4.0.0.xsd">

    <modelVersion>4.0.0</modelVersion>
    <groupId>com.example.e4</groupId>
    <artifactId>com.example.e4.releng</artifactId>
    <version>1.0.0-SNAPSHOT</version>
    <packaging>pom</packaging>

    <properties>
        <tycho.version>4.0.10</tycho.version>
    </properties>

    <modules>
        <module>../com.example.e4.rcp</module>
        <module>../com.example.e4.swtbot.tests</module>
    </modules>

    <build>
        <plugins>
            <plugin>
                <groupId>org.eclipse.tycho</groupId>
                <artifactId>tycho-maven-plugin</artifactId>
                <version>${tycho.version}</version>
                <extensions>true</extensions>
            </plugin>

            <plugin>
                <groupId>org.eclipse.tycho</groupId>
                <artifactId>target-platform-configuration</artifactId>
                <version>${tycho.version}</version>
                <configuration>
                    <environments>
                        <environment>
                            <os>linux</os><ws>gtk</ws><arch>x86_64</arch>
                        </environment>
                        <environment>
                            <os>win32</os><ws>win32</ws><arch>x86_64</arch>
                        </environment>
                        <environment>
                            <os>macosx</os><ws>cocoa</ws><arch>x86_64</arch>
                        </environment>
                    </environments>

                    <dependency-resolution>
                        <extraRequirements>
                            <!-- Required for SWTBot tests on Eclipse 4 -->
                            <requirement>
                                <type>eclipse-plugin</type>
                                <id>org.eclipse.equinox.event</id>
                                <versionRange>0.0.0</versionRange>
                            </requirement>
                        </extraRequirements>
                    </dependency-resolution>
                </configuration>
            </plugin>
        </plugins>
    </build>
</project>
9.4. Test plug-in pom
The test plug-in uses the eclipse-test-plugin packaging and configures tycho-surefire-plugin to start the product with the UI harness.
<?xml version="1.0" encoding="UTF-8"?>
<project xmlns="http://maven.apache.org/POM/4.0.0"
         xmlns:xsi="http://www.w3.org/2001/XMLSchema-instance"
         xsi:schemaLocation="http://maven.apache.org/POM/4.0.0 http://maven.apache.org/xsd/maven-4.0.0.xsd">

    <modelVersion>4.0.0</modelVersion>
    <parent>
        <groupId>com.example.e4</groupId>
        <artifactId>com.example.e4.releng</artifactId>
        <version>1.0.0-SNAPSHOT</version>
        <relativePath>../com.example.e4.releng/pom.xml</relativePath>
    </parent>

    <artifactId>com.example.e4.swtbot.tests</artifactId>
    <packaging>eclipse-test-plugin</packaging> (1)

    <build>
        <plugins>
            <plugin>
                <groupId>org.eclipse.tycho</groupId>
                <artifactId>tycho-surefire-plugin</artifactId>
                <version>${tycho.version}</version>
                <configuration>
                    <useUIHarness>true</useUIHarness>      (2)
                    <useUIThread>false</useUIThread>       (3)
                    <product>com.example.e4.rcp.product</product>
                    <application>org.eclipse.e4.ui.workbench.swt.E4Application</application>
                    <dependencies>
                        <dependency>
                            <type>p2-installable-unit</type>
                            <artifactId>org.eclipse.swtbot.e4.finder</artifactId>
                        </dependency>
                    </dependencies>
                </configuration>
            </plugin>
        </plugins>
    </build>
</project>| 1 | Packaging eclipse-test-plugin makes Tycho execute the tests in this module. |
| 2 | useUIHarness=true starts the workbench, which is required for SWT widgets. |
| 3 | useUIThread=false runs the test in a worker thread so SWTBot can post events to the UI thread. |
9.5. build.properties shortcut
Instead of writing a custom pom for every test plug-in, you can use pomless Tycho builds and configure the two surefire properties from build.properties directly:
pom.model.property.tycho.surefire.useUIHarness = true
pom.model.property.tycho.surefire.useUIThread = false
This is enough for a basic setup and keeps the pom files free of SWTBot specific configuration.
9.6. Run the build
Execute the build from the parent module.
mvn clean verifyTycho resolves the target platform, builds the product, builds the test plug-in and finally starts the product to run the SWTBot tests.
On a headless CI server, wrap the command with xvfb-run so a virtual display is available.
xvfb-run -a mvn clean verifyA failing SWTBot test produces a screenshot in the screenshots directory of the test plug-in, see the next section for details.
10. Screenshots on failure
SWTBot can capture a screenshot of the running application whenever a test fails.
For JUnit 5 register the SWTBot extension on the test class.
Add a dependency on the org.eclipse.swtbot.junit5 plug-in, then annotate the test class as follows:
import org.eclipse.swtbot.swt.finder.junit5.SWTBotJunit5Extension;
import org.junit.jupiter.api.extension.ExtendWith;

@ExtendWith(SWTBotJunit5Extension.class)
public class ExitHandlerTest {
    // tests
}
Screenshots are written to the screenshots folder of the test project.
If the folder is not visible in the IDE, refresh the project with F5.
You can also trigger a screenshot from code, for example before tearing down a complex setup:
bot.captureScreenshot("after-login.png");11. Learn more and get support
This tutorial continues on Eclipse RCP online training or Eclipse IDE extensions with lots of video material, additional exercises and much more content.
12. SWTBot Resources
12.1. vogella Java example code
If you need more assistance we offer Online Training and Onsite training as well as consulting