Gerrit tutorial. This tutorial explains the installation and usage of the Gerrit code review system. It describes the setup of Eclipse (with EGit) as well as the command line setup.
1. Code review
1.1. The code review process
A code review process is based on a process in which people can suggest, review, update and accept changes.
Once a change is accepted, people with the correct permission can accept it.
The involved people are typically decided into two groups: * contributors - people with the permission to create, review and update changes * committers - people with the additional permission to accept changes
A code review process can be implemented without any tool support. But it is typically more efficient, if a structured code review system is used.
Using a code review system, allows to perform an automated test build of the proposed merge. Continuous integration tools like Jenkins or Hudson can integrate with the review system to find compilation errors and to run a test suite.
In general, a structured code review process has the following advantages:
-
Early error detection:
-
Build problems are detected immediately by automatic test builds.
-
Logical flaws can be spotted by the human reviewer before any code is merged.
-
-
Alignment with project standards:
-
Allows the team to identify early in the process any violations with the team code standards.
-
Helps to keep code readable and easier to maintain.
-
Allows continuous integration system to check for code standard conformity automatically as part of the build process.
-
-
Knowledge exchange:
-
The code review process allows newcomers to see the code of other more experienced developers.
-
Developers can get feedback on their suggested changes.
-
Experienced developers can help to evaluate the impact on the whole code.
-
Shared code ownership: by reviewing code of other developers the whole team gets a solid knowledge of the complete code base.
-
-
Easy entry to contribution: People without write permission to a repository have an easy way to start contributing and to get feedback.
-
Enables review before a change is submitted: Iteration based on review comments / build results happen before a change is merged into the target branch. This result in a cleaner history of the repository.
For an efficient process, the code review should be conducted in a supportive environment where constructive feedback is given to enhance the change.
1.2. The Gerrit code review system?
Gerrit is a code review system developed for the Git version control system. It is a web based code review system, facilitating online code reviews for projects. Gerrit is a Git server which adds a fine-grained access control system and a code review system and workflow.
The user interface of Gerrit is based on Google Web Toolkit. Its uses JGit library to provide the Git functionality.
A developer can use Gerrit to suggest a change. Other developers can review the change and suggest improvements. If a Gerrit change needs improvement, it is possible to update it with a new commit. Once the suggested changes are accepted, they can be merged to the target branch of the Git repository via the Gerrit user interface.
Gerrit makes code reviews easier by showing changes in a side-by-side display. It also supports to display the change as a unified diff which is often easier to read on smaller screens.
A reviewer can add comments to every single line changed.
Gerrit is licensed under the Apache 2.0 license.
The Gerrit review system uses the term change, to define a code review / review request. Each change is based on one commit.
1.3. How does Gerrit work?
Gerrit can prevent users from pushing directly to the Git repository. If you push to Gerrit, you use a certain path ( ref specification) which tells Gerrit that you want to create a change. This push ref specification is refs/for/master if the target of the change under review is the master branch. You can also push to refs/for/xyz to put a commit into the review queue for the xyz branch.
If you push to this ref specification, Gerrit creates a new change or makes an update of an existing one. Gerrit uses the Change-Id information in the commit message to identify if the push is a new commit or an update of an existing change.
A change consists of one or more patch sets that are used to improve the first proposal based on review comments. One patch set corresponds to one Git commit.
It is still possible to bypass code review by pushing directly to refs/heads/master if sufficient rights have been granted.
1.4. Review categories - Verified and Code-Review
Gerrit supports different categories (also known as labels) for review feedback. In its default configuration it supports the Code-Review category.
In typical installations also the Verified category is installed.
The Verified category typically means you were able to build and test the change introduced with the Gerrit change. Typically, this is done by an automated process such as a Jenkins / Hudson build server.
The "Code-Review" category is typically used to vote on the quality of the implementation, code style, code conformity. It also indicates that the change is in accordance with the standards desired by the project.
Committers and contributors can vote in these categories.
1.5. Voting in Gerrit
The rules for voting in Gerrit is:
-
Highest vote (+2 in Code-Review and +1 in Verified) enables submitting
-
Lowest vote (-2 in Code-Review) is a veto blocking that the change can be submitted and cannot be overruled by other reviewers
-
You cannot submit the changes to the Git repository until there is the highest vote in all categories
Typically Gerrit instances uses the Verified and the Code-Review category.
If you did some manual testing and the code works as you desire then it is good to +1 in the "Verified" category. Or give -1 if it failed some of your use cases that must be resolved to merge. Otherwise, leave it as 0, if you did not test the code.
Non-committers of the project can vote with -1 and +1 to indicate an opinion in either way. But ultimately it is up to the decision of those with +2 power to make the overall decision. You may want to -2 vote to block the submission of the code. Or vote +2 to indicate that you approve that the contribution is merged into the Git repository.
1.6. Posting draft reviews
There is also a special refs/drafts/master refspec which you can use to push changes to for private review before publishing them to all developers.
This is useful if your work is in progress and not ready for public reviews. You can also CC specific people to review this private change. Once it is ready for public review there is a Publish button to convert the draft into a change review.
2. Installation of Gerrit
The installation of Gerrit can be done directly on a server or within a Docker container.
2.1. Installation of Gerrit on a server
A server can also be the local machine, for example, if you want to test Gerrit.
2.1.1. Download Gerrit
Download the latest Gerrit release from the Gerrit download page.
The download is a .war file.
This war file can run in a servlet container, for example, a Jetty or Tomcat installation.
The .war file contains a Jetty web server and can be started directly for testing or rapid deployment.
The following description uses the approach to start the Gerrit server directly via the command line.
2.1.2. Setup of Gerrit
Copy the .war file into an empty directory.
Switch on the command line to the location of the directory to which you extracted the .war file.
Install Gerrit with the following command.
# create Gerrit review site with questionaire
java -jar gerrit*.war init -d review_site

# alternatively use the --batch command
java -jar gerrit*.war init --batch -d review_site|
If Java does not find the jar if you use *, use the full name. This is required on Microsoft windows. |
The Gerrit instance is installed into the folder specified with the -d parameter, in this example review_site.
If you do not use --batch flag, you can interactively configure the Gerrit instance via a set of questions.
A few of these options are discussed in the following table.
| Option | Description |
|---|---|
Location of Git repositories |
Location of Git repositories, default is the |
Database server type |
Gerrit supports several databases, by default it uses a preconfigured H2 database. |
Run as user |
Select that Gerrits runs as "root" user. |
Listen on port |
Allows you to configure the port Gerrit is listening to, Gerrit by default listens on port 29418 for SSH access and on port 8080 for web access. This can be changed if the ports are already used. |
Authentication method |
Typical configuring to access the Gerrit server uses LDAP or OpenID Single Sign-on which is the default setting. Use ? to see all available settings for this option. For testing use "development_become_any_account". |
|
Use development_become_any_account to enable general access to Gerrit. If started with this setting, you have a Become link in the web interface that allows you to login and to create a new account. To enable that authentication method, you can use the following command: git config --file ~/etc/gerrit.config auth.type DEVELOPMENT_BECOME_ANY_ACCOUNT |
2.1.3. Start Gerrit server
After a successful installation Gerrit starts automatically on Unix-like systems. You can start and stop it again with the following commands on Linux based systems.
# assumes you installed Gerrit in
# the home directory under gerrit

# start if not running
~/gerrit/review_site/bin/gerrit.sh start

# stop it again
~/gerrit/review_site/bin/gerrit.sh stop
On Microsoft Windows based systems you need to invoke the daemon directly.
If you created your Gerrit installation in the folder review_site, start your Gerrit server via the following command.
java -jar review_site/bin/gerrit.war daemon -d .This starts Gerrit. To stop it again, kill the running process using Ctrl+C.
|
If something goes wrong, look into the |
|
The local Gerrit configuration is stored in the |
3. Gerrit workflow
3.1. A typical Gerrit workflow
The following describes a typical Gerrit workflow of you as a developer using Gerrit.
-
You fetch or pull in the latest changes from the Git repository
-
Optionally, you create a new local branch based on the
origin/masterbranch.
|
This step is optional but it is considered a good practice to create an independent branch per change to avoid unnecessary dependencies between commits (Gerrit reviews). |
-
You implement a change (new feature, bug fix, documentation change) and create a commit in his local repository with these modifications.
-
implements (if necessary) more changes and amends the existing commit, until he is satisfied with the change.
Afterwards, you perform the following steps.
-
Push the change to the Gerrit review system to the
refs/for/masterrefspec to create a change for the master branch. -
If you receive improvement suggestions, fetch the latest changes and rebase your patch onto origin/master
Repeat the last three steps until the patch is finally accepted and merged into the codebase (or until the change is completely rejected). Finally you can delete your local branch.
3.2. Gerrit vs. Git workflow
In the Gerrit scenario amending a commit is used to update the Gerrit change request. Using the amend operation on a published commit is usually discouraged in Git, in Gerrit it is the normal process.
3.3. Gerrit vs. GitHub workflow
The Gerrit review system is based on the assumption that each commit is reviewed separately. At GitHub, a complete branch is reviewed and merging with the pull request.
4. User setup
4.1. Create user
You require a valid Gerrit user to work with Gerrit. In your test installation, you create your own users.
|
If you are not the administrator, you have to ask the responsible person to create a user for you. |
Login to your Gerrit installation. Assuming that you installed it on your local machine using the default values, you can access it via the following URL:
https://localhost:8080/login/
The first user to login automatically gets the administrator status.
4.2. SSH setup
If you want to use SSH you have to upload your SSH key. If you prefer to use HTTPS, skip this step and go to HTTPS setup.
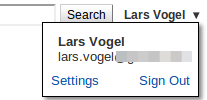
From the user drop down menu select Settings and select SSH Keys to upload your public SSH key.
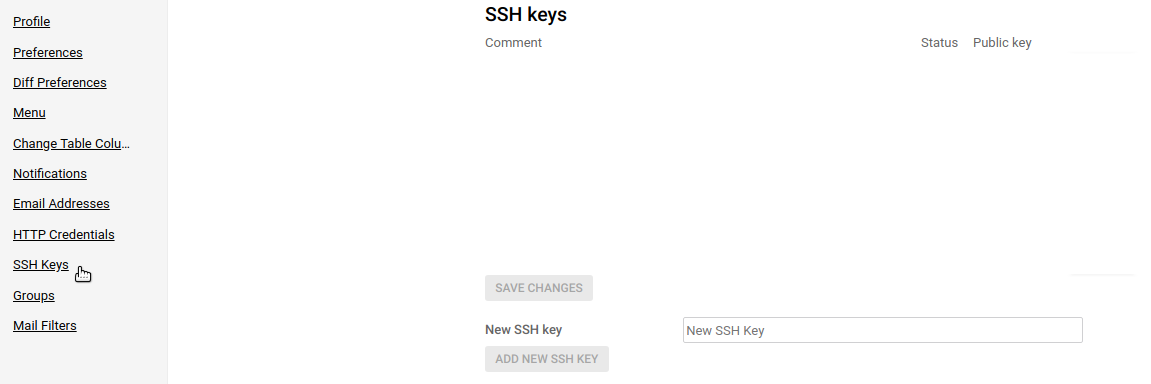
Based on your SSH key you are now able to exchange data with the Gerrit server.
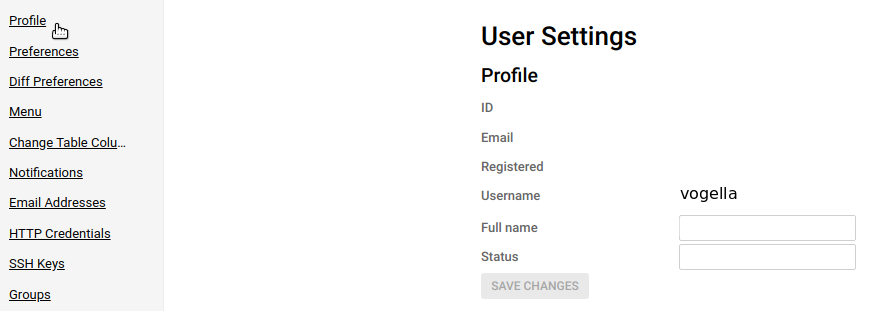
Select Profile to assign a Username to your user.
5. Administrator: Upload Git repository
This part is only relevant for the administrator. Create a new Git repository called gerrittest via EGit or the Git command line.
Create a the new Git repository in Gerrit via the following command.
# assumes that Gerrit runs on port 29418
# on localhost

ssh -p 29418 <userid>@localhost gerrit create-project demo/gerrittest
You can also click in the web interface.
The new project can be found in the Gerrit web interface under .

Select your project and Access.
For testing give push rights to all registered users, which is the default after a fresh installation. In a productive environment, you can configure Gerrit to be more restrictive.
Especially the access right Push Merge Commit for feature branches named refs/heads/* is something only trusted and experienced committers should be allowed to do.
6. Administrator: Create example project
Also for testing create a new Java project called com.vogella.gerrit.example. Add a few classes to it. Create a new local Git repository and add the project to it.
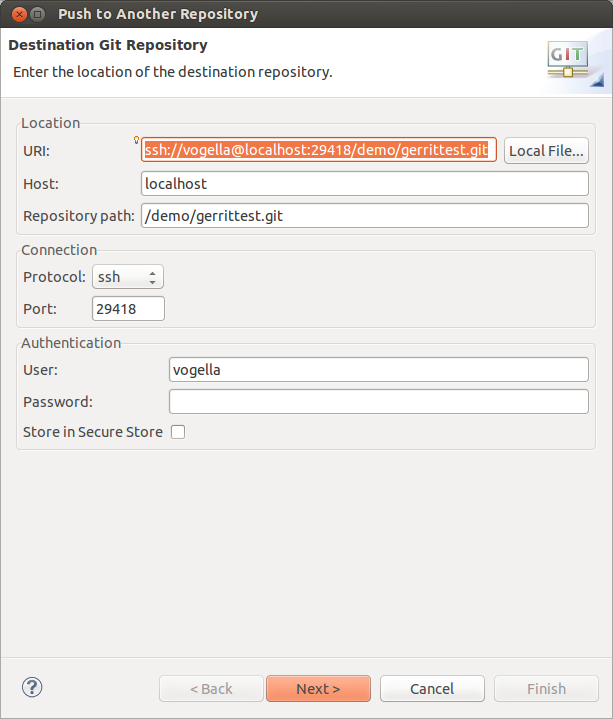
Afterwards, push the local Git repository to Gerrit by selecting . Enter the following URL ssh://<userid>@localhost:29418/demo/gerrittest.git in the wizard and press the Next button.
On the next page, click the Add All Branches Spec button.
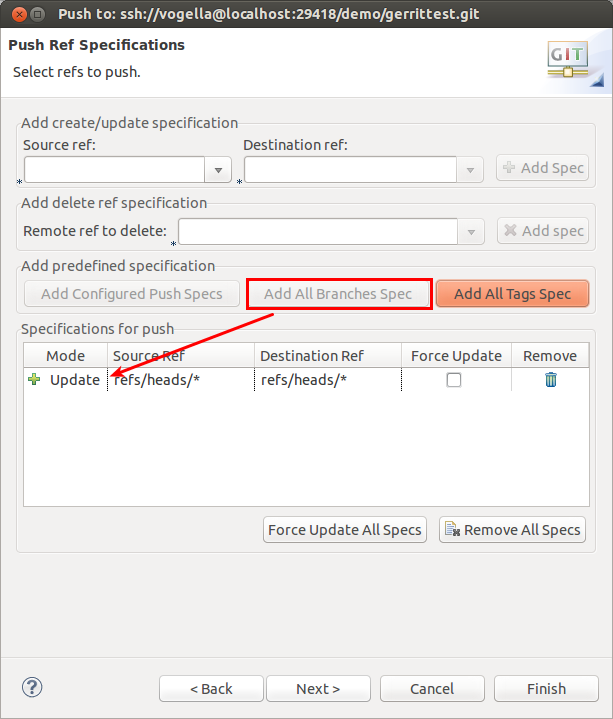
Press the Next button and on the last wizard page the Finish button.
|
This pushes the changes directly to the Git repository without a change in Gerrit. This is possible as the default permissions in Gerrit are set to allow this. |
7. Project Owner: Editing the project config through Git
Each Gerrit project is configured via a project configuration file. You can edit the project configuration via the webuser interface, under .
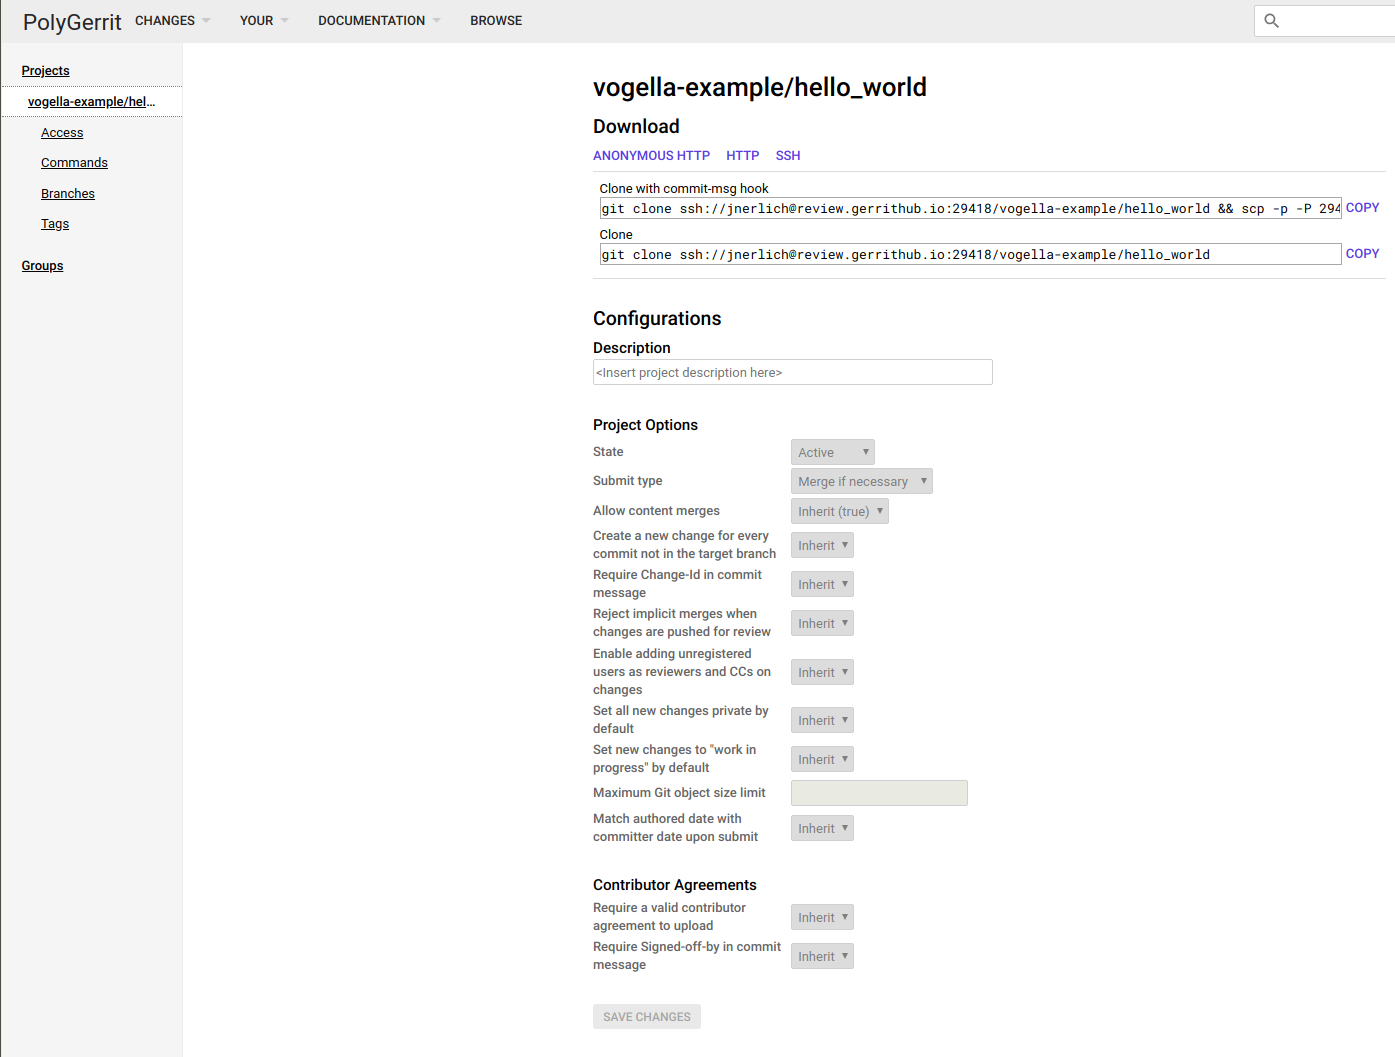
It is possible to edit this directly.
The config files are store in the projects Git repository.
They reside in the special branch refs/meta/config.
To check them out issue the following commands on your terminal:
git remote add gerrit ssh://<gerrit-site>:<gerrit-port>
git fetch gerrit refs/meta/config:refs/remotes/gerrithub/meta/config
git checkout gerrithub/meta/config
Your project specific rules are in the file project.config.
The file follows the Git configuration format.
Assuming your project is lacking the "Verified" label you could add the following to the config:
[label "Verified"]
       function = MaxWithBlock
       value = -1 Fails
       value =  0 No score
       value = +1 Verified
After you have committed your changes you can push them:
git push -f gerrithub HEAD:refs/meta/config8. Project Owner: Managing project access
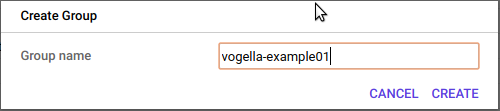
Project access in Gerrit is generally handled through Groups, although you can also set permissions on a per user basis. an open-source project might have a group for commiters, who can review and merge changes, and a group for their CI solutions. To create a new group navigate to .
Once you have created a group you are taken to the group management page, where you can add new members to the group.
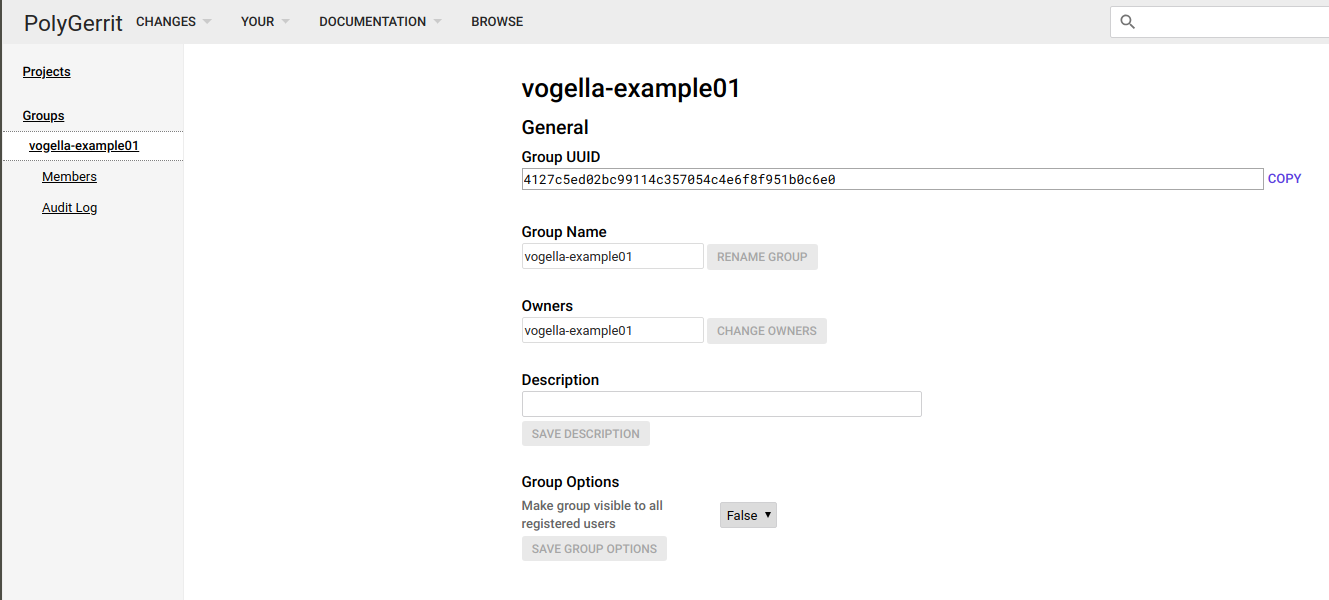
After that you can give this Group access to your project. This is done either through the web interface at or by editing the projects config file as described in Project Owner: Editing the project config through Git.
9. Developer: Clone repository from Gerrit
In this exercise, you act as a developer who wants to upload a Gerrit review. This requires that you have a valid Gerrit user on the Gerrit system.
For this exercise, it is assumed that you have not yet a local Git repository. Therefore, you need to clone the Git repository from the Gerrit server. Use a new workspace for this.
Open the Git Repositories view in Eclipse and select that you want to clone an existing repository. Enter the URL from the Git repository hosted at Gerrit, for example: ssh://<user-id>@localhost:29418/demo/gerrittest.git.
10. Developer: Gerrit configuration for the Git repository
|
If you used Eclipse for cloning the Git repository from Gerrit, you can skip this step. Eclipse configured itself automatically to work with Gerrit. If you cloned via the command line, you need to perform this configuration step. |
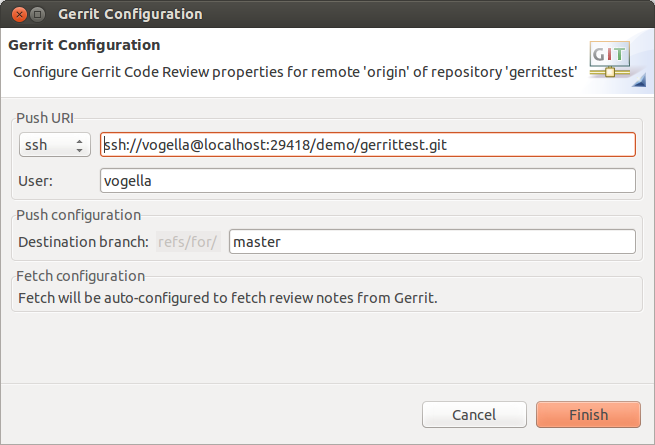
Right-click on your cloned repository in the Git Repositories view on the origin remote and select Gerrit Configuration….
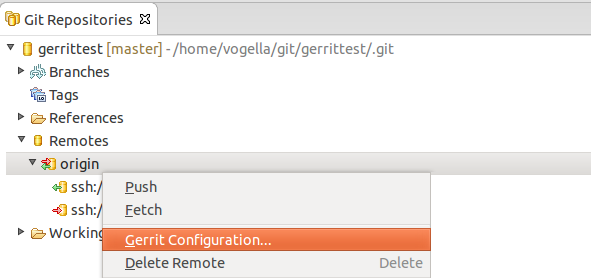
The default values in this dialog are okay. Press the Finish button.
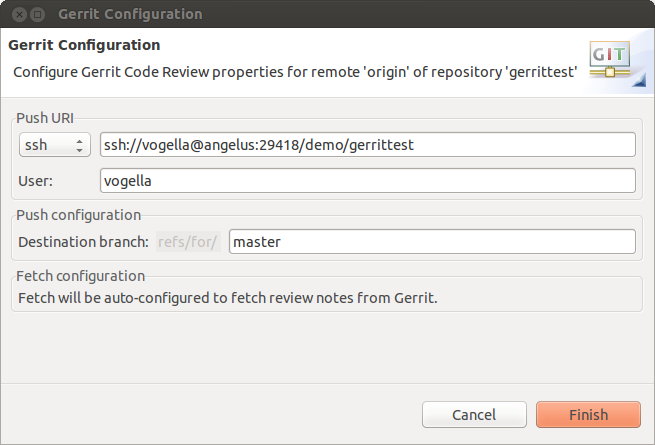
This sets your push configuration for this remote to refs/for/* which tells Gerrit that you created or updated a change. To valid the push configuration, right-click on your remote and select Configure push. Ensure that the setting is similar to the following screenshot. It also adds a flag to your repository to tell the Eclipse Git tooling to create a Gerrit Change-id.
| Use the Properties view on your repository to see the details of your repository configuration. |
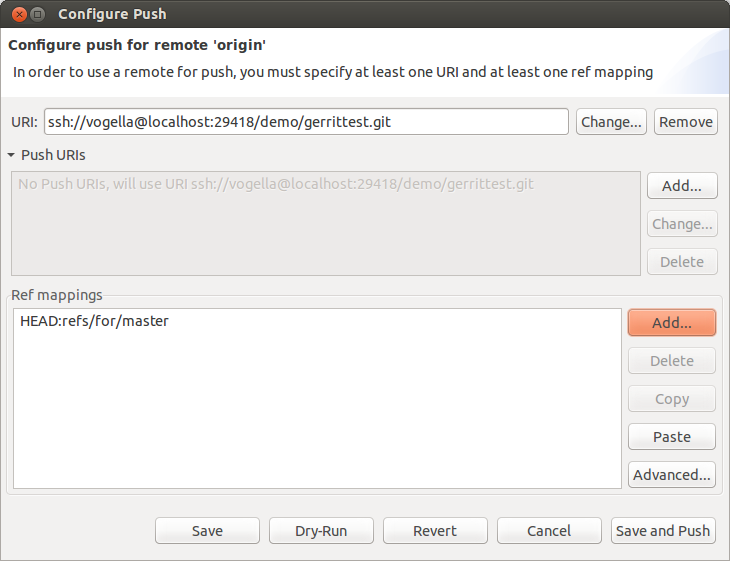
The refs/for/* ensures that every push is handled by Gerrit. If you use the refs/heads/master ref mapping, you can directly push to the Git repository. This option is typically restricted to administrators.
| You can also do this setup directly via the Git command line. |
git config remote.origin.push refs/heads/*:refs/for/*11. Creating and updating a Gerrit change request from Eclipse
In the following description we create a Gerrit change request.
After getting the latest source code, when you are ready for development, create a new local branch starting from the origin/master branch.
Perform some changes in your Java project. Commit the changes and ensure to select the Add Change-Id button in the Git Staging view.
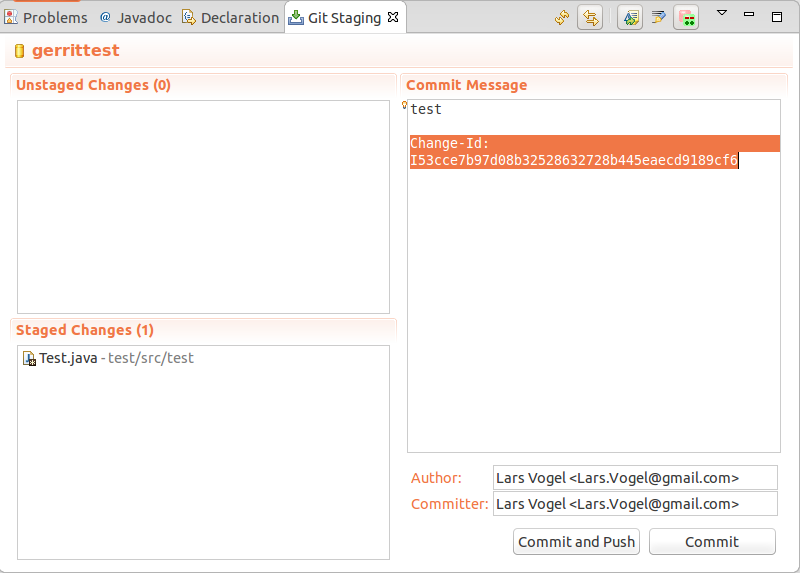
The Change-ID is what uniquely identifies the change in Gerrit.
The
entry is initially set to
Change-Id: I0000000000000000000000000000000000000000.
During the commit, this is replaced with an ID generated by the Git
tooling.
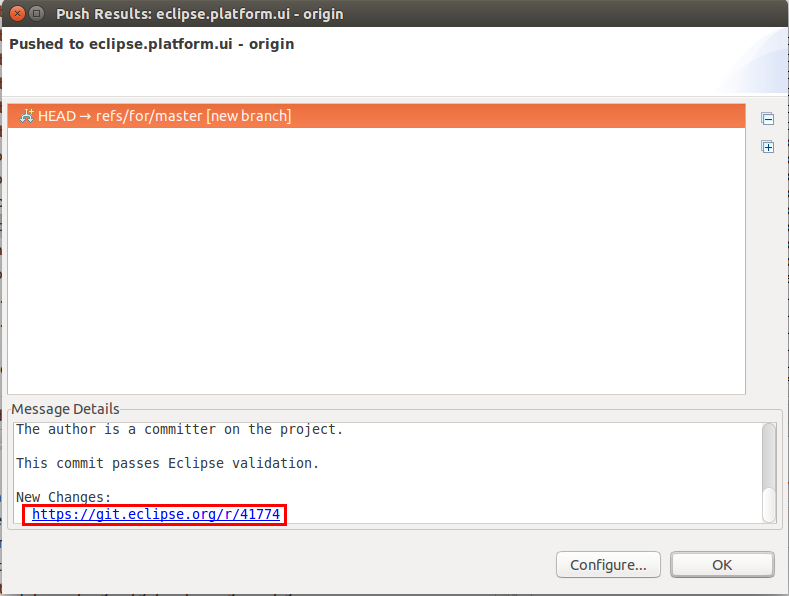
Push the change to Gerrit. As your push configuration is configured for Gerrit, this should create a change. The Eclipse Git tooling shows a dialog after the push. This dialog contains error messages in case the push was not successful. Via the URL you can access the Gerrit web interface and analyze the Gerrit review.
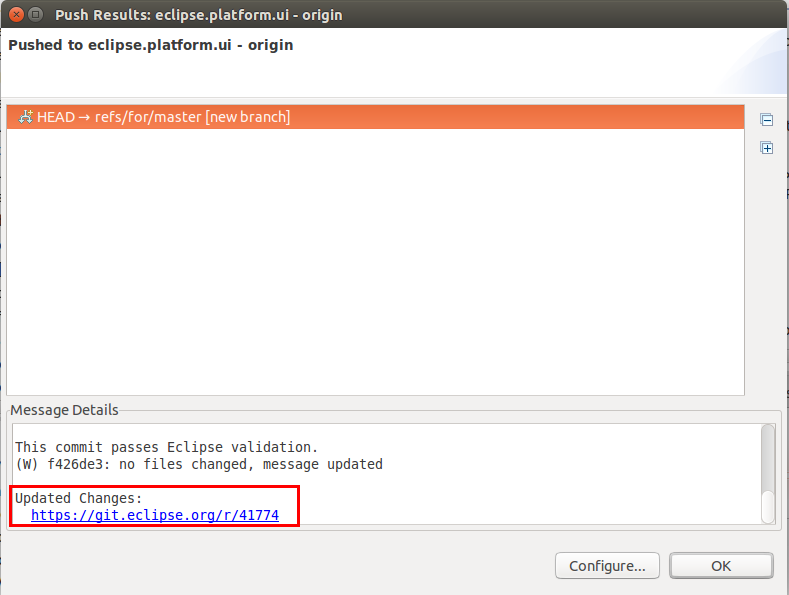
Do a few new changes to your Java project and commit them to your local Git repository. Ensure that you amend the existing commit. This makes sure the existing change id is used and avoids that Gerrit cannot apply your change because of a dependency cycle on the commits. Push your new commit to Gerrit, this should update the existing review request. The Eclipse Git push confirmation dialog should tell you that you created a new change set.
12. Combining changes from two commits / Gerrit change reviews
Sometimes you want to update an existing Gerrit but push a new commit which creates a new Gerrit. So you have two Gerrit change reviews, instead of one.
Here is what you have to do to combine them:
-
Use Ctrl+3 Fetch from Gerrit and fetch the second Gerrit into your local repository
-
Go to the history view, you will see both commits
-
Select the last commit before the two commits that you want to combine
-
Right-mouse clicke and select Rebase Interactive
-
In the Rebase view, select
Fixupon the second commit to combine two commits using the commit message from the first commit. -
Press Start to run the interactive rebase
-
Push the changed commit to Gerrit, this will update the first Gerrit, as the
Change-Idis still the same. -
Abandon the second commit
13. URL for reviews
To see the reviews on your Gerrit server, open the link to your Gerrit instance. For example, if you have Gerrit locally installed use
https://localhost:8080/
which is the default port for a local Gerrit installation. You see all change requests, if you login into the Gerrit instance you see Gerrit changes you are involved with.
|
You can use the Search field to search for review see Search options in Gerrit for available search options. |
14. Using the Gerrit web interface
14.1. Reviewing a change request
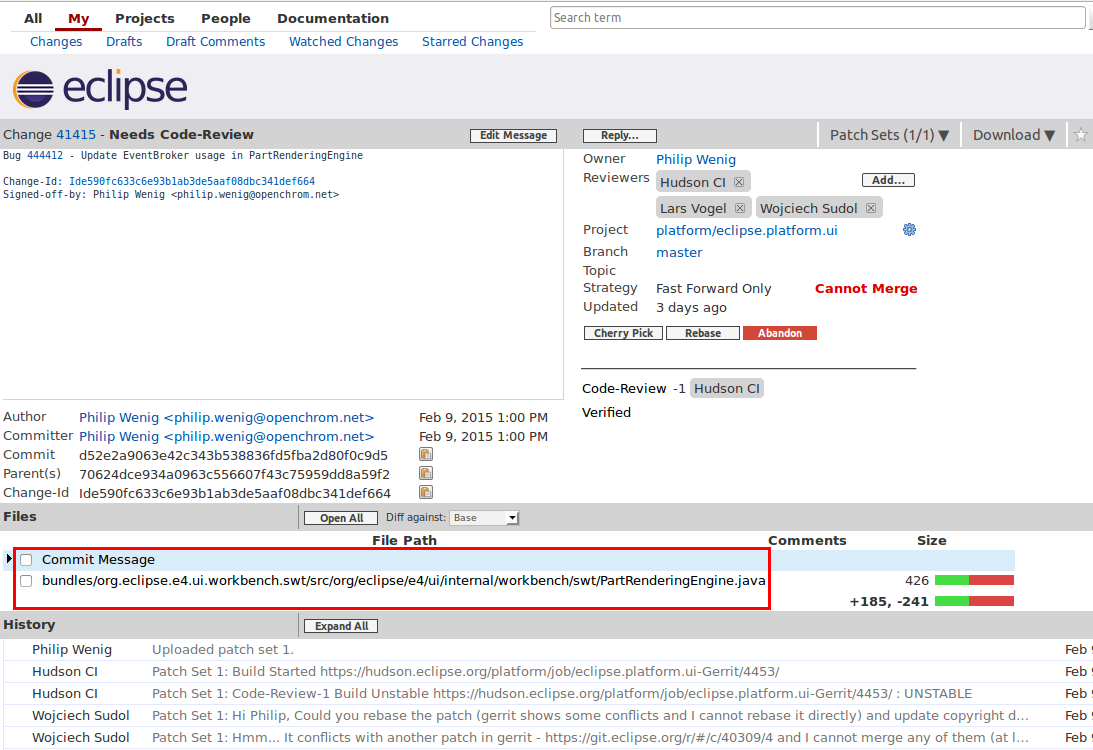
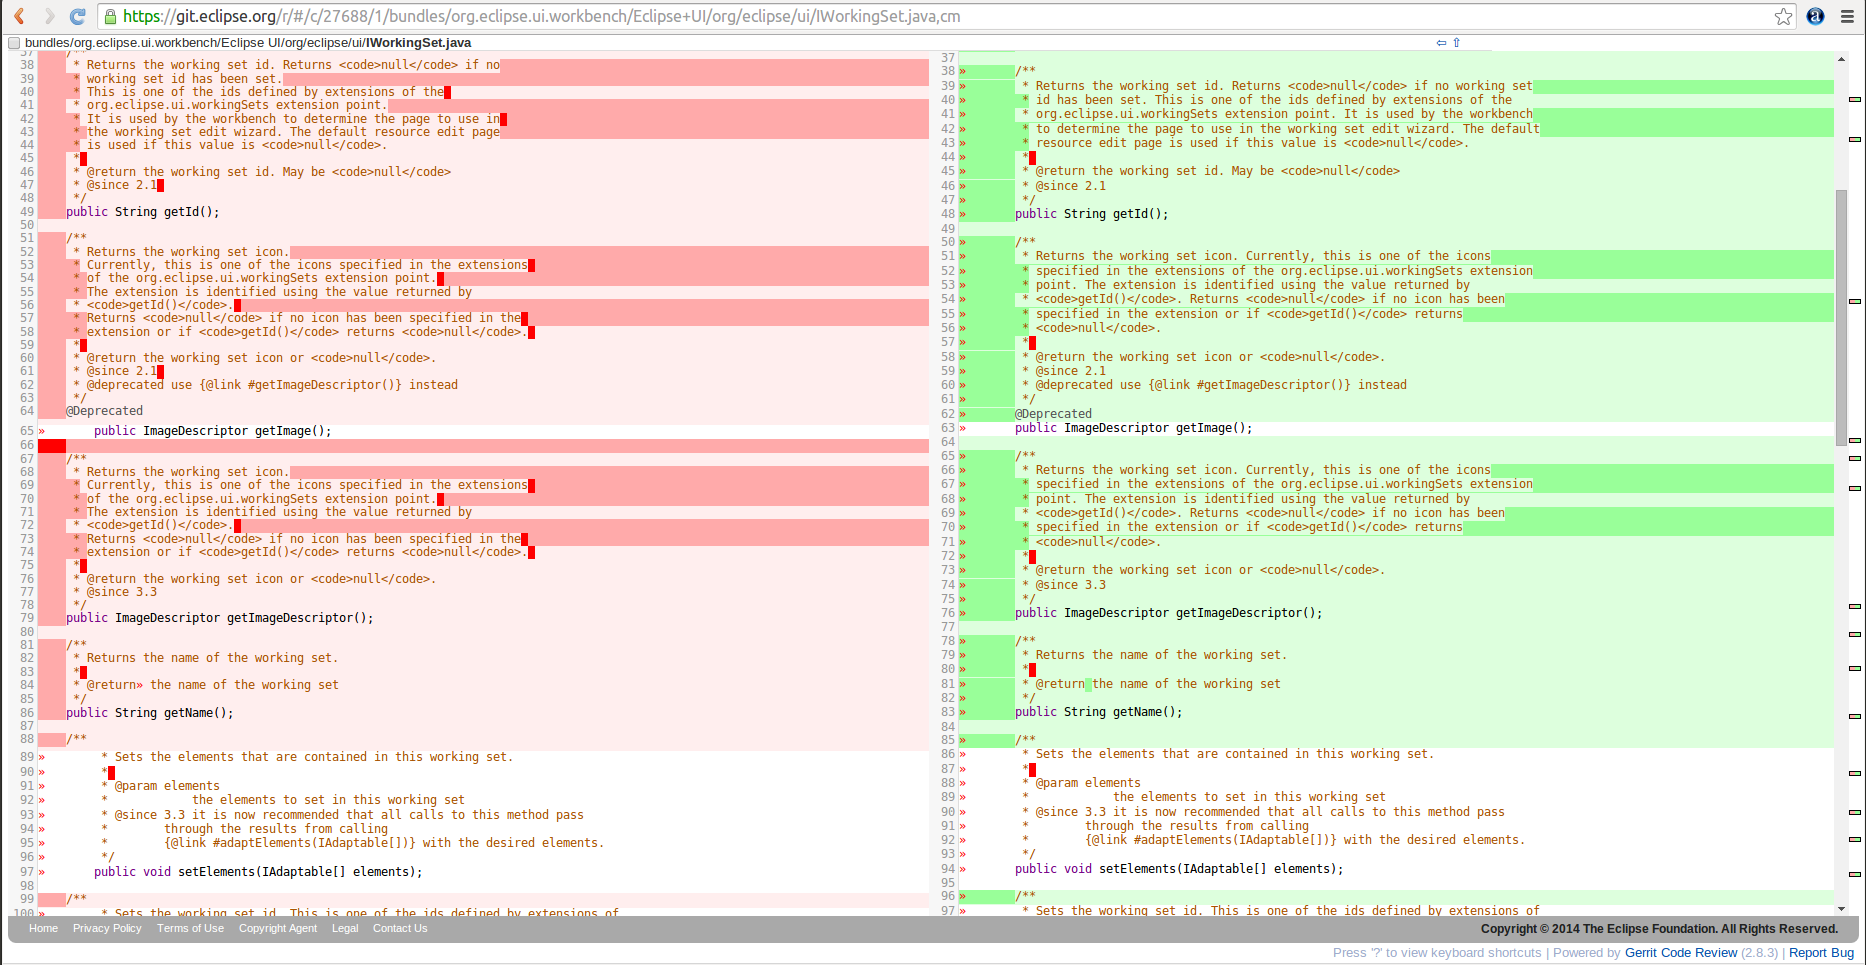
Click on one change request to see the details of the Gerrit change request. Click on the commit message of the file name (highlighted in the screenshot) to see the changes in the file.
You can double-click on a line to comment on the change.
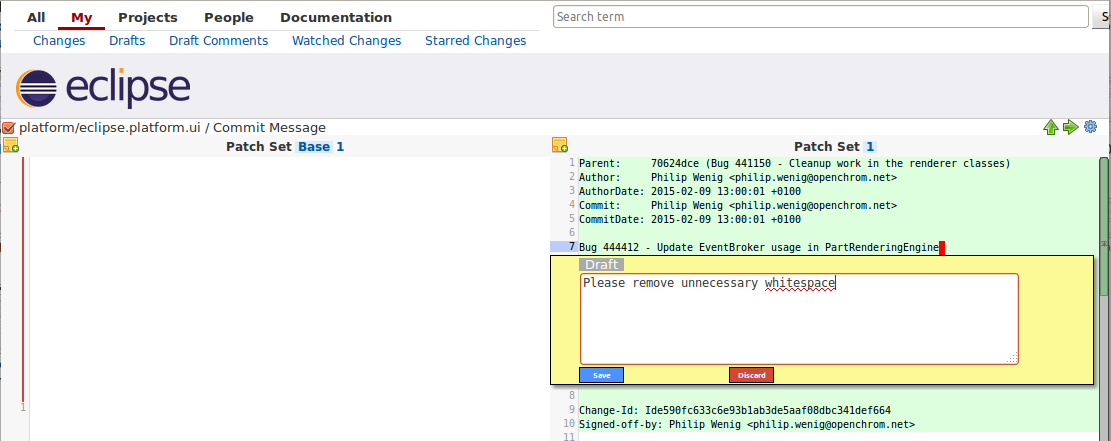
Clicking on Up to change brings you back to the change.
Gerrit allows you to review the commit message, which appears at the top of the file list. To understand the history of the repository it is important to provide a good commit message.
14.2. Publishing your review result
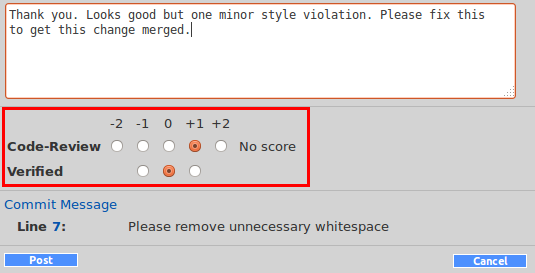
Click on Reply button to give feedback on the change.

You can give a summary of your feedback and return a review number between -2 and +2 (if you are a committer) or between -1 and +1 (if you are not a committer). If you vote -1 or -2, you respectively indicate that the patch still requires rework or that you disagree with the suggested change. See Voting in Gerrit for details of the default voting rules.
14.3. Improve a change based on review feedback
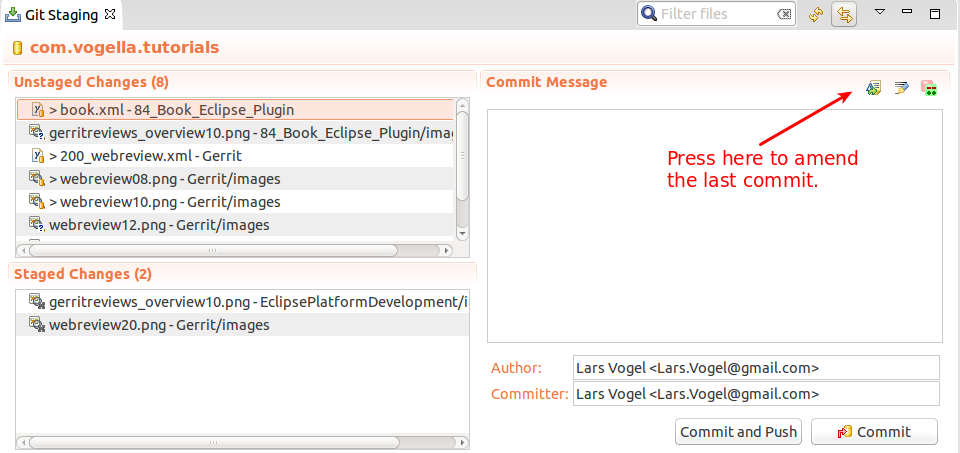
If the review process has resulted review comments explaining how to improve the proposed patch, the author of the patch (or someone else) can adjust the patch. The developer amends the commit in his local repository and pushes the improved commit to Gerrit. He can also adjust the commit message while amending the commit.
As the developer amends the commit, the same Change-Id is used and the Gerrit review system identifies the change as update of the existing change.
The Git Staging view allows amending the last commit by clicking the amend button shown in the screenshot.
| Gerrit allows you to select which patch sets you want to compare in Comparison view. Typically you compare the base version with the latest patch set, but if e.g., you already reviewed patch set 3 you may want to just see what the author changed between patchset 3 and patchset 5. |

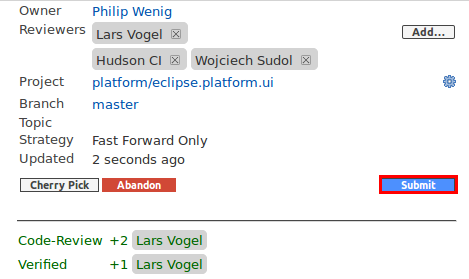
Once the change has reached the required quality, the reviewer can give a +2 evaluation of the change.
Depending on the settings of the Gerrit repository, the Gerrit review might have to be rebased. If conflicts happen during this rebase operation, you can trigger this rebase directly from the web interface. If a change is rebased, it needs to be reviewed again.
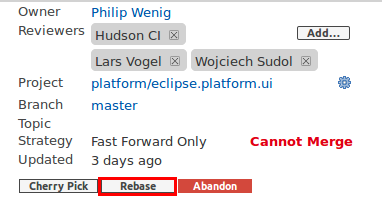
Afterwards, a developer with commit rights can submit the change. This is typically done by the same committer who voted +2. This may require that the corresponding commit is based on the current origin/master branch. This depends on the Gerrit configuration for the project. The Gerrit UI allows the committer or contributor to rebase the change onto origin/master if no conflicts occur.
14.4. Keyboard shortcuts in Gerrit
Press the "?" key in the Gerrit web user interface to see the actions you can trigger via shortcuts. The available shortcuts depend on there you are in the user interface.
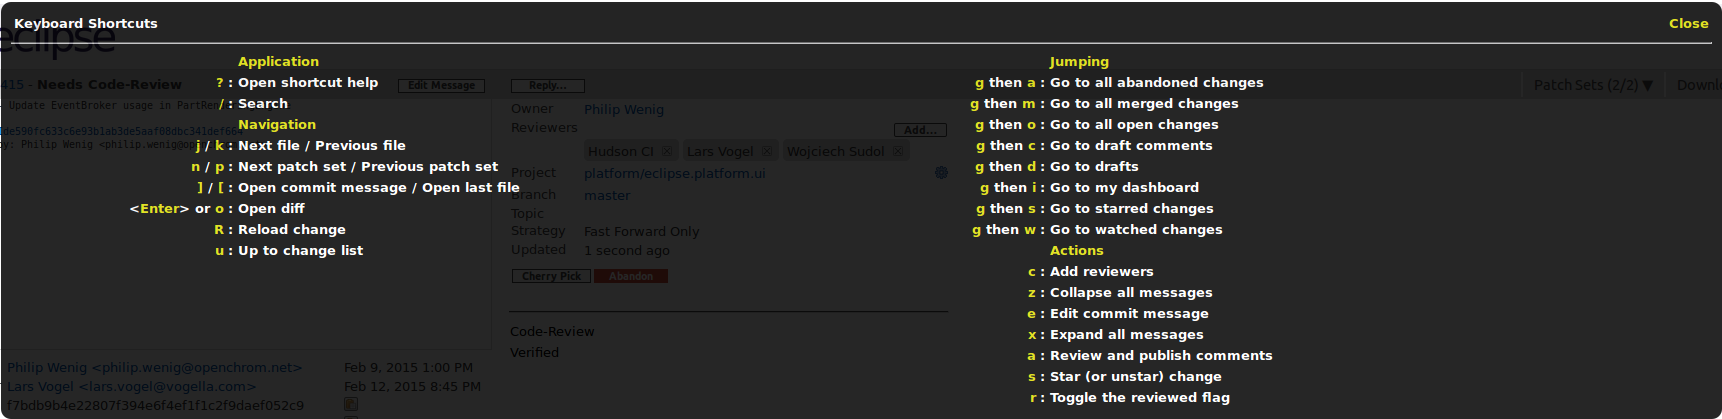
The available shortcuts are different, depending on the page you are.
14.5. Fetching a remote change into a local Git repository
It is possible to fetch the changes from the Gerrit review into another local Git repository. The Gerrit page lists the commands for downloading the change. This is depicted in the following screenshot.
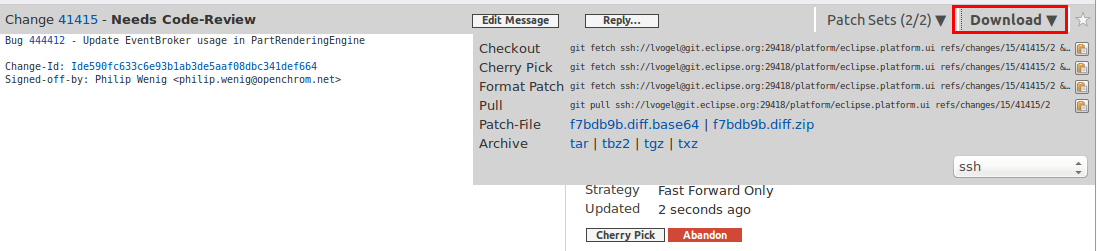
After fetching a change, the developer can adjust the change and amend the commit. If he pushes it to Gerrit, the change is updated. Such a procedure should be coordinated by the author of the original change to avoid that two developers do the same work.
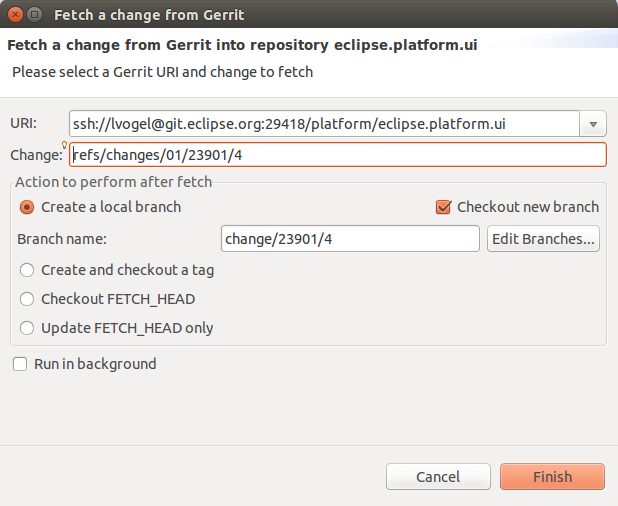
14.6. Fetching a remote change with Eclipse Git
| The Git tooling in Eclipse allows you to fetch a change from Gerrit. For this, right-click on the project . |
When working with many projects, it is often easier to right-click on the repository instead and access Fetch from Gerrit from there. You can paste the change’s number (shown in the change’s URL) and use Ctrl+Space to expand the change number to the list of patch sets. Select the one you want to download and fetch it into a new local branch. Afterwards, you can test the changes in isolation.
14.7. Edit a change directly via the web interface
You can also edit directly in Gerrit. Press the edit button for this.
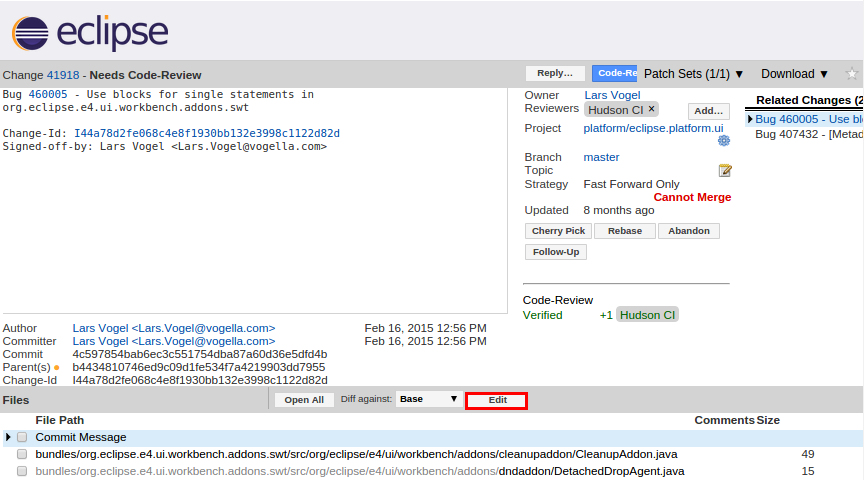
Afterwards, select the file or the commit message you want to edit. Press save and close once you are done. After you are done with all your edits, press the Publish Edit.
15. Solving typical Gerrit problems
15.1. You forgot to amend the commit
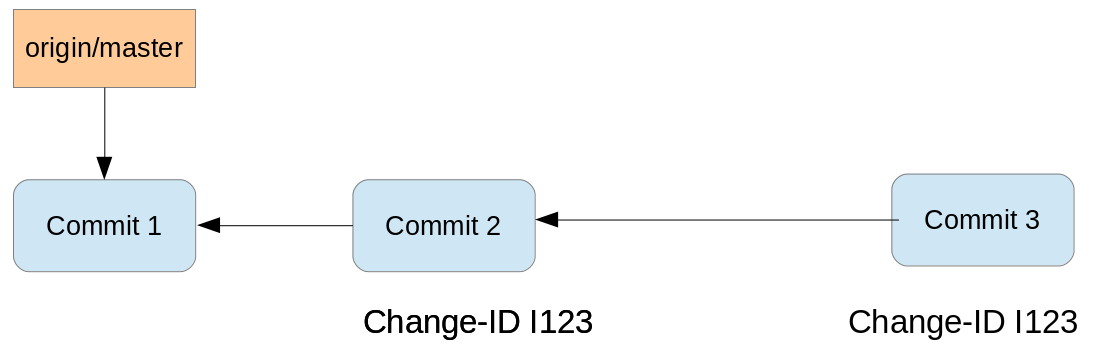
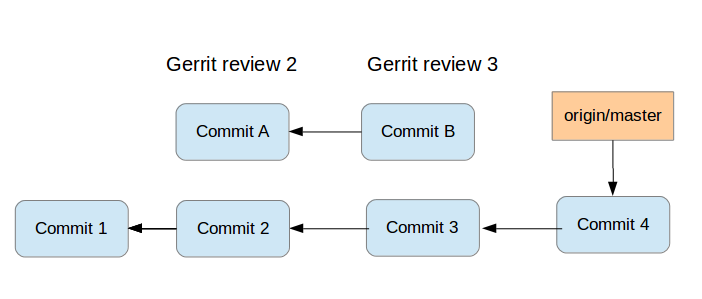
If you try to push a commit that contains the same ChangeId as a predecessor commit, Gerrit rejects it and responds with the error message: "squash commits first".
In this case you probably forgot to amend the existing commit and used the same Gerrit Change-ID. This is depicted in the following graphic.
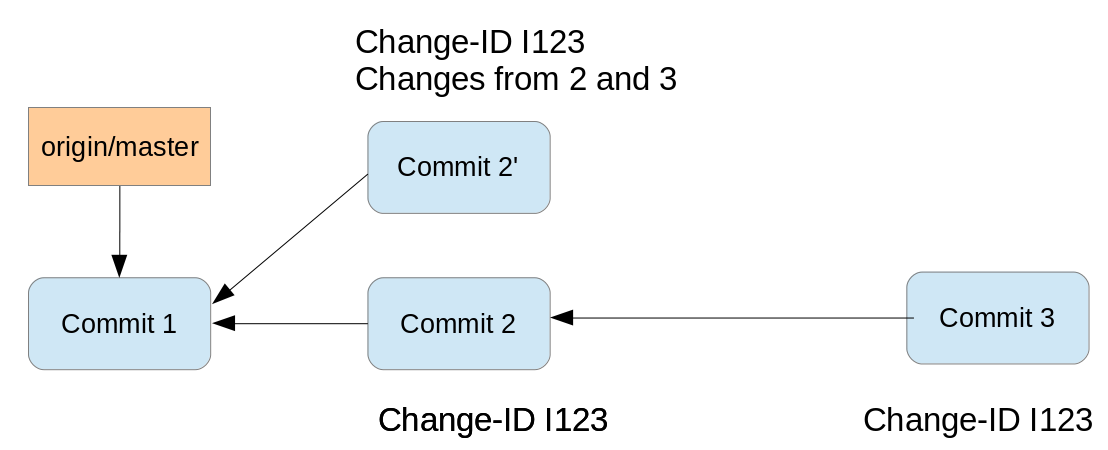
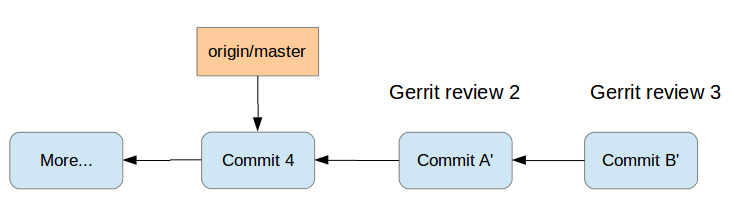
In this case you need to squash the commits. This results in a new commit that can be pushed to Gerrit. As you use the same Change-ID this pushed commit updates the Gerrit review. In the following diagram the "Commit 2'" is the result of squashing "Commit 2" and "Commit 3" into one commit.
An easy solution to handle this is, to do a soft reset in Git to the previous commit and commit the change files again, this time with the amend option. If you intended to create two commits you need to generate a new changeId in the second commit which was rejected.
| The Git tooling in Eclipse allows squashing commits via the Git Interactive Rebase view. A simple way of doing this is by selecting the adjacent commits you want to squash in the History view and by selecting from the context menu. |
15.2. Handling merge conflicts
The submit step may fail due to merge conflicts, depending on the Gerrit project configuration.
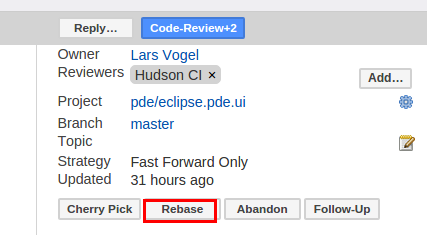
The easiest way to do so is via the Rebase button in the Gerrit web interface, if there are no conflicts.
In case you have to resolve merge conflicts you have to do this locally and push an updated commit. The steps required to solve a merge conflict are:
-
Rebase your local branch onto the latest state of
origin/master -
Resolve all conflicts
-
Commit them using
-
Push your change again to Gerrit for review
This creates a new patch set for the change. The new patch set has to pass the code review again. Submit the new patch set change to merge it into the master branch.
15.3. non-fast forward
You get this error message, if you try to submit a commit which would result in a non-fast forward merge. The Gerrit service is sometimes configured with the setting to allow only fast-forward merges.
|
The default submit type in Gerrit is "Merge if necessary". |
In this case the pushed commit is not based on the current tip of the remote branch. This problem is depicted in the following graphic.
The solution is to rebase your commit onto origin/master.
Afterwards, you push the commit again to Gerrit.
See non-fast forward for details.
16. More infos on trouble shooting
16.1. Remove a bad commit from a series of commits
If you create a series of dependent commits, it might happen that one of the commits is rejected during the review process.
In this case, you cannot merge the other commits as they still have a dependency to the "bad" commit.

During the review process commit 2 are rejected. The commit 3 and commit 4 are still good and do not depend on the changes in commit 2.
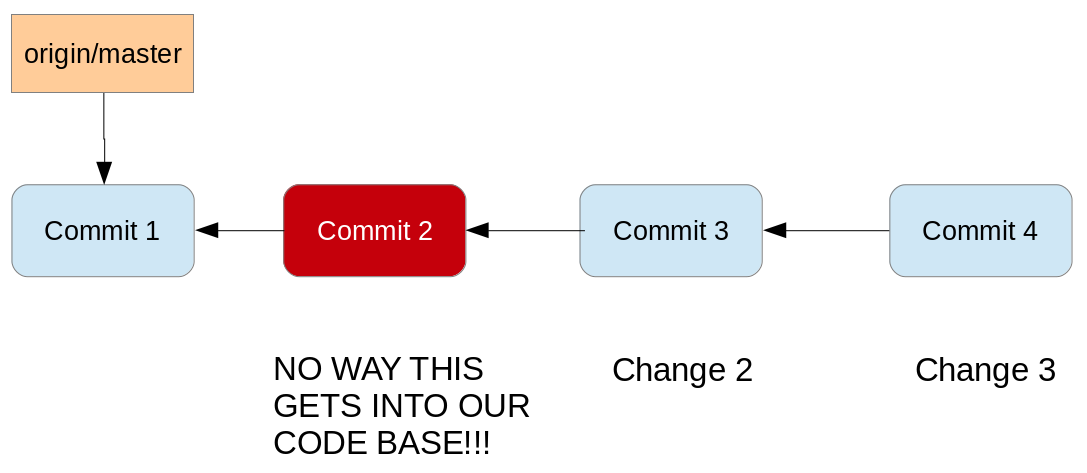
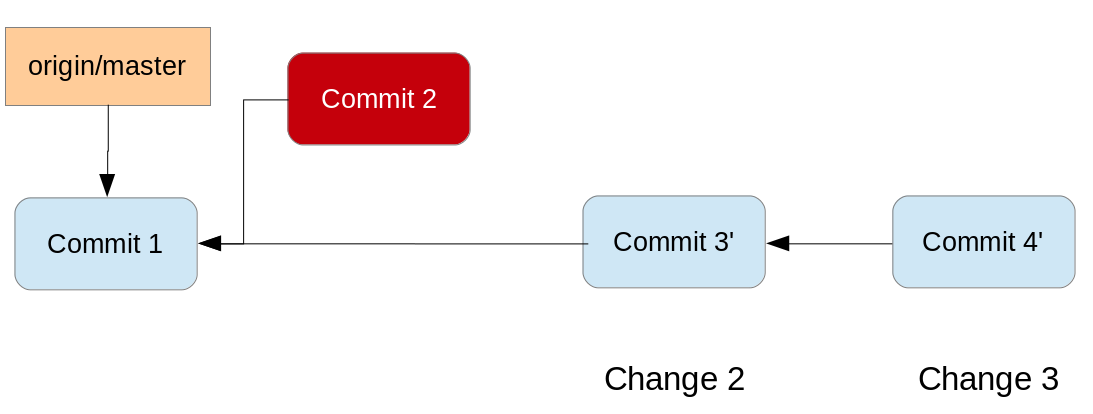
The solution is to use interactive rebase to skip the bad commit.
|
The Gerrit user interface does show "depends on" and "needed by" fields when it knows that a Gerrit review depends on another review. This helps you manage your dependency trail. |
16.2. More error messages and their solution
See Gerrit error message for more error messages and their solutions.
17. Things to consider if you want to contribute to an existing project
17.1. How to start contributing?
It is typically a good approach to fix something simple as the first step. Search for a few warning messages in the code, or a typo in the documentation, and prepare a fix for it.
Once you get familiar with the contribution process start contributing something more difficult.
17.2. Scope of a Gerrit change / commit
A Gerrit change (== one commit) should address only one issue.
Avoid going "off topic" with your patches. If you would like to clean up some code, or fix something out of the scope of your patch, create additional patches. This will make your patches more concise, easier to review and easier to revert if something go wrong.
In many open-source projects smaller patches tend to be reviewed faster and merged faster as it is easier for the committer to review. With this in mind, try to break your contributions into small concise Gerrit changes. It is more likely that these get reviewed and accepted.
It also helps to reach a clean history. Imagine you are chasing a bug in code which was introduced 2 years back. If the history is built from small concise commits, it is easier to find the commit which introduced the problem and understand the motivation why it was done in the way it was implemented.
17.3. Commit message
Most project handles the required commit message a bit differently. For example, the Eclipse Platform project prefers the following format:
Bug XXXXXXXX - bug title

Short description of what the fix contains, or the direction of the fix

Change-Id: I0000000000000000000000000000000000000000
Signed-off-by: email-from-the-CLA
The text in the header must match the title in Bugzilla. The Eclipse Git tooling complains about commit headers longer than 80, but you can ignore this warning. For example the following is a valid commit message for the Eclipse platform project. The description in the body of the commit message can take as many lines as necessary and should be descriptive of what is going into the patch. For more complex patches you should provide implementation details and enough notes to allow the reviewer to understand what your fix provides.
Bug 434846 - Update the system default Locale if the -nl Locale is invalid

An incorrect locale value causes the IEclipseContext to run the conversion frequently.
The patch ensures that only valid values are saved in Eclipse context.

Change-Id: I6099172a5986e9678a830f84d78b2cdb8c161dc6
Signed-off-by: Dirk Fauth <dirk.fauth@fake.com>
It is important to explain in the commit body, why the change was done. Also explain why you have chosen a certain implementation method, if there was something special about it.
| Don’t worry too much about the correct commit message format, the project you are contributing to will also review your commit message. |
17.4. Copyright header update
In some projects the source file contains a copyright header. If you modify the file you should also update the copyright header. Different project might use different standards here.
Have a look at existing commits and the header in the existing files and try to adapt the style preferred by the existing developers.
17.5. Example: Copyright header in Eclipse Platform UI
Most Eclipse projects to not required to update the copyright header. Optionally you can also add yourself to the copyright with a reference to the bug and update the copyright header with the last modified year. The following listing shows an example for this standard.
/*******************************************************************************
* Copyright (c) 2008, 2015 IBM Corporation and others.
* All rights reserved. This program and the accompanying materials
* are made available under the terms of the Eclipse Public License v1.0
* which accompanies this distribution, and is available at
* https://www.eclipse.org/legal/epl-v10.html
*
* Contributors:
*     IBM Corporation - initial API and implementation
*     John Doe <John.Doe@fake.org> - Bug 429728 Fix compiler warning
*******************************************************************************/
The above file was created in 2008 and last modified in 2015. It was originally created by employees of IBM and also modified by John Doe and he fixed Bug 429728 with it. The additional entry in the Contributors section is typically considered optional, but this depends on the individual project.
If you work for an organization the Foundation recommends adding the organization name in parentheses. See: Copyright info from eclipse.org. For example:`John Doe (vogella GmbH) John.Doe@fake.com - Bug 429728 - Fixed compiler warnings`
If you add a new file do not forget to add the copyright header using the project’s license. For new files, list "yourself and others" instead of "IBM and others" in the first line.
If you fix several bugs in the same file, you should list the bug separately as in the following example listing. In case you find yourself changing the same file over and over again, you could also use "ongoing maintenance" instead of listing every bug number.
/*******************************************************************************
* Copyright (c) 2008, 2014 IBM Corporation and others.
* All rights reserved. This program and the accompanying materials
* are made available under the terms of the Eclipse Public License v1.0
* which accompanies this distribution, and is available at
* https://www.eclipse.org/legal/epl-v10.html
*
* Contributors:
*     IBM Corporation - initial API and implementation
*     John Doe <John.Doe@eclipse.org> - Bug 429728, 429972
*******************************************************************************/
In most cases you should avoid putting in the bug number into the source code (except the header). Only if you have to implement a workaround for an existing bug, you should add a reference in the source to this bug.
17.6. Stay polite
The best way to get your contribution accepted is to stay polite and to follow the guidance of the existing committers. For the first few contributions it is best to stay with the current processes and guidelines. If you continue to contribute, you will gain more trust and responsibility and you may be able to improve also the processes used by the project.
17.7. Avoid unnecessary formatting changes
Typically open-source projects dislike if you re-format unchanged lines, as this makes the review process much harder. Avoid pressing the Format source code shortcut in your editor. Instead, only select the changes lines and then press the format source code shortcut (this is also an auto-save preference).
Unnecessary format changes makes it harder to review a Gerrit change. The following screenshot shows a file which was reformatted, it is unnecessary hard for the reviewer to find the real change.
17.8. Avoid unnecessary whitespace changes
Typically projects dislike unnecessary whitespace in the contributed code. Ensure that you remove trailing whitespaces from your contributed code.
Unfortunately, lots of project have unnecessary whitespace included in the source code, most committers also do not like if you remove them as it changes the history.
17.9. Pushing unfinished features
For most projects it is OK to push an initial (unfinished) implementation concept to Gerrit and to ask for feedback.
Mark unfinished commits with [RFC] (request for comments) or [WIP] (work in progress) in the commit message header to avoid frustrating reviewers who typically want to know if the change is considered to be ready by the author or not.
| In general, you should develop in the open as much as possible to avoid the unpleasant surprise that your perfect contribution is rejected because it does not fit into the design of the software. |
17.10. Valid user and email
Some project uses additional validation plug-ins. For example, the Eclipse foundation uses a server-side Gerrit plug-in which checks for conformity with the CLA. When you push a change to Gerrit this plugin verifies if your contribution passes all the CLA requirements from the Eclipse foundation.
This means that the author field must be a valid Eclipse user. If the author is not a committer it requires that the author also "Sign-off" their contribution. Eclipse Git provides a preference to always sign-off changes.
17.11. Not getting feedback
If everything works perfectly, the developers of the project you are contributing to will accept your contribution and help you to solve all your open questions.
If you do not get feedback there are different possible reasons: maybe all committers are busy or in vacation. Or your change is extremely large (hard to review) or it ignores all the rules explained in the project’s contributor guide.
If your contribution is ignored, feel free to ask in the Bug report for feedback or to send email to the project mailing list.
17.12. Dealing with negative feedback
Don’t get frustrated by negative feedback, as the collaboration almost always results in a better commit that benefits everyone.
18. Gerrit support in Eclipse
The Gerrit support in Eclipse is good that even customers that use a different IDE, use Eclipse as Gerrit client.
To use Gerrit in Eclipse, clone the repository as seen before, and
import
your projects. By
default, the Eclipse Git
tooling creates a
configuration that
pushes the
local master
branch to the remote master
branch. To connect with
Gerrit,
change
the configuration to push the
local master to
refs/for/master
instead.
After cloning the repository you can configure Gerrit in the Git repositories view by right-clicking on the origin remote and selecting Gerrit Configuration.
You can see the Gerrit review notes in Eclipse. Select Open in Commit Viewer on a commit in the History View. In the Commit Viewer you have an additional tab called Notes. Here you see the data which was created by the Gerrit reviewer.
19. Contributing to Eclipse via Gerrit
This part of the tutorial has moved to Eclipse platform development.
20. Gerrit related links
20.1. vogella Java example code
If you need more assistance we offer Online Training and Onsite training as well as consulting