Eclipse EMF. This tutorial describes the usage of Eclipse EMF, a framework for modeling your data model and creating Java code from it. This tutorial is based on Eclipse 4.6 (Eclipse Neon).
1. Models and Eclipse EMF
1.1. Data model
A data model, sometimes called domain model, represents the data you want to work with.
For example, if you develop an online flight booking application, you might model your domain model with objects like Person, Flight, Booking etc.
The EMF tooling allows you to create UML diagrams.
A good practice is to model the data model of an application independently of the application logic or user interface.
This approach leads to classes with almost no logic and a lot of properties, e.g., a Person class could have the firstName, lastName, Address properties, etc.
With EMF you define your domain model explicitly. This helps to provide clear visibility of the model. The code generator for EMF models can be adjusted and in its default setting. It provides change notification functionality to the model in case of model changes. EMF generates interfaces and a factory to create your objects; therefore, it helps you to keep your application clean from the individual implementation classes.
Another advantage is that you can regenerate the Java code from the model at any point in time.
1.2. Eclipse Modeling Framework (EMF)
The Eclipse Modeling Framework (EMF) is a set of Eclipse plug-ins that can be used to model a data model and to generate code or other output based on this mode. EMF has a distinction between the meta-model and the actual model. The meta-model describes the structure of the model. A model is a concrete instance of this meta-model.
EMF allows the developer to create the meta-model via different means, e.g., XMI, Java annotations, UML or an XML scheme. It allows to persists the model data; the default implementation uses a data format called XML Metadata Interchange.
1.3. Generate data from an EMF model
The information stored in the EMF models can be used to generate derived output. A typical use case is that you use EMF to define the domain model of your application and that you generate the corresponding Java implementation classes from this model. The EMF framework supports that the generated code can be safely extended by hand.
The EMF model (which holds real data based on the model structure) can be used to generate different output, e.g., HTML pages, or it can be interpreted at runtime within an application.
1.4. Meta models - Ecore and Genmodel
The EMF meta-model consists of two parts; the ecore and the genmodel description files.
The ecore file contains the information about the defined classes. The genmodel file contains additional information for the code generation, e.g., the path and file information. The genmodel file contains the control parameter how the code should be generated.
1.5. Ecore description file
The ecore file allows defining the following elements.
-
EClass: represents a class, with zero or more attributes and zero or more references. -
EAttribute: represents an attribute which has a name and a type. -
EReference: represents one end of an association between two classes. It has flags to indicate if it represents a containment and a reference class to which it points. -
EDataType: represents the type of an attribute, e.g.,int,floatorjava.util.Date
The Ecore model shows a root object representing the whole model. This model has children that represent the packages, whose children represent the classes, while the children of the classes represent the attributes of these classes.
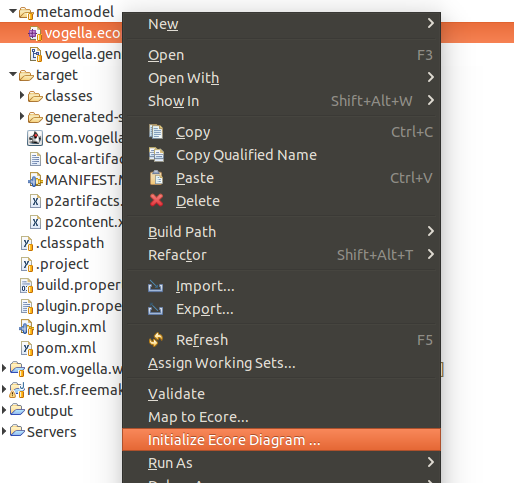
1.6. Ecore description file
You can create a graphical representation of an existing ecore model via the context menu of an .ecore file and by selecting Initialize Ecore Diagram….
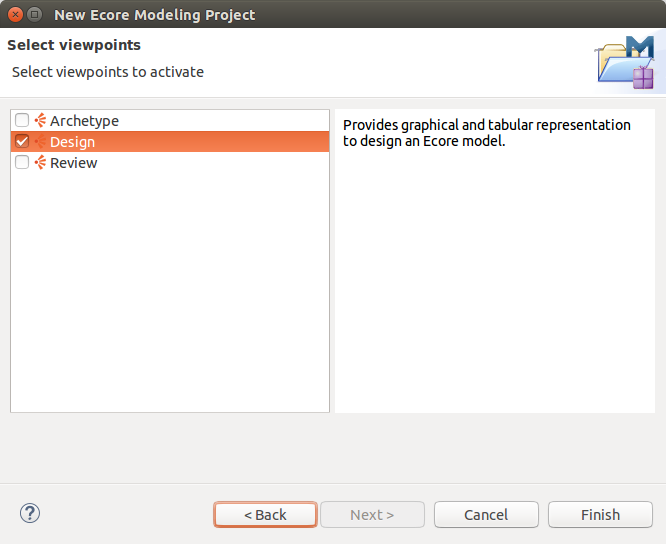
2. Installation
Install EMF via the menu entry in Eclipse. Select Modeling and install EMF - Eclipse Modeling Framework SDK and the Ecore Diagram Editor (SDK). The second entry allows you to create models.
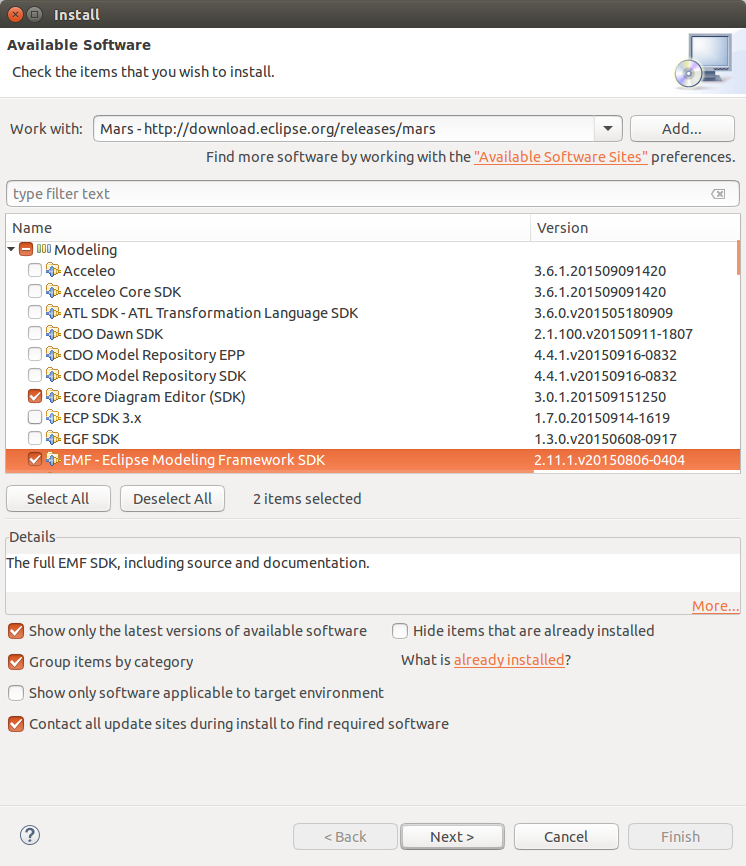
Restart your Eclipse IDE after the installation.
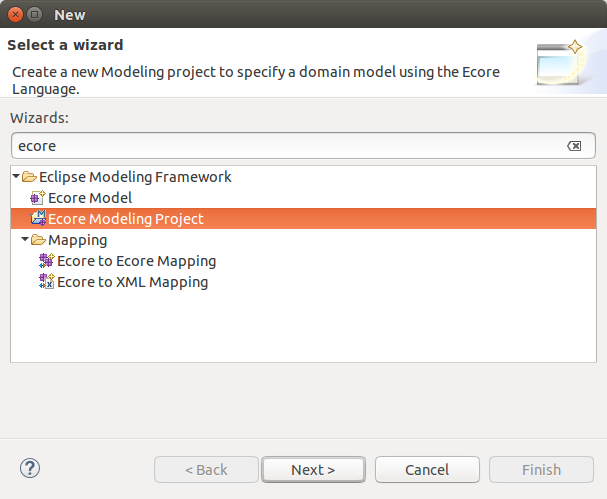
3. Exercise: Define a new EMF model and create Java code from it
3.1. Project and initial model creation
Create a new project called com.vogella.emf.webpage.model via .
Enter webpage.ecore as the Domain File Name parameter.
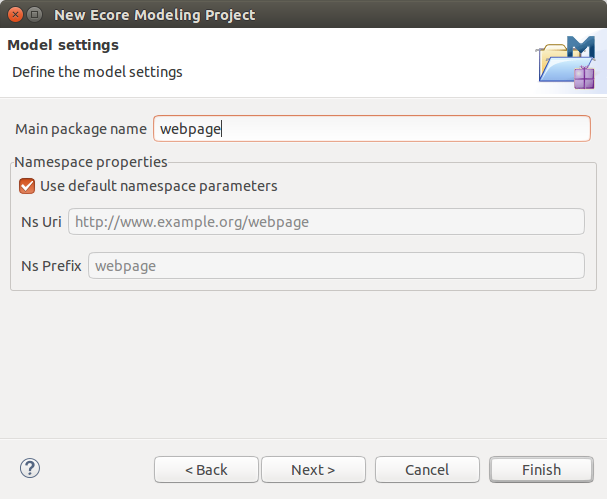
This should open a visual editor for creating EMF models.
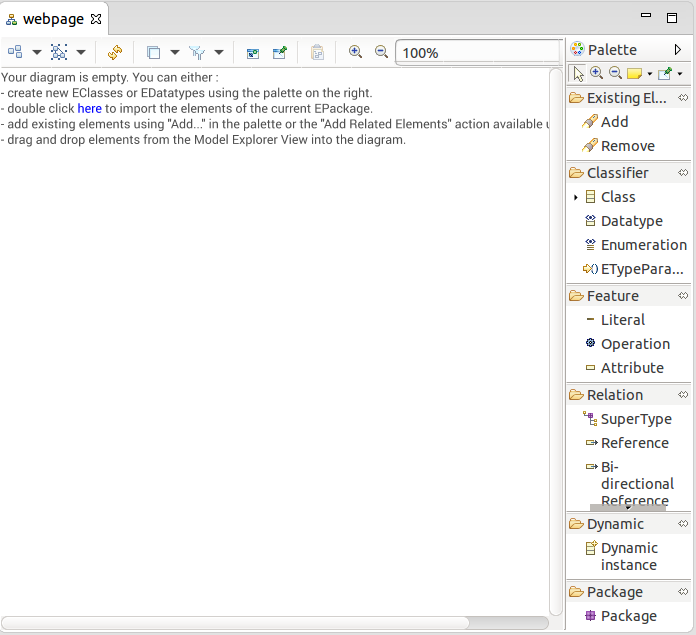
Open the Properties view via the menu. This view allows you to modify the attributes of your model elements.
Click on Class and click into the editor to create a new class.
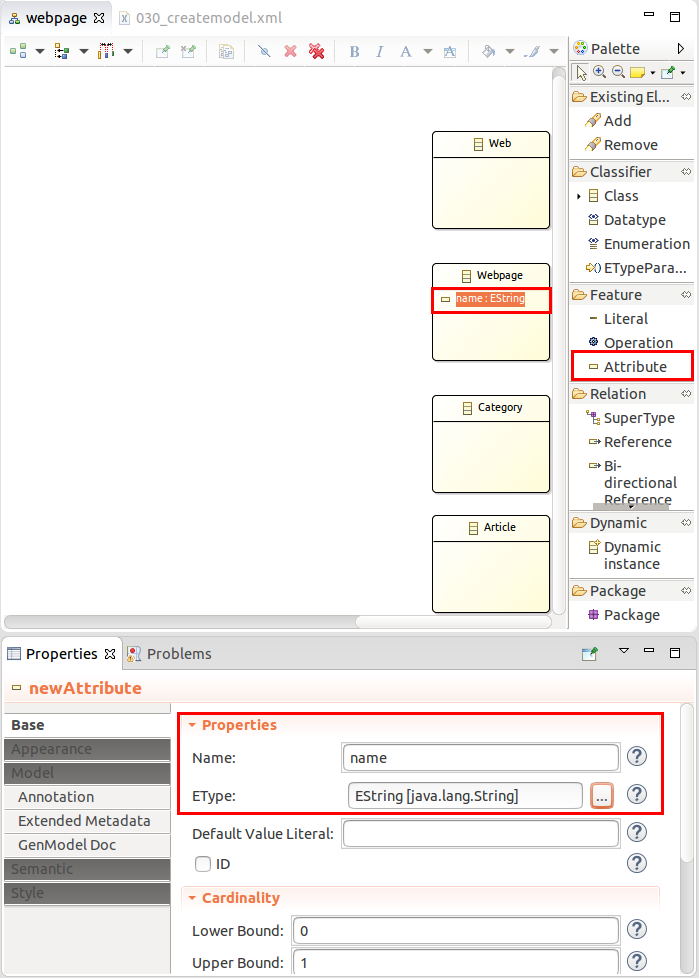
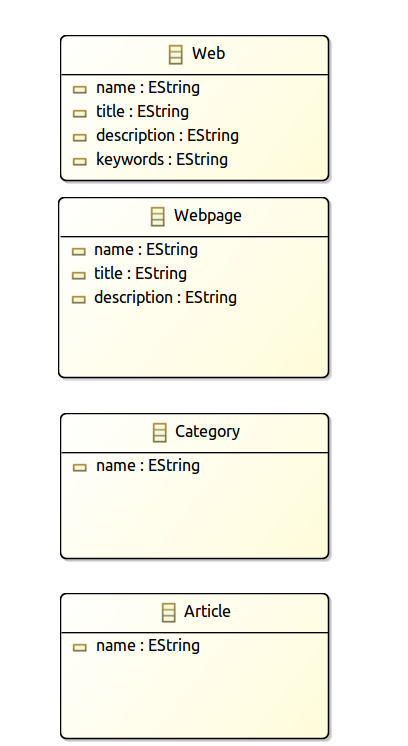
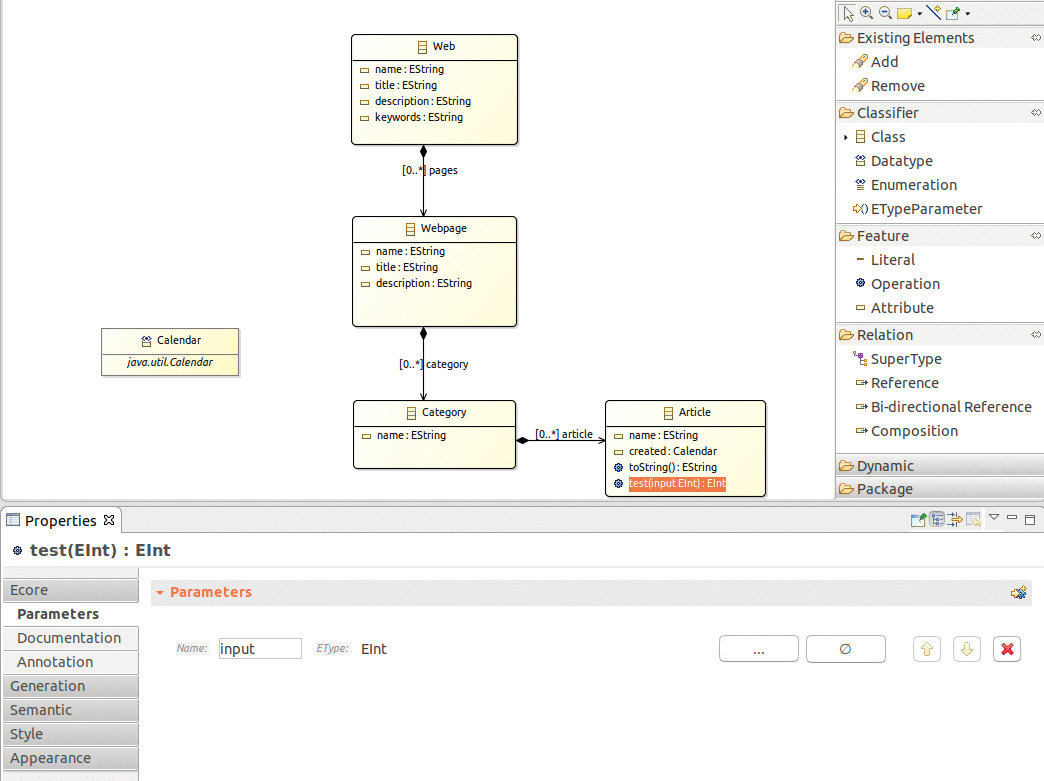
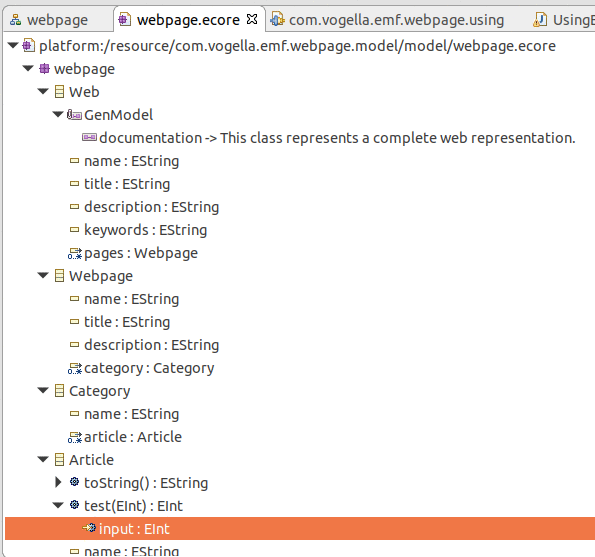
Create the MyWeb, Webpage, Category and Article EClasses.
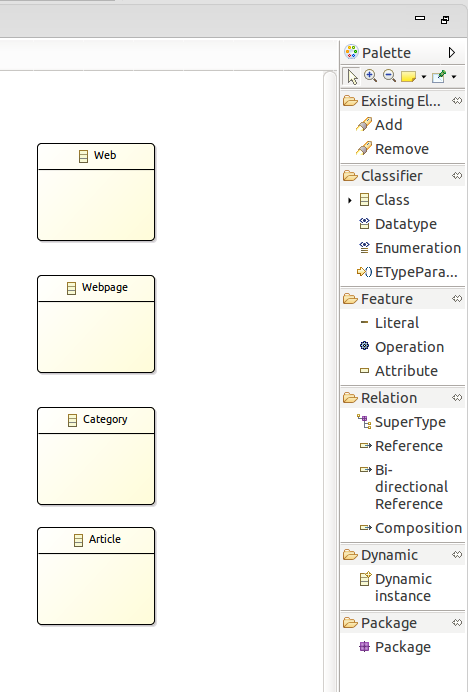
Use the Attribute node to assign the attribute called name to each object.
This attribute should have the EString type.
Add the title, description, and keywords attributes to the Web and Webpage model elements.
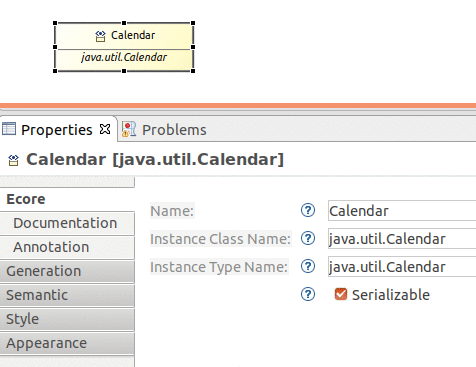
We want to use the data type calendar in our model.
Select Datatype and drag it into your model.
Assign the name Calendar to it.
Use java.util.Calendar as type parameter.
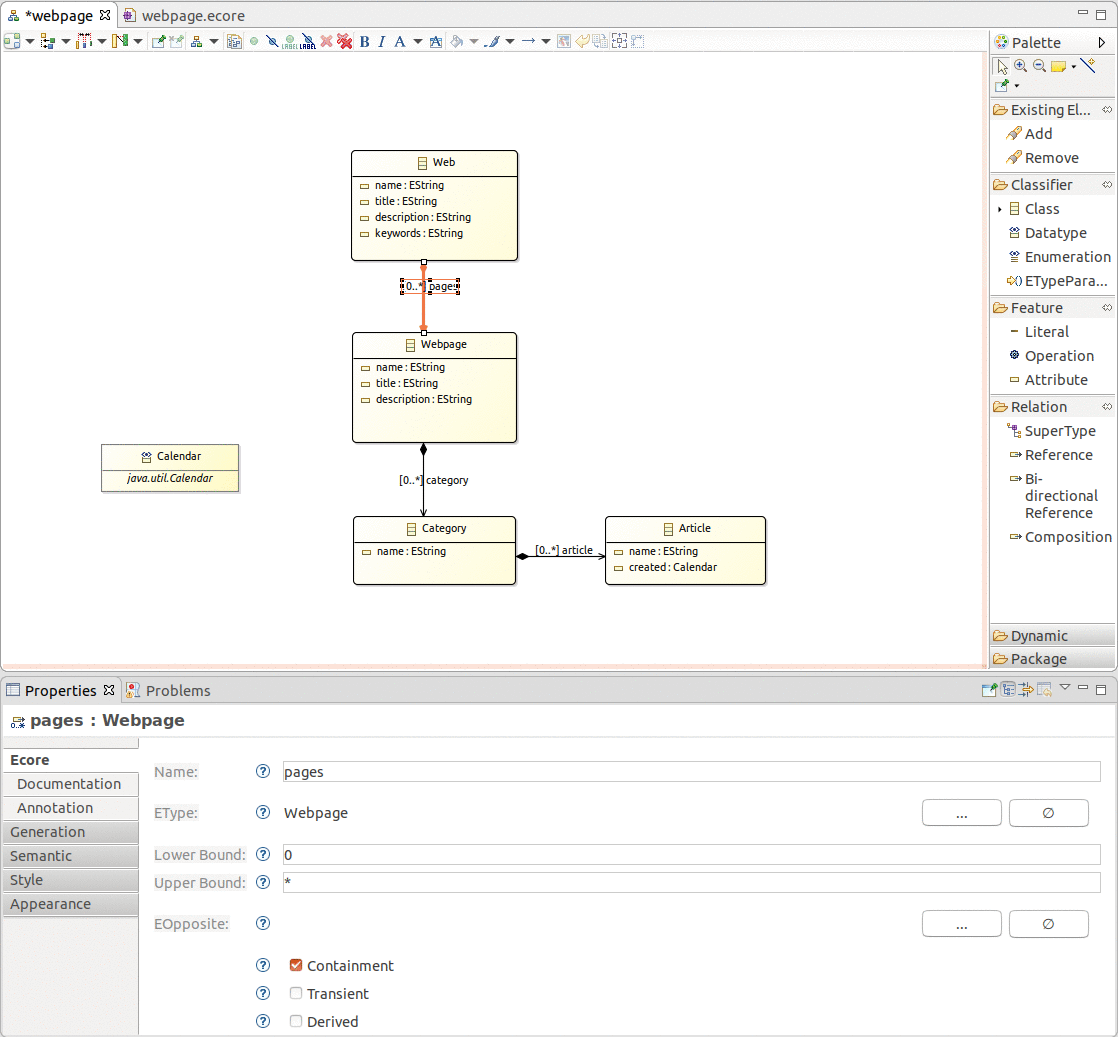
Add a new Attribute called created to Article and use the new type Calendar.
Select References and create an arrow similar to the following picture.
Make sure the upper bound is set to * and that the Containment property is flagged.
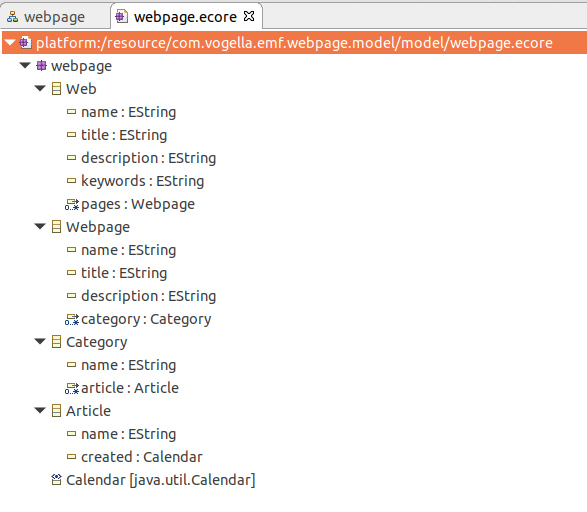
3.2. View Ecore diagram
Close the diagram and open the webpage.ecore file. The result should look like the following screenshot.
3.3. Set the package
Open the webpage.genmodel and select the Webpage node.
Set the base package property to com.vogella.emf.webpage.model.

4. Generating the domain classes
4.1. Generating Java code
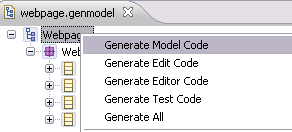
Based on the .genmodel files, you can generate Java code.
Right-click on the root node of the .genmodel file and select Generate Model Code. This creates the Java implementation of the EMF model in the current project.
4.2. Review the generated code
The generated code will consist of the following:
-
model.webpage — Interfaces and the Factory to create the Java classes
-
model.webpage.impl — Specific implementation of the interfaces defined in model
-
model.webpage.util — The AdapterFactory
The central factory has methods for creating all defined objects via createObjectName() methods.
For each attribute the generated interface and its implementation contain getter and (if allowed in the model definition) setter methods.
Each setter has a generated notification to observers of the model.
This means that other objects can attach them to the model and react to changes in the model.
Each generated interface extends the EObject interface.
EObject is the base of every EMF class and is the EMF equivalent of java.lang.Object.
EObject and its corresponding implementation class EObjectImpl provide a lightweight base class that lets the generated interfaces and classes participate in the EMF notification and persistence frameworks.
Every generated method is tagged with @generated.
If you want to manually adjust the method and have EMF overwrite the method during the next generation run, you need to remove this tag.
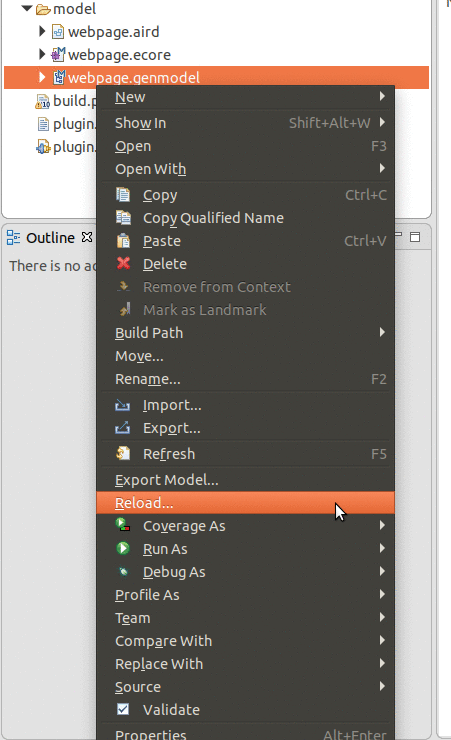
4.3. Updating the model
If you change your .ecore model then you can update the .genmodel by reloading.
5. Create EMF Editor plug-ins
EMF can generate plug-ins that provide wizards for creating new model instances and an editor that allows you to enter your model information.
The following assumes that you already have knowledge in developing Eclipse plug-ins. For more information about Eclipse plug-in development please see Eclipse plug-in Tutorial.
5.1. Generating edit / editor code
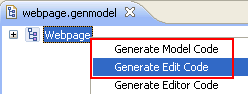
Eclipse EMF allow you to create an editor for your model. Open your .genmodel file, right-click on it and select Generate Edit Code and afterwards Generate Editor Code.
Two Eclipse Plug-in projects have been created, com.vogella.emf.webpage.model.edit and com.vogella.emf.webpage.model.editor.
5.2. Test your plug-ins
Select the *.editor project and start a new Eclipse instance with your new Plug-in via right-click on it and by selecting .
This should start a new Eclipse runtime instance.
5.3. Create your model
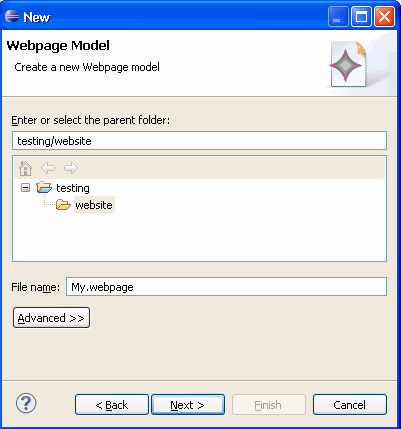
In new Eclipse instance create a new project of type General called testing and a folder called website.
Select this folder, right-click on it, select .
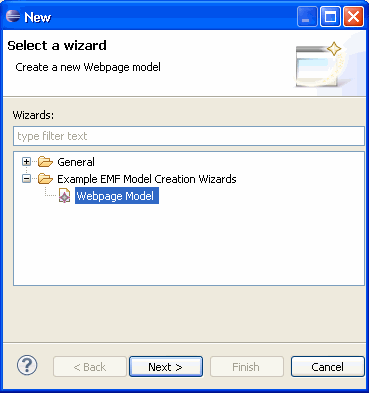
Name your model My.webpage.
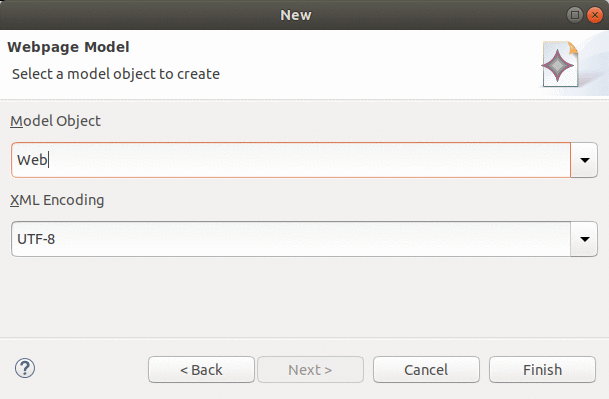
Select as the Model Object Web and press finish.
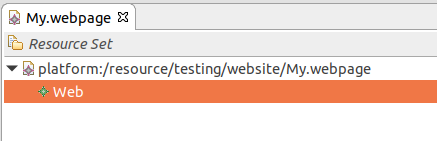
5.4. Edit your model
You should now see an editor for your website.model.
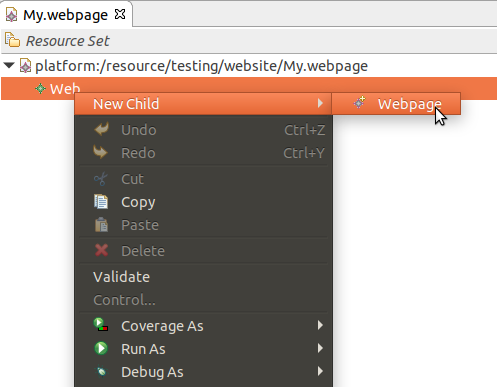
Right-click on Web and create a new element. To edit the elements use the Properties View that can be found under .
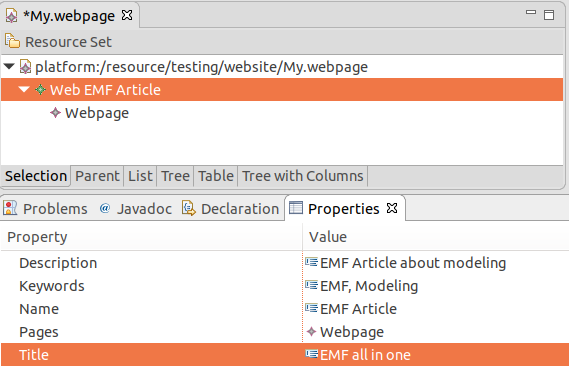
Save your created model.
6. Using the model code
6.1. Overview
The generated model code is standard Java code and can be used as such. The following demonstrates how to create objects based on the generated code.
6.2. Example
Create a new plug-in project called com.vogella.emf.webpage.usingmodel.
Add the following dependency to your MANIFEST.MF.
-
org.eclipse.emf.ecore
-
com.vogella.emf.webpage.model
Create the following class.
package com.vogella.emf.webpage.usingmodel;

import com.vogella.emf.webpage.model.webpage.Web;
import com.vogella.emf.webpage.model.webpage.Webpage;
import com.vogella.emf.webpage.model.webpage.WebpageFactory;
import com.vogella.emf.webpage.model.webpage.WebpagePackage;

public class UsingEMFModel {
    public static void main(String[] args) {
        WebpagePackage.eINSTANCE;
        // Retrieve the default factory singleton
        WebpageFactory factory = WebpageFactory.eINSTANCE;
        // create an instance of myWeb
        Web myWeb = factory.createWeb();
        myWeb.setName("Hallo");
        myWeb.setDescription("This is a description");
        // create a page
        Webpage webpage = factory.createWebpage();
        webpage.setTitle("This is a title");
        // add the page to myWeb
        myWeb.getPages().add(webpage);
        // and so on, and so on
        // as you can see the EMF model can be (more or less) used as standard Java
    }
}
The *PackageImpl.init() method needs to be called before doing anything else as this method initializes the model and the listeners.
|
7. Creating JavaDoc
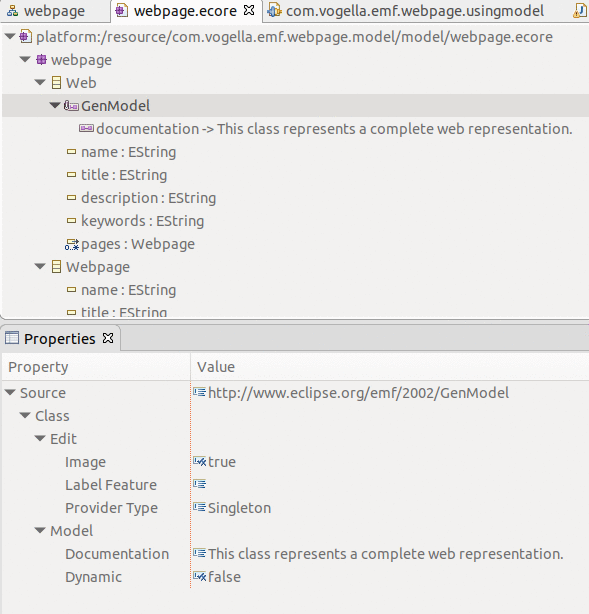
You can generate Javadoc for your classes and methods. EMF uses annotations for this with a certain property key. The easiest way of adding this is again the diagram. Select a class and maintain the documentation in the Documentation section.
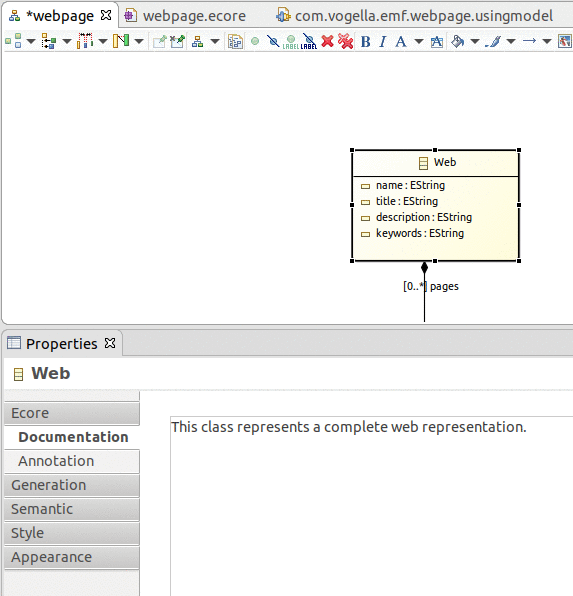
The ecore model looks now like the following. The key in the annotation https://www.eclipse.org/emf/2002/GenModel is necessary and the key on the details entry must be documentation.
8. Generating methods
By default, EMF generates getter and setter for every class.
You can add Operations or for example overwrite methods, e.g., the toString() method.
For Article the following toString method was generated in ArticleImpl.
     * @generated
     */
    @Override
    public String toString() {
        if (eIsProxy()) return super.toString();

        StringBuffer result = new StringBuffer(super.toString());
        result.append(" (name: ");
        result.append(name);
        result.append(", created: ");
        result.append(created);
        result.append(')');
        return result.toString();
    }
To overwrite this, add an Operation to Article with the name toString. Maintain in the properties EType EString as return type.
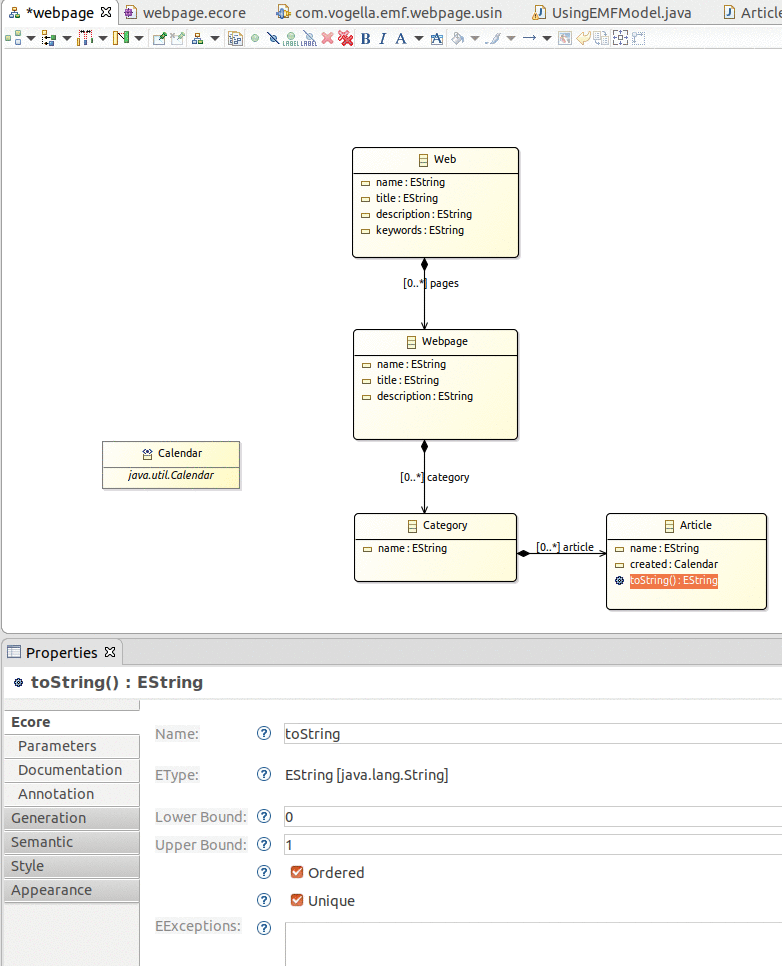
Add an annotation with the source https://www.eclipse.org/emf/2002/GenModel and maintain an entry with the key body, the value is the code that will be generated into the method, you find it listed below.
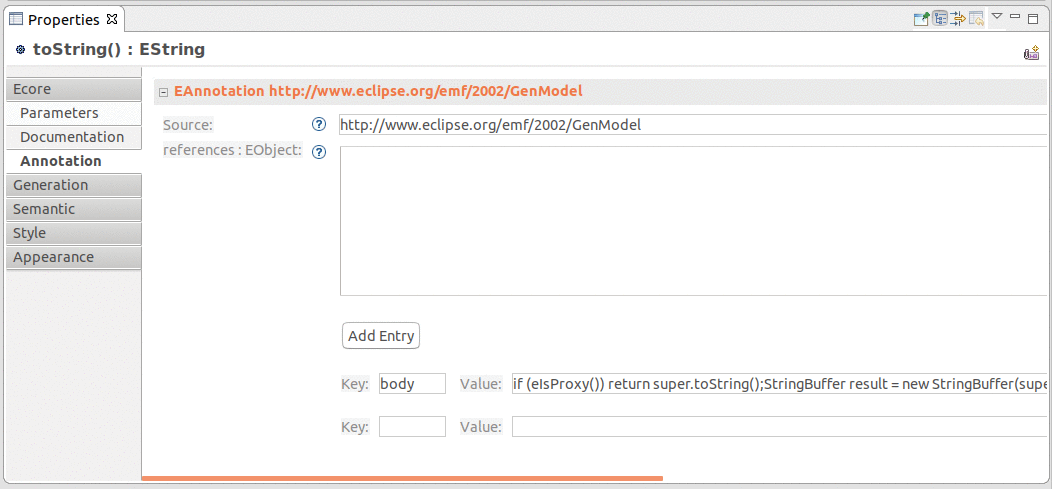
if (eIsProxy()) return super.toString();
        StringBuffer result = new StringBuffer(super.toString());
        result.append("Article: ");
        result.append(name);
        return result.toString();
You can generate methods with input parameter, just add parameters with their type to your Operation.
9. Extending an EMF Ecore model (inheritance)
9.1. Overview
EMF allows to extend existing models via inheritance. The following will define a base model and an extension based on this base model. This can for example be used to extend the Eclipse e4 application model. It will demonstrate how to work with EMF ecore models directly without using the ecore tools.
9.2. Example
Create a new EMF project com.vogella.emf.inheritance . In this project, create a folder called model and in this folder create a new model by selecting on the project just created. Name the model base.ecore. Select EPackage as the basis and maintain the following properties for this package.
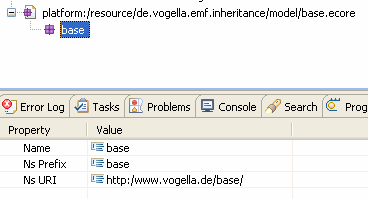
Right-click on the EPackage base and select .
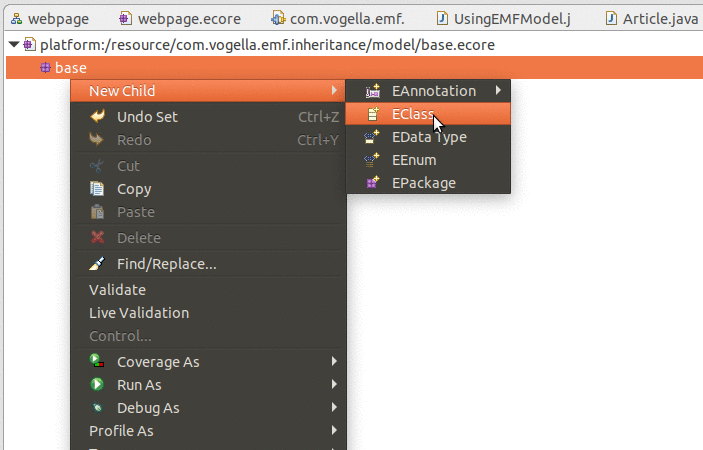
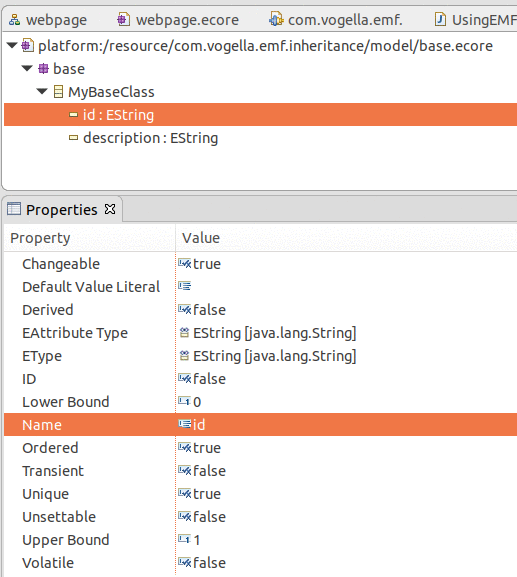
Maintain the class MyBaseClass with two EAttributes id and description of type EString.
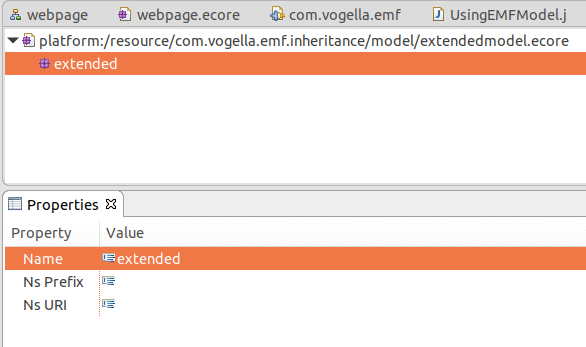
In the model folder, create a new Ecore model extendedmodel.ecore.
Maintain extendedmodel as the EPackage name.
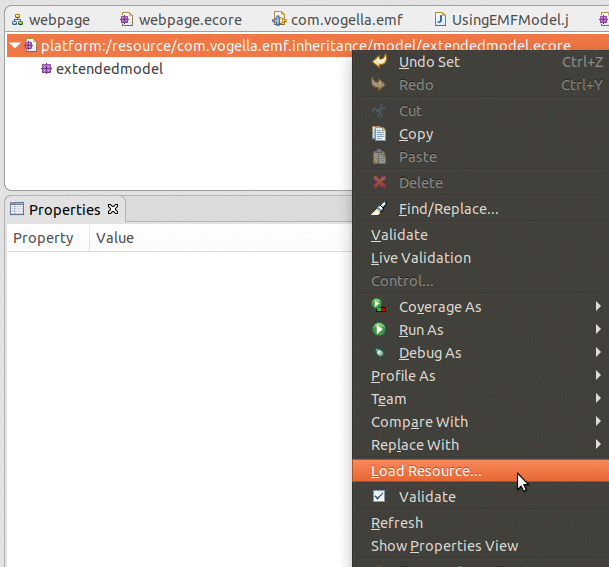
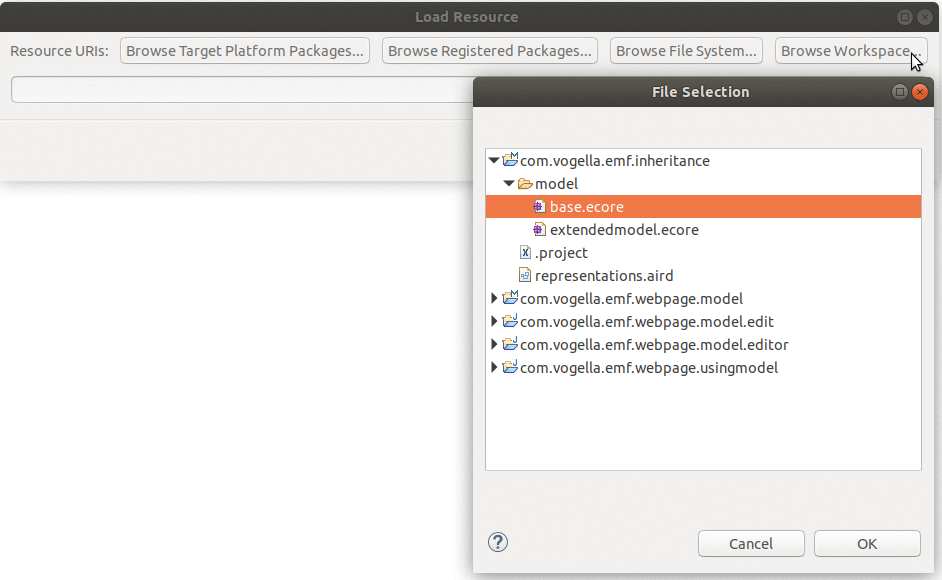
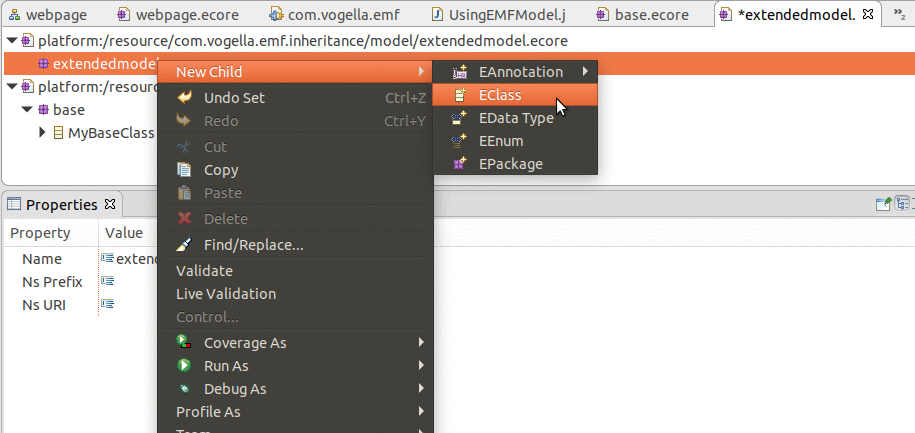
Right-click your model and select Load resource.

Create a new class MyExtendedClass.
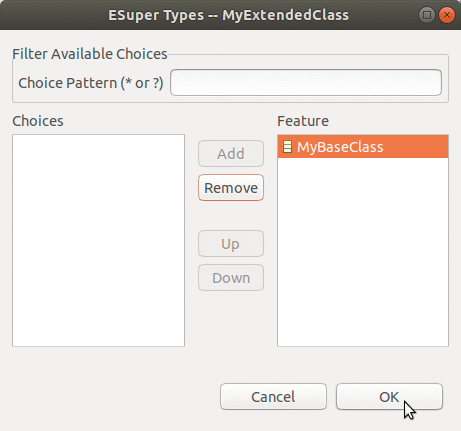
Now set the name and the ESuper Types in the Properties view.

Add your MyBaseClass.
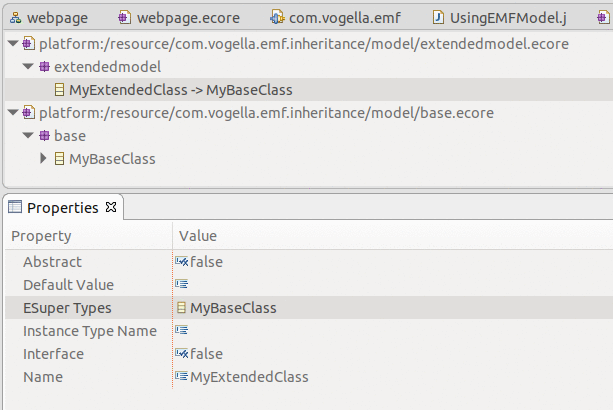
Maintain a new EAtribute detailedField on MyExtendedClass.
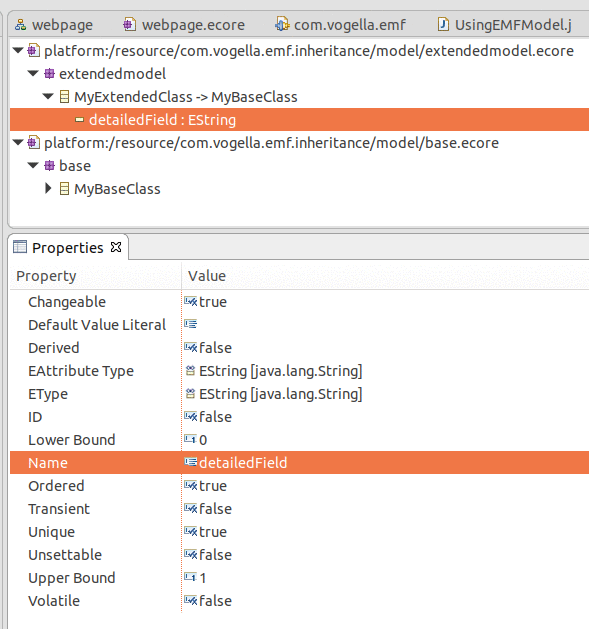
Create a new genmodel extended.genmodel based on extended.ecore. Generated Java code and you will see that the MyExtendedClass has extended MyBaseClass.
10. Setting the empty string as default value
It is not obvious how to set an empty string as a default value for an EMF string attribute. To set an empty string as default value do the following:
-
Select the Attribute
-
In the Property View click into the value field of "Default Value Literal"
-
Do not enter something
To remove this empty value again, click "Restore Default Value" in the toolbar.
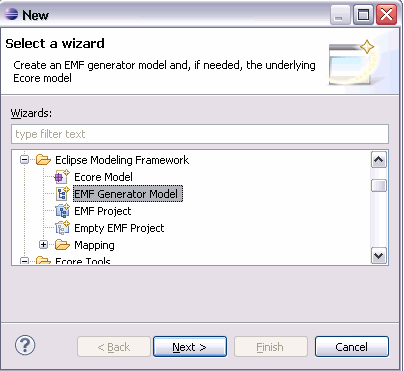
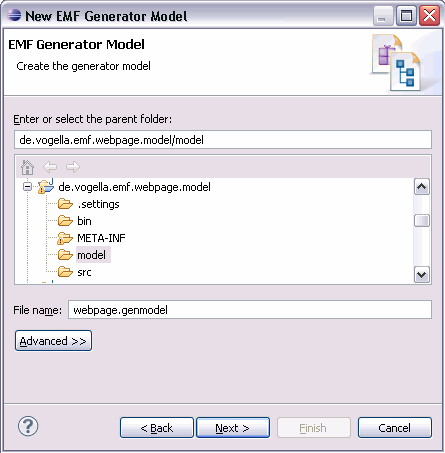
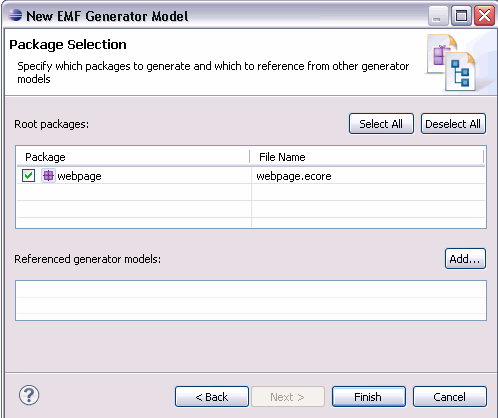
11. Create EMF Generator Model
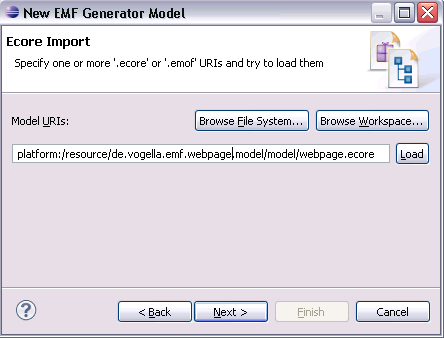
If your EMF genmodel is missing you can create one. Right-click your .ecore file and select . Create the webpage.genmodel file based on your Ecore model.

Select your model and press load.
12. Notifications and Adapters with Adapter and EContentAdapter
EMF has the possibility to inform observers / listeners about changes in the model. You can listen to changes of an individual object and to changes to all objects in a collection.
To test this notification create a new Java Project called com.vogella.emf.notifications.
Create the model based on the following two interfaces and generate the model code from it.
package com.vogella.emf.notifications.model;

import org.eclipse.emf.ecore.EObject;

/**
 * @model
 */
public interface IPerson extends EObject {
    /**
     * @model
     */
    public String getFirstName();

    void setFirstName(String value);
}
package com.vogella.emf.notifications.model;
import org.eclipse.emf.common.util.EList;
import org.eclipse.emf.ecore.EObject;
/**
* @model
* @generated
*/
public interface IPersonList extends EObject {
/**
* @model containment="true"
* @generated
*/
EList<IPerson> getPersons();
} // IPersonListCreate the following to two classes ElementObserver and TotalObserver.
The ElementObserver instance listens to changes of the list (delete, insert items) and an TotalObserver instance listens in addition to changes of the attributes of the elements that are contained in the list.
package com.vogella.emf.notifications.observers;

import model.IPerson;
import model.IPersonList;
import model.ModelFactory;

import org.eclipse.emf.common.notify.Adapter;
import org.eclipse.emf.common.notify.Notification;
import org.eclipse.emf.common.notify.impl.AdapterImpl;

public class ElementObserver {
    private IPersonList persons;

    public ElementObserver() {
        ModelFactory factory = ModelFactory.eINSTANCE;
        persons = factory.createIPersonList();

        Adapter adapter = new AdapterImpl() {
            public void notifyChanged(Notification notification) {
                System.out
                        .println("Notfication received from the data model. Data model has changed!!!");
            }
        };
        persons.eAdapters().add(adapter);
    }

    public void doStuff() {
        ModelFactory factory = ModelFactory.eINSTANCE;
        IPerson person = factory.createIPerson();
        person.setFirstName("Lars");
        System.out.println("I'm adding a person.");
        persons.getPersons().add(person);
        System.out.println("I'm changing a entry");
        persons.getPersons().get(0).setFirstName("Lars2");
    }
}
package com.vogella.emf.notifications.observers;
import model.IPerson;
import model.IPersonList;
import model.ModelFactory;
import org.eclipse.emf.common.notify.Notification;
import org.eclipse.emf.ecore.util.EContentAdapter;
public class TotalObserver {
private IPersonList persons;
public TotalObserver() {
ModelFactory factory = ModelFactory.eINSTANCE;
persons = factory.createIPersonList();
EContentAdapter adapter = new EContentAdapter() {
public void notifyChanged(Notification notification) {
super.notifyChanged(notification);
System.out
.println("Notfication received from the data model. Data model has changed!!!");
}
};
persons.eAdapters().add(adapter);
}
public void doStuff() {
ModelFactory factory = ModelFactory.eINSTANCE;
IPerson person = factory.createIPerson();
person.setFirstName("Lars");
System.out.println("I'm adding a person.");
persons.getPersons().add(person);
System.out.println("I'm changing a entry");
IPerson person2 = persons.getPersons().get(0);
person2.setFirstName("Lars2");
}
}Create a main class to test the different behavior and run the main method.
package main;

import observers.ElementObserver;
import observers.TotalObserver;

public class Main {

    /**
     * @param args
     */
    public static void main(String[] args) {
        ElementObserver observ1 = new ElementObserver();
        observ1.doStuff();
        TotalObserver observ2 = new TotalObserver();
        observ2.doStuff();
    }
}
13. Persisting EMF models via XMI
The Eclipse Modeling Framework (EMF) allows to store the model content via the EMF persistence framework. EMF provides XMI and XML persistence providers. By default, EMF uses XMI (XML Metadata Interchange). XMI is a standard for exchanging metadata via Extensible Markup Language (XML).
The following demonstrates how you create an EMF model instance, save it and load it again.
If you persist an EMF object all dependent objects will automatically be persistent.
Objects which do not have a contains relationship must be added explicitly to the resource.getContents().add().
If objects are not added and not included in a contains relationship an exception is thrown when calling the resource.save() method.
14. Example
The following is based on the earlier EMF model you created. Create a new plug-in project com.vogella.emf.webpage.instance. Add the following dependency to your plugin.xml.
-
org.eclipse.emf.ecore
-
org.eclipse.emf.ecore.xmi
package writeWebpage;

import java.io.IOException;
import java.util.Collections;
import java.util.Map;

import org.eclipse.emf.common.util.URI;
import org.eclipse.emf.ecore.resource.Resource;
import org.eclipse.emf.ecore.resource.ResourceSet;
import org.eclipse.emf.ecore.resource.impl.ResourceSetImpl;
import org.eclipse.emf.ecore.xmi.impl.XMIResourceFactoryImpl;

import datamodel.website.MyWeb;
import datamodel.website.Webpage;
import datamodel.website.WebsiteFactory;
import datamodel.website.WebsitePackage;
import datamodel.website.impl.WebsitePackageImpl;

public class CreateSaveTester {

    /**
     * @param args
     */
    public static void main(String[] args) {
        // Initialize the model
        WebsitePackage.eINSTANCE.eClass();
        // Retrieve the default factory singleton
        WebsiteFactory factory = WebsiteFactory.eINSTANCE;

        // create the content of the model via this program
        MyWeb myWeb = factory.createMyWeb();
        Webpage page = factory.createWebpage();
        page.setName("index");
        page.setDescription("Main webpage");
        page.setKeywords("Eclipse, EMF");
        page.setTitle("Eclipse EMF");
        myWeb.getPages().add(page);

        // As of here we preparing to save the model content

        // Register the XMI resource factory for the .website extension

        Resource.Factory.Registry reg = Resource.Factory.Registry.INSTANCE;
        Map<String, Object> m = reg.getExtensionToFactoryMap();
        m.put("website", new XMIResourceFactoryImpl());

        // Obtain a new resource set
        ResourceSet resSet = new ResourceSetImpl();

        // create a resource
        Resource resource = resSet.createResource(URI
                .createURI("website/My2.website"));
        // Get the first model element and cast it to the right type, in my
        // example everything is hierarchical included in this first node
        resource.getContents().add(myWeb);

        // now save the content.
        try {
            resource.save(Collections.EMPTY_MAP);
        } catch (IOException e) {
            // TODO Auto-generated catch block
            e.printStackTrace();
        }
    }
}
14.1. Load an existing model
The following code can be used to load an existing model.
package writeWebpage;

import java.util.Map;

import org.eclipse.emf.common.util.URI;
import org.eclipse.emf.ecore.resource.Resource;
import org.eclipse.emf.ecore.resource.ResourceSet;
import org.eclipse.emf.ecore.resource.impl.ResourceSetImpl;
import org.eclipse.emf.ecore.xmi.impl.XMIResourceFactoryImpl;

import datamodel.website.MyWeb;
import datamodel.website.WebsitePackage;
import datamodel.website.impl.WebsitePackageImpl;

public class EMFModelLoad {
    public MyWeb load() {
        // Initialize the model
        WebsitePackage.eINSTANCE.eClass();

        // Register the XMI resource factory for the .website extension

        Resource.Factory.Registry reg = Resource.Factory.Registry.INSTANCE;
        Map<String, Object> m = reg.getExtensionToFactoryMap();
        m.put("website", new XMIResourceFactoryImpl());

        // Obtain a new resource set
        ResourceSet resSet = new ResourceSetImpl();

        // Get the resource
        Resource resource = resSet.getResource(URI
                .createURI("website/My.website"), true);
        // Get the first model element and cast it to the right type, in my
        // example everything is hierarchical included in this first node
        MyWeb myWeb = (MyWeb) resource.getContents().get(0);
        return myWeb;
    }

}
You can then access the model content via standard Java coding.
package writeWebpage;

import java.util.Iterator;

import datamodel.website.MyWeb;
import datamodel.website.Webpage;

public class LoadTest {

    /**
     * @param args
     */
    public static void main(String[] args) {
        // Loading the existing model
        EMFModelLoad loader = new EMFModelLoad();
        MyWeb myWeb = loader.load();
        // Accessing the model information
        System.out.println(myWeb.getDescription());
        System.out.println(myWeb.getTitle());
        // Lets see what info the webpage has
        for (Iterator<Webpage> iterator = myWeb.getPages().iterator(); iterator
                .hasNext();) {
            Webpage page = iterator.next();
            System.out.println("Name : " + page.getName());
            // We could iterate over the Articles...
        }
    }
}
15. Appendix: Encryption
EMF has the possibility to encrypt the data model before writing it and to decrypt it before loading. The following demonstrates this.
Create an model based on the following interface.
package mymodel;

import org.eclipse.emf.ecore.EObject;
/**
 * @model
 */
public interface IPerson extends EObject {
    /**
     * @model default="";
     */
    public String getLastname();
}
Create the following factory which sets the option for encryption.
package factory;

import org.eclipse.emf.common.util.URI;
import org.eclipse.emf.ecore.resource.Resource;
import org.eclipse.emf.ecore.resource.impl.AESCipherImpl;
import org.eclipse.emf.ecore.xmi.XMIResource;
import org.eclipse.emf.ecore.xmi.impl.XMIResourceFactoryImpl;

public class MyXMIFactoryImpl extends XMIResourceFactoryImpl {

    @Override
    public Resource createResource(URI uri) {
        XMIResourceFactoryImpl resFactory = new XMIResourceFactoryImpl();
        XMIResource resource = (XMIResource) resFactory.createResource(uri);
        try {
            resource.getDefaultLoadOptions().put(Resource.OPTION_CIPHER,
                    new AESCipherImpl("12345"));
            resource.getDefaultSaveOptions().put(Resource.OPTION_CIPHER,
                    new AESCipherImpl("12345"));
        } catch (Exception e) {
            e.printStackTrace();
        }
        return resource;
    }
}
Create the following test class.
package load;

import java.io.IOException;
import java.util.Collections;
import java.util.Map;

import mymodel.IPerson;
import mymodel.MymodelFactory;
import mymodel.impl.MymodelPackageImpl;

import org.eclipse.emf.common.util.URI;
import org.eclipse.emf.ecore.resource.Resource;
import org.eclipse.emf.ecore.resource.ResourceSet;
import org.eclipse.emf.ecore.resource.impl.ResourceSetImpl;

import factory.MyXMIFactoryImpl;

public class Create {
    public void create() {
        MymodelPackageImpl.init();
        // Retrieve the default factory singleton
        MymodelFactory factory = MymodelFactory.eINSTANCE;

        // create the content of the model via this program
        IPerson person = factory.createIPerson();
        person.setLastname("Lars");

        // Register the XMI resource factory for the .website extension
        Resource.Factory.Registry reg = Resource.Factory.Registry.INSTANCE;
        Map<String, Object> m = reg.getExtensionToFactoryMap();
        m.put("person", new MyXMIFactoryImpl());

        // Obtain a new resource set
        ResourceSet resSet = new ResourceSetImpl();

        // create a resource
        Resource resource = resSet.createResource(URI
        .createURI("mymodel.person"));
        resource.getContents().add(person);

        // now save the content.
            try {
                resource.save(Collections.EMPTY_MAP);
            } catch (IOException e) {
                e.printStackTrace();
            }
    }

    public void load() {
        // Initialize the model
        MymodelPackageImpl.init();
        // Register the XMI resource factory for the .website extension
        Resource.Factory.Registry reg = Resource.Factory.Registry.INSTANCE;
        Map<String, Object> m = reg.getExtensionToFactoryMap();
        m.put("person", new MyXMIFactoryImpl());
        ResourceSet resSet = new ResourceSetImpl();
        Resource resource = resSet.getResource(URI
                .createURI("mymodel.person"), true);
        try {
            IPerson person= (IPerson) resource.getContents().get(0);
            System.out.println(person.getLastname());
        } catch (Exception e) {
            e.printStackTrace();
        }
    }

    public static void main(String[] args){
        Create test = new Create();
        test.create();
        test.load();
    }
}
16. EMF Resources
Eclipse ATL - allows model to model transformation for EMF
16.1. vogella Java example code
If you need more assistance we offer Online Training and Onsite training as well as consulting