Developing Android Widgets. This article describes how to create home screen widgets in Android.
1. Prerequisites
The following description assume that you already have experience in building standard Android application. Please see https://www.vogella.com/tutorials/Android/article.html - Android Tutorial. It also partly uses Android services. You find an introduction into Android Services in https://www.vogella.com/tutorials/AndroidServices/article.html - Android Service Tutorial.
2. Android Widgets
2.2. Home screen widgets
Home screen widgets are broadcast receivers that provide interactive components. They are primarily used on the Android home screen. They typically display some kind of data and allow the user to perform actions with them. For example, a widget can display a short summary of new emails and if the user selects an email, it could start the email application with the selected email.
To avoid confusion with views (that are also called widgets), this text uses the term home screen widgets, if it speaks about widgets.
A widget runs as part of the process of its host. This requires that the widget preserves the permissions of their application.
Widget use RemoteViews to create their user interface.
A RemoteView can be executed by another process with the same permissions as the original application.
This way the widget runs with the permissions of its defining application.
The user interface for a Widget is defined by a broadcast receiver.
This receiver inflates its layout into an object of type RemoteViews.
This object is delivered to Android, which hands it over the home screen application.
2.3. Steps to create a Widget
To create a widget, you:
-
Define a layout file
-
Create an XML file (
AppWidgetProviderInfo) which describes the properties of the widget, e.g., size or the fixed update frequency. -
Create a
BroadcastReceiverwhich is used to build the user interface of the widget. -
Enter the Widget configuration in the AndroidManifest.xml file.
-
Optional you can specify a configuration activity which is called once a new instance of the
widgetis added to the widget host.
2.4. Widget size
Before Android 3.1 a widget always took a fixed amount of cells on the home screen.
A cell is usually used to display the icon of one application.
As a calculation rule you should define the size of the widget with the formula:
((Number of columns / rows) * 74) - 2.
These are device independent pixels and the -2 is used to avoid rounding errors.
As of Android 3.1 a widget
can be flexible in size, e.g., the
user can
make it larger or smaller.
To enable this for widget,
you can use the
android:resizeMode="horizontal|vertical"
attribute in the XML configuration file for the widget.
3. Creating the Broadcast receiver for the widget
3.1. Create and configure widget
To register a widget, you create a broadcast receiver
with an intent
filter for the
android.appwidget.action.APPWIDGET_UPDATE
action.
 <receiver
       android:icon="@drawable/icon"
       android:label="Example Widget"
       android:name="MyWidgetProvider" >
       <intent-filter >
            <action android:name="android.appwidget.action.APPWIDGET_UPDATE" />
       </intent-filter>

       <meta-data
          android:name="android.appwidget.provider"
          android:resource="@xml/widget_info" />
</receiver>
The receiver can get a label and icon assigned. These are used in the list of available widgets in the Android launcher.
You also specify the metadata for the widget
via the
android:name="android.appwidget.provider
attribute. The configuration file referred by this
metadata
contains
the configuration settings for the
widget.
It contains, for example, the
update interface, the size and
the
initial layout of
the widget.
<?xml version="1.0" encoding="utf-8"?>
<appwidget-provider xmlns:android="http://schemas.android.com/apk/res/android"
    android:initialLayout="@layout/widget_layout"
    android:minHeight="72dp"
    android:minWidth="146dp"
    android:updatePeriodMillis="1800000" >

</appwidget-provider>
3.2. Available views and layouts
A widget is restricted in the
View
classes it can use. As layouts you
can
use the
FrameLayout,
LinearLayout
and
RelativeLayout
classes. As views you can use
AnalogClock,
Button,
Chromometer,
ImageButton,
ImageView,
ProgressBar
and
TextView.
As of Android 3.0 more views are available:
GridView,
ListView,
StackView,
ViewFlipper
and
AdapterViewFlipper.
These adapter
views
require that you define a
collection view widget
which is described later in this tutorial.
The only interaction that is possible with the
views
of a
widget
is via
an
OnClickListener event.
This
OnClickListener
can be registered on a widget and is triggered by the user.
3.3. AppWidgetProvider
Your
BroadcastReceiver
implementation
typically
extends the
AppWidgetProvider
class.
The
AppWidgetProvider
class implements the
onReceive()
method, extracts the required information and calls the
following
widget lifecycle methods.
As you can add several instances of a widget to the home screen, you have lifecycle methods that are called only for the first instance added / removed to the home screen and others that are called for every instance of your widget.
| Method | Description |
|---|---|
|
Called the first time an instance of your widget is added to the home screen. |
|
Called once the last instance of your widget is removed from the home screen. |
|
Called for every update of the widget. Contains the IDs of |
|
Widget instance is removed from the home screen. |
3.4. Receiver and asynchronous processing
A widget has the same runtime restrictions as a normal broadcast receiver, i.e., it has only 5 seconds to finish its processing.
A receive (widget) should therefore perform time consuming operations in a service and perform the update of the widgets from the service.
4. Widget updates
A widget
gets its data on a periodic timetable. There are two methods
to update
a widget, one is based on an XML configuration
file and the
other is
based on the Android
AlarmManager
service.
In the widget configuration file you can specify a fixed update interval. The system will wake up after this time interval and call your broadcast receiver to update the widget. The smallest update interval is 1800000 milliseconds (30 minutes).
The
AlarmManager
allows you
to be more resource efficient and to have a higher
frequency
of
updates. To use this approach, you define a service
and schedule this
service
via the
AlarmManager
regularly. This service updates the widget.
Please note that a higher update frequency will wake up the phone from the energy safe mode. As a result your widget consumes more energy.
5. Exercise: widget with fixed update interval
5.1. Target
In the following tutorial you create a widget that displays a random
number. This random number is
updated every 30
minutes.
You also
register an
OnClickListener
so that the widgets updates once the user clicks on it.
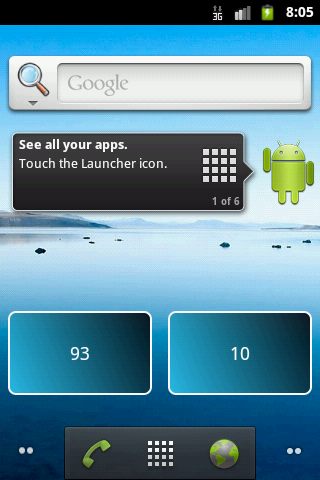
The resulting widget will look like the following.
5.2. Create project and widget implementation
Create a new Android project called
de.vogella.android.widget.example
with an activity
in the package
de.vogella.android.widget.example.
Create a new file myshape.xml in the <filename class="directory">/res/drawable_ folder. This file defines the drawable used as background in the widget.
<?xml version="1.0" encoding="UTF-8"?>
<shape xmlns:android="http://schemas.android.com/apk/res/android"
    android:shape="rectangle" >

    <stroke
        android:width="2dp"
        android:color="#FFFFFFFF" />

    <gradient
        android:angle="225"
        android:endColor="#DD2ECCFA"
        android:startColor="#DD000000" />

    <corners
        android:bottomLeftRadius="7dp"
        android:bottomRightRadius="7dp"
        android:topLeftRadius="7dp"
        android:topRightRadius="7dp" />

</shape>
Define the following widget_layout.xml file under the <filename class="directory">res/layout_ folder.
<?xml version="1.0" encoding="utf-8"?>
<LinearLayout xmlns:android="http://schemas.android.com/apk/res/android"
android:id="@+id/layout"
android:layout_width="match_parent"
android:layout_height="match_parent"
android:layout_margin="8dip"
android:background="@drawable/myshape" >
<TextView
android:id="@+id/update"
style="@android:style/TextAppearance.Medium"
android:layout_width="match_parent"
android:layout_height="match_parent"
android:layout_gravity="center"
android:gravity="center_horizontal|center_vertical"
android:layout_margin="4dip"
android:text="Static Text" >
</TextView>
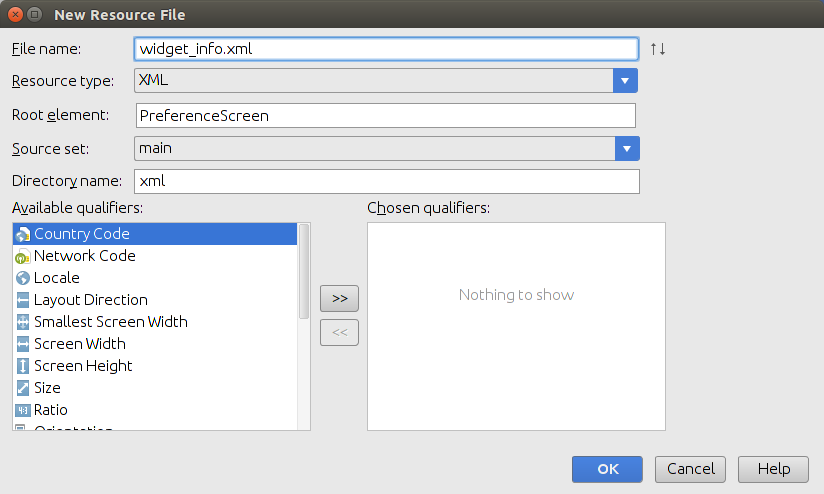
</LinearLayout>Create a new resource file called widget_info.xml via right-click on the res folder and by selecting .
<?xml version="1.0" encoding="utf-8"?>
<appwidget-provider
        xmlns:android="http://schemas.android.com/apk/res/android"
    android:initialLayout="@layout/widget_layout"
    android:minHeight="72dp"
    android:minWidth="300dp"
    android:updatePeriodMillis="300000" >

</appwidget-provider>
Create the following receiver class which is called during updates.
package de.vogella.android.widget.example;

import java.util.Random;

import android.app.PendingIntent;
import android.appwidget.AppWidgetManager;
import android.appwidget.AppWidgetProvider;
import android.content.ComponentName;
import android.content.Context;
import android.content.Intent;
import android.util.Log;
import android.widget.RemoteViews;

public class MyWidgetProvider extends AppWidgetProvider {

    private static final String ACTION_CLICK = "ACTION_CLICK";

    @Override
    public void onUpdate(Context context, AppWidgetManager appWidgetManager,
            int[] appWidgetIds) {

        // Get all ids
        ComponentName thisWidget = new ComponentName(context,
                MyWidgetProvider.class);
        int[] allWidgetIds = appWidgetManager.getAppWidgetIds(thisWidget);
        for (int widgetId : allWidgetIds) {
            // create some random data
            int number = (new Random().nextInt(100));

            RemoteViews remoteViews = new RemoteViews(context.getPackageName(),
                    R.layout.widget_layout);
            Log.w("WidgetExample", String.valueOf(number));
            // Set the text
            remoteViews.setTextViewText(R.id.update, String.valueOf(number));

            // Register an onClickListener
            Intent intent = new Intent(context, MyWidgetProvider.class);

            intent.setAction(AppWidgetManager.ACTION_APPWIDGET_UPDATE);
            intent.putExtra(AppWidgetManager.EXTRA_APPWIDGET_IDS, appWidgetIds);

            PendingIntent pendingIntent = PendingIntent.getBroadcast(context,
                    0, intent, PendingIntent.FLAG_UPDATE_CURRENT);
            remoteViews.setOnClickPendingIntent(R.id.update, pendingIntent);
            appWidgetManager.updateAppWidget(widgetId, remoteViews);
        }
    }
}
Open the AndroidManifest.xml and register your widget similar to the following listing.
<?xml version="1.0" encoding="utf-8"?>
<manifest xmlns:android="http://schemas.android.com/apk/res/android"
    package="de.vogella.android.widget.example"
    android:versionCode="1"
    android:versionName="1.0" >

    <application
        android:icon="@drawable/icon"
        android:label="@string/app_name" >
        <receiver android:name="MyWidgetProvider" >
            <intent-filter >
                <action
                    android:name="android.appwidget.action.APPWIDGET_UPDATE" />
            </intent-filter>

            <meta-data
                android:name="android.appwidget.provider"
                android:resource="@xml/widget_info" />
        </receiver>
    </application>

    <uses-sdk android:minSdkVersion="8" />

</manifest>
This attribute specifies that the
AppWidgetProvider
accepts the
ACTION_APPWIDGET_UPDATE
broadcast and specifies the metadata for the widget.
5.3. Validate
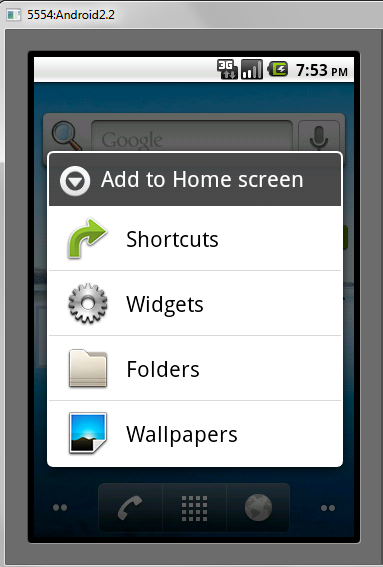
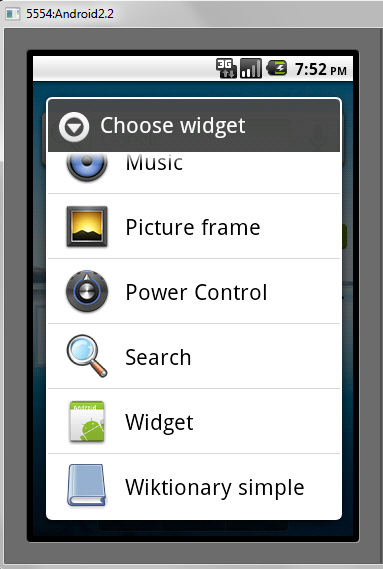
Deploy your application on your Android device. Once your application has been deployed use the Android launcher to install your new widget on the home screen and test it.
6. Collection View Widgets
Collection view widgets
add support for the usage of the
ListView,
StackView
and
GridView
classes in widgets.
For collection view widgets you need two layout files, one for the widget and one for each item in the widget collection.
The widget
items are filled by an instance of the
RemoteViewsFactory
factory class.
This factory class is provided by an Android service
which extends the
RemoteViewsService
class. This service requires the
android.permission.BIND_REMOTEVIEWS
permission.
To connect your views
with the service,
you use your
onUpdate()
method in your widget implementation.
You define an intent
pointing to the service
and use the
setRemoteAdapter
method on the
RemoteViews
class.
Intent intent = new Intent(context, YourRemoteViewsService.class);
intent.putExtra(AppWidgetManager.EXTRA_APPWIDGET_ID, appWidgetId);
views.setRemoteAdapter(
    apppWidgetId,
    R.id.widget_your_id_to_collectionview,
    intent)
7. Enabling a app widget for the lock Screen
Since Android 4.2, it is possible to add home screen app widgets to the lock screen of an Android device.
To enable your widget for the look
screen you need to add
keyguard
category in
the
android:widgetCategory
attribute in the
AppWidgetProviderInfo
XML
file. The following code shows an example.
<appwidget-provider xmlns:android="http://schemas.android.com/apk/res/android"
android:widgetCategory="keyguard|home_screen"
    ...
>
...
</appwidget-provider>
In this example, you declare a widget to support both - the home and the lock screens. If you recompile and launch your application now, you will be able to add the widget to the lock screen already.
You can also detect a widget category at runtime. For this, in the
AppWidgetProvider.onUpdate()
method, you can check for the category
option of a widget with the
following code.
Bundle options = appWidgetManager.getAppWidgetOptions(widgetId);

int category = options.getInt(AppWidgetManager.OPTION_APPWIDGET_HOST_CATEGORY, -1);
boolean isLockScreen = category == AppWidgetProviderInfo.WIDGET_CATEGORY_KEYGUARD;
Using this technique you can decide at runtime whether the widgets your application provides, will look differently, when they are hosted on the lock screen.
Similarly to how you used the
android:initialLayout
attribute for defining
an
initial layout for home screen widgets, you
can use a new
android:initialKeyguardLayout
attribute for the lock screen in the
AppWidgetProviderInfo
XML file. This layout will appear immediately
after a widget is added
and will be replaced by the real layout once the
widget is initialized.
8. Exercise: Update widget via a service
The following will demonstrate the usage of a service to update the widget.
Create the following
UpdateWidgetService
class in your project.
package de.vogella.android.widget.example;

import java.util.Random;

import android.app.PendingIntent;
import android.app.Service;
import android.appwidget.AppWidgetManager;
import android.content.ComponentName;
import android.content.Intent;
import android.os.IBinder;
import android.util.Log;
import android.widget.RemoteViews;

public class UpdateWidgetService extends Service {
    private static final String LOG = "de.vogella.android.widget.example";

    @Override
    public void onStart(Intent intent, int startId) {
        AppWidgetManager appWidgetManager = AppWidgetManager.getInstance(this
                .getApplicationContext());

        int[] allWidgetIds = intent
                .getIntArrayExtra(AppWidgetManager.EXTRA_APPWIDGET_IDS);

//      ComponentName thisWidget = new ComponentName(getApplicationContext(),
//              MyWidgetProvider.class);
//      int[] allWidgetIds2 = appWidgetManager.getAppWidgetIds(thisWidget);

        for (int widgetId : allWidgetIds) {
            // create some random data
            int number = (new Random().nextInt(100));

            RemoteViews remoteViews = new RemoteViews(this
                    .getApplicationContext().getPackageName(),
                    R.layout.widget_layout);
            Log.w("WidgetExample", String.valueOf(number));
            // Set the text
            remoteViews.setTextViewText(R.id.update,
                    "Random: " + String.valueOf(number));

            // Register an onClickListener
            Intent clickIntent = new Intent(this.getApplicationContext(),
                    MyWidgetProvider.class);

            clickIntent.setAction(AppWidgetManager.ACTION_APPWIDGET_UPDATE);
            clickIntent.putExtra(AppWidgetManager.EXTRA_APPWIDGET_IDS,
                    allWidgetIds);

            PendingIntent pendingIntent = PendingIntent.getBroadcast(
                    getApplicationContext(), 0, clickIntent,
                    PendingIntent.FLAG_UPDATE_CURRENT);
            remoteViews.setOnClickPendingIntent(R.id.update, pendingIntent);
            appWidgetManager.updateAppWidget(widgetId, remoteViews);
        }
        stopSelf();

        super.onStart(intent, startId);
    }

    @Override
    public IBinder onBind(Intent intent) {
        return null;
    }
}
Add this class as a
Service
to your
AndroidManifest.xml
file.
<service android:name=".UpdateWidgetService"></service>Change
MyWidgetProvider
to the following. It will now only construct the service and start it.
package de.vogella.android.widget.example;

import android.appwidget.AppWidgetManager;
import android.appwidget.AppWidgetProvider;
import android.content.ComponentName;
import android.content.Context;
import android.content.Intent;
import android.util.Log;

public class MyWidgetProvider extends AppWidgetProvider {

    private static final String LOG = "de.vogella.android.widget.example";

    @Override
    public void onUpdate(Context context, AppWidgetManager appWidgetManager,
            int[] appWidgetIds) {

        Log.w(LOG, "onUpdate method called");
        // Get all ids
        ComponentName thisWidget = new ComponentName(context,
                MyWidgetProvider.class);
        int[] allWidgetIds = appWidgetManager.getAppWidgetIds(thisWidget);

        // Build the intent to call the service
        Intent intent = new Intent(context.getApplicationContext(),
                UpdateWidgetService.class);
        intent.putExtra(AppWidgetManager.EXTRA_APPWIDGET_IDS, allWidgetIds);

        // Update the widgets via the service
        context.startService(intent);
    }
}
Once called, this service will update all widgets. You can click on one of the widgets to update all widgets.
9. Links and literature
9.3. vogella Java example code
If you need more assistance we offer Online Training and Onsite training as well as consulting