This tutorial describes how to integrate update functionality into Eclipse RCP applications using Eclipse p2.
1. Prerequisites
This tutorial assumes that you have a basic understanding of development for the Eclipse platform.
Please see Eclipse RCP development and Eclipse plug-in development for an introduction. It assumes that you know how to create Eclipse feature projects.
2. Eclipse Application Updates with p2
2.1. Eclipse Application Updates
The Eclipse platform offers a robust installation and update mechanism for Eclipse applications known as p2 (short for provisioning platform).
With p2, you can install and update Eclipse applications or individual features using feature projects (often shortened to features). In p2’s terminology, these features are referred to as installable units.
2.2. Creating p2 Update Sites
Installable units can be grouped into a p2 repository, which is a predefined set of files. A p2 update site contains two types of files: artifacts and metadata.
Typically, these files are hosted on a web server, allowing users to install new functionality or upgrades using the p2 mechanism. A p2 repository is known as an update site.
A p2 repository is accessed via a URI that can either point to a local file system or a web server.
If you are building an Eclipse application, creating an update site is essential. The recommended approach (and only reliable way) for creating update sites is by using Maven Tycho.
3. Required plug-ins for updates
The following table lists the core plug-ins and the features that provide the non-user interface functionality of p2.
| Plug-in | Description |
|---|---|
org.eclipse.equinox.p2.core |
Core p2 functionality. |
org.eclipse.equinox.p2.engine |
The engine carries out the provisioning operation. |
org.eclipse.equinox.p2.operations |
Layer over the core and engine API to describe updates as an atomic install. |
org.eclipse.equinox.p2.metadata.repository |
Contains the definition of p2 repositories. |
org.eclipse.equinox.p2.core.feature |
Feature containing the p2 bundles. |
org.eclipse.equinox.p2.touchpoint.natives |
Contains the p2 additions for touchpoints that allow changes to your product configuration |
To use the Eclipse p2 update API you need to include these features or plug-ins into your target platform. You must add the features / plug-ins to your product configuration file.
4. Triggering an update in Eclipse RCP applications
To update your Eclipse RCP application you use the p2 API. To use the p2 API in your code, add the corresponding plug-in or package to the manifest of the plug-in.
5. Exercise: Implementing an application update via p2
In this exercise, you implement an update functionality for an existing product.
It assumes that you :
-
implemented a product called
com.vogella.tasks.productbased on features and plug-ins. -
have configured the command line build via Tycho for your components
5.1. Update your target platform
Add the following entries to your target platform.
        <location includeAllPlatforms="false" includeConfigurePhase="true" includeMode="planner" includeSource="true" type="InstallableUnit">
            <repository location="https://download.eclipse.org/releases/2024-09"/>
            <unit id="org.eclipse.equinox.p2.core.feature.feature.group"/>
        </location>
5.2. Add p2 features to your product
Open your product configuration file and add the following plug-in to the list of the Contents tab.
-
org.eclipse.equinox.p2.core
After adding these features, the Add Required button needs to be clicked so that the required features listed below are available as well.

5.3. Create new plug-in and add dependencies
Create a new simple plug-in called com.vogella.tasks.update.
Add the following as dependencies to its manifest file.

5.4. Create a user interface
Create the following new class which will be used as handler.
package com.vogella.tasks.update.handlers;

import java.net.URI;
import java.net.URISyntaxException;
import org.eclipse.core.runtime.IProgressMonitor;
import org.eclipse.core.runtime.IStatus;
import org.eclipse.core.runtime.OperationCanceledException;
import org.eclipse.core.runtime.Status;
import org.eclipse.core.runtime.jobs.IJobChangeEvent;
import org.eclipse.core.runtime.jobs.Job;
import org.eclipse.core.runtime.jobs.JobChangeAdapter;
import org.eclipse.e4.core.di.annotations.Execute;
import org.eclipse.e4.ui.workbench.IWorkbench;
import org.eclipse.equinox.p2.core.IProvisioningAgent;

import org.eclipse.equinox.p2.operations.ProvisioningJob;

import org.eclipse.equinox.p2.operations.ProvisioningSession;

import org.eclipse.equinox.p2.operations.UpdateOperation;

public class UpdateHandler {

    private static final String REPOSITORY_LOC = System.getProperty("UpdateHandler.Repo", "https://localhost/repository");

    private IWorkbench workbench;

    @Execute
    public void execute(final IProvisioningAgent agent, IWorkbench workbench) {
        this.workbench = workbench;
        Job updateJob = Job.create("Update Job", monitor -> {
            performUpdates(agent, monitor);
        });
        updateJob.schedule();

    }

    private IStatus performUpdates(final IProvisioningAgent agent, IProgressMonitor monitor) {
        // configure update operation
        final ProvisioningSession session = new ProvisioningSession(agent);
        final UpdateOperation operation = new UpdateOperation(session);
        // create uri and check for validity

        URI uri = null;

        try {
            uri = new URI(REPOSITORY_LOC);
        } catch (URISyntaxException e) {
            throw new OperationCanceledException("Invalid repository location");

        }

        operation.getProvisioningContext().setArtifactRepositories(uri);
        operation.getProvisioningContext().setMetadataRepositories(uri);

        // check for updates, this causes I/O

        final IStatus status = operation.resolveModal(monitor);

        // failed to find updates (inform user and exit)

        if (status.getCode() == UpdateOperation.STATUS_NOTHING_TO_UPDATE) {
            return Status.CANCEL_STATUS;
        }

        // run installation
        ProvisioningJob provisioningJob = operation.getProvisioningJob(monitor);

        // updates cannot run from within Eclipse IDE!!!

        if (provisioningJob == null) {
            return Status.CANCEL_STATUS;

        }

        configureProvisioningJob(provisioningJob);
        provisioningJob.schedule();
        return Status.OK_STATUS;

    }

    private void configureProvisioningJob(ProvisioningJob provisioningJob) {

        // register a job change listener to track

        // installation progress and restart application in case of updates

        provisioningJob.addJobChangeListener(new JobChangeAdapter() {
            @Override
            public void done(IJobChangeEvent event) {
                if (event.getResult().isOK()) {
                    workbench.restart();
                }
                super.done(event);
            }
        });
    }
}
Ensure to adjust the REPOSITORY_LOC constant in this code to the actual p2 update site location on your file system.
5.5. Create a new Update menu entry in your application.
Implement a new handler for this menu entry.
5.6. Enter a version in your product configuration file
Ensure that you have entered a version number for the product and to append the ".qualifier" suffix to the product version.

5.7. Create the initial product export
Build your product via the Tycho build system on the command line. If you do not want to use Tycho, you can export your product via the Eclipse Product export link on the Overview tab of the product file.
Do not choose the REPOSITORY_LOC path as destination, this path is later used to place the update site in.
5.8. Start the exported application and check for updates
Start your exported application from the export directory. Check for updates by invoking your update handler. Your handler should give you the feedback that no updates are available.
5.9. Make a change and export the product again
Change a (visible) label in your application, e.g., remove the generated top trimbar. Increment the product version on the overview page of the product editor to indicate a functional change.
Run the Tycho build again or export your product again via the UI. Use a different export folder than you did before. You do not want to override the existing exported application. Make sure to select the Generate metadata repository option on the export dialog. Do not export to the REPOSITORY_LOC path.
In the new export folder you find a sub-folder called repository. Copy this sub-folder to the REPOSITORY_LOC path.
5.10. Update the application
Start your exported application and check again for updates via your menu entry. If everything was implemented correctly, your handler should report that updates are available. Install these updates and restart the application.
| In case your handler does not find the update, restart your application to clear the caches of p2. p2 caches the metadata of an update site via a weak HashMap. As long as the application is running and it has enough memory the information is cached. |
Verify that all updates have been applied.
6. Adding p2 update sites
If you place a p2.inf file beside your product configuration file you can add update sites to your product. The following listing is an example for that.
instructions.configure=\
  addRepository(type:0,location:http${#58}//download.eclipse.org/eclipse/updates/4.5,name:Eclipse Mars Update Site);\
  addRepository(type:1,location:http${#58}//download.eclipse.org/eclipse/updates/4.5,name:Eclipse Mars Update Site);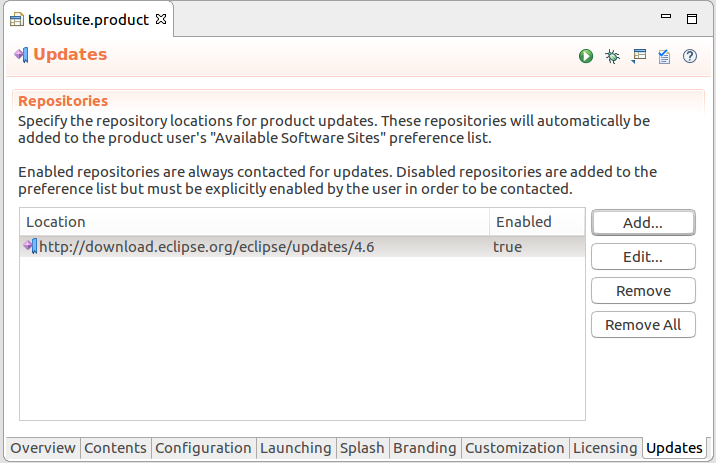
7. Custom install actions (touchpoints) in p2
The Eclipse p2 functionality invokes actions (touchpoints) when an installable unit is installed, configured, or uninstalled. For example, it is possible to unzip or copy artifacts or to set file permissions.
The Eclipse p2 API uses install actions for this, called touchpoints. By default, it supports two touchpoint types, native and OSGi types. Native touchpoint actions are not directly related to Eclipse (such as file commands) while the OSGi ones are Eclipse specific.
It is possible to add custom touchpoint actions via the org.eclipse.equinox.p2.engine.action extension point. The class that implements this touchpoint action must implement ProvisioningAction.
p2 must be instructed to run this touchpoint. For this, you need to specify the action as a requirement via a MetaRequirements section in the META-INF/p2.inf file of the corresponding plug-in. It must define how to invoke the execution of the custom touchpoint.
See https://eclipsesource.com/blogs/2013/05/23/custom-touchpoints-in-p2 for a detailed example.
8. p2 composite repositories
It is possible to create p2 composite repositories. Such a repository wraps the information about other repositories. If a client connects to such an update site, the other update sites are contacted and the user can install features from the other update site.
To build such a composite repository you have to create two files. The first file must be called compositeContent.xml. The second file must be called compositeArtifacts.xml. The following example demonstrates the content of these files.
The following listing is an example for an compositeContent.xml file.
<?xml version='1.0' encoding='UTF-8'?>
<?compositeMetadataRepository version='1.0.0'?>
<repository name='"oclipse development environment"'
type='org.eclipse.equinox.internal.p2.metadata.repository.CompositeMetadataRepository'
version='1.0.0'>
<properties size='1'>
<property name='p2.timestamp' value='1243822502499' />
</properties>
<children size='2'>
<child location='https://download.eclipse.org/releases/luna/'/>
<child location='http://dl.bintray.com/vogellacompany/eclipse-preference-spy/'/>
</children>
</repository>The following listing is an example for a fitting compositeArtifacts.xml file.
<?xml version='1.0' encoding='UTF-8'?>
<?compositeArtifactRepository version='1.0.0'?>
<repository name='"voclipse development environment"'
type='org.eclipse.equinox.internal.p2.artifact.repository.CompositeArtifactRepository'
version='1.0.0'>
<properties size='1'>
<property name='p2.timestamp' value='1243822502440' />
</properties>
<children size='2'>
<child location='https://download.eclipse.org/releases/luna/' />
<child location='http://dl.bintray.com/vogellacompany/eclipse-preference-spy/' />
</children>
</repository>9. Eclipse p2 update resources
9.1. vogella Java example code
If you need more assistance we offer Online Training and Onsite training as well as consulting