Eclipse Dialogs. This article explains the various types of dialogs available for use in Eclipse plug-in development.
1. Dialogs in Eclipse
Eclipse allows you to use dialogs to prompt the user for additional information or provide the user with feedback. The Eclipse platform offers several standard dialogs via SWT and JFace.
2. SWT dialogs
SWT provides an API to use the native dialogs from the OS platform.
The default SWT dialogs are listed below.
-
ColorDialog- for selecting a color -
DirectoryDialog- for selecting a directory -
FileDialog- for selecting a file -
FontDialog- for selecting a font -
MessageBox- for opening a message dialog
The following code demonstrates the usage of the MessageBox class to open a message dialog.
// create a dialog with ok and cancel buttons and a question icon
MessageBox dialog = new MessageBox(shell, SWT.ICON_QUESTION | SWT.OK| SWT.CANCEL);
dialog.setText("My info");
dialog.setMessage("Do you really want to do this?");

// open dialog and await user selection
returnCode = dialog.open();
3. JFace Dialogs
3.1. Dialogs from JFace
JFace contains several frequently used dialogs that are not based on the native dialogs as well as a framework for building custom dialogs.
| Even though JFace dialogs are not native, they follow the native platform semantics for things like the button order. |
3.2. Using the builder API for creating message dialogs
It is possible to use a builder API to create a message dialog.
PlainMessageDialog.getBuilder(shell, "Copied to clipboard").message("Selected task copied to clipboard. Paste in any editor")
                .buttonLabels(List.of("Close")).build().open();
3.3. Using the static helper methods of the JFace MessageDialog class
The MessageDialog class provides static methods to open commonly used dialogs, for example an information or a warning dialog.
The following code demonstrates the usage of these static methods.
// standard message dialogs
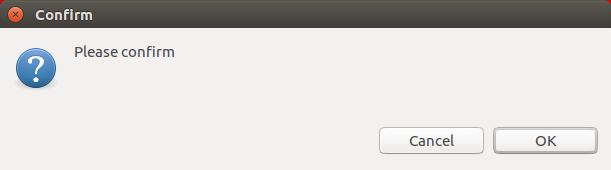
MessageDialog.openConfirm(shell, "Confirm", "Please confirm");
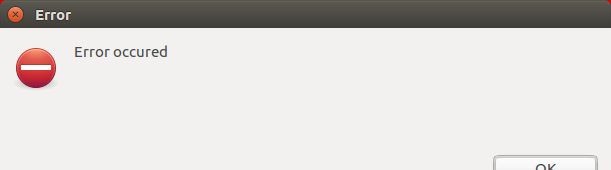
MessageDialog.openError(shell, "Error", "Error occurred");
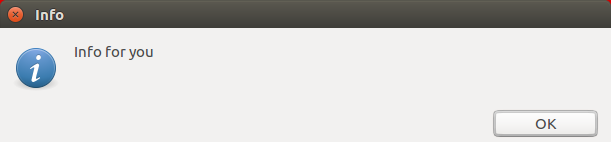
MessageDialog.openInformation(shell, "Info", "Info for you");
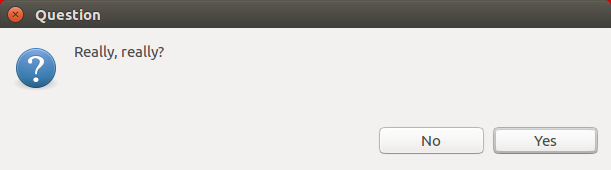
MessageDialog.openQuestion(shell, "Question", "Really, really?");
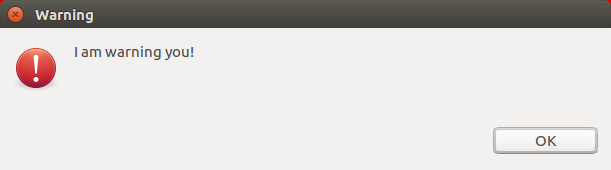
MessageDialog.openWarning(shell, "Warning", "I am warning you!");The resulting dialogs are depicted in the following screenshots.
3.4. Using the JFace MessageDialog class directly
The MessageDialog class allows the customization of the buttons in the dialog.
The following code demonstrates its usage.
// customized MessageDialog with configured buttons
MessageDialog dialog = new MessageDialog(shell, "My Title", null,
    "My message", MessageDialog.ERROR, new String[] { "First",
    "Second", "Third" }, 0);
int result = dialog.open();
System.out.println(result);
If you open this dialog, it looks similar to the following screenshot.
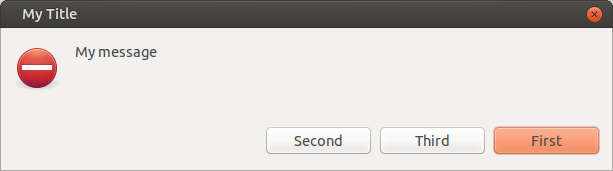
| The display of the default button is platform-dependent; the above screenshot shows it on Linux. |
Several of these dialogs return the user selection, e.g., the openConfirm() method returns true if the user selected the OK button.
The following example code prompts the user for confirmation and handles the result.
boolean result =
    MessageDialog.openConfirm(shell, "Confirm", "Please confirm");

if (result){
 // OK Button selected do something
} else {
 // Cancel Button selected do something
}
3.5. ErrorDialog
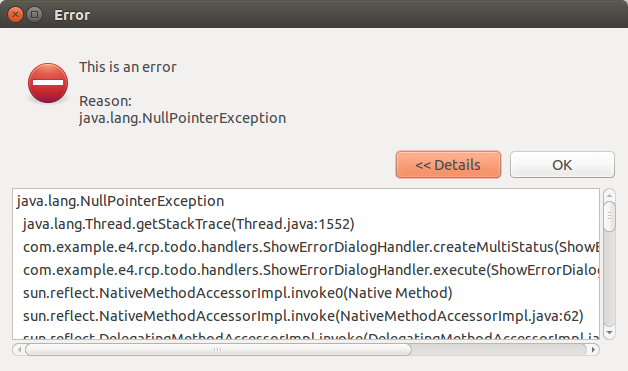
The ErrorDialog class can be used to display one or more errors to the user.
If an error contains additional detailed information then a button is automatically added, which shows or hides this information when pressed by the user.
The following snippet shows a handler class that uses this dialog.
package com.vogella.tasks.ui.handlers;

import java.util.ArrayList;
import java.util.List;

import org.eclipse.core.runtime.IStatus;
import org.eclipse.core.runtime.MultiStatus;
import org.eclipse.core.runtime.Status;
import org.eclipse.e4.core.di.annotations.Execute;
import org.eclipse.e4.ui.model.application.ui.basic.MWindow;
import org.eclipse.jface.dialogs.ErrorDialog;
import org.eclipse.swt.widgets.Shell;

public class ShowErrorDialogHandler {
    @Execute
    public void execute(final Shell shell, MWindow window) {
        // create exception on purpose to demonstrate ErrorDialog
        try {
            String s = null;
            System.out.println(s.length());
        } catch (NullPointerException e) {
            // build the error message and include the current stack trace
            MultiStatus status = createMultiStatus(e.getLocalizedMessage(), e);
            // show error dialog
            ErrorDialog.openError(shell, "Error", "This is an error", status);
        }
    }

    private static MultiStatus createMultiStatus(String msg, Throwable t) {

        List<Status> childStatuses = new ArrayList<>();
        StackTraceElement[] stackTraces = Thread.currentThread().getStackTrace();

        for (StackTraceElement stackTrace: stackTraces) {
            Status status = new Status(IStatus.ERROR,
                    "com.vogella.tasks.ui", stackTrace.toString());
            childStatuses.add(status);
        }

        MultiStatus ms = new MultiStatus("com.vogella.tasks.ui",
                IStatus.ERROR, childStatuses.toArray(new Status[] {}),
                t.toString(), t);
        return ms;
    }
}
If you trigger this handler, the dialog shows the exception messages and allows access to details. The detail page contains the stack trace, as depicted in the following screenshot.
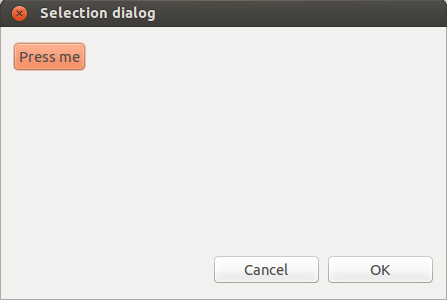
3.6. Creating a custom dialog
The org.eclipse.jface.dialogs.Dialog class can be extended to create your own dialog implementation.
This class creates an area in which you can place controls and it adds a OK and a Cancel button by default.
The method to create these buttons can be overridden if you want to display custom buttons.
Your class needs to implement the createDialogArea() method.
This method receives a Composite that expects to have a GridData object assigned as its layout data.
Via the super.createDialogArea(parent) method call, you can create a Composite to which you can add your controls.
This is demonstrated by the following example code.
package com.vogella.plugin.dialogs.custom;

import org.eclipse.jface.dialogs.Dialog;
import org.eclipse.swt.SWT;
import org.eclipse.swt.events.SelectionAdapter;
import org.eclipse.swt.events.SelectionEvent;
import org.eclipse.swt.graphics.Point;
import org.eclipse.swt.layout.GridData;
import org.eclipse.swt.widgets.Button;
import org.eclipse.swt.widgets.Composite;
import org.eclipse.swt.widgets.Control;
import org.eclipse.swt.widgets.Shell;

public class MyDialog extends Dialog {

    public MyDialog(Shell parentShell) {
        super(parentShell);
    }

    @Override
    protected Control createDialogArea(Composite parent) {
        Composite container = (Composite) super.createDialogArea(parent);
        Button button = new Button(container, SWT.PUSH);
        button.setLayoutData(new GridData(SWT.BEGINNING, SWT.CENTER, false,
                false));
        button.setText("Press me");
        button.addSelectionListener(new SelectionAdapter() {
            @Override
            public void widgetSelected(SelectionEvent e) {
                System.out.println("Pressed");
            }
        });

        return container;
    }

    // overriding this methods allows you to set the
    // title of the custom dialog
    @Override
    protected void configureShell(Shell newShell) {
        super.configureShell(newShell);
        newShell.setText("Selection dialog");
    }

    @Override
    protected Point getInitialSize() {
        return new Point(450, 300);
    }
}
TIP: The example code demonstrates how to set the title of your custom dialog via the configureShell() method.
If you open this dialog it looks similar to the following screenshot.
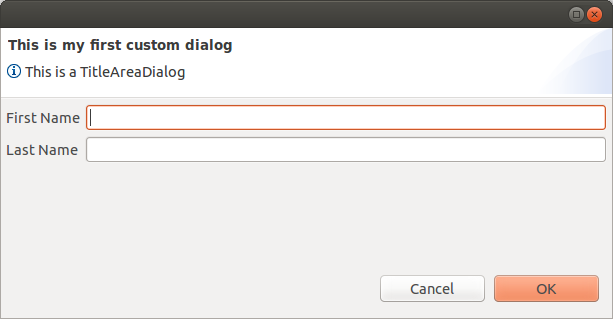
3.7. TitleAreaDialog
You can implement your custom dialog based on the TitleAreaDialog class.
TitleAreaDialog reserves space for providing user feedback.
You can set the text in this space via the setMessage() and setErrorMessage() methods.
The following example shows a custom defined TitleAreaDialog.
package com.vogella.plugin.dialogs.custom;

import org.eclipse.jface.dialogs.IMessageProvider;
import org.eclipse.jface.dialogs.TitleAreaDialog;
import org.eclipse.swt.SWT;
import org.eclipse.swt.layout.GridData;
import org.eclipse.swt.layout.GridLayout;
import org.eclipse.swt.widgets.Composite;
import org.eclipse.swt.widgets.Control;
import org.eclipse.swt.widgets.Label;
import org.eclipse.swt.widgets.Shell;
import org.eclipse.swt.widgets.Text;

public class MyTitleAreaDialog extends TitleAreaDialog {

    private Text txtFirstName;
    private Text lastNameText;

    private String firstName;
    private String lastName;

    public MyTitleAreaDialog(Shell parentShell) {
        super(parentShell);
    }

    @Override
    public void create() {
        super.create();
        setTitle("This is my first custom dialog");
        setMessage("This is a TitleAreaDialog", IMessageProvider.INFORMATION);
    }

    @Override
    protected Control createDialogArea(Composite parent) {
        Composite area = (Composite) super.createDialogArea(parent);
        Composite container = new Composite(area, SWT.NONE);
        container.setLayoutData(new GridData(SWT.FILL, SWT.FILL, true, true));
        GridLayout layout = new GridLayout(2, false);
        container.setLayout(layout);

        createFirstName(container);
        createLastName(container);

        return area;
    }

    private void createFirstName(Composite container) {
        Label lbtFirstName = new Label(container, SWT.NONE);
        lbtFirstName.setText("First Name");

        GridData dataFirstName = new GridData();
        dataFirstName.grabExcessHorizontalSpace = true;
        dataFirstName.horizontalAlignment = GridData.FILL;

        txtFirstName = new Text(container, SWT.BORDER);
        txtFirstName.setLayoutData(dataFirstName);
    }

    private void createLastName(Composite container) {
        Label lbtLastName = new Label(container, SWT.NONE);
        lbtLastName.setText("Last Name");

        GridData dataLastName = new GridData();
        dataLastName.grabExcessHorizontalSpace = true;
        dataLastName.horizontalAlignment = GridData.FILL;
        lastNameText = new Text(container, SWT.BORDER);
        lastNameText.setLayoutData(dataLastName);
    }

    @Override
    protected boolean isResizable() {
        return true;
    }

    // save content of the Text fields because they get disposed
    // as soon as the Dialog closes
    private void saveInput() {
        firstName = txtFirstName.getText();
        lastName = lastNameText.getText();
    }

    @Override
    protected void okPressed() {
        saveInput();
        super.okPressed();
    }

    public String getFirstName() {
        return firstName;
    }

    public String getLastName() {
        return lastName;
    }
}
This dialog is depicted in the following screenshot.
The usage of this dialog is demonstrated in the following code snippet. This code might, for example, be used in a handler.
// more imports
import org.eclipse.jface.window.Window;
import org.eclipse.swt.widgets.Shell;


var dialog = new MyTitleAreaDialog(shell);
// just to demonstrate how to set the title background color
dialog.setTitleAreaColor(Display.getDefault().getSystemColor(SWT.COLOR_DARK_GRAY).getRGB());

// now open the dialog
dialog.create();
if (dialog.open() == Window.OK) {
    System.out.println(dialog.getFirstName());
    System.out.println(dialog.getLastName());
}
NOTE: The title area image and color can be set via the setTitleImage() and setTitleAreaColor() methods, respectively.
3.8. Creating a non-modal / non-blocking dialog
Use the setShellStyle method to create a non-modal dialog.
package com.vogella.tasks.ui.handlers;

import org.eclipse.jface.dialogs.Dialog;
import org.eclipse.swt.SWT;
import org.eclipse.swt.graphics.Point;
import org.eclipse.swt.layout.GridData;
import org.eclipse.swt.widgets.Button;
import org.eclipse.swt.widgets.Composite;
import org.eclipse.swt.widgets.Control;
import org.eclipse.swt.widgets.Shell;

public class MyNonModalDialog extends Dialog {

    public MyNonModalDialog(Shell parentShell) {
        super(parentShell);
        setShellStyle(SWT.CLOSE | SWT.MODELESS | SWT.BORDER | SWT.TITLE);
        setBlockOnOpen(false);
    }

    @Override
    protected Control createDialogArea(Composite parent) {
        Composite container = (Composite) super.createDialogArea(parent);
        Button button = new Button(container, SWT.PUSH);
        button.setLayoutData(new GridData(SWT.BEGINNING, SWT.CENTER, false, false));
        button.setText("Press");
        return container;
    }

    @Override
    protected Point getInitialSize() {
        return new Point(450, 300);
    }
}
4. Selection Dialogs
Eclipse provides several standard selection dialogs in Eclipse 3.x. In Eclipse 3.x you can directly use them; in Eclipse 4.x you may have to copy them into your plug-in and modify them slightly. These dialogs are listed here so that you can use their code as examples.
Here is a list of these dialogs:
-
ElementListSelectionDialog
-
ListDialog
-
ElementTreeSelectionDialog
-
CheckTreeSelectionDialog
For example, ElementListSelectionDialog allows you to select elements from a list where the dialog provides a filter for the elements.
ElementListSelectionDialog dialog =
    new ElementListSelectionDialog(shell, new LabelProvider());
dialog.setElements(new String[] { "Linux", "Mac", "Windows" });
dialog.setTitle("Which operating system are you using");
// user pressed cancel
if (dialog.open() != Window.OK) {
        return false;
}
Object[] result = dialog.getResult();
5. Prerequisites for this tutorial
This tutorial assumes that you have basic understanding of development for the Eclipse platform. Please see Eclipse RCP Tutorial or Eclipse plug-in Tutorial if you need any basic information.
6. Exercise: Use SWT dialogs
The following exercise demonstrates how to use the SWT dialogs.
Create a new Eclipse plug-in project named de.vogella.rcp.dialogs.swt with one part. Create the following class.
package de.vogella.rcp.dialogs.swt;

import org.eclipse.swt.SWT;
import org.eclipse.swt.events.SelectionAdapter;
import org.eclipse.swt.events.SelectionEvent;
import org.eclipse.swt.graphics.FontData;
import org.eclipse.swt.graphics.RGB;
import org.eclipse.swt.widgets.Button;
import org.eclipse.swt.widgets.ColorDialog;
import org.eclipse.swt.widgets.Composite;
import org.eclipse.swt.widgets.DirectoryDialog;
import org.eclipse.swt.widgets.FileDialog;
import org.eclipse.swt.widgets.FontDialog;
import org.eclipse.swt.widgets.MessageBox;
import org.eclipse.swt.widgets.Shell;

public class MyComposite extends Composite {

    public MyComposite(final Composite parent, int style) {
        super(parent, style);
        Button button = new Button(parent, SWT.PUSH);
        button.setText("Press me");
        button.addSelectionListener(new SelectionAdapter() {
            @Override
            public void widgetSelected(SelectionEvent e) {
                Shell shell = parent.getShell();
                openDialogs(shell);
            }
        });

    }

    private void openDialogs(Shell shell) {
        // File standard dialog
        FileDialog fileDialog = new FileDialog(shell);
        // Set the text
        fileDialog.setText("Select File");
        // Set filter on .txt files
        fileDialog.setFilterExtensions(new String[] { "*.txt" });
        // Put in a readable name for the filter
        fileDialog.setFilterNames(new String[] { "Textfiles(*.txt)" });
        // Open Dialog and save result of selection
        String selected = fileDialog.open();
        System.out.println(selected);

        // Directly standard selection
        DirectoryDialog dirDialog = new DirectoryDialog(shell);
        dirDialog.setText("Select your home directory");
        String selectedDir = dirDialog.open();
        System.out.println(selectedDir);

        // Select Font
        FontDialog fontDialog = new FontDialog(shell);
        fontDialog.setText("Select your favorite font");
        FontData selectedFont = fontDialog.open();
        System.out.println(selectedFont);

        // Select Color
        ColorDialog colorDialog = new ColorDialog(shell);
        colorDialog.setText("Select your favorite color");
        RGB selectedColor = colorDialog.open();
        System.out.println(selectedColor);

        // Message
        MessageBox messageDialog = new MessageBox(shell, SWT.ERROR);
        messageDialog.setText("Evil Error has happend");
        messageDialog.setMessage("This is fatal!!!");
        int returnCode = messageDialog.open();
        System.out.println(returnCode);

        // Message with ok and cancel button and info icon
        messageDialog = new MessageBox(shell,
                SWT.ICON_QUESTION |
                SWT.OK
                | SWT.CANCEL);
        messageDialog.setText("My info");
        messageDialog.setMessage("Do it.");
        returnCode = messageDialog.open();
        System.out.println(returnCode);
    }

}
In the method which creates your user interface, add this composite to your part as demonstrated in the following code.
new MyComposite(parent, SWT.NONE);Run the application. If you select your button the dialogs will be displayed.
7. Optional exercise: Add a notification to the application
Use the JFace snippets from https://github.com/eclipse-platform/eclipse.platform.ui/blob/master/docs/JFaceSnippets.md#notification to learn how to add a notification to your application.
For example, add a notification after a new task has been created with the NewTaskHandler.
For this, add org.eclipse.jface.notifications as plug-in dependency to the manifest of the com.vogella.tasks.ui plug-in.
Add the following code to the NewTaskHandler class.
// new import
import org.eclipse.jface.notifications.NotificationPopup;

// more code

// add this code to your execute method at the end
 NotificationPopup.forShell(shell)
                .title("Created a new task", true)
                .delay(2000)
                .text("Task created: " + task.getSummary())
                .build()
                .open();
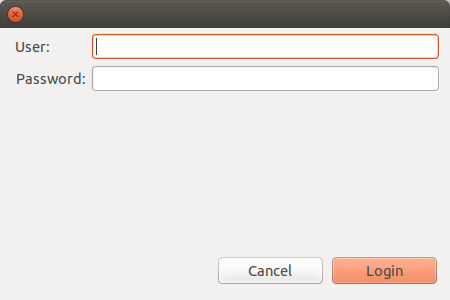
8. Exercise: Create a password dialog
Create a new class called PasswordDialog which extends the Dialog in your com.vogella.tasks.ui plug-in.
This dialog allows users to enter a username and a password.
package com.vogella.tasks.ui.dialogs;

import org.eclipse.jface.dialogs.Dialog;
import org.eclipse.jface.dialogs.IDialogConstants;
import org.eclipse.swt.SWT;
import org.eclipse.swt.graphics.Point;
import org.eclipse.swt.layout.GridData;
import org.eclipse.swt.layout.GridLayout;
import org.eclipse.swt.widgets.Composite;
import org.eclipse.swt.widgets.Control;
import org.eclipse.swt.widgets.Label;
import org.eclipse.swt.widgets.Shell;
import org.eclipse.swt.widgets.Text;

public class PasswordDialog extends Dialog {
    private Text txtUser;
    private Text txtPassword;
    private String user = "";
    private String password = "";

    public PasswordDialog(Shell parentShell) {
        super(parentShell);
    }

    @Override
    protected Control createDialogArea(Composite parent) {
        Composite container = (Composite) super.createDialogArea(parent);
        GridLayout layout = new GridLayout(2, false);
        layout.marginRight = 5;
        layout.marginLeft = 10;
        container.setLayout(layout);

        Label lblUser = new Label(container, SWT.NONE);
        lblUser.setText("User:");

        txtUser = new Text(container, SWT.BORDER);
        txtUser.setLayoutData(new GridData(SWT.FILL, SWT.CENTER, true, false,
                1, 1));
        txtUser.setText(user);
        txtUser.addModifyListener(e -> {
            Text textWidget = (Text) e.getSource();
            String userText = textWidget.getText();
            user = userText;
        });

        Label lblPassword = new Label(container, SWT.NONE);
        GridData gridDataPasswordLabel = new GridData(SWT.LEFT, SWT.CENTER, false,false);
        gridDataPasswordLabel.horizontalIndent = 1;
        lblPassword.setLayoutData(gridDataPasswordLabel);
        lblPassword.setText("Password:");

        txtPassword = new Text(container, SWT.BORDER| SWT.PASSWORD);
        txtPassword.setLayoutData(new GridData(SWT.FILL, SWT.CENTER, true, false));
        txtPassword.setText(password);
        txtPassword.addModifyListener(e -> {
            Text textWidget = (Text) e.getSource();
            String passwordText = textWidget.getText();
            password = passwordText;
        });
        return container;
    }

    // override method to use "Login" as label for the OK button
    @Override
    protected void createButtonsForButtonBar(Composite parent) {
        createButton(parent, IDialogConstants.OK_ID, "Login", true);
        createButton(parent, IDialogConstants.CANCEL_ID, IDialogConstants.CANCEL_LABEL, false);
    }

    @Override
    protected Point getInitialSize() {
        return new Point(450, 300);
    }

    @Override
    protected void okPressed() {
        user = txtUser.getText();
        password = txtPassword.getText();
        super.okPressed();
    }

    public String getUser() {
        return user;
    }

    public void setUser(String user) {
        this.user = user;
    }

    public String getPassword() {
        return password;
    }

    public void setPassword(String password) {
        this.password = password;
    }
}
To use the dialog in your application, create a new menu entry (and a command with a handler) that allows you to open this dialog. The class associated with the handler should be called EnterCredentialsHandler.
package com.vogella.tasks.ui.handlers;

import org.eclipse.e4.core.di.annotations.Execute;
import org.eclipse.jface.window.Window;
import org.eclipse.swt.widgets.Shell;

import com.vogella.tasks.ui.dialogs.PasswordDialog;

public class EnterCredentialsHandler {

    @Execute
    public void execute(
            Shell shell) {
        PasswordDialog dialog = new PasswordDialog(shell);

        // get the new values from the dialog
        if (dialog.open() == Window.OK) {
            String user = dialog.getUser();
            String pw = dialog.getPassword();
        }
    }
}
Ensure that your handler links to the EnterCredentialsHandler class and not to the PasswordDialog.
|
9. Links and literature
9.2. vogella Java example code
If you need more assistance we offer Online Training and Onsite training as well as consulting