Using styles and themes in Android. Developing own services and using system services in Android. This tutorial describes how to create and consume Android services.
1. Android Services
1.1. What are services?
A service is a component that runs in the background without direct interaction with the user. As the service has no user interface, it is not bound to the lifecycle of an activity.
Services are used for repetitive and potentially long running operations, i.e., Internet downloads, checking for new data, data processing, updating content providers and the like.
Services run with a higher priority than inactive or invisible activities and therefore it is less likely that the Android system terminates them. Services can also be configured to be restarted if they get terminated by the Android system once sufficient system resources are available again.
It is possible to assign services the same priority as foreground activities. In this case it is required to have a visible notification active for the related service. It is frequently used for services which play videos or music.
1.2. Services and background processing
By default, a service runs in the same process as the main thread of the application.
Therefore, you need to use asynchronous processing in the
service
to
perform
resource intensive tasks
in
the
background. A
commonly used pattern
for a service implementation is to create and run a new
Thread
in the service to perform the processing in the background and then
to terminate the service once it has finished the
processing.
Services
which run in the process of the application are sometimes
called
local
services.
1.3. Platform service and custom services
The Android platform provides and runs
predefined system services and
every Android application can use
them, given the
right permissions.
These system services are
usually
exposed via
a specific Manager
class. Access to them
can be
gained via
the
getSystemService()
method. The
Context
class defines several constants for accessing these services.
An Android application can, in addition to consuming the existing Android platform services, define and use new services. Defining your custom services allows you to design responsive applications. You can fetch the application data via it and once the application is started by the user, it can present fresh data to the user.
1.4. Starting and defining custom services
Custom services are started from other Android components, i.e., activities, broadcast receivers and other services.
1.5. Foreground services
A foreground service is a service that should have the same priority as an active activity and therefore should not be killed by the Android system, even if the system is low on memory. A foreground service must provide a notification for the status bar, which is placed under the "Ongoing" heading, which means that the notification cannot be dismissed unless the service is either stopped or removed from the foreground.
Notification notification = new Notification(R.drawable.icon, getText(R.string.ticker_text),
        System.currentTimeMillis());
Intent notificationIntent = new Intent(this, ExampleActivity.class);
PendingIntent pendingIntent = PendingIntent.getActivity(this, 0, notificationIntent, 0);
notification.setLatestEventInfo(this, getText(R.string.notification_title),
        getText(R.string.notification_message), pendingIntent);
startForeground(ONGOING_NOTIFICATION_ID, notification);
2. Defining custom services
2.1. Implementation and declaration
A
service
needs to be declared in the
AndroidManifest.xml
file
and the implementing class must extend the
Service
class
or one
of
its subclasses.
The following code shows an example for a service declaration and its implementation.
<service
    android:name="MyService"
    android:icon="@drawable/icon"
    android:label="@string/service_name"
    >
</service>
public class MyService extends Service {
@Override
public int onStartCommand(Intent intent, int flags, int startId) {
//TODO do something useful
return Service.START_NOT_STICKY;
}
@Override
public IBinder onBind(Intent intent) {
//TODO for communication return IBinder implementation
return null;
}
} 2.2. Start a service
An Android component (service, receiver, activity)
can trigger the
execution of a service via
the
startService(intent)
method.
// use this to start and trigger a service
Intent i= new Intent(context, MyService.class);
// potentially add data to the intent
i.putExtra("KEY1", "Value to be used by the service");
context.startService(i);
Alternatively,
you can also start a
service
via the
bindService()
method call. This allows you to communicate directly with the
service.
We discuss that later.
2.3. Service start process and execution
If the
startService(intent)
method is called and the
service is not yet running, the service
object is
created and
the
onCreate()
method of the service is called.
Once the
service
is started, the
onStartCommand(intent)
method in the
service
is called.
It passes in the
Intent
object
from the
startService(intent)
call.
If
startService(intent)
is called while the service
is running, its
onStartCommand()
is also called. Therefore your
service
needs to be prepared that
onStartCommand()
can be called several times.
What if you call this method twice in your code? Do you have to worry about synchronizing the onStartCommand() method call?
No, this method is called by the Android system in the main user interface thread, therefore it cannot be called simultaneously from two different threads.
|
A service is only started once, no matter how often you call the
startService()
method.
2.4. Service restart behavior
In its
onStartCommand()
method call, the service returns an
int
which defines its restart behavior in case the service gets terminated
by the Android platform. You can use the constants, the most common
options are described by the following table.
| Option | Description |
|---|---|
Service.START_STICKY |
Service is restarted if it gets terminated.
Intent data passed to the |
Service.START_NOT_STICKY |
Service is not restarted.
Used for services that are periodically triggered anyway.
The service is only restarted if the runtime has pending |
Service.START_REDELIVER_INTENT |
Similar to Service.START_STICKY but the original |
You can check if the service was restarted via the
Intent.getFlags()
method.
START_FLAG_REDELIVERY
(in case the service was started with
Service.START_REDELIVER_INTENT)
or
START_FLAG_RETRY
(in case the service was started with Service.START_STICKY)
is
passed.
|
2.5. Stopping a service
You
stop
a
service
via the
stopService()
method. No matter how frequently you called the
startService(intent)
method, one
call to the
stopService()
method
stops the service.
A
service
can terminate itself by calling the
stopSelf()
method. This is typically done if the service finishes its work.
3. IntentServices for one time tasks
You can also extend the
IntentService
class for your service implementation.
The
IntentService
is used to perform a certain task in the background. Once
done, the
instance of
IntentService
terminates itself automatically. An example for its usage would be
downloading certain resources from the internet.
The
IntentService
class offers the
onHandleIntent()
method which will be asynchronously called by the Android system.
4. Communication with services
4.1. Options for communication
There are several possibilities for a communication between an activity and a service. The following description discusses the possible approaches and provides recommendation which to use.
4.2. Using Intent data
In a simple scenario no direct communication is required. The service receives the intent data from the starting Android component and performs its work. No notification is necessary. For example, in case the service updates a content provider, the activity is notified by the content provider and no extra step in the service is necessary. This approach works for local and services running in their own process.
4.3. Using receiver
You can use broadcasts and registered receivers for the communication. For example, your activity can register a broadcast receiver for an event and the service sends outs corresponding events. This is a typical scenario, in which the service need to signal to the activity that his processing has finished.
This communication flow is depicted in the following graphic.
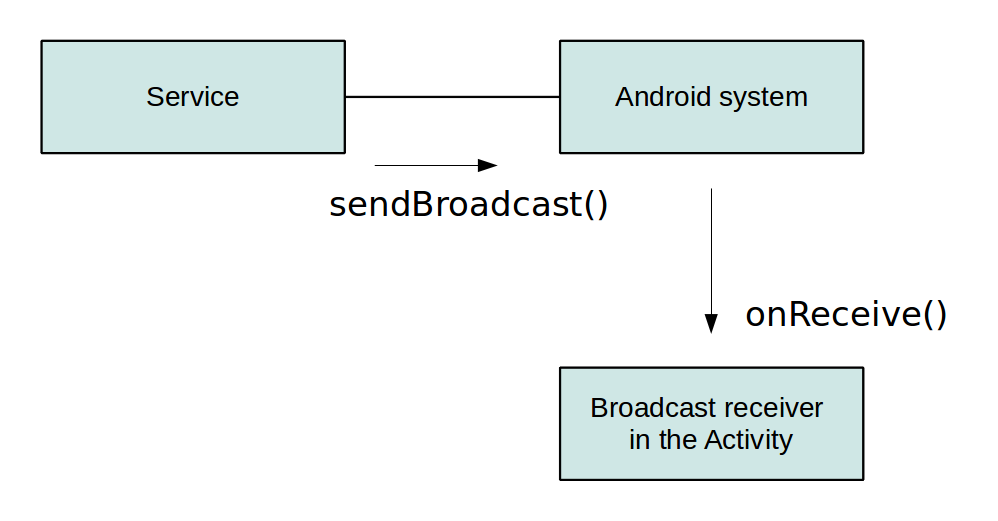
This approach works for local and services running in their own process.
|
Android provides the |
4.4. Activity binding to local service
If the service is started in the same process as the activity, the activity can directly bind to the service. This is a relatively simple and efficient way to communicate and recommended for activities which need to have a fast communication layer with the service.
This approach works for local services.
4.5. Handler and ResultReceiver or Messenger
If the service should be communicating back to the activity, it can receive an object of type Messenger via the Intent data it receives from the activity.
If the Messenger is bound to a Handler in the activity, the service can send objects of type Message to the activity.
A Messenger is parcelable, which means it can be passed to another process and you can use this object to send Messages to the Handler in the activity.
Messenger also provides the method getBinder() that allows passing a Messenger to the activity.
The activity can therefore send Messages to the service.
This approach works for local services running in their own process.
4.6. AIDL for services in a different process
To bind to a service which runs in a different process, you need to use Inter Process Communication (IPC) to community your the data. To do so, you need to create a AIDL file which looks similar to a Java interface, but ends with the .aidl file extension and is only allowed to extend other AIDL files.
This approach is required if you need to bind to a service running in another process, i.e., if your service is consumed by other Android applications.
You can find more information about this approach in the Android developer documentation about AIDL.
5. Scheduling service
See https://www.vogella.com/tutorials/AndroidTaskScheduling/article.html - Android task scheduling to learn how to schedule service periodically.
6. Exercise: Use services and service communication
The following example demonstrates how to use a service to download a file from the Internet based on a button click from an activity. Once done, the service notifies the activity via a broadcast receiver that the download is complete.
In this exercise, you use the IntentService class, as this class provides automatic background processing.
Create a new project called com.vogella.android.service.receiver with the activity called MainActivity.
Create the following class for the service.
package com.vogella.android.service.receiver;

import java.io.File;
import java.io.FileOutputStream;
import java.io.IOException;
import java.io.InputStream;
import java.io.InputStreamReader;
import java.net.URL;

import android.app.Activity;
import android.app.IntentService;
import android.content.Intent;
import android.net.Uri;
import android.os.Bundle;
import android.os.Environment;
import android.os.Message;
import android.os.Messenger;
import android.util.Log;

public class DownloadService extends IntentService {

    private int result = Activity.RESULT_CANCELED;
    public static final String URL = "urlpath";
    public static final String FILENAME = "filename";
    public static final String FILEPATH = "filepath";
    public static final String RESULT = "result";
    public static final String NOTIFICATION = "com.vogella.android.service.receiver";

    public DownloadService() {
        super("DownloadService");
    }

    // will be called asynchronously by Android
    @Override
    protected void onHandleIntent(Intent intent) {
        String urlPath = intent.getStringExtra(URL);
        String fileName = intent.getStringExtra(FILENAME);
        File output = new File(Environment.getExternalStorageDirectory(),
                fileName);
        if (output.exists()) {
            output.delete();
        }

        InputStream stream = null;
        FileOutputStream fos = null;
        try {

            URL url = new URL(urlPath);
            stream = url.openConnection().getInputStream();
            InputStreamReader reader = new InputStreamReader(stream);
            fos = new FileOutputStream(output.getPath());
            int next = -1;
            while ((next = reader.read()) != -1) {
                fos.write(next);
            }
            // successfully finished
            result = Activity.RESULT_OK;

        } catch (Exception e) {
            e.printStackTrace();
        } finally {
            if (stream != null) {
                try {
                    stream.close();
                } catch (IOException e) {
                    e.printStackTrace();
                }
            }
            if (fos != null) {
                try {
                    fos.close();
                } catch (IOException e) {
                    e.printStackTrace();
                }
            }
        }
        publishResults(output.getAbsolutePath(), result);
    }

    private void publishResults(String outputPath, int result) {
        Intent intent = new Intent(NOTIFICATION);
        intent.putExtra(FILEPATH, outputPath);
        intent.putExtra(RESULT, result);
        sendBroadcast(intent);
    }
}
Add this class to the AndroidManifest.xml file. Also add the permission to write to external storage and to access the Internet. The resulting AndroidManifest.xml file should look similar to the following listing.
<?xml version="1.0" encoding="utf-8"?>
<manifest xmlns:android="http://schemas.android.com/apk/res/android"
    package="com.vogella.android.service.receiver"
    android:versionCode="1"
    android:versionName="1.0" >

    <uses-sdk
        android:minSdkVersion="17"
        android:targetSdkVersion="18" />

    <uses-permission android:name="android.permission.INTERNET" />
    <uses-permission android:name="android.permission.WRITE_EXTERNAL_STORAGE" />

    <application
        android:allowBackup="true"
        android:icon="@drawable/ic_launcher"
        android:label="@string/app_name"
        android:theme="@style/AppTheme" >
        <activity
            android:name="com.vogella.android.service.receiver.MainActivity"
            android:label="@string/app_name" >
            <intent-filter>
                <action android:name="android.intent.action.MAIN" />

                <category android:name="android.intent.category.LAUNCHER" />
            </intent-filter>
        </activity>

        <service android:name="com.vogella.android.service.receiver.DownloadService" >
        </service>
    </application>

</manifest>
Change the layout file of your activity to the following.
<?xml version="1.0" encoding="utf-8"?>
<LinearLayout xmlns:android="http://schemas.android.com/apk/res/android"
    android:layout_width="match_parent"
    android:layout_height="match_parent"
    android:orientation="vertical" >

    <Button
        android:id="@+id/button1"
        android:layout_width="wrap_content"
        android:layout_height="wrap_content"
        android:onClick="onClick"
        android:text="Download" />

    <LinearLayout
        android:layout_width="wrap_content"
        android:layout_height="wrap_content" >

        <TextView
            android:layout_width="wrap_content"
            android:layout_height="wrap_content"
            android:text="Status: " />

        <TextView
            android:id="@+id/status"
            android:layout_width="wrap_content"
            android:layout_height="wrap_content"
            android:text="Not started" />
    </LinearLayout>

</LinearLayout>
Change MainActivity to the following.
package com.vogella.android.service.receiver;

import android.app.Activity;
import android.content.BroadcastReceiver;
import android.content.Context;
import android.content.Intent;
import android.content.IntentFilter;
import android.os.Bundle;
import android.view.View;
import android.widget.TextView;
import android.widget.Toast;

public class MainActivity extends Activity {

    private TextView textView;
    private BroadcastReceiver receiver = new BroadcastReceiver() {

        @Override
        public void onReceive(Context context, Intent intent) {
            Bundle bundle = intent.getExtras();
            if (bundle != null) {
                String string = bundle.getString(DownloadService.FILEPATH);
                int resultCode = bundle.getInt(DownloadService.RESULT);
                if (resultCode == RESULT_OK) {
                    Toast.makeText(MainActivity.this,
                            "Download complete. Download URI: " + string,
                            Toast.LENGTH_LONG).show();
                    textView.setText("Download done");
                } else {
                    Toast.makeText(MainActivity.this, "Download failed",
                            Toast.LENGTH_LONG).show();
                    textView.setText("Download failed");
                }
            }
        }
    };

    @Override
    public void onCreate(Bundle savedInstanceState) {
        super.onCreate(savedInstanceState);
        setContentView(R.layout.activity_main);
        textView = (TextView) findViewById(R.id.status);


    }

    @Override
    protected void onResume() {
        super.onResume();
        registerReceiver(receiver, new IntentFilter(
                DownloadService.NOTIFICATION));
    }
    @Override
    protected void onPause() {
        super.onPause();
        unregisterReceiver(receiver);
    }

    public void onClick(View view) {

        Intent intent = new Intent(this, DownloadService.class);
        // add infos for the service which file to download and where to store
        intent.putExtra(DownloadService.FILENAME, "index.html");
        intent.putExtra(DownloadService.URL,
                "https://www.vogella.com/index.html");
        startService(intent);
        textView.setText("Service started");
    }
}
If you run your example and press the button, the download should be performed by the service.
Once done, the user interface is updated and a Toast with the file name is shown.
Change the setting so that the service runs in its own process. Ensure that the application still works, as broadcast receivers are received across process boundaries.
7. Exercise: Define and consume local service
This exercise demonstrates how to bind to a local service from an activity.
The activity binds itself to the service to access its data.
Create a new project called com.vogella.android.localservice with the activity called MainActivity using the Empty Activity template.
Create the following LocalWordService class.
package com.vogella.android.localservice;

import android.app.Service;
import android.content.Intent;
import android.os.Binder;
import android.os.IBinder;

import java.util.ArrayList;
import java.util.Arrays;
import java.util.List;
import java.util.Random;
public class LocalWordService extends Service {
    private final IBinder mBinder = new MyBinder();
    private List<String> resultList = new ArrayList<String>();
    private int counter = 1;

    @Override
    public int onStartCommand(Intent intent, int flags, int startId) {
        addResultValues();
        return Service.START_NOT_STICKY;
    }

    @Override
    public IBinder onBind(Intent intent) {
        addResultValues();
        return mBinder;
    }

    public class MyBinder extends Binder {
        LocalWordService getService() {
            return LocalWordService.this;
        }
    }

    public List<String> getWordList() {
        return resultList;
    }

    private void addResultValues() {
        Random random = new Random();
        List<String> input = Arrays.asList("Linux", "Android","iPhone","Windows7" );
        resultList.add(input.get(random.nextInt(3)) + " " + counter++);
        if (counter == Integer.MAX_VALUE) {
            counter = 0;
        }
    }
}
Register your service in the AndroidManifest.xml file.
<?xml version="1.0" encoding="utf-8"?>
<manifest xmlns:android="http://schemas.android.com/apk/res/android"
          package="com.vogella.android.localservice">

    <application
        android:allowBackup="true"
        android:icon="@mipmap/ic_launcher"
        android:label="@string/app_name"
        android:roundIcon="@mipmap/ic_launcher_round"
        android:supportsRtl="true"
        android:theme="@style/AppTheme">
        <activity android:name=".MainActivity">
            <intent-filter>
                <action android:name="android.intent.action.MAIN"/>

                <category android:name="android.intent.category.LAUNCHER"/>
            </intent-filter>
        </activity>
        <service
            android:name=".LocalWordService"
            android:label="Word service" >
        </service>

    </application>

</manifest>
Change the layout file of the activity similar to the following example.
<?xml version="1.0" encoding="utf-8"?>
<LinearLayout xmlns:android="http://schemas.android.com/apk/res/android"
              android:layout_width="fill_parent"
              android:layout_height="fill_parent"
              android:orientation="vertical" >

    <LinearLayout
        android:layout_width="match_parent"
        android:layout_height="match_parent"
        android:orientation="horizontal"
        >
        <Button
            android:id="@+id/updateList"
            android:layout_width="wrap_content"
            android:layout_height="wrap_content"
            android:layout_weight="1"
            android:onClick="onClick"
            android:text="Update the list"
            >
        </Button>
        <Button
            android:id="@+id/triggerServiceUpdate"
            android:layout_width="wrap_content"
            android:layout_height="wrap_content"
            android:layout_weight="1"
            android:onClick="onClick"
            android:text="Trigger service"
            >
        </Button>


    </LinearLayout>

    <ListView
        android:id="@id/android:list"
        android:layout_width="match_parent"
        android:layout_height="wrap_content" >
    </ListView>

</LinearLayout>
Change your activity class to the following code.
package com.vogella.android.localservice;

import android.app.ListActivity;
import android.content.ComponentName;
import android.content.Context;
import android.content.Intent;
import android.content.ServiceConnection;
import android.os.Bundle;
import android.os.IBinder;
import android.view.View;
import android.widget.ArrayAdapter;
import android.widget.Toast;

import java.util.ArrayList;
import java.util.List;

public class MainActivity extends ListActivity implements ServiceConnection {
    private LocalWordService s;

    @Override
    public void onCreate(Bundle savedInstanceState) {
        super.onCreate(savedInstanceState);
        setContentView(R.layout.activity_main);
        wordList = new ArrayList<String>();
        adapter = new ArrayAdapter<String>(this, android.R.layout.simple_list_item_1, android.R.id.text1, wordList);

        setListAdapter(adapter);
    }

    @Override
    protected void onResume() {
        super.onResume();
        Intent intent= new Intent(this, LocalWordService.class);
        bindService(intent, this, Context.BIND_AUTO_CREATE);
    }

    @Override
    protected void onPause() {
        super.onPause();
        unbindService(this);
    }

    private ArrayAdapter<String> adapter;
    private List<String> wordList;

    public void onClick(View view) {
        switch (view.getId()) {
            case R.id.updateList:
                if (s != null) {
                    Toast.makeText(this, "Number of elements" + s.getWordList().size(),
                            Toast.LENGTH_SHORT).show();
                    wordList.clear();
                    wordList.addAll(s.getWordList());
                    adapter.notifyDataSetChanged();
                }
                break;
            case R.id.triggerServiceUpdate:
                Intent service = new Intent(getApplicationContext(), LocalWordService.class);
                getApplicationContext().startService(service);
                break;
        }
    }

    @Override
    public void onServiceConnected(ComponentName name, IBinder binder) {
        LocalWordService.MyBinder b = (LocalWordService.MyBinder) binder;
        s = b.getService();
        Toast.makeText(MainActivity.this, "Connected", Toast.LENGTH_SHORT).show();
    }

    @Override
    public void onServiceDisconnected(ComponentName name) {
        s = null;
    }
}
Run your application. Via your buttons you can update your list or tell the service to fetch more data.
8. Links and literature
8.1. Android Resources
include::../10_Include/sourcejava.adoc[]
If you need more assistance we offer Online Training and Onsite training as well as consulting