This tutorial shows how to setup and use SpringBootAdmin.
1. SpringBootAdmin
SpringBootAdmin is a deployable web application that lets you monitor any Spring (Boot) application in real time. A SpringBoot application can register itself with a central server. This server provides a UI that shows many different metrics.
In this tutorial you will learn how to deploy a SpringBootAdmin (also referred to as SBA) application and connect clients to it.
2. Setup
The core functionality of SpringBootAdmin consists of a client and a server library. Both have to be imported into separate applications.
It’s advisable to use a standalone application as the server only serves the purpose of SpringBootAdmin and nothing else.
This tutorial will use the Spring Tools.
2.1. Server
Start by creating a new spring boot project. You can use https://start.spring.io/ as a quick start.
This example project uses Gradle, Java 8+ and SpringBoot 2.1.2.
Chose com.vogella as the group name.
The artifact should be called spring-boot-admin.
SpringBootAdmin is capable of using both servlets and the reactor library. Chose one and add it to the dependencies.
Your selection should now look similar to this:
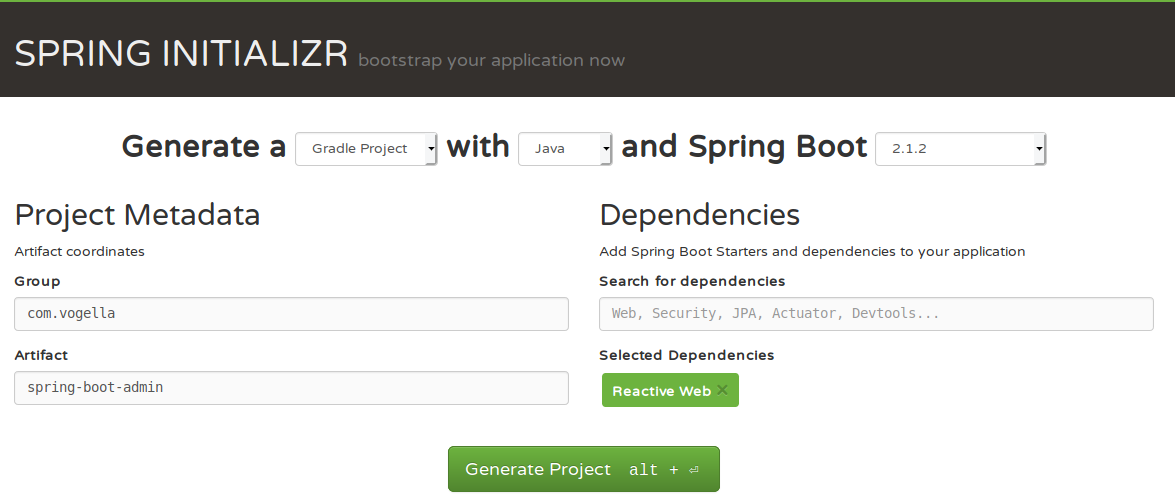
Download the generated project via Generate Project and import it into Spring Tools as a Gradle project.
Add the SpringBootAdmin dependency to build.gradle.
implementation group: 'de.codecentric', name: 'spring-boot-admin-starter-server', version: '2.1.2'Refresh the project with a right-click on the project: .
Configure the application to start as a SpringBootAdmin server.
This is as simple as adding the annotation @EnableAdminServer to SpringBootAdminApplication.java.
package com.vogella.springbootadmin;

import org.springframework.boot.SpringApplication;
import org.springframework.boot.autoconfigure.SpringBootApplication;
import de.codecentric.boot.admin.server.config.EnableAdminServer;

@EnableAdminServer
@SpringBootApplication
public class SpringBootAdminApplication {

    public static void main(String[] args) {
        SpringApplication.run(SpringBootAdminApplication.class, args);
    }
}| If you get any compilation errors double check if Gradle actually refreshed the project by checking the Gradle console output. |
Lastly is it advisable to change the port of the server.
The standard port for spring boot servers is 8080.
To avoid collision with any other SpringBoot application change the port in application.properties in src/main/resources:
server.port=9999To validate if your setup works right-click on the project and select . This should start the application at https://localhost:9999/. You can leave this running as you will register the client application in the next part.
2.2. Clients
Any SpringBoot application can be a SpringBootAdmin client.
Add the following dependency to the build.gradle file of the project you want to monitor:
implementation group: 'de.codecentric', name: 'spring-boot-admin-starter-client', version: '2.1.2'| Keep in mind that there are version constraints by SpringBootAdmin. The version of the client dependency should match the version of the server. |
Again, refresh the project by clicking .
To configure where the client can reach the monitoring server add the following to your application.properties:
spring.boot.admin.client.url=https://localhost:9999
management.endpoints.web.exposure.include=*
This tells the client where to register and that every management endpoint should be open for monitoring.
| You should carefully consider which monitoring endpoints you want to expose as they can expose sensitive data. |
Now start the client (and the server if it is not already running).
Navigate to https://localhost:9999/. You should see something like this:
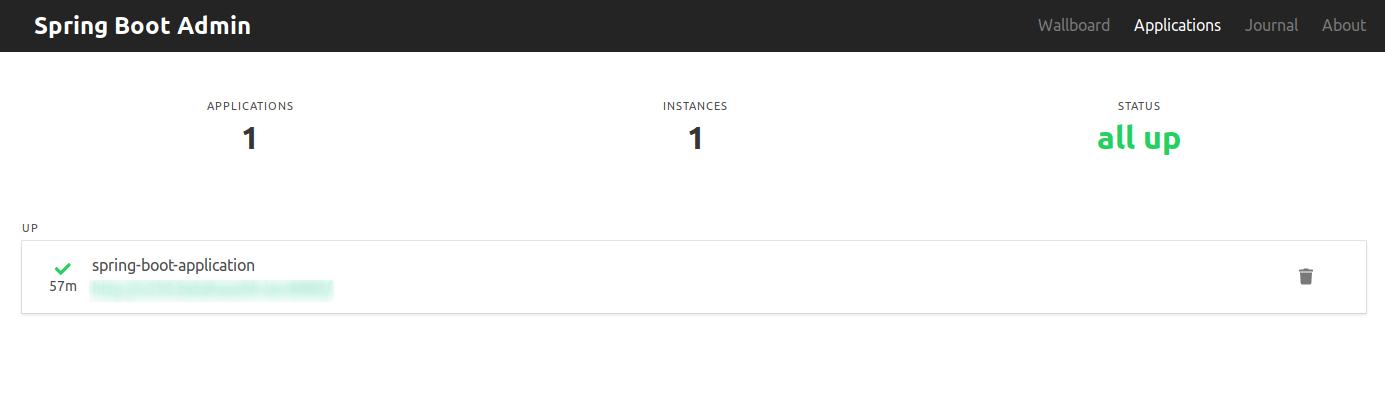
All registered applications should show up here.
| If you do not see the application, check for errors in the clients console output. |
3. Security
To show meaningful data SpringBootAdmin needs access to sensitive metric endpoints. Currently, these are not secured and could be accessed by anyone.
To prevent this we can use SpringSecurity. This is a project developed by the Spring developers that provides the ability to fine tune any web related security setting.
3.1. Setup
To secure your monitoring setup it is advisable to add the SpringSecurity dependency to both the server and the clients.
3.1.1. Server
First we will focus on securing the server application.
Add the following dependency to your build.gradle.
implementation group: 'org.springframework.boot', name: 'spring-boot-starter-security', version: '2.1.2.RELEASE'
Make sure that your SpringBoot version matches the version of the spring-boot-starter-security
|
Refresh your Gradle project to fetch the new dependencies.
Create a new class WebSecurityConfig in the same package your SpringBootAdminApplication is in.
Use the following configuration:
@Configuration
public class WebSecurityConfig extends WebSecurityConfigurerAdapter {

    @Override
    protected void configure(HttpSecurity http) throws Exception {

        http
            .formLogin()
            .loginPage("/login")
            .permitAll();
        http
            .logout().logoutUrl("/logout").permitAll();
        http.csrf()
            .ignoringAntMatchers("/actuator/**", "/instances/**", "/logout");
        http
            .authorizeRequests()
            .antMatchers("/**/*.css", "/assets/**", "/third-party/**", "/logout", "/login")
            .permitAll();
        http
            .authorizeRequests()
            .anyRequest()
            .authenticated();
        http.httpBasic(); // Activate Http basic Auth for the server
    }
}
This will configure your application to have a login page. It will also prevent unauthenticated users from accessing any sensitive data.
You will also need to add an initial user to access the pages.
Add the following to application.properties:
spring.security.user.name=admin
spring.security.user.password=test| For projects that use version control (like git) it is advisable to set passwords with environment variables. |
3.1.2. Clients
If you start your client application now it will fail to register. This is because the clients need to provide authentication to the server as well.
We can provide these credentials in the application.properties file:
spring.boot.admin.client.username=admin
spring.boot.admin.client.password=test
These credentials are the same you configured during the server setup.
Your application should now register itself successfully.
3.2. Other configuration
3.2.1. Management Server Port
It can be useful to run the management endpoints on a different port than the client application.
This can be done via the management.server.port property:
management.server.port=8081Now you could manually deny access to the management port if the server and the client run on the same server.
3.2.2. Path of Actuator
If you want to hide the actuator from discovery you can change the default management path.
Use the property management.endpoints.web.base-path for this.
4. Configuration
The following section explains useful configuration options.
4.1. Server
As the server is essentially a SpringBoot app you could do the standard SpringBoot configuration. However it is recommended to just do the basic security as anything other would require you to rebuild the SpringBootAdmin server.
There are some customization options you can use:
4.1.1. Branding
Change the page title: spring.boot.admin.ui.title=SpringBootAdmin
Navigation bar branding: spring.boot.admin.ui.brand=SpringBootAdmin.
You can also use custom HTML here (such as an image).
4.1.2. Context Path
Running the application under another path requires setting the spring.boot.admin.context-path property.
4.1.3. Status Life Time
Some systems restart frequently and they are intended to be down a few seconds.
If you only want to be notified once a service is down for more than 10 seconds (the default) set the spring.boot.admin.monitor.status-lifetime property.
4.2. Client
4.2.1. Name
Change the name of the application that is displayed in the servers dashboard:
spring.boot.admin.client.instance.name=spring-boot-application4.2.2. Enable/Disable the Client
Disable the client (useful if you do not want it to run in the development profile):
spring.boot.admin.client.enabled=false5. Notifications
SpringBootAdmin supports sending out notifications to different platforms. These include email, Slack, HipChat, Discord, MSTeams, LetsChat, Opsgenie, Telegram and PagerDuty.
By default, SpringBootAdmin will send out notifications upon state changes (e.g., a client is down) once a channel is configured.
5.1. Email
| You will need access to an email server |
The email sending is done via the SpringBoot email starter package.
Add the dependency to your build.gradle file and refresh your gradle after that:
implementation 'org.springframework.boot:spring-boot-starter-mail'This will add all the necessary libraries to your project.
Now you need to configure a JavaMailSender.
SpringBoot can do this for your from properties.
You just need to set the mail servers host and port:
spring.mail.host=localhost
spring.mail.port= 6784
Change these values to your setup.
Some mail servers require authentication.
These can be set via the spring.mail.username and spring.mail.password properties.
For more information see https://docs.spring.io/spring/docs/5.1.5.RELEASE/spring-framework-reference/integration.html#mail and https://docs.spring.io/spring-boot/docs/current/reference/html/boot-features-email.html.
|
Now provide the recipients email addresses:
spring.boot.admin.notify.mail.to=webmaster@vogella.com,status@vogella.comThis can be a comma separated list of multiple addresses or just one address.
Restart your server and wait for it to fully come back online. Than shut down your client application to check if the server sent out an email.
6. SpringBootAdmin resources
6.1. vogella Java example code
If you need more assistance we offer Online Training and Onsite training as well as consulting