Spring Boot is a rapid application development platform built on top of the popular Spring Framework.
1. Spring Boot
Spring Boot is an opinionated framework built on top of the Spring Framework.
You can find out more about the Spring framework and its modules in our Spring tutorial.
Spring typical requires a lot of configuration. Spring Boot simplifies this setup by providing defaults for many features. You can still adjust the defaults according to your needs.
Spring Boot is mostly used to create web applications but can also be used for command line applications.
A Spring Boot web application can be built to a stand-alone JAR.
This JAR contains an embedded web server that can be started with java -jar.
Spring Boot provides selected groups of auto configured features and dependencies, which makes it faster to get started.
2. Download and installation of the Spring Tool Suite
The Spring Tool Suite (STS) can be downloaded from the Spring tools site
After the download unpack it and STS is ready to be started. The latest STS release contains a runtime Java, so no additional installation is required.
Issue with the tooling can be reported here: https://github.com/spring-projects/sts4 Nightly builds are available here: https://dist.springsource.com/snapshot/STS4/nightly-distributions.html
3. Example: Create your first Spring Boot application
In this exercise, you create a starter Spring Boot webapplication using the Gradle build system. Later exercises will extend this application. The final version of this application will allow users to submit issues.
3.1. Create application
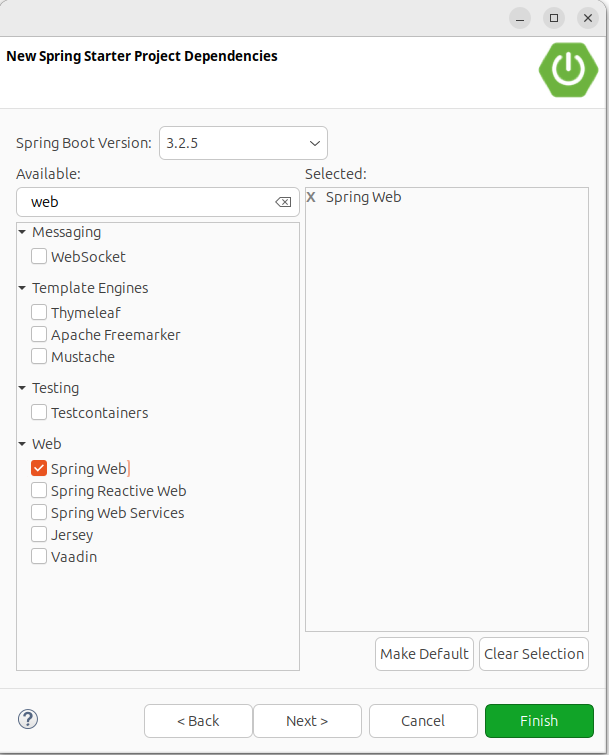
Click on to open the spring project creation wizard.
Use com.vogella.spring.issues as name and select values similar to the following screenshot.

Add Spring Web and the second page and press Finish.
| You can also create your project with the online wizard and import it into your favorite IDE. |
Three folders were automatically created:
-
src/main/java- used to save all java source files -
src/main/resources- used for templates and any other files -
src/main/test- used for tests
3.2. Adjust the generated code
Open your project and create a new Java class named HelloWorldController.java in the com.vogella.spring.issues package of the src/main/java folder:
package com.vogella.spring.issues;

import org.springframework.web.bind.annotation.GetMapping;
import org.springframework.web.bind.annotation.RestController;


@RestController
public class HelloWorldController {

    @GetMapping("/")
    String index() {
        return "Hello, World!";
    }

}
3.3. Start application
Right-click on the Application class and select .
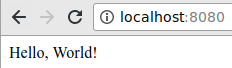
The embedded server starts listening on port 8080.
When you point your browser to https://localhost:8080 you should see the welcome message:
4. Exercise - Building the base for an issue tracking web application
In this exercises you extend the application you created earlier.
4.1. Configuring Spring Boot for web based applications
This application will use additional Java libraries. These libraries serve the following purpose:
-
Thymeleaf:: Thymeleaf is a powerful template processing engine for the Spring framework.
-
Spring Boot Devtools:: The Spring Boot Devtools automatically recompiles and redeploys the app upon saving and provide additional development experience enhancements
-
Spring Data JPA:: Spring Data JPA makes it easy to implement JPA based repositories and build Spring-powered applications that use data access technologies.
-
H2:: H2 is a Java SQL database. It’s a lightweight database that can be run in-memory.
To make these libraries available, open the build.gradle file in the root folder of the project.
Add the following to the section 'dependencies'.
    implementation('org.springframework.boot:spring-boot-starter-thymeleaf')
    implementation('org.springframework.boot:spring-boot-starter-data-jpa')
    runtime('org.springframework.boot:spring-boot-devtools')
    runtime('com.h2database:h2')
Afterwards, right-click on your project and select .
|
You can activate auto-refresh for Gradle dependencies. This will automatically synchronize your project, if you change your Gradle dependencies. img:sts-gradle-automatic-project-sync.png[] |
4.2. Validate
Your build.gradle should now look similar to the following.
| Your versions might be different. |
plugins {
    id 'org.springframework.boot' version '2.3.0.RELEASE'
    id 'io.spring.dependency-management' version '1.0.9.RELEASE'
    id 'java'
}

group = 'com.vogella'
version = '0.0.1-SNAPSHOT'
sourceCompatibility = '14'

repositories {
    mavenCentral()
}

dependencies {
    implementation 'org.springframework.boot:spring-boot-starter-web'
    implementation('org.springframework.boot:spring-boot-starter-thymeleaf')
    implementation('org.springframework.boot:spring-boot-starter-data-jpa')
    runtime('org.springframework.boot:spring-boot-devtools')
    runtime('com.h2database:h2')
    testImplementation('org.springframework.boot:spring-boot-starter-test') {
        exclude group: 'org.junit.vintage', module: 'junit-vintage-engine'
    }
}

test {
    useJUnitPlatform()
}
4.3. Start application
If another web application is already running on the same port, you need to stop it first.
Start your application with right-click on your project .
4.4. Test reload
Since we have the dev-tools dependency added to the project we can use its live-reload functionality.
Without any further configuration it reloads the application every time you save a file in the project.
Change the "Hello, World!" in your HelloWorldController class to something else. Save and reload the application in your web browser. The message returned by the web application should have changed.
5. Exercise - Creating a web @Controller
Create a new package with the name com.vogella.spring.issues.controller in the src/main/java folder.
In there, create the following Class IssueController.
package com.vogella.spring.issues.controller;

import org.springframework.web.bind.annotation.GetMapping;
import org.springframework.web.bind.annotation.PostMapping;
import org.springframework.web.bind.annotation.RestController;

@RestController                   // (1)
public class IssueController {

    @GetMapping("/issuereport") // (2)
    public String getReport() { // (3)
        return "issues/issuereport_form";
    }

    @PostMapping("/issuereport") // (4)
    public String submitReport() { // (5)
        return "issues/issuereport_form";
    }

    @GetMapping("/issues")
    public String getIssues() {  // (6)
        return "issues/issuereport_list";
    }
}
This class contains the methods responsible for handling incoming web requests.
| 1 | The @RestController annotation on the class tells the Spring framework that this class is a controller and that all its request mapping methods assume a @ResponseBody by default |
| 2 | The @GetMapping annotation on the method defines that the method handles GET requests. |
| 3 | The getReport() method later will return the base form template in which the user can submit the issue they found.
Right now it only returns a string, the functionality will be added later. |
| 4 | The @PostMapping annotation signals that this method handles POST requests.
It gets called when a POST request is received. |
| 5 | The submitReport() method is responsible for handling the user input after submitting the form.
When the data is received and handled (e.g., added to the database), this method returns the same issuereport template from the first controller method. |
| 6 | the getIssues() method will handle the HTML template for a list view in which all the requests can be viewed.
This method will return a template with a list of all reports that were submitted. |
Currently all our controller methods use the @ResponseBody annotation by default, as we use the @RestController annotation.
With this annotation, the String returned by the methods is sent to the browser as plain text.
The @ResponseBody annotation will be removed in a later step.
If we remove it, the Thymeleaf library will look for an HTML Template with the name returned.
5.1. Validate
Since we use the dependency dev-tools, the server already recompiled the code.
So you only need to refresh the page in the browser.
If you navigate to localhost:8080/issuereport you should see the text issues/issuereport_form.
6. Exercise - Creating an entity data class
In this exercise, you create a data class that represents an issue report by a user. Some of the values are entered by the user, others generated by the system.
6.1. Create entity data class
Create the following new class in the com.vogella.spring.issues.entities package.
package com.vogella.spring.issues.entities;

import java.sql.Date;
import javax.persistence.Entity;
import javax.persistence.GeneratedValue;
import javax.persistence.GenerationType;
import javax.persistence.Id;
import javax.persistence.Table;

@Entity(1)
@Table(name = "issues")(2)
public class IssueReport {
    @Id
    @GeneratedValue(strategy = GenerationType.AUTO)
    private long id;
    private String email;
    private String url;
    private String description;
    private boolean markedAsPrivate;
    private boolean updates;
    private boolean done;
    private Date created;
    private Date updated;

    public IssueReport() {}
}| 1 | The @Entity annotation tells our JPA provider Hibernate that this class should be mapped to the database. |
| 2 | Set the database table name with the @Table(name = "issues") annotation.
By explicitly setting the table name you avoid the possibility of accidently breaking the database mapping by renaming the class later on. |
Spring requires getters and setters.
To generate them, right-click in the source code window of the IssueReport class and select
Select all fields and select the Generate button.
6.2. Validation
Your IssueReport class should look like this:
package com.vogella.spring.issues.entities;

import java.sql.Date;
import javax.persistence.Entity;
import javax.persistence.GeneratedValue;
import javax.persistence.GenerationType;
import javax.persistence.Id;
import javax.persistence.Table;

@Entity
@Table(name = "issues")
public class IssueReport {
    @Id
    @GeneratedValue(strategy = GenerationType.AUTO)
    private long id;
    private String email;
    private String url;
    private String description;
    private boolean markedAsPrivate;
    private boolean updates;
    private boolean done;
    private Date created;
    private Date updated;

    public IssueReport() {}

    public String getEmail() {
        return email;
    }

    public void setEmail(String email) {
        this.email = email;
    }

    public String getUrl() {
        return url;
    }

    public void setUrl(String url) {
        this.url = url;
    }

    public String getDescription() {
        return description;
    }

    public void setDescription(String description) {
        this.description = description;
    }

    public boolean isMarkedAsPrivate() {
        return markedAsPrivate;
    }

    public void setMarkedAsPrivate(boolean markedAsPrivate) {
        this.markedAsPrivate = markedAsPrivate;
    }

    public boolean isUpdates() {
        return updates;
    }

    public void setUpdates(boolean updates) {
        this.updates = updates;
    }

    public boolean isDone() {
        return done;
    }

    public void setDone(boolean done) {
        this.done = done;
    }

    public Date getCreated() {
        return created;
    }

    public void setCreated(Date created) {
        this.created = created;
    }

    public Date getUpdated() {
        return updated;
    }

    public void setUpdated(Date updated) {
        this.updated = updated;
    }
}
7. Exercise - Creating Templates using Thymeleaf
Thymeleaf is a powerful template engine that can be used with the Spring framework. It lets you write plain HTML code while also using Java objects for data binding.
7.1. Serving HTML Templates
Create the folder src/main/resources/templates/issues.
Create the following files in this folder:
-
issuereport_form.html- this file will be used on the/issuereportroute. -
issuereport_list.html- this file will be used on the/issuesroute.
To serve the HTML templates, remove the @ResponseBody annotation from the relevant IssueController methods.
Afterwards, it should look like the following.
package com.vogella.example.controller;

import org.springframework.stereotype.Controller;
import org.springframework.web.bind.annotation.GetMapping;
import org.springframework.web.bind.annotation.PostMapping;

@Controller
public class IssueController {
    @GetMapping("/issuereport")
    public String getReport() {
        return "issues/issuereport_form";
    }
    @PostMapping("/issuereport")
    public String submitReport() {
        return "issues/issuereport_form";
    }
    @GetMapping("/issues")
    public String getIssues() {
        return "issues/issuereport_list";
    }
}
Each method, which is mapped to a route (endpoint) via the GetMapping annotation, now returns the name of the template it should serve.
-
getReport()
issues/issuereport_form -
submitReport()
issues/issuereport_form -
getIssues()
issues/issurereport_list
Spring looks for the templates with the given name and serve them to the browser.
You specify the folder structure inside your templates folder separated by forward slashes.
Is is important that the String doesn’t start with a /.
The following URL would not work: /issues/issuereport_form.
|
7.2. Binding objects to templates
You can pass data to the templates by adding a parameter to the controller methods parameters. Such parameters are automatically injected by the Spring framework when the endpoint is called.
Spring provides a Model object that can be passed into the controller.
You can configure this model object via the addAttribute(key, value) method.
The first parameter of addAttribute() is the key under which the second parameter can be accessed.
You will use this key to access the object passed as a value inside your template.
Do do all this, change the controller to the following.
package com.vogella.spring.issues;

import org.springframework.stereotype.Controller;
import org.springframework.ui.Model;
import org.springframework.web.bind.annotation.GetMapping;
import org.springframework.web.bind.annotation.PostMapping;

import com.vogella.spring.issues.entities.IssueReport;


@Controller
public class IssueController {
    @GetMapping("/issuereport")
    public String getReport(Model model) {
        model.addAttribute("issuereport", new IssueReport()); (1)
        return "issues/issuereport_form";
    }
    @PostMapping(value="/issuereport")
    public String submitReport(IssueReport issueReport, Model model) {  (2)
        model.addAttribute("issuereport", new IssueReport());  (3)
        model.addAttribute("submitted", true); (4)
       return "issues/issuereport_form";
    }
    @GetMapping("/issues")
    public String getIssues(Model model) {
        return "issues/issuereport_list";
    }
}| 1 | Pass a new IssueReport object to the template |
| 2 | Deliver the data submitted via the form to this method. In the submitReport() method we also want to handle the data submitted via the form. |
| 3 | Pass a new IssueReport object to the template. To do this we also need to add IssueReport issueReport to the method parameters. |
| 4 | To show feedback upon receiving the form data, we add another attribute containing a boolean.
If it is set to true the template will show some kind of modal or confirming message.
Since this boolean is only passed to the template if the route hit from the user was via POST HTTP method (and thus only upon form submission) the confirmation message is ONLY shown after the form was submitted. |
| The objects defined as method parameters are automatically constructed and injected by the Spring framework. |
7.3. Definey our Stylesheet
Using stylesheets is optional and does not change the behavior of the application in any way.
Create a new file called style.css in the src/main/resources/static folder.
Copy the following snippet into it.
*{
    padding: 0;
    margin: 0;
    box-sizing: border-box;
}
body{
    font-family: sans-serif;
}
.container {
    width: 100vw;
    height: 100vh;
    padding: 100px 0;
    text-align: center;
}
.container form{
    width: 100%;
    height: 100%;
    margin: 0 auto;
    max-width: 350px;
}
.container form input[type="text"], .container form textarea{
    width: 100%;
    padding: 10px;
    border-radius: 3px;
    border: 1px solid #b8b8b8;
    font-family: inherit;
    margin-bottom: 20px;
}
.container h3{
    margin-bottom: 20px;
}
.container form input[type="submit"]{
    max-width: 250px;
    margin: auto;
    display: block;
    width: 55%;
    padding: 10px;
    background: darkorange;
    border: 1px solid #b8b8b8;
    border-radius: 3px;
    margin-top: 20px;
    cursor: pointer;
}
.issue_list table{
    text-align: left;
    border-collapse: collapse;
    border: 1px #b8b8b8 solid;
    margin: auto;
}
.issue_list .desc{
    min-width: 500px;
}
.issue_list td, .issue_list th{
    border-bottom: 1px #b8b8b8 solid;
    border-top: 1px #b8b8b8 solid;
    padding: 5px;
}
.issue_list tr{
    height: 35px;
    transition: background .25s;

}
.issue_list tr:hover{
    background: #eee;
}
.issue_list .status.done:after{
    content: '✓';
}
7.4. Creating a Thymeleaf template
We will use a specific syntax in the Thymeleaf templates to use the objects passed in.
These are Thymeleaf specific extensions to standard HTML and start with the prefix th:.
Add the following coding to the issuereport_form.html file:
<!DOCTYPE html>
<html xmlns:th="https://www.thymeleaf.org">
<head>
<title>Vogella Issuereport</title>
<link rel="stylesheet" href="./style.css" />
<meta charset="UTF-8" />
</head>
<body>
<div class="container">
<form method="post" action="#">
<h3>Vogella Issuereport</h3>
<input type="text" placeholder="Email" id="email"/>
<input type="text" placeholder="Url where the issue was found on" id="url"/>
<textarea placeholder="Description of the issue" rows="5" id="description"></textarea>
<label for="private_id">
Private?
<input type="checkbox" name="private" id="private_id"/>
</label>
<label for="updates_id">
Keep me posted
<input type="checkbox" id="updates_id" name="updates"/>
</label>
<input type="submit" value="Submit"/>
</form>
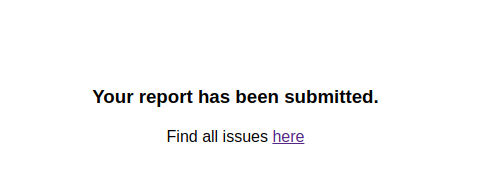
<div class="result_message">
<h3>Your report has been submitted.</h3>
<p>Find all issues <a href="/issues">here</a></p>
</div>
</div>
</body>
</html>This provides a basic HTML document with a form in it. We will later add logic to this document.
Without the attribute xmlns:th="https://www.thymeleaf.org" in the <html> tag, your editor might show warnings because he doesn’t know the attributes prefixed with th:.
|
Now the file will be served on the route /issuereport.
If you have the application still running you can navigate to the route or click the link.
7.5. Data-binding
Now we want to use the IssueReport object which Spring passed to the template in our HTML form.
This is done by adding th:object="${issuereport}" to the <form> tag in issuereport_form.html:
<form method="post" th:action="@{/issuereport}" th:object="${issuereport}">
th:action defines the action that should happen upon submission of the form.
|
We set the key for the IssueReport object to issuereport this key is now used to access the object.
|
To instruct Spring to connect the form fields with the object, you use the attribute th:field="*{}" on the <input> element.
${} is the way to refer to objects that were passed to the template, using SpEL.
*{} is the syntax to refer to fields of the object bound to the form.
|
Add the following attributes to the <input> and <textarea> elements respectively.
<input type="text" placeholder="Email" id="email" th:field="*{email}"/>
<input type="text" placeholder="Url where the issue was found on" id="url" th:field="*{url}"/>
<textarea placeholder="Description of the issue" rows="5" id="description" th:field="*{description}"></textarea>
<input type="checkbox" name="private" id="private_id" th:field="*{markedAsPrivate}"/>
<input type="checkbox" id="updates_id" name="updates" th:field="*{updates}"/>
We also want to show some kind of confirmation message upon submission.
This is done via the <div class="result_message"> in the template.
To show this only if the user submitted an issue, you can use the conditional expression th:if="".
We use the boolean defined by the key submitted in our example to determine that the confirmation message should be displayed.
Add th:if="${submitted}" to the <div class="result_message">.
The result should look like this: <div class="result_message" th:if="${submitted}">
Now the class result_message will only be displayed if submitted is true.
The submitted boolean is only added to the POST request mapping, i.e., only if the form was submitted.
|
The issuereport_form.html should now look like this:
<!DOCTYPE html>
<html xmlns:th="https://www.thymeleaf.org">
<head>
    <title>Vogella Issuereport</title>
<link rel="stylesheet" href="./style.css" />
    <meta charset="UTF-8" />
</head>
<body>
    <div class="container">
        <form method="post" action="#" th:object="${issuereport}" th:action="@{/issuereport}">
            <h3>Vogella Issue Report</h3>
            <input type="text" placeholder="Email" id="email" th:field="*{email}"/>
            <input type="text" placeholder="Url where the issue was found on" id="url" th:field="*{url}" />
            <textarea placeholder="Description of the issue" rows="5" id="description" th:field="*{description}" ></textarea>

            <label for="private_id">
                Private?
                <input type="checkbox" name="private" id="private_id" th:field="*{markedAsPrivate}" />
            </label>

            <label for="updates_id">
                Keep me posted
                <input type="checkbox" id="updates_id" name="updates" th:field="*{updates}" />
            </label>

            <input type="submit" value="Submit"/>
        </form>


        <div class="result_message" th:if="${submitted}">
            <h3>Your report has been submitted.</h3>
            <p>Find all issues <a href="/issues">here</a></p>
        </div>
    </div>
</body>
</html>
7.6. List view
Create the HTML page for the issue report list by adding the code to issuereport_list.html.
<!DOCTYPE html>
<html xmlns:th="https://www.thymeleaf.org">
<head>
    <title>Vogella Issuereport</title>
    <link rel="stylesheet" href="./style.css" />
    <meta charset="UTF-8" />
</head>
<body>
    <div class="container issue_list">
        <h2>Issues</h2>
        <br />
        <table>
            <tr>
                <th>Url</th>
                <th class="desc">Description</th>
                <th>Done</th>
                <th>Created</th>
            </tr>
            <th:block th:each="issue : ${issues}">
                <tr>
                    <td ><a th:href="@{${issue.url}}" th:text="${issue.url}"></a></td>
                    <td th:text="${issue.description}">...</td>
                    <td><span class="status" th:classappend="${issue.done} ? done : pending"></span></td>
                    <td th:text="${issue.created}">...</td>
                </tr>
            </th:block>
        </table>
    </div>
</body>
</html>
th:classappend conditionally adds classes to an element, if the expression passed to it is true or false.
|
th:each="issue : ${issues} loops over the issues list.
|
7.7. Validate
Reload the page on the https://localhost:8080/issuereport.
The styling should have been applied.
Enter some values in the fields and press submit.
Now the result_message <div> will also be shown.
The route /issues will show an empty list. This is because we have nothing added there yet.
8. Exercise - Embedding a database
In this exercise, you learn how to use a database in SpringBoot applications. You will store the users issues and query them to show them on the list view.
8.1. Setup
We will use the h2 database in your application.
You already added the required dependencies to your project during the project creation.
Spring Boot automatically created and configures a h2 database when its dependency is on the classpath.
Now we only need to write a repository to interface with the db.
Create a new package called com.vogella.spring.issues.repositories.
Create the following new interface with the name IssueRepository in the new package.
package com.vogella.spring.issues.repositories;

import org.springframework.data.jpa.repository.JpaRepository;

import com.vogella.spring.issues.entities.IssueReport;

public interface IssueRepository extends JpaRepository<IssueReport, Long>{ (1)
}| 1 | leverage Spring data functionality, IssueReport represents the object you are storing and Long the ID of the object in the database. |
IssueRepository provides now already the functionality to
-
fetch all the entries from the database
-
add new entries
-
do all basic CRUD operations.
To fetch all entries that are not marked private can be done by adding a method using a custom query.
Add this method to your interface
package com.vogella.spring.issues.repositories;

import java.util.List;

import org.springframework.data.jpa.repository.JpaRepository;
import org.springframework.data.jpa.repository.Query;

import com.vogella.spring.issues.entities.IssueReport;

public interface IssueRepository extends JpaRepository<IssueReport, Long>{

    @Query(value = "SELECT i FROM IssueReport i WHERE markedAsPrivate = false") (1)
    List<IssueReport> findAllButPrivate();
}| 1 | The annotation @Query allows defining custom JPQL queries that are executed upon calling the method. |
We also want to get all IssueReport objects reported by the same email-address.
This is also done with a custom method but this does not require a custom @Query string.
You can define a method named findAllByXXX. XXX is a placeholder for the column you want to select by from the database.
The value for this is passed in as a method parameter.
Add the ` findAllByEmail` method to your interface.
package com.vogella.spring.issues.repositories;

import java.util.List;

import org.springframework.data.jpa.repository.JpaRepository;
import org.springframework.data.jpa.repository.Query;

import com.vogella.spring.issues.entities.IssueReport;

public interface IssueRepository extends JpaRepository<IssueReport, Long>{

    @Query(value = "SELECT i FROM IssueReport i WHERE markedAsPrivate = false")
    List<IssueReport> findAllButPrivate();

    List<IssueReport> findAllByEmail(String email);
}
8.2. Using the repository
In IssueController.java add a new field of the repository interface to the class.
Since the @Controller is managed by Spring the IssueRepository will automatically be injected into the constructor.
package com.vogella.spring.issues.controller;

import org.springframework.stereotype.Controller;
import org.springframework.ui.Model;
import org.springframework.web.bind.annotation.GetMapping;
import org.springframework.web.bind.annotation.PostMapping;

import com.vogella.spring.issues.entities.IssueReport;
import com.vogella.spring.issues.repositories.IssueRepository;;


@Controller
public class IssueController {

    IssueRepository issueRepository;

    public IssueController(IssueRepository issueRepository) {
        this.issueRepository = issueRepository;
    }

    @GetMapping("/issuereport")
    public String getReport(Model model) {
        model.addAttribute("issuereport", new IssueReport()); // #1
        return "issues/issuereport_form";
    }
    @PostMapping(value="/issuereport")
    public String submitReport(IssueReport issueReport, Model model) {  // #2
        model.addAttribute("issuereport", new IssueReport());  // #3
        model.addAttribute("submitted", true); // #4
       return "issues/issuereport_form";
    }
    @GetMapping("/issues")
    public String getIssues(Model model) {
        return "issues/issuereport_list";
    }
}
8.2.1. Saving records to the database
Use the method save() from the IssueRepository interface to save a record to the database.
This method takes the object to save as parameter.
In this case this is the received data on the path /issuereport.
package com.vogella.spring.issues.controller;

import org.springframework.beans.factory.annotation.Autowired;
import org.springframework.stereotype.Controller;
import org.springframework.ui.Model;
import org.springframework.web.bind.annotation.GetMapping;
import org.springframework.web.bind.annotation.ModelAttribute;
import org.springframework.web.bind.annotation.PostMapping;

import com.vogella.example.entity.IssueReport;
import com.vogella.example.repository.IssueRepository;

@Controller
public class IssueController {
    IssueRepository issueRepository;

    public IssueController(IssueRepository issueRespository) {
        this.issueRepository = issueRepository;
    }

    @GetMapping("/issuereport")
    public String getReport(Model model) {
        model.addAttribute("issuereport", new IssueReport());
        return "issues/issuereport_form";
    }

    @PostMapping(value="/issuereport")
    public String submitReport(IssueReport issueReport, Model model) {
        IssueReport result = this.issueRepository.save(issueReport); (1)
        model.addAttribute("submitted", true);
        model.addAttribute("issuereport", result);
        return "issues/issuereport_form";
    }

    @GetMapping("/issues")
    public String getIssueReport(Model model) {
        return "issues/issuereport_list";
    }
}| 1 | Saves the issueReport object to the database and returns the saved object. You should always continue with the entity returned by the repository, because it contains the ID set by the database and might contain other changes done in the database too. |
8.3. Redirecting after POST
If you post an issue report to the server and then refresh the page (F5), the browser wants the send the posted information again. This could make users accidentally post an issue report multiple times. For this reason, lets redirect the request in our controller method and remove the usage of the issue report object.
    @PostMapping("/issuereport")
    public String submitReport(IssueReport issueReport, RedirectAttributes ra) {
        this.issueRepository.save(issueReport);
        ra.addAttribute("submitted", true);
        return "redirect:/issuereport";
    }
8.3.1. Fetching all public records from the database
We want to show all public issues reported by using our method findAllButPrivate().
package com.vogella.spring.issues.controller;

import org.springframework.beans.factory.annotation.Autowired;
import org.springframework.stereotype.Controller;
import org.springframework.ui.Model;
import org.springframework.web.bind.annotation.GetMapping;
import org.springframework.web.bind.annotation.ModelAttribute;
import org.springframework.web.bind.annotation.PostMapping;

import com.vogella.example.entity.IssueReport;
import com.vogella.example.repository.IssueRepository;

@Controller
public class IssueController {
    IssueRepository issueRepository;

    public IssueController(IssueRepository issueRespository) {
        this.issueRepository = issueRepository;
    }

    @GetMapping("/issuereport")
    public String getReport(Model model, @RequestParam(name = "submitted", required = false) boolean submitted) {
        model.addAttribute("submitted", submitted);
        model.addAttribute("issuereport", new IssueReport());
        return "issues/issuereport_form";
    }

    @PostMapping(/issuereport")
    public String submitReport(IssueReport issueReport, RedirectAttributes ra) {
        this.issueRepository.save(issueReport);
        ra.addAttribute("submitted", true);
        return "redirect:/issuereport";
    }

    @GetMapping("/issues")
    public String getIssueReport(Model model) {
        model.addAttribute("issues", this.issueRepository.findAllButPrivate()); (1)
       return "issues/issuereport_list";
    }
}| 1 | Reads all public entries from the database |
8.4. Validate
Your IssueController should now look like this:
package com.vogella.spring.issues.controller;

import org.springframework.stereotype.Controller;
import org.springframework.ui.Model;
import org.springframework.web.bind.annotation.GetMapping;
import org.springframework.web.bind.annotation.PostMapping;
import org.springframework.web.bind.annotation.RequestParam;
import org.springframework.web.servlet.mvc.support.RedirectAttributes;

import com.vogella.spring.issues.entities.IssueReport;
import com.vogella.spring.issues.repositories.IssueRepository;

@Controller
public class IssueController {
    IssueRepository issueRepository;

    public IssueController(IssueRepository issueRepository) {
        this.issueRepository = issueRepository;
    }

    @GetMapping("/issuereport")
    public String getReport(Model model, @RequestParam(name = "submitted", required = false) boolean submitted) {
        model.addAttribute("submitted", submitted);
        model.addAttribute("issuereport", new IssueReport());
        return "issues/issuereport_form";
    }

    @PostMapping("/issuereport")
    public String submitReport(IssueReport issueReport, RedirectAttributes ra) {
        this.issueRepository.save(issueReport);
        ra.addAttribute("submitted", true);
        return "redirect:/issuereport";
    }

    @GetMapping("/issues")
    public String getIssues(Model model) {
        model.addAttribute("issues", this.issueRepository.findAllButPrivate());
       return "issues/issuereport_list";
    }
}
Go ahead and reload the form and enter some data.
Now click submit and go to the route /issues. You should see the previously entered data.
9. Exercise - Making the information available via REST
To access your data available via JSON, you can provide a REST API. The SpringBoot framework provides support for providing an REST API.
The @RestController annotation on a class defines a controller which methods returns JSON data.
The setup for the routes is similar to normal routes.
Use the @GetMapping for GET requests. And @PostMapping for POST requests.
The difference is that this time you do not want templates to be rendered.
So the return type is the data which should be returned as JSON, e.g., IssueReport or even List<IssueReport>.
If you want to access a variable in the URL (in this case id), you declare it as variable in the @GetMapping arguments ({id}).
Then you tell Spring to inject it into your method by adding a parameter with the @PathVariable annotation.
9.1. Create your REST controller
Create the following new class named IssueRestController.
package com.vogella.spring.issues.controller;

import java.util.List;

import org.springframework.web.bind.annotation.GetMapping;
import org.springframework.web.bind.annotation.PathVariable;
import org.springframework.web.bind.annotation.RequestMapping;
import org.springframework.web.bind.annotation.RestController;

import com.vogella.spring.issues.entities.IssueReport;

@RestController                                             (1)
@RequestMapping("/api/issues")                              (2)
public class IssueRestController {
    @GetMapping
    public List<IssueReport> getIssues() {
        return null;
    }

    @GetMapping("/{id}")
    public IssueReport getIssue(@PathVariable("id") long id) {
        return null;
    }
}
<.>. defines the class is RestController
<.>. using @RequestMapping allows us to extract the part of the path that is shared by all endpoints defined in the class
9.2. Making the data available
Accessing the data can b done via an injected instance of the IssueRepository.
You can use its methods to return the data from there.
import java.util.List;
import java.util.Optional;

import org.springframework.http.HttpStatus;
import org.springframework.http.ResponseEntity;
import org.springframework.web.bind.annotation.GetMapping;
import org.springframework.web.bind.annotation.PathVariable;
import org.springframework.web.bind.annotation.RequestMapping;
import org.springframework.web.bind.annotation.RestController;

import com.vogella.spring.issues.entities.IssueReport;
import com.vogella.spring.issues.repositories.IssueRepository;

@RestController
@RequestMapping("/api/issues")
public class IssueRestController {
    private IssueRepository issueRepository;

    public IssueRestController(IssueRepository issueRepository) {
        this.issueRepository = issueRepository;
    }

    @GetMapping
    public List<IssueReport> getIssues() {
        return this.issueRepository.findAllButPrivate();
    }

    @GetMapping("/{id}")
    public ResponseEntity<IssueReport> getIssue(@PathVariable("id") Optional<IssueReport> issueReportOptional) {
        if (!issueReportOptional.isPresent() ) {
            return new ResponseEntity<>(HttpStatus.NOT_FOUND);
        }

        return new ResponseEntity<>(issueReportOptional.get(), HttpStatus.OK);
    }
}
In the getIssue method we let Spring inject an Optional<IssueReport> into it.
This is done with the help of DomainClassConverter$ToEntityConverter which takes the ID we specified with @PathVariable and tries to retrieve the respective entity from the database.
If Spring could not find an entity with the given id we return an empty response with status code 404 in the guard clause.
Otherwise, the entity gets returned as JSON.
10. Annotations
Spring uses multiple annotations to configure classes. In this chapter you find a small overview of them:
10.1. @Component and @RestController
Configures Spring to manage instances of this classes, e.g., an instance of this class is created by the Spring dependency injection framework on demand
@RestController is a convenience annotation that is itself annotated with @Controller and @ResponseBody. @RequestMapping methods assume @ResponseBody semantics by default.
11. Testing Spring Boot Applications
You can write unit tests without any dependency on Spring is these classes use constructor or setter injection. In this case your tests would initialize the dependent objects (or use mock framework to create them and provide them to the class under test.
If you need to write integration tests, you need Spring support to load a Spring ApplicationContext for your test.
To add testing support to your Spring Boot application, you can require spring-boot-starter-test in your build configuration.
It adds testing support for Spring boot spring-boot-starter-test and other useful libraries for your tests like JUnit, Mockito and AssertJ.
11.1. Test annotations
Spring Boot provides several test annotations that allow you to decide which parts of the application should get loaded.
To keep test startup times minimal you should only load what your test actually needs.
For these annotations to work, you have to add the @RunWith(SpringRunner.class) annotation to your test class.
You can find an overview of all the auto-configurations that get loaded by a particular annotation in the Spring Boot manual.
11.2. Rolling back database changes after tests
If you want Spring to roll back your database changes after a test finishes, you can add @Transactional to your test class.
If you run a @SpringBootTest with either RANDOM_PORT or DEFINED_PORT, your test will get executed in a different thread than the server.
This means that every transaction initiated on the server will not be rolled back.
Using @Transactional on a test class can hide errors because changes do not get actually flushed to the database.
Another option is to force Spring to commit the transaction at the end of the test with @Commit and manually reset/reload the database state after every test.
This approach works but makes your tests hard to parallelize.
11.3. @SpringBootTest
The @SpringBootTest annotation searches upwards from the test package until it finds a @SpringBootApplication or @SpringBootConfiguration.
The Spring team advises to place the Application class into the root package, which should ensure that your main configuration is found by your test.
This means that your test will start with all Spring managed classes loaded.
You can set the webEnvironment attribute if you want to change which ApplicationContext is created:
-
MOCK (default): loads a
WebApplicationContextbut mocks the servlet environment -
RANDOM_PORT: loads an
EmbeddedWebApplicationContextwith servlet containers in their own thread, listening on a random port -
DEFINED_PORT: loads an
EmbeddedWebApplicationContextwith servlet containers in their own thread, listening on their configured port -
NONE: loads an
ApplicationContextwith no servlet environment
To make calls to the server started by your test you can let Spring inject a TestRestTemplate:
@RunWith(SpringRunner.class)
@SpringBootTest(webEnvironment = SpringBootTest.WebEnvironment.RANDOM_PORT)
public class SpringIntegrationTest {

    @Autowired
    private TestRestTemplate restTemplate;
    // ...
}
11.4. @WebMvcTest
WebMvcTests are used to test controller behavior without the overhead of starting a web server. In conjunction with mocks it is possible to test that routes are configured correctly without the overhead of executing the operations associated with the endpoints. A WebMvcTest configures a MockMvc instance that can be used to simulate network calls.
import static org.springframework.test.web.servlet.request.MockMvcRequestBuilders.get;
import static org.springframework.test.web.servlet.result.MockMvcResultMatchers.status;
import static org.springframework.test.web.servlet.result.MockMvcResultMatchers.view;

@RunWith(SpringRunner.class)
@WebMvcTest(UserController.class)
public class UserLoginIntegrationTest {
    @Autowired
    private MockMvc mvc;
    @MockBean
    private UserService userService;

    @Test
    public void loginTest() throws Exception {
        mvc.perform(get("/login"))
            .andExpect(status().isOk())
            .andExpect(view().name("user/login"));
    }
}
If you want Spring to load additional classes you can specify an include filter:
@WebMvcTest(value = UserController.class, includeFilters = { @ComponentScan.Filter(type = FilterType.ASSIGNABLE_TYPE, classes = UserService.class) })11.5. @DataJpaTest
DataJpaTests load @Entity and @Repository but not regular @Component classes.
This makes it possible to test your JPA integration with minimal overhead.
You can inject a TestEntityManager into your test, which is an EntityManager specifically designed for tests.
If you want to have your JPA repositories configured in other tests you can use the @AutoConfigureDataJpa annotation.
To use a different database connection than the one specified in your configuration you can use @AutoConfigureTestDatabase.
@RunWith(SpringRunner.class)
@DataJpaTest
public class JpaDataIntegrationTest {

    @Autowired
    private UserRepository userRepository;

    // ...
}
11.6. Mocking
Spring Boot provides the @MockBean annotation that automatically creates a mock object.
When this annotation is placed on a field this mock object is automatically injected into any class managed by Spring that requires it.
@RunWith(SpringRunner.class)
@WebMvcTest(UserController.class)
public class UserTest {

    @MockBean
    private UserService userService;
    @Autowired
    private MockMvc mvc;

    @Test
    public void loginTest() throws Exception {
        when(userService.login(anyObject())).thenReturn(true);
        mvc.perform(get("/login"))
            .andExpect(status().isOk())
            .andExpect(view().name("user/login"));
    }
}
11.7. MockMvc
MockMvc is a powerful tool that allows you to test controllers without starting an actual web server.
In an @WebMvcTest MockMvc gets auto configured and can be injected into the test class with @Autowired.
To auto configure MockMvc in a different test you can use the @AutoConfigureMockMvc annotation.
Alternatively, you can create it yourself:
@Autowired
private WebApplicationContext webApplicationContext;
private MockMvc mvc;

@Before
public void setUp() throws Exception {
    mvc = MockMvcBuilders.webAppContextSetup(webApplicationContext).build();
}
12. Exercise: Create a reactive Spring Boot project
Create a new project called com.vogella.spring.playground via .
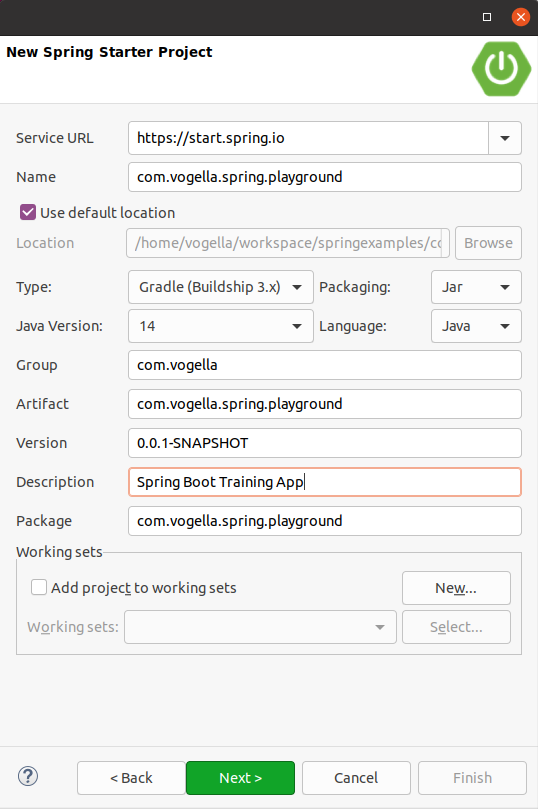
When pressing Next the desired dependencies can be specified.
Use the latest Spring Boot Version and the following dependencies:
-
Spring Data MongoDB
-
Spring Data Reactive MongoDB
-
Embedded MongoDB Database
-
Spring Boot Actuator
-
Spring Reactive Web
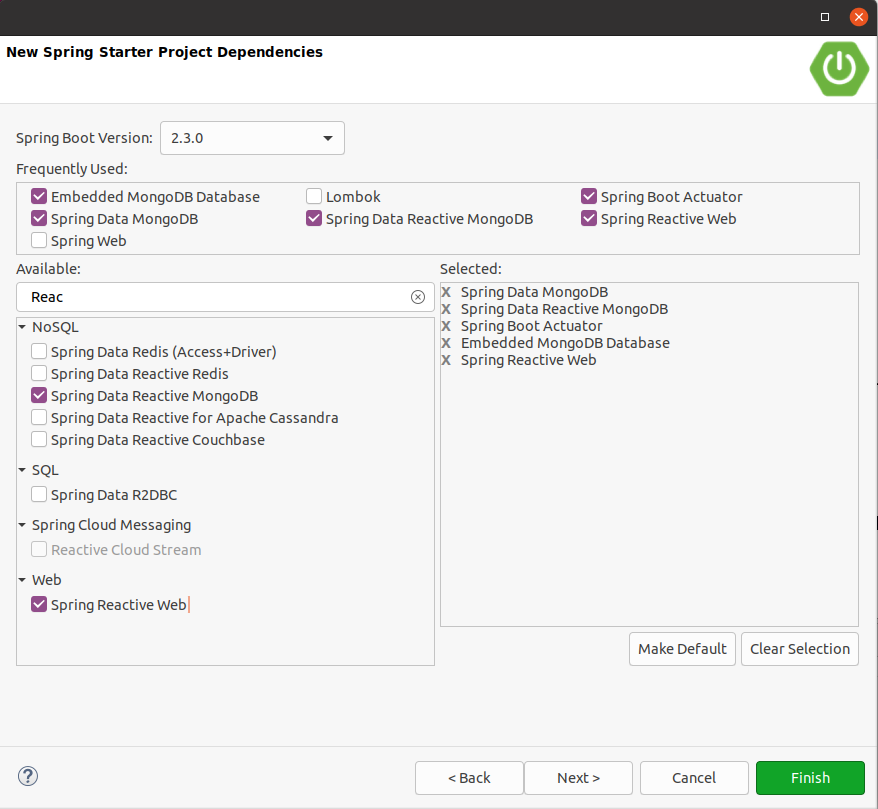
Then press Finish so that the project will be generated.
|
Please avoid to add spring web mvc dependencies, otherwise webflux won´t work properly. If this cannot be avoided the reactive |
13. Exercise: Use dependency injecton
13.1. @Component and @Service annotations
Create a com.vogella.spring.playground.di package inside the com.vogella.spring.playground project.
This package should contain an interface called Beer.
package com.vogella.spring.playground.di;

public interface Beer {
    String getName();
}
Then create a class called Flensburger.
The @Component annotation specifies that the Spring Framework can create an instance of this class once it is needed.
package com.vogella.spring.playground.di;

import org.springframework.stereotype.Component;

@Component
public class Flensburger implements Beer {

    @Override
    public String getName() {
        return "Flensburger";
    }

}
Now an instance of the 'Beer' interface can be injected into another class.
Let´s say we have a service called BarKeeperService, which can do something with the beer.
The @Service annotation does basically the same as the @Component annotation, but marks it as service.
package com.vogella.spring.playground.di;

import org.slf4j.Logger;
import org.slf4j.LoggerFactory;
import org.springframework.stereotype.Service;

@Service
public class BarKeeperService {

    Logger LOG = LoggerFactory.getLogger(BarKeeperService.class);

    private Beer beer;

    public BarKeeperService(Beer beer) {
        this.beer = beer;
    }

    public void logBeerName() {
        LOG.info(beer.getName());
    }
}
To test that this dependency injection works, open the Application class and inject the BarKeeperService via method injection by using the @Autowired annotation.
package com.vogella.spring.playground;

import org.springframework.beans.factory.annotation.Autowired;
import org.springframework.boot.SpringApplication;
import org.springframework.boot.autoconfigure.SpringBootApplication;

import com.vogella.spring.playground.di.BarKeeperService;

@SpringBootApplication
public class Application {

    public static void main(String[] args) {
        SpringApplication.run(Application.class, args);
    }

    @Autowired
    public void setBeerService(BarKeeperService beerService) {
        beerService.logBeerName();
    }
}
Now you can run the application and see Barkeeper serves Flensburger in the logs.
|
If you see exception in the log related to MongoDB, check your build.gradle file and check your Correct entry: |
13.2. @Configuration and @Bean annotation
A @Configuration class can be used to configure your beans programmatically.
So now we create a class called BeerConfig, which is capable of creating beer instances/beans.
package com.vogella.spring.playground.di;

import org.springframework.context.annotation.Bean;
import org.springframework.context.annotation.Configuration;

@Configuration
public class BeerConfig {

    @Bean
    public Beer getBecks() {
        return new Beer() {
            @Override
            public String getName() {
                return "Becks";
            }
        };
    }
}
Now try to start the application.
It will fail and tell you that you have two beans and one of them must be marked as @Primary so that Spring knows which one to create.
Add the @Primary annotation to the Flensburger class (the beer you like most) and re-run the application, which should now print your primary beer.
The @Primary annotation can be placed below or above @Bean or @Component annotation.
Now remove that annotation from the Flensburger class and add after the @Bean annotation in BeerConfig.
|
Do not forget to press Ctrl+SHIFT+O to add the import of the |
13.3. Optional exercise: @Qualifier annotation
Different components or beans can also be qualified by using the @Qualifier annotation.
This approach is used to handle ambiguity of components of the same type, in case the @Primary approach is not sufficient.
package com.vogella.spring.playground.di;

import org.springframework.beans.factory.annotation.Qualifier;
import org.springframework.stereotype.Component;

@Component
@Qualifier("Flensburger") // (1)
public class Flensburger implements Beer {

    @Override
    public String getName() {
        return "Flensburger";
    }

}| 1 | Qualifies the Flensburger class with the Flensburger qualifier |
package com.vogella.spring.playground.di;

import org.springframework.beans.factory.annotation.Qualifier;
import org.springframework.context.annotation.Bean;
import org.springframework.context.annotation.Configuration;

@Configuration
public class BeerConfig {

    @Bean
    @Qualifier("Becks") // (1)
    public Beer getBecks() {
        return () -> "Becks";
    }
}| 1 | Qualifies the becks beer bean with the Becks qualifier. |
After the different beers have been qualified, a certain bean can be demanded by using the @Qualifier annotation as well.
package com.vogella.spring.playground.di;

import org.slf4j.Logger;
import org.slf4j.LoggerFactory;
import org.springframework.beans.factory.annotation.Qualifier;
import org.springframework.stereotype.Service;
@Service
public class BarKeeperService {

    Logger LOG = LoggerFactory.getLogger(BarKeeperService.class);

    private Beer beer;

    public BarKeeperService(@Qualifier("Flensburger") Beer beer) {
        this.beer = beer;
    }

    public void logBeerName() {
        LOG.info("Barkeeper serves " + beer.getName());
    }
}
13.4. Optional exercise: Getting all available types of a bean or component
You can also retrieve all available instances of a certain class or interface.
You can simply create a list and spring automatically gathers all beer beans and components and passes them to the barkeeper.
package com.vogella.spring.playground.di;

import java.util.List;

import org.slf4j.Logger;
import org.slf4j.LoggerFactory;
import org.springframework.stereotype.Service;

@Service
public class BarKeeperService {

    Logger LOG = LoggerFactory.getLogger(BarKeeperService.class);

    private List<Beer> beer;

    public BarKeeperService(List<Beer> beer) {
        this.beer = beer;
    }

    public void logBeerName() {
        beer.stream().map(Beer::getName).forEach(LOG::info);
    }
}
13.5. Exercise: Use the configuration class with property values
The src/main/resources source folder contains an application.properties file. This file can be used to configure the spring application or custom property values can be added as well.
These properties can be used in @Configuration classes via the @Value annotation to configure your beans.
To test this, add the beer.name property to the application.properties file.
beer.name=Carlsberg|
Usually the application.properties file is used to configure Spring properties therefore the editor might show a warning about an unknown property But it is fine to add custom properties to this file, in the next optional exercise you use your custom property file.  |
Add a getBeerNameFromProperty method, which reads the beer.name property in the BeerConfig class.
package com.vogella.spring.playground.di;

import java.util.List;
import java.util.stream.Collectors;

import org.springframework.beans.factory.annotation.Qualifier;
import org.springframework.beans.factory.annotation.Value;
import org.springframework.context.annotation.Bean;
import org.springframework.context.annotation.Configuration;

@Configuration
public class BeerConfig {

    // ... other beans

    @Bean
    public Beer getBeerNameFromProperty(@Value("${beer.name}") String beerName) {
        return new Beer() {
            @Override
            public String getName() {
                return beerName;
            }
        };
    }
}
If you start the Spring Boot application again, you should see all three beans injected in the log output.
14. Optional exercise: Adding a dedicated properties file
In this exercise, you create your custom properties file to store your custom properties. Create a new beers.properties file in the src/main/resources source folder and add the following property.
beer.names=Bitburger,Krombacher,Berliner KindlThe @Configuration class has to point via the @PropertySource annotation to this file, as these custom property files are not automatically parsed.
package com.vogella.spring.playground.di;

import java.util.List;
import java.util.stream.Collectors;

import org.springframework.beans.factory.annotation.Qualifier;
import org.springframework.beans.factory.annotation.Value;
import org.springframework.context.annotation.Bean;
import org.springframework.context.annotation.Configuration;
import org.springframework.context.annotation.PropertySource;

@Configuration
@PropertySource("classpath:/beers.properties")
public class BeerConfig {

    // ... other beans

    @Bean
    public List<Beer> getBeerNamesFromProperty(@Value("${beer.names}") List<String> beerNames) {
        return beerNames.stream().map(bN -> new Beer() {

            @Override
            public String getName() {
                return bN;
            }
        }).collect(Collectors.toList());
    }
}
15. Exercise: Create a webapplication to build up a REST interface to manage users
In this new webapplication we will build a JSON API to manage users. First you will be able to display the JSON data of users.
Create a new Spring Starter project called com.vogella.spring.user using the latest Spring Boot version.
Use Gradle as build system.
Use the following settings in the project creation dialog:
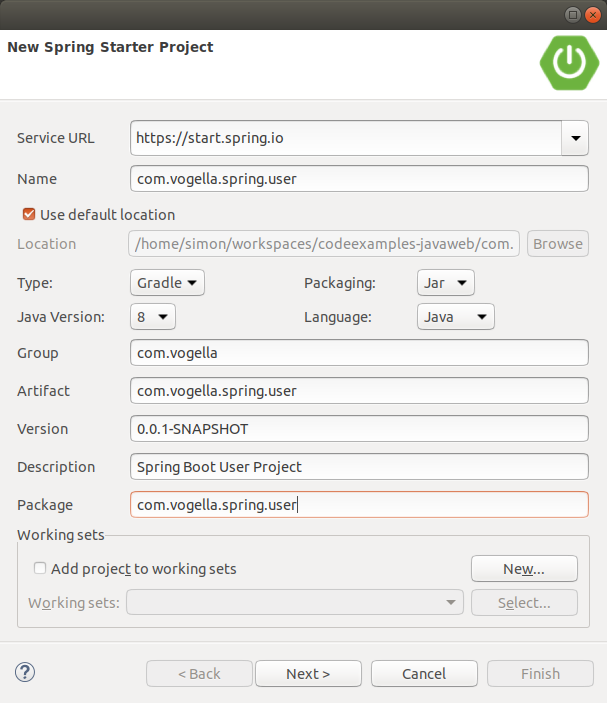
Specify the following dependencies:
-
Spring DataReactive MongoDB
-
Embedded MongoDB
-
Spring Boot Actuator
-
Spring Reactive Web
-
Spring Boot DevTools
Then press Finish so that the project will be generated.
16. Exercise: Create a User domain model
Create another package called com.vogella.spring.user.domain and create a User class inside it.
package com.vogella.spring.user.domain;

import java.time.Instant;
import java.util.ArrayList;
import java.util.List;

import com.fasterxml.jackson.annotation.JsonIgnoreProperties;

@JsonIgnoreProperties(ignoreUnknown = true) (1)
public class User {

    private long id;

    private String name = "";

    private String email = "";

    private String password = "";

    private List<String> roles = new ArrayList<>();

    private Instant lastLogin = Instant.now();

    private boolean enabled;

    public String getName() {
        return name;
    }

    public void setName(String name) {
        this.name = name;
    }

    public String getEmail() {
        return email;
    }

    public void setEmail(String email) {
        this.email = email;
    }

    public String getPassword() {
        return password;
    }

    public void setPassword(String password) {
        this.password = password;
    }

    public List<String> getRoles() {
        return roles;
    }

    public void setRoles(List<String> roles) {
        this.roles = roles;
    }

    public Instant getLastLogin() {
        return lastLogin;
    }

    public void setLastLogin(Instant lastLogin) {
        this.lastLogin = lastLogin;
    }

    public boolean isEnabled() {
        return enabled;
    }

    public void setEnabled(boolean enabled) {
        this.enabled = enabled;
    }

    public long getId() {
        return id;
    }

    public User(long id) {
        this.id = id;
    }

    public User(long id, String name, String email, String password, List<String> roles, Instant lastLogin,
            boolean enabled) {
        this.id = id;
        this.name = name;
        this.email = email;
        this.password = password;
        this.roles = roles;
        this.lastLogin = lastLogin;
        this.enabled = enabled;
    }
}| 1 | The User is also supposed to be serialized and deserialized with JSON, Spring uses the Jackson library for this by default. @JsonIgnoreProperties(ignoreUnknown = true) specifies that properties that are available in the JSON String, but not specified as class members will be ignored instead of raising an Exception. |
17. Exercise: Create a reactive rest controller
Create a package private UserRestController class inside a com.vogella.spring.user.controller package.
ppackage com.vogella.spring.user.controller;

import java.time.Instant;
import java.util.Collections;

import org.springframework.web.bind.annotation.GetMapping;
import org.springframework.web.bind.annotation.RequestMapping;
import org.springframework.web.bind.annotation.RestController;

import com.vogella.spring.user.domain.User;

import reactor.core.publisher.Flux;

@RestController (1)
@RequestMapping("/user") (2)
class UserRestController { (3)

    private Flux<User> users; (4)

    public UserRestController() {
        users = createUserModel();
    }

    private Flux<User> createUserModel() {
        User user = new User(1, "Fabian Pfaff", "fabian.pfaff@vogella.com", "sdguidsdsghuds",
                Collections.singletonList("ADMIN"), Instant.now(), true);
        User user2 = new User(2, "Simon Scholz", "simon.scholz@vogella.com", "sdguidsdsghuds",
                Collections.singletonList("ADMIN"), Instant.now(), false);
        User user3 = new User(3, "Lars Vogel", "lars.vogel@vogella.com", "sdguidsdsghuds",
                Collections.singletonList("USER"), Instant.now(), true);

        return Flux.just(user, user2, user3);
    }

    @GetMapping (5)
    public Flux<User> getUsers() {
        return users;
    }
}| 1 | The @RestController annotation tells Spring that this class is a rest controller, which will be instantiated by the Spring framework |
| 2 | The @RequestMapping annotation is used to point to a default prefix for the rest endpoints for the rest controller |
| 3 | Rest controllers is package private since it should only be created by the Spring framework and not by client code |
| 4 | Flux<T> is a type of the Reactor Framework that implements the reactive stream api like RxJava does. |
| 5 | The @GetMapping annotation tells Spring that the endpoint https://{yourdomain}/user should invoke the getUsers() method. |
Now start the application by right-clicking the project and clicking on .
Now let us test the result when navigating to https://localhost:8080/user.
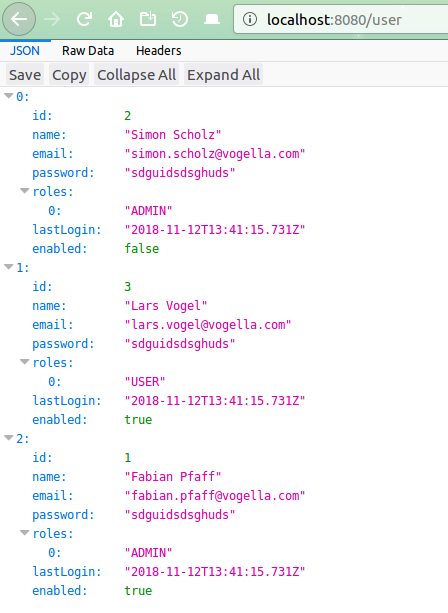
The result is shown as JSON, this is handled by default by the @RestController functionality of Spring Boot.. If no specific mime type for the response is requested the result will be the object serialized as JSON. By default, Spring uses the Jackson library the serialize and deserialize Java objects from and to JSON.
18. Exercise: Passing parameters to the rest api
In this exercise, you add the option to restrict the date returned by the rest controller via search capabilities.
package com.vogella.spring.user.controller;

import java.time.Instant;
import java.util.Collections;

import org.springframework.web.bind.annotation.GetMapping;
import org.springframework.web.bind.annotation.PathVariable;
import org.springframework.web.bind.annotation.RequestMapping;
import org.springframework.web.bind.annotation.RequestParam;
import org.springframework.web.bind.annotation.RestController;

import com.vogella.spring.user.domain.User;

import reactor.core.publisher.Flux;
import reactor.core.publisher.Mono;

@RestController
@RequestMapping("/user")
class UserRestController {

    // more code ...

    @GetMapping
    public Flux<User> getUsers(@RequestParam(name = "limit", required = false, defaultValue = "-1") long limit) { // (1)
        if(-1 == limit) {
            return users;
        }
        return users.take(limit);
    }

    @GetMapping("/{id}")
    public Mono<User> getUserById(@PathVariable("id") long id) { // (2)
        return Mono.from(users.filter(user -> id == user.getId()));
    }
}| 1 | @RequestParam can be used to request parameters and also apply default values, if the parameter is not required |
| 2 | Spring will automatically map the {id} from a request to be a method parameter when the @PathVariable annotation is used |
Test this the browser.
-
https://localhost:8080/user/1 returns the user with the ID 1
-
https://localhost:8080/user?limit=2 returns two users
19. Exercise: Posting data to the rest controller
In this exercise, you provide a API to create new users via a rest call.
package com.vogella.spring.user.controller;

import java.time.Instant;
import java.util.Collections;

import org.springframework.web.bind.annotation.GetMapping;
import org.springframework.web.bind.annotation.PathVariable;
import org.springframework.web.bind.annotation.PostMapping;
import org.springframework.web.bind.annotation.RequestBody;
import org.springframework.web.bind.annotation.RequestMapping;
import org.springframework.web.bind.annotation.RequestParam;
import org.springframework.web.bind.annotation.RestController;

import com.vogella.spring.user.domain.User;

import reactor.core.publisher.Flux;
import reactor.core.publisher.Mono;

@RestController
@RequestMapping("/user")
class UserRestController {

    // more code ...

    @PostMapping (1)
    public Mono<User> newUser(@RequestBody User user) {
        Mono<User> userMono = Mono.just(user);
        users = users.mergeWith(userMono); // (2)
        return userMono;
    }
}| 1 | @PostMapping defines that this method is used for a post request |
| 2 | The mergeWith method merges the existing Flux with the new Mono<User> containing the posted User object |
Curl or any rest client you like, e.g., RESTer for Firefox, can be used to post data to the rest endpoint.
curl -d '{"id":100, "name":"Spiderman"}' -H "Content-Type: application/json" -X POST https://localhost:8080/userThis will return the "New custom User" and show it on the command line.
20. Exercise: Sending a delete request
Add a method that allows to delete users via the rest API.
package com.vogella.spring.user.controller;

import java.time.Instant;
import java.util.Collections;

import org.springframework.web.bind.annotation.DeleteMapping;
import org.springframework.web.bind.annotation.GetMapping;
import org.springframework.web.bind.annotation.PathVariable;
import org.springframework.web.bind.annotation.PostMapping;
import org.springframework.web.bind.annotation.RequestBody;
import org.springframework.web.bind.annotation.RequestMapping;
import org.springframework.web.bind.annotation.RequestParam;
import org.springframework.web.bind.annotation.RestController;

import com.vogella.spring.user.domain.User;

import reactor.core.publisher.Flux;
import reactor.core.publisher.Mono;

@RestController
@RequestMapping("/user")
class UserRestController {

    // more code ...
    @DeleteMapping("/{id}") (1)
    public Mono<Void> deleteUser(@PathVariable("id") int id) { (2)
        users = users.filter(user -> user.getId() != id);
        return users.then();
    }
}| 1 | @DeleteMapping can be used for delete operations via the rest API and curly braces + name like {id} can be used as alternative of using query parameters like ?id=3 |
| 2 | @PathVariable specifies the path, which will be used for the {id} path variable |
User no. 3 can be deleted, since we learned how to create new users now.
curl -X DELETE https://localhost:8080/user/3Call the https://localhost:8080/user method again to check whether the deletion was successful. After using the curl command the remaining users are returned.
21. Exercise: Testing the RestController
After implementing the rest controller, you add some tests in this exercise to ensure the controller behaves correctly.
21.1. Adding a first test to validate that a user can be returned
The tests reside in the src/test/java test folder.
Create a new package called com.vogella.spring.user.controller inside the test folder.
The advantage of using the same package names as in the src/main/java folder is that you can access protected and package private methods in your tests.
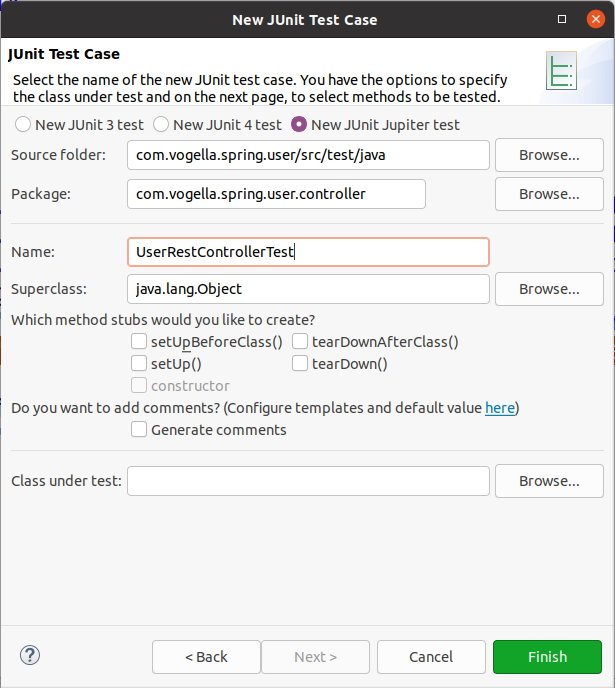
Change the test to the following.
package com.vogella.spring.user.controller;

import org.junit.jupiter.api.BeforeEach;
import org.junit.jupiter.api.extension.ExtendWith;
import org.springframework.beans.factory.annotation.Autowired;
import org.springframework.boot.test.autoconfigure.web.reactive.WebFluxTest;
import org.springframework.context.ApplicationContext;
import org.springframework.test.context.junit.jupiter.SpringExtension;
import org.springframework.test.web.reactive.server.WebTestClient;

@ExtendWith(SpringExtension.class)
@WebFluxTest(UserRestController.class) (1)
public class UserRestControllerTest {

    @Autowired (2)
    private ApplicationContext context;
    private WebTestClient webTestClient;

    @BeforeEach
    public void setUp() {
        webTestClient = WebTestClient.bindToApplicationContext(context).configureClient().baseUrl("/").build(); (3)
    }

}| 1 | @WebFluxTest starts a Spring application with only the annotated controller loaded, shortening the test startup time |
| 2 | @Autowired we can use field injection since no other class should instantiate a test class |
| 3 | WebTestClient allows us to programmatically make reactive REST calls in our tests |
Now write a test.
package com.vogella.spring.user.controller;

import static org.assertj.core.api.Assertions.assertThat;

import org.junit.jupiter.api.BeforeEach;
import org.junit.jupiter.api.Test;
import org.junit.jupiter.api.extension.ExtendWith;
import org.springframework.beans.factory.annotation.Autowired;
import org.springframework.boot.test.autoconfigure.web.reactive.WebFluxTest;
import org.springframework.context.ApplicationContext;
import org.springframework.test.context.junit.jupiter.SpringExtension;
import org.springframework.test.web.reactive.server.WebTestClient;
import org.springframework.test.web.reactive.server.WebTestClient.ResponseSpec;

import com.vogella.spring.user.domain.User;

@ExtendWith(SpringExtension.class)
@WebFluxTest(UserRestController.class) (1)
public class UserRestControllerTest {

    @Autowired (2)
    private ApplicationContext context;
    private WebTestClient webTestClient;

    @BeforeEach
    public void setUp() {
        webTestClient = WebTestClient.bindToApplicationContext(context).configureClient().baseUrl("/").build(); (3)
    }

    @Test
    public void ensureThat_getUserByIdFromInitialDataModel_returnsUser() throws Exception {
        ResponseSpec rs = webTestClient.get().uri("/user/1").exchange();

        rs.expectStatus().isOk() (1)
        .expectBody(User.class) (2)
        .consumeWith(result -> { (3)
            User user = result.getResponseBody();
            assertThat(user).isNotNull();
            assertThat(user.getName()).isEqualTo("Fabian Pfaff");
        });
    }

}| 1 | expectStatus http response status must be 200 |
| 2 | expectBodyList() the response body must be convertible to the User class |
| 3 | consumeWith() accepts a consumer for the response, validations get placed inside the consumer |
Right-click on the test class and select menu:[Run-As| JUnit test]. Your test should run successfully.
21.2. Adding a test for checking for invalide users
Our previous test only tests the presence of an existing user. Now you write a tests that tests what happens if the server receives an unknown id.
    @Test
    public void getUserById_invalidId_error() throws Exception {
        ResponseSpec rs = webTestClient.get().uri("/user/-1").exchange();

        rs.expectStatus().isNotFound();
    }
When you run this test, you will notice that it fails. Our controller doesn’t return the right http status in case he cannot find the entity.
We want the endpoint to return a 404 not found response.
For this adjust the getUserById method in the UserRestController class.
import org.springframework.http.HttpStatus;
import org.springframework.http.ResponseEntity;
import org.springframework.web.server.ResponseStatusException;
import reactor.core.publisher.Mono;

    @GetMapping("/{id}")
    public Mono<ResponseEntity<User>> getUserById(@PathVariable("id") long id) { // (2)
        Mono<User> foundUser = Mono.from(users.filter(user -> id == user.getId()));
        return foundUser.map(ResponseEntity::ok)
                .switchIfEmpty(Mono.error((new ResponseStatusException(HttpStatus.NOT_FOUND))));
    }
22. Exercise: Testing user creation
A rest API should return the 201 status code, if a new resource has been created. It should also return the information where to find the new resource. Spring does the latter via the LOCATION header. Let’s write a test that checks for this behavior.
    @Test
    public void ensureThat_createUser_withValidUserInput_createsUser() throws Exception {
        var user = new User(4);
        user.setName("Jonas Hungershausen");
        user.setEmail("jonas.hungershausen@vogella.com");
        ResponseSpec rs = webTestClient.post().uri("/user")
                .body(BodyInserters.fromValue(user)) (1)
                .exchange();

        rs.expectStatus().isCreated().expectHeader() (2)
        .valueMatches("LOCATION", "^/user/\\d+"); (3)
}| 1 | BodyInserters offers various methods to fill the request body |
| 2 | expecting the 201 response status |
| 3 | verifying that the http header contains the correct value |
Running this test should fail. Let’s adjust the controller to returns the proper response.
package com.vogella.spring.user.controller;

import java.net.URI;
import java.time.Instant;
import java.util.Collections;

import org.springframework.http.HttpStatus;
import org.springframework.http.ResponseEntity;
import org.springframework.http.server.reactive.ServerHttpRequest;
import org.springframework.web.bind.annotation.DeleteMapping;
import org.springframework.web.bind.annotation.GetMapping;
import org.springframework.web.bind.annotation.PathVariable;
import org.springframework.web.bind.annotation.PostMapping;
import org.springframework.web.bind.annotation.RequestBody;
import org.springframework.web.bind.annotation.RequestMapping;
import org.springframework.web.bind.annotation.RequestParam;
import org.springframework.web.bind.annotation.RestController;
import org.springframework.web.server.ResponseStatusException;

import com.vogella.spring.user.domain.User;

import reactor.core.publisher.Flux;
import reactor.core.publisher.Mono;

// more code
    @PostMapping
    public Mono<ResponseEntity<Object>> newUser(@RequestBody Mono<User> userMono, ServerHttpRequest req) {
        userMono = userMono.map(user -> {
            user.setId(6);
            return user;
        });
        users = users.mergeWith(userMono);
        return userMono.map(u -> ResponseEntity.created(URI.create(req.getPath() + "/" + u.getId())).build());
    }
Now run the test again to verify the fix.
23. Optional exercise: Write tests for the rest of the endpoints
Implement tests for the rest of the endpoints. Try to consider the happy path as well as the possible failures and invalid inputs.
For example:
-
POST /user/searchshould return status 400 if the given json cannot be mapped to user -
DELETE /user/{id}should return status 404 if the ID is not valid -
DELETE /user/{id}should return status 204 if a user was successfully deleted
24. Exercise: Create a service for the business logic
24.1. Create and use service
Creating an initial model should not be part of the UserRestController itself.
A rest controller should only specify the rest API and use a service for the business logic.
Therefore create a UserService class in the com.vogella.spring.user.service package.
package com.vogella.spring.user.service;

import java.time.Instant;
import java.util.Collections;

import org.springframework.stereotype.Service;
import org.springframework.web.bind.annotation.PathVariable;
import org.springframework.web.bind.annotation.RequestBody;
import org.springframework.web.bind.annotation.RequestParam;

import com.vogella.spring.user.domain.User;

import reactor.core.publisher.Flux;
import reactor.core.publisher.Mono;

@Service (1)
public class UserService {

    private Flux<User> users;

    public UserService() {
        users = createUserModel();
    }

    private Flux<User> createUserModel() {
        User user = new User(1, "Fabian Pfaff", "fabian.pfaff@vogella.com", "sdguidsdsghuds",
                Collections.singletonList("ADMIN"), Instant.now(), true);
        User user2 = new User(1, "Simon Scholz", "simon.scholz@vogella.com", "sdguidsdsghuds",
                Collections.singletonList("ADMIN"), Instant.now(), false);
        User user3 = new User(1, "Lars Vogel", "lars.vogel@vogella.com", "sdguidsdsghuds",
                Collections.singletonList("USER"), Instant.now(), true);

        return Flux.just(user, user2, user3);
    }

    public Flux<User> getUsers(@RequestParam(name = "limit", required = false, defaultValue = "-1") long limit) {
        if (-1 == limit) {
            return users;
        }
        return users.take(limit);
    }

    public Mono<User> findUserById(@PathVariable("id") long id) {
        return Mono.from(users.filter(user -> id == user.getId()));
    }

    public Mono<User> newUser(@RequestBody User user) {
        Mono<User> userMono = Mono.just(user);
        users = users.mergeWith(userMono);
        return userMono;
    }

    public Mono<Void> deleteUser(@PathVariable("id") int id) {
        users = users.filter(user -> user.getId() != id);
        return users.then();
    }
}| 1 | The @Service annotation specifies the annotated class as spring service, which will be created when it is demanded by other classes like the refactored UserRestController. |
Basically we just moved everything into another class, but left out the rest controller specific annotations.
Now change the UserRestController to delegates the rest requests to the UserService.
package com.vogella.spring.user.controller;

import java.net.URI;

import org.springframework.http.HttpStatus;
import org.springframework.http.ResponseEntity;
import org.springframework.http.server.reactive.ServerHttpRequest;
import org.springframework.web.bind.annotation.DeleteMapping;
import org.springframework.web.bind.annotation.GetMapping;
import org.springframework.web.bind.annotation.PathVariable;
import org.springframework.web.bind.annotation.PostMapping;
import org.springframework.web.bind.annotation.RequestBody;
import org.springframework.web.bind.annotation.RequestMapping;
import org.springframework.web.bind.annotation.RequestParam;
import org.springframework.web.bind.annotation.RestController;
import org.springframework.web.server.ResponseStatusException;

import com.vogella.spring.user.domain.User;
import com.vogella.spring.user.service.UserService;

import reactor.core.publisher.Flux;
import reactor.core.publisher.Mono;

@RestController
@RequestMapping("/user")
class UserRestController {

    private UserService userService;

    public UserRestController(UserService userService) { (1)
        this.userService = userService;
    }

    @GetMapping
    public Flux<User> getUsers(@RequestParam(name = "limit", required = false, defaultValue = "-1") long limit) {
        return userService.getUsers(limit);
    }

    @GetMapping("/{id}")
    public Mono<ResponseEntity<User>> findUserById(@PathVariable("id") long id) {
        return userService.findUserById(id).map(ResponseEntity::ok)
                .switchIfEmpty(Mono.error(new ResponseStatusException(HttpStatus.NOT_FOUND)));
    }

    @PostMapping
    public Mono<ResponseEntity<Object>> newUser(@RequestBody User user, ServerHttpRequest req) {
        return userService.newUser(user)
                .map(u -> ResponseEntity.created(URI.create(req.getPath() + "/" + u.getId())).build());
    }

    @DeleteMapping("/{id}")
    public Mono<Void> deleteUser(@PathVariable("id") int id) {
        return userService.deleteUser(id);
    }
}| 1 | Since the Spring framework instantiates the UserRestController it is able to find the UserService, which is demanded in the UserRestController constructor. This works, because the UserService class has the @Service annotation being applied. |
24.2. Update your software test
Execute the tests in UserRestControllerTest again.
This tests fail because of the introduction of the UserService.
The RestController now needs the ` UserService as an collaborator.
But since our test only loads the web slice for the UserRestController, it is not available.
One easy way to get around this it to transform the test into an integration test that loads the full Spring application.
This is slower, but ensures that the UserService is available for injection.
Create a new class called UserRestControllerIntegrationTest with the @SpringBootTest annotation and paste in the tests from UserRestController:
@ExtendWith(SpringExtension.class)
@SpringBootTest
public class UserRestControllerIntegrationTest {
       // test code copied from UserRestController..
}
The new integration tests should all pass, if you run them.
24.3. Exercise: Update your @WebFluxTest tests to run after the introduction of the service
In this exercise, you mock the service so that you can run again your @WebFluxTests.
To mock the service, you use the Mockito framework.
To define a mock object in a Spring test, we can use the @MockBean annotation.
Define the mocked UserService as a field in the test class; Spring will automatically pick it up and inject it at runtime:
    @MockBean
    private UserService userService;
Then adjust the tests. In the setup phase we define the desired mock behavior and then trigger the test call as before:
import static org.assertj.core.api.Assertions.assertThat;
import static org.mockito.Mockito.when;

import org.junit.jupiter.api.BeforeEach;
import org.junit.jupiter.api.Test;
import org.junit.jupiter.api.extension.ExtendWith;
import org.springframework.beans.factory.annotation.Autowired;
import org.springframework.boot.test.autoconfigure.web.reactive.WebFluxTest;
import org.springframework.boot.test.mock.mockito.MockBean;
import org.springframework.context.ApplicationContext;
import org.springframework.test.context.junit.jupiter.SpringExtension;
import org.springframework.test.web.reactive.server.WebTestClient;
import org.springframework.test.web.reactive.server.WebTestClient.ResponseSpec;
import org.springframework.web.reactive.function.BodyInserters;

import com.vogella.spring.user.domain.User;
import com.vogella.spring.user.service.UserService;

import reactor.core.publisher.Mono;

// more code

    @Test
    public void ensureThat_getUserByIdFromInitialDataModel_returnsUser() throws Exception {
        int id = 1;
        String name = "Fabian Pfaff";
        when(userService.findUserById(id)).thenReturn(Mono.just(User.builder().name(name).build()));

        ResponseSpec rs = webTestClient.get().uri("/user/" + id).exchange();

        rs.expectStatus().isOk().expectBody(User.class).consumeWith(result -> {
            User user = result.getResponseBody();
            assertThat(user).isNotNull();
            assertThat(user.getName()).isEqualTo(name);
        });
    }
For the test with the invalid id, return an empty result:
    @Test
    public void ensureThat_getUserById_invalidId_resultsInError() throws Exception {
        long invalidId = -1;
        when(userService.findUserById(invalidId)).thenReturn(Mono.empty());

        ResponseSpec rs = webTestClient.get().uri("/user/" + invalidId).exchange();

        rs.expectStatus().isNotFound();
    }
The user creation test only reads the ID from the created user, so this is enough to make the test pass:
    @Test
    public void ensureThat_createUser_withValidUserInput_createsUser() throws Exception {
        long id = 42;
        when(userService.newUser(ArgumentMatchers.any())) (1)
            .thenReturn(Mono.just(User.builder().id(id).build()));

        var user = new User(4);
        user.setName("Jonas Hungershausen");
        user.setEmail("jonas.hungershausen@vogella.com");

        ResponseSpec rs = webTestClient.post().uri("/user")
                .body(BodyInserters.fromValue(user)) (1)
                .exchange();

        rs.expectStatus().isCreated().expectHeader().valueEquals("LOCATION", "/user/" + id); (2)
}| 1 | ArgumentMatchers.any() with ArgumentMatchers we can match on certain input patterns, in this case we match on any input |
| 2 | Since we mock the response, we can expect the actual id and do not have to match with regex. |
24.4. Validate
Run your UserRestControllerTest again, all test should not run successfully.
24.5. Optional exercise: Write mocks for all endpoint tests
If you have done the earlier optional exercise Write tests for the rest of the endpoints you still have some tests that fail because of the missing UserService. If you have not completed the earlier exercise go ahead and do it now.
Write mocks for all test methods you have implemented to make them pass again.
25. Using @DataMongoTest
@DataMongoTest starts a test with only the Spring persistence slice loaded.
This means that all repositories are available for injection.
Since UserRepository#findAll() returns a Flux we will use the StepVerifier.
The StepVerifier is used to lazily define expectations about a reactive Producer.
Only when StepVerifier#verify() is called the verification is actually started.
@RunWith(SpringRunner.class)
@DataMongoTest
public class UserMongoIntegrationTest {

    @Autowired
    private UserRepository userRepository;

    @Test
    public void save_validUserInput_canBeFoundWithFindAll() throws Exception {
        userRepository.save(User.builder().id(1).name("Lars Vogel").build())
                .mergeWith(userRepository.save(User.builder().id(2).name("Simon Scholz").build()))
                .blockLast();

        Flux<User> users = userRepository.findAll();

        StepVerifier.create(users) (1)
            .recordWith(ArrayList::new) (2)
            .expectNextCount(2) (3)
            .consumeRecordedWith(userList -> { (4)
                    assertThat(userList).withFailMessage("Should contain user with name <%s>", "Simon Scholz")
                            .anyMatch(user -> user.getName().equals("Simon Scholz"));
            }).expectComplete()
            .verify();
    }
}| 1 | create() prepare a StepVerifier for the Flux |
| 2 | recordWith() tells the verifier which Collection type to use when we later call consumeRecordedWith |
| 3 | verifies how many elements the Publisher pushes, equivalent to assertThat(userList).hasSize(2); |
| 4 | inside the consumeWith block you can place all your assertions on the result |
If you are writing an application using JPA then you will have to use the @DataJpaTest annotation instead.
|
26. Exercise: Reactive database access with Spring Data
Currently the users are kept in memory.
Your project dependencies already include dependencies to MongoDB.
The compile('org.springframework.boot:spring-boot-starter-data-mongodb-reactive') dependency in your build.gradle file, provides an abstraction layer around the database.
|
MongoDB has the benefit that it comes with a reactive database driver, which other databases like JDBC cannot offer. Hopefully, in the future other databases will also provide reactive asynchronous database drivers as well. |
To find, save and delete User objects in the MongoDB a UserRepository in the com.vogella.spring.user.data package should be created.
package com.vogella.spring.user.data;

import org.springframework.data.repository.reactive.ReactiveCrudRepository;

import com.vogella.spring.user.domain.User;

public interface UserRepository extends ReactiveCrudRepository<User, Long> {

}
Now Spring can create a ReactiveCrudRepository for User objects at runtime.
This API provides (c)reate, (e)ead, (u)pdate and (d)elete capabilties.
|
The |
Now we have to enable MongoDB to work with User objects.
For this, annotate the ID field with @Id.
package com.vogella.spring.user.domain;

import java.time.Instant;
import java.util.ArrayList;
import java.util.List;

import org.springframework.data.annotation.Id;

import com.fasterxml.jackson.annotation.JsonIgnoreProperties;

@JsonIgnoreProperties(ignoreUnknown = true)
public class User {

    @Id (1)
    private long id;

}| 1 | @Id is used to specify the ID of the object, which is supposed to be stored in the database |
Now the UserService should be updated to store the data by using the UserRepository.
package com.vogella.spring.user.service;

import java.time.Instant;
import java.util.Arrays;
import java.util.Collections;

import org.springframework.stereotype.Service;

import com.vogella.spring.user.data.UserRepository;
import com.vogella.spring.user.domain.User;

import reactor.core.publisher.Flux;
import reactor.core.publisher.Mono;

@Service
public class UserService {

    private UserRepository userRepository;

    public UserService(UserRepository UserRepository) { (1)
        this.userRepository = UserRepository;
        createUserModel();
    }

    private void createUserModel() {
        User user = new User(1, "Fabian Pfaff", "fabian.pfaff@vogella.com", "sdguidsdsghuds",
                Collections.singletonList("ADMIN"), Instant.now(), true);
        User user2 = new User(2, "Simon Scholz", "simon.scholz@vogella.com", "sdguidsdsghuds",
                Collections.singletonList("ADMIN"), Instant.now(), false);
        User user3 = new User(3, "Lars Vogel", "lars.vogel@vogella.com", "sdguidsdsghuds",
                Collections.singletonList("USER"), Instant.now(), true);

        userRepository.saveAll(Arrays.asList(user, user2, user3)).subscribe(); (2)
    }

    public Flux<User> getUsers(long limit) {
        if (-1 == limit) {
            return userRepository.findAll();
        }
        return userRepository.findAll().take(limit);
    }

    public Mono<User> findUserById(long id) {
        return userRepository.findById(id);
    }

    public Mono<User> newUser(User User) {
        return userRepository.save(User);
    }

    public Mono<Void> deleteUser(long id) {
        return userRepository.deleteById(id);
    }
}| 1 | Even tough the UserRepository interface is not annotated with @Service, @Bean, @Component or something similar it is automatically injected. The Spring Framework creates an instance of the UserRepository at runtime once it is requested by the UserService, because the UserRepository is derived from ReactiveCrudRepository. |
| 2 | For the initial model the 3 Users from former chapters are now stored in the MongoDB. |
For all other operations the ReactiveCrudRepository default methods, which return Reactor types, are used (findAll, findById, save, deleteById).
27. Exercise: Implement custom query methods
Basically everything can be done by using CRUD operations. In case a User should be found by looking for text in the summary the findAll() method can be used and the service can iterate over the Flux<User> to find appropriate User objects.
public static Flux<User> getByEmail(String email) {
    Flux<User> findAll = userRepository.findAll();
    Flux<User> filteredFlux = findAll.filter(user -> user.getUserEmail().toLowerCase().contains(email.toLowerCase()));
    return filteredFlux;
}
But wait, is it efficient to get all Users and then filter them?
Modern databases can do this way more efficient by for example using the SQL LIKE statement. In general, it is way better to delegate the query of certain elements to the database to gain more performance.
Spring data provides way more possibilities than just using the CRUD operations that are derived from the ReactiveCrudRepository interface.
Inside the almost empty UserRepository class custom method with a certain naming schema can be specified and Spring will take care of creating appropriate query out of them.
So rather than filtering the Users from the database on ourselves it can be done like this:
package com.vogella.spring.user.data;

import org.springframework.data.repository.reactive.ReactiveCrudRepository;

import com.vogella.spring.user.domain.User;

import reactor.core.publisher.Flux;

public interface UserRepository extends ReactiveCrudRepository<User, Long> {

    Flux<User> findByEmailContainingIgnoreCase(String email);
}
We leave it up to the reader to make use of the findByEmailContainingIgnoreCase in the UserService and then make use of it in the UserRestController by providing a https://localhost:8080/search rest endpoint.
The schema possibilities for writing such methods are huge, but out of scope in this exercise.
|
You can also write real queries by using the |
28. Exercise: Use Example objects for queries
With the query method schema lots of properties of the User class can be combined for a query, but sometimes this can also be verbose:
// could be even worse...
Flux<User> findByEmailContainingAndRolesContainingAllIgnoreCaseAndEnabledIsTrue(String email, String role);
It would be nicer to create an instance of a User and then pass it to a find method.
User user = new User(1);
User theUserWithIdEquals1 = userRepository.find(user);
Unfortunately, the ReactiveCrudRepository does not provide such a method.
But this capability is proivded by the ReactiveQueryByExampleExecutor<T> class.
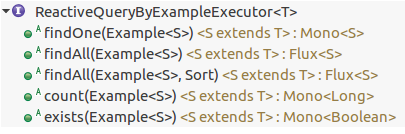
package com.vogella.spring.user.data;

import org.springframework.data.repository.query.ReactiveQueryByExampleExecutor;
import org.springframework.data.repository.reactive.ReactiveCrudRepository;

import com.vogella.spring.user.domain.User;

import reactor.core.publisher.Flux;

public interface UserRepository extends ReactiveCrudRepository<User, Long>, ReactiveQueryByExampleExecutor<User> { (1)

    Flux<User> findByEmailContainingIgnoreCase(String email);

    Flux<User> findByEmailContainingAndRolesContainingAllIgnoreCaseAndEnabledIsTrue(String email, String role);
}| 1 | By implementing the ReactiveQueryByExampleExecutor<User> interface the methods above can be used to query by using Example objects. |
So instead of using a findByEmailContainingAndRolesContainingAllIgnoreCaseAndEnabledIsTrue method an Example can be used to express the same:
Please add the following methods to the UserService class.
public Mono<User> findUserByExample(User user) {
    ExampleMatcher matcher = ExampleMatcher.matching().withIgnoreCase()
            .withMatcher("email", GenericPropertyMatcher::contains)
            .withMatcher("role", GenericPropertyMatcher::contains)
            .withMatcher("enabled", GenericPropertyMatcher::exact);
    Example<User> example = Example.of(user, matcher);
    return userRepository.findOne(example);
}
When looking for exact matches no ExampleMatcher has to be configured.
public Mono<User> findUserByExampleExact(User user) {
    Example<User> example = Example.of(user);
    return userRepository.findOne(example);
}
The UserRestController can make use of this like that:
@PostMapping("/search")
public Mono<User> getUserByExample(@RequestBody User user) {
    return userService.findUserByExample(user);
}
29. Extracting the database setup code
Until now the database setup code resides in the UserService.
During development this works well, but eventually we want more control over when this code is run.
One way to do this is to extract the code into a SmartInitializingSingleton.
Implementing this interface gives the guarantee that all beans are fully set up when afterSingletonsInstantiated() is called.
The UserDataInitializer is supposed to be created in the com.vogella.spring.user.initialize package.
package com.vogella.spring.user.initialize;

import java.time.Instant;
import java.util.Arrays;
import java.util.Collections;

import org.springframework.beans.factory.SmartInitializingSingleton;
import org.springframework.context.annotation.Profile;
import org.springframework.stereotype.Component;

import com.vogella.spring.user.data.UserRepository;
import com.vogella.spring.user.domain.User;

@Profile("!production") (1)
@Component
public class UserDataInitializer implements SmartInitializingSingleton {

    private UserRepository userRepository;

    public UserDataInitializer(UserRepository userRepository) {
        this.userRepository = userRepository;
    }

    @Override
    public void afterSingletonsInstantiated() {
        User user = new User(1, "Fabian Pfaff", "fabian.pfaff@vogella.com", "sdguidsdsghuds",
                Collections.singletonList("ADMIN"), Instant.now(), true);
        User user2 = new User(2, "Simon Scholz", "simon.scholz@vogella.com", "sdguidsdsghuds",
                Collections.singletonList("ADMIN"), Instant.now(), false);
        User user3 = new User(3, "Lars Vogel", "lars.vogel@vogella.com", "sdguidsdsghuds",
                Collections.singletonList("USER"), Instant.now(), true);

        userRepository.saveAll(Arrays.asList(user, user2, user3)).subscribe();
    }

}| 1 | @Profile("!production") this stops Spring from loading this bean when the "production" profile is activated |
Profiles can be activated by specifying them in the application.properties file inside the src/main/resources/ folder.

spring.profiles.active=productionPlease startup the server without the production profile and with the production profile being activated. You can see the difference by navigating to https://localhost:8080/user for both scenarios.
30. Validations with JSR-303
So far the UserController accepts any input for a new user entity.
To stop clients to create entities with invalid data we can add validations.
Java provides a way to define validation rules by placing @annotations on fields.
The user object must only be created when a valid email and password have been provided:
package com.vogella.spring.user.domain;

import java.time.Instant;
import java.util.ArrayList;
import java.util.List;

import javax.validation.constraints.Email;
import javax.validation.constraints.NotEmpty;
import javax.validation.constraints.Size;

import org.springframework.data.annotation.Id;

import com.fasterxml.jackson.annotation.JsonIgnoreProperties;

import lombok.AllArgsConstructor;
import lombok.Builder;
import lombok.Data;
import lombok.NoArgsConstructor;

@Data
@NoArgsConstructor
@AllArgsConstructor
@Builder
@JsonIgnoreProperties(ignoreUnknown = true)
public class User {

    @Id
    private long id;
    @Builder.Default
    private String name = "";

    @NotEmpty
    @Email
    @Builder.Default
    private String email = "";

    @Size(min = 8, max = 254)
    @Builder.Default
    private String password = "";

    @Builder.Default
    private List<String> roles = new ArrayList<>();

    @Builder.Default
    private Instant lastLogin = Instant.now();

    private boolean enabled;

    public User(long id) {
        this.id = id;
    }

}
To tell Spring that it should run the validations in the controller we have to add a @Valid annotation to the incoming data:
    @PostMapping
    public Mono<ResponseEntity<Object>> newUser(@RequestBody @Valid Mono<User> userMono, ServerHttpRequest req) {
        return userMono.flatMap(user -> {
            return userService.newUser(user)
                    .map(u -> ResponseEntity.created(URI.create(req.getPath() + "/" + u.getId())).build());
        });
    }
Now try to create a user like we have done in a former exercise and see what happens:
curl -d '{"id":100, "name":"Spiderman"}' -H "Content-Type: application/json" -X POST https://localhost:8080/userThis time the response contains a 400 error code and complains about the invalid email and password field.
Therefore the request has to be updated to include a valid email address and password.
curl -d '{"id":100, "name":"Spiderman", "email":"me@spidey.com", "password":"WithGreatPowerComesGreatResponsibility"}' -H "Content-Type: application/json" -X POST https://localhost:8080/userThis time the Spiderman user is successfully added to the list of users, which can be verified by navigating to https://localhost:8080/user.
31. Exercise: Write your own custom validation
So far we have used annotations provided by JSR-303, but now we will create our own. The goal is to make sure that we only save roles for our users that the application knows about.
import java.lang.annotation.Documented;
import java.lang.annotation.ElementType;
import java.lang.annotation.Retention;
import java.lang.annotation.RetentionPolicy;
import java.lang.annotation.Target;

import javax.validation.Constraint;
import javax.validation.Payload

@Target({ ElementType.FIELD }) (1)
@Retention(RetentionPolicy.RUNTIME) (2)
@Constraint(validatedBy = { ValidRolesValidator.class }) (3)
@Documented (4)
public @interface ValidRoles {

    String message() default "Invalid role detected"; (5)

    Class<?>[] groups() default {}; (6)

    Class<? extends Payload>[] payload() default {}; (7)
}| 1 | @Target Where the annotation is allowed to be placed, we only allow fields |
| 2 | @Retention Annotation needs to be around at runtime to be read with reflection |
| 3 | @Constraint Marks the annotation as a validation and links to the validator |
| 4 | @Documented become part of the Java doc of the target class |
| 5 | message() required field, message to show the user after failed validation |
| 6 | groups() groups allow you to control when certain validations are run |
| 7 | payloud() can be used to provide additional metadata, eg., severity level |
The Validator has to implement ConstraintValidator and gets the value of the field injected:
import java.util.Collection;
import java.util.List;

import javax.validation.ConstraintValidator;
import javax.validation.ConstraintValidatorContext;

import com.google.common.collect.Lists;

public class ValidRolesValidator implements ConstraintValidator<ValidRoles, Collection<String>> {

    private List<String> validRoles = Lists.newArrayList("ROLE_USER", "ROLE_ADMIN");

    @Override
    public boolean isValid(Collection<String> collection, ConstraintValidatorContext context) {
        return collection.stream().allMatch(validRoles::contains);
    }

}
Finally we can add the annotation to the field in the User class and Spring will do the rest:
    @ValidRoles
    private List<String> roles = new ArrayList<>();
32. Exercise: Change the default port of the web app
By default, Spring Boot uses port 8080, but this can be changed by using the server.port property in the application.properties file.
For the upcoming exercises each project needs a distinct port.
The port for the user project should be changed to 8081.
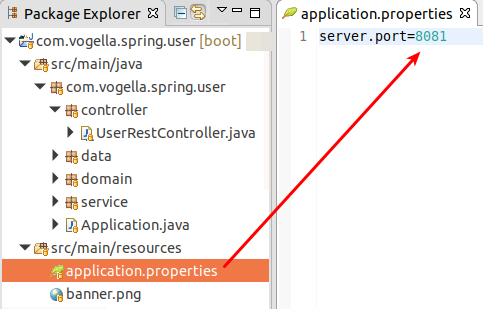
server.port=808133. Exercise: Spring Cloud Gateway project
The user application has become bigger meanwhile, but we do not want to end up with a huge monolithic server application.
Micro services have become more public and Spring Cloud helps to manage this architecture.
First of all we would like to create a new project called com.vogella.spring.gateway.
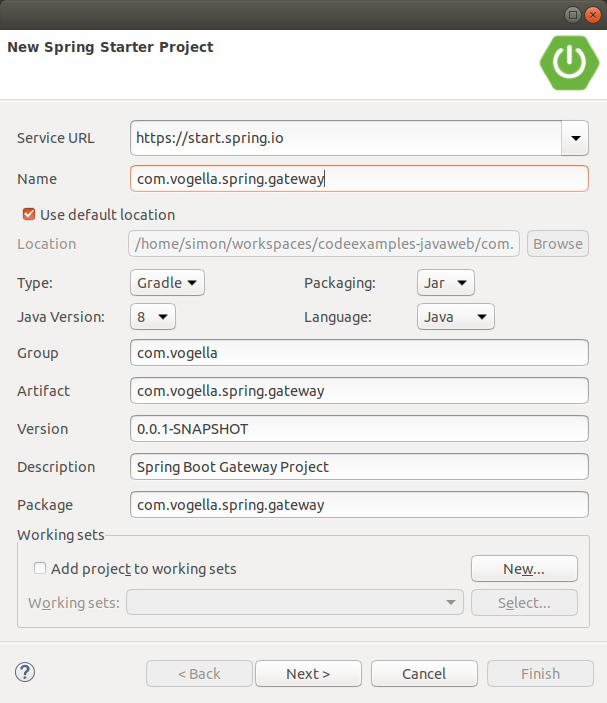
Press Next and add the following dependencies:
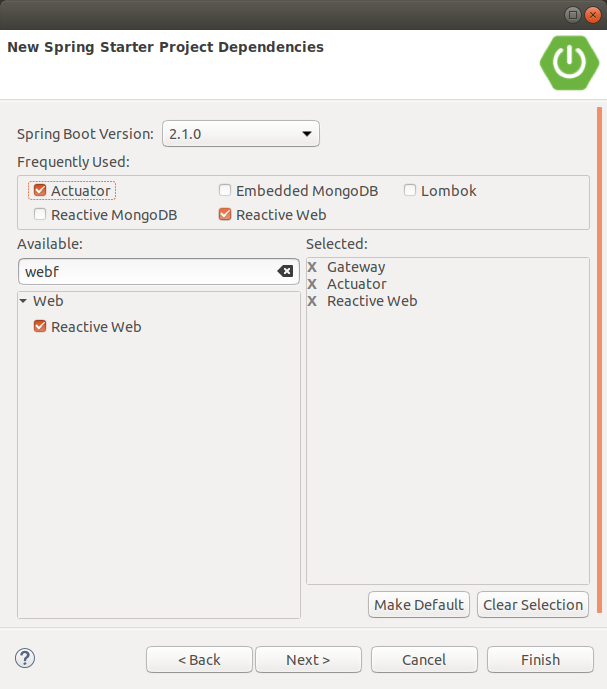
This gateway project will be used as facade, which delegates to different micro services, e.g., the user project (com.vogella.spring.user).
First of all the ports should be changed so that the gateway uses port 8080 and the port of the user project should have been changed to 8081. This can be achieved by changing the server.port property in the application.properties file in both projects.
| In case port 8080 is already blocked on your machine you can choose a different port, e.g., 8090, and target this instead. |
To route to other micro services from the gateway a RouteLocator bean has to be created.
Therefore we create a RouteConfig class, which will be responsible of the RouteLocator creation.
package com.vogella.spring.gateway;

import org.springframework.cloud.gateway.route.RouteLocator;
import org.springframework.cloud.gateway.route.builder.RouteLocatorBuilder;
import org.springframework.context.annotation.Bean;
import org.springframework.context.annotation.Configuration;

@Configuration
public class RouteConfig {
    @Bean
    public RouteLocator customRouteLocator(RouteLocatorBuilder builder) {
        return builder.routes().route("users", r ->
                r.path("/user/**")
                .uri("https://localhost:8081"))
                .build();
    }
}|
Currently the Greenwich.M1 version is used and therefore the build.gradle file of the gateway project has to be changed. To make it easy, please just override it for now with the following contents: Afterwards, refresh the Gradle dependencies by using the context menu while selecting the com.vogella.spring.gateway project.
|
Once this has been done the gateway server and the user server should be started.
Now the gateway is able to delegate requests to the user server.
You can try this by navigating to https://localhost:8080/user and should receive the users in json format.
|
You can also navigate to https://localhost:8081/user and should get the same result, but directly from the user server. |
34. Exercise: Spring Cloud service discovery
Currently the gateway just points to the user service directly and we do not see any real benefit of having this facade in front of the user service.
One huge benefit of using micro service architectures is that additional services can be spawned, which can be load balanced, if one service is too busy.
For service discovery a generic name for services has to be applied. This can be done by using the spring.application.name property.
For the user project the application.properties file should look like this:
server.port=8081
spring.application.name=user
We want to use Netflix Eureka for service discovery and therefore have to add a dependency to org.springframework.cloud:spring-cloud-starter-netflix-eureka-client.
The build.gradle should be adjusted to look like this:
buildscript {
    ext {
        springBootVersion = '2.1.0.RELEASE'
    }
    repositories {
        mavenCentral()
    }
    dependencies {
        classpath("org.springframework.boot:spring-boot-gradle-plugin:${springBootVersion}")
    }
}

apply plugin: 'java'
apply plugin: 'eclipse'
apply plugin: 'org.springframework.boot'
apply plugin: 'io.spring.dependency-management'

group = 'com.vogella'
version = '0.0.1-SNAPSHOT'
sourceCompatibility = 1.8

repositories {
    mavenCentral()
    maven { url "https://repo.spring.io/milestone" } (1)
}

ext {
    springCloudVersion = 'Greenwich.M1' (2)
}

dependencies {
    implementation('org.springframework.boot:spring-boot-starter-actuator')
    implementation('org.springframework.boot:spring-boot-starter-data-mongodb-reactive')
    implementation('org.springframework.boot:spring-boot-starter-webflux')
    implementation('org.springframework.cloud:spring-cloud-starter-netflix-eureka-client') (3)
    compileOnly('org.projectlombok:lombok')
    testImplementation('org.springframework.boot:spring-boot-starter-test')
    testImplementation('de.flapdoodle.embed:de.flapdoodle.embed.mongo')
    testImplementation('io.projectreactor:reactor-test')
}

dependencyManagement { (4)
    imports {
        mavenBom "org.springframework.cloud:spring-cloud-dependencies:${springCloudVersion}"
    }
}| 1 | The milestone repositories have to be added, because the Spring Cloud Greenwich version is published as milestone for now. |
| 2 | Store the Spring Cloud version in a ext project property |
| 3 | Add the org.springframework.cloud:spring-cloud-starter-netflix-eureka-client dependency |
| 4 | dependencyManagement for Spring Cloud dependencies has to be applied |
Now refresh the Gradle dependencies by clicking and add the @EnableDiscoveryClient to the Application class and the user project is ready to be discovered by Netflix Eureka.
35. Exercise: Create a Netflix Eureka server
Create a new Spring project called com.vogella.spring.eureka.
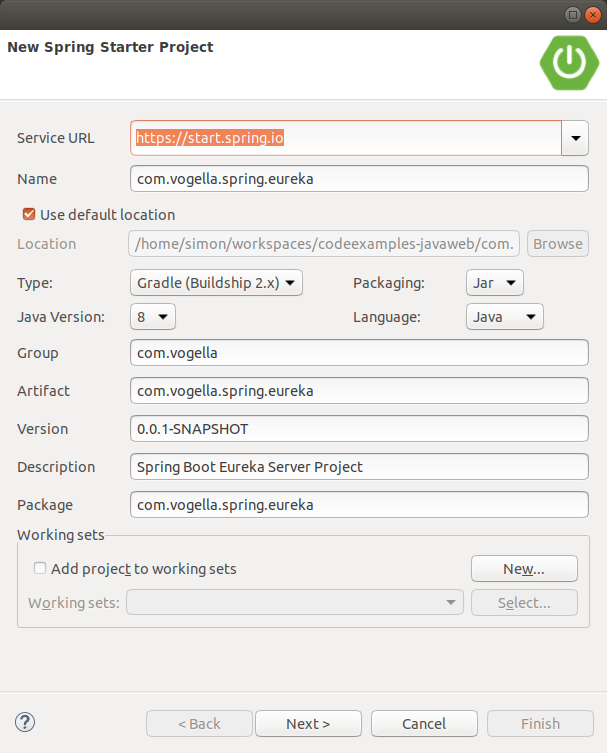
Press Next and add the Eureka Server dependency('org.springframework.cloud:spring-cloud-starter-eureka-server') and then press finish.
When the project is created the @EnableEurekaServer annotation has to be added the application config.
@SpringBootApplication
@EnableEurekaServer
public class Application {
    public static void main(String[] args) {
        SpringApplication.run(Application.class, args);
    }
}
And these would be the default application.yml for the Eureka server.
| If you still have a application.properties file you can rename it to application.yml. |
server:
  port: 8761
eureka:
  client:
    registerWithEureka: false
    fetchRegistry: false
Now you can navigate to https://localhost:8761 with a browser and see the Eureka dashboard and the service that have been discovered.
You should now (re-)start the user server and then see the user service in the Eureka dashboard:

36. Exercise: Start Eureka server with Spring Cloud Cli
In a previous exercise the spring cloud cli has been installed.
By running spring cloud --list in the command line available cloud services can be found.
Besides others eureka is listed as well.
To start it you can run spring cloud eureka in the command line.
Once the eureka server has been started it prints the following to the command line:
eureka: To see the dashboard open https://localhost:8761

Type Ctrl-C to quit.|
Starting the eureka server with Spring Cloud CLI may take awail. Just be patient or try to create a new Spring Boot project, which is described in the next NOTE of this exercise. |
Now you can navigate to https://localhost:8761 with a browser and see the Eureka dashboard and the services that have been discovered.
You should now (re-)start the user server and then see the user service in the Eureka dashboard:
|
In case you do not want to use the Spring Cloud CLI you can easily create a Eureka server on your own by creating a new Spring Boot project.
Add the Netflix Eureka Server depenedency ('org.springframework.cloud:spring-cloud-starter-eureka-server') and add the And these would be the default application.yml for the Eureka server: |
37. Exercise: Let the gateway find services load balanced
Now that we are able to add services to the Eureka server, we no longer want to address services via its physical address, but by service name.
So instead of pointing to the user server by using https://localhost:8081 with the RouteLocator in the gateway project a different uri can be used.
package com.vogella.spring.gateway;

import org.springframework.cloud.client.discovery.EnableDiscoveryClient;
import org.springframework.cloud.gateway.route.RouteLocator;
import org.springframework.cloud.gateway.route.builder.RouteLocatorBuilder;
import org.springframework.context.annotation.Bean;
import org.springframework.context.annotation.Configuration;

@Configuration
@EnableDiscoveryClient (1)
public class RouteConfig {
    @Bean
    public RouteLocator customRouteLocator(RouteLocatorBuilder builder) {
        return builder.routes()
                .route("users", r -> r.path("/user/**")
                .uri("lb://user")) (2)
                .build();
    }
}| 1 | The gateway itself has also to be registered to eureka to make it work properly |
| 2 | lb stands for load balanced |
Load balanced means that Eureka can now decide to which user service instance it passes the request, in case several user service instances are running.
The application.properties of the gateway project have to look like this:
server.port=8080
spring.application.name=gateway (1)

spring.cloud.gateway.discovery.locator.enabled=true (2)
spring.cloud.gateway.discovery.locator.lower-case-service-id=true (3)| 1 | Service name in the eureka registry |
| 2 | The discovery locator has to be enabled to make the RouteLocator work |
| 3 | By default, services are written with upper case letters and this setting allows lower case |
The implementation('org.springframework.cloud:spring-cloud-starter-netflix-eureka-client') dependency has to be added to the gateway as well in the build.gradle as well.
Now three server should be started: Eureka server, Gateway server and the User server.
When navigating to the https://localhost:8080/user end point the same result as before should be returned as response.
The big benefit is that it is now possible to start several user server on different ports and eureka will load balance the requests.

38. Exercise: Use a Circuit Breaker
Sometimes services are not available any more and you might want to provide a fallback. That is the point where circuit breaker come into play.
A popular implementation is the Netflix Hystrix fault tolerance library.
Imagine all user services are down and you still want to return a fallback from the gateway when the /user end point is requested.
First of all the implementation('org.springframework.cloud:spring-cloud-starter-netflix-hystrix')
has to be added to the build.gradle file of the com.vogella.spring.gateway project.
After the gradle dependencies have been refreshed, we can either add the @EnableCircuitBreaker annotation to a @Configuration class.
@Configuration
@EnableDiscoveryClient
@EnableCircuitBreaker
public class RouteConfig {

    // ... more code ...
}
or the @SpringCloudApplication annotation instead of the @SpringBootApplication annotation can be used.
@SpringCloudApplication (1)
public class Application {

    public static void main(String[] args) {
        SpringApplication.run(Application.class, args);
    }
}| 1 | @SpringCloudApplication applies both @EnableDiscoveryClient and @EnableCircuitBreaker |
Once the Hystrix circuit breaker has been enabled a filter for providing a hystrix fallback can be applied to the RouteLocator.
@Configuration
@EnableDiscoveryClient (1)
@EnableCircuitBreaker (2)
public class RouteConfig {
    @Bean
    public RouteLocator customRouteLocator(RouteLocatorBuilder builder) {
        return builder.routes()
                .route("user",
                        r -> r.path("/user/**")
                                .filters(f -> f.hystrix(c -> c.setName("fallback") (3)
                                        .setFallbackUri("forward:/fallback")))
                                .uri("lb://user"))
                .build();
    }
}| 1 | Can be omitted in case the @SpringCloudApplication annotation has been applied |
| 2 | Can be omitted in case the @SpringCloudApplication annotation has been applied |
| 3 | Set a fallback name and fallback uri, which will be used in case the lb://user uri cannot be reached |
To make this forward:/fallback work a rest controller, which acts as a fallback has to be created:
package com.vogella.spring.gateway;

import org.springframework.http.HttpStatus;
import org.springframework.http.ResponseEntity;
import org.springframework.web.bind.annotation.GetMapping;
import org.springframework.web.bind.annotation.RestController;

import reactor.core.publisher.Mono;

@RestController
class HystrixFallbackContoller {

    @GetMapping("/fallback")
    public Mono<ResponseEntity<String>> userFallback() {
        return Mono.just(ResponseEntity.status(HttpStatus.SERVICE_UNAVAILABLE).build());
    }
}
A better fallback would be to return a default user or asking another service for users.
39. Exercise: Spring Cloud Config Server
Configuring several different micro services can be struggling, because by default the configuration resides inside the build jar file. Therefore the configurations are not easily available for system admins and you do not want to build a new jar file every time a configuration has to be changed.
To centralize this configuration a Config Server can be created. Create a new project called com.vogella.spring.config.
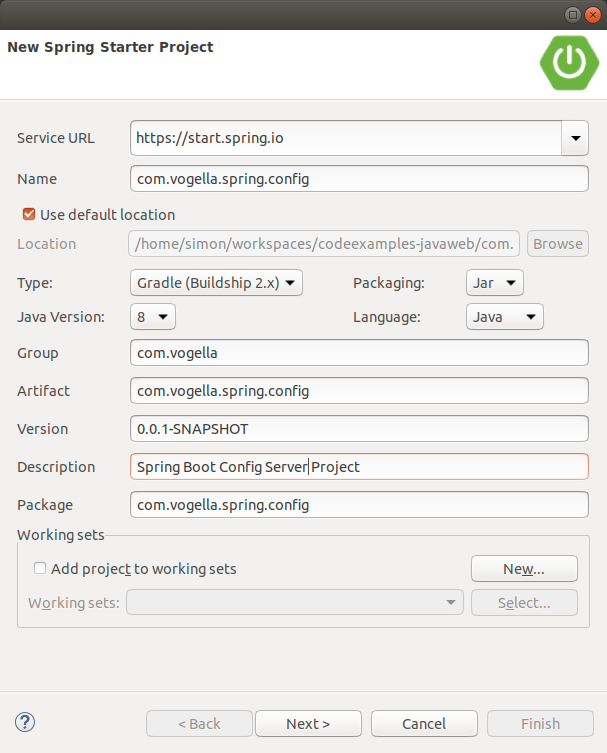
Press Next, add the Config Server (org.springframework.cloud:spring-cloud-config-server) as dependency and press Finish.
Add the @EnableConfigServer annotation to the com.vogella.spring.config.Application class.
@SpringBootApplication
@EnableConfigServer (1)
public class Application {

    public static void main(String[] args) {
        SpringApplication.run(Application.class, args);
    }
}| 1 | Tells Spring that this Spring Boot application is a Config Server |
Now this Config Server needs to be configured in its application.properties so that it points to a Git repository, where the configurations should reside.
server.port=8888 (1)
spring.cloud.config.server.git.uri=https://github.com/vogellacompany/codeexamples-javaweb/ (2)
spring.cloud.config.server.git.searchPaths=config (3)| 1 | The default port for Config Server is usually port 8888. |
| 2 | This property is used to point to a git repository that contains configuration files |
| 3 | A searchPath is used to point to subfolders (can also be a list) |
40. Exercise: Spring Cloud Config client
Different micro services, e.g., com.vogella.spring.user, should now get their configuration from the Config Server rather than holding their own configuration.
The application.properties file can be deleted from the com.vogella.spring.user project.
Instead of using the application.properties a bootstrap.properties now has to be added to the src/main/resources folder.
spring.application.name=user (1)
spring.cloud.config.uri=https://localhost:8888 (2)
management.security.enabled=false (3)| 1 | Besides Eureka, also the Cloud Config Server makes use of this property to find the right config file in the git repo |
| 2 | Tells this Config Server client where to find the Config Server |
| 3 | Disable security right now for convenience, but it will be added again later ;-) |
To enable the user project to talk to a Cloud Config Server the
implementation('org.springframework.cloud:spring-cloud-starter-config') dependency has to be added to the build.gradle file.
| Do not forget to refresh the Gradle project. |
Now start the Eureka Server, the Config Server and finally the user server.
Look into the console log of the user application and validate that the remote properties in the git repo have been used.
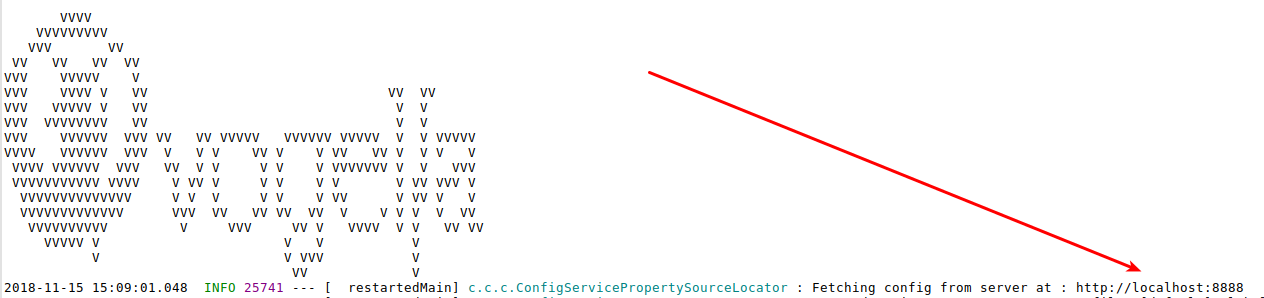
41. Exercise: Local Git Repository with configurations
Create your own local git repository and provide a user.properties for the configuration in the git repository.
mkdir config

git init

echo 'server.port=8081' > user.properties

git add .

git commit -m "Added user config"
Now the Cloud Config Server can point to the local repository by changing the application.properties of the com.vogella.spring.config project.
server.port=8888
spring.cloud.config.server.git.uri=file://${path-to-repo} (1)| 1 | ${path-to-repo} has to be replaced by the actual path to the previously created repo |
Now again start the Eureka Server, the Config Server and finally the user server.
Look into the console log of the user application and validate that the remote properties in the git repo have been used.
42. Exercise: Add Spring Security to the classpath
To ensure that not everyone can read any user, the rest end point should be secured.
To achieve this the org.springframework.boot:spring-boot-starter-security compile dependency has to be added.
dependencies {

    // more dependencies ...

    compile('org.springframework.boot:spring-boot-starter-security')
    testImplementation('org.springframework.security:spring-security-test')
}
Spring Boot automatically adds default security settings to the web application by adding this dependency.
Again try to get all users by navigating to https://localhost:8080/user in the browser.
Now you should be redirected to https://localhost:8080/login and being faced with a login page.
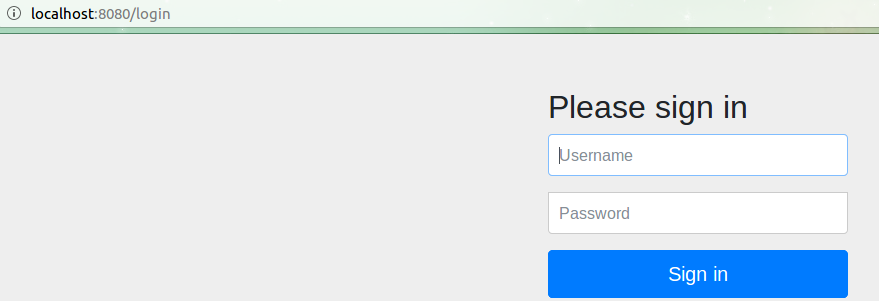
The default user is called user and the password can be found in the console.
Using generated security password: 64c68d82-0448-465b-8b97-a7002c612d2543. Exercise: Configure Spring Security with user repository
Using a password from the console is not that secure and it would be better to use the users from the database to authenticate.
We want to modify the User class by adding an additional constructor:
public User(User user) { (1)
    this.id = user.id;
    this.name = user.name;
    this.email = user.email;
    this.password = user.password;
    this.roles = user.roles;
    this.lastLogin = user.lastLogin;
    this.enabled = user.enabled;
}| 1 | Basically this is a copy constructor to create new User instances by copying the field values from an existing user object. |
To achieve this create a com.vogella.spring.user.security package and create a ServiceReactiveUserDetailsService class in this package.
package com.vogella.spring.user.security;

import java.util.Collection;
import java.util.stream.Collectors;

import org.springframework.security.core.GrantedAuthority;
import org.springframework.security.core.authority.SimpleGrantedAuthority;
import org.springframework.security.core.userdetails.ReactiveUserDetailsService;
import org.springframework.security.core.userdetails.UserDetails;
import org.springframework.stereotype.Component;

import com.vogella.spring.user.domain.User;
import com.vogella.spring.user.service.UserService;

import reactor.core.publisher.Mono;

@Component
public class ServiceReactiveUserDetailsService implements ReactiveUserDetailsService {

    private UserService userService;

    public ServiceReactiveUserDetailsService(UserService userService) {
        this.userService = userService;
    }

    @Override
    public Mono<UserDetails> findByUsername(String username) {
        return userService
            .findUserByEmail(username) (1)
            .map(CustomUserDetails::new); (2)
    }

    static class CustomUserDetails extends User implements UserDetails {

        private static final long serialVersionUID = -2466968593900571404L;

        public CustomUserDetails(User user) {
            super(user);
        }

        @Override
        public Collection<? extends GrantedAuthority> getAuthorities() {
            return getRoles() (3)
                .stream()
                .map(authority -> new SimpleGrantedAuthority(authority))
                .collect(Collectors
                    .toList());
        }

        @Override
        public String getUsername() {
            return getEmail(); (4)
        }

        @Override
        public boolean isAccountNonExpired() {
            return true;
        }

        @Override
        public boolean isAccountNonLocked() {
            return true;
        }

        @Override
        public boolean isCredentialsNonExpired() {
            return true;
        }
    }
}| 1 | The email address is supposed to be used for a login and therefore the email is queried |
| 2 | Make use of an adapter for the UserDetails interface so that CustomUserDetails can be returned in by the overridden findByUsername method. |
| 3 | Map the roles to be authorities |
| 4 | Use the Users email as unique user name |
For the other values we simply return true for now.
The UserDetails class also has also an isEnabled and getPassword, which is already being implemented by the User class.
This ReactiveUserDetailsService implementation will be claimed by Spring Security and used to authenticate users with the formlogin or basic auth header.
We also want to use a proper password encoder for our users that are created in the UserDataInitializer class.
Therefore we create a SecurityConfig class in the com.vogella.spring.user.security package.
package com.vogella.spring.user.security;

import org.springframework.context.annotation.Bean;
import org.springframework.security.config.annotation.method.configuration.EnableReactiveMethodSecurity;
import org.springframework.security.config.annotation.web.reactive.EnableWebFluxSecurity;
import org.springframework.security.crypto.factory.PasswordEncoderFactories;
import org.springframework.security.crypto.password.PasswordEncoder;

@EnableWebFluxSecurity
@EnableReactiveMethodSecurity
public class SecurityConfig {

    @Bean
    public PasswordEncoder passwordEncoder() {
        return PasswordEncoderFactories
            .createDelegatingPasswordEncoder();
    }
}
The DelegatingPasswordEncoder automatically uses the latest and greatest encryption algorithm and therefore is the best choice to be used as PasswordEncoder.
Since a PasswordEncoder is now available as bean it can be injected into our UserDataInitializer class to encode the given passwords.
package com.vogella.spring.user.initialize;

import java.time.Instant;
import java.util.Arrays;
import java.util.Collections;

import org.springframework.beans.factory.SmartInitializingSingleton;
import org.springframework.context.annotation.Profile;
import org.springframework.security.crypto.password.PasswordEncoder;
import org.springframework.stereotype.Component;

import com.vogella.spring.user.data.UserRepository;
import com.vogella.spring.user.domain.User;

@Profile("!production")
@Component
public class UserDataInitializer implements SmartInitializingSingleton {

    private UserRepository userRepository;
    private PasswordEncoder passwordEncoder;

    public UserDataInitializer(UserRepository userRepository, PasswordEncoder passwordEncoder) { (1)
        this.userRepository = userRepository;
        this.passwordEncoder = passwordEncoder;
    }

    @Override
    public void afterSingletonsInstantiated() {
        User user = new User(1, "Fabian Pfaff", "fabian.pfaff@vogella.com", passwordEncoder (2)
            .encode("fap"),
                Collections
                    .singletonList("ROLE_ADMIN"),
                Instant
                    .now(),
                true);
        User user2 = new User(2, "Simon Scholz", "simon.scholz@vogella.com", passwordEncoder
            .encode("simon"),
                Collections
                    .singletonList("ROLE_ADMIN"),
                Instant
                    .now(),
                false);
        User user3 = new User(3, "Lars Vogel", "lars.vogel@vogella.com", passwordEncoder
            .encode("vogella"),
                Collections
                    .singletonList("ROLE_USER"),
                Instant
                    .now(),
                true);

        userRepository.saveAll(Arrays.asList(user, user2, user3)).subscribe();
    }

}| 1 | Inject the PasswordEncoder |
| 2 | Make use of the PasswordEncoder to encode the user passwords |
Optional exercise: Make use of the PasswordEncoder in the UserService newUser method for new users.
To verify that now the users from the database are used try to navigate to https://localhost:8080/user and you will be redirected to
a login form, where you can type in simon.scholz@vogella.com as user and simon as password. (See UserDataInitializer for other names and passwords)
And now you should be able to see the user json again.
44. Exercise: Use JWT token for authentication
Using a form login or http basic authentication has some drawbacks, because with http basic authentication the user credentials have to be sent together with each and every request. A form login is also not always suitable in case you are not using a browser to access the data.
JWT tokens offer the possibility to exchange bearer tokens for each request, where authentication is necessary.
To make use of this we need to be able to generate these tokens by using a JWTUtil.
package com.vogella.spring.user.security;

import java.util.Date;
import java.util.HashMap;
import java.util.Map;

import org.springframework.beans.factory.annotation.Value;
import org.springframework.stereotype.Component;

import com.vogella.spring.user.domain.User;

import io.jsonwebtoken.Claims;
import io.jsonwebtoken.Jwts;
import io.jsonwebtoken.SignatureAlgorithm;

@Component
public class JWTUtil {

    @Value("${jwt.secret}")
    private String secret;

    @Value("${jwt.expiration}")
    private String expirationTime;

    public Claims getAllClaimsFromToken(String token) {
        return Jwts.parser().setSigningKey(secret).parseClaimsJws(token).getBody();
    }

    public String getUsernameFromToken(String token) {
        return getAllClaimsFromToken(token).getSubject();
    }

    public Date getExpirationDateFromToken(String token) {
        return getAllClaimsFromToken(token).getExpiration();
    }

    private Boolean isTokenExpired(String token) {
        final Date expiration = getExpirationDateFromToken(token);
        return expiration.before(new Date());
    }

    public String generateToken(User user) {
        Map<String, Object> claims = new HashMap<>();
        claims.put("role", user.getRoles());
        claims.put("enable", user.isEnabled());
        return doGenerateToken(claims, user.getEmail());
    }

    private String doGenerateToken(Map<String, Object> claims, String username) {
        Long expirationTimeLong = Long.parseLong(expirationTime); //in second

        final Date createdDate = new Date();
        final Date expirationDate = new Date(createdDate.getTime() + expirationTimeLong * 1000);
        return Jwts.builder()
                .setClaims(claims)
                .setSubject(username)
                .setIssuedAt(createdDate)
                .setExpiration(expirationDate)
                .signWith(SignatureAlgorithm.HS512, secret)
                .compact();
    }

    public Boolean validateToken(String token) {
        return !isTokenExpired(token);
    }
}| To learn more about JWT tokens you can get further information on https://jwt.io/ |
The JWTUtil class makes use of the jwt.secret and jwt.expiration properties, which we will add to the bootstrap.properties file for now.
The next thing to do is to create a rest end point to obtain a JWT token, which can be used for authorization.
Create an AuthRequest, AuthResponse and a AuthRestController class inside the com.vogella.spring.user.controller package.
package com.vogella.spring.user.controller;

import lombok.AllArgsConstructor;
import lombok.Data;
import lombok.NoArgsConstructor;
import lombok.ToString;

@Data
@NoArgsConstructor
@AllArgsConstructor
@ToString
public class AuthRequest {
    private String email;
    private String password;
}
package com.vogella.spring.user.controller;
import lombok.AllArgsConstructor;
import lombok.Data;
import lombok.NoArgsConstructor;
import lombok.ToString;
@Data
@NoArgsConstructor
@AllArgsConstructor
@ToString
public class AuthResponse {
private String token;
}package com.vogella.spring.user.controller;
import java.security.Principal;
import org.springframework.beans.factory.annotation.Autowired;
import org.springframework.http.HttpStatus;
import org.springframework.http.ResponseEntity;
import org.springframework.security.access.prepost.PreAuthorize;
import org.springframework.security.core.annotation.AuthenticationPrincipal;
import org.springframework.security.core.userdetails.ReactiveUserDetailsService;
import org.springframework.security.crypto.password.PasswordEncoder;
import org.springframework.web.bind.annotation.GetMapping;
import org.springframework.web.bind.annotation.PostMapping;
import org.springframework.web.bind.annotation.RequestBody;
import org.springframework.web.bind.annotation.RestController;
import com.vogella.spring.user.domain.User;
import com.vogella.spring.user.security.JWTUtil;
import reactor.core.publisher.Mono;
@RestController
public class AuthRestController {
@Autowired
private JWTUtil jwtUtil;
@Autowired
private PasswordEncoder passwordEncoder;
@Autowired
private ReactiveUserDetailsService userDetailsService;
@PostMapping("/auth")
public Mono<ResponseEntity<AuthResponse>> auth(@RequestBody AuthRequest ar) {
return userDetailsService
.findByUsername(ar
.getEmail())
.map((userDetails) -> {
if (passwordEncoder
.matches(ar
.getPassword(),
userDetails
.getPassword())) {
return ResponseEntity
.ok(new AuthResponse(jwtUtil
.generateToken((User) userDetails)));
} else {
return ResponseEntity
.status(HttpStatus.UNAUTHORIZED)
.build();
}
});
}
}With this /auth end point a JWT token can be obtained in case the sent AuthRequest has correct credentials.
Try to obtain a JWT token by using curl or your favorite rest client:
curl -d '{"email":"simon.scholz@vogella.com", "password":"simon"}' -H "Content-Type: application/json" -X POST https://localhost:8080/authSomething similar to this should be returned:
{
  "token": "eyJhbGciOiJIUzUxMiJ9.eyJzdWIiOiJsYXJzLnZvZ2VsQHZvZ2VsbGEuY29tIiwicm9sZSI6WyJST0xFX1VTRVIiXSwiZW5hYmxlIjp0cnVlLCJleHAiOjE1NDIzNTQ0MTIsImlhdCI6MTU0MjMyNTYxMn0.zBVx_-Npp3y6_6EqIpEVWy4EtQoCo01Ii8lSsI1w3X2imIUkrylTOgabgbNo8HgSunMwCujz1d5uIZ6JuGycQw"
}
Now that you got a valid JWT token the server side has to validate this token and secure the application in case the token is not valid.
To achieve that several classes have to be created:
package com.vogella.spring.user.security;

import java.util.List;
import java.util.stream.Collectors;

import org.springframework.beans.factory.annotation.Autowired;
import org.springframework.security.authentication.ReactiveAuthenticationManager;
import org.springframework.security.authentication.UsernamePasswordAuthenticationToken;
import org.springframework.security.core.Authentication;
import org.springframework.security.core.authority.SimpleGrantedAuthority;
import org.springframework.stereotype.Component;

import io.jsonwebtoken.Claims;
import reactor.core.publisher.Mono;

@Component
public class AuthenticationManager implements ReactiveAuthenticationManager {

    @Autowired
    private JWTUtil jwtUtil;

    @Override
    public Mono<Authentication> authenticate(Authentication authentication) {
        String authToken = authentication.getCredentials().toString();

        String username;
        try {
            username = jwtUtil.getUsernameFromToken(authToken);
        } catch (Exception e) {
            username = null;
        }
        if (username != null && jwtUtil.validateToken(authToken)) {
            Claims claims = jwtUtil.getAllClaimsFromToken(authToken);
            List<String> roles = claims.get("role", List.class);
            UsernamePasswordAuthenticationToken auth = new UsernamePasswordAuthenticationToken(username, null, roles
                    .stream().map(authority -> new SimpleGrantedAuthority(authority)).collect(Collectors.toList()));
            return Mono.just(auth);
        } else {
            return Mono.empty();
        }
    }
}
package com.vogella.spring.user.security;
import org.springframework.beans.factory.annotation.Autowired;
import org.springframework.http.HttpHeaders;
import org.springframework.http.server.reactive.ServerHttpRequest;
import org.springframework.security.authentication.ReactiveAuthenticationManager;
import org.springframework.security.authentication.UsernamePasswordAuthenticationToken;
import org.springframework.security.core.Authentication;
import org.springframework.security.core.context.SecurityContext;
import org.springframework.security.core.context.SecurityContextImpl;
import org.springframework.security.web.server.context.ServerSecurityContextRepository;
import org.springframework.stereotype.Component;
import org.springframework.web.server.ServerWebExchange;
import reactor.core.publisher.Mono;
@Component
public class SecurityContextRepository implements ServerSecurityContextRepository{
@Autowired
private ReactiveAuthenticationManager authenticationManager;
@Override
public Mono<Void> save(ServerWebExchange swe, SecurityContext sc) {
throw new UnsupportedOperationException("Not supported yet.");
}
@Override
public Mono<SecurityContext> load(ServerWebExchange swe) {
ServerHttpRequest request = swe.getRequest();
String authHeader = request.getHeaders().getFirst(HttpHeaders.AUTHORIZATION);
if (authHeader != null && authHeader.startsWith("Bearer ")) {
String authToken = authHeader.substring(7);
Authentication auth = new UsernamePasswordAuthenticationToken(authToken, authToken);
return this.authenticationManager.authenticate(auth).map((authentication) -> {
return new SecurityContextImpl(authentication);
});
} else {
return Mono.empty();
}
}
}package com.vogella.spring.user.security;
import org.springframework.context.annotation.Configuration;
import org.springframework.web.reactive.config.CorsRegistry;
import org.springframework.web.reactive.config.WebFluxConfigurer;
@Configuration
public class CORSFilter implements WebFluxConfigurer {
@Override
public void addCorsMappings(CorsRegistry registry) {
registry.addMapping("/**").allowedOrigins("*").allowedMethods("*").allowedHeaders("*");
}
}After these classes have been created we also want to add a custom SecurityWebFilterChain bean inside the SecurityConfig class:
package com.vogella.spring.user.security;

import org.springframework.context.annotation.Bean;
import org.springframework.http.HttpMethod;
import org.springframework.security.authentication.ReactiveAuthenticationManager;
import org.springframework.security.config.annotation.method.configuration.EnableReactiveMethodSecurity;
import org.springframework.security.config.annotation.web.reactive.EnableWebFluxSecurity;
import org.springframework.security.config.web.server.ServerHttpSecurity;
import org.springframework.security.crypto.factory.PasswordEncoderFactories;
import org.springframework.security.crypto.password.PasswordEncoder;
import org.springframework.security.web.server.SecurityWebFilterChain;
import org.springframework.security.web.server.context.ServerSecurityContextRepository;

@EnableWebFluxSecurity
@EnableReactiveMethodSecurity
public class SecurityConfig {

    @Bean
    public PasswordEncoder passwordEncoder() {
        return PasswordEncoderFactories
            .createDelegatingPasswordEncoder();
    }

    @Bean
    public SecurityWebFilterChain securitygWebFilterChain(ServerHttpSecurity http, (1)
            ReactiveAuthenticationManager authenticationManager,
            ServerSecurityContextRepository securityContextRepository) {
        return http
            .csrf()
            .disable()
            .formLogin()
            .disable()
            .httpBasic()
            .disable()
            .authenticationManager(authenticationManager)
            .securityContextRepository(securityContextRepository)
            .authorizeExchange()
            .pathMatchers(HttpMethod.OPTIONS)
            .permitAll()
            .pathMatchers("/auth")
            .permitAll()
            .anyExchange()
            .authenticated()
            .and()
            .build();

    }
}| 1 | This is the new method, the rest of the class except of the imports stays the same |
With this SecurityWebFilterChain you now need to pass the JWT token as authentication header to the server.
curl -H "Authorization: Bearer <your-token>" -H "Content-Type: application/json" -X GET https://localhost:8080/user (1)
| 1 | <your-token> must be replaced by your actual token, which you obtained from the /auth rest end point. |
45. Exercise: Taking roles into account to constrain access
We have specified that any request besides the /auth request has to be authorized in the SecurityConfig.
But so far we did not take the different roles of the user into account.
This can be done in several ways like further adjusting the SecurityWebFilterChain or using the @PreAuthorize annotation.
We can say that any delete request can only the done by ADMIN users:
@Bean
public SecurityWebFilterChain securitygWebFilterChain(ServerHttpSecurity http,
        ReactiveAuthenticationManager authenticationManager,
        ServerSecurityContextRepository securityContextRepository) {
    return http
        .csrf()
        .disable()
        .formLogin()
        .disable()
        .httpBasic()
        .disable()
        .authenticationManager(authenticationManager)
        .securityContextRepository(securityContextRepository)
        .authorizeExchange()
        .pathMatchers(HttpMethod.OPTIONS)
        .permitAll()
        .pathMatchers("/auth")
        .permitAll()
        .pathMatchers(HttpMethod.DELETE) (1)
        .hasAuthority("ADMIN") (2)
        .anyExchange()
        .authenticated()
        .and()
        .build();

}| 1 | Specify for any delete request |
| 2 | authority has to be ADMIN |
The pathMatchers method is also overloaded and you can be more precise about this, but you can also make use of the @PreAuthorize annotation.
This @PreAuthorize annotation can for example be added to the deleteUser method in the UserService class.
package com.vogella.spring.user.service;

import org.springframework.data.domain.Example;
import org.springframework.data.domain.ExampleMatcher;
import org.springframework.data.domain.ExampleMatcher.GenericPropertyMatcher;
import org.springframework.security.access.prepost.PreAuthorize;
import org.springframework.stereotype.Service;

import com.vogella.spring.user.data.UserRepository;
import com.vogella.spring.user.domain.User;

import reactor.core.publisher.Flux;
import reactor.core.publisher.Mono;

@Service
public class UserService {

    private UserRepository userRepository;

    public UserService(UserRepository UserRepository) {
        this.userRepository = UserRepository;
    }

    public Flux<User> getUsers(long limit) {
        if (-1 == limit) {
            return userRepository.findAll();
        }
        return userRepository.findAll().take(limit);
    }

    public Mono<User> findUserById(long id) {
        return userRepository.findById(id);
    }

    public Mono<User> findUserByEmail(String email) {
        return userRepository.findByEmail(email);
    }

    public Mono<User> findUserByExample(User user) {
        ExampleMatcher matcher = ExampleMatcher.matching().withIgnoreCase()
                .withMatcher("email", GenericPropertyMatcher::contains)
                .withMatcher("role", GenericPropertyMatcher::contains)
                .withMatcher("enabled", GenericPropertyMatcher::exact);
        Example<User> example = Example.of(user, matcher);
        return userRepository.findOne(example);
    }

    public Mono<User> newUser(User User) {
        return userRepository.save(User);
    }

    @PreAuthorize("hasAuthority('ADMIN')") (1)
    public Mono<Void> deleteUser(long id) {
        return userRepository.deleteById(id);
    }

}| 1 | Before this method will be invoked the @PreAuthorize checks whether to logged in user has the ADMIN authority. |
You can try this by logging in with a different user that has different roles/authorities.
46. Exercise: Generating RestDocs from Tests
In this exercise we will generate documentation for our REST api from test definitions.
In the com.vogella.spring.user project, add the following to your build.gradle file in the right places:
buildscript {
    ext {
        springBootVersion = '2.1.0.RELEASE'
    }
    repositories {
        mavenCentral()
        jcenter()
    }
    dependencies {
        classpath("org.springframework.boot:spring-boot-gradle-plugin:${springBootVersion}")
        classpath('org.asciidoctor:asciidoctor-gradle-plugin:1.5.9.2')
    }
}

// ... other plugins
apply plugin: 'org.asciidoctor.convert'

ext {
    // ...
    snippetsDir = file('build/generated-snippets')
}

dependencies {
    // ... other dependencies
    asciidoctor('org.springframework.restdocs:spring-restdocs-asciidoctor')
    testCompile('org.springframework.restdocs:spring-restdocs-webtestclient')
}

test {
    outputs.dir snippetsDir
}

asciidoctor {
    inputs.dir snippetsDir
    dependsOn test
}

bootJar {
    dependsOn asciidoctor
    from ("${asciidoctor.outputDir}/html5") {
        into 'static/docs'
    }
}
Then create a new test class:
package com.vogella.spring.user.controller;

import static org.springframework.restdocs.request.RequestDocumentation.parameterWithName;
import static org.springframework.restdocs.request.RequestDocumentation.pathParameters;
import static org.springframework.restdocs.webtestclient.WebTestClientRestDocumentation.document;
import static org.springframework.restdocs.webtestclient.WebTestClientRestDocumentation.documentationConfiguration;

import org.junit.Before;
import org.junit.Rule;
import org.junit.Test;
import org.junit.runner.RunWith;
import org.springframework.beans.factory.annotation.Autowired;
import org.springframework.boot.test.context.SpringBootTest;
import org.springframework.context.ApplicationContext;
import org.springframework.restdocs.JUnitRestDocumentation;
import org.springframework.security.test.context.support.WithMockUser;
import org.springframework.test.context.junit4.SpringRunner;
import org.springframework.test.web.reactive.server.WebTestClient;
import org.springframework.test.web.reactive.server.WebTestClient.ResponseSpec;

import com.vogella.spring.user.domain.User;

@RunWith(SpringRunner.class)
@SpringBootTest
public class UserRestDocsControllerTest {

    @Rule
    public JUnitRestDocumentation restDocumentation = new JUnitRestDocumentation();

    @Autowired
    private ApplicationContext context;

    private WebTestClient webTestClient;

    @Before
    public void setUp() {
        this.webTestClient = WebTestClient.bindToApplicationContext(context).configureClient().baseUrl("/")
                .filter(documentationConfiguration(restDocumentation)).build();
    }

    @Test
    @WithMockUser
    public void shouldReturnUser() throws Exception {
        ResponseSpec rs = webTestClient.get().uri("/user/{id}", 1).exchange();

        rs.expectStatus().isOk().expectBody(User.class)
                .consumeWith(document("sample",
                        pathParameters(parameterWithName("id").description("The id of the User entity"))));
    }
}
Create a new folder in your project directory: "/src/docs/asciidoc". Then create an adoc template that includes the auto-generated snippets from the test:
= Spring REST Docs with WebTestClient
Simon Scholz (c) 2018 vogella GmbH;
:doctype: book
:icons: font
:source-highlighter: highlightjs

Application demonstrating how to use Spring REST Docs with Spring Framework's
WebTestClient.

cURL request:

include::{snippets}/sample/curl-request.adoc[]

HTTPie request:

include::{snippets}/sample/httpie-request.adoc[]

HTTP request:

include::{snippets}/sample/http-request.adoc[]

Request body:

IMPORTANT: The following snippet is empty because it does not have any request body.

include::{snippets}/sample/request-body.adoc[]

HTTP response:

include::{snippets}/sample/http-response.adoc[]

Response body:

include::{snippets}/sample/response-body.adoc[]

Path Parameters:

include::{snippets}/sample/path-parameters.adoc[]
There are probably failing tests in your project. Deactivate all other test classes with @Ignore before proceeding.
|
To trigger the build run
./gradlew bootJar
The generated snippets reside in /build/generated-snippets/sample.
The documentation file generated from the index.adoc template can be found at /build/asciidoc/html5/index.html.
47. Spring Boot resources
47.1. vogella Java example code
If you need more assistance we offer Online Training and Onsite training as well as consulting