The article contains a introduction to JavaScript.
1. What is JavaScript (ECMAScript)?
JavaScript is a case sensitive scripting language. JavaScripts syntax is C-based, with semicolons and curly braces.
All main browsers contain a compiler or interpreter for JavaScript.
In earlier days JavaScript was primarily used within HTML webpages.
Nowadays, JavaScript is also used on the server, for example with Node.js.
|
JavaScript and Java are completely different programming languages even though they have a similar name. |
1.1. JavaScript and webpages
You can put JavaScript into an external file or directly into the HTML page.
If you put the JavaScript code into the HTML page you can either put it into the header or in the body of the HTML page.
JavaScript which is embedded into an HTML page must be surrounded by <script type="text/javascript"> </script> tags.
JavaScripts in the body is be executed while the page loads.
JavaScripts in the header is be executed when other JavaScript functions in the HTML body call them.
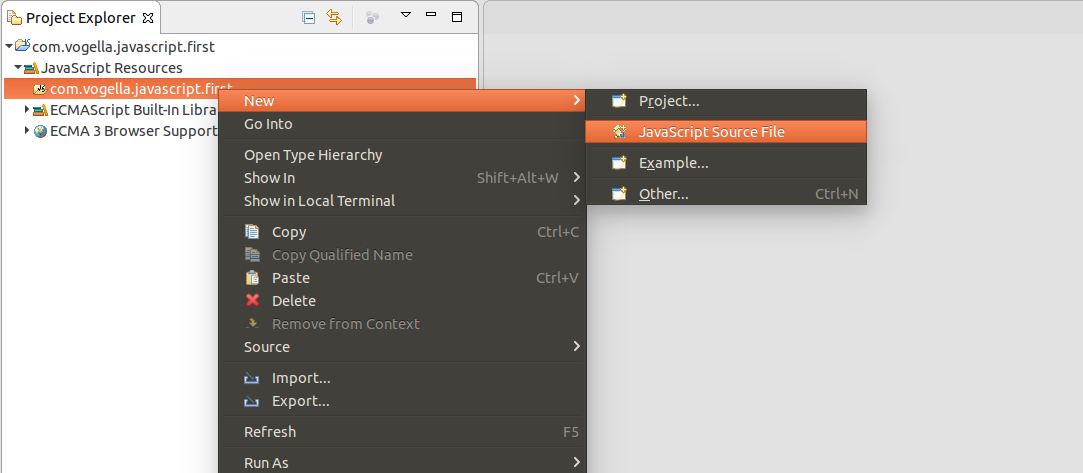
2. Editor
Any editor like VScode or the Eclipse IDE provides good support for writing Javascript.
3. Your first JavaScript
In the editor of your choice create a file named helloworld.html with the following content.
In this example, the JavaScript is embedded into the HTML page.
<!DOCTYPE html>
<html>
<body>
<script type="text/javascript">
<!--This is single line comment -->
/*
This is a multi line commend
The following command write output the text into the HTML code. -->
*/
document.writeln("Hello, JavaScript!");
</script>
</body>
</html>
Open this file in a browser.
4. Your first JavaScript outside an HTML page
You can also put the JavaScript in a separate file and include it in the HTML page.
For example, create the file javascriptinclude.html with the following content.
<!DOCTYPE html>
<html>
<body>
<script src="myfirstjsfile.js"></script>
</body>
</html>
Create the file 'myfirstjsfile.js' in the same directory as the HTML page.
As the JavaScript is in a separate file you do not have to use script tag. Simple write the code directly into the file.
document.writeln("<b>Bold Hello World via an external js file!</b>");Open the HTML page in a browser. The script should get executed and you should see the message.
5. Debugging
The easiest way to "debug" JavaScript is to use the alert() method that allows to give the user some feedback.
This is the equivalent to println in other programming languages.
For example, the following program shows a popup with the currently value to the user.
<!DOCTYPE HTML PUBLIC "-//W3C//DTD HTML 4.01 Transitional//EN">
<html>

<body>
<script type="text/javascript">
/*Declare a text variable and print it to the HTML page*/
var mytext= "Example Text.";
/*Call the function*/
alert(mytext);

</script>
</body>
</html>
You can also open the webpage in a Browser like Chrome and debug it there.
6. Appendix - Programming in JavaScript
6.1. Variables and data types
The following example demonstrates how to declare and use variables in JavaScript. You may notice that there are several ways of declaring variables.
let mytext= "Hello, hello.
Turn the radio on.
Is there anybody out there...";

/* declare variables t o do some math*/
a = 5; // global variable avoid this
let b = 1;
let result = a - b;

/* concatenate two strings*/
let mytext1 = "I like Spanish";
let mytext2 = " because the melody is nice.";
document.writeln(mytext1 + mytext2);|
JavaScript allows you to declare a variable without a keyword.
This creates global variables that can lead to hard to determine bugs.
You should avoid them.
Also the |
Variables defined without the keyword var are global variables.
Variables defined with var are scoped according to their declaration, e.g., if you define a var in a function this variable is only valid in the current function body.
Variables defined with let and const are only valid in the current block.
It is good JavaScript practice to always use one of the keywords to avoid global variables.
JavaScript has four basic types, Object and the primitive types Number, String, and Boolean. While Objects are passed by reference, the primitive types are passed by value.
6.2. String operations
You can define string and concatenate them.
The following example assumes you have two variables user and validationError.
var message = "Invalide user action for " + user.firstName + " " + user.lastName +
  ". Operations ended with " + validationError;
Alternatively, can you also use the backtick string literal to allow string interpolation.
var message = `Invalide user action for ${user.firstName} ${user.lastName}. Operations ended with ${validationError}`;6.3. Arrays
Arrays are Objects in JavaScript. You can define them and use the method pop() to remove the first element and push(newValue) to add a new element at the end. You can also iterate over it.
<!DOCTYPE html>
<html>
<body>
<script type="text/javascript">

let myArray = ["Android", true, 7]
alert(myArray[0]);
alert(myArray.length);
myArray.pop();
alert(myArray);
myArray.push("Eclipse")
alert(myArray);

/*Iterate over the array and write it to the console of the browser*/

for(let i = 0; i < myArray.length; i++) { alert(myArray[i]) }

</script>
</body>
</html>
6.4. Functions
A function in JavaScript encapsulates reusable code and is represented as an Object. Functions can be directly called via other JavaScript code. It is recommended that you put functions in the header of the HTML page. Functions are declared via the function keyword. You can call a function directly, or use the apply method on the function.
<!DOCTYPE html>
<html>
<header>
<script type="text/javascript">
/*Write the text twice to the document*/
function writetext(text) {
    document.writeln(text);
    document.writeln(text + "<p>");
}
</script>

</header>
<body>
<script type="text/javascript">
/*Declare a text variable and print it to the HTML page*/
var mytext = "Example Text.";
/*Call the function*/
writetext(mytext)
/*Call it via apply*/
writetext(mytext + "apply").apply();
</script>
</body>
</html>
6.5. Prototypes in JavaScript
JavaScripts Objects are not fundamentally class based like in object orientated programming languages. JavaScript is a prototype-based language, by this approach you can reuse functions by cloning existing objects.
Here is a an example that shows object creation with inheritance in ECMA5.
var Point2D = function (x, y) {
    this.move(x, y);
};
Point2D.prototype.move = function (x, y) {
    this.x = x;
    this.y = y;
};
var Point3D = function (x, y, z) {
    Point2D.call(this, x, y);
    this.move(x, y, z);
};
Point3D.prototype = Object.create(Point2D.prototype);
Point3D.prototype.constructor = Point3D;
Point3D.prototype.move = function (x, y, z) {
    Point2D.prototype.move(x, y);
    this.z = z;
}
var point3d = new Point3D(5, 3, 6);
console.log(point3d.x); // => 5
console.log(point3d.z); // => 6
ECMA6 introduced a class syntax that can be used like in object oriented languages but is just syntactic sugar for the prototype based approach.
class Point2D {
    constructor (x, y) {
        this.move(x, y);
    }
    move (x, y) {
        this.x = x;
        this.y = y;
    }
}
class Point3D extends Point2D {
    constructor (x, y, z) {
        super();
        this.move(x, y, z);
    }
    move (x, y, z) {
        super.move(x, y);
        this.z = z;
    }
}
var point3d = new Point3D(5, 3, 6);
console.log(point3d.x); // => 5
console.log(point3d.z); // => 6
6.6. Assigning functions to HTML buttons
The following gives an example how to assign a function to an HTML button.
<!DOCTYPE HTML PUBLIC "-//W3C//DTD HTML 4.01 Transitional//EN">
<html>
<head>
<script type="text/javascript">
function writetext(mytext) {
    document.writeln(mytext);
}

function addNumber(a, b) {
    var result = a + b;
    return result;
}
</script>

</head>
<body>

<input type="button" value="Write Text after click"
onclick="writetext('Hello function')" >

<input type="button" value="Add number"
onclick="writetext(addNumber(1,3))" >
</body>
</html>
6.7. HTML Events
JavaScript can react to certain events on the page and be registered with webpage elements, e.g., buttons. You can register a function to an event in the HTML page.
| Event | Description |
|---|---|
Onload |
Triggered when the user loads the page. The onload event can for example be used to check the visitors browser type. |
onChange |
Called whenever a field is changed. Can for example be used to validate an input field of a form. |
onSubmit |
Called when a user clicks on the submit button of a form. |
OnMouseOver and OnMouseOut |
Called when the mouse enters a certain element on the page or leaves it. |
7. JavaScript and HTML interaction
7.1. HTML DOM
A HTML webpage is represented via a HTML Document Object Model (DOM). The HTML DOM is defined via a W3C standard. This HTML DOM defines a standard way to access and manipulate HTML documents. You can use JavaScript to modify the HTML DOM.
7.2. Manipulation HTML with JavaScript
You can for example search via JavaScript for certain elements and modify their properties. The following example shows how to find HTML elements with a certain div class and set the display property to hide / show them.
<!DOCTYPE HTML PUBLIC "-//W3C//DTD HTML 4.01 Transitional//EN">
<html>
<head>
<script type="text/javascript">

function hideshow() {

    var allHTMLTags = new Array();

    //Create Array of All HTML Tags
    var allHTMLTags = document.getElementsByTagName("*");

    //Loop through all tags using a for loop
    for (i = 0; i < allHTMLTags.length; i++) {

        //Get all tags with the specified class name.
        if (allHTMLTags[i].className == "revhistory") {

            // hide or display the elements
            if (allHTMLTags[i].style.display == "none") {
                allHTMLTags[i].style.display = "";
            } else {
                allHTMLTags[i].style.display = "none";
            }
        }
    }
}
</script>

</head>
<body>

<div class="revhistory">This is the text which will be manipulated via JavaScript</div>

<input type="button" value="Show/ Hide"
onclick="hideshow()">


</body>
</html>
8. JavaScript Examples
8.1. Create a dynamic link using the webpage information
The following shows how a URL for an link can be dynamically created via JavaScript. This examples uses JavaScript to create a link for the website "digg".
<!DOCTYPE HTML PUBLIC "-//W3C//DTD HTML 4.01 Transitional//EN">
<html>
<head>

/* This script will read the current URL and the title of the document
and submit this webpage to the social bookmarking website. */

<script type="text/javascript">
function toDiggUrl(){
    var result = "http://digg.com/submit?phase=2&url=";
    result += encodeURIComponent(location.href);
    result += "&title=";
    result += encodeURIComponent(document.title);
    result += "&topic=programming";
    window.location = result;
}
</script>
</head>

<body>

<b>Here we write some information to the HTML page.</b>
<BR>
Write the current URL to this HTML document
<script type="text/javascript">
document.writeln(location.href);
</script>

<BR>
<BR>
<b>Encodes the current URL so that special characters will get
encoded</b>
<BR>
<script type="text/javascript">
document.writeln(encodeURIComponent(location.href))
</script>


<BR>
<BR>
<b>More fancy stuff, evalute page information and send this to a
social bookmarking website (digg)</b>
<BR>


<table border="0" cellpadding="10" cellspacing="0" width="100%">
    <tr>
        <td width="320">If you press the hyperlink below the JavaScript
        will run <BR>
        <a href="javascript: toDiggUrl()">Digg this site</a></td>
    </tr>
</table>


</body>
</html>
8.2. Reading META Tags via JavaScript
You can use JavaScript to read existing meta tags from the webpage. The following reads the content of the meta tag description from the webpage.
<!DOCTYPE HTML PUBLIC "-//W3C//DTD HTML 4.01 Transitional//EN">
<html>

<head>
<meta name="description" content="Tutorials from www.vogella.com!">

<script type="text/javascript">
function getMetaDescription () {
  var metaElements = document.all ?
    document.all.tags('META') :
    document.getElementsByTagName ?
    document.getElementsByTagName ('META') : new Array();
  var metaKeywords = new Array();
  var i = 0;
  for (var m = 0; m < metaElements.length; m++)
    if (metaElements[m].name == 'description')
      metaKeywords[i++] = metaElements[m].content;
  return metaKeywords;
}
</script>
</head>

<h2>
This will write the meta tag description to this page
</h2>

<body>

<script type="text/javascript">
    document.write(getMetaDescription());
</script>


</body>
</html>
8.3. HTML forms and JavaScript
The following is an example on checking input data of HTML forms and setting hidden parameters via Javascript. In this case the URL is automatically determined and send to the service once submit is pressed.
function updateFormAction() {

    document.forms["myform"].elements["webpage"].value = encodeURIComponent(location.href);
    var value = document.forms["myform"].elements["user"].value;
    if (value == null || value == "") {
        var Textknoten = document.createTextNode("Please fill out all fields");
        document.getElementById("replace").replaceChild(Textknoten, document.getElementById("replace").firstChild);

        return false;
    }
    var value = document.forms["myform"].elements["email"].value;
    if (value == null || value == "") {
        return false;
    }
    var value = document.forms["myform"].elements["summary"].value;
    if (value == null || value == "") {
        return false;
    }

    var value = document.forms["myform"].elements["comment"].value;
    if (value == null || value == "") {
        return false;
    }
    return true;

}
<html>
<head> </head>
<body>
<!-- Favorites -->
<table border="0" cellpadding="10" cellspacing="0" width="100%">
<tr>
<td>
<div dojoType="dijit.TitlePane" title="Feedback Form">
So how did you like this webpage? <BR>
<FORM id=myform " NAME="myform" ACTION="https://www.vogella.com/FeedbackForm/FeedbackSave" method="get"
onclick="return updateFormAction()"><input TYPE="hidden"
NAME="webpage" VALUE="test">
<table>
<tr>
<td></td>
</tr>
<tr>
<td align="right">User: (*)</td>
<td><input name="user" type="text" size="30" maxlength="30"></td>
</tr>
<tr>
<td align="right">Email:(*)</td>
<td><input name="email" type="text" size="30" maxlength="30">
(will not be visible)</td>
</tr>
<tr>
<td align="right" valign="top">Summary:(*)</td>
<td><input name="summary" type="text" size="30" maxlength="30"></td>
</tr>
<tr>
<td align="right" valign="top">Comment:(*)</td>
<td><textarea name="comment" rows="6" cols="40"></textarea></td>
</tr>
<tr>
<td></td>
<td><input type="submit" value="Submit"></td>
</tr>
<tr> <td colspan="2"> <div id="replacefeedback"> (*) are required </div></div> </td></tr>
</table>
</FORM>
</div>
</td>
</tr>
</table>
</body>
</html>9. Modern JavaScript
JavaScript is evolving rapidly. Initially, it was knows as a client-side scripting language, for web page manipulation, validation, and minor processing. After the introduction of Google’s V8 and Node.js, there were an increasing number of ways of using it in programming.
With its increasing importance also in backends, JavaScript is now considered "The programming language for the web", used on the Full Stack: Client, Server, and Middleware. Furthermore, you can use Modern JavaScript also to write applications running on Mobile, Desktop, and Containers.
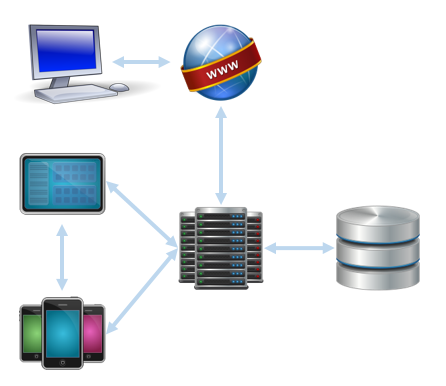
Some examples of modern JavaScript usage are: Web UIs; Mobile UIs; Browser-based applications; IoT applications; large-scale real-time systems; REST-APIs services; databases; etc.
In this article, we will introduce Modern JavaScript's workflows, and tools, using Eclipse with JSDT 2.0 as main IDE.
9.1. JSDT 2.0 (JavaScript Development Tools)
JSDT is the Eclipse Project supporting JavaScript development, also used as base by commercial tools like JBossTools, ZendStudio, etc.
JSDT 1.x, shipped until Eclipse Mars.2, was used for Classic client-side JavaScript, supporting ECMAScript 3.0 (ES3, 1999).
JSDT 2.x, shipped from Eclipse Neon on, is a total reboot of the tooling, to fill existing gaps with Modern JavaScript, supporting:
-
ECMAScript 6 (ES6, 2015)
-
Node.js and tools like npm, Bower, Gulp and Grunt
-
Chromium debugging
9.1.1. JSDT parser/compiler infrastructure
JSDT changed several parser/compiler toolchains. Below you see a brief resume:
-
JSDT 1.0, until Mars.2: supports ES3 using Rhino (Mozilla Foundation), a Java-based parser/compiler for JavaScript.
-
JSDT 2.0, initial release: supports ES6 using Esprima (jQuery Foundation). As Esprima is written in JavaScript, this version of JSDT 2.0 needs to hook Nashorn, the Java8’s JS interpreter.
-
JSDT 2.0, from Neon.2 release: supports ES6 using ClosureCompiler (Google), a java-based parsing infrastructure for JavaScript.
9.1.2. ECMAScript 6 (ES6)
JSDT 2.0 supports ECMAScript 6 (ES6, 2015), the most recent spec. at development time. ES6 introduces new language features, such as Classes, default parameters, template literals, destructuring assignments (from Node.js), and much more.
// Class
class Smartphone extends Phone {
  constructor(name){
    super('Smart Phone')
    // ..
  }
}

// default parameters
var addRows = function(parent, nRows=10, bgColor='red'){
  // ..
}

// template literals
var welcome = `Welcome, mr. ${name} ${surname}.`
var url = `https://server.co/api/message/${id}`

// destructuring assignments
var {user,pass} = request.body
var [line1, line2, line3] = file.split('\n')
9.1.3. Node.js and Tools
Node.js is an increasingly popular JavaScript runtime, generally used with a variety of connected tools.
JSDT 2.0 supports running and debugging Node.js applications, using commands available in the context menu.
JSDT 2.0 also integrates common Node.js tools, as:
Package Managers, using JSON-based files to manage and install dependencies:
-
Npm: used for installing node modules. Its nested dependency tree is generally heavy in size.
-
Bower: for installing frontend components. Its "flat folder" structure avoids duplicate downloads and helps reducing page loads.
Task runners, to automate operations:
-
Grunt: to configure separate independent tasks. It uses a json-based file to describe the tasks.
-
Gulp: intuitive and fast task runner. The tasks are defined in a file with JavaScript syntax.
9.1.4. Chromium Debugging
JSDT 2.0 uses Chromium as JavaScript debugger. The code, developed as part of Google Chrome dev tools, is now EPL-licensed, and available in the JSDT repository, under the org.eclipse.wst.jsdt.chromium project.
JSDT adopted the Chromium Debugger as part of the EPL-licensed integration with Google Chrome dev tools.
9.2. Exercise: Install Node.js and tools
To use JSDT 2.0 for the tutorials, install Node.js and tools on your system, then verify the installation is correct.
Download and install Node.js on your computer.
The default installation should provide both node and npm commands.
Verify the installation by checking the versions of the two commands.
$ node -v
v4.4.5
$ npm -v
2.2.15Before adding other Node.js plugins, ensure your npm is up-to-date, by running the below command. Note that -g means globally, or system-wide.
$ npm update -g npmNow, install Bower, Gulp and Grunt using Npm, the Node.js package manager. Install the modules globally, with the -g flag, using the commands below.
Note: in linux systems, you might need to use sudo npm …
$ npm install -g bower$ npm install -g grunt
$ npm install -g grunt-cli$ npm install -g gulp
$ npm install -g gulp-cliWhen done, check the tools are available in your system, by checking their versions via command line.
$ bower -v && grunt -version && gulp -version
1.7.9
grunt-cli v1.2.0
[17:18:39] CLI version 1.2.2
[17:18:39] Local version 3.9.1
9.3. Get your IDE with JSDT 2.0
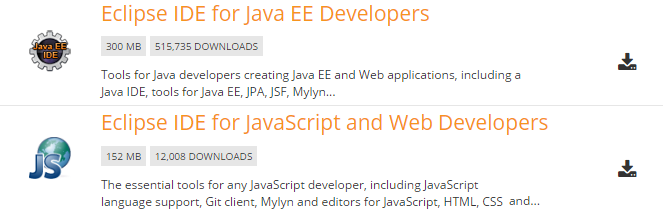
JSDT 2.0 is available starting from Eclipse Neon, and is shipped either in Eclipse IDE for Java EE Developers, or for JavaScript and Web Developers.
In the tutorial, we will use the latest JSDT features integrated with Java EE and web development.
Download the latest version of the Eclipse IDE for Java EE Developers from the EPP download page, or from the EPP downloads for developers.
When done, unzip and launch the IDE. Then, open the Console by pressing Ctrl+Alt+Shift+T, and type npm -v.
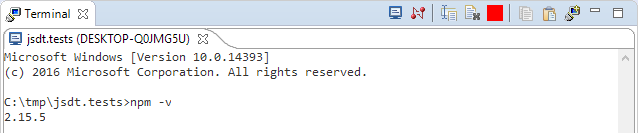
If you can read the npm version, the installation is successful, and we can proceed creating out first Node.js application with JSDT.
9.4. Run a Node.js Application
Create a new General Project named com.vogella.jsdt.test.
Select the project, press Ctrl+N, type npm init, and select the entry to create a new npm Init file.
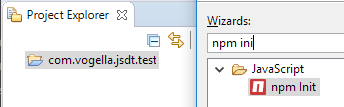
With the npm Initialization Wizard you can initialize the NPM package providing the main information for your Node.js module.
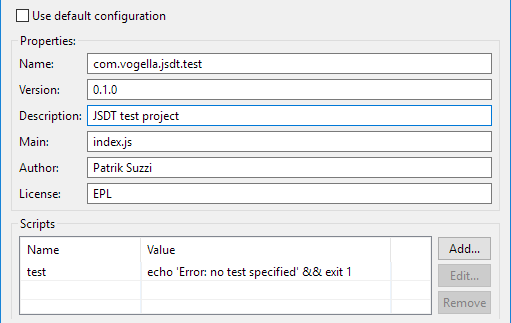
When done, the wizard generates the package.json, which is the file describing the Node.js module packaging and information.
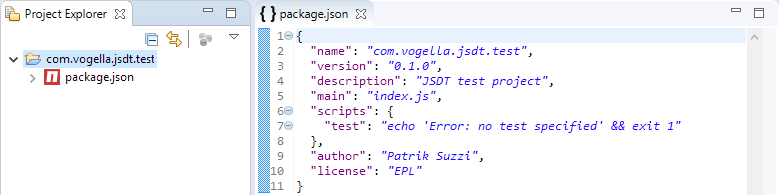
In the package.json, we read "main" : "index.js", which declares the main entry point for the module is index.js .
For most modules, it makes the most sense having a main script and often not too much else.
9.4.1. A simple Node.js application
Create a new file named index.js, the main entry point for the application, and add the content you see below.
/** com.vogella.jsdt.test/index.js */
var open = require('open');
// open with default browser
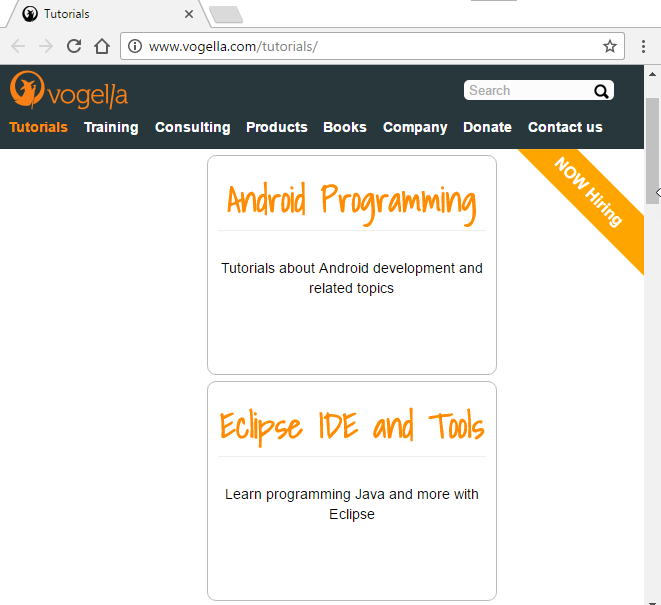
open('https://www.vogella.com/tutorials');The program declares a dependency to the module open, and uses a function of that module to open a the system default browser passing a given URL.
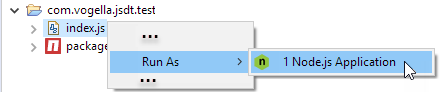
Test the program running it with Node.js by selecting the file, right-clicking and choosing Run as > Node.js application.
After running, we will see a console error: Error: Cannot find module 'open'. This is because Node.js is missing a reference to the module named "open".
9.4.2. Installing dependencies
To fix this issue, we need to add the module to the package.json dependencies and then install the dependencies by downloading them locally.
To add the missing dependency, edit manually the package.json, by adding a development-time dependency to the latest version ("*") of the module "open".
{
  "name": "com.vogella.jsdt.test",
  "version": "0.1.0",
  "description": "JSDT test project",
  "main": "index.js",
  "scripts": {
    "test": "echo 'Error: no test specified' && exit 1"
  },
  "author": "Patrik Suzzi",
  "license": "EPL",
  "devDependencies" : {
    "open" : "*"
  }
}
Then, run the npm install using hte JSDT integration:
right-click on package.json and select Run As > npm Install.
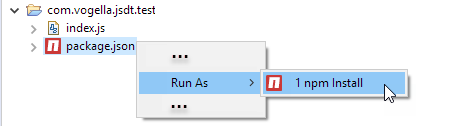
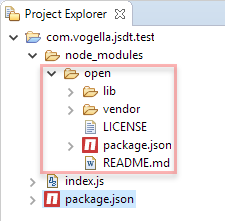
As a result, you will see all the needed dependencies downloaded under the node_modules folder.
Now, we can run the application again, right-clicking the index.js and then selecting Run As > Node.js Application. This time, as a result, we expect to see the Node.js instance launching the browser and opening the given webpage.
10. JavaScript Frontend Example
In this example, we will build an Angular.JS single page application with routing and controllers. The styling will be done with Bootstrap and FontAwesome. At the end, we will use a Node.js script to launch an Express server and serve the application on localhost.
10.1. Install frontend components with Bower
Create a bower.json file, using the shortcut: Ctrl + N > "Bower init".
Add the dependencies we will use in the project: angular, angular-route, bootstrap and font-awesome.
The bower file should look like the snippet below.
{
  "name": "jsdt.demo01",
  "version": "1.0.0",
  "license": "EPL",
  "ignore": [
    "**/.*",
    "node_modules",
    "bower_components",
    "test",
    "tests"
  ],
  "dependencies": {
    "angular": "1.2.25",
    "angular-route": "1.2.25",
    "bootstrap": "3.0.0",
    "font-awesome": "4.0.0"
  }
}
JSDT integrates the Bower command in Eclipse, so you can launch it via context menu.
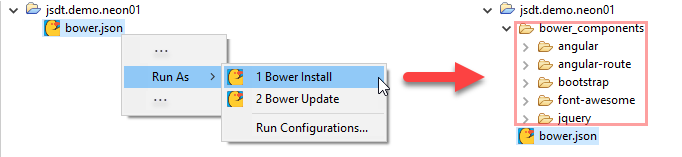
To download and install all the frontend components,
right-click on the bower.json file, and select Run As.. > Bower Install.
So doing, all the needed components will be downloaded under the default folder: bower_components.
10.2. Test frontend libraries
We test the imported libraries with a simple HTML using the most important javascript and css.
-
In the <html> tag, use the
ng-appdirective -
In <head>, reference js and css libs from bower_components
-
In <body>, test Bootstrap styling and Angular instructions.
<!DOCTYPE html>
<html ng-app>

<head>
  <title>Demo 01</title>
  <!-- Bootstrap and Font-awesome css -->
  <link rel="stylesheet" href="bower_components/bootstrap/dist/css/bootstrap.css" />
  <link rel="stylesheet" href="bower_components/font-awesome/css/font-awesome.css">
  <!-- Scripts -->
  <script src="bower_components/angular/angular.js"></script>
  <script src="bower_components/angular-route/angular-route.js"></script>
</head>

<body>
  <div class="container">
    <!-- Nav bar / header -->
    <nav class="navbar navbar-inverse">
      <a class="navbar-brand" href="#">Demo 01</a>
    </nav>
    <!-- Main content -->
    <div class="main">
      <div class="jumbotron text-center">
        <h1>{{'Hello,'+' world!'}}</h1>
        <!-- put in a circle a rectangular image -->
        <img src="html_128.png" class="img-circle" alt="HTML5">
      </div>
    </div>
  </div>
</body>

</html>
You can test visually that Boostrap is loaded and Angular is working. The working web application, should look like the image below.
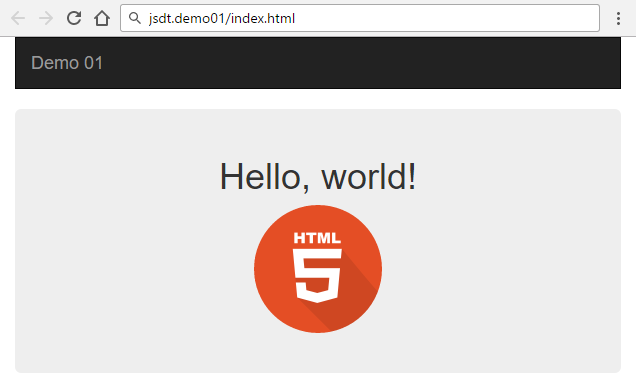
In this case you can verify that Boostrap is providing styles to the page,
and putting a link::res/jsdt.demo01/html_128.png[square image] in a circle;
while Angular can evaluate expressions like {{'Hello,'+' world!'}}.
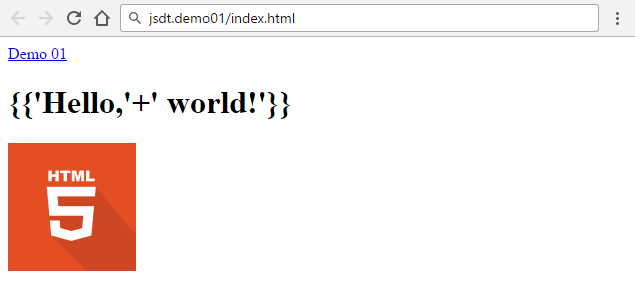
Below you can see a screenshot of what the page would look like in case Angular and Bootstrap are not loaded.
10.3. Angular Application
Create a javascript file named application.js, which will contain the code for the Angular application, and paste the code below.
/** application.js */

// module
var app = angular.module('jsdtApp', []);

//controllers with injected angular $scope
app.controller('mainController', function ($scope) {
  // create a message to display in our view
  $scope.message = 'Learn more about JSDT in the Eclipse JavaScript Development Tools project';
});
The first line creates an Angular application named jsdtApp, and declare it uses ngRoute as imported module.
The second statement, defines a controller named mainController.
When the controller is created, assigns a value to $scope.message,
a scope variable that we will use later, to display a message.
10.3.1. Use Angular Application in HTML
Now we edit the HTML file use the Angular application.
-
In <html>, set the application name
ng-app="jsdtApp", as we defined in the module. -
In <head>, include the angular application: application.js
-
In <body>, add the controller directive:
ng-controller="mainController" -
In <div id="main">, print the message from the controller:
$scope.message.
The HTML below represents a full working solution
<!DOCTYPE html>
<html ng-app="jsdtApp">
<head>
<title>Demo 01</title>
<!-- Bootstrap and Font-awesome css -->
<link rel="stylesheet" href="bower_components/bootstrap/dist/css/bootstrap.css" />
<link rel="stylesheet" href="bower_components/font-awesome/css/font-awesome.css">
<!-- Scripts -->
<script src="bower_components/angular/angular.js"></script>
<script src="bower_components/angular-route/angular-route.js"></script>
<!-- Application -->
<script type="text/javascript" src="application.js"></script>
</head>
<body ng-controller="mainController">
<div class="container">
<!-- Nav bar / header -->
<nav class="navbar navbar-inverse">
<a class="navbar-brand" href="#">Demo 01</a>
</nav>
<!-- Main content -->
<div class="main">
<div class="jumbotron text-center">
<h1>{{'Hello,'+' world!'}}</h1>
<!-- put in a circle a rectangular image -->
<img src="html_128.png" class="img-circle" alt="HTML5">
<p>{{message}}</p>
</div>
</div>
</div>
</body>
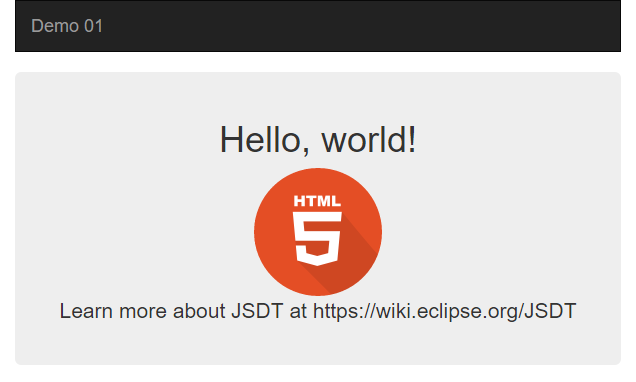
</html>Test visually the angular controller is working by observing the {{message}} is present.
10.4. Angular Routing
Routing means loading dynamically multiple HTML views inside a SPA (Single Page Application).
As an example, we will use clickable links on the navigation bar, to change the main content.
| Angular routing is not intended to work on local files. You should serve pages using a web server to avoid Cross origin request problems. |
10.4.1. Multiple HTML Views
We start creating three views to display the contents: about, contact, and home.
<!-- home.html -->
<div class="jumbotron bg-light text-center">
  <h1>{{'Hello,'+' world!'}}</h1>
  <img src="html_128.png" class="img-circle" alt="HTML5">
  <p>{{message}}</p>
</div>
<!-- about.html -->
<div class="jumbotron bg-dark text-center">
<h1>About</h1>
<p>{{message}}</p>
<a href="https://www.google.it/search?q=JSDT" class="btn btn-default btn-lg">
<i class="fa fa-search" aria-hidden="true"></i> Search</a>
</div><!-- contact.html -->
<div class="jumbotron bg-orange text-center">
<h1>Contact</h1>
<p>{{message}}</p>
</div>Note that the views are different each other, but all are using a {{message}} object.
Also note the views are using css classes bg-light, bg-dark and bg-orange, to be defined later.
10.4.2. Configure Routing and multiple Controllers
As we already included the angular-route.js script in the HTML,
we can add the dependency to the ngRoute module in the Angular.js application.
Then, we edit the javascript file, using the $routeProvider,
to configure three routes, one for each content page we created.
For each route we declare its path; we define the templateUrl to find the HTML view template; and we assign a controller to manage the view lifecycle.
Then, we add three controllers to the app, one for each page.
So doing we store page specific messages in the angular $scope.
Note: controllers contains business logic for a view. You can learn more in the official documentation
Based on the above premises, we edit the javascript file, so that it looks like the snippet you can see below.
var app = angular.module('jsdtApp', ['ngRoute']);

//configure routes
app.config(function ($routeProvider, $locationProvider) {
  $routeProvider
    .when('/', {
      templateUrl: 'pages/home.html',
      controller: 'mainController'
    })
    .when('/about', {
      templateUrl: 'pages/about.html',
      controller: 'aboutController'
    })
    .when('/contact', {
      templateUrl: 'pages/contact.html',
      controller: 'contactController'
    });
});

//controllers with injected angular $scope
app.controller('mainController', function ($scope) {
  // create a message to display in our view
  $scope.message = 'Learn more about JSDT in the Eclipse JavaScript Development Tools project';
});

app.controller('aboutController', function ($scope) {
  $scope.message = 'The JavaScript Development Tools (JSDT) \
        provide plug-ins for an IDE supporting JavaScript development.';
});

app.controller('contactController', function ($scope) {
  $scope.message = 'Please, get in touch with open source development.';
});
10.4.3. Enable Routing in HTML
To enable routing we need to edit the main HTML file as follows:
-
Add navigation links to activate routing
-
Add the
ng-viewtag, to mark the area to be replaced by views
Below you can see the updated HTML inside the <body> element.
<body ng-controller="mainController">
  <div class="container">
    <!-- Nav bar / header -->
    <nav class="navbar navbar-inverse">
      <div class="container-fluid">
        <div class="navbar-header">
          <a class="nav navbar-brand" href="#">Demo 01</a>
        </div>
        <ul class="nav navbar-nav navbar-right fa-2x">
          <li><a href="#"><i class="fa fa-fw fa-home"></i> Home</a></li>
          <li><a href="#about"><i class="fa fa-fw fa-book"></i>About</a></li>
          <li><a href="#contact"><i class="fa fa-fw fa-comment"></i>Contact</a></li>
        </ul>
      </div>
    </nav>
    <!-- Main content -->
    <div class="main">
      <div class="ng-view"></div>
    </div>
  </div>
</body>
10.4.4. Add style
To complete the page, add some inline style, to give different colors at the content pages, and to animate the user selection on navigation bar.
<head>
  ...
  <style type="text/css">
    .bg-dark { background-color: #6e6e6e; color: #ffffff; }
    .bg-light { background-color: #f4f4f4; color: #505050; }
    .bg-orange { background-color: #ff9900; color: #ffffff; }
    li:hover { background-color: #ff9900; }
  </style>
</head>
10.4.5. Test Routing avoiding issues
As anticipated, Angular Routing is not supposed to work on local files. Therefore, you can see empty areas, when loading an HTML file from the local filesystem.
At the time of writing, Firefox is able to render the routing example as we expect.
But, Chrome doesn’t work as Firefox, as its security model doesn’t allow serving local files when routing. In this case, you can detect the error inspecting the page and looking at the console.
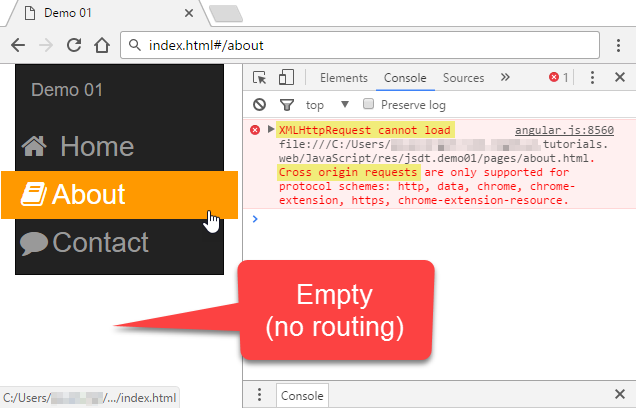
The real point of this section, is understanding that your frontend is not a simple local webpage. Instead, it is an application that should live in a webserver.
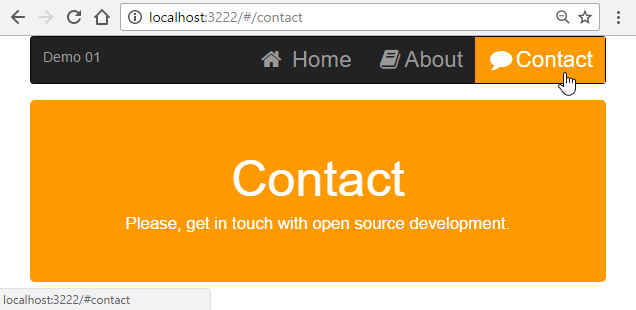
To fix this, we will use Node.js to launch a lightweight server and publish our SPA. So doing, you will access the frontend at a web address like https://localhost:3222
10.5. Node.js server on Localhost
In this section, we will see how to use Node.js to launch a local server to display our frontend.
Create a package.json file with the content you see in the snippet below.
{
  "name": "com.vogella.jsdt.demo.neon01",
  "version": "1.0.0",
  "author": "Patrik Suzzi",
  "license": "EPL",
  "devDependencies": {
    "express": "*",
    "open": "*"
  }
}
Note that we are importing two existing node modules:
-
express, providing a lightweight local server
-
open, providing a command to launch the default browser.
Then, use the JSDT integrations to install the libraries.
Right-click on the package.json and select Run As.. > NPM Install.

This will install the needed dependencies under the node_modules folder.
Then, create a javascript file called launch-server.js with the content below.
/** launch-server.js */

var open = require('open'),
  express = require('express'),
  app = express(),
  port = 3222;

// configure serving static content
app.use(express.static(__dirname + '/'));
// enable URL rewrite to support HTML5Mode: send the index.html
app.all('/*', function (req, res, next) {
  res.sendFile('index.html', { root: __dirname });
});

// launch server
app.listen(process.env.PORT || port, function () {
  console.log('Express server on http:/localhost:' + port + '!');
});

// open with default browser
open('http://localhost:' + port);
As you can see, the code loads the modules, starts the local server, and opens the inex.html. Please, not this server is configured to support URL-rewrite, hence you can reload pages and reuse URLs like in common rest applications.
Now, run the Node.js script to see the frontend application running on server. R-click 'launch-static-server.js' and select Run As .. > Node.js Application. This will launch node passing your script as parameter

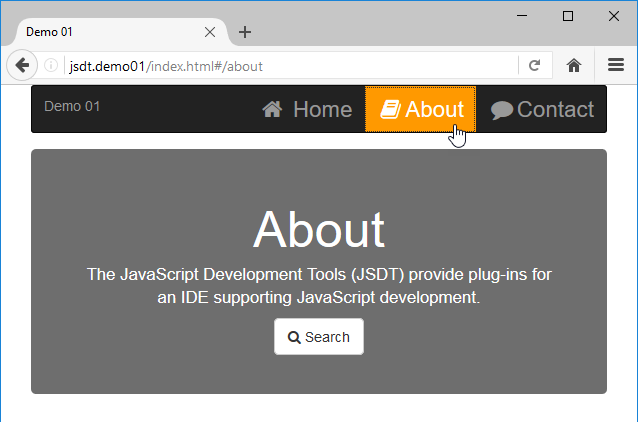
Now that the application is running on a local webserver, we can test it works as expected. Below you can see screenshots with the final result.


10.6. Tips for a Professional Single Page Application
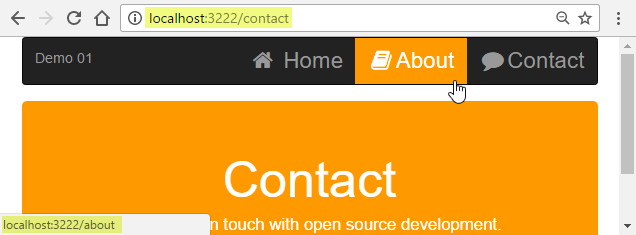
To have a more professional single-page applications, we should remove hashtags from webaddresses.
To do so, first you should use the $locationProvide.html5Mode, as shown below.
//configure routes
app.config(function ($routeProvider, $locationProvider) {
  // ..
  // use HTML5 History API to rewrite urls
  $locationProvider.html5Mode(true);
});
Then we should edit the HTML, by removing hashtags in redirect URLs
  <ul class="nav navbar-nav navbar-right fa-2x">
    <li><a href="/"><i class="fa fa-fw fa-home"></i> Home</a></li>
    <li><a href="/about"><i class="fa fa-fw fa-book"></i>About</a></li>
    <li><a href="/contact"><i class="fa fa-fw fa-comment"></i>Contact</a></li>
  </ul>
Finally you can see that the URLs in your web applications are now looking more professional.
10.7. Source Code
You can find the source code for this tutorial in the https://github.com/vogellacompany/codeexamples-javascript repository, under the com.vogella.jsdt.demo.neon01 directory.
11. JavaScript Fullstack Example
In this example, we will see how to use JSDT 2.0 to build and run a fullstack application, with
-
frontend: Angular/Bootstrap
-
Backend: NodeJS / Express / MongoDB
Once built, we will see how to debug this NodeJS Backend
12. Modern JavaScript integration with JEE
In this section, we will see how to integrate modern JavaScript within a JEE application, and how to debug JavaScript and Java together within Eclipse.
13. JavaScript with Eclipse resources
13.1. vogella Java example code
If you need more assistance we offer Online Training and Onsite training as well as consulting