This tutorial describes how to use the Gradle build tool.
1. Introduction to the Gradle build system
1.1. Definition of the Gradle build system
Gradle is a general purpose build management system. Gradle supports the automatic download and configuration of dependencies or other libraries. It supports Maven and Ivy repositories for retrieving these dependencies.
Gradle supports multi-project and multi-artifact builds.
1.2. Projects and tasks in Gradle
Gradle builds are described via a or multiple build.gradle files. At least one build file is typically located in the root folder of the project. Each build file defines a project and its tasks.
Projects can be something which should be built or something that should be done.
Each project consists of tasks. A task represents a piece of work which a build performs, e.g., compile the source code or generate the Javadoc.
These build files are based on a Domain Specific Language (DSL). In this file you can use a combination of declarative and imperative statements. You can also write Groovy or Kotlin code, whenever you need it. Tasks can also be created and extended dynamically at runtime.
The following listing represents a simple build file.
task hello {
    doLast {
        println 'Hello Gradle'
    }
}
To execute the hello task in this build file, type gradle hello on the command line in the directory of the build file.
If the Gradle output should be suppressed, use the -q (quiet) parameter.
gradle hello

# alternative add the -q flag
gradle -q hello
1.3. Comments in Gradle build files
You can use single and multiline comments in Gradle build files.
// Single line comment

/*
 Multi
 line
 comment
*/
1.4. Project settings and description
By default, Gradle uses the directory name as project name. You can change this by creating a settings.gradle file in the directory which specifies the project name.
rootProject.name ='com.vogella.gradle.first'You can also add a description to your project via the build.gradle file.
description ="""
Example project for a Gradle build

Project name: ${project.name}

More detailed information here... """

task hello {
    doLast {
        println 'Hello Gradle'
    }
}
Use the gradle project command to get information about your project.
The following listing shows the output.
:projects

------------------------------------------------------------
Root project -
Example project for a Gradle build

Project name: com.vogella.gradle.first

More detailed information here...
------------------------------------------------------------

Root project 'com.vogella.gradle.first' -
Example project for a Gradle build

Project name: com.vogella.gradle.first

More detailed information here...
No sub-projects

To see a list of the tasks of a project, run gradle <project-path>:tasks
For example, try running gradle :tasks

BUILD SUCCESSFUL

Total time: 1.048 secs
2. Gradle plug-ins
The Gradle build system uses plug-ins to extend its core functionality. A plug-in is an extension to Gradle which typically adds some preconfigured tasks. Gradle ships with a number of plug-ins, and you can develop custom plug-ins.
One example is the Java plug-in. This plug-in adds tasks to your project that allow compiling Java source code, run unit tests and to create a JAR file.
A plug-in is included in a build.gradle file with the apply plugin: 'pluginname' statement.
For example, the entry apply plugin: 'com.android.application' makes the Android plug-in available for a Gradle build.
Gradle provides also a registry for plug-ins via Gradle Plugin search.
2.1. IDE support for Gradle
The Gradleware company is developing Eclipse Gradle tutorial via the Eclipse Buildship project.
Other IDEs like IntelliJ and Android Studio already include also good Gradle support.
3. Installing and configuring Gradle
The usage of Gradle requires an JDK (Java Development Kit) installation.
3.1. Download and extract Gradle
The latest version of Gradle can be found on the Gradle Download page. Download the latest Complete distribution.
It is a gradle-${version}-all.zip, where ${version} is a placeholder for the current version.
Extract the contents of the downloaded zip file a new folder.
3.2. Installing Gradle on Windows
Add the folder to which you extracted Gradle to your PATH environment variable.
By pressing Win + Pause the system settings can be opened.
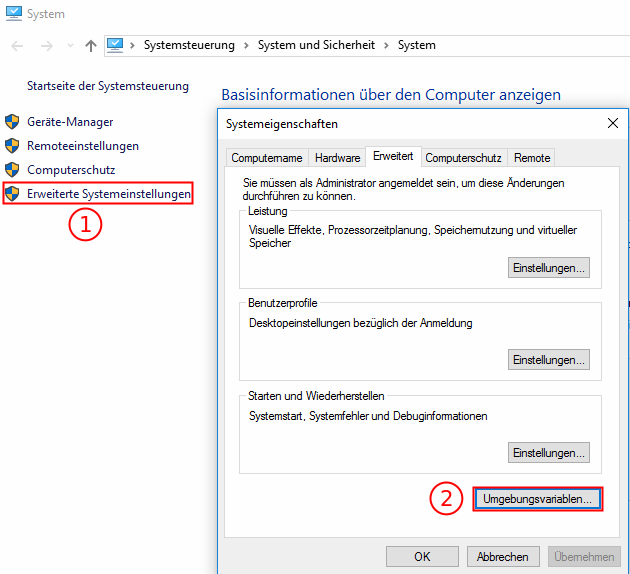
First the Advanced System Settings have to be selected and then the Environment Variables button needs to be pressed.
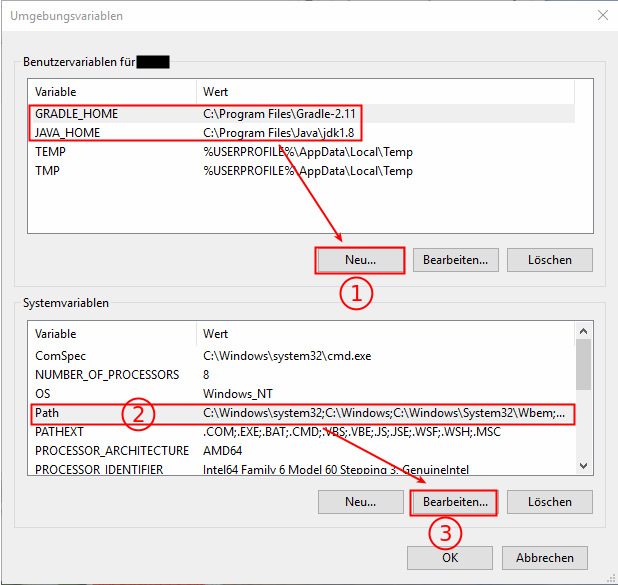
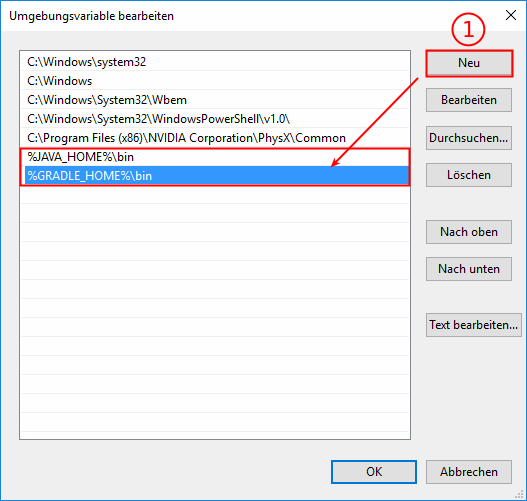
In the Environment Variables dialog the (1) GRADLE_HOME and JAVA_HOME user variables should be set. After that the (2) Path entry in the system variables is selected, the modify button can be pressed to add the bin folder of the Gradle installation to the Path.
3.3. Installing Gradle on Linux/Mac
3.3.1. Manual installation
The JAVA_HOME variable must point to a proper jdk and $JAVA_HOME/bin must be part of the PATH environment variable.
Add Gradle to the path by running export PATH=/usr/local/gradle/FOLDER_TO_WHICH_YOU_EXTRACTED_GRADLE/bin:$PATH in a terminal.
3.3.2. Installation with SDKMAN!
SDKMAN! is a command-line tool that allows you to install multiple Gradle versions and switch between them. It runs on any UNIX based operating system.
Installing SDKMAN!
You install it from the command-line. If you have already installed SDKMAN! you can skip this step.
curl -s "https://get.sdkman.io" | bash After you have installed SDKMAN! you have to restart you terminal before using it.
Installing Gradle and setting default version
sdk install gradle 3.2
sdk default gradle 3.2
gradle -v
Switching Gradle version
sdk install gradle 2.13
# use 2.13 for current terminal session
sdk use gradle 2.13
gradle -v
3.3.3. Check if Gradle installation was successful
Open a command line and type gradle, which will run Gradle’s help task by default.
3.4. Using the Gradle daemon for improved startup time
Gradle allows to start Gradle as daemon to avoid starting the Java Virtual Machine for every build. To configure that create a file called gradle.properties in the ${HOME}/.gradle and add the following line to it:
org.gradle.daemon=true
You can also place the gradle.properties file to the root directory of your project and commit it to your version control system.
If Gradle is not used for a few hours, the daemon stops automatically.
Executing gradle with the --daemon parameter on the command line starts the gradle daemon.
To stop the daemon interactively use the gradle --stop command.
3.5. Specify custom JVM settings for Gradle
The GRADLE_OPTS environment variable offers the opportunity to set specific JVM options for Gradle.
In Using the Gradle daemon for improved startup time the performance for the JVM startup is improved, but another performance killer for large builds can be a too small maximum heap space. Therefore it makes sense to increase it for Gradle.
export GRADLE_OPTS=-Xmx1024m
defines that Gradle can use 1 GB as maximum heap size.
On Windows OS environment variables are usually defined via the system property UI.
If you want to set JVM settings not globally but on a per project basis you can place them in <Your app folder>/gradle.properties:
org.gradle.jvmargs=-Xms2g -Xmx4g -XX\:MaxHeapSize\=3g
3.6. Typical .gitignore file for Gradle projects
If you are using Git as version control system, you can use the following .gitignore file as template for a Gradle project.
# Android built artifacts
*.apk
*.ap_
*.dex

# Java build artifacts class files
*.class

# other generated files
bin/
gen/
build/

# local configuration file (for Android sdk path, etc)
local.properties

# OSX files
.DS_Store

# Eclipse project files
.classpath
.project

# Android Studio
*.iml
.idea
.gradle


#NDK
obj/
4. Exercise - Create a Java project with Gradle command line
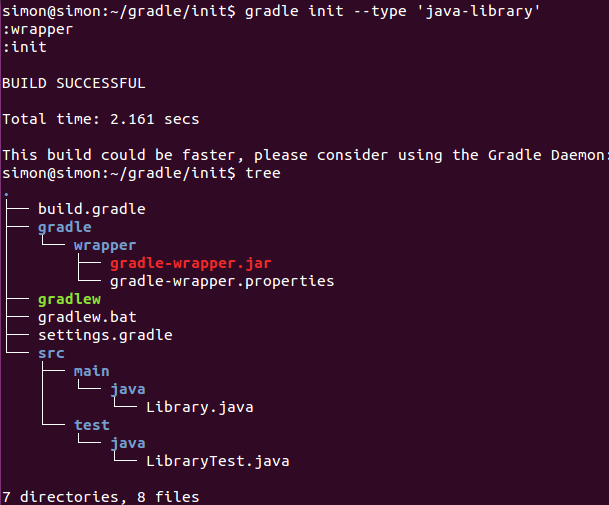
Gradle provides scaffolding support for creating Gradle based projects via the command line.
Create a new directory on your file system, switch to it and run the following command.
gradle init --type java-library --test-framework junit-jupiterThis creates a new Gradle based Java project that uses JUnit Jupiter for unit testing.
You can run the build via
gradle buildAnd the generated test via:
gradle testGradle will generate a test report in the `/build/reports/tests/test" folder.
5. Exercise: Configure Gradle properties
When using the gradle command the first time a .gradle folder is created in the ${USER_HOME} directory.
On Linux this is usually /home/${yourUserName}/.gradle
On Windows this is usually C:\Users\${yourUserName}\.gradle
On Mac this is usually /Users/${yourUserName}/.gradle
Inside this .gradle folder a gradle.properties file with the following contents has to be created.
org.gradle.warning.mode=allNow the default of the org.gradle.warning.mode property will be overridden. (Default is summary)
| Common or secret properties can be set or overridden here, e.g., Gradle defaults or access tokens for deployment. |
6. Dependency management for Java projects
6.1. Managing dependencies with Gradle
Gradle allows managing the classpath of your projects. It can add JAR files, directories or other projects to the build path of your application. It also supports the automatic download of your Java library dependencies. Specify the dependency in your Gradle build file. This triggers Gradle to download the library including its transient dependencies during the build.
A Java library is identified by Gradle via its project’s groupId:artifactId:version (also known as GAV in Maven).
This GAV uniquely identifies a library in a certain version.
You can use the Search Maven Website to search for the GAV of a library in Maven Central.
To add a dependency add an entry to the dependency section in your build.gradle file as demonstrated by the following listing.
dependencies {
    compile fileTree(dir: 'libs', include: ['*.jar'])
    compile 'com.squareup.okhttp:okhttp:2.5.0'
    testCompile 'junit:junit:4.12'

}
6.2. Specifying the repositories to search for dependencies
In your build file you specify the remote repositories to look for dependencies. Gradle supports Maven and Ivy repositories to search for dependencies. The following listing shows how to configure Maven central as dependency source.
repositories {
    mavenCentral()
}
It is also possible to configure the target as a URL.
repositories {
    maven {
        url "http://repo.mycompany.com/maven2"
    }
}
You can also specify other targets, for example Bintray as Maven repository.
repositories {
    maven ("http://jcenter.bintray.com/")
}
The next listing demonstrates how to define an Ivy dependency.
repositories {
    ivy {
        url "http://repo.mycompany.com/repo"
    }
}
You can also add different repositories at once.
repositories {
    maven ("https://repository-achartengine.forge.cloudbees.com/snapshot/")
    jcenter {
        url "http://jcenter.bintray.com/"
    }
}
You can also reference artifacts from the file system.
apply plugin: 'java'

repositories {
    mavenCentral()
}

dependencies {
    compile group: 'commons-collections', name: 'commons-collections', version: '3.2'
    testCompile group: 'junit', name: 'junit', version: '4.+'
    runtime files('libs/library1.jar', 'libs/library2.jar')
    runtime fileTree(dir: 'libs', include: '*.jar')
    compile fileTree(dir: "${System.properties['user.home']}/libs/cargo", include: '*.jar')
}
6.3. Show dependencies of a project (also transient dependencies) .
The following command shows all transient dependencies of a Gradle project.
gradle dependencies|
https://mvnrepository.com allows also to search for an artifact and shows its direct dependencies. |
6.4. Gradle cache and deleting the cache
You can refresh dependencies in your cache with the command line option --refresh-dependencies.
You can also delete the cached files under ~/.gradle/caches.
With the next build Gradle attempts to download the dependencies again.
6.5. Excluding transitive dependencies
Sometimes you have dependencies on packages that define conflicting transitive dependencies. One solution is to exclude a dependency from a specific module:
compile 'org.springframework:spring-web:4.3.10.RELEASE' {
    exclude group: 'com.google.code.gson', module: 'gson'
}
If you have multiple dependency that define a dependency you want to exclude, you can do so at the project level:
configurations.all {
    exclude group: 'com.google.code.gson', module: 'gson'
}
Following the same approach we can exclude a dependency only during runtime:
configurations.runtime {
    exclude group: 'com.google.code.gson', module: 'gson'
}
6.6. Forcing a specific version of a transitive dependency
It is possible to force gradle to pick a specific version when it encounters conflicting transitive dependencies. Keep in mind that you might have to manually update this version when you are upgrading the packages that depend on it.
configurations.all {
    resolutionStrategy.force 'com.google.code.gson:gson:2.8.1'
}
7. Running a build
When starting a Gradle build via the command line, the gradle command tool looks for a file called build.gradle in the current directory.
Gradle also supports abbreviation of tasks, e.g,. to start the task lars using the gradle l command is sufficient.
The abbreviation must uniquely identify a task, otherwise Gradle gives you an error message, which tell that the abbreviation is ambiguous.
Camel-case can also be used for an abbreviation, e.g., the task gradle vogellaCompany can also be called with the gradle vC command.
A Gradle build can be triggered via the gradle or gradle -q command.
The -q or --quiet parameter makes the execution of Gradle less verbose.
A specific task can be addressed like this: gradle -q other, which runs the "other" task.
You can of course also use the Gradle wrapper script, if that is available.
To define a different build file the -b buildFileName option can be used.
In scenarios where no network connection is available the --offline parameter can be used.
This runs the Gradle build offline, which means that Gradle does not try to reach resources from the network during a build.
E.g., for dependencies from an artifact repository like Maven Central or Bintray.
To get a detailed output of what Gradle is doing you can specify the --info parameter.
8. Gradle Tasks
8.1. Default Gradle tasks
Gradle also offers tasks for introspection of Gradle itself, so a Gradle project can be analyzed by using Gradle’s default tasks.
A good example is the tasks task, which shows the available tasks of a project.
When typing gradle -q tasks, a list of tasks is shown.
This command lists the base tasks even without an build.gradle file.
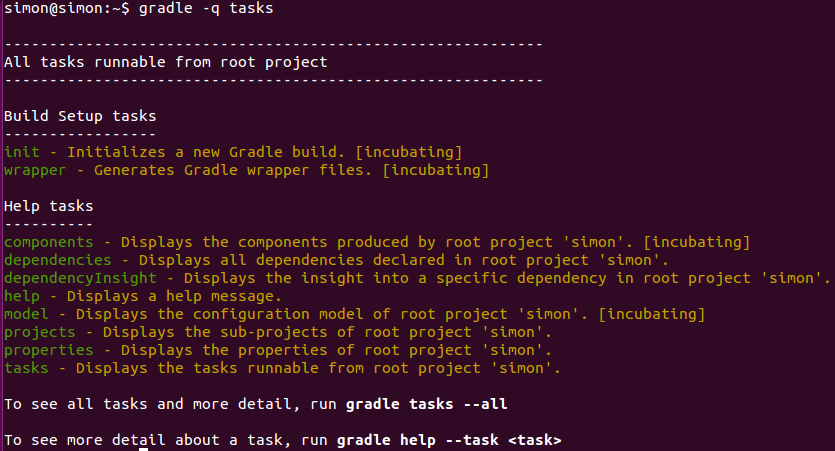
Gradle also tries to give some guidance for the usage of invoked tasks, as shown in the bottom of the console output.
The gradle tasks --all command would also list dependent tasks that are invoked before the actual task.
When running gradle tasks --all the output looks quite similar to the one before, except of the init task, which depends on the wrapper task.
8.2. Creating custom Gradle tasks
You already created a first minimalistic task in a build.gradle file has been created.
task hello {
    doLast {
        println 'Hello Gradle'
    }
}
When running the gradle -q tasks task with this build.gradle file, the hello task will be listed under "Other tasks".
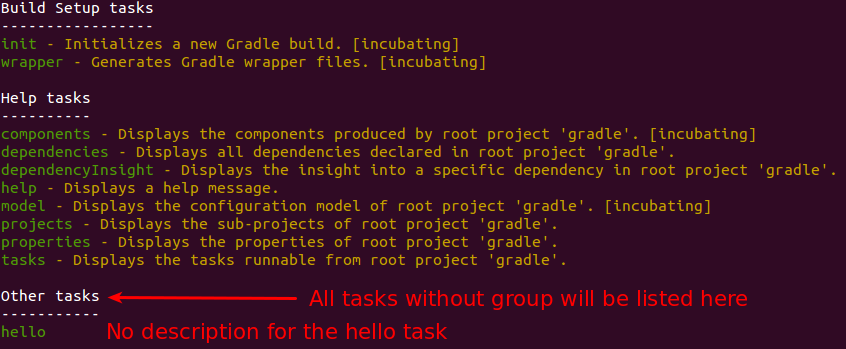
Tasks without a group are considered as private tasks. For instance, the Gradle Task View of the Eclipse Gradle Plug-in does not show such tasks. But they can be shown by activating the right entry in the view’s menu.
Groups can be applied with the group property and a description can be applied by using the description property.
In case the group already exists the hello task is added to it. If the group does not exist, it is created.
task hello {
     group 'vogella'
     description 'The hello task greets Gradle by saying "Hello Gradle"'

     doFirst {
        println 'Hello Gradle'
     }
     doLast {
        println 'Bye bye Gradle'
     }
}
8.3. Task structure
Gradle has different phases, when working with tasks. First of all there is a configuration phase, where the code, which is specified directly in a task’s closure, is executed. The configuration block is executed for every available task and not only for those tasks that are later executed.
After the configuration phase, the execution phase then runs the code inside the doFirst or doLast closures of those tasks that are actually executed.
task onlySpecifiesCodeForConfigurationPhase {
    group 'vogella'
    description 'Configuration phase task example.'

    println 'I always get printed even though, I am not invoked'
}

task anotherUnrelatedTask {
    doLast {
        println 'I am in the doLast execution phase'
    }
}
When running gradle -q anotherUnrelatedTask the following is printed:
I always get printed even though, I am not invoked
I am in the doLast execution phase
The first statement comes from the configuration phase in which the task definition of the onlySpecifiesCodeForConfigurationPhase is evaluated.
8.4. Task dependencies
Gradle allows the definition of default tasks in the build file. These are executed, if no other tasks are specified. Tasks can also define their dependencies. Both settings are demonstrated in the following build file.
defaultTasks 'clean', 'compile'

task clean {
    doLast {
        println 'Executing the clean task'
    }
}

task compile {
    doLast {
        println 'Executing the compile task'
    }
}

task other(dependsOn: 'compile') {
    doLast {
        println "I'm not a default task!"
    }
}

task cleanOther {
    doLast {
        println "I want to clean up before running!"
    }
}

cleanOther.dependsOn clean, compile
Hooking into predefined task executions for default tasks or tasks from plug-ins can also be done by using the dependsOn method.
For instance, when certain things have to be done right after the compilation of java code:
apply plugin: 'java'

task invokedAfterCompileJava(dependsOn: 'compileJava')  {
    doLast {
        println 'This will be invoked right after the compileJava task is done'
    }
}
An alternative to creating a new task, which depends on the
'compileJava'
task, a new execution block can also be directly applied to an
existing
task, e.g., the
'compileJava'
task.
apply plugin: 'java'

compileJava.doFirst { println 'Another action applied to the "compileJava" task' }
compileJava.doLast { println 'Another doLast action is also applied' }
When running the javaCompile task, all actions that have been applied to the task are run one by one in the order they were applied.
8.5. Skipping Tasks
Skipping tasks can be done by passing a predicate closure to the onlyIf method of a task or by throwing a StopExecutionException.
task eclipse {
    doLast {
        println 'Hello Eclipse'
    }
}

// #1st approach - closure returning true, if the task should be executed, false if not.
eclipse.onlyIf {
    project.hasProperty('usingEclipse')
}

// #2nd approach - alternatively throw an StopExecutionException() like this
eclipse.doFirst {
    if(!usingEclipse) {
        throw new StopExecutionException()
    }
}
Tasks depending on the eclipse task will be run even, if a StopExecutionException is thrown.
|
8.5.1. Accessing system variables like the user home directory
You can access system variables. For example, to get the user home directory use the following:
def homePath = System.properties['user.home']9. Exercise: Gradle Tasks
9.1. Using the tasks Gradle task
The target of this exercise is to get an overview about the default tasks that are delivered by default.
Open a command line and execute the following command:
gradle -q tasks9.2. Using the help task
The target of this exercise is to make use of the help task to get more information about other tasks, e.g., the init task.
gradle -q help --task init9.3. Create a Groovy project
The previous exercise informed about the usage of the init task.
gradle -q init --type groovy-library9.4. Optional - Import the new groovy project
Eclipse Buildship can be used to import the project into the Eclipse IDE.
9.5. Using the dependencies task
To see the project’s dependencies (including the transitive ones) the dependencies task has to be invoked.
./gradlew dependenciesIf the optional Buildship import exercise has been done the dependencies task can also be invoked using the Gradle Tasks view.
10. Using the Gradle wrapper
The Gradle wrapper allows that a user can run the build with a predefined version and settings of Gradle without a local Gradle installation. This wrapper is a batch script on Windows, and a shell script for other operating systems. When you start a Gradle build via the wrapper, the specified version of Gradle is automatically downloaded and used to run the build.
The wrapper is the preferred way of starting a Gradle build, as it make the execution of the build independent of the installed Gradle version.
The wrapper script can be created via gradle wrapper.
As a result you find a gradlew for *nix based systems and gradlew.bat for window systems.
These files can be used instead for the gradle command, and if Gradle is not installed on the machine, Gradle is automatically downloaded and installed.
It is also possible to define a task which defines the version of the wrapper. If this task is executed, it creates the wrapper and downloads the correct version of Gradle.
wrapper {
    gradleVersion = '4.9'
}
The version of the Gradle Wrapper can also be defined, when creating it via the command line.
gradle wrapper --gradle-version 4.9
Without this explicit version parameter Gradle will automatically pick the latest version.
10.1. Configure GRADLE_OPTS for the Gradle wrapper
GRADLE_OPTS can also be defined inside the gradlew or gradlew.bat file.
#!/usr/bin/env bash

##############################################################################
##
##  Gradle start up script for UN*X
##
##############################################################################

# Add default JVM options here.
# You can also use JAVA_OPTS and GRADLE_OPTS to pass JVM options to this script.
DEFAULT_JVM_OPTS="-Xmx1024m"

#... {more lines}
@if "%DEBUG%" == "" @echo off
@rem ##########################################################################
@rem
@rem Gradle startup script for Windows
@rem
@rem ##########################################################################
@rem Set local scope for the variables with windows NT shell
if "%OS%"=="Windows_NT" setlocal
@rem Add default JVM options here. You can also use JAVA_OPTS
# and GRADLE_OPTS to pass JVM options to this script.
set DEFAULT_JVM_OPTS=-Xmx1024m
@rem ... {more lines}11. Exercise: Configuring the Wrapper Task
Tasks like Gradle’s Wrapper Task are available by default and certain properties of it, e.g., gradleVersion can be configured like this:
wrapper {
    gradleVersion = '4.9'
}
12. Exercise - Create Custom Gradle Tasks
12.1. Exercise - Hello Gradle Task
Create a helloGradle task, which prints Hello Gradle with the group workshop and a proper description.
Then use the ./gradlew tasks command to see your new helloGradle task in the console or use Buildship in the Eclipse IDE.
Then invoke the helloGradle task by calling ./gradlew hG or again use Buildship in the Eclipse IDE.
12.2. Exercise - Dependencies between tasks
Create two new tasks called learnGroovy, which prints Learn Groovy, and learnGradle, which prints 'Learn Gradle'.
These tasks should have reasonable dependencies.
12.3. Exercise - doFirst action for the tasks
Extend the learnGroovy task so that it prints Install Eclipse IDE with Buildship before it prints Learn Groovy.
13. Exercise: Create a Copy Task
New tasks can also be created and derived from another task and specify certain properties.
The Copy task type can be used to specify such a task, which is able to copy files.
Create a new project with the following build.gradle file:
task copyFile(type: Copy) {
    from 'source'
    into 'destination'
}
Create a source folder inside this project and add a text file to this folder.
When running the copyFile task it copies the text file to a new destination folder.
14. Exercise: Specifying a custom Task in another gradle file
Create a new Gradle project that contains the following structure.
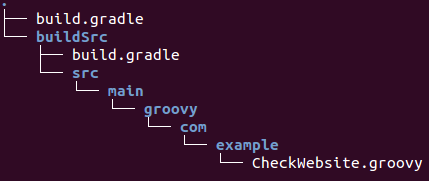
The CheckWebsite.groovy class looks like this:
package com.example

import org.gradle.api.DefaultTask
import org.gradle.api.tasks.TaskAction

import java.io.IOException;

import org.jsoup.Jsoup;
import org.jsoup.nodes.Document;

class CheckWebsite extends DefaultTask {

    String url = 'http://www.vogella.com'

    @TaskAction
    void checkWebsite() {
        // check the given website by using the url
    try {
        Document doc = Jsoup.connect(url).get();
        String title = doc.title();
        println title
        println url
    } catch (IOException e) {
        e.printStackTrace();
    }
    }
}
Since this class has external dependencies to jsoup, a build.gradle file for this class has to be created.
So the build.gradle inside the buildSrc folder, which is responsible for building the CheckWebsite class, looks like this:
plugins {
    id 'groovy'
}

repositories {
   jcenter()
}

dependencies {
    compile 'org.jsoup:jsoup:1.8.3'
}
Finally the main build.gradle file in the root folder makes use of the new com.example.CheckWebsite task type.
task defaultWebsiteCheck(type: com.example.CheckWebsite)

task checkGradleWebsite(type: com.example.CheckWebsite) {
    url = 'https://docs.gradle.org/'
}

wrapper {
    gradleVersion = '4.9'
}
15. Exercise: Trigger Gradle build from Java code
This exercise describes how to trigger a gradle build from Java code.
15.1. Create new gradle projects
Create two new gradle projects with the names BaseProject (this project starts the gradle build) and TargetProject (this project is built by the BaseProject). Make sure the BaseProject applies the java plugin.
15.2. Add dependencies
Add the following dependency to the BaseProject.
compile 'org.gradle:gradle-tooling-api:4.0-rc-2'
15.3. Build TargetProject
Create a class named Application with a static main method like the following.
import java.io.File;

import org.gradle.tooling.BuildLauncher;
import org.gradle.tooling.GradleConnector;
import org.gradle.tooling.ProjectConnection;

public class Application {

    public static void main(String[] args) {
        ProjectConnection connection = GradleConnector.newConnector().forProjectDirectory(new File("path/to/targetproject")).connect();
        try {
            BuildLauncher build = connection.newBuild();
            build.forTasks("build");
            build.run();
        } catch (Exception e) {
            e.printStackTrace();
        } finally {
            connection.close();
        }
    }
}
This method first creates a ProjectConnection to the project that should be build and connects to it. Make sure to replace path/to/targetproject with the path of the TargetProject. From the project connection, a new BuildLauncher can be obtained. With the help of the method forTasks() you can specify the gradle tasks that should be executed. The BuildLauncher also provides some other methods to configure the build. You can, for example, set gradle build arguments or change the Java version to build the project with. By calling the run() method the build is finally executed. Make sure to close the connection in the finally block.
16. Building Java projects
16.1. The Java plug-in
The Java plug-in provides tasks to compile Java source code, run unit tests, create Javadoc and create a JAR file.
16.2. Default project layout of Java projects
This plug-ins assume a certain setup of your Java project (similar to Maven).
-
src/main/java contains the Java source code
-
src/test/java contains the Java tests
If you follow this setup, the following build file is sufficient to compile, test and bundle a Java project.
apply plugin: 'java'To start the build, type gradle build on the command line.
SourceSets can be used to specify a different project structure, e.g., the sources are stored in a src folder rather than in src/main/java.
apply plugin: 'java'

sourceSets {
    main {
         java {
              srcDir 'src'
              }
         }
    test {
         java {
              srcDir 'test'
              }
         }
}
16.3. Java project creation with the init task
Gradle does not yet support multiple project templates (called archetypes) like Maven.
But it offers an init task to create the structure of a new Gradle project.
Without additional parameters, this task creates a Gradle project that contains the gradle wrapper files, a build.gradle and settings.gradle file.
When adding the --type parameter with 'java-library' as a value, a java project structure is created and the build.gradle file contains a certain Java template with JUnit.
The build.gradle file will look similar to this:
/*
 * ... deleted the generated text for brevity
 */

// Apply the java plugin to add support for Java
apply plugin: 'java'

// In this section you declare where to find the dependencies of your project
repositories {
    // Use 'jcenter' for resolving your dependencies.
    // You can declare any Maven/Ivy/file repository here.
    jcenter()
}

// In this section you declare the dependencies for your production and test code
dependencies {
    // The production code uses the SLF4J logging API at compile time
    compile 'org.slf4j:slf4j-api:1.7.12'

    // Declare the dependency for your favourite test framework you want to use
    // TestNG is also supported by the Gradle Test task. Just change the
    // testCompile dependency to testCompile 'org.testng:testng:6.8.1' and add
    // 'test.useTestNG()' to your build script.
    testCompile 'junit:junit:4.12'
}
A project hosted at GitHub Gradle-templates project provides more templates beyond the init task. The Gradle team is also working on this archetype/template topic.
16.4. Specifying the Java version in your build file
Usually a Java project has a version and a target JRE on which it is compiled.
The version and sourceCompatibility property can be set in the build.gradle file.
version = 0.1.0
sourceCompatibility = 1.8
When the version property is set, the name of the resulting artifact will be changed accordingly, e.g., {my-lib-name}-0.1.0.jar.
If the artifact is an executable java application the MANIFEST.MF file must be aware of the class with the main method.
apply plugin: 'java'

jar {
    manifest {
        attributes 'Main-Class': 'com.example.main.Application'
    }
}
17. Building Groovy projects
17.1. The Groovy plug-in
The Groovy plug-in for Gradle extends the Java plug-in and provides tasks for Groovy programs.
apply plugin: 'groovy'

repositories {
  mavenCentral()
}
dependencies {
    implementation 'org.codehaus.groovy:groovy-all:2.4.5'
    testImplementation 'junit:junit:4.12'
}
To start the build, type gradle build on the command line.
17.2. Default project layout of Groovy projects
This plug-ins assume a certain setup of your Groovy project.
-
src/main/groovy contains the Groovy source code
-
src/test/groovy contains the Groovy tests
-
src/main/java contains the Java source code
-
src/test/java contains the Java tests
If you follow this setup, the following build file is sufficient to compile, test and bundle a Groovy project.
19. Running JUnit 5 tests with Gradle
To use Junit 5 for Java, add the following to your dependencies closure in your 'build.gradle` file.
Use at least Gradle 6.0 for this to avoid already fixed issues.
dependencies {

    // more stuff
    testImplementation(enforcedPlatform("org.junit:junit-bom:5.4.0")) // JUnit 5 BOM
    testImplementation("org.junit.jupiter:junit-jupiter")
}
19.1. Test naming conventions for Gradle
The Gradle "test" task scans all compiled classes in the source folder of the project, e.g., /src/test/java or /src/test/groovy. JUnit classes are identified by:
-
Class or a super class extends TestCase or GroovyTestCase
-
Class or a super class is annotated with @RunWith
-
Class or a super class contain a method annotated with @Test
You can set the scanForTestClasses property to false, if you do not want automatic test class detection.
In this case, if no additional include / exclude patterns are
specified, the default for included classes are /Tests.class”,
“/*Test.class” and the
default excluded
classes are
“*/Abstract*.class”.
19.2. Include and Exclude particular Tests
The test configuration in general is described at Gradle Test tasks description.
The Test class has a include and exclude method.
These methods can be used to specify, which tests should actually be run.
Only run included tests:
test {
    include '**my.package.name/*'
}
Skip excluded tests:
test {
    exclude '**my.package.name/*'
}
19.3. Show all test output in the terminal
By default, Gradle doesn’t print the standard output of your tests to the terminal. To see all output of your tests add this to your build file:
test {
    testLogging.showStandardStreams = true
}
20. Building multiple projects with Gradle
20.1. Creating a multi project build structure
A business application usually does not consist of only one single project/module, but has many projects, which should be build.
Gradle has the concept of a root project that can have many sub projects. The root project is specified by a build.gradle file, like the single projects before. To specify, which projects belong to the build a settings.gradle file is used.
For instance, there might be this project structure:
-
root_project
-
core
-
ui
-
util
-
-
settings.gradle
Having this project structure the settings.gradle file would look like this:
include 'core', 'ui', 'util'

# altenative way would be
#include 'core'
#include 'ui'
#include 'util'
Besides the tasks task Gradle also provides a projects help task that can be run in the root_project folder.
> gradle projects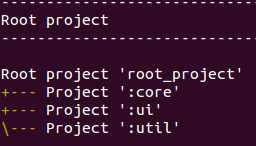
20.2. Specifying a general build configuration
In a build.gradle file in the root_project general configurations can be applied to all projects or just to the sub projects.
allprojects {
    group = 'com.example.gradle'
    version = '0.1.0'
}

subprojects {
    apply plugin: 'java'
    apply plugin: 'eclipse'
}
This specifies a common com.example.gradle group and the 0.1.0 version to all projects.
The subprojects closure applies common configurations for all sub projects, but not to the root project, like the allprojects closure does.
20.3. Project specific configurations and dependencies
The core, ui and util sub projects can also have their own build.gradle file.
If they have specific needs that are not already applied by the general configuration of the root project.
For instance, the ui project usually has a dependency to the core project. So the ui project needs its own build.gradle file to specify this dependency.
dependencies {
    compile project(':core')
    compile 'log4j:log4j:1.2.17'
}
Project dependencies are specified with the project method.
|
The |
Alternatively, you can also define the dependencies of a project in the root build.gradle file. But it is considered good practice to define the dependencies in the project specific build.gradle files, hence the following approach is only included for demonstration purpose.
allprojects {
 apply plugin: 'java'

 repositories {
  mavenCentral()
 }

}

project(':com.example.core').dependencies {
    compile project(':com.example.model')
    compile 'log4j:log4j:1.2.17'
}
21. Deployment with Gradle
21.1. How to deploy with Gradle
Gradle offers several ways to deploy build artifacts to artifact repositories, like Artifactory or Sonatype Nexus.
21.2. Using the maven-publish plugin
The most common way is to use the maven-publish plugin, which is provided by Gradle by default.
// other plug-ins
apply plugin: 'maven-publish'

publishing {
    publications {
        mavenJava(MavenPublication) {
            from components.java
        }
    }

    repositories {
        maven {
            url "$buildDir/repo"
        }
    }
}
There are several publish options, when the java and the maven-publish plugin is applied.

The deployment to a remote repository can be done like this:
apply plugin: 'groovy'
apply plugin: 'maven-publish'

group 'workshop'
version = '1.0.0'

publishing {
    publications {
        mavenJava(MavenPublication) { from components.java }
    }

    repositories {
        maven {
            // default credentials for a nexus repository manager
            credentials {
                username 'admin'
                password 'admin123'
            }
            // url to the releases maven repository
            url "http://localhost:8081/nexus/content/repositories/releases/"
        }
    }
}
More information about the deployment to a Maven artifact repository can be found here: Publish to Maven repository with Gradle.
22. Integration with Ant
Gradle supports running Ant tasks via the Groovy AntBuilder.
23. Convert Maven Projects to Gradle
Gradle provides an incubating init task, which helps with the creation of new Gradle projects. This task can also convert Apache Maven pom.xml files to Gradle build files, if all used Maven plug-ins are known to this task.
In this section the following pom.xml maven configuration will be converted to a Gradle project.
<project xmlns="http://maven.apache.org/POM/4.0.0" xmlns:xsi="http://www.w3.org/2001/XMLSchema-instance"
    xsi:schemaLocation="http://maven.apache.org/POM/4.0.0
http://maven.apache.org/xsd/maven-4.0.0.xsd">
    <modelVersion>4.0.0</modelVersion>
    <groupId>com.example.app</groupId>
    <artifactId>example-app</artifactId>
    <packaging>jar</packaging>
    <version>1.0.0-SNAPSHOT</version>
    <dependencies>
        <dependency>
            <groupId>junit</groupId>
            <artifactId>junit</artifactId>
            <version>4.11</version>
            <scope>test</scope>
        </dependency>
    </dependencies>
</project>
Running the gradle init --type pom command on the command line results in the following Gradle configuration.

The init task depends on the wrapper task so that also a Gradle wrapper is created.
The resulting build.gradle file looks similar to this:
apply plugin: 'java'
apply plugin: 'maven'

group = 'com.example.app'
version = '1.0.0-SNAPSHOT'

description = """"""

sourceCompatibility = 1.5
targetCompatibility = 1.5

repositories {
     maven { url "http://repo.maven.apache.org/maven2" }
}

dependencies {
    testImplementation group: 'junit', name: 'junit', version:'4.11'
}
24. Developing custom Gradle plug-ins
24.1. Why creating Gradle plug-ins
As a general rule, it is useful to have a build that is as much declarative as possible as this simplifies future maintenance. Therefore it is advised to avoid complex code in your Gradle build file. If you need custom logic you should place it into a custom Gradle plug-in.
24.2. Gradle DSL
Each Gradle plug-in comes with a DSL. To see all properties of a Gradle object, you can use the following code snippet:
println variants.properties
            .sort{it.key}
            .collect{it}
            .findAll{!filtered.contains(it.key)}
            .join('\n')
For example, to define a tasks which show the properties of all android.applicationVariants (in an Android project), use:
task showAndoidVariantsInformation {
    doLast {
        android.applicationVariants.all { variants ->
            println variants.properties
            .sort{it.key}
            .collect{it}
            .findAll{!filtered.contains(it.key)}
            .join('\n')
        }
    }
}
25. Exercise - Creating a simple Gradle plugin
The 'java-gradle-plugin' Gradle plug-in simplifies creating custom Gradle plug-ins. This plug-in is current incubating.
It does the following:
-
the gradleApi() dependency is automatically added
-
the gradleTestKit() dependency is automatically added
-
the necessary plug-in descriptor files automatically
25.1. Create a Gradle project
Select in Eclipse to create a new Gradle project. The com.vogella.gradleplugin as project name.
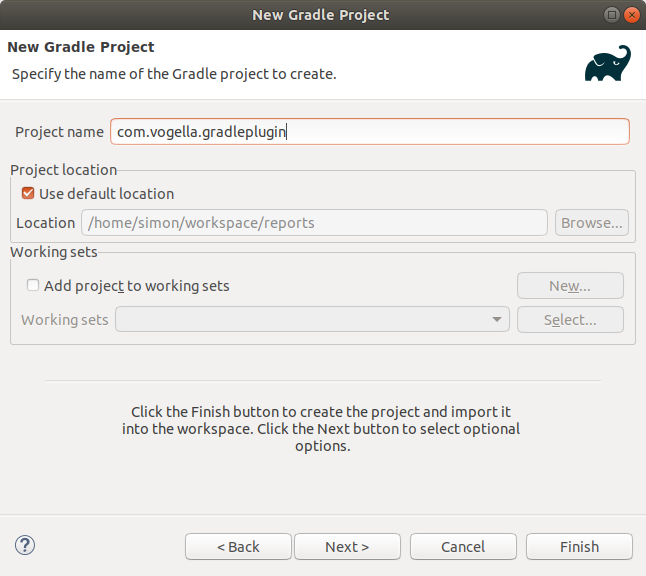
Stick to the defaults of the wizard and create the project.
25.2. Apply the 'java-gradle-plugin' plug-in
Change the build.gradle file to the following:
plugins {
    id 'java-gradle-plugin'
}

gradlePlugin {
    plugins {
        vogellaPlugin {
            id = 'com.vogella.gradleplugin'
            implementationClass = 'com.vogella.gradleplugin.MyPlugin'
        }
    }
}

repositories {
    jcenter()
}

dependencies {
    // No need to add gradleApi() here, because it is applied by the 'java-gradle-plugin' plug-in

    // We want to merge and parse SpotBugs xml files with XSLT
    compile('net.sf.saxon:Saxon-HE:9.8.0-12')
    // Use JUnit test framework
    testImplementation 'junit:junit:4.12'
}

wrapper {
    gradleVersion = '4.9'
}
In the /src/main/java folder create the following two classes.
package com.vogella.gradleplugin;

import org.gradle.api.DefaultTask;
import org.gradle.api.tasks.TaskAction;

public class MyTask extends DefaultTask {

    @TaskAction
    public void myTask() {
        System.out.println("Hello from vogella task");
    }
}
package com.vogella.gradleplugin;
import org.gradle.api.Plugin;
import org.gradle.api.Project;
public class MyPlugin implements Plugin<Project> {
@Override
public void apply(Project project) {
project.getTasks().create("myTask", MyTask.class);
}
}Run the build task to build to plug-in and see next exercises on how to deploy and consume the plug-in.
26. Exercise - Deploy your custom Gradle plug-in to your local Maven repository
Add the maven-publish Gradle plug-in and the publishing closure to the build.gradle file.
plugins {
    id 'java-gradle-plugin'
    id 'maven-publish'
}

group = 'com.vogella'
version = '0.0.1-SNAPSHOT'
sourceCompatibility = 1.8

// ... more code

publishing {
    publications {
        mavenJava(MavenPublication) {
            from components.java
        }
    }
}
Now additional publishing tasks are available and the publishToMavenLocal task can be used to add the Gradle plug-in to the local Maven repository.
./gradlew pTML27. Exercise - Using the new plug-in
To use the new Gradle plug-in a dependency to it has to be defined. If you pushed your plug-in to your local Maven repository, Gradle should find it and make it available.
buildscript {
    repositories {
        mavenLocal()
    }
    dependencies {
        classpath 'com.vogella:com.vogella.gradleplugin:0.0.1-SNAPSHOT'
    }
 }

apply plugin: 'com.vogella.gradleplugin'
Now the new task from the com.vogella.gradleplugin should be available:
./gradlew tasks

./gradlew myTask
28. Optional exercise - Publishing the plug-in to the Gradle plug-in portal
To publish a Gradle plug-in in the Gradle Plug-in Portal the com.gradle.plugin-publish Gradle plug-in can be used.
Before uploading Gradle plug-ins to the portal you must register at https://plugins.gradle.org/user/register and obtain the api keys from your profile.
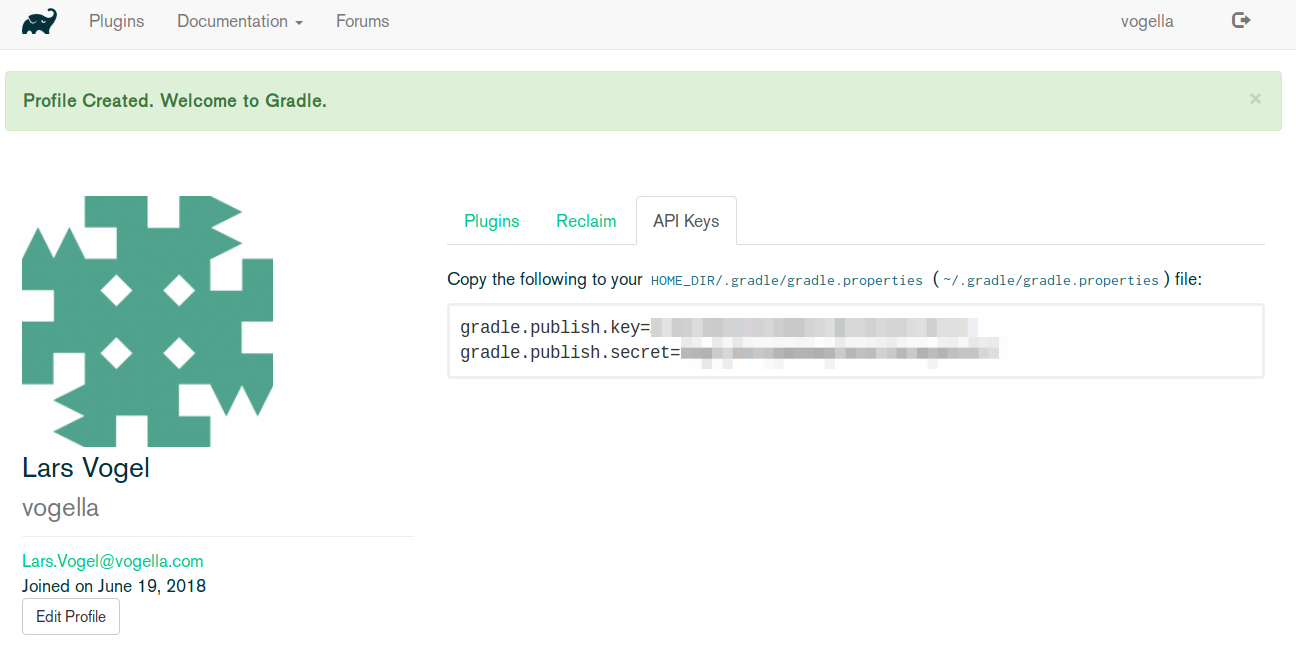
The gradle.publish.key and gradle.publish.secret properties have to be added to the gradle.properties.
|
The gradle.properties file is usually located in the gradleHomeDir (usually /${user.home}/.gradle) |
Then the build.gradle file needs to be adjusted to be able to upload Gradle plug-ins.
plugins {
    id 'java-gradle-plugin'
    id 'maven-publish'
    id 'com.gradle.plugin-publish' version '0.9.10'
}

// more code ...

pluginBundle {
    website = '${Web site for your plugin}'
    vcsUrl = 'https://github.com/${your-repo}'

    plugins {
        vogellaPlugin {
            id = 'com.vogella.gradleplugin'
            displayName = 'Vogella Sample Plug-in'
            description = 'Vogella Sample Plug-in for trying the '
            tags = ['Vogella','Training','Gradle','Sample']
            // Gradle's plug-in portal does not support SNAPSHOTs
            version = '0.0.1'
        }
    }
}
The following task can then be used to upload the Gradle plug-in.
./gradlew publishPluginsWhen the plug-in has been published the plugins closure can be used to make use of the Gradle plug-in.
plugins {
  id "com.vogella.gradleplugin" version "0.0.1"
}
So the more verbose buildscript closure and the apply plugin method from previous chapters can be omitted.
|
More details can be found here: https://guides.gradle.org/publishing-plugins-to-gradle-plugin-portal/ |
29. Debugging Gradle Plug-ins
29.1. Activate remote debugging
The following properties have to be specified in the gradle.properties file to enable remote debugging:
org.gradle.daemon=true
org.gradle.jvmargs=-XX:+HeapDumpOnOutOfMemoryError -Xmx4g -agentlib:jdwp=transport=dt_socket,server=y,suspend=n,address=5006
When running a Gradle build locally with these settings remote debugging can be accessed via localhost on port 5006.
|
The gradle.properties file is usually located in the gradleHomeDir (usually /${user.home}/.gradle) |
29.2. Remote debugging in the Eclipse IDE
You should import a certain Gradle plug-in into the Eclipse IDE by using the Buildship tooling.
Then break points can be added to the Gradle plug-in’s source files.
After that open the debug configuration and right-click Remote Java Application to create a New Debug Configuration with the follwing settings:
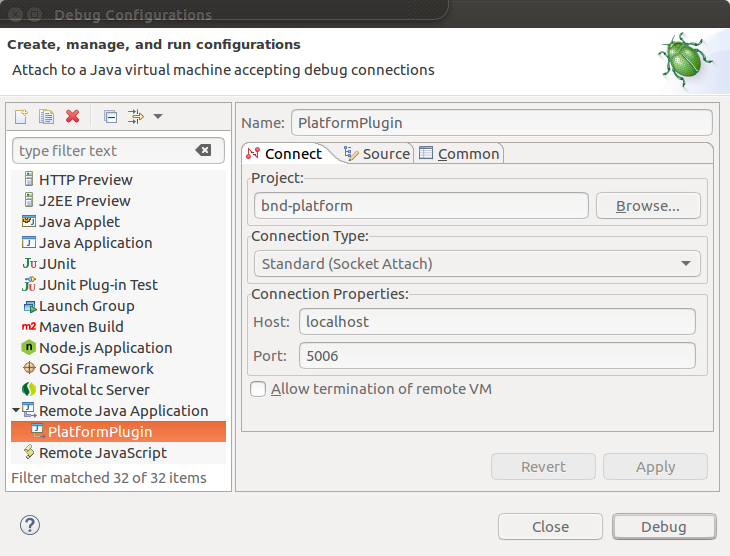
Press the Debug button to run the remote debugger.
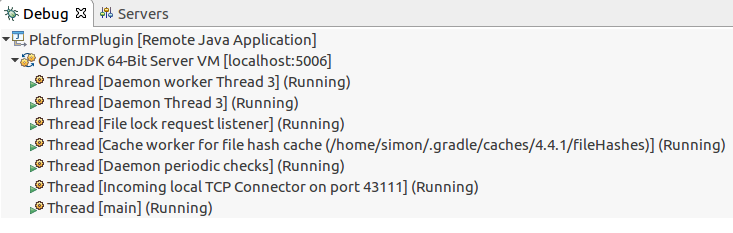
Then a Gradle build that uses the desired Gradle plug-in, can be run by either using the Gradle Tasks View of the Buildship tooling inside the Eclipse IDE or invoke a Gradle build from command line.
When a break point is hit during the Gradle task processing the Eclipse IDE will stop at that point.
30. Using code analysis tools
Gradle provides several plugins for analyzing the code base of a Gradle project.
| Tool | Plugin | Description |
|---|---|---|
checkstyle |
Validates checkstyle rules that are applied for a project |
|
jacoco |
Checks for test coverage of the code being built |
|
findbugs |
Static Code Analysis for Java |
|
codenarc |
Static Code Analysis for Groovy |
|
pmd |
Adds code quality checks for several programming languages to the build |
|
jdepend |
Another code analysis tool for analyzing dependencies in Java code |
30.1. Jacoco for Gradle projects
To use Jacoco for test coverage analysis the following code must be added to the top level build.gradle file
plugins {
    id 'jacoco'
}

jacocoTestReport {
    reports {
        xml.enabled true
        html.enabled true
    }
}
If you have a multi project Gradle project then you need to add the jacocoTestReport and the jacoco plugin to the subprojects section of the top level build.gradle file.
plugins {
    id 'jacoco'
}

subprojects {

    apply plugin: 'jacoco'

    jacocoTestReport {
        reports {
            xml.enabled true
            html.enabled true
        }
    }
}
If you would like to have a consolidated xml file for all the subprojects, e.g., to be used by SonarQube, you can create it with the following task in the top level build.gradle
task generateMergedReport(type: JacocoReport) {
    dependsOn = subprojects.test

    additionalSourceDirs.setFrom files(subprojects.sourceSets.main.allSource.srcDirs)
    sourceDirectories.setFrom files(subprojects.sourceSets.main.allSource.srcDirs)
    classDirectories.setFrom files(subprojects.sourceSets.main.output)

    executionData.setFrom project.fileTree(dir: '.', include: '**/build/jacoco/test.exec')

    reports {
        xml.enabled true
        xml.destination file("../coverage-reports/coverage.xml")
    }
}
This task will save the consolidated xml file on the top level of the project under coverage-reports.
To finally create the consolidated xml file, run Gradle with the created task generateMergedReport.
./gradle clean build generateMergedReport31. Gradle
31.1. vogella Java example code
If you need more assistance we offer Online Training and Onsite training as well as consulting