This tutorial shows you how to use the SWT/Eclipse test framework Eclipse RedDeer.
1. Eclipse RedDeer Testing Framework
Eclipse RedDeer allows you to test SWT/Eclipse applications by interacting with the graphical user interface. RedDeer supports testing SWT, JFace, RCP Workbench and Eclipse components and graphical editors based on GEF or Graphiti.
RedDeer tests can be executed from the Eclipse IDE or in an CI environment. To make the examination of test results easier RedDeer takes screenshots on test failures. It collects Eclipse Platform logs.
RedDeers high-level API wraps the components you want to test. These wrapper classes provide a way to locate, instantiate and interact with Eclipse components.
For example, the class DefaultText, which wraps an SWT Text widget.
It is still possible to call getText() or setText on the object like you are used from the SWT class but RedDeer will execute the interactions through the UI.
On the first level of the component API you have classes that allow you to locate and instantiate Eclipse components like Views, Editors, Wizards, and Shells. On the second level of the API wrapper for all common SWT UI elements like Buttons and Trees. This second level provides the building blocks for the first level. In your tests you will want to only interact with the first level, for example a View. This way you do not interact with low-level UI components directly, which makes your tests more robust and easier to read and understand.
2. Installation of RedDeer
2.1. Eclipse IDE
To install RedDeer in your Eclipse IDE navigate to .
In the text field with the label Work with enter one of the following URLs.
For the latest stable release use:
https://download.eclipse.org/reddeer/releases/latestFor the latest nightly build use:
https://download.eclipse.org/reddeer/snapshotsInstall the following components:
-
RedDeer Eclipse Feature
-
RedDeer SWT Feature
-
RedDeer E4 Feature
-
RedDeer UI Feature
-
RedDeer Recorder Feature
2.2. Target platform
Add the following entry to your target platform to use Reddeer.
        <location includeAllPlatforms="false" includeConfigurePhase="true" includeMode="planner" includeSource="true" type="InstallableUnit">
            <repository location="https://download.eclipse.org/reddeer/releases/latest"/>
            <unit id="org.eclipse.reddeer.go"/>
        </location>
3. Exercise: Create your first RedDeer test for the Eclipse IDE
In this exercise, you use the RedDeer project wizard to create an example RedDeer test to test the Eclipse IDE.
3.1. Creating a RedDeer Test Plug-in
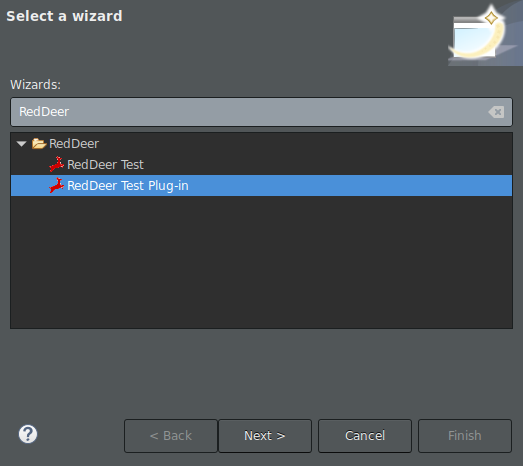
Create a new RedDeer Test Plug-in project. Click on and choose RedDeer Test Plug-in.
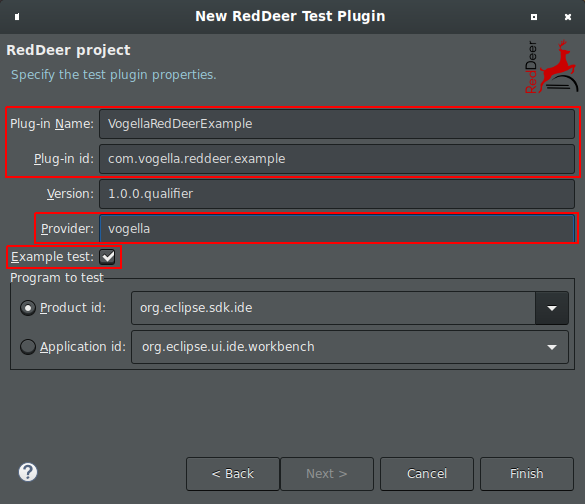
Fill in the required fields Plugin-in Name, Plug-in ID and Provider.
Also set a checkmark on Example Test.
3.2. The test class
You should now have a new project in your workspace with a test class that looks something like this:
@RunWith(RedDeerSuite.class) (1)
public class RedDeerTest {

    @Test
    public void redDeerTestExample() {
        // Create Java Project
        JavaProjectWizard projectDlg = new JavaProjectWizard();
        projectDlg.open(); (2)
        NewJavaProjectWizardPageOne projectPage = new NewJavaProjectWizardPageOne(projectDlg);
        projectPage.setProjectName("testProject"); (3)
        projectDlg.finish();

        // Create Java class
        NewClassCreationWizard classDlg = new NewClassCreationWizard();
        classDlg.open(); (2)
        NewClassWizardPage classPage = new NewClassWizardPage(classDlg);
        classPage.setName("RedDeerDemo"); (3)
        classPage.setPackage("org.reddeer.demo"); (3)
        classDlg.finish();

        // Edit Java class
        TextEditor textEditor = new TextEditor("RedDeerDemo.java");
        textEditor.setText("Written by RedDeer"); (3)
        textEditor.save();

        // Check ProblemsView
        ProblemsView problemsView = new ProblemsView();
        problemsView.open(); (2)
        assertFalse(problemsView.getProblems(ProblemType.ERROR).isEmpty()); (4)
    }
}| 1 | RedDeer tests have to be run with RedDeerSuite. |
| 2 | You instantiate Views and Wizards by creating an instance of the wrapper class provided by RedDeer and calling open() on it. |
| 3 | The wrapper classes provide you a way to interact with the sub components of the Eclipse component that you are testing. |
| 4 | Each wrapper class provides methods to retrieve informations from the sub components to use in your assertions. |
Now run this class by opening its right-click menu and selecting .
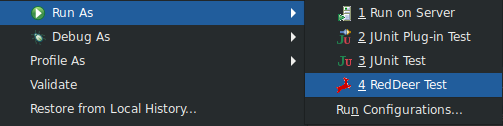
A runtime eclipse will open up and you can watch RedDeer execute the test instructions.
4. Matchers
Matchers are employed throughout the RedDeer API to select widgets on a certain criteria or to define test conditions. RedDeer uses Hamcrest matchers under the hood.
All the RedDeer SWT widgets have a constructor that accepts matchers to be used in the widget lookup.
public DefaultCombo(Matcher... matchers)This can for example be used to match a Combo which text is an integer.
Matcher regexMatcher = new RegexMatcher("^\\d+$")
Combo c = new DefaultCombo(new WithTextMatcher(regexMatcher));
Note how this example combines a WithTextMatcher with a RegexMatcher.
You could just as well use WithTextMatcher to match against a particular text.
Combo c = new DefaultCombo(new WithTextMatcher("42"));4.1. Writing your own Matcher
RedDeer allows you to define your own matchers.
This is done by extending BaseMatcher.
The following example shows a matcher that matches Combos that contain a certain String in their items.
import java.util.Arrays;

import org.eclipse.reddeer.common.util.Display;
import org.eclipse.swt.widgets.Combo;
import org.hamcrest.BaseMatcher;
import org.hamcrest.Description;
import org.hamcrest.Matcher;
import org.hamcrest.core.Is;

public class ComboItemMatcher extends BaseMatcher<String> {

    private Matcher<String> matcher;

    public ComboItemMatcher(String text) {
        matcher = Is.<String>is(text);
    }

    @Override
    public boolean matches(Object match) {
        if (match instanceof Combo) {
            String[] items = Display.syncExec(() -> ((Combo) match).getItems());
            return Arrays.stream(items).anyMatch(item -> matcher.matches(item));
        }
        return false;
    }

    @Override
    public void describeTo(Description description) {
        description.appendText("Matcher matching Combos containing item" + matcher.toString());
    }
}
All operations done on SWT widgets inside the matches() method have to be executed via Display.syncExec, so they are done inside the UI thread.
|
5. Wait conditions
Wait conditions are used to make a test to wait until a certain condition is met. This is often needed since the interaction with the UI is handled asynchronously.
For example, you might want to wait until a View is opened before we can interact with it.
new WaitUntil(new ViewIsOpen(view))Or you might want to wait until a View is closed.
new WaitWhile(new ViewIsOpen(view))5.1. Timeout
Be aware that every wait condition is started with a timeout.
By default, the timeout is set to 10 seconds (TimePeriod.DEFAULT).
When the timeout period has run out a WaitTimeoutExpiredException is thrown.
A different timeout is set via a second constructor parameter.
new WaitUntil(new ViewIsOpen(view), TimePeriod.LONG)5.2. Group waits
Group waits are used to bind multiple wait conditions to a single timeout.
new GroupWait(TimePeriod.LONG, WaitProvider.waitUntil(new ViewIsOpen(view), ...))5.3. Waiting a fixed time period
If you are for whatever reason unable to define a specific wait condition you can wait for a fixed time period.
This sleeps the current thread for 3 seconds:
AbstractWait.sleep(TimePeriod.getCustom(3));|
Avoid using a fixed wait period. The time a test has to wait will vary greatly depending on the execution environment. A better solution might be to to implement your own wait condition. |
5.4. Implementing your own wait condition
A wait condition is written by implementing the WaitCondition interface or by extending AbstractWaitCondition.
test() should return true as soon as the wait condition is fulfilled.
getResult() should return the result of the operation that was waited on or null if test() is false.
The following example shows how to wait on a Socket connection.
public class SocketIsConnected extends AbstractWaitCondition {

    private Socket socket;
    private Socket connectedSocket;

    public SocketIsConnected(Socket socket) {
        this.socket = socket;
    }

    @Override
    public boolean test() {
        if (socket.isConnected()) {
            connectedSocket = socket;
            return true;
        }
        return false;
    }

    @SuppressWarnings("unchecked")
    @Override
    public Socket getResult() {
        return connectedSocket;
    }
}
6. Exercise: Testing a custom ViewPart
In this exercise we will learn how to write our own wrapper class for a custom ViewPart. This will give us a chance to look under the hood of the first level API and to work directly with the wrappers for the SWT components.
6.1. Creating a Plug-in project
As a first step, we will need to create a Plug-in project with a custom ViewPart that we can test.
Add the following dependencies to your project:
-
org.eclipse.swt
-
org.eclipse.core.runtime
-
org.eclipse.reddeer.go
Set the singleton directive in the MANIFEST.MF tab:
Bundle-SymbolicName: CustomViewPart; singleton:=true
Then switch to the Overview tab and click on Extensions: to create the plugin.xml file. Switch to the plugin.xml tab and fill this in:
<?xml version="1.0" encoding="UTF-8"?>
<?eclipse version="3.4"?>
<plugin>
   <extension
         point="org.eclipse.ui.views">
      <category
            id="CustomViewPart.categoryVogella"
            name="vogella">
      </category>
      <view
            category="CustomViewPart.categoryVogella"
            class="com.vogella.reddeer.customviewpart.ComboViewPart"
            id="CustomViewPart.view"
            name="Combo ViewPart"
            restorable="true">
      </view>
   </extension>

</plugin>
Now create the class ComboViewPart in the package com.vogella.reddeer.customviewpart with our ViewPart implementation.
package com.vogella.reddeer.customviewpart;

import org.eclipse.swt.SWT;
import org.eclipse.swt.layout.GridLayout;
import org.eclipse.swt.widgets.Combo;
import org.eclipse.swt.widgets.Composite;
import org.eclipse.ui.part.ViewPart;

public class ComboViewPart extends ViewPart {

    private Combo combo1;

    public ComboViewPart() {
    }

    @Override
    public void createPartControl(Composite parent) {
        GridLayout gridLayout = new GridLayout(1, false);
        gridLayout.marginWidth = 5;
        gridLayout.marginHeight = 5;
        gridLayout.verticalSpacing = 0;
        gridLayout.horizontalSpacing = 0;
        parent.setLayout(gridLayout);

        combo1 = new Combo(parent, SWT.NONE);
        new Combo(parent, SWT.NONE);
    }

    @Override
    public void setFocus() {
        combo1.setFocus();
    }
}
6.2. Writing a RedDeer wrapper for our ViewPart
RedDeer provides the WorkBenchView class that we extend.
The constructor we use takes a category and title.
This information is used to locate our ViewPart in Eclipses IViewRegistry.
package com.vogella.reddeer.customviewpart;

import org.eclipse.reddeer.core.lookup.WidgetLookup;
import org.eclipse.reddeer.swt.impl.combo.DefaultCombo;
import org.eclipse.reddeer.workbench.impl.view.WorkbenchView;
import org.hamcrest.Matcher;

public class DefaultComboViewPart extends WorkbenchView {

    private DefaultCombo combo1;
    private DefaultCombo combo2;

    public DefaultComboViewPart() {
        super("vogella", "Combo ViewPart");
    }

    @Override
    public void open() {
        super.open();
        retrieveCombos();
    }

    private void retrieveCombos() {
        // convenience constructor that looks for the first Combo in the ViewPart
        combo1 = new DefaultCombo(getCTabItem());

        // matching the second Combo
        combo2 = new DefaultCombo(WidgetLookup.getInstance().activeWidget(getCTabItem(),
                org.eclipse.swt.widgets.Combo.class, 1, new Matcher[0]));
    }

    public String getComboText() {
        return combo1.getText() + " " + combo2.getText();
    }

    public void setTextCombo1(String text) {
        combo1.setText(text);
    }

    public void setTextCombo2(String text) {
        combo2.setText(text);
    }

}
6.3. Writing the test class
In the test class we first instantiate and open the ViewPart. Then we use RedDeers API to set the text through the UI and assert that it was entered correctly. Notice how every interaction with the Application during the test goes through the UI.
package com.vogella.reddeer.customviewpart;

import static org.junit.Assert.assertEquals;
import static org.junit.Assert.assertTrue;

import org.eclipse.reddeer.junit.runner.RedDeerSuite;
import org.junit.Test;
import org.junit.runner.RunWith;

@RunWith(RedDeerSuite.class)
public class DefaultComboViewPartTest {

    @Test
    public void canSetTextOnViewPart() {
        DefaultComboViewPart part = new DefaultComboViewPart();
        part.open();
        assertTrue(part.isOpen());
        part.setTextCombo1("Hello,");
        part.setTextCombo2("RedDeer");
        assertEquals("Hello, RedDeer", part.getComboText());
    }

}
7. Eclipse RedDeer resources
7.1. vogella Java example code
If you need more assistance we offer Online Training and Onsite training as well as consulting