This article describes how to build user interfaces using Eclipse Forms.
1. Eclipse Forms
1.1. Definition of the Eclipse Forms API
Eclipse supports a predefined web-like user interface style, called Eclipse Forms.
Eclipse Forms is provided by the org.eclipse.ui.forms plug-in and is based on SWT und JFace.
Eclipse Forms can be used in Eclipse-based application using the 3.x or the 4.x API.
The class FormToolkit serves as a factory for the creation of the required user interface elements.
This factory adjust the look and feel of the standard SWT and JFace elements to the Forms API.
Existing UI elements can be enhanced to the form API via the method adapt (Composite).
1.2. Form / ScrolledForm
FormToolkit provides Form or ScrollForm which serve as the frame for the user interface elements.
They provide a header, a toolbar and a body.
The body can get accessed via the getBody() method and can contain other user interface elements.
2. Forms examples
2.1. Standalone example
package aaatest.parts;


import org.eclipse.swt.SWT;
import org.eclipse.swt.layout.FillLayout;
import org.eclipse.swt.layout.GridData;
import org.eclipse.swt.layout.GridLayout;
import org.eclipse.swt.widgets.Composite;
import org.eclipse.swt.widgets.Display;
import org.eclipse.swt.widgets.Label;
import org.eclipse.swt.widgets.Shell;
import org.eclipse.ui.forms.widgets.ExpandableComposite;
import org.eclipse.ui.forms.widgets.Form;
import org.eclipse.ui.forms.widgets.FormToolkit;
import org.eclipse.ui.forms.widgets.Section;

public class SnippetTwistie {

    public static void main(String[] args) {
        Display display = new Display();
        Shell shell = new Shell(display);
        shell.setLayout(new FillLayout());
        FormToolkit toolkit= new FormToolkit(display);
        Form form = toolkit.createForm(shell);
        toolkit.decorateFormHeading(form);
        form.setText("Testview");
        form.getBody().setLayout(new GridLayout());
        ExpandableComposite ec = toolkit.createExpandableComposite(form.getBody(), Section.TWISTIE);
        ec.setText("Test Expandable Composite");
        ec.setLayoutData(new GridData(SWT.FILL,SWT.FILL,true,true));
        Composite client=new Composite(ec,SWT.BORDER);
        client.setLayout(new GridLayout());
        Label label=new Label(client,SWT.WRAP);
        label.setText("This snippet shows a Expandable Composite with a twistie.");
        label.setLayoutData(new GridData(SWT.FILL,SWT.FILL,true,true));
        ec.setClient(client);
        shell.open();
        while (!shell.isDisposed()) {
            if (!display.readAndDispatch())
                display.sleep();
        }
        display.dispose();
    }
}
2.2. First RCP example
Create a new Eclipse RCP project called de.vogella.rcp.intro.forms. Use the "RCP Application with a view" as a template. Add a dependency to "org.eclipse.ui.forms" in your manifest file via the Dependencies tab.
Change the generated View class to the following.
This creates a re-sizable table in a form with a button on the right side of it.
package de.vogella.rcp.intro.forms;
import org.eclipse.jface.viewers.ArrayContentProvider;
import org.eclipse.jface.viewers.ColumnLabelProvider;
import org.eclipse.jface.viewers.TableViewer;
import org.eclipse.jface.viewers.TableViewerColumn;
import org.eclipse.swt.SWT;
import org.eclipse.swt.graphics.Image;
import org.eclipse.swt.layout.GridData;
import org.eclipse.swt.layout.GridLayout;
import org.eclipse.swt.widgets.Button;
import org.eclipse.swt.widgets.Composite;
import org.eclipse.swt.widgets.Table;
import org.eclipse.ui.ISharedImages;
import org.eclipse.ui.PlatformUI;
import org.eclipse.ui.forms.widgets.FormToolkit;
import org.eclipse.ui.forms.widgets.ScrolledForm;
import org.eclipse.ui.forms.widgets.Section;
import org.eclipse.ui.part.ViewPart;
public class View extends ViewPart {
public static final String ID = "de.vogella.rcp.intro.forms.view";
private TableViewer viewer;
/**
* This is a callback that will allow us to create the viewer and initialize
* it.
*/
public void createPartControl(Composite parent) {
FormToolkit toolkit = new FormToolkit(parent.getDisplay());
ScrolledForm form = toolkit.createScrolledForm(parent);
form.setText("Eclipse Forms API Example");
// Lets make a layout for the first section of the screen
GridLayout layout = new GridLayout();
layout.numColumns = 1;
layout.marginWidth = 2;
layout.marginHeight = 2;
// Creating the Screen
Section section = toolkit.createSection(parent, Section.DESCRIPTION
| Section.TITLE_BAR);
section.setText("Section 1 for demonstration"); //$NON-NLS-1$
section.setDescription("This demonstrates the usage of section");
// Composite for storing the data
Composite client = toolkit.createComposite(section, SWT.WRAP);
layout = new GridLayout();
layout.numColumns = 2;
layout.marginWidth = 2;
layout.marginHeight = 2;
client.setLayout(layout);
Table t = toolkit.createTable(client, SWT.NONE);
GridData gd = new GridData(GridData.FILL_BOTH);
gd.heightHint = 20;
gd.widthHint = 100;
t.setLayoutData(gd);
toolkit.paintBordersFor(client);
Button b = toolkit.createButton(client, "Do something", SWT.PUSH); //$NON-NLS-1$
gd = new GridData(GridData.VERTICAL_ALIGN_BEGINNING);
b.setLayoutData(gd);
section.setClient(client);
viewer = new TableViewer(t);
viewer.setContentProvider(ArrayContentProvider().getInstance());
TableViewerColumn viewerColumn = new TableViewerColumn(viewer, SWT.NONE);
viewerColumn.getColumn().setWidth(100);
viewerColumn.setLabelProvider(new ColumnLabelProvider() {
@Override
public String getText(Object element) {
return element.toString();
};
public Image getImage(Object element) {
return PlatformUI.getWorkbench().getSharedImages()
.getImage(ISharedImages.IMG_OBJ_ELEMENT);
};
}
);
viewer.setInput(getViewSite());
}
/**
* Passing the focus request to the viewer's control.
*/
public void setFocus() {
viewer.getControl().setFocus();
}
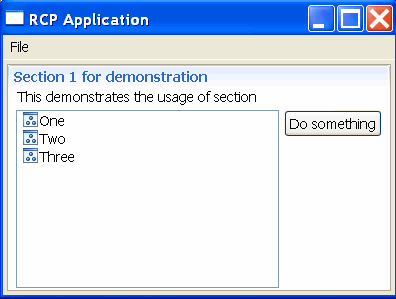
}The resulting application should look like the following:
2.3. Adding a command to the menu
You can add a command to the menu of the form. For this, define a command with a handler. Add this command to a popup menu contribution as for example in the following plugin.xml.
<?xml version="1.0" encoding="utf-8"?>
<?eclipse version="3.2"?>
<plugin>

   <extension
         id="application"
         point="org.eclipse.core.runtime.applications">
      <application>
         <run
               class="de.vogella.rcp.intro.forms.Application">
         </run>
      </application>
   </extension>
   <extension
         point="org.eclipse.ui.perspectives">
      <perspective
            name="Perspective"
            class="de.vogella.rcp.intro.forms.Perspective"
            id="de.vogella.rcp.intro.forms.perspective">
      </perspective>
   </extension>
   <extension
         point="org.eclipse.ui.views">
      <view
            name="View"
            class="de.vogella.rcp.intro.forms.View"
            id="de.vogella.rcp.intro.forms.view">
      </view>
   </extension>
   <extension
         point="org.eclipse.ui.commands">
      <command
            defaultHandler="de.vogella.rcp.intro.forms.handler.HelloHandler"
            id="de.vogella.rcp.intro.forms.hello"
            name="Hello">
      </command>
   </extension>
   <extension
         point="org.eclipse.ui.menus">
      <menuContribution
            allPopups="false"
            locationURI="popup:formsToolBar">
         <command
               commandId="de.vogella.rcp.intro.forms.hello"
               icon="icons/alt_window_16.gif"
               label="Hello"
               style="push">
         </command>
      </menuContribution>
   </extension>

</plugin>
Change the view to display the command in the form and you should see the command in your form.
package de.vogella.rcp.intro.forms;

import org.eclipse.jface.action.ToolBarManager;
import org.eclipse.jface.viewers.ArrayContentProvider;
import org.eclipse.jface.viewers.ColumnLabelProvider;
import org.eclipse.jface.viewers.TableViewer;
import org.eclipse.jface.viewers.TableViewerColumn;
import org.eclipse.swt.SWT;
import org.eclipse.swt.graphics.Image;
import org.eclipse.swt.layout.GridData;
import org.eclipse.swt.layout.GridLayout;
import org.eclipse.swt.widgets.Button;
import org.eclipse.swt.widgets.Composite;
import org.eclipse.swt.widgets.Table;
import org.eclipse.ui.ISharedImages;
import org.eclipse.ui.PlatformUI;
import org.eclipse.ui.forms.widgets.FormToolkit;
import org.eclipse.ui.forms.widgets.ScrolledForm;
import org.eclipse.ui.forms.widgets.Section;
import org.eclipse.ui.menus.IMenuService;
import org.eclipse.ui.part.ViewPart;

public class View extends ViewPart {
    public static final String ID = "de.vogella.rcp.intro.forms.view";

    private TableViewer viewer;

    /**
     * This is a callback that will allow us to create the viewer and initialize
     * it.
     */
    public void createPartControl(Composite parent) {
        FormToolkit toolkit = new FormToolkit(parent.getDisplay());
        ScrolledForm form = toolkit.createScrolledForm(parent);
        ToolBarManager manager = (ToolBarManager) form.getToolBarManager();
        toolkit.decorateFormHeading(form.getForm());
        IMenuService menuService = (IMenuService) getSite().getService(
                IMenuService.class);
        menuService.populateContributionManager(manager, "popup:formsToolBar");
        manager.update(true);

        form.setText("Eclipse Forms API Example");

        // Lets make a layout for the first section of the screen
        GridLayout layout = new GridLayout();
        layout.numColumns = 1;
        layout.marginWidth = 2;
        layout.marginHeight = 2;
        // Creating the Screen
        Section section = toolkit.createSection(parent, Section.DESCRIPTION
                | Section.TITLE_BAR);
        section.setText("Section 1 for demonstration"); //$NON-NLS-1$
        section.setDescription("This demonstrates the usage of section");
        // Composite for storing the data
        Composite client = toolkit.createComposite(section, SWT.WRAP);
        layout = new GridLayout();
        layout.numColumns = 2;
        layout.marginWidth = 2;
        layout.marginHeight = 2;
        client.setLayout(layout);
        Table t = toolkit.createTable(client, SWT.NONE);
        GridData gd = new GridData(GridData.FILL_BOTH);
        gd.heightHint = 20;
        gd.widthHint = 100;
        t.setLayoutData(gd);
        toolkit.paintBordersFor(client);
        Button b = toolkit.createButton(client, "Do something", SWT.PUSH); //$NON-NLS-1$
        gd = new GridData(GridData.VERTICAL_ALIGN_BEGINNING);
        b.setLayoutData(gd);
        section.setClient(client);
        viewer = new TableViewer(t);

        viewer.setContentProvider(new ArrayContentProvider());

        TableViewerColumn viewerColumn = new TableViewerColumn(viewer, SWT.NONE);
        viewerColumn.getColumn().setWidth(100);
        viewerColumn.setLabelProvider(new ColumnLabelProvider() {
            @Override
            public String getText(Object element) {
                return element.toString();
            };

            public Image getImage(Object element) {
                return PlatformUI.getWorkbench().getSharedImages()
                        .getImage(ISharedImages.IMG_OBJ_ELEMENT);
            };
        }

        );
        viewer.setInput(getViewSite());
    }

    /**
     * Passing the focus request to the viewer's control.
     */
    public void setFocus() {
        viewer.getControl().setFocus();
    }
}
3. Links and literature
3.1. vogella Java example code
If you need more assistance we offer Online Training and Onsite training as well as consulting