Single and multi touch in Android. This tutorial describes how to use the touch API in Android applications.
1. Android Touch
1.1. Android touch basics
The Android
standard
View
class
support touch events. You can react to touch events in your
custom views and your
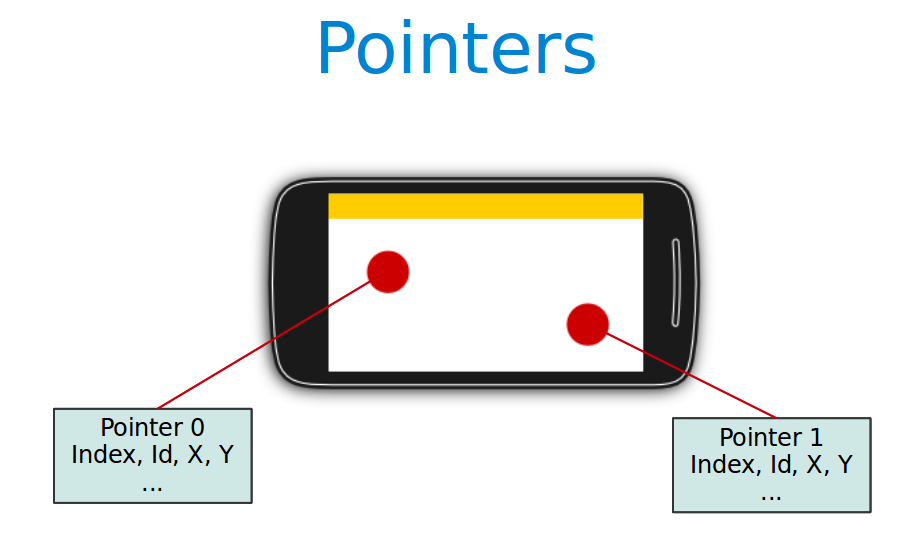
activities. Android supports multiple pointers,
e.g., fingers that are interacting with the screen.
The base class for touch support is the
MotionEvent
class which is passed to
Views
via the
onTouchEvent()
method.
To react to touch events
you override the
onTouchEvent()
method.
The
MotionEvent
class
contains the touch related information, e.g., the number of
pointers, the X/Y coordinates and size and pressure of each pointer.
This method returns
true
if the touch event has been handled by the view. Android tries to
find the deepest view which returns true to handles the touch event.
If the view is part of another view (parent view), the parent can
claim the event by returning
true
from the
onInterceptTouchEvent()
method. This would send an
MotionEvent.ACTION_CANCEL
event to the view which received previously the touch events.
To react to touch events in an
activity,
register an
OnTouchListener
for the relevant
Views.
1.2. Single touch
If single
input is used you can
use the getX()
and
getY()
methods to get the current position of the first finger.
Via the
getAction()
method
you receive the action which was performed. The
MotionEvent
class provides the following constants to determine the action which
was performed.
| Event | Description |
|---|---|
MotionEvent.ACTION_DOWN |
New touch started |
MotionEvent.ACTION_MOVE |
Finger is moving |
MotionEvent.ACTION_UP |
Finger went up |
MotionEvent.ACTION_CANCEL |
Current event has been canceled, something else took control of the touch event |
MotionEvent.ACTION_POINTER_DOWN |
Pointer down (multi-touch) |
MotionEvent.ACTION_POINTER_UP |
Pointer up (multi-touch) |
1.3. Multi touch
Multi-touch is available since Android 2.0 and has been improved in the version 2.2. This description uses the API as of version 2.2.
The
MotionEvent.ACTION_POINTER_DOWN
and
MotionEvent.ACTION_POINTER_UP
are send starting with the second finger. For the first finger
MotionEvent.ACTION_DOWN
and
MotionEvent.ACTION_UP
are used.
The
getPointerCount()
method on
MotionEvent
allows you to determine the number of pointers on the device. All
events and the position of the pointers are included in the instance
of
MotionEvent
which you receive in the
onTouch()
method.
To track the
touch events from multiple pointers you have to use the
MotionEvent.getActionIndex()
and the
MotionEvent.getActionMasked()
methods to identify the index of the pointer and the touch event
which
happened for this pointer.
This pointer
index can
change over time, e.g., if one finger is lifted
from the device. The stable version of a
pointer is the
pointer id,
that can be determined with the
getPointerId(pointerIndex)
method from the
MotionEvent
object.
The usage if demonstrated in the following code snippet.
@Override
public boolean onTouchEvent(MotionEvent event) {

        // get pointer index from the event object
        int pointerIndex = event.getActionIndex();

        // get pointer ID
        int pointerId = event.getPointerId(pointerIndex);

        // get masked (not specific to a pointer) action
        int maskedAction = event.getActionMasked();

        switch (maskedAction) {

        case MotionEvent.ACTION_DOWN:
        case MotionEvent.ACTION_POINTER_DOWN: {
            // TODO use data
            break;
        }
        case MotionEvent.ACTION_MOVE: { // a pointer was moved
            // TODO use data
            break;
        }
        case MotionEvent.ACTION_UP:
        case MotionEvent.ACTION_POINTER_UP:
        case MotionEvent.ACTION_CANCEL: {
            // TODO use data
            break;
        }
        }
        invalidate();

        return true;
}| Multitouch cannot be tested on the emulator. You need a real Android device as input device. |
1.4. GestureDetectors
Android provide the
GestureDetector
class that allow to
consume
MotionEvents
and to create
higher level gesture
events to listeners.
For example, the
ScaleGestureDetector
class allows to determine the
predefined gesture of increasing and
decreasing the size of the object via two fingers.
2. Prerequisites
The following assumes that you have already basic knowledge in Android development.
3. Exercise: Custom view and touch events
3.1. Draw via touch
This exercise demonstrates the handling of (single) touch events within a custom view.
Create an Android project called com.vogella.android.touch.single with the activity called SingleTouchActivity.
This activity uses a DialogFragment to set the color which is used for drawing.
Create the following layout called fragment_colorpicker.xml.
<?xml version="1.0" encoding="utf-8"?>
<LinearLayout xmlns:android="http://schemas.android.com/apk/res/android"
    android:orientation="vertical" android:layout_width="match_parent"
    android:layout_height="match_parent">

    <View
        android:layout_width="match_parent"
        android:layout_height="40dp"
        android:layout_margin="20dp"
        android:background="#ff0000"
        android:id="@+id/preview"
        />

    <SeekBar
        android:layout_width="match_parent"
        android:layout_height="wrap_content"
        android:id="@+id/red"
        android:progress="255"
        android:max="255"/>

    <SeekBar
        android:layout_width="match_parent"
        android:layout_height="wrap_content"
        android:id="@+id/green"
        android:max="255"/>

    <SeekBar
        android:layout_width="match_parent"
        android:layout_height="wrap_content"
        android:id="@+id/blue"
        android:max="255"/>
</LinearLayout>
Create the following TouchEventView class that implements a View which supports single touch.
package com.vogella.android.touch.single;

import android.content.Context;
import android.graphics.Canvas;
import android.graphics.Color;
import android.graphics.Paint;
import android.graphics.Path;
import android.util.AttributeSet;
import android.util.Log;
import android.view.GestureDetector;
import android.view.MotionEvent;
import android.view.VelocityTracker;
import android.view.View;

public class TouchEventView extends View {
  private Paint paint = new Paint();
  private Path path = new Path();
  Context context;

  GestureDetector gestureDetector;

  public TouchEventView(Context context, AttributeSet attrs) {
    super(context, attrs);
    gestureDetector = new GestureDetector(context, new GestureListener());
    this.context = context;

    paint.setAntiAlias(true);
    paint.setStrokeWidth(6f);
    paint.setColor(Color.BLACK);

    paint.setStyle(Paint.Style.STROKE);
    paint.setStrokeJoin(Paint.Join.ROUND);
  }

  public void setColor(int r, int g, int b) {
    int rgb = Color.rgb(r, g, b);
    paint.setColor(rgb);
  }

  private class GestureListener extends GestureDetector.SimpleOnGestureListener {
    // event when double tap occurs
    @Override
    public boolean onDoubleTap(MotionEvent e) {
      float x = e.getX();
      float y = e.getY();

      // clean drawing area on double tap
      path.reset();
      Log.d("Double Tap", "Tapped at: (" + x + "," + y + ")");

      return true;
    }

  }
  @Override
  protected void onDraw(Canvas canvas) {
    canvas.drawPath(path, paint);
  }

  @Override
  public boolean onTouchEvent(MotionEvent event) {
    float eventX = event.getX();
    float eventY = event.getY();

    switch (event.getAction()) {
    case MotionEvent.ACTION_DOWN:
      path.moveTo(eventX, eventY);
      return true;
    case MotionEvent.ACTION_MOVE:

      path.lineTo(eventX, eventY);
      break;
    case MotionEvent.ACTION_UP:

      break;
    default:
      return false;
    }

    // for demostraction purposes
    gestureDetector.onTouchEvent(event);
    // Schedules a repaint.
    invalidate();
    return true;
  }
}
Adjust the activity_main.xml layout file to the following.
<?xml version="1.0" encoding="utf-8"?>
<LinearLayout xmlns:android="http://schemas.android.com/apk/res/android"
              android:orientation="vertical"
              android:layout_width="match_parent"
              android:layout_height="match_parent">

    <com.vogella.android.touch.single.SingleTouchEventView
        android:layout_width="match_parent"
        android:background="@drawable/dwarf"
        android:layout_height="match_parent"
        android:id="@+id/drawingview">
    </com.vogella.android.touch.single.SingleTouchEventView>
</LinearLayout>
Add this view to your activity.
package com.vogella.android.touch.single;

import android.app.Activity;
import android.os.Bundle;

public class SingleTouchActivity extends Activity {
    @Override
    public void onCreate(Bundle savedInstanceState) {
        super.onCreate(savedInstanceState);
        setContentView(new SingleTouchEventView(this, null));
    }
}
If you run your application you will be able to draw on the screen with your finger (or with the mouse in the emulator).
Change your coding so that you use a layout definition based on XML.
|
To use your own view in an XML layout definition you have to use the full-qualified class name (class including package information). |
3.2. Allow to pick the line width
Add a menu to your application.
<?xml version="1.0" encoding="utf-8"?>
<menu xmlns:android="https://schemas.android.com/apk/res/android">

    <item android:title="Pick pen" android:id="@+id/action_pickpen"/>
</menu>
3.3. Tracking
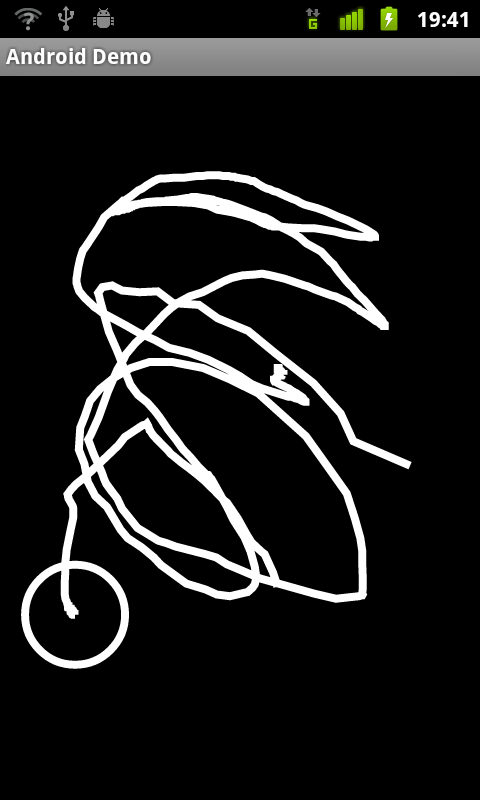
Add code to your drawing example so that the current position of a finger is marked via a circle.
To draw a circle you can use the addCircle(x, y, 50, Path.Direction.CW) method call on a Path or use the canvas element directly.
Make sure that only the current position is highlighted with a circle. The circle should appears as soon as the finger goes down and vanish once the finger goes up.
The result should look like the following.
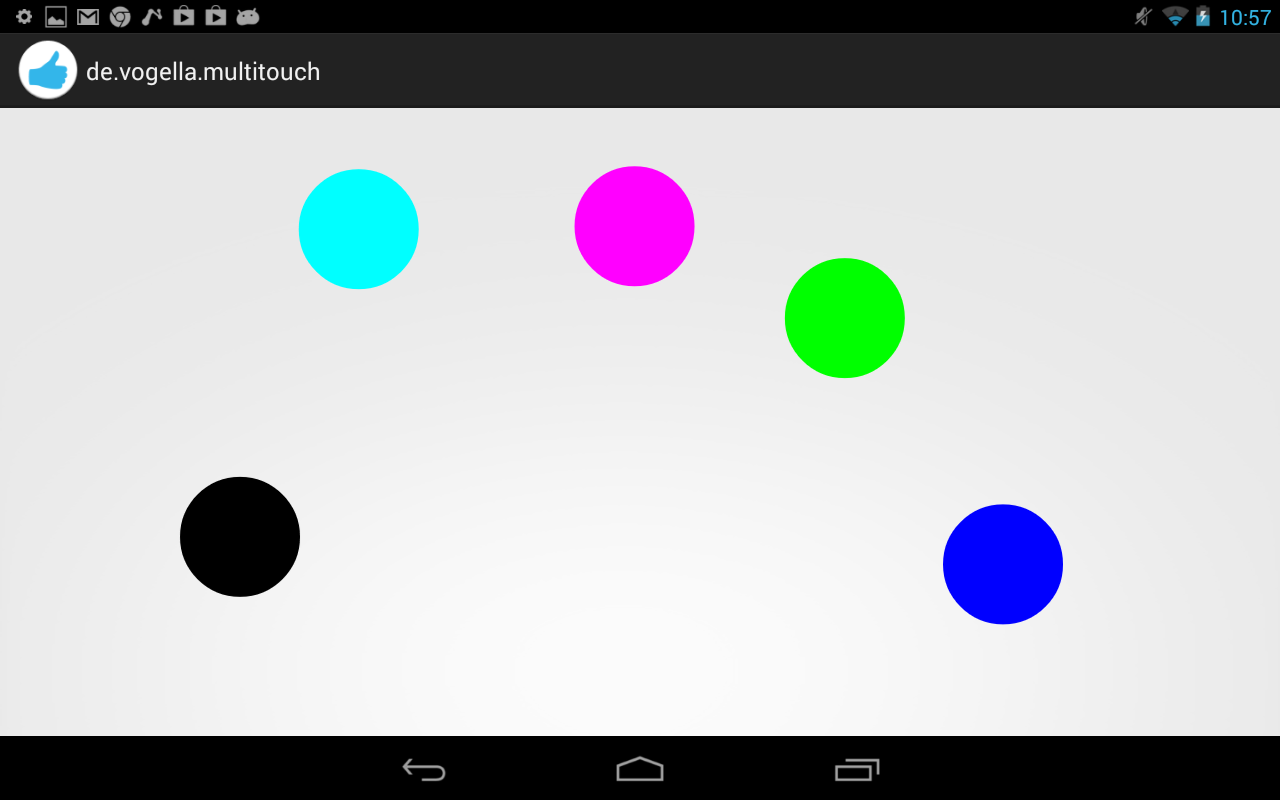
4. Exercise: Multitouch
In this exercise, you create a view which support multitouch and allows you to track several fingers on your device. On the Android emulator you can only simulate singletouch with the mouse.
Create an Android project called com.vogella.android.multitouch with an activity called MainActivity.
Create the following
MultitouchView
class.
package com.vogella.android.multitouch;

import android.content.Context;
import android.graphics.Canvas;
import android.graphics.Color;
import android.graphics.Paint;
import android.graphics.PointF;
import android.util.AttributeSet;
import android.util.SparseArray;
import android.view.MotionEvent;
import android.view.View;

public class MultitouchView extends View {

    private static final int SIZE = 60;

    private SparseArray<PointF> mActivePointers;
    private Paint mPaint;
    private int[] colors = { Color.BLUE, Color.GREEN, Color.MAGENTA,
            Color.BLACK, Color.CYAN, Color.GRAY, Color.RED, Color.DKGRAY,
            Color.LTGRAY, Color.YELLOW };

    private Paint textPaint;


    public MultitouchView(Context context, AttributeSet attrs) {
        super(context, attrs);
        initView();
    }

    private void initView() {
        mActivePointers = new SparseArray<PointF>();
        mPaint = new Paint(Paint.ANTI_ALIAS_FLAG);
        // set painter color to a color you like
        mPaint.setColor(Color.BLUE);
        mPaint.setStyle(Paint.Style.FILL_AND_STROKE);
        textPaint = new Paint(Paint.ANTI_ALIAS_FLAG);
        textPaint.setTextSize(20);
    }

    @Override
    public boolean onTouchEvent(MotionEvent event) {

        // get pointer index from the event object
        int pointerIndex = event.getActionIndex();

        // get pointer ID
        int pointerId = event.getPointerId(pointerIndex);

        // get masked (not specific to a pointer) action
        int maskedAction = event.getActionMasked();

        switch (maskedAction) {

        case MotionEvent.ACTION_DOWN:
        case MotionEvent.ACTION_POINTER_DOWN: {
            // We have a new pointer. Lets add it to the list of pointers

            PointF f = new PointF();
            f.x = event.getX(pointerIndex);
            f.y = event.getY(pointerIndex);
            mActivePointers.put(pointerId, f);
            break;
        }
        case MotionEvent.ACTION_MOVE: { // a pointer was moved
            for (int size = event.getPointerCount(), i = 0; i < size; i++) {
                PointF point = mActivePointers.get(event.getPointerId(i));
                if (point != null) {
                    point.x = event.getX(i);
                    point.y = event.getY(i);
                }
            }
            break;
        }
        case MotionEvent.ACTION_UP:
        case MotionEvent.ACTION_POINTER_UP:
        case MotionEvent.ACTION_CANCEL: {
            mActivePointers.remove(pointerId);
            break;
        }
        }
        invalidate();

        return true;
    }

    @Override
    protected void onDraw(Canvas canvas) {
        super.onDraw(canvas);

        // draw all pointers
        for (int size = mActivePointers.size(), i = 0; i < size; i++) {
            PointF point = mActivePointers.valueAt(i);
            if (point != null)
                mPaint.setColor(colors[i % 9]);
            canvas.drawCircle(point.x, point.y, SIZE, mPaint);
        }
        canvas.drawText("Total pointers: " + mActivePointers.size(), 10, 40 , textPaint);
    }

}
Add this view to the layout of your activity.
<RelativeLayout
    xmlns:android="http://schemas.android.com/apk/res/android"
    android:layout_width="match_parent"
    android:layout_height="match_parent">

    <com.vogella.android.multitouch.MultitouchView
        android:layout_width="match_parent"
        android:layout_height="match_parent"
        />

</RelativeLayout>
Your generated activity can remain the same.
package com.vogella.android.multitouch;

import android.app.Activity;
import android.os.Bundle;
import android.view.Menu;

public class MainActivity extends Activity {

    @Override
    protected void onCreate(Bundle savedInstanceState) {
        super.onCreate(savedInstanceState);
        setContentView(R.layout.activity_main);
    }

    @Override
    public boolean onCreateOptionsMenu(Menu menu) {
        getMenuInflater().inflate(R.menu.activity_main, menu);
        return true;
    }

}
If you run your application you will be able to draw on the screen with your fingers. Every device has an upper limit how many pointers are supported, test out how many simultaneous pointers your device supports. This application should look similar to the following screenshot.
5. Exercise: Use ScaleGestureDetector
Create the Android project called de.vogella.android.touch.scaledetector with an activity called ScaleDetectorTestActivity.
Create the following class.
package de.vogella.android.touch.scaledetector;

import android.content.Context;
import android.graphics.Canvas;
import android.graphics.drawable.Drawable;
import android.view.MotionEvent;
import android.view.ScaleGestureDetector;
import android.view.View;

public class ImageViewWithZoom extends View {
    private Drawable image;
    private float scaleFactor = 1.0f;
    private ScaleGestureDetector scaleGestureDetector;

    public ImageViewWithZoom(Context context) {
        super(context);
        image = context.getResources().getDrawable(R.drawable.icon);
        setFocusable(true);
        image.setBounds(0, 0, image.getIntrinsicWidth(),
                image.getIntrinsicHeight());
        scaleGestureDetector = new ScaleGestureDetector(context,
                new ScaleListener());
    }

    @Override
    protected void onDraw(Canvas canvas) {
        super.onDraw(canvas);
        // Set the image bounderies
        canvas.save();
        canvas.scale(scaleFactor, scaleFactor);
        image.draw(canvas);
        canvas.restore();
    }

    @Override
    public boolean onTouchEvent(MotionEvent event) {
        scaleGestureDetector.onTouchEvent(event);
        invalidate();
        return true;
    }

    private class ScaleListener extends
            ScaleGestureDetector.SimpleOnScaleGestureListener {
        @Override
        public boolean onScale(ScaleGestureDetector detector) {
            scaleFactor *= detector.getScaleFactor();

            // do not let the object get too small or too large.
            scaleFactor = Math.max(0.1f, Math.min(scaleFactor, 5.0f));

            invalidate();
            return true;
        }
    }
}
Add this view to your activity.
package de.vogella.android.touch.scaledetector;

import android.app.Activity;
import android.os.Bundle;

public class ScaleDetectorTestActivity extends Activity {
    /** Called when the activity is first created. */
    @Override
    public void onCreate(Bundle savedInstanceState) {
        super.onCreate(savedInstanceState);
        setContentView(new ImageViewWithZoom(this));
    }
}
If you run your application you should be able to shrink and enlarge the image via a multi-touch gesture (pitch zoom).
6. Links and Literature
6.3. vogella Java example code
If you need more assistance we offer Online Training and Onsite training as well as consulting