This tutorial describes how to implement and use custom SWT widgets.
1. Custom widgets in SWT
A custom widget is an UI element which is typical created because the existing native widgets cannot support a certain requirement. Custom SWT widgets are typically developed in pure Java.
The Eclipse project itself delivers several custom SWT widgets in the org.eclipse.swt.custom package, like CLabel, CCombo, StyledText and others.
Also the Eclipse Nebula project provides multiple custom widgets.
There are three common approaches to create a custom SWT widget:
-
Compound custom widgets, which contain other existing widgets (
Composite) -
Custom drawn widgets, which have no children and we simply draw on (
Canvas) -
Mixing both (
CompositeandCanvas)
Here is an example of a compound composite, which contains other widgets.
This snippet also use JFace API as this plug-in provide nice factories.
package com.vogella.rcp.custom.widgets.widget;

import org.eclipse.jface.layout.GridDataFactory;
import org.eclipse.jface.layout.GridLayoutFactory;
import org.eclipse.swt.SWT;
import org.eclipse.swt.widgets.Composite;
import org.eclipse.swt.widgets.Label;
import org.eclipse.swt.widgets.Text;

public class LabeledTextWidget extends Composite {

    private Label label;
    private Text text;

    public LabeledTextWidget(Composite parent, int style) {
        this(parent, style, SWT.NONE, SWT.BORDER);
    }

    public LabeledTextWidget(Composite parent, int style, int labelStyle, int textStyle) {
        super(parent, style);
        GridLayoutFactory.fillDefaults().numColumns(2).applyTo(this);

        label = new Label(this, labelStyle); (1)
        GridDataFactory.fillDefaults().applyTo(label);

        text = new Text(this, textStyle); (2)
        GridDataFactory.fillDefaults().grab(true, false).applyTo(getText());
    }

    public void setLabelText(String text) {
        checkWidget();
        label.setText(text);
    }

    public Text getText() {
        checkWidget();
        return text;
    }

}| 1 | Pass this to the child widgets of your compound custom widget, do not use the parent Composite |
| 2 | Pass this to the child widgets of your compound custom widget, do not use the parent Composite |
2. General guidelines for custom widgets
If you develop custom widgets, you should follow the following guidelines.
2.1. Dispose your system resources
If you allocate system resources, like fonts or images, you have to dispose them once you do not use them anymore.
To do this, you can attach a DisposeListener to your widget by using the addDisposeListener() method of the Canvas or Composite.
Alternatively, you can use JFace LocalResourceManager class to create system resources and dispose them once the widgets used for registration is disposed.
package com.vogella.rcp.custom.widgets.widget;

import org.eclipse.jface.resource.FontDescriptor;
import org.eclipse.jface.resource.JFaceResources;
import org.eclipse.jface.resource.LocalResourceManager;
import org.eclipse.jface.resource.ResourceManager;
import org.eclipse.swt.SWT;
import org.eclipse.swt.graphics.Color;
import org.eclipse.swt.graphics.Font;
import org.eclipse.swt.graphics.RGB;
import org.eclipse.swt.widgets.Canvas;
import org.eclipse.swt.widgets.Composite;

public class ResourceManagerCanvas extends Canvas {

    private ResourceManager resourceManager;

    public ResourceManagerCanvas(Composite parent, int style) {
        super(parent, style);
        // The LocalResourceManager attaches the DisposeHandler to the Canvas for you
        resourceManager = new LocalResourceManager(JFaceResources.getResources(), this);

        // Always create colors, fonts and images with the ResourceManager instance
        Color orange = resourceManager.createColor(new RGB(255, 191, 0));
        Font boldArialFont = resourceManager.createFont(FontDescriptor.createFrom("Arial", 12, SWT.BOLD));

        // Draw your widget.....
    }

}|
You should not override the |
|
It is not necessary to dispose |
2.2. Fail fast
At the beginning of each method, you should invoke the checkWidget method, before another other call to functionality of the custom widget.
The checkWidget method of the Widget class checks pre-conditions for the proper use of a Widget.
This involves whether the widget is not disposed and not accessed from an other Thread than the SWT Thread.
package com.vogella.rcp.custom.widgets.widget;

import org.eclipse.swt.widgets.Composite;

public class CustomWidget extends Composite {

    public CustomWidget(Composite parent, int style) {
        super(parent, style);
    }

    public void callFunctionalityOfCustomWidget() {
        checkWidget();

        // do custom things with the CustomWidget
    }

}
2.3. Tell others how big you are
By implementing the computeSize method you give Layout classes or other widgets the option to determine the size of your custom widget.
In this case the Layout, of the parent Composite, is able to align its child widgets properly.
package com.vogella.rcp.custom.widgets.widget;

import org.eclipse.swt.SWT;
import org.eclipse.swt.graphics.Point;
import org.eclipse.swt.widgets.Composite;

public class ComputeSizeWidget extends Composite {

    private static final int LINE_WIDTH = 30;
    private static final int LINE_HEIGHT = 2;

    public ComputeSizeWidget(Composite parent, int style) {
        super(parent, style);

        // draw a line with a width of 30 and a height of 2.
    }

    @Override
    public Point computeSize(int wHint, int hHint, boolean changed) {

        // try to consider the given hints. Here we decided to use the smallest
        // value so that the line would not be bigger than 30x2.
        // In case the SWT.DEFAULT flag for the hints is used, we simply stick to
        // the LINE_WIDTH and LINE_HEIGHT.
        int width = wHint != SWT.DEFAULT ? Math.min(wHint, LINE_WIDTH) : LINE_WIDTH;
        int height = hHint != SWT.DEFAULT ? Math.min(hHint, LINE_HEIGHT) : LINE_HEIGHT;

        return new Point(width, height);
    }
}
2.4. Use SWT errors
In case errors occur inside your custom widget, you should use one of the three static error methods of the SWT class.
-
public static void error (int code) -
public static void error (int code, Throwable throwable) -
public static void error (int code, Throwable throwable, String detail)
The code parameter of each error method must be one of the SWT.ERROR_* constants.
In case a parameter of a method must not be null, you can check this parameter and call SWT.error(SWT.ERROR_NULL_ARGUMENT) if it is null.
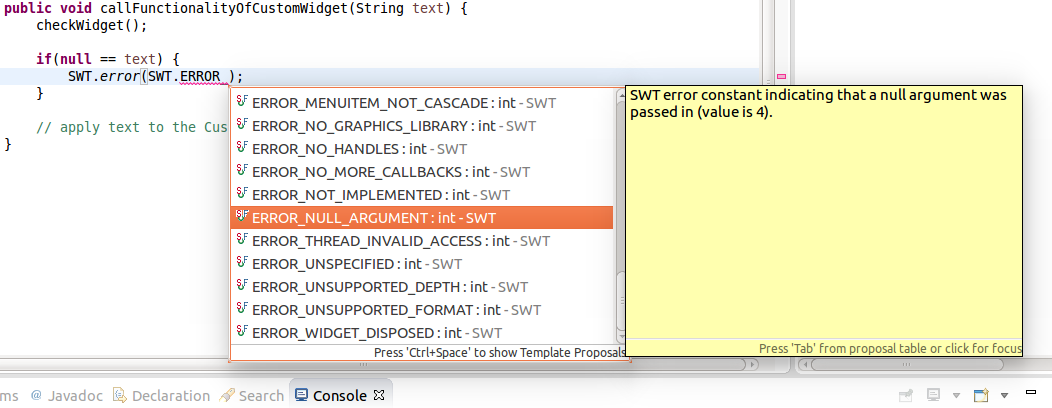
|
Also have a look at the other |
2.5. Also support bi-directional behavior
The SWT class contains two style flags, which can be passed to a widgets' constructor, where you can define the Bi-directional behavior of a widget.
SWT.RIGHT_TO_LEFT is used to write the widgets text and other included elements from right to left.
SWT.LEFT_TO_RIGHT is the default for most widgets.
3. Custom drawn widgets
As noted Canvas should be used for self drawn widgets, which do not have children.
To draw on a widget use the addPaintListner method in order to draw on a Canvas or Composite.
Use the redraw() method instead of directly calling your internal paint methods, so that the framework may queue all redraw requests
and do them all at once.
package aaa.parts;

import org.eclipse.jface.resource.FontDescriptor;
import org.eclipse.jface.resource.JFaceResources;
import org.eclipse.jface.resource.LocalResourceManager;
import org.eclipse.jface.resource.ResourceManager;
import org.eclipse.swt.SWT;
import org.eclipse.swt.graphics.Color;
import org.eclipse.swt.graphics.Font;
import org.eclipse.swt.graphics.GC;
import org.eclipse.swt.graphics.Point;
import org.eclipse.swt.graphics.RGB;
import org.eclipse.swt.widgets.Canvas;
import org.eclipse.swt.widgets.Composite;

public class CustomCanvasWithPaintListener extRends Canvas {

    private final int BORDER_MARGIN = 4;

    private ResourceManager resourceManager;

    private String text = "";

    public CustomCanvasWithPaintListener(Composite parent, int style) {
        super(parent, style);
        // The LocalResourceManager attaches the DisposeHandler to the Canvas
        // for you
        resourceManager = new LocalResourceManager(
                JFaceResources.getResources(), this);

        // Draw your widget.....
        addPaintListener(paintEvent -> {
            GC gc = paintEvent.gc;
            paintBorderAndText(gc);
        });
    }

    protected void paintBorderAndText(GC gc) {

        Font boldArialFont = resourceManager.createFont(FontDescriptor.createFrom("Arial", 14, SWT.BOLD));
        gc.setFont(boldArialFont);
        // setFont before using textExtent, so that the size of the text
        // can be calculated correctly
        Point textExtent = gc.textExtent(getText());

        // system colors may be used without the resourceManager, because those
        // system colors are maintained by the OS itself
        gc.setBackground(getDisplay().getSystemColor(SWT.COLOR_BLACK));

        // Always begin with the background so that everything is drawn upon it
        gc.fillRoundRectangle(3, 3, textExtent.x + BORDER_MARGIN, textExtent.y + BORDER_MARGIN, 8, 8);

        // draw the orange border
        Color orange = resourceManager.createColor(new RGB(255, 191, 0));
        gc.setBackground(orange);
        gc.setForeground(orange);

        gc.drawRoundRectangle(3, 3, textExtent.x + BORDER_MARGIN, textExtent.y
                + BORDER_MARGIN, 8, 8);

        // And finally draw the given text
        gc.drawString(getText(), 5, 4, true);
    }

    public String getText() {
        checkWidget();
        return text;
    }

    public void setText(String text) {
        checkWidget();
        this.text = text;

        // use redraw() instead of directly calling
        // the paintBorderAndText(GC gc) method.
        getParent().layout();
        redraw();
    }

}
This widget can be used via the following code:
parent.setLayout(new GridLayout(1, false));

CustomCanvasWithPaintListener paintListenerCanvas = new CustomCanvasWithPaintListener(parent, SWT.NONE);
paintListenerCanvas.setText("This is a custo, drawn widget");
paintListenerCanvas.setLayoutData(GridDataFactory.fillDefaults().create());
The widget looks similar to the following screenshot.

3.1. SWT events and listener
The widget should also react to user interface.
Therefore, it should fire events like other widgets also do, i.e., a Button, which fires a widgetSelected event to it’s attached SelectionListener.
While you can also add new events and listeners for your specific needs, in most cases the existing SWT event are sufficient.
Imagine a custom drawn button, which obviously should reuse a default SelectionListener.
In case you reuse such an existing SWT event, you should either support TypedListener and also use SWT’s low level Listener API, which can be applied to every widget by using the addListener(int, Listener) method.
For custom drawn widgets you likely want to add custom event listeners, which suit to
the widget’s special purposes.
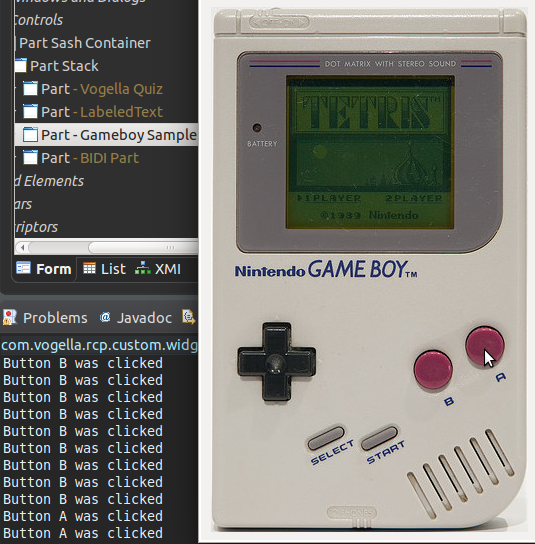
Say we got a custom Gameboy widget, where we want to be able to listen to the clicks on the Gameboy’s buttons.
The first thing to do is to define a custom event, which is derived from java.util.EventObject.
package com.vogella.rcp.custom.widgets.widget.gameboy;

import java.util.EventObject;

public class GameboySelectionEvent extends EventObject {

    private static final long serialVersionUID = 1059740358205812736L;

    public static final int BUTTON_POWER = 0;
    public static final int BUTTON_A = 1;
    public static final int BUTTON_B = 2;
    public static final int BUTTON_START = 3;
    public static final int BUTTON_SELECT = 4;
    public static final int BUTTON_UP = 5;
    public static final int BUTTON_DOWN = 6;
    public static final int BUTTON_LEFT = 7;
    public static final int BUTTON_RIGHT = 8;

    private int gameboyButton;

    public GameboySelectionEvent(Object source, int gameboyButton) {
        super(source);
        assert (gameboyButton < 9 && gameboyButton > -1);
        this.gameboyButton = gameboyButton;
    }

    public int getButton() {
        return gameboyButton;
    }
}
With this event implementation we provide the event information, which button has been selected. Normally you just define a getter for specific event information and pass the values to the constructor of the custom event. The next thing to do is to provide a listener interface to which the event is passed in case a certain event occurs.
package com.vogella.rcp.custom.widgets.widget.gameboy;

import java.util.EventListener;

/**
 * This listener is used to be registered for the {@link GameboyWidget} and will
 * be invoked every time a button on the {@link GameboyWidget} is selected.
 *
 */
public interface GameboySelectionListener extends EventListener {

    public void gameboyButtonSelected(GameboySelectionEvent gameboySelectionEvent);
}
The last thing to do is simply offering an API to add and remove your custom listener and to fire your custom events, which will be passed to the listener.
3.2. Positions in custom drawings
In custom drawings the positions of the elements inside it should be stored.
So the positions of certain elements inside the custom widget can be found after they are drawn.
This is especially important, if elements of the drawing should trigger certain events.
Now that we know how to draw a custom widget with a PaintListener and defined our listener interfaces and events, we need to figure out when those events should be fired.
Therefore we need to track the positions of our custom drawings on the widget.
In order to do such a tracking we implement a HoverCheck class, which will enable us to recognize whenever a certain part of a widget is hovered.
package com.vogella.rcp.custom.widgets.widget.listener;

import java.beans.PropertyChangeListener;
import java.beans.PropertyChangeSupport;

import org.eclipse.swt.SWT;
import org.eclipse.swt.events.DisposeEvent;
import org.eclipse.swt.events.DisposeListener;
import org.eclipse.swt.graphics.Point;
import org.eclipse.swt.graphics.Rectangle;
import org.eclipse.swt.widgets.Control;
import org.eclipse.swt.widgets.Event;
import org.eclipse.swt.widgets.Listener;

public class HoverCheck implements Listener, DisposeListener {

    private PropertyChangeSupport changeSupport = new PropertyChangeSupport(this);

    private Control containerWidget;
    private Point widgetCoords;
    private Point widgetSize;

    private boolean hovering;

    public HoverCheck(Control containerWidget, Point widgetCoords,
            Point widgetSize) {
        assert (containerWidget != null);
        this.containerWidget = containerWidget;
        this.widgetCoords = widgetCoords;
        this.widgetSize = widgetSize;
        containerWidget.addDisposeListener(this);
        containerWidget.addListener(SWT.MouseMove, this);
    }

    @Override
    public void handleEvent(Event event) {
        switch (event.type) {
        case SWT.MouseMove:
            Rectangle targetBounds = containerWidget.getBounds();

            // just override the original size of the Rectangle, because the
            // getBounds() method always creates a new Rectangle instance every
            // time it gets called.
            targetBounds.x += widgetCoords.x;
            targetBounds.y += widgetCoords.y;
            targetBounds.width = widgetSize.x;
            targetBounds.height = widgetSize.y;

            if (targetBounds.contains(event.x, event.y)) {
                if (!isHovering()) {
                    setHovering(true);
                }
            } else {
                if (isHovering()) {
                    setHovering(false);
                }
            }
            break;
        default:
            break;
        }
    }

    @Override
    public void widgetDisposed(DisposeEvent e) {
        if (containerWidget != null && !containerWidget.isDisposed()) {
            containerWidget.removeListener(SWT.MouseMove, this);
        }
    }

    public void addHoverListener(PropertyChangeListener hoverChangeListener) {
        changeSupport
                .addPropertyChangeListener("hovering", hoverChangeListener);
    }

    public void removeHoverListener(PropertyChangeListener hoverChangeListener) {
        changeSupport.removePropertyChangeListener("hovering",
                hoverChangeListener);
    }

    public boolean isHovering() {
        return hovering;
    }

    protected void setHovering(boolean hovering) {
        changeSupport.firePropertyChange("hovering", isHovering(),
                this.hovering = hovering);
    }
}
Inside this class we pass the widget itself, the x, y coordinates and the size of the part, where hovering should be checked.
With this information we are able to create a Rectangle, which represents the position and size of this special part (i.e. a Gameboy button) and can use the Rectangle’s contains method in
order to check, if the current mouse position is within this Rectangle or not.
In the GameboyWidget itself, we can use this HoverCheck class to figure out, if a certain button on the Gameboy was selected.
package com.vogella.rcp.custom.widgets.widget.gameboy;

import java.beans.PropertyChangeEvent;
import java.beans.PropertyChangeListener;
import java.net.URL;
import java.util.ArrayList;
import java.util.Collection;

import org.eclipse.core.runtime.FileLocator;
import org.eclipse.core.runtime.Path;
import org.eclipse.jface.resource.ImageDescriptor;
import org.eclipse.jface.resource.JFaceResources;
import org.eclipse.jface.resource.LocalResourceManager;
import org.eclipse.jface.resource.ResourceManager;
import org.eclipse.swt.SWT;
import org.eclipse.swt.events.PaintEvent;
import org.eclipse.swt.events.PaintListener;
import org.eclipse.swt.graphics.GC;
import org.eclipse.swt.graphics.Image;
import org.eclipse.swt.graphics.Point;
import org.eclipse.swt.graphics.Rectangle;
import org.eclipse.swt.widgets.Canvas;
import org.eclipse.swt.widgets.Composite;
import org.eclipse.swt.widgets.Event;
import org.eclipse.swt.widgets.Listener;
import org.osgi.framework.Bundle;
import org.osgi.framework.FrameworkUtil;

import com.vogella.rcp.custom.widgets.widget.listener.HoverCheck;

public class GameboyWidget extends Canvas {

    private static final int Y_OFFSET = 10;
    private static final int X_OFFSET = 10;

    private ResourceManager resourceManager;

    private Collection<GameboySelectionListener> gameboySelectionListeners = new ArrayList<GameboySelectionListener>();

    private HoverCheck buttonAHoverCheck;
    private HoverCheck buttonBHoverCheck;

    private Image gameBoyImage;

    public GameboyWidget(Composite parent, int style) {
        super(parent, style);
        resourceManager = new LocalResourceManager(
                JFaceResources.getResources(), this);
        gameBoyImage = loadGameboyImage();

        setupButtonHoverChecks();

        addPaintListener(this::paint);

        addListener(SWT.MouseDown, event -> {
            if (buttonAHoverCheck.isHovering()) {
                System.out.println("Button A was clicked");
                fireGameboySelectionChanged(new GameboySelectionEvent(this,
                        GameboySelectionEvent.BUTTON_A));
            } else if (buttonBHoverCheck.isHovering()) {
                System.out.println("Button B was clicked");
                fireGameboySelectionChanged(new GameboySelectionEvent(this,
                        GameboySelectionEvent.BUTTON_B));
            }
        });
    }

    private void setupButtonHoverChecks() {
        Point buttonsSize = new Point(40, 40);
        buttonAHoverCheck = new HoverCheck(this, new Point(266, 330), buttonsSize);
        buttonAHoverCheck.addHoverListener(event ->  {
            if (Boolean.TRUE.equals(event.getNewValue())) {
                setCursor(getDisplay().getSystemCursor(SWT.CURSOR_HAND));
            } else {
                setCursor(null);
            }
        });

        buttonBHoverCheck = new HoverCheck(this, new Point(211, 353), buttonsSize);
        buttonBHoverCheck.addHoverListener(event -> {
            if (Boolean.TRUE.equals(event.getNewValue())) {
                setCursor(getDisplay().getSystemCursor(SWT.CURSOR_HAND));
            } else {
                setCursor(null);
            }
        });
    }

    protected void paint(PaintEvent event) {
        event.gc.drawImage(gameBoyImage, X_OFFSET, Y_OFFSET);
    }

    @Override
    public Point computeSize(int wHint, int hHint, boolean changed) {
        Rectangle bounds = gameBoyImage.getBounds();

        // Just return the size of the Gameboy image
        return new Point(bounds.width, bounds.height);
    }

    public void addGameboySelectionListener(
            GameboySelectionListener selectionListener) {
        gameboySelectionListeners.add(selectionListener);
    }

    public void removeGameboySelectionListener(
            GameboySelectionListener selectionListener) {
        gameboySelectionListeners.remove(selectionListener);
    }

    protected void fireGameboySelectionChanged(
            GameboySelectionEvent selectionEvent) {
        for (GameboySelectionListener gameboySelectionListener : gameboySelectionListeners) {
            gameboySelectionListener.gameboyButtonSelected(selectionEvent);
        }
    }

    private Image loadGameboyImage() {
        Bundle bundle = FrameworkUtil.getBundle(getClass());
        URL imgUrl = FileLocator.find(bundle, new Path("images/gameboy.jpg"),
                null);
        ImageDescriptor imgDescriptor = ImageDescriptor.createFromURL(imgUrl);
        return resourceManager.createImage(imgDescriptor);
    }
}
4. Using custom Regions for Widgets
In order to apply a custom shape for a Control the Region class can be used.
A Region is derived from org.eclipse.swt.graphics.Resource, which means that it is necessary to dispose them, once not needed any more.
Region region = new Region();

// apply region shape

control.setRegion(region);

region.dispose();
4.1. Specifying a Region for a Control
The Control class offers a setRegion method, where a Region can be applied.
The most important methods of a Region are add, intersect and subtract where the shape can be defined by either a rectangle or an array of points.
Here is an example where the Shell gets a shape of a crown:
import org.eclipse.swt.SWT;
import org.eclipse.swt.graphics.Rectangle;
import org.eclipse.swt.graphics.Region;
import org.eclipse.swt.widgets.Display;
import org.eclipse.swt.widgets.Shell;

public class CrownRegion
{

  public static void main(String[] args)
  {
    final Display display = new Display();
    // Shell must be created with style SWT.NO_TRIM
    final Shell shell = new Shell(display, SWT.NO_TRIM | SWT.ON_TOP);
    shell.setBackground(display.getSystemColor(SWT.COLOR_YELLOW));

    // Create a region that looks like a crown
    Region region = new Region();
    region.add(0, 0, 300, 150);
    // subtract for the spikes of the crown
    region.subtract(new int[] { 2, 0, 75, 75, 150, 0, 225, 75, 298, 0 });
    shell.setRegion(region);
    Rectangle size = region.getBounds();
    shell.setSize(size.width * 2, size.height);

    // center the shell on the display
    Rectangle bounds = display.getBounds();
    shell.setLocation(bounds.width / 2 - 150, bounds.height / 2 + 75);

    shell.open();

    while (!shell.isDisposed())
    {
      if (!display.readAndDispatch())
        display.sleep();
    }
    region.dispose();
    display.dispose();
  }
}
The x and y coordinates of the Region are relative to the Control´s position and not relative to the display like the shell. That´s why the region rectangle (region.add(0, 0, 300, 150);) starts at 0, 0.
|
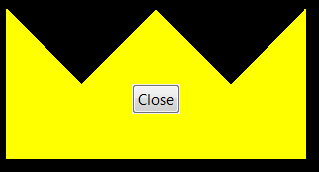
4.2. Adding controls to a "regionized" Shell
When adding controls to a shell, which has an applied Region, the area, which is not part of the region, should be considered.
For example by simply adding a Button it usually won´t show up, because it would be rendered in the area between the spikes of the crown.
Therefore the layout data, e.g. GridData, can be used to specify an indent for the Control.
public class CrownRegionWithButton
{

  public static void main(String[] args)
  {
    final Display display = new Display();
    // Shell must be created with style SWT.NO_TRIM
    final Shell shell = new Shell(display, SWT.NO_TRIM | SWT.ON_TOP);
    GridLayoutFactory.fillDefaults().applyTo(shell);
    shell.setBackground(display.getSystemColor(SWT.COLOR_YELLOW));

    // Create a region that looks like a crown
    Region region = new Region();
    region.add(0, 0, 300, 150);
    // subtract for the spikes of the crown
    region.subtract(new int[] { 2, 0, 75, 75, 150, 0, 225, 75, 298, 0 });
    shell.setRegion(region);
    Rectangle size = region.getBounds();
    shell.setSize(size.width * 2, size.height);

    // center the shell on the display
    Rectangle bounds = display.getBounds();
    shell.setLocation(bounds.width / 2 - 150, bounds.height / 2 + 75);

    Button button = new Button(shell, SWT.PUSH);
    button.setText("Close");

    int halfSize = size.width / 2;
    int halfButtonSize = button.computeSize(SWT.DEFAULT, SWT.DEFAULT).x / 2;
    // Adding an indent to draw the close button in the middle
    GridDataFactory.fillDefaults().indent(halfSize - halfButtonSize, 75).applyTo(button);
    button.addListener(SWT.Selection, e -> shell.close());

    shell.open();

    while (!shell.isDisposed())
    {
      if (!display.readAndDispatch())
        display.sleep();
    }
    region.dispose();
    display.dispose();
  }
}
In this case an indent is added to the GridData of the Button.
The result should look similar to this:
4.3. Examples from SWT Snippets
The SWT snippets are always a nice source for more advanced examples like Snippet 134:
/*******************************************************************************
 * Copyright (c) 2000, 2016 IBM Corporation and others.
 * All rights reserved. This program and the accompanying materials
 * are made available under the terms of the Eclipse Public License v1.0
 * which accompanies this distribution, and is available at
 * http://www.eclipse.org/legal/epl-v10.html
 *
 * Contributors:
 *     IBM Corporation - initial API and implementation
 *******************************************************************************/
package org.eclipse.swt.snippets;

/*
 * Shell example snippet: create a non-rectangular window
 *
 * For a list of all SWT example snippets see
 * http://www.eclipse.org/swt/snippets/
 *
 * @since 3.0
 */
import org.eclipse.swt.*;
import org.eclipse.swt.graphics.*;
import org.eclipse.swt.widgets.*;

public class Snippet134 {

static int[] circle(int r, int offsetX, int offsetY) {
    int[] polygon = new int[8 * r + 4];
    //x^2 + y^2 = r^2
    for (int i = 0; i < 2 * r + 1; i++) {
        int x = i - r;
        int y = (int)Math.sqrt(r*r - x*x);
        polygon[2*i] = offsetX + x;
        polygon[2*i+1] = offsetY + y;
        polygon[8*r - 2*i - 2] = offsetX + x;
        polygon[8*r - 2*i - 1] = offsetY - y;
    }
    return polygon;
}

public static void main(String[] args) {
    final Display display = new Display();
    //Shell must be created with style SWT.NO_TRIM
    final Shell shell = new Shell(display, SWT.NO_TRIM | SWT.ON_TOP);
    shell.setBackground(display.getSystemColor(SWT.COLOR_RED));
    //define a region that looks like a key hole
    Region region = new Region();
    region.add(circle(67, 67, 67));
    region.subtract(circle(20, 67, 50));
    region.subtract(new int[]{67, 50, 55, 105, 79, 105});
    //define the shape of the shell using setRegion
    shell.setRegion(region);
    Rectangle size = region.getBounds();
    shell.setSize(size.width, size.height);
    //add ability to move shell around
    Listener l = new Listener() {
        /** The x/y of the MouseDown, relative to top-left of the shell. */
        Point origin;
        @Override
        public void handleEvent(Event e) {
            switch (e.type) {
                case SWT.MouseDown:
                    Point point = shell.toDisplay(e.x, e.y);
                    Point loc = shell.getLocation();
                    origin = new Point(point.x - loc.x, point.y - loc.y);
                    break;
                case SWT.MouseUp:
                    origin = null;
                    break;
                case SWT.MouseMove:
                    if (origin != null) {
                        Point p = display.map(shell, null, e.x, e.y);
                        shell.setLocation(p.x - origin.x, p.y - origin.y);
                    }
                    break;
            }
        }
    };
    shell.addListener(SWT.MouseDown, l);
    shell.addListener(SWT.MouseUp, l);
    shell.addListener(SWT.MouseMove, l);
    //add ability to close shell
    Button b = new Button(shell, SWT.PUSH);
    b.setBackground(shell.getBackground());
    b.setText("close");
    b.pack();
    b.setLocation(10, 68);
    b.addListener(SWT.Selection, e -> shell.close());
    shell.open();
    while (!shell.isDisposed()) {
        if (!display.readAndDispatch())
            display.sleep();
    }
    region.dispose();
    display.dispose();
}
}
And as mentioned before the setRegion method belongs to the Control class, which means that a Region can also be applied for other Controls like a Button:
/*******************************************************************************
 * Copyright (c) 2000, 2016 IBM Corporation and others.
 * All rights reserved. This program and the accompanying materials
 * are made available under the terms of the Eclipse Public License v1.0
 * which accompanies this distribution, and is available at
 * http://www.eclipse.org/legal/epl-v10.html
 *
 * Contributors:
 *     IBM Corporation - initial API and implementation
 *******************************************************************************/
package org.eclipse.swt.snippets;

import org.eclipse.swt.*;
import org.eclipse.swt.graphics.*;
import org.eclipse.swt.layout.*;
import org.eclipse.swt.widgets.*;

/*
 * Region on a control: create a non-rectangular button
 *
 * For a list of all SWT example snippets see
 * http://www.eclipse.org/swt/snippets/
 *
 * @since 3.4
 */

public class Snippet294 {

    static int[] circle(int r, int offsetX, int offsetY) {
        int[] polygon = new int[8 * r + 4];
        // x^2 + y^2 = r^2
        for (int i = 0; i < 2 * r + 1; i++) {
            int x = i - r;
            int y = (int)Math.sqrt(r*r - x*x);
            polygon[2*i] = offsetX + x;
            polygon[2*i+1] = offsetY + y;
            polygon[8*r - 2*i - 2] = offsetX + x;
            polygon[8*r - 2*i - 1] = offsetY - y;
        }
        return polygon;
    }

    public static void main(String[] args) {
        final Display display = new Display();

        final Shell shell = new Shell(display);
        shell.setText("Regions on a Control");
        shell.setLayout(new FillLayout());
        shell.setBackground(display.getSystemColor(SWT.COLOR_DARK_RED));

        Button b2 = new Button(shell, SWT.PUSH);
        b2.setText("Button with Regions");

        // define a region that looks like a circle with two holes in ot
        Region region = new Region();
        region.add(circle(67, 87, 77));
        region.subtract(circle(20, 87, 47));
        region.subtract(circle(20, 87, 113));

        // define the shape of the button using setRegion
        b2.setRegion(region);
        b2.setLocation(100,50);

        b2.addListener(SWT.Selection, e -> shell.close());

        shell.setSize(200,200);
        shell.open();

        while (!shell.isDisposed()) {
            if (!display.readAndDispatch())
                display.sleep();
        }
        region.dispose();
        display.dispose();
    }

}
5. SWT Widget online resources
If you need more assistance we offer Online Training and Onsite training as well as consulting