This tutorial explains how to use NatTable for building advanced tables and trees in SWT-based applications.
1. Introduction to NatTable
1.1. What is NatTable?
NatTable is a framework to create table, grid and tree controls. I can handle large data sets and supports sorting, filtering, grouping and fixed/frozen columns and rows and other advanced features. NatTable is also fully stylable.
|
Why is it called NatTable?
The original implementation was dedicated to the girlfriend of the creator whose name was Natalie. A lot has changed since then and the original implementation was mainly refactored. But the name stayed. Today we think of Nat as an acronym for Not a(nother) table, because it is a lot more than a simple table control. This acronym was finally approved by Lars Vogel. When we met him at a conference, introducing NatTable to him, his first reaction was to shout out Oh No! Not Another Table widget. As said at the beginning, he was right with that statement, since it is a framework to create rich table, grid or tree controls and not just another table widget. |
1.2. Bundles and dependencies
The NatTable project is split into core and extensions.
The core contains all the interface definitions and common implementations. It has the following dependencies:
-
SWT - rendering and interaction (key, mouse)
-
JFace - resource handling and dialogs
-
org.eclipse.equinox.common & org.eclipse.core.commands - JFace dependencies
-
Apache Commons Logging - internal logging
The extensions category contains special implementations of core functionality using third-party libraries. Currently there are four extensions available:
-
The Eclipse 4 extension contains CSS styling capabilities using the Eclipse CSS engine. It also contains e4 specific implementations like for example the
E4SelectionListenerto support selection handling the e4 way. -
The GlazedLists extension contains implementations for sorting, filtering and trees using the GlazedLists library. It also contains the GroupBy feature which is currently not available in NatTable Core. The GlazedLists Extension has an additional dependency to Apache Commons Codec, which is needed for serialization purposes.
-
The Nebula extension contains implementations for integrating widgets from the Nebula project. Currently it only contains an
ICellEditorand anICellPainterthat uses the RichText control. -
The Apache POI extension contains implementations for Excel exports using the Apache POI library. It adds support for advanced export features.
1.3. Available update sites
You can add NatTable to your target platform via the p2 update sites listed on Nebula NatTable download page. For example, the following update sites are available.
// Update site for the 1.6.0 release
https://download.eclipse.org/nattable/releases/1.6.0/repository/

// Latest snapshop
https://download.eclipse.org/nattable/snapshots/latest/repository/
2. NatTable example application
2.1. Exploring the NatTable capabilities
NatTable provides an example application that demonstrates almost every feature.
The application shows all the available examples in a tree on the left opens the selected example on the right.
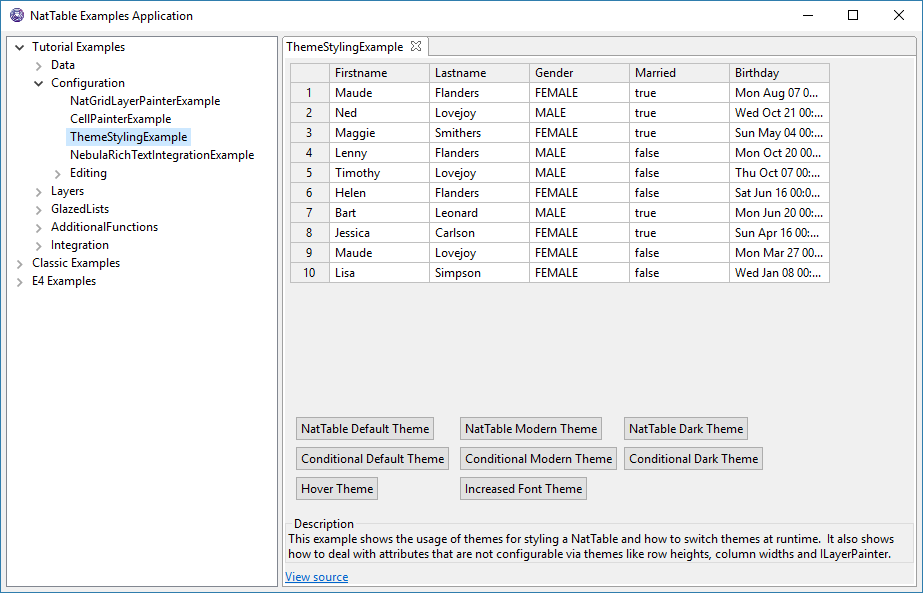
Via the View Source link at the bottom of the example, you can open the source code of the example.
The tree currently contains three main sections:
-
Tutorial Examples
The examples that are referred to in upcoming tutorials. -
Classic Examples
The examples that exist for a long time. -
E4 Examples
Examples to show the use of E4 mechanisms like CSS styling or the E4 selection mechanism.
|
The E4 Examples are not available in the plain SWT version of the NatTable examples application. |
2.2. Starting the example application
To start the NatTable examples application you have several options. First, you need to download the application from the NatTable website. It can be reached by clicking on the Try it button on the start page.

The easiest way to download the Eclipse RCP version for your operating system. Unzip the downloaded archive and start the application via the executable.
The second option to run the examples application is to download the JAR file for the desired version (currently NatTableExamples-1.5.0.jar) and start it via command line. The JAR file is also available via the NatTable Examples Application Download Page. The JAR file does not contain the platform-specific SWT libraries. Therefore you need to ensure that the SWT jar file for your platform is added to the classpath when starting the examples application.
For starting the NatTable examples application on a 32bit Windows machine you would need to copy the
org.eclipse.swt.win32.win32.x86_.jar to the same place where the NatTableExamples JAR is located and call
java -cp org.eclipse.swt.win32.win32.x86_.jar;NatTableExamples.jar org.eclipse.nebula.widgets.nattable.examples.NatTableExamplesThe third option is to run the examples application from the sources.
Checked out the sources from Git as explained in the Contribution Guide.
Afterwards, start the org.eclipse.nebula.widgets.nattable.examples.NatTableExamples main class in the org.eclipse.nebula.widgets.nattable.examples project.
3. Exercise: Install NatTable into your IDE
Open the and enter https://download.eclipse.org/nattable/releases/1.6.0/repository/ in the Work with: field. The expected output is shown in the screenshot below.

Select all items in all categories and finish the installation. Restart the Eclipse IDE after the installation.
4. Architecture
The architecture of NatTable supports flexible composition and configuration. The following chapters covers the architecture basics, explaining layers, configurations, command and event handling and the label concept used for conditional configuration.
4.1. Basics and Limitations
NatTable is a virtual table as it processes only the current visible part of the table. This allows to handle large data sets, as only the visible elements are drawn.
The default implementations operate on data that resides in memory. To handle large data sets that must be fetched on demand, you need to provide your custom implementations.
|
Currently NatTable can handle max int rows * max int columns, because the implementation uses |
4.1.1. Comparison to other table widgets
Unlike the SWT Table control, NatTable doesn’t use the native table control of the operating system.
It extends the SWT Canvas class and paints its visible part using the Canvas API.
Therefore, NatTable does not have the limitations of the native controls, like the missing ability to show different row heights in one table (an issue on Windows).
JFace table end up creating lots of objects compared to NatTable.
Currently NatTable does not support the JFace data binding. NatTable already directly operates on the data model as the data providers are connected to it. And it also supports data conversion and validation mechanisms that fit better into the concepts of NatTable. Therefore, it seems not necessary to support JFace data binding.
4.2. Layers
A NatTable instance is typically build out of several ILayer layers.
A layer is a rectangular region of cells and has methods to access columns, rows, width and height.
Basic features are implemented in a layer and are added to the table by using a layer stack or a layer composition.
For example, to add the ability to select cells in a table you can stack a SelectionLayer on top of your data layer.
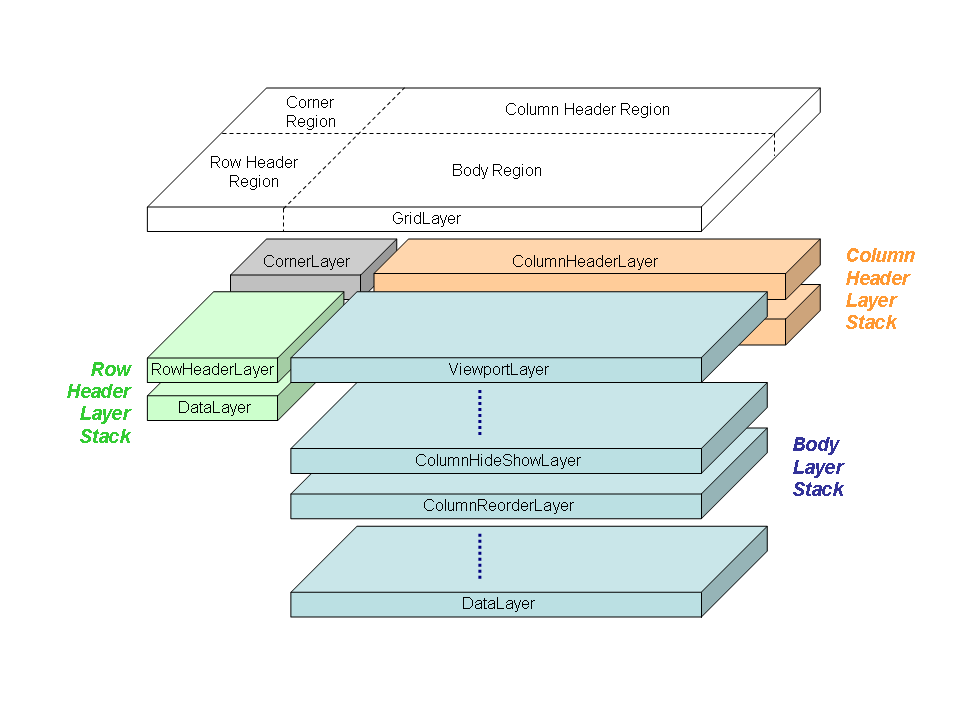
The following diagram shows the stacking and composing of a NatTable grid.
4.2.1. Layer stacks and compositions
Layers can be stacked to combine multiple features in a NatTable instance.
The DataLayer is mandatory and needs to be the bottom most layer in the stack.
The other layers are created on top of another layer.
You can also use layer compositions where several layers or layer stacks are positioned side by side. A grid, for example, is a common composition that consists of four regions: corner, column header, row header and body, where every region contains separate layer stacks.
4.2.2. Position-Index transformation
By stacking a layer on top of another layer, it is possible to expose a transformed view of its underlying layer cell structure. A transformed view for example can be used to hide or reorder columns.
Columns and rows in a layer can be referenced either by position or by index.
-
The position of a column/row in a layer corresponds to the location of the column/row in the CURRENT layer. Positions always start from 0 and increase sequentially.
-
The index of a column/row in a layer corresponds to the location of the column/row in the LOWEST level layer in the layer stack. Indexes are not necessarily ordered, and in some cases may not even be unique within a layer above the lowest level layer.
These concepts are illustrated by the following example.
The layer stack shows a ColumnHideShowLayer that is stacked on top of a ColumnReorderLayer which is in turn stacked on a DataLayer.
The positions in the DataLayer are the same as its indexes, because it is the lowest level layer in the stack.
The ColumnReorderLayer reorders column 0 of its underlying layer after column 2 of its underlying layer.
The ColumnHideShowLayer hides the first column of its underlying layer.
ColumnHideShowLayer
0 1 2 3 4 <- column positions
2 0 3 4 5 <- column indexes


ColumnReorderLayer
0 1 2 3 4 5 <- column positions
1 2 0 3 4 5 <- column indexes


DataLayer
0 1 2 3 4 5 <- column positions
0 1 2 3 4 5 <- column indexes
Usually, the framework does the necessary position-index transformations.
So typically, it is not necessary to perform that transformation manually.
In the few cases where it might be necessary, you can have a look at the LayerUtil helper class that provides some static methods for that purpose.
|
4.3. Configuration
NatTable allows to use configuration to customize the styling and behavior of the layers and the table . Every layer typically introduces configurations for the features they add.
Configurations are registered via registries. There are two configuration registries for each NatTable instance:
-
IConfigRegistry: Contains configuration attributes, like styling, editing or layer specific configurations. -
IUIBindingRegistry: Contains UI bindings for mouse and keyboard interactions.
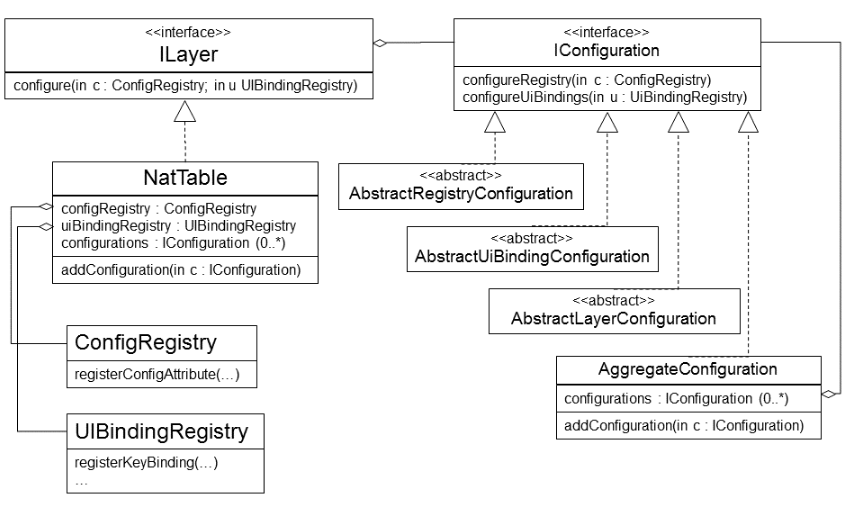
It is recommended to create separate configuration classes to encapsulate the different configurations. It is also possible to put configurations directly into a registry which is mostly used for dynamic behavior changes at runtime. There are four types of configuration classes:
-
AbstractRegistryConfiguration: Used to register configuration values to theIConfigRegistry. -
AbstractUiBindingConfiguration: Used to bind actions to UI interactions viaIUIBindingRegistry. -
AbstractLayerConfiguration: Used to configure anILayer. This typically means to registerILayerCommandHandlerandILayerEventHandleron a layer. -
AggregateConfiguration: Used to combine several configurations in one. Several default configurations delivered with NatTable are implementations ofAggregateConfiguration. Using this only one configuration instance needs to be registered to add a configuration for styling and ui binding at once.
The following simplified UML diagram shows the relationship between configurations, the NatTable and layers.
|
Editing support is specified via configuration. There is no layer that needs to be added to the layer stack to enable editing. |
When creating a NatTable instance with auto configuration turned on, internally the DefaultNatTableStyleConfiguration
os added and NatTable#configure() will be called automatically to start building up the registries.
In such a case configuration instances can only be added to layers before the NatTable instance is created.
Adding configurations to layers afterwards will not have an effect.
Trying to add configuration instances to the NatTable instance will result in an IllegalStateException.
The auto configuration can be turned off at creation time by setting the constructor parameter autoconfigure to false.
Doing this allows to add configuration instances to layers and
the NatTable instance itself, until the registries are build up executing NatTable#configure().
After the registries are build up it is not possible to add further configuration instances.
This is because configuration instances will only get interpreted once for initially building up the registries.
It is still possible to modify, add, remove or exchange configuration values at runtime by directly operating on the registries itself.
|
In case the auto configuration of NatTable is disabled, you need to ensure that at least the
|
The following listing demonstrates the creation of a NatTable instance with auto configuration turned off.
// create a NatTable using a GridLayer and configure to not using the default configurations
NatTable natTable = new NatTable(parent, gridLayer, false);

// add the default style configuration
natTable.addConfiguration(new DefaultNatTableStyleConfiguration());

// add additional custom configurations
...

// call NatTable#configure() to start the configuration process
natTable.configure();
Some layers need the reference to the IConfigRegistry as constructor parameter.
This is because in the current architecture there is nothing like a global context, and the layers itself are well
encapsulated to not having any direct reference to the NatTable instance they are connected to.
The following listing demonstrates the pattern for creating a NatTable instance that uses an externally created IConfigRegistry.
// create a ConfigRegistry that can be used to create advanced layers
ConfigRegistry configRegistry = new ConfigRegistry();

// create some layers
...

// create a NatTable using a GridLayer and configure to not using the default configurations
NatTable natTable = new NatTable(parent, gridLayer, false);

// set the ConfigRegistry to the NatTable instance BEFORE additional configuration are added
natTable.setConfigRegistry(configRegistry);

// add the default style configuration
natTable.addConfiguration(new DefaultNatTableStyleConfiguration());

// add additional custom configurations
...

// call NatTable#configure() to start the configuration process
natTable.configure();
4.4. Cell display mode
In NatTable a cell can have several modes in which they are displayed. These modes are called DisplayMode.
This allows to specify different configurations for the same cell in different modes.
The following table lists the currently supported display modes.
| DisplayMode | Description | ||
|---|---|---|---|
DisplayMode#NORMAL |
The normal state a cell is in if no other state applies. |
||
DisplayMode#SELECT |
The state that shows that a cell is currently selected. |
||
DisplayMode#EDIT |
The state that shows that a cell is currently edited.
|
||
DisplayMode#HOVER |
The state that shows that currently the mouse hovers over the cell. |
||
DisplayMode#SELECT_HOVER |
The state that shows that currently the mouse hovers over the cell that is currently selected. |
4.5. Configuration by labels
NatTable supports conditional configuration via a label mechanism. This means that it is possible to add labels to a cell and register configurations for labels.
Every cell in a NatTable has a so called LabelStack, which is a collection of Strings.
Via labels it is possible to tie configurations to specific cells,
for example styling a cell with a special error style or configure a checkbox editor for a cell that contains boolean values.
The following listing shows an example that registers an ImagePainter for the label myImageLabel.
Further details on registering configuration attribute values are described in Configuration attributes.
configRegistry.registerConfigAttribute(
    CellConfigAttributes.CELL_PAINTER,
    new ImagePainter(),
    DisplayMode.NORMAL,
    "myImageLabel");
How labels are added to the LabelStack of a cell is described in the following sections.
When using a CompositeLayer it is possible to set a region label per composition region.
You can think of the region label as a default label that is applied to every cell in the corresponding region,
e.g., every cell in the body region of a grid has the label GridRegion.BODY in its LabelStack.
Every layer is able to add labels to a cells label stack in the ILayer#getConfigLabelsByPosition(int, int) method.
This way layer specific stylings are added, e.g., a sort indicator in the column header cells in case the SortHeaderLayer is involved.
Additionally custom labels can be added by using an IConfigLabelAccumulator.
Each layer in the layer composition can take an IConfigLabelAccumulator that can be set by calling
AbstractLayer#setConfigLabelAccumulator(IConfigLabelAccumulator).
4.5.1. Add custom labels by standard criteria
NatTable ships with several default implementations that can be used to register custom labels. They
implement AbstractOverrider and allow registering of labels for special criteria.
| AbstractOverrider implementation | Description |
|---|---|
CellOverrideLabelAccumulator |
Registers a label that is applied in case the specified value is shown in the specified column.
|
ColumnOverrideLabelAccumulator |
Register labels that will be added to the label stack of cells in the column of the specified index.
|
RowOverrideLabelAccumulator |
Register labels that will be added to the label stack of cells in the row of the specified index.
|
4.5.2. Add column position based default labels
The ColumnLabelAccumulator is a simple implementation that adds column based labels to the label stack.
The labels follow the pattern COLUMN_ + <column position>. Via the constant
ColumnLabelAccumulator#COLUMN_LABEL_PREFIX concatenated with the column position, it is possible to
register custom configurations for those default labels.
4.5.3. Add custom labels by custom criteria
As there are several use cases where the default implementations doesn’t match, it is of course possible to create
custom IConfigLabelAccumulator. By implementing IConfigLabelAccumulator#accumulateConfigLabels(LabelStack, int, int)
it is possible to add additional labels to the given LabelStack.
You can add a custom label by calling LabelStack#addLabel(String) which means it will be added to the end of the stack. To ensure the newly
added label gets a higher priority the LabelStack#addLabelOnTop(String) method can be called, which will add the
new label at the first position of the label stack.
|
Setting a label at the top of a label stack doesn’t ensure that no other layer or accumulator adds another label on top afterwards. |
The following code snippet is an example for an IConfigLabelAccumulator that uses the
IDataProvider of the body to be able to retrieve the object which is currently processed.
// add labels to provide conditional styling
bodyDataLayer.setConfigLabelAccumulator(new IConfigLabelAccumulator() {
    @Override
    public void accumulateConfigLabels(
        LabelStack configLabels, int columnPosition, int rowPosition) {

        Person p = bodyDataProvider.getRowObject(rowPosition);
        if (p != null) {
            configLabels.addLabel(
                p.getGender().equals(Gender.FEMALE) ? FEMALE_LABEL : MALE_LABEL);
        }
    }
});|
Best practice is to set an |
4.5.4. Add multiple labels
A layer only takes one IConfigLabelAccumulator. To use multiple IConfigLabelAccumulator
instances, there needs to be a way to combine them. To achieve this the AggregateConfigLabelAccumulator
can be used which is itself an IConfigLabelAccumulator that is able to combine multiple instances.
4.6. Configuration attributes
As explained before, the IConfigRegistry is the instance global registry for various typed configuration attributes.
Despite UI bindings and special layer configurations, almost every NatTable customization that can be configured is done by
registering a value for a configuration attribute. This includes for example styling, editing, layer specific
configurations (e.g., configuration of a summary row) and non-layer specific configurations (e.g., excel export).
Configuration attributes are defined via the ConfigAttribute<T> interface, where the generic specifies the value type.
The following code specifies for example a configuration attribute for the value type org.eclipse.swt.graphics.Color.
ConfigAttribute<Color> GRID_LINE_COLOR = new ConfigAttribute<Color>();The supported default configuration attributes are defined as constants at several places, e.g., CellConfigAttributes or EditConfigAttributes.
4.6.1. Register configuration attributes
Configuration attribute values can be registered by calling one of the available registerConfigAttribute() methods on IConfigRegistry.
Since ConfigAttribute<T> is a generic interface, the registration of configuration attribute values is type safe.
|
The |
To register a value for a configuration attribute, you need to specify the ConfigAttribute<T> and the value to set.
Additionally you can specify the DisplayMode and a label for which the configuration attribute should be registered.
See Cell display mode and Configuration by labels for further information on that.
|
Without specifying the |
The following snippet shows some examples for registering configuration attribute values.
// register a global default style
configRegistry.registerConfigAttribute(
    CellConfigAttributes.CELL_STYLE,
    cellStyle);

// register a global style for selected cells
configRegistry.registerConfigAttribute(
    CellConfigAttributes.CELL_STYLE,
    selectionCellStyle,
    DisplayMode.SELECT);

// register a conditional style a custom label
configRegistry.registerConfigAttribute(
    CellConfigAttributes.CELL_STYLE,
    customCellStyle,
    DisplayMode.NORMAL,
    "myLabel");
4.6.2. Unregister configuration attributes
Configuration attribute values can be unregistered by calling one of the available unregisterConfigAttribute() methods on IConfigRegistry.
Unregistering configuration attribute values is typically used to change a NatTable configuration dynamically at runtime. But it can also be done when extending and modifying a default NatTable configuration.
|
Unregistering configuration attribute values outside an |
4.6.3. Determine the configuration attribute value
As there can be various values registered for the same configuration attribute by specifying DisplayMode and label,
there is a search pattern to determine the value that should be used.
-
Determine the
IDisplayModeOrderingfor the currentDisplayMode. -
Iterate over the
DisplayMode`s specified by the found `IDisplayModeOrdering. -
For every
DisplayMode, iterate over the labels in aLabelStackand search for a configuration attribute value. If no value is found for aDisplayModeand label combination, check for a value that is registered only for theDisplayMode.
The first value that is found for a DisplayMode and label combination will be used.
The following gives an example on the determination of a configuration attribute value.
The value (e.g., a style) is searched for a cell that is selected and has the LabelStack
[COLUMN_3, myLabel].
The IDisplayModeOrdering for DisplayMode#SELECT is [SELECT, NORMAL].
Therefore the search order is as follows:
-
DisplayMode#SELECT&& label == COLUMN_3 -
DisplayMode#SELECT&& label == myLabel -
DisplayMode#SELECT -
DisplayMode#NORMAL&& label == COLUMN_3 -
DisplayMode#NORMAL&& label == myLabel -
DisplayMode#NORMAL
4.7. Commands & Events
Interactions in NatTable are implemented using a special command and event pattern.
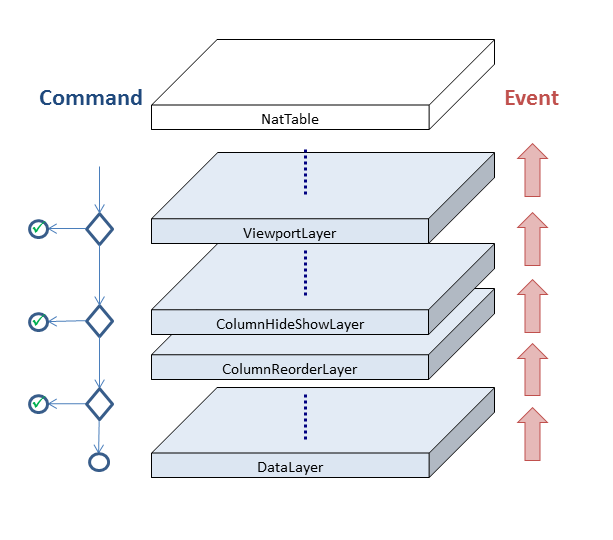
Every UI interaction triggers a command that is transported down the layer stack until a handler takes the command and performs several corresponding actions.
Typically the command gets consumed when it is handled which means it is not passed further down the layer stack.
There are a few exceptions to that rule for some internal commands that need to
get handled in several places, e.g., ClientAreaResizeCommand.
After the command is executed, an event is fired that is transported up the layer stack, giving every layer and every listener the ability to react on possible structural or visual state changes that are the result of the command processing. Events are never consumed and will always be transported to the top of the layer stack.
NatTable is executing commands on user interactions by registering actions to UI interactions. If actions on a NatTable instance should be performed programmatically by pressing a button outside the NatTable instance, e.g., hiding several columns or triggering a visual refresh, the NatTable commands can also be created and processed programmatically.
natTable.doCommand(new VisualRefreshCommand());4.8. Configuring the NatTable column width
In typical cases a NatTable instance should span its columns to full size to grab all space of a view.
A NatTable has a default size for the columns, which does not grab all available space.
| Method | Description |
|---|---|
|
Set a fixed column width for a specific column |
|
Set a fixed column width for a specific column and fire a ColumnResizeEvent for updating the NatTable immediately. |
|
Activate the percentage sizing for the whole table |
|
Activate the percentage sizing for a specific column |
|
Set the percentage value of a certain column, after activating percentage sizing for this column |
These column width methods can be used like this:
DataLayer dl = new DataLayer(dataProvider);
// activate percentage sizing for all columns
dl.setColumnPercentageSizing(true);
// deactivate percentage sizing for the first column
dl.setColumnPercentageSizing(0, false);
// apply a fixed size for the first column without percentage sizing
dl.setColumnWidthByPosition(0, 100);

// Use percentage values for the rest of the table
dl.setColumnWidthPercentageByPosition(1, 40);
dl.setColumnWidthPercentageByPosition(2, 60);
5. Data Access
The first step on creating a NatTable instance is to configure how the data is provided.
For the layer architecture of NatTable this means, you need to use the DataLayer as lower most layer in a layer stack.
5.1. Providing data to the DataLayer
To create a DataLayer you need to provide a IDataProvider.
The IDataProvider is the connection between the model and NatTable.
It provides information about the number of columns and rows and grants access to the model via column and row index.
Below you can see the interface definition.
public interface IDataProvider {

    Object getDataValue(int columnIndex, int rowIndex);

    void setDataValue(int columnIndex, int rowIndex, Object newValue);

    int getColumnCount();

    int getRowCount();
}
The implementation of an IDataProvider to access data in a custom data structure is straight forward.
You could for example show data that is stored in a two-dimensional array as shown below.
class TwoDimensionalArrayDataProvider implements IDataProvider {

    private String[][] data;

    public TwoDimensionalArrayDataProvider(String[][] data) {
        this.data = data;
    }

    @Override
    public Object getDataValue(int columnIndex, int rowIndex) {
        return this.data[columnIndex][rowIndex];
    }

    @Override
    public void setDataValue(int columnIndex, int rowIndex, Object newValue) {
        this.data[columnIndex][rowIndex] = newValue != null ? newValue.toString() : null;
    }

    @Override
    public int getColumnCount() {
        return this.data.length;
    }

    @Override
    public int getRowCount() {
        return this.data[0] != null ? this.data[0].length : 0;
    }
}|
The above example is based on the NatTable Examples Application |
5.2. Providing data stored in a list
In typical cases the data shown in a NatTable is stored in a collection.
Typically a list will be used because of the need for ordering and index based access.
For such cases NatTable provides the ListDataProvider that implements IRowDataProvider to access data row-based via index.
While the ListDataProvider automatically uses the index of an element in a list as the row index, you need to specify which model property should be shown per column.
This is done using an instance of the IColumnAccessor class.
To create a ListDataProvider instance you need to specify the list that contains the data and an IColumnAccessor.
List<Person> persons = ...;

IColumnPropertyAccessor<Person> columnPropertyAccessor = ...;

IDataProvider bodyDataProvider = new ListDataProvider<Person>(
        persons, columnPropertyAccessor);
5.3. Mapping properties to columns
When using a ListDataProvider to visualize objects in a NatTable, it is necessary specify how
to access the object properties of the model elements and how they are mapped to column positions.
This task is taken by the IColumnAccessor.
The IColumnAccessor is similar to the IDataProvider.
While the IDataProvider operates on row and column index, the IColumnAccessor operates on an Object and a column index.
You can see the interface definition below.
public interface IColumnAccessor<T> {

    Object getDataValue(T rowObject, int columnIndex);

    void setDataValue(T rowObject, int columnIndex, Object newValue);

    int getColumnCount();
}
Similar to implementing an IDataProvider implementing a custom IColumnAccessor is straight forward.
Below you see an example that will show the first name of a Person object at column index 0 and the last name of the Person object at column index 1 in a NatTable that shows two columns.
class PersonColumnAccessor implements IColumnAccessor<Person> {

    @Override
    public Object getDataValue(Person rowObject, int columnIndex) {
        switch (columnIndex) {
            case 0:
                return rowObject.getFirstName();
            case 1:
                return rowObject.getLastName();
        }
        return "";
    }

    @Override
    public void setDataValue(Person rowObject, int columnIndex, Object newValue) {
        switch (columnIndex) {
            case 0:
                rowObject.setFirstName((String)newValue);
                break;
            case 1:
                rowObject.setLastName((String)newValue);
                break;
        }
    }

    @Override
    public int getColumnCount() {
        return 2;
    }
}
5.4. Mapping property names to columns
Additionally to the IColumnAccessor there is a IColumnPropertyResolver which is used
to map between the property name in the backing bean and its corresponding column index in the NatTable instance.
The IColumnPropertyResolver is used internally for several framework functionalities like sorting
in combination with GlazedLists.
The following example shows the method signatures that are added by the IColumnPropertyResolver class.
public interface IColumnPropertyResolver {

    String getColumnProperty(int columnIndex);

    int getColumnIndex(String propertyName);
}
Typically you do not need to implement a IColumnPropertyResolver directly. Instead of creating
just an IColumnAccessor instance you will usually create an instance of the IColumnPropertyAccessor
class which is a combination of both, IColumnAccessor and IColumnPropertyResolver.
To extend the PersonColumnAccessor class from above to implement IColumnPropertyAccessor you
need to add the necessary methods like shown in the example below.
public static final String[] PERSONWITHADDRESS_PROPERTY_NAMES = {
    FIRSTNAME_PROPERTYNAME,
    LASTNAME_PROPERTYNAME
};

@Override
public String getColumnProperty(int columnIndex) {
    return PERSONWITHADDRESS_PROPERTY_NAMES[columnIndex];
}

@Override
public int getColumnIndex(String propertyName) {
    return Arrays.asList(PERSONWITHADDRESS_PROPERTY_NAMES).indexOf(propertyName);
}
NatTable comes with two generic IColumnPropertyAccessor implementations that are using reflection
to access the properties in a model object. The two implementations ReflectiveColumnPropertyAccessor
and ExtendedReflectiveColumnPropertyAccessor are explained below.
5.5. Access properties via reflection
The ReflectiveColumnPropertyAccessor accesses the properties in a model object via
reflection. To specify which columns should be shown in which order, it takes a String array as
constructor parameter.
String[] propertyNames = {"firstName", "lastName", "gender", "married", "birthday"};

IColumnPropertyAccessor<Person> columnPropertyAccessor =
new ReflectiveColumnPropertyAccessor<Person>(propertyNames);|
The |
5.6. Extended access to properties via reflection
The ReflectiveColumnPropertyAccessor is not able to access nested objects. It only operates on
the direct properties of a class. To support also nested properties the ExtendedReflectiveColumnPropertyAccessor
was introduced.
It is created the same way as the ReflectiveColumnPropertyAccessor.
The only difference is that you are able to specify nested properties via dot separated attribute concatenation.
String[] propertyNames = {"firstName", "lastName", "address.street", "address.city"};

IColumnPropertyAccessor<PersonWithAddress> columnPropertyAccessor =
    new ExtendedReflectiveColumnPropertyAccessor<PersonWithAddress>(propertyNames);
5.7. Calculated values
For most use cases the provided default implementations of IDataProvider and IColumnPropertyAccessor
should be sufficient.
But there are of course use cases where you need to create a custom implementation.
One case for example is to add calculated values to a grid.
is to add calculated values to a grid. Of course you could also extend the model to contain the calculated value itself, but for a clean
separation the calculated value is usually not part of it.
To add a column with calculated values, you can for example create a custom IColumnAccessor that calculates the
value in the getDataValue() method.
class CalculatingDataProvider implements IColumnAccessor<NumberValues> {

    @Override
    public Object getDataValue(NumberValues rowObject, int columnIndex) {
        switch(columnIndex) {
            case 0: return rowObject.getColumnOneNumber();
            case 1: return rowObject.getColumnTwoNumber();
            case 2: return rowObject.getColumnThreeNumber();
            case 3: //calculate the sum
                    return rowObject.getColumnTwoNumber() + rowObject.getColumnThreeNumber();
            case 4: //calculate the percentage
                    return new Double(rowObject.getColumnTwoNumber() + rowObject.getColumnThreeNumber())
                        / rowObject.getColumnOneNumber();
        }
        return null;
    }

    @Override
    public void setDataValue(NumberValues rowObject, int columnIndex, Object newValue) {
        switch(columnIndex) {
            case 0: rowObject.setColumnOneNumber((Integer)newValue);
                    break;
            case 1: rowObject.setColumnTwoNumber((Integer)newValue);
                    break;
            case 2: rowObject.setColumnThreeNumber((Integer)newValue);
                    break;
            //as column 3 and 4 are calculated we don't need to update the model
        }
    }

    @Override
    public int getColumnCount() {
        //this example will show exactly 5 columns
        return 5;
    }
}|
The full example can be found in the NatTable Examples Application |
|
The example above will calculate the value every time the data value is requested. As this can cause serious performance
issues in some cases the |
5.8. Dynamic columns
Typically the number of columns is fixed because of the number of members a class specifies. For use cases where
dynamic column creation or removal is necessary, you also need to provide a custom implementation of an
IDataProvider or IColumnPropertyAccessor.
A custom implementation will need to implement a mechanism to access column properties dynamically, similar to the
mechanism the ListDataProvider uses to access rows dynamically. This can be done for example if
the model contains a collection of values as a property.
|
You can find an example for dynamic columns in the NatTable Examples Application |
6. Install NatTable with a target definition
See https://www.vogella.com/tutorials/EclipseTargetPlatform/article.html#exercise-setting-up-a-target-platform for setting up your target platform to use NatTable.
7. Exercise: Setting up a basic NatTable example
This exercise shows the usage of NatTable. A new view will be created that can be contributed to any Eclipse-based application.
In this view, your data model is shown, and each element of your data model is in one individual row.
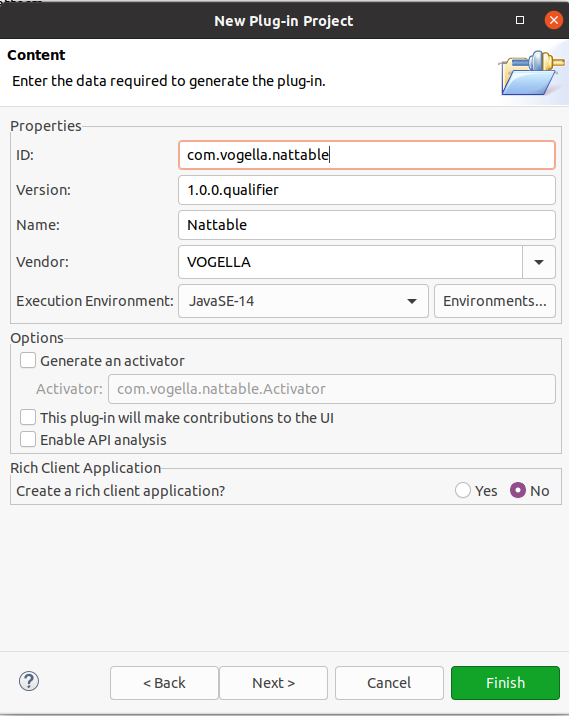
Create a new simple plug-in called com.vogella.nattable via the menu entry.
On the second page of the wizard select the options similar to the following screenshot
No template is needed so you can simply press the Finish button on the second page.
7.1. Configure the dependencies
Open the MANIFEST.MF file and add the following dependencies to the Required Plug-ins in the Dependencies section.
-
com.vogella.tasks.model -
com.vogella.tasks.services -
org.eclipse.jface -
org.eclipse.nebula.widgets.nattable.core
The manifest should look similar to the following listing. Your manifest will contain minimum version constraints that is fine.
Solution example
Manifest-Version: 1.0
Bundle-ManifestVersion: 2
Bundle-Name: Nattable
Bundle-SymbolicName: com.vogella.nattable;singleton:=true
Bundle-Version: 1.0.0.qualifier
Bundle-Vendor: VOGELLA
Require-Bundle: com.vogella.tasks.model,
 com.vogella.tasks.services,
 org.eclipse.jface,
 org.eclipse.nebula.widgets.nattable.core
Bundle-RequiredExecutionEnvironment: JavaSE-21
Import-Package: jakarta.annotation,
 jakarta.inject
Automatic-Module-Name: com.vogella.nattable
7.2. Update your product
Also add org.eclipse.nebula.widgets.nattable.core.feature to your product.
And add com.vogella.nattable to your own feature.
7.3. Validate your setup
Start via your product and ensure that you see no dependency errors for your plug-ins during startup.
7.4. Add a part to your Eclipse IDE
Create a new class called com.vogella.nattable.parts.NattableExample.
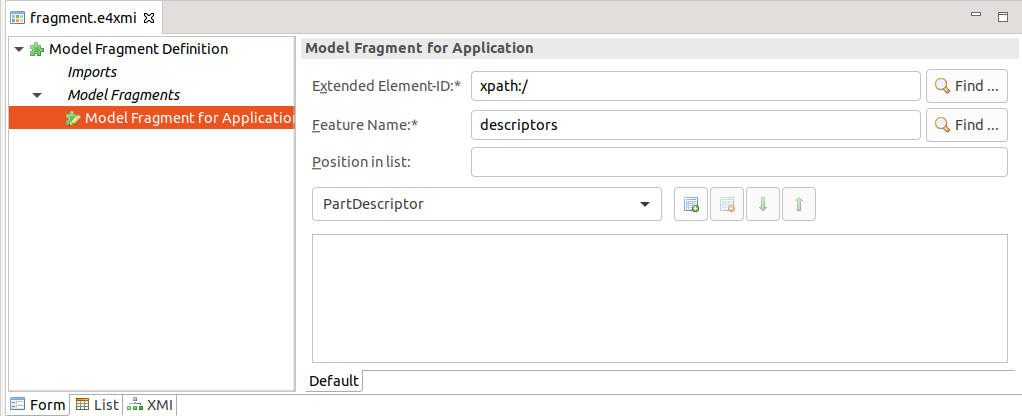
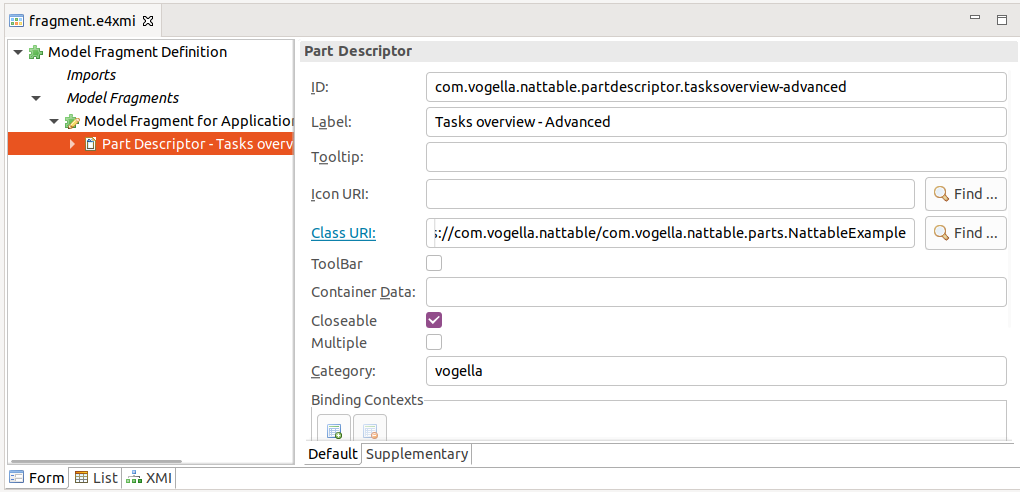
Add a new model fragment to your com.vogella.nattable plug-in.
Add here a part descriptor to your application, similar to the following screenshots.
7.5. Create the NatTable instance
Change the NattableExample class similar to the following listing.
package com.vogella.nattable.parts;

import jakarta.annotation.PostConstruct;

import org.eclipse.jface.layout.GridDataFactory;
import org.eclipse.nebula.widgets.nattable.NatTable;
import org.eclipse.nebula.widgets.nattable.data.IColumnPropertyAccessor;
import org.eclipse.nebula.widgets.nattable.data.IDataProvider;
import org.eclipse.nebula.widgets.nattable.data.ListDataProvider;
import org.eclipse.nebula.widgets.nattable.data.ReflectiveColumnPropertyAccessor;
import org.eclipse.nebula.widgets.nattable.layer.DataLayer;
import org.eclipse.swt.SWT;
import org.eclipse.swt.layout.GridLayout;
import org.eclipse.swt.widgets.Composite;

import com.vogella.tasks.model.Task;
import com.vogella.tasks.model.TaskService;

public class NattableExample {

    @PostConstruct
    public void postConstruct(Composite parent, TaskService taskService) {
        parent.setLayout(new GridLayout());

        // property names of the Person class
        String[] propertyNames = { Task.FIELD_ID, Task.FIELD_SUMMARY, Task.FIELD_DESCRIPTION, Task.FIELD_DUEDATE,
                Task.FIELD_DONE };

        // create the data provider
        IColumnPropertyAccessor<Task> columnPropertyAccessor = new ReflectiveColumnPropertyAccessor<>(propertyNames);
        IDataProvider bodyDataProvider = new ListDataProvider<Task>(taskService.getAll(),
                columnPropertyAccessor);

        DataLayer bodyDataLayer = new DataLayer(bodyDataProvider);

        // use different style bits to avoid rendering of inactive scrollbars for small
        // table
        // Note: The enabling/disabling and showing of the scrollbars is handled by the
        // ViewportLayer. Without the ViewportLayer the scrollbars will always be
        // visible with the default style bits of NatTable.
        NatTable natTable = new NatTable(parent, SWT.NO_REDRAW_RESIZE | SWT.DOUBLE_BUFFERED | SWT.BORDER,
                bodyDataLayer);

        GridDataFactory.fillDefaults().grab(true, true).applyTo(natTable);
    }


}
The example uses the ReflectiveColumnPropertyAccessor that is created using a String array.
It is used to create a ListDataProvider together with a list of Person`s that are retrieved by the `PersonService.
The layer composition in this example consists only of the DataLayer. It is therefore directly
used to create the NatTable instance.
|
As there is no other layer involved, the created table does not support scrolling. Therefore this example uses style bits to avoid rendering scrollbars that never get active. |
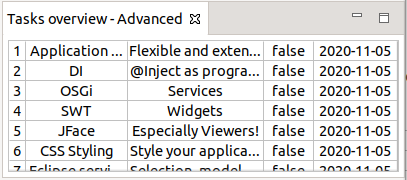
7.6. Validate your table implementation
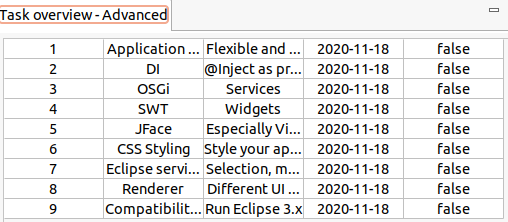
Start the example application by opening the product definition file and clicking Launch an Eclipse application.
Your Nattable part should display a table showing the generated example data, similar to the following screenshot.
|
If you have problems starting your application, check the dependencies section of your product.
It should contain the |
|
Currently you cannot scroll in your table. We add this is a later exercise. |
7.7. Exercise: Create your custom property accessor
In the previous exercise a ReflectiveColumnPropertyAccessor was used to access the data object properties.
Reflection is not the fastest way of accessing Java objects.
To avoid this performance impact a custom IColumnPropertyAccessor<R> will be implemented in this exercise.
7.7.1. Implement a custom IColumnPropertyAccessor for a Person
Create the following class.
package com.vogella.nattable.parts;

import java.time.LocalDate;
import java.util.Arrays;
import java.util.List;

import org.eclipse.nebula.widgets.nattable.data.IColumnPropertyAccessor;

import com.vogella.tasks.model.Task;

public class TaskColumnPropertyAccessor implements IColumnPropertyAccessor<Task> {

    // property names of the Task class
    // will also be used for the column header once you define them
    public static final List<String> propertyNames =
            Arrays.asList(Task.FIELD_ID, Task.FIELD_SUMMARY, Task.FIELD_DESCRIPTION, Task.FIELD_DUEDATE,
                    Task.FIELD_DONE);

    @Override
    public Object getDataValue(Task task, int columnIndex) {
        switch (columnIndex) {
            case 0:
                return task.getId();
            case 1:
                return task.getSummary();
            case 2:
                return task.getDescription();
            case 3:
                return task.isDone();
            case 4:
                return task.getDueDate();
            default:
                return "UNDEFINED";
            }
    }

    @Override
    public void setDataValue(Task task, int columnIndex, Object newValue) {
        switch (columnIndex) {
            case 0:
                throw new IllegalArgumentException("change not allowed");
            case 1:
                task.setSummary(String.valueOf(newValue));
                break;
            case 2:
                task.setDescription(String.valueOf(newValue));
            case 3:
                task.setDone((boolean) newValue);
                break;
            case 4:
                String stringDate = (String) newValue;
                LocalDate date = LocalDate.parse(stringDate);
                task.setDueDate(date);
                break;
            default:
                throw new IllegalArgumentException("column number out of range");

        }
    }

    @Override
    public int getColumnCount() {
        return propertyNames.size();
    }

    @Override
    public String getColumnProperty(int columnIndex) {
        return propertyNames.get(columnIndex);
    }

    @Override
    public int getColumnIndex(String propertyName) {
        return propertyNames.indexOf(propertyName);
    }

}
Now use this new class in the NattableExample class.
package com.vogella.nattable.parts;

import jakarta.annotation.PostConstruct;

import org.eclipse.jface.layout.GridDataFactory;
import org.eclipse.nebula.widgets.nattable.NatTable;
import org.eclipse.nebula.widgets.nattable.data.IColumnPropertyAccessor;
import org.eclipse.nebula.widgets.nattable.data.IDataProvider;
import org.eclipse.nebula.widgets.nattable.data.ListDataProvider;
import org.eclipse.nebula.widgets.nattable.layer.DataLayer;
import org.eclipse.swt.SWT;
import org.eclipse.swt.layout.GridLayout;
import org.eclipse.swt.widgets.Composite;

import com.vogella.tasks.model.Task;
import com.vogella.tasks.model.TaskService;

public class NattableExample {

    @PostConstruct
    public void postConstruct(Composite parent, TaskService taskService) {
        parent.setLayout(new GridLayout());

        IColumnPropertyAccessor<Task> columnPropertyAccessor = new TaskColumnPropertyAccessor();
        IDataProvider bodyDataProvider = new ListDataProvider<Task>(taskService.getAll(),
                columnPropertyAccessor);

        DataLayer bodyDataLayer = new DataLayer(bodyDataProvider);

        NatTable natTable = new NatTable(parent, SWT.NO_REDRAW_RESIZE | SWT.DOUBLE_BUFFERED | SWT.BORDER,
                bodyDataLayer);

        GridDataFactory.fillDefaults().grab(true, true).applyTo(natTable);
    }

}
7.7.2. Run
When running the application the NatTableDataExamplePart should look completely equal to the one before. But it uses dedicated access to the data model instead of using reflection.
8. Exercise: NatTable column width
In this exercise, you assign widths to the columns in your NatTable. The description column of a person should have more weight and the done column should have a fixed size of 50.
8.1. Adding fixed and percentage values as column widths
The different sizing constraints will be applied to the underlying data layer.
package com.vogella.nattable.parts;

import jakarta.annotation.PostConstruct;

import org.eclipse.jface.layout.GridDataFactory;
import org.eclipse.nebula.widgets.nattable.NatTable;
import org.eclipse.nebula.widgets.nattable.data.IColumnPropertyAccessor;
import org.eclipse.nebula.widgets.nattable.data.IDataProvider;
import org.eclipse.nebula.widgets.nattable.data.ListDataProvider;
import org.eclipse.nebula.widgets.nattable.layer.DataLayer;
import org.eclipse.swt.SWT;
import org.eclipse.swt.layout.GridLayout;
import org.eclipse.swt.widgets.Composite;

import com.vogella.tasks.model.Task;
import com.vogella.tasks.model.TaskService;

public class NattableExample {

    @PostConstruct
    public void postConstruct(Composite parent, TaskService taskService) {
        parent.setLayout(new GridLayout());

        IColumnPropertyAccessor<Task> columnPropertyAccessor = new TaskColumnPropertyAccessor();
        IDataProvider bodyDataProvider = new ListDataProvider<Task>(taskService.getAll(),
                columnPropertyAccessor);

        DataLayer bodyDataLayer = new DataLayer(bodyDataProvider);

        // activate percentage sizing for all columns
        bodyDataLayer.setColumnPercentageSizing(true);

        // Use percentage values for the first three columns column
        bodyDataLayer.setColumnWidthPercentageByPosition(0, 5);
        bodyDataLayer.setColumnWidthPercentageByPosition(1, 30);
        bodyDataLayer.setColumnWidthPercentageByPosition(2, 30);

        // deactivate percentage sizing for the fourth column (isDone)
        bodyDataLayer.setColumnPercentageSizing(3, false);
        // apply a fixed size for the fourth column
        bodyDataLayer.setColumnWidthByPosition(3, 50);

        // also use percentage sizing for the dueDate column
        bodyDataLayer.setColumnWidthPercentageByPosition(4, 35);

        NatTable natTable = new NatTable(parent, SWT.NO_REDRAW_RESIZE | SWT.DOUBLE_BUFFERED | SWT.BORDER,
                bodyDataLayer);

        GridDataFactory.fillDefaults().grab(true, true).applyTo(natTable);
    }


}
8.2. Validate
The actual part should look like this:

Try to shrink the window and see how the percentage column sizing working.
Ensure that the done column keeps its fixed size.
9. Overview of the NatTable layers
A NatTable is created by using layers that can be stacked and composed. Every layer has its own functionality and encapsulates cell transformations if necessary.
The following is a list of layers that are shipped with NatTable.
| Layer | Description |
|---|---|
DataLayer |
Provides the data that is shown in a layer stack. |
ViewportLayer |
Responsible for adding and handling the virtual nature to a NatTable instance. |
SelectionLayer |
Adds the ability to perform selection actions. |
HoverLayer |
Adds the ability to change styling on hover. |
ColumnHideShowLayer |
Adds the ability to hide columns. |
RowHideShowLayer |
Adds the ability to hide rows. |
GlazedListsRowHideShowLayer |
Adds the ability to hide rows when |
ColumnReorderLayer |
Adds the ability to reorder columns. |
RowReorderLayer |
Adds the ability to reorder rows. |
SortHeaderLayer |
Adds the ability to sort columns by clicking on the column header. |
FilterRowHeaderComposite |
Adds a filter row between the column header and the body of a NatTable composition. |
ColumnGroupHeaderLayer |
Adds a second level column header to group columns. |
ColumnGroupGroupHeaderLayer |
Adds a third level column header to group columns and column groups. |
ColumnGroupReorderLayer |
Adds the ability to reorder column groups. |
ColumnGroupExpandCollapseLayer |
Adds the ability to expand and collapse column groups. |
RowGroupHeaderLayer |
Adds a second level row header to group rows. |
SummaryRowLayer |
Adds a summary row at the end of a NatTable instance. |
FreezeLayer |
Handles and stores states dependent on freezing columns and rows. |
CompositeFreezeLayer |
Composition to add freeze functionality. |
TreeLayer |
Transformation layer that shows the underlying data model collection in a tree representation. |
BlinkLayer |
Adds the ability to dynamically react on data model changes in the background. |
GlazedListsEventLayer |
Transforms list change events sent by GlazedLists into NatTable events to refresh rendering on list changes. GlazedLists events are conflated in a 100ms interval to reduce the amount of NatTable refresh events. |
DetailGlazedListsEventLayer |
Transforms list change events sent by GlazedLists into NatTable events to refresh rendering on list changes. Every GlazedLists event is transformed and fired to the NatTable layer stack, transporting the detail information about the list change, e.g., which rows have been deleted. |
GroupByHeaderLayer |
Adds a section on top were columns can be dragged to dynamically group the data model elements. |
GroupByDataLayer |
Specialized DataLayer that needs to be used to make the groupBy feature work. |
Additionally, there are several layers that are used to create composites, like the CompositeLayer, GridLayer, RowHeaderLayer, ColumnHeaderLayer and the CornerLayer to name the most important ones.
They will be explained in the following chapters.
10. Exercise: Implementing a layer stack
You want to make the table scrollable and allow the user to select cells. For this, you create a basic layer stack.
10.1. Create the NatTable instance
Change the NattableExample so that you create a layer stack that consists of DataLayer, a SelectionLayer and a ViewportLayer.
You are doing this by creating the layer instances one by one, using the prior layer as underlyingLayer constructor parameter as shown in the code snippet below.
DataLayer bodyDataLayer = new DataLayer(bodyDataProvider);
SelectionLayer selectionLayer = new SelectionLayer(bodyDataLayer);
ViewportLayer viewportLayer = new ViewportLayer(selectionLayer);|
The default UI bindings for selection actions are bound to the |
viewportLayer.setRegionName(GridRegion.BODY);
Change new NatTable call to use the viewportLayer.
|
It is not necessary to set custom style bits, as now a |
package com.vogella.nattable.parts;

import jakarta.annotation.PostConstruct;

import org.eclipse.jface.layout.GridDataFactory;
import org.eclipse.nebula.widgets.nattable.NatTable;
import org.eclipse.nebula.widgets.nattable.data.IColumnPropertyAccessor;
import org.eclipse.nebula.widgets.nattable.data.IDataProvider;
import org.eclipse.nebula.widgets.nattable.data.ListDataProvider;
import org.eclipse.nebula.widgets.nattable.grid.GridRegion;
import org.eclipse.nebula.widgets.nattable.layer.DataLayer;
import org.eclipse.nebula.widgets.nattable.selection.SelectionLayer;
import org.eclipse.nebula.widgets.nattable.selection.config.DefaultRowSelectionLayerConfiguration;
import org.eclipse.nebula.widgets.nattable.viewport.ViewportLayer;
import org.eclipse.swt.layout.GridLayout;
import org.eclipse.swt.widgets.Composite;

import com.vogella.tasks.model.Task;
import com.vogella.tasks.model.TaskService;

public class NattableExample {

    @PostConstruct
    public void postConstruct(Composite parent, TaskService taskService) {
        parent.setLayout(new GridLayout());

        IColumnPropertyAccessor<Task> columnPropertyAccessor = new TaskColumnPropertyAccessor();
        IDataProvider bodyDataProvider = new ListDataProvider<Task>(taskService.getAll(),
                columnPropertyAccessor);

        // create layer stack consisting out of:
        // data layer
        // selection layer
        // viewport layer
        DataLayer bodyDataLayer = new DataLayer(bodyDataProvider);
        setColumnWidth(bodyDataLayer);

        // selection layer
        SelectionLayer selectionLayer = new SelectionLayer(bodyDataLayer);
        // Enable full selection for rows
        selectionLayer.addConfiguration(new DefaultRowSelectionLayerConfiguration());


        // view port layer
        ViewportLayer viewportLayer = new ViewportLayer(selectionLayer);

        // as the selection mouse bindings are registered for the region label
        // GridRegion.BODY
        // we need to set that region label to the viewport so the selection via mouse
        // is working correctly
        viewportLayer.setRegionName(GridRegion.BODY);


        NatTable natTable = new NatTable(parent, viewportLayer);

        GridDataFactory.fillDefaults().grab(true, true).applyTo(natTable);
    }

    private void setColumnWidth(DataLayer bodyDataLayer) {
        // activate percentage sizing for all columns
        bodyDataLayer.setColumnPercentageSizing(true);

        // Use percentage values for the first three columns column
        bodyDataLayer.setColumnWidthPercentageByPosition(0, 5);
        bodyDataLayer.setColumnWidthPercentageByPosition(1, 30);
        bodyDataLayer.setColumnWidthPercentageByPosition(2, 40);

        // deactivate percentage sizing for the fourth column (isDone)
        bodyDataLayer.setColumnPercentageSizing(3, false);
        // apply a fixed size for the fourth column
        bodyDataLayer.setColumnWidthByPosition(3, 50);

        // also use percentage sizing for the dueDate column
        bodyDataLayer.setColumnWidthPercentageByPosition(4, 25);
    }


}
10.2. Run
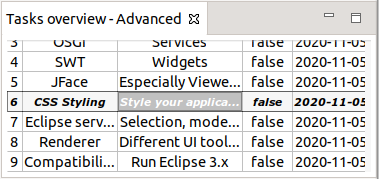
Start your application and show the view. Your view is now scrollable and supports cell selection.
11. Layer compositions
Additionally to stacking up layers, it is possible to create compositions and arrange layer stacks side by side.
Following the design principles in NatTable, this is achieved by using a CompositeLayer.
A CompositeLayer is itself column and row based, where every part is called a region.
To create a CompositeLayer you need to specify the number of columns and rows of regions.
Afterwards, the layers/layer stacks can be put in the CompositeLayer by calling CompositeLayer#setChildLayer(String, ILayer, int, int), where the first parameter specifies the region label.
// create a composition with one column and two rows
CompositeLayer compositeLayer = new CompositeLayer(1, 2);
// set the column header layer in the first row of the first column
compositeLayer.setChildLayer(GridRegion.COLUMN_HEADER, columnHeaderLayer, 0, 0);
// set the viewport layer in the second row of the first column
compositeLayer.setChildLayer(GridRegion.BODY, viewportLayer, 0, 1);
11.1. Dimensional dependencies
In a layer composition typically one region is leading in terms of cell boundaries. For example, in a composition that contains a body and a column header, the body is typically scrollable, so the column header cell boundaries need to follow the cell boundaries of the body cells.
Layers whose cell boundaries are attached to the cell boundaries of another layer are called dimensionally dependent.
Every dimensionally dependent layer extends DimensionallyDependentLayer and needs to know the layer it depends on at creation time.
Layers can either be horizontally dependent (e.g., ColumnHeaderLayer), vertically dependent (e.g., RowHeaderLayer) or both horizontally and vertically dependent (e.g., CornerLayer).
11.2. Creating a grid composition
The GridLayer is a specialized CompositeLayer that has two rows and two columns.
It therefore has four regions:
-
Corner (upper left region)
-
Column Header (upper right region)
-
Row Header (bottom left region)
-
Body (bottom right region)
11.3. GridLayer default configuration
The GridLayer contains several default configurations to specify behavior in a grid.
These configuration are aggregated in DefaultGridLayerConfiguration.
| Configuration class | Description |
|---|---|
|
Adds the key binding for exporting a NatTable and configuration regarding the default export settings. |
|
Adds the key binding for printing a NatTable. |
|
Adds the UI bindings for keys and mouse interactions regarding the editing behavior. |
|
Registers the command handlers necessary for editing and adds default configurations like the default cell editor, the editable rule and the default data validator. |
|
Configures the styling for alternating row colors. |
|
If you are building up a custom layer composition and notice that some functions are not working as intended,
it is always a good idea to check if the necessary default configurations are added to the custom |
11.4. GridLayer commands
The following section lists and describes the commands that are handled by the GridLayer.
| Command | CommandHandler | Description |
|---|---|---|
|
|
Performs additional transformations to correctly support percentage sizing. |
|
|
Prints the NatTable. |
|
|
Exports the NatTable to a Excel compatible format. |
|
|
Performs an auto resize for a specified column. |
|
|
Performs an auto resize for a specified row. |
11.5. Layer stack of the body region
The body layer stack is the main part of a NatTable composition. Typically it handles selection and the virtual nature via viewport. Also additional layers for handling e.g., column reordering or column hide/show are added to this stack.
// build the body layer stack
IDataProvider bodyDataProvider
    = new ListDataProvider<Person>(personService.getPersons(50), columnPropertyAccessor);
DataLayer bodyDataLayer = new DataLayer(bodyDataProvider);
SelectionLayer selectionLayer = new SelectionLayer(bodyDataLayer);
ViewportLayer viewportLayer = new ViewportLayer(selectionLayer);
11.6. Layer stack of the column header region
The column header layer stack is used to render the column header. It has a horizontal dimensional dependency to the body layer stack.
This dependency is resolved using the ColumnHeaderLayer.
To create a ColumnHeaderLayer you need to specify the underlying base layer, which is typically the DataLayer for the column header region.
The layer to resolve the dimensional dependency, is typically the ViewportLayer or a custom body layer stack that was encapsulated in a separate class,
and the SelectionLayer which is necessary to be able to visualize cell selections in the column
header.
To add additional functionality to the column header layer, it is of course possible to add further layers to the layer stack.
For example, adding the SortHeaderLayer adds the ability to sort the content via clicking the column header cells.
Using the ColumnGroupHeaderLayer adds a additional row on top of the column header for grouping columns.
|
The |
// build the column header layer stack
IDataProvider columnHeaderDataProvider = new DefaultColumnHeaderDataProvider(propertyNames, propertyToLabelMap);
DataLayer columnHeaderDataLayer = new DataLayer(columnHeaderDataProvider);
ILayer columnHeaderLayer = new ColumnHeaderLayer(columnHeaderDataLayer, viewportLayer,  selectionLayer);
11.7. Layer stack of the row header region
The row header layer stack is used to render the row header. It has a vertical dimensional dependency to the body layer stack.
This dependency is resolved using the RowHeaderLayer.
To create a RowHeaderLayer you need to specify the underlying base layer, which is typically
the DataLayer for the row header region, the layer to resolve the dimensional dependency,
typically the ViewportLayer or a custom body layer stack that was encapsulated in a separate class,
and the SelectionLayer which is necessary to be able to visualize cell selections in the column
header.
Using the DefaultRowHeaderDataProvider ties the number of rows to the body layer stack.
It simply returns (row index+1) as content for cells in the row header. To change what information
should be showed in the row header, use a different IDataProvider.
|
The |
To add additional functionality to the row header layer, it is of course possible to add further layers to the layer stack.
For example, using the RowGroupHeaderLayer adds a additional column to the left of the row header for grouping rows.
// build the row header layer stack
IDataProvider rowHeaderDataProvider = new DefaultRowHeaderDataProvider(bodyDataProvider);
DataLayer rowHeaderDataLayer = new DataLayer(rowHeaderDataProvider, 40, 20);
ILayer rowHeaderLayer = new RowHeaderLayer(rowHeaderDataLayer, viewportLayer, selectionLayer);
11.8. Layer stack of the corner region
The corner layer stack is typically non functional. It needs to be there to fill the fourth remaining region of the grid. It is dimensionally dependent to both, the column header region and the row header region.
// build the corner layer stack
IDataProvider cornerDataProvider =  new DefaultCornerDataProvider(columnHeaderDataProvider, rowHeaderDataProvider);
DataLayer cornerDataLayer = new DataLayer(cornerDataProvider);
ILayer cornerLayer = new CornerLayer(cornerDataLayer, rowHeaderLayer, columnHeaderLayer);|
As the corner region is also built with a layer stack it is of course possible to add content or other layers to the stack. |
12. Exercise: Implementing a layer stack
You want to make the table scrollable and allow the user to select cells. For this, you create a basic layer stack.
12.1. Create the NatTable instance
Change the NattableExample so that you create a layer stack that consists of DataLayer, a SelectionLayer and a ViewportLayer.
You are doing this by creating the layer instances one by one, using the prior layer as underlyingLayer constructor parameter as shown in the code snippet below.
DataLayer bodyDataLayer = new DataLayer(bodyDataProvider);
SelectionLayer selectionLayer = new SelectionLayer(bodyDataLayer);
ViewportLayer viewportLayer = new ViewportLayer(selectionLayer);|
The default UI bindings for selection actions are bound to the |
viewportLayer.setRegionName(GridRegion.BODY);
Change new NatTable call to use the viewportLayer.
|
It is not necessary to set custom style bits, as now a |
package com.vogella.nattable.parts;

import jakarta.annotation.PostConstruct;

import org.eclipse.jface.layout.GridDataFactory;
import org.eclipse.nebula.widgets.nattable.NatTable;
import org.eclipse.nebula.widgets.nattable.data.IColumnPropertyAccessor;
import org.eclipse.nebula.widgets.nattable.data.IDataProvider;
import org.eclipse.nebula.widgets.nattable.data.ListDataProvider;
import org.eclipse.nebula.widgets.nattable.grid.GridRegion;
import org.eclipse.nebula.widgets.nattable.layer.DataLayer;
import org.eclipse.nebula.widgets.nattable.selection.SelectionLayer;
import org.eclipse.nebula.widgets.nattable.selection.config.DefaultRowSelectionLayerConfiguration;
import org.eclipse.nebula.widgets.nattable.viewport.ViewportLayer;
import org.eclipse.swt.layout.GridLayout;
import org.eclipse.swt.widgets.Composite;

import com.vogella.tasks.model.Task;
import com.vogella.tasks.model.TaskService;

public class NattableExample {

    @PostConstruct
    public void postConstruct(Composite parent, TaskService taskService) {
        parent.setLayout(new GridLayout());

        IColumnPropertyAccessor<Task> columnPropertyAccessor = new TaskColumnPropertyAccessor();
        IDataProvider bodyDataProvider = new ListDataProvider<Task>(taskService.getAll(),
                columnPropertyAccessor);

        // create layer stack consisting out of:
        // data layer
        // selection layer
        // viewport layer
        DataLayer bodyDataLayer = new DataLayer(bodyDataProvider);
        setColumnWidth(bodyDataLayer);

        // selection layer
        SelectionLayer selectionLayer = new SelectionLayer(bodyDataLayer);
        // Enable full selection for rows
        selectionLayer.addConfiguration(new DefaultRowSelectionLayerConfiguration());


        // view port layer
        ViewportLayer viewportLayer = new ViewportLayer(selectionLayer);

        // as the selection mouse bindings are registered for the region label
        // GridRegion.BODY
        // we need to set that region label to the viewport so the selection via mouse
        // is working correctly
        viewportLayer.setRegionName(GridRegion.BODY);


        NatTable natTable = new NatTable(parent, viewportLayer);

        GridDataFactory.fillDefaults().grab(true, true).applyTo(natTable);
    }

    private void setColumnWidth(DataLayer bodyDataLayer) {
        // activate percentage sizing for all columns
        bodyDataLayer.setColumnPercentageSizing(true);

        // Use percentage values for the first three columns column
        bodyDataLayer.setColumnWidthPercentageByPosition(0, 5);
        bodyDataLayer.setColumnWidthPercentageByPosition(1, 30);
        bodyDataLayer.setColumnWidthPercentageByPosition(2, 40);

        // deactivate percentage sizing for the fourth column (isDone)
        bodyDataLayer.setColumnPercentageSizing(3, false);
        // apply a fixed size for the fourth column
        bodyDataLayer.setColumnWidthByPosition(3, 50);

        // also use percentage sizing for the dueDate column
        bodyDataLayer.setColumnWidthPercentageByPosition(4, 25);
    }


}
12.2. Run
Start your application and show the view. Your view is now scrollable and supports cell selection.
13. Exercise: NatTable Layer Composition
This exercise shows how to create a layer composition with column header and body in a NatTable.
13.1. Add data and data provider for the column headers
To display table headers, you need:
-
data for the columns
-
a data provider for the columns
Create the following map data for your column display.
Map<String, String> propertyToLabelMap = Map.of("id", "ID", "summary", "Summary", "description",
    "Description", "done", "Done", "dueDate", "Due Date");
Now create a IDataProvider that is used for the column header region.
You can use the existing default implementation DefaultColumnHeaderDataProvider.
Afterwards, create a ILayer column header layer stack that consists of a DataLayer and a ColumnHeaderLayer.
// build the column header layer stack
IDataProvider columnHeaderDataProvider = new DefaultColumnHeaderDataProvider(
    TaskColumnPropertyAccessor.propertyNames.toArray(new String[0]), propertyToLabelMap);
DataLayer columnHeaderDataLayer = new DataLayer(columnHeaderDataProvider);
ILayer columnHeaderLayer = new ColumnHeaderLayer(columnHeaderDataLayer, viewportLayer, selectionLayer);|
There are two ways to create a |
Create a CompositeLayer and set the column header layer stack and the body layer stack to the appropriate positions.
The following code snippet gives an example on how this should look like.
// create a composition with one column and two rows
CompositeLayer compositeLayer = new CompositeLayer(1, 2);
// set the column header layer in the first row of the first column
compositeLayer.setChildLayer(GridRegion.COLUMN_HEADER, columnHeaderLayer, 0, 0);
// set the viewport layer in the second row of the first column
compositeLayer.setChildLayer(GridRegion.BODY, viewportLayer, 0, 1);
Create a NatTable instance for the created CompositeLayer that uses the compositeLayer layer configurations.
package com.vogella.nattable.parts;
import java.util.Map;
import jakarta.annotation.PostConstruct;
import org.eclipse.jface.layout.GridDataFactory;
import org.eclipse.nebula.widgets.nattable.NatTable;
import org.eclipse.nebula.widgets.nattable.data.IColumnPropertyAccessor;
import org.eclipse.nebula.widgets.nattable.data.IDataProvider;
import org.eclipse.nebula.widgets.nattable.data.ListDataProvider;
import org.eclipse.nebula.widgets.nattable.grid.GridRegion;
import org.eclipse.nebula.widgets.nattable.grid.data.DefaultColumnHeaderDataProvider;
import org.eclipse.nebula.widgets.nattable.grid.layer.ColumnHeaderLayer;
import org.eclipse.nebula.widgets.nattable.layer.CompositeLayer;
import org.eclipse.nebula.widgets.nattable.layer.DataLayer;
import org.eclipse.nebula.widgets.nattable.layer.ILayer;
import org.eclipse.nebula.widgets.nattable.selection.SelectionLayer;
import org.eclipse.nebula.widgets.nattable.selection.config.DefaultRowSelectionLayerConfiguration;
import org.eclipse.nebula.widgets.nattable.viewport.ViewportLayer;
import org.eclipse.swt.layout.GridLayout;
import org.eclipse.swt.widgets.Composite;
import com.vogella.tasks.model.Task;
import com.vogella.tasks.model.TaskService;
public class NattableExample {
Map<String, String> propertyToLabelMap = Map.of("id", "ID", "summary", "Summary", "description", "Description",
"done", "Done", "dueDate", "Due Date");
@PostConstruct
public void postConstruct(Composite parent, TaskService taskService) {
parent.setLayout(new GridLayout());
IColumnPropertyAccessor<Task> columnPropertyAccessor = new TaskColumnPropertyAccessor();
IDataProvider bodyDataProvider = new ListDataProvider<Task>(taskService.getAll(),
columnPropertyAccessor);
// create the body layer stack consisting out of:
// data layer
// selection layer
// viewport layer
DataLayer bodyDataLayer = new DataLayer(bodyDataProvider);
setColumnWidth(bodyDataLayer);
// selection layer
SelectionLayer selectionLayer = new SelectionLayer(bodyDataLayer);
// Enable full selection for rows
selectionLayer.addConfiguration(new DefaultRowSelectionLayerConfiguration());
// view port layer
ViewportLayer viewportLayer = new ViewportLayer(selectionLayer);
// as the selection mouse bindings are registered for the region label
// GridRegion.BODY
// we need to set that region label to the viewport so the selection via mouse
// is working correctly
viewportLayer.setRegionName(GridRegion.BODY);
// create the column header layer stack
IDataProvider headerDataProvider = new DefaultColumnHeaderDataProvider(
TaskColumnPropertyAccessor.propertyNames.toArray(new String[0]),
propertyToLabelMap);
DataLayer headerDataLayer = new DataLayer(headerDataProvider);
ILayer columnHeaderLayer = new ColumnHeaderLayer(headerDataLayer, viewportLayer, selectionLayer);
// create a composition with one column and two rows
CompositeLayer compositeLayer = new CompositeLayer(1, 2);
// set the column header layer in the first row of the first column
// set the region labels to make default configurations work, e.g., selection
compositeLayer.setChildLayer(GridRegion.COLUMN_HEADER, columnHeaderLayer, 0, 0);
// set the viewport layer in the second row of the first column
compositeLayer.setChildLayer(GridRegion.BODY, viewportLayer, 0, 1);
NatTable natTable = new NatTable(parent, compositeLayer);
GridDataFactory.fillDefaults().grab(true, true).applyTo(natTable);
}
private void setColumnWidth(DataLayer bodyDataLayer) {
// activate percentage sizing for all columns
bodyDataLayer.setColumnPercentageSizing(true);
// Use percentage values for the first three columns column
bodyDataLayer.setColumnWidthPercentageByPosition(0, 5);
bodyDataLayer.setColumnWidthPercentageByPosition(1, 30);
bodyDataLayer.setColumnWidthPercentageByPosition(2, 40);
// deactivate percentage sizing for the fourth column (isDone)
bodyDataLayer.setColumnPercentageSizing(3, false);
// apply a fixed size for the fourth column
bodyDataLayer.setColumnWidthByPosition(3, 50);
// also use percentage sizing for the dueDate column
bodyDataLayer.setColumnWidthPercentageByPosition(4, 25);
}
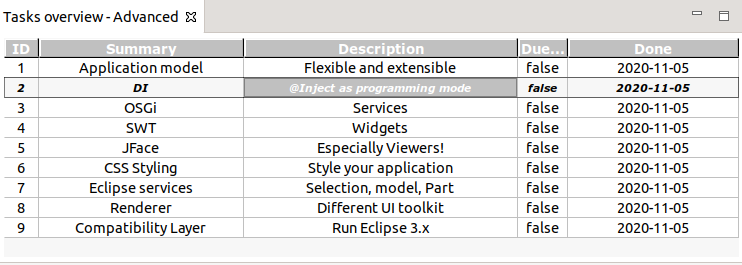
}13.2. Run
Start your application and open the view. Your view should shows the scrollable composition of column header and body.
13.3. Exercise: NatTable Layer Composition
This exercise shows how to create a grid layer composition in NatTable. We will build:
-
a body
-
a column header
-
a row header
-
a corner
13.3.1. Prepare the stacks for the grid composition
You already have a column header layer stack that consists of a DataLayer and a ColumnHeaderLayer in your view.
Build up a row header layer stack that consists of DataLayer and RowHeaderLayer.
This should look similar to the following code snippet.
// build the row header layer stack
IDataProvider rowHeaderDataProvider = new DefaultRowHeaderDataProvider(bodyDataProvider);
DataLayer rowHeaderDataLayer = new DataLayer(rowHeaderDataProvider, 40, 20);
ILayer rowHeaderLayer = new RowHeaderLayer(rowHeaderDataLayer, viewportLayer, selectionLayer);
Build up a corner layer stack that consists of DataLayer and CornerLayer.
This should look similar to the following code snippet.
// build the corner layer stack
IDataProvider cornerDataProvider =  new DefaultCornerDataProvider(columnHeaderDataProvider, rowHeaderDataProvider);
DataLayer cornerDataLayer = new DataLayer(cornerDataProvider);
ILayer cornerLayer = new CornerLayer(cornerDataLayer, rowHeaderLayer,  columnHeaderLayer);
13.4. Build your grid with the created stacks
Build up a GridLayer using the prior created layer stacks in the correct positions, similar to the following code snippet.
// create the grid layer composed with the prior created layer stacks
GridLayer gridLayer = new GridLayer(viewportLayer, columnHeaderLayer, rowHeaderLayer, cornerLayer);
Create a NatTable instance for the created GridLayer that uses the default configurations.
package com.vogella.nattable.parts;

import java.util.HashMap;
import java.util.Map;

import jakarta.annotation.PostConstruct;

import org.eclipse.jface.layout.GridDataFactory;
import org.eclipse.nebula.widgets.nattable.NatTable;
import org.eclipse.nebula.widgets.nattable.data.IColumnPropertyAccessor;
import org.eclipse.nebula.widgets.nattable.data.IDataProvider;
import org.eclipse.nebula.widgets.nattable.data.ListDataProvider;
import org.eclipse.nebula.widgets.nattable.data.ReflectiveColumnPropertyAccessor;
import org.eclipse.nebula.widgets.nattable.grid.data.DefaultColumnHeaderDataProvider;
import org.eclipse.nebula.widgets.nattable.grid.data.DefaultCornerDataProvider;
import org.eclipse.nebula.widgets.nattable.grid.data.DefaultRowHeaderDataProvider;
import org.eclipse.nebula.widgets.nattable.grid.layer.ColumnHeaderLayer;
import org.eclipse.nebula.widgets.nattable.grid.layer.CornerLayer;
import org.eclipse.nebula.widgets.nattable.grid.layer.GridLayer;
import org.eclipse.nebula.widgets.nattable.grid.layer.RowHeaderLayer;
import org.eclipse.nebula.widgets.nattable.layer.DataLayer;
import org.eclipse.nebula.widgets.nattable.layer.ILayer;
import org.eclipse.nebula.widgets.nattable.selection.SelectionLayer;
import org.eclipse.nebula.widgets.nattable.viewport.ViewportLayer;
import org.eclipse.swt.layout.GridLayout;
import org.eclipse.swt.widgets.Composite;

import com.vogella.model.person.Person;
import com.vogella.model.person.PersonService;

public class NatTableGridExamplePart {

    @PostConstruct
    public void postConstruct(Composite parent, PersonService personService) {
        parent.setLayout(new GridLayout());

        // property names of the Person class
        String[] propertyNames = {
                "firstName",
                "lastName",
                "gender",
                "married",
                "birthday" };

        // mapping from property to label, needed for column header labels
        Map<String, String> propertyToLabelMap = new HashMap<String, String>();
        propertyToLabelMap.put("firstName", "Firstname");
        propertyToLabelMap.put("lastName", "Lastname");
        propertyToLabelMap.put("gender", "Gender");
        propertyToLabelMap.put("married", "Married");
        propertyToLabelMap.put("birthday", "Birthday");

        IColumnPropertyAccessor<Person> columnPropertyAccessor =
                new ReflectiveColumnPropertyAccessor<Person>(propertyNames);

        // build the body layer stack
        IDataProvider bodyDataProvider =
                new ListDataProvider<Person>(
                        personService.getPersons(50),
                        columnPropertyAccessor);
        DataLayer bodyDataLayer = new DataLayer(bodyDataProvider);
        SelectionLayer selectionLayer = new SelectionLayer(bodyDataLayer);
        ViewportLayer viewportLayer = new ViewportLayer(selectionLayer);

        // build the column header layer stack
        IDataProvider columnHeaderDataProvider =
                new DefaultColumnHeaderDataProvider(propertyNames, propertyToLabelMap);
        DataLayer columnHeaderDataLayer =
                new DataLayer(columnHeaderDataProvider);
        ILayer columnHeaderLayer =
                new ColumnHeaderLayer(columnHeaderDataLayer, viewportLayer, selectionLayer);

        // build the row header layer stack
        IDataProvider rowHeaderDataProvider =
                new DefaultRowHeaderDataProvider(bodyDataProvider);
        DataLayer rowHeaderDataLayer =
                new DataLayer(rowHeaderDataProvider, 40, 20);
        ILayer rowHeaderLayer =
                new RowHeaderLayer(rowHeaderDataLayer, viewportLayer, selectionLayer);

        // build the corner layer stack
        ILayer cornerLayer = new CornerLayer(
                new DataLayer(
                        new DefaultCornerDataProvider(columnHeaderDataProvider, rowHeaderDataProvider)),
                rowHeaderLayer,
                columnHeaderLayer);

        // create the grid layer composed with the prior created layer stacks
        GridLayer gridLayer =
                new GridLayer(viewportLayer, columnHeaderLayer, rowHeaderLayer, cornerLayer);

        NatTable natTable = new NatTable(parent, gridLayer);

        GridDataFactory.fillDefaults().grab(true, true).applyTo(natTable);
    }

}
13.4.1. Run
Start the example application and open your view.
In a grid the headers typically do not move while scrolling the body region.
And because of the default configuration of the GridLayer it is possible to print Ctrl+P and export Ctrl+E the NatTable instance.
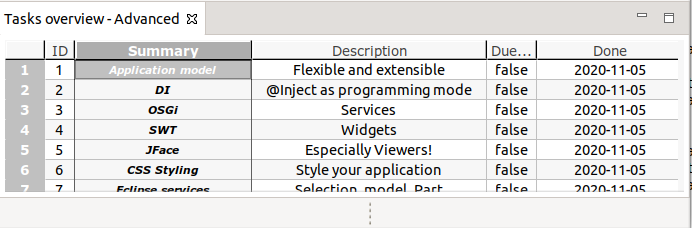
14. Links and Literature
https://github.com/eclipse-nattable/nattable [NatTable GitHub] https://github.com/eclipse-nattable/nattable/wiki [NatTable wiki]
14.1. vogella Java example code
If you need more assistance we offer Online Training and Onsite training as well as consulting