This tutorial explains the usage of the distributed version control system Git via the command line. The examples were done on Linux (Ubuntu), but should also work on other operating systems like Microsoft Windows.
1. Introduction to version control systems
1.1. What is a version control system?
A version control system (VCS) allows you to manage a collection of files and provides access to different versions of these files.
The VCS allows you to capture the content and structure of your files at a certain point in time. You can use the VCS to switch between these versions and work on them in parallel. The different versions are stored in a storage system which is typically called a repository. The process of creating different versions (snapshots) in the repository is depicted in the following graphic.
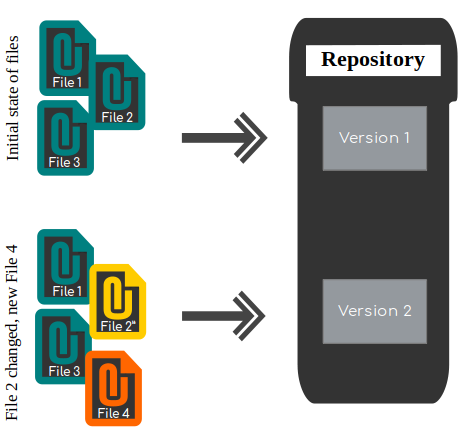
In this example, the repository contains two versions. The first has three files, and the second has four: two files are unchanged from the first version, one is modified, and one is new.
VCSs are well-suited for tracking changes in text files. For example, you may track changes in HTML code or Java source code. It is also possible to use a VCS for other file types, but VCSs are not as efficient at tracking changes in binary files.
A localized version control system keeps local copies of the files. This approach can be as simple as creating a manual copy of the relevant files.
A centralized version control system provides a server software component that stores and manages the different versions of the files. A developer can copy (checkout) a certain version from the central server onto their individual computer.
Both approaches have the drawback that they have a single point of failure. In a localized version control system, it is the individual computer, and in a centralized version control system, it is the server machine. Both systems also make it harder to work in parallel on different features. To remove the limitations of local and centralized version control systems, distributed version control systems have been created.
1.2. Distributed version control systems
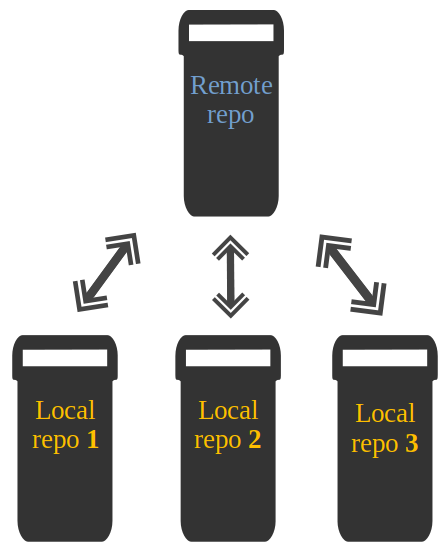
In a distributed version control system, each user has a complete local copy of a repository on their individual computer. The user can copy an existing repository. This copying process is typically called cloning and the resulting repository can be referred to as a clone.
Every clone contains the full history of the files and has the same functionality as the original repository.
Every repository can exchange file versions with other repositories by transporting these changes. This is typically done via a repository running on a server that is always online, unlike the local machine of a developer. While a central server is often used for hosting a repository, each clone is a full copy of it. The decision of which copy is considered the central server repository is a matter of convention.
2. Introduction to Git
The following description gives you a high-level overview of the Git version control system.
2.1. What is Git?
Git is the leading distributed version control system.
Git originated from Linux kernel development and was created in 2005 by Linus Torvalds. Nowadays it is used by many popular open-source projects, e.g., Visual Studio Code from Microsoft, Android from Google, and the Eclipse developer teams, as well as many commercial organizations.
The core of Git was originally written in the programming language C, but Git has also been re-implemented in other languages, e.g., Java, Ruby and Python.
2.2. Git repositories and working trees
A Git repository manages a collection of files in a certain directory. A Git repository is file-based, i.e., all versions of the managed files are stored on the file system.
A Git repository can be designed to be used on a server or for a user:
-
bare repositories are designed to be used on a server for sharing changes coming from different developers. Such repositories do not allow the user to modify local files and to create new versions in the repository based on these modifications.
-
non-bare repositories are intended for the user. They allow you to modify files and to create new versions in the repository. This is the default type that is created if you do not specify any parameter during the clone operation.
A local non-bare Git repository is typically called local repository.
Git allows the user to synchronize the local repository with other (remote) repositories.
Users with sufficient authorization can send new commits from their local repository to remote repositories via the push operation. They can also integrate changes from other repositories into their local repository via the fetch and pull operations.
Every local repository has a working tree. The files in the working tree may be new or based on a certain version from the repository. The user can change and create files or delete them.
After making changes in the working tree, the user can capture new versions of the files in the Git repository. Alternatively, the user can restore files to a state already captured by Git.
2.3. Adding a new version of the files to a Git repository
After modifying files in your working tree you need to perform two steps to add them to your local repository.
-
mark the desired file changes as relevant for the next commit; this operation is called
staging -
instruct Git to create a new version of the managed files via the commit operation; the newly created version is called a commit.
This process is depicted in the following graphic.
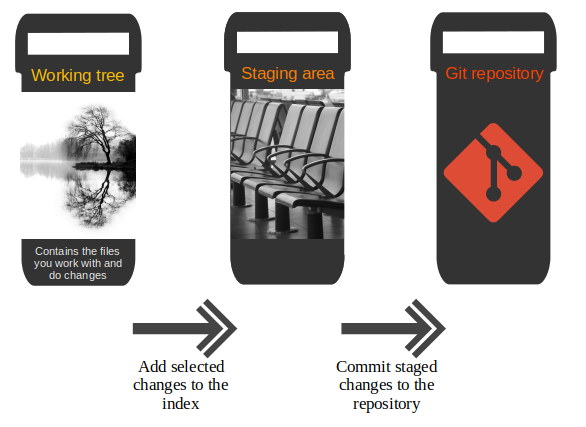
During the stage operation, copies of the specified files are added to persistent storage called the staging area (sometimes also called the index). This allows you to do further modifications to the same file without including these modifications in the next commit. You can repeat the staging operation until you are satisfied and continue with the commit operation.
The commit operation creates a new persistent snapshot called commit object (short form: commit) of the managed files in the Git repository. A commit object, like all objects in Git, is immutable.
2.4. File states in a Git repository
A file in the working tree of a Git repository can have one of the following states.
Untracked: the file is not tracked by the Git repository. This means that the file has never been staged or committed.
Tracked: the file has been committed and has not been changed since the last commit.
Staged: the file has been added to the staging area and is included in the next commit.
Dirty / modified: the file has been changed in the working tree but the change has not yet been staged.
2.5. Alternative versions of files with branches
Git allows you to work on different versions of your files in parallel. For this, Git uses branches. A branch allows the user to switch between these versions so that they can work on different changes independently of each other.
For example, if you want to develop a new feature, you can create a branch and make the changes in this branch.
This does not affect the state of your files in other branches.
For example, you can work independently on a branch called production for bugfixes and on another branch called feature_123 for implementing a new feature.
Branches in Git are local to the repository. A branch created in a local repository does not need to have a counterpart in a remote repository. Local branches can be compared with other local branches and with remote-tracking branches. A remote-tracking branch proxies the state of a branch in another remote repository.
Git supports the combination of changes from different branches. The developer can use Git commands to combine the changes at a later point in time.
2.6. Summary of the core Git terminology
The following table summarizes important Git terminology. It is intended to be used as a reference, so you can skip this now and return to it if you need clarification.
| Term | Definition |
|---|---|
Branch |
A branch is a named pointer to a commit. Selecting a branch in Git terminology is called to check out (or to switch to) a branch. If you are working in a certain branch, the creation of a new commit advances this pointer to the newly created commit. Each commit knows its parents (predecessors). Successors are retrieved by traversing the commit graph starting from branches or other refs, symbolic references (for example: HEAD) or explicit commit objects. This way, a branch defines its own line of descendants in the overall version graph formed by all commits in the repository. You can create a new branch from an existing one and change the code independently of other branches. One of the branches is the default (typically named main or master). The default branch is the one for which a local branch is automatically created when cloning the repository. |
Commit |
When you commit your changes into a repository, this creates a new commit object in the Git repository. This commit object uniquely identifies a new revision of the content of the repository. This revision can be retrieved later, for example, if you want to see the source code of an older version. Each commit object contains the author and the committer. This makes it possible to identify who made the change. The author and committer might be different people. The author made the change and the committer applied the change to the Git repository. This is common for contributions to open-source projects. |
HEAD |
HEAD is a symbolic reference typically pointing to the currently checked-out branch. Sometimes HEAD points directly to a commit object; this is called detached HEAD mode. In that state, the creation of a commit will not move any branch. If you switch branches, the HEAD pointer points to the branch pointer which in turn points to a commit. If you check out a specific commit, the HEAD points to this commit directly. |
Index |
Index is an alternative term for the staging area. |
Repository |
A repository contains the history, the different versions over time and all different branches and tags. In Git, each copy of the repository is a complete repository. If the repository is not a bare repository, it allows you to check out revisions into your working tree and to capture changes by creating new commits. Bare repositories are only changed by transporting changes from other repositories. The term repository typically refers to a non-bare repository. If a bare repository is referenced, this is explicitly mentioned. |
Revision |
Represents a version of the source code. Git implements revisions as commit objects (or commits for short). These are identified by a hash (SHA-1 or SHA-256 depending on the repository configuration). |
Staging area |
The staging area is the place to store changes in the working tree before the commit. The staging area contains a snapshot of the changes in the working tree (changed or new files) relevant for creating the next commit and stores their mode (file type, executable bit). |
Tag |
A tag points to a commit that uniquely identifies a version of the Git repository. With a tag, you can have a named point to which you can always revert. You can revert to any point in a Git repository, but tags make it easier. The benefit of tags is to mark the repository for a specific reason, e.g., for a release. Branches and tags are named pointers; the difference is that branches move when a new commit is created while tags always point to the same commit. Tags can have a timestamp and a message associated with them. |
URL |
A URL in Git determines the location of the repository. Git distinguishes between fetchurl for getting new data from other repositories and pushurl for pushing data to another repository. |
Working tree |
The working tree contains the set of working files for the repository. You can modify the content and commit the changes as new commits to the repository. |
3. Git tooling
Git operations can be performed via the command line or through various graphical user interface tools.
3.1. The Git command line tooling
The most commonly used Git tooling is the git command line tool.
The examples in this tutorial use the Git command line tooling.
Without any arguments, this command lists its options and the most common commands.
You can get help for a specific Git command using the git help command followed by the command name.
git help [command to get help for]To see all possible commands, use the git help --all command.
|
Git supports a short and a long version for several commands, similar to other Unix commands. The short version uses a single hyphen and the long version uses two hyphens. The following two commands are equivalent. |
|
The double hyphens (--) in Git separate references or other options from a path (usually file names).
For example, HEAD points to the active commit. If Git can determine the correct parameters and options automatically, the double hyphens can be omitted. |
3.2. Graphical tools and IDEs
Modern IDEs, like the Eclipse IDE or Visual Studio Code, provide excellent support for working with Git repositories. Graphical tools like NetBeans or IntelliJ also provide integrated Git tooling.
Various standalone graphical tools are also available. See GUI Clients for an overview of other available tools.
4. Installation of the Git command line tooling
4.1. Microsoft Windows
The Git download page provides native installers for Windows.
4.2. macOS
The Git download page also provides native installers for macOS. Git is also installed by default with the Apple Developer Tools on macOS.
4.3. Ubuntu, Debian and derived systems
On Ubuntu and similar systems, you can install the Git command line tool via the following command:
sudo apt-get install git4.4. Fedora, Red Hat and derived systems
On Fedora, Red Hat, and similar systems, you can install the Git command line tool via the following command:
dnf install git4.5. Other Linux systems
To install Git on other Linux distributions, please check the documentation of your distribution. The following listing contains the commands for the most popular ones.
# Arch Linux
sudo pacman -S git

# Gentoo
sudo emerge -av git

# SUSE
sudo zypper install git
5. Git configuration
Git requires at least the user name and a valid email to work. Git settings for all possible settings. This description describes the most important ones.
5.1. Git configuration levels
You configure git via the git config command.
These settings can be system wide, user or repository specific.
A setting for the repository overrides the user setting and a user setting overrides a system wide setting.
5.1.1. Git system-wide configuration
You can provide a system wide configuration for your Git settings. A system wide configuration is not common. Most settings are user specific or repository specific as described in the next chapters.
On a Unix based system, Git uses the /etc/gitconfig file for this system-wide configuration.
To set this up, ensure you have sufficient rights, i.e. root rights, in your OS and use the --system option for the git config command.
5.1.2. Git user configuration
Git allows you to store user settings in the .gitconfig file located in the user home directory.
This is also called the global Git configuration.
For example, Git stores the committer and author of a change in each commit. This and additional information can be stored in the Git user settings.
In each Git repository you can also configure the settings for this repository.
User configuration is done if you include the --global option in the git config command.
5.1.3. Repository specific configuration
You can also store repository specific settings in the .git/config file of a repository.
Use the --local or use no flag at all.
If neither the --system nor the --global parameter is used, the setting is specific for the current Git repository.
5.2. User credential configuration
You have to configure at least your user and email address to be able to commit to a Git repository because this information is stored in each commit.
# configure the user which will be used by Git
# this should be not an acronym but your full name
git config --global user.name "Firstname Lastname"

# configure the email address
git config --global user.email "your.email@example.org"
5.3. Push configuration
Since Git version 2.0 the git push command pushes only the active branch to your Git remote repository by default.
If you are using an older version of Git, you should configure this behavior explicitly via the following command.
# set default so that only the current branch is pushed
git config --global push.default simple
You learn about the push command in Push changes to another repository.
5.4. Always rebase during pull
By default, Git runs the git fetch followed by the git merge command if you use the git pull command.
You can configure Git to use git rebase instead of git merge for the pull command via the following setting.
# use rebase during pull instead of merge
git config --global pull.rebase true|
This setting helps avoiding merge commits during the pull operation which synchronizes your Git repository with a remote repository. The author of this description always uses this setting for their Git repositories. |
5.5. Allow rebasing with uncommitted changes
If you want Git to automatically save your uncommitted changes before a rebase you can activate autoStash.
After the rebase is done your changes will get reapplied.
For an explanation of git stash please see Stashing changes in Git.
git config --global rebase.autoStash true|
Before Git v2.6 |
5.6. Color Highlighting
The following commands enable color highlighting for Git in the console.
git config --global color.ui auto5.7. Setting the default editor
By default, Git uses the system default editor which is taken from the VISUAL or EDITOR environment variables if set. You can configure a different one via the following setting.
# setup vim as default editor for Git (Linux)
git config --global core.editor vim
5.8. Setting the default merge tool
File conflicts might occur in Git during an operation that combines different versions of the same files. In this case the user can directly edit the file to resolve the conflict.
Git also allows you to configure a merge tool for solving these conflicts. You can use third party visual merge tools like tortoisemerge, p4merge, kdiff3 etc. A search for these tools helps you to install them on your platform. Keep in mind that such tools are not required, you can always edit the files directly in a text editor.
Once you have installed them you can set your selected tool as default merge tool with the following command.
# setup kdiff3 as default merge tool (Linux)
git config --global merge.tool kdiff3

# to install it under Ubuntu use
sudo apt-get install kdiff3
5.9. Query Git settings
To query your Git settings, execute the following command:
git config --listIf you want to query the global settings you can use the following command.
git config --global --list6. Configure files and directories to ignore
6.1. Ignoring files and directories with a .gitignore file
Git can be configured to ignore certain files and directories for repository operations.
This is configured via one or several .gitignore files.
Typically, this file is located at the root of your Git repository but it can also be located in sub-directories.
In the second case the defined rules are only valid for the sub-directory and below.
You can use certain wildcards in this file.
* matches several characters.
More patterns are possible and described under the following
URL: gitignore manpage
For example, the following .gitignore file tells Git to ignore the bin and target directories and all files ending with a ~.
# ignore all bin directories
# matches "bin" in any subfolder
bin/

# ignore all target directories
target/

# ignore all files ending with ~
*~
You can create the .gitignore file in the root directory of the working
tree to make it specific for the Git repository.
|
The This is useful if you want to add, for example, auto-generated binaries, but you need to have a fine control about the version which is added and want to exclude them from the normal workflow. |
It is a good practice to commit the local .gitignore file into the Git
repository so that everyone who clones this repository have it.
6.2. Stop tracking files based on the .gitignore file
Files that are tracked by Git are not automatically removed if you add them to a .gitignore file.
Git never ignores files that are already tracked, so changes in the .gitignore file only affect new files.
If you want to ignore files that are already tracked you need to explicitly remove them.
The following command demonstrates how to remove the .metadata
directory and the doNotTrackFile.txt file from being tracked. This is
example code, as you did not commit the corresponding files in your
example, the command will not work in your Git repository.
# remove directory .metadata from git repo
git rm -r --cached .metadata
# remove file test.txt from repo
git rm --cached doNotTrackFile.txt
Adding a file to the .gitignore file does not remove the file from the
repository history. If the file should also be removed from the history,
have a look at the git filter-branch command that allows you to
rewrite the commit history. See [filterbranch_definition] for details.
6.3. Global (cross-repository) .gitignore settings
You can also create a global .gitignore file valid for all Git
repositories via the core.excludesfile setting. The setup of this
setting is demonstrated in the following code snippet.
# Create a ~/.gitignore in your user directory
cd ~/
touch .gitignore

# Exclude bin and .metadata directories
echo "bin" >> .gitignore
echo ".metadata" >> .gitignore
echo "*~" >> .gitignore
echo "target/" >> .gitignore
# for Mac
echo ".DS_Store" >> .gitignore
echo "._*" >> .gitignore

# Configure Git to use this file
# as global .gitignore

git config --global core.excludesfile ~/.gitignore
The global .gitignore file is only locally available.
6.4. Local per-repository ignore rules
You can also create local per-repository rules by editing the
.git/info/exclude file in your repository. These rules are not
committed with the repository so they are not shared with others.
This allows you to exclude, for example, locally generated files.
6.5. Tracking empty directories with Git
Git ignores empty directories, i.e., it does not put them under version control.
If you want to track an empty directory in your Git repository, it is a good practice to put a file called .gitignore in the directory.
As the directory now contains a file, Git includes it in its version control mechanism.
|
The file could be called anything.
Some people suggest to call the file |
7. Configuration for Git usage via the command line
To use Git, you have to configure your user name and email address via the following command.
# configure the user which will be used by Git
# this should not be an acronym but your full name
git config --global user.name "Firstname Lastname"

# configure the email address
git config --global user.email "your.email@example.org"
Another common setting is to configure Git to use rebase during the pull operation.
# configure new branches to use fetch and rebase during the pull operation
git config --global branch.autosetuprebase always

# always use fetch and rebase during pull
git config --global pull.rebase true|
If you do not know at this point what the rebase or pull operation is, you can skip these settings and configure them later. The remainder of this chapter assumes that you have set them. |
8. Performing a local Git workflow via the command line
In this exercise, use the Git command line to create a local Git repository and commit to it.
Open a command shell for the operations.
|
Some commands are Linux specific, e.g., appending to a file or creating a directory. Substitute these commands with the commands of your operating system. The comments (marked with #) before the commands explain the specific actions. |
8.1. Create a directory
The following commands create an empty directory which is used later in this exercise to contain the working tree and the Git repository.
# switch to a directory of your choice and afterwards
# create a directory named "repo01" and switch into it
mkdir repo01
cd repo01

# create a new directory
mkdir datafiles
8.2. Create some files
Use your favorite text editor to create the following files and directory structure in the current folder.
-
datafiles/data.txt
-
test01
-
test02
-
test03
You could also create these files via the command line, for example the following commands create these files on Linux via the command line.
# ensure that you are in your Git repository

# create an empty file in a new directory
touch datafiles/data.txt
touch test01
touch test02
touch test03
8.3. Create a new Git repository
Use the git init command to create a new local Git repository in the created directory.
Git does not care whether you start with an empty directory or if it already contains files.
# initialize the Git repository for the current directory
git init
All files inside the repository folder, excluding the .git folder, are the working tree.
8.4. See the current status of your repository
View the status of your repository via the following command.
git statusThe output looks similar to the following listing.
On branch main

Initial commit

Untracked files:
  (use "git add <file>..." to include in what will be committed)

    datafiles/
    test01
    test02
    test03

nothing added to commit but untracked files present (use "git add" to track)
8.5. Add changes to the staging area
Inform git that all new files should be added to the Git repository with the git stage command.
# add all files to the index of the Git repository
git stage .
# if stage is not available use git add instead, stage was added around 2020 to the git command line
Afterwards, run the git status command again to see the current status.
The following listing shows the output of this command.
On branch main

No commits yet

Changes to be committed:
  (use "git rm --cached <file>..." to unstage)
    new file:   datafiles/data.txt
    new file:   test01
    new file:   test02
    new file:   test03
8.6. Change files that are staged
Adjust an existing file.
# append a string to the test03 file
echo "foo2" >> test03
Validate that the new changes are not yet staged.
On branch main

No commits yet

Changes to be committed:
  (use "git rm --cached <file>..." to unstage)

    new file:   datafiles/data.txt
    new file:   test01
    new file:   test02
    new file:   test03

Changes not staged for commit:
  (use "git add <file>..." to update what will be committed)
  (use "git restore <file>..." to discard changes in working directory)

    modified:   test03
Add the new changes to the staging area.
# add all files to the index of the Git repository
git stage .
Use the git status command again to see that all changes are staged.
On branch main

No commits yet

Changes to be committed:
  (use "git rm --cached <file>..." to unstage)

    new file:   datafiles/data.txt
    new file:   test01
    new file:   test02
    new file:   test03
8.7. Commit staged changes to the repository
Commit the staged changes to your Git repository.
# commit your files to the local repository
git commit -m "Initial commit"
8.8. Viewing the commit history
The commit operation created a new version of your files in the local repository inside the .git folder.
Run the git log command to see the history.
# show the Git log for the change
git log
You see an output similar to the following.
commit dbbd83bffddb8b9129f37912338011bb82927d0e (HEAD -> main)
Author: Lars Vogel <Lars.Vogel@vogella.com>
Date:   Mon Feb 8 21:53:12 2021 +0100

    Initial commit
8.9. Viewing the changes of a commit
Use the git show command to see the changes of a commit.
If you specify a commit reference as third parameter, this is used to determine the changes, otherwise the HEAD reference is used.
8.10. Remove files
Delete a file.
Stage the deletion for the next commit with the git stage . command.
# remove the "test03" file
rm test03
# add and commit the removal
git stage .
git commit -m "Removes the test03 file"
Alternatively, you can use the git rm command to delete the file from your working tree and record the deletion of the file in the staging area.
8.11. Revert changes in files in the working tree
Use the git restore command to restore a tracked file (a file that was once staged or committed) to its latest staged or commit state.
In older versions of Git, git checkout was used for this purpose.
Restore the deleted file by restoring the last version before the current commit (HEAD~1).
git restore --source HEAD~1 -- test03Check the status and commit the file again.
git status
git commit -m "Adding test03 back"
You can also replace the content of a file with its last stage version or the version from a certain commit.
In the following example, you reset some changes in your working tree.
echo "useless data" >> test02
echo "another unwanted file" >> unwantedfile.txt

# see the status
git status

# remove unwanted changes from the working tree
# CAREFUL this deletes the local changes in the tracked file
git restore test02

# unwantedstaged.txt is not tracked by Git simply delete it
rm unwantedfile.txt
If you use git status command you will see that there are no changes
left in the working directory.
On branch main
nothing to commit, working directory clean|
Use this command carefully.
The |
8.12. Correct the changes of the commit with git amend
The git commit --amend command makes it possible to rework the changes of the last commit.
It creates a new commit with the adjusted changes.
|
The amended commit is still available until a clean-up job removes it.
But it is not included in the |
Assume the last commit message was incorrect as it contained a typo.
The following command corrects this via the --amend parameter.
# assuming you have something to commit
git commit -m "message with a tpyo here"
# amend the last commit
git commit --amend -m "More changes - now correct"You should use the git commit --amend command only for commits that have not been pushed to a public branch of another Git repository.
The git commit --amend command creates a new commit ID and people may have already based their work on the existing commit.
If that would be the case, they would need to migrate their work based on the new commit.
8.13. Ignore files and directories with the .gitignore file
Create the following .gitignore file in the root of your Git directory to ignore the specified directory and file.
cd ~/repo01
touch .gitignore
echo ".metadata/" >> .gitignore
echo "doNotTrackFile.txt" >> .gitignore|
The above command creates the file via the command line. A more common approach is to use your favorite text editor to create the file. This editor must save the file as plain text. Editors which do this are for example gedit under Ubuntu or Notepad under Windows. |
The resulting file looks like the following listing.
.metadata/
doNotTrackFile.txt
8.14. Commit the .gitignore file
It is a good practice to commit the .gitignore file into the Git repository.
Use the following commands for this.
# add the .gitignore file to the staging area
git stage .gitignore
# commit the change
git commit -m "Adds .gitignore file"
9. Remote repositories
9.1. What are remotes?
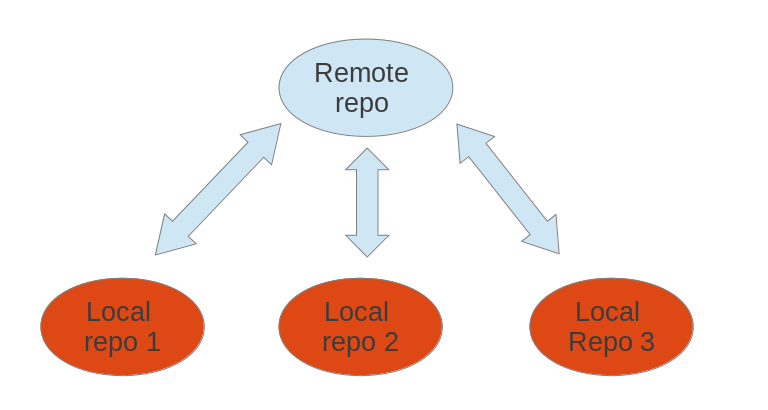
Git allows you to synchronize your repository with more than one remote repository.
In the local repository you can address each remote repository by a shortcut. This shortcut is called remote. Such a remote repository points to another remote repository that can be hosted on the Internet, locally or on the network.
You can specify properties for the remote, e.g., URL, branches to fetch or branches to push.
|
Think of remotes as shorter bookmarks for repositories. You can always connect to a remote repository if you know its URL and if you have access to it. Without remotes the user would have to type the URL for each and every command which communicates with another repository. |
It is possible that users connect their individual repositories directly, but a typical Git workflow involves one or more remote repositories that are used to synchronize the individual repository. Typically the remote repository which is used for synchronization is located on a server which is always available.
|
A remote repository can also be hosted in the local file system. |
9.2. Bare repositories
A remote repository on a server typically does
not require a working tree. A Git repository without a working tree
is called a bare repository. You can create such a repository with
the --bare option. The command to create a new empty bare remote
repository is displayed below.
# create a bare repository
git init --bare
By convention the name of a bare repository should end with the .git
extension.
To create a bare Git repository in the Internet you would, for example, connect to your server via the SSH protocol or you use some Git hosting platform, e.g., GitHub.com.
9.3. Convert a Git repository to a bare repository
Converting a normal Git repository to a bare repository is not directly supported by Git.
You can convert it manually by moving the content of the .git folder
into the root of the repository and by removing all other files from
the working tree. Afterwards, you need to update the Git repository
configuration with the git config core.bare true command.
As this is officially not supported, you should prefer cloning a
repository with the --bare option.
9.4. Cloning a repository
The git clone command copies an existing Git repository.
This copy is a working Git repository with the complete history of the cloned repository.
It can be used completely isolated from the original repository.
Git supports several transport protocols to connect to other Git
repositories; the native protocol for Git is also called git.
The following command clones an existing repository using the Git protocol. The Git protocol uses port 9148 which might be blocked by firewalls.
# switch to a new directory
mkdir ~/online
cd ~/online

# clone online repository
git clone git://github.com/vogellacompany/eclipse_rcp_example.git
If you have SSH access to a Git repository, you can also use the ssh
protocol. The name preceding @ is the user name used for the SSH
connection.
# clone online repository
git clone ssh://git@github.com/vogellacompany/eclipse_rcp_example.git

# older syntax
git clone git@github.com:vogellacompany/eclipse_rcp_example.git
Alternatively, you could clone the same repository via the http protocol.
# the following will clone via HTTP
git clone https://github.com/vogellacompany/eclipse_rcp_example.git
9.5. Adding remote repositories
If you clone a repository, Git implicitly creates a remote named origin by default. The origin remote links back to the cloned repository.
You can push changes to this repository via git push as Git uses origin
as default. Of course, pushing to a remote repository requires write
access to this repository.
If you create a Git repository from scratch with the git init command,
the origin remote is not created automatically.
Use the following command to add a remote to your repository using the origin name.
# add ../remote-repository.git with the name origin
git remote add origin ../remote-repository.git
You can add further remotes using the git remote add [name] [URL_to_Git_repo] command.
For example, to add a remote named github_http for the HTTP protocol:
# add the HTTPS protocol
git remote add github_http https://vogella@github.com/vogellacompany/eclipse_rcp_example.git
9.6. Rename remote repositories
To rename an existing remote repository use the git remote rename
command. This is demonstrated by the following listing.
# rename the existing remote repository from
# github_http to github_testing
git remote rename github_http github_testing
9.7. Remote operations via HTTP
It is possible to use the HTTP protocol to clone Git repositories. This is especially helpful if your firewall blocks everything except HTTP or HTTPS.
git clone http://git.eclipse.org/gitroot/platform/eclipse.platform.ui.gitFor secured SSL encrypted communication you should use the SSH or HTTPS protocol to guarantee security.
9.8. Using a proxy
Git also provides support for HTTP access via a proxy server. The following Git command could, for example, clone a repository via HTTP and a proxy. You can either set the proxy variable in general for all applications or set it only for Git.
The following listing configures the proxy via environment variables.
# Linux and Mac
export http_proxy=http://proxy:8080
export https_proxy=https://proxy:8443

# Windows
set http_proxy http://proxy:8080
set https_proxy http://proxy:8080

git clone http://git.eclipse.org/gitroot/platform/eclipse.platform.ui.git
The following listing configures the proxy via Git config settings.
# set proxy for git globally
git config --global http.proxy http://proxy:8080
# to check the proxy settings
git config --get http.proxy
# just in case you need to you can also revoke the proxy settings
git config --global --unset http.proxy
|
Git is able to store different proxy configurations for
different domains, see |
9.9. Synchronizing with remote repositories
You can synchronize your local Git repository with remote repositories. These commands are covered in detail in later sections but the following command demonstrates how you can send changes to your remote repository.
# do some changes
echo "I added a remote repo" > test02

# commit
git commit -a -m "This is a test for the new remote origin"

# to push use the command:
# git push [target]
# default for [target] is origin
git push origin
9.10. Show the existing remotes
To see the existing definitions of the remote repositories, use the following command.
# show the details of the remote repo called origin
git remote show origin
To see the details of the remotes, e.g., the URL use the following command.
# show the existing defined remotes
git remote

# show details about the remotes
git remote -v
9.11. Push changes to another repository
The git push command allows you to send data to other repositories.
By default, it sends data from your current branch to the same branch of the remote repository.
By default, you can only push to bare repositories (repositories without working tree). You can also only push a change to a remote repository which results in a fast-forward merge.
See Push changes of a branch to a remote repository for details on pushing branches or the Git push manpage for general information.
9.12. Pull changes from a remote repository
The git pull command allows you to get the
latest changes from another repository for the current branch.
The git pull command is a shortcut for git fetch followed by the git merge or the git rebase
command depending on your configuration.
You configured your Git repository so that git pull is a fetch followed by a rebase.
10. Exercise: Working with a (local) remote repository
You now create a local bare repository based on your existing Git repository. To simplify the examples, the Git repository is hosted locally in the filesystem and not on a server in the Internet.
Afterwards, you pull from and push to your bare repository to synchronize changes between your repositories.
10.1. Create a bare Git repository via the clone operation
Execute the following commands to create a bare repository based on your existing Git repository.
# switch to the first repository
cd ~/repo01

# create a new bare repository by cloning the first one
git clone --bare . ../remote-repository.git

# check the content of the git repo, it is similar
# to the .git directory in repo01
# files might be packed in the bare repository

ls ~/remote-repository.git
10.2. Exercise: Clone your bare repository
Clone your bare repository and checkout a working tree in a new directory via the following commands.
# switch to home
cd ~
# make new directory
mkdir repo02

# switch to new directory
cd ~/repo02
# clone
git clone ../remote-repository.git .
10.3. Exercise: Use the push command
Make some changes in one of your non-bare local repositories and push them to your bare repository via the following commands.
# make some changes in the first repository
cd ~/repo01

# make some changes in the file
echo "Hello, hello. Turn your radio on" > test01
echo "Bye, bye. Turn your radio off" > test02

# commit the changes, -a will commit changes for modified files
# but will not add automatically new files
git commit -a -m "Some changes"

# push the changes
git push ../remote-repository.git
10.4. Exercise: Use the pull command
To test the git pull in your example Git repositories, switch to the other non-bare local repository.
Pull in the recent changes from the remote repository.
Afterwards, make some changes and push them again to your remote repository.
# switch to second directory
cd ~/repo02

# pull in the latest changes of your remote repository
git pull

# make changes
echo "A change" > test01

# commit the changes
git commit -a -m "A change"

# push changes to remote repository
# origin is automatically created as we cloned original from this repository
git push origin
You can pull in the changes in your first example repository with the following commands.
# switch to the first repository and pull in the changes
cd ~/repo01

git pull ../remote-repository.git/

# check the changes
git status
11. Using Branches
11.1. What are branches?
Git allows you to create branches. Branches are named pointers to commits. You can work on different branches independently from each other. The default branch is typically called main (or master in older repositories).
A branch pointer in Git is 41 bytes large, 40 bytes of characters and an additional new line character. Therefore, the creation of branches in Git is fast and cheap in terms of resource consumption. Git encourages the usage of branches on a regular basis.
If you decide to work on a branch, you checkout (or switch to) this branch. This means that Git populates the working tree with the version of the files from the commit to which the branch points and moves the HEAD pointer to the new branch.
HEAD is a symbolic reference usually pointing to the branch which is currently checked out.
11.2. Detached HEAD
If you checkout a commit or a tag directly and not a branch, you are in the so-called detached HEAD mode. If you commit changes in this mode, you have no branch that points to this commit.
It is not recommended to create new commits in this mode because such commits would not be visible on a branch and you may not find them easily. Detached HEAD mode is intended to make it easy to view files referred to by a certain commit.
11.3. List available branches
The git branch command lists all local branches. The currently active branch is marked with *.
# lists available branches
git branch
If you want to see all branches (including remote-tracking branches), use the -a for the git branch command.
# lists all branches including the remote branches
git branch -a
The -v option lists more information about the branches.
To list branches in a remote repository use the git branch -r command as demonstrated in the following example.
# lists branches in the remote repositories
git branch -r
11.4. Create new branch
You can create a new branch via the git branch [newname] command.
This command allows you to specify the commit (commit id, tag, remote or local branch) to which the branch pointer originally points.
If not specified, the commit to which the HEAD reference points is used to create the new branch.
# syntax: git branch <name> <hash>
# <hash> in the above is optional
git branch testing
11.5. Switch to a branch
To start working in a branch you have to switch to (or checkout) the branch. If you switch to a branch, the HEAD pointer moves to the last commit in this branch and the files in the working tree are set to the state of this commit.
The following commands demonstrate how you switch to the branch called testing, perform some changes in this branch and switch back to the default branch.
# switch to your new branch
git switch testing

# do some changes
echo "Cool new feature in this branch" > test01
git commit -a -m "new feature"

# switch to the main branch
git switch main

# check that the content of
# the test01 file is the old one
cat test01|
In older versions of Git (before 2.23), |
To create a branch and to switch to it at the same time you can use the git switch command with the -c parameter.
# create branch and switch to it
git switch -c bugreport12

# creates a new branch based on the main branch
# without the last commit
git switch -c mybranch main~1
11.6. Rename a branch
Renaming a branch can be done with the following command.
# rename branch
git branch -m [old_name] [new_name]
11.7. Delete a branch
To delete a branch which is no longer needed, you can use the following command.
You may get an error message that there are uncommitted changes if you did the previous examples step by step. Use force delete (uppercase -D) to delete it anyway.
# delete branch testing
git branch -d testing
# force delete testing
git branch -D testing
# check if branch has been deleted
git branch
11.8. Push changes of a branch to a remote repository
You can push the changes in a branch to a remote repository by specifying the target branch. This creates the target branch in the remote repository if it does not yet exist.
If you do not specify the remote repository, the origin is used as default
# push current branch to a branch called "testing" to remote repository
git push origin testing

# switch to the testing branch
git switch testing

# some changes
echo "News for you" > test01
git commit -a -m "new feature in branch"

# push current HEAD to origin
git push

# make new branch
git branch anewbranch
# some changes
echo "More news for you" >> test01
git commit -a -m "a new commit in a feature branch"
# push anewbranch to the main in the origin
git push origin anewbranch:main

# get the changes into your local main
git switch main
git pull
This way you can decide which branches you want to push to other repositories and which should be local branches.
11.9. Switching branches with untracked files
Untracked files (never added to the staging area) are unrelated to any branch. They exist only in the working tree and are ignored by Git until they are committed to the Git repository. This allows you to create a branch for unstaged and uncommitted changes at any point in time.
11.10. Switching branches with uncommitted changes
Similar to untracked files you can switch branches with unstaged or staged modifications that are not yet committed.
You can switch branches if the modifications do not conflict with the files from the branch.
If Git needs to modify a changed file during the checkout of a branch, the checkout fails with a checkout conflict error.
This avoids losing changes in your files.
In this case the changes must be committed, reverted or stashed. You can also always create a new branch based on the current HEAD.
11.11. Differences between branches
To see the difference between two branches you can use the following command.
# shows the differences between
# current head of main and your_branch

git diff main your_branch
You can use commit ranges. For example, if you compare a branch called your_branch with the main branch the following command shows the changes in your_branch and main since these branches diverged.
# shows the differences in your
# branch based on the common
# ancestor for both branches

git diff main...your_branch
12. Using Tags
Git has the option to add additional metadata to commits. This can be used to document for example a commit which is used to perform a software release.
This is done via tags.
Git supports two different types of tags, lightweight and annotated tags.
A lightweight tag is a named pointer to a commit, without any additional information about the tag. An annotated tag contains additional metadata:
-
the name and email of the person who created the tag
-
tagging message similar to a commit message
-
the date of the tagging
Annotated tags can also be signed and verified with GNU Privacy Guard (GPG).
You can list the available tags via the following command:
git tag

# Shows all tags with the commits they point to
git show-ref --tags --abbrev|
Creating lightweight tags
To create a lightweight tag do not use the Lightweight tags in Git are sometimes used to identify the input for a build. |
To see the commit the tag points to, you can use:
git show 1.7.1|
You could also use the following command (and define an alias for that):
You can create a new annotated tag via the You can also create tags for a certain commit id. |
12.1. Creating signed tags
You can use the option -s to create a signed tag.
These tags are signed with GNU Privacy Guard (GPG) and can also be
verified with GPG. For details on this please see the following URL:
Git tag
manpage.
12.2. Checkout tags
If you want to use the code associated with the tag, use:
git switch --detach <tag_name>|
If you checkout a tag, you are in the detached head mode and commits created in this mode are harder to find after you checkout a branch again. |
12.3. Push tags
By default, the git push command does not transfer
tags to remote repositories. You explicitly have to push the tag with
the following command.
# push a tag or branch called tagname
git push origin [tagname]

# to explicitly push a tag and not a branch
git push origin tag <tagname>

# push all tags
git push --tags
12.4. Delete tags
You can delete tags with the -d parameter. This
deletes the tag from your local repository. By default, Git does not push
tag deletions to a remote repository, you have to trigger that
explicitly.
The following commands demonstrate how to push a tag deletion.
# delete tag locally
git tag -d 1.7.0

# delete tag in remote repository
# called origin
git push origin :refs/tags/1.7.0
12.5. Search by pattern for a tag
You can use the -l parameter in the git tag command to search for a pattern in the tag.
git tag -l <pattern>12.6. Using tags for software releases
Tags are frequently used to tag a software release. In this case, they are called release tags.
Convention is that release tags are labeled based on the [major].[minor].[patch] naming scheme. These release tags follow the semantic versioning of the software release.
-
the patch version is incremented if (only) backwards compatible bug fixes are introduced
-
the minor version is incremented if backwards compatible functionality of the user of the public API are introduced
-
the major version is incremented if incompatible changes are introduced in the public API
For example, "1.0.0" or "v1.0.0".
If software build tools like Maven or Gradle are used, the released version should also follow the semantic versioning. In this case the tag is typically the same as the release version.
See Semantic versioning for more information.
12.7. Creating of a release log based on tags
Git allows you to list the commits between any reference; this includes tags.
This allows you to create a release log, for example via the following commands.
# show log between two tags
git log tag1..tag2

# show shortlog between two tags
git shortlog tag1..tag2
13. Comparing changes
13.1. Listing changed files
The git status command shows the current status of your repository and possible actions which you can perform.
It shows which files have changed, which are staged and which are not part of the staging area. It also shows which files have merge conflicts and gives an indication what the user can do with these changes, e.g., add them to the staging area or remove them, etc.
|
|
13.2. Example: Using git status
The following commands create some changes in your Git repository.
# assumes that the test01 and test02 files exist
# and have been committed in the past
echo "This is a new change to the file" > test01
echo "and this is another new change" > test02

# create a new file
ls > newfileanalysis.txt
Now use the status command.
git statusThe output of the command looks like the following listing.
# On branch main
# Your branch is ahead of 'origin/main' by 1 commit.
#   (use "git push" to publish your local commits)
#
# Changes not staged for commit:
#   (use "git add <file>..." to update what will be committed)
#   (use "git restore <file>..." to discard changes in working directory)
#
#   modified:   test01
#   modified:   test02
#
# Untracked files:
#   (use "git add <file>..." to include in what will be committed)
#
#   newfileanalyzis.txt
no changes added to commit (use "git add" and/or "git commit -a")
13.3. Using git diff
The git diff command allows you to compare changes between commits, the staging area and working tree, etc.
Via an optional third parameter you can specify a path to filter the displayed changes.
The path can be a file or directory git diff [path].
The following example code demonstrates the usage of the git diff command.
echo "This is a change" > test01
echo "and this is another change" > test02git diff (1)
git diff --cached (2)
git diff COMMIT_REF1 COMMIT_REF2 (3)
git diff -- [file_reference] (4)
| 1 | shows the changes introduced in the working tree compared with the staging area |
| 2 | shows the differences between the staging area and the last commit |
| 3 | shows the differences introduced between two commit references |
| 4 | shows the differences introduced in the working tree compared with the staging area for [file_reference] |
14. Analyzing the commit history with git log
Reviewing the changes in a Git repository can be used to identify:
-
who changed a file or a set of files
-
who is working on a certain repository
-
how a certain change was done
-
which changes were done in a certain timeframe to identify commits which caused a failure
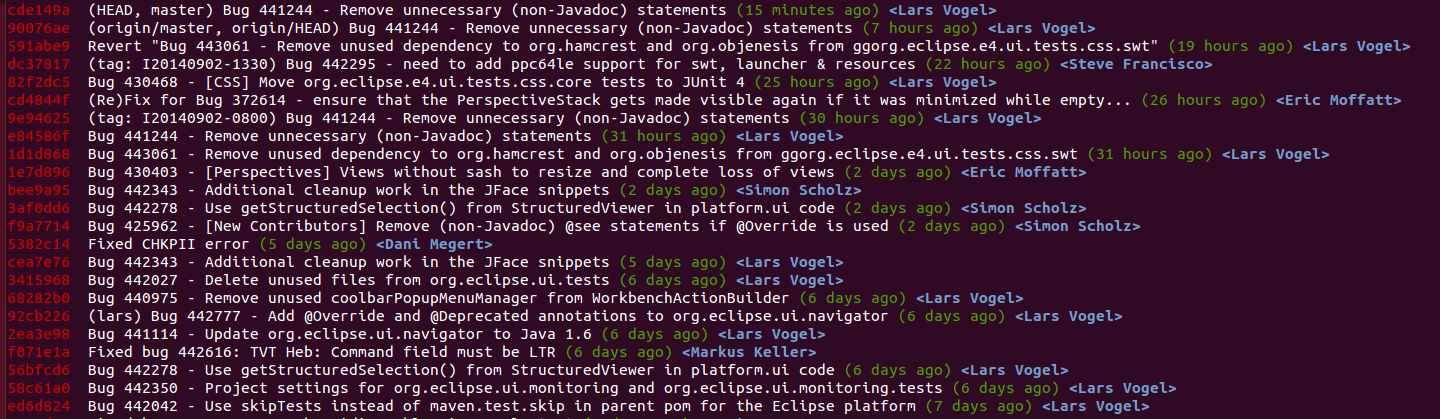
14.1. Using git log
The git log command shows the history of the Git repository.
If no commit reference is specified it starts from the commit referred to by the HEAD pointer.
git log

git log HEAD~10 (1)

git log COMMIT_REF (2)
| 1 | shows the history of commits starting from the HEAD~10 commit |
| 2 | shows the history of commits starting from the COMMIT_REF commit |
14.2. Helpful parameters for git log
The following gives an overview of useful parameters for the git log command.
git log --oneline  (1)
git log --abbrev-commit (2)
git log --graph --oneline (3)
git log --decorate (4)
| 1 | --oneline - fits the output of the git log command in one line. --oneline is a shorthand for "--pretty=oneline --abbrev-commit" |
| 2 | --abbrev-commit - the log command uses shorter versions of the SHA-1 identifier for a commit object but keeps the SHA-1 unique. This parameter uses 7 characters by default, but you
can specify other numbers, e.g., --abbrev-commit --abbrev=4. |
| 3 | graph - draws a text-based graphical representation of the branches and the merge history of the Git repository. |
| 4 | decorate - adds symbolic pointers to the log output |
For more options on the git log command see the
Git log manpage.
14.3. View the change history of a file
To see changes in a file you can use the -p option in the git log command.
git log -- [file_reference] (1)

git log -p -- [file_reference]  (2)

git log --follow -p -- [file_reference] (3)
| 1 | - shows the list of commits for this file |
| 2 | - the -p parameter shows the diffs of each commit |
| 3 | - --follow includes renames in the log output |
14.4. Configuring output format
You can use the --pretty parameter to configure the output.
# command must be issued in one line, do not enter the line break
git log --pretty=format:'%Cred%h%Creset %d%Creset %s %Cgreen(%cr)
 %C(bold blue)<%an>%Creset' --abbrev-commit
This command creates the output.
| Git allows you to create a short form of one or several existing Git commands. You can define an alias for such long commands. |
14.5. Filtering based on the commit message via regular expressions
You can filter the output of the git log command to commits whose commit message, or reflog entry,
respectively, matches the specified regular expression pattern with the --grep=<pattern> and --grep-reflog=<pattern> option.
For example, the following command instructs the log command to list all commits that contain the word "workspace" in their commit message.
git log --oneline --grep="workspace" (1)
| 1 | Greps in commit message for "workspace", oneline parameter included for better readability of the output |
There is also the --invert-grep=<pattern> option. When this option is used, git log lists the commits that do not match the specified pattern.
14.6. Filtering the log output based on author or committer
You can use the --author=<pattern> or --committer=<pattern> to filter
the log output by author or committer. You do not need to use the full
name, if a substring matches, the commit is included in the log output.
The following command lists all commits with an author name containing the word "Vogel".
git log --author="Vogel"See also git shortlog for release announcements.
15. Viewing changes with git diff and git show
15.1. See the differences introduced by a commit
To see the changes introduced by a commit use the following command.
git show <commit_id>15.2. See the difference between two commits
To see the differences introduced between two commits you use the git diff command specifying the commits.
For example, the following command shows the differences introduced in the last commit.
# directly between two commits
git diff HEAD~1 HEAD

# using commit ranges
git diff  HEAD~1..HEAD
15.3. See the files changed by a commit
To see the files that have been changed in a commit use the git diff-tree command.
The name-only tells the command to show only the names of the files.
git diff-tree --name-only -r <commit_id>16. Using the Git blame command
16.1. Analyzing line changes with git blame
Using the Git log command and filtering the history is a useful tool for inspecting the project history. However, if you look at a particular file and find a bug in a particular line of code you would like to instantly know who was the last person who changed this line of code. Additionally, you would like to know why the developer did that, i.e., locate the commit in which the change was done.
In Git, this feature is called git blame or git annotate.
The git blame command allows you to see which commit and author last modified each line of a file.
That is useful to identify the person or the commit which introduced a change.
16.2. Understanding the git blame output
The output of git blame shows one annotated entry per line of the file.
Each entry contains the following information:
-
Abbreviated commit SHA-1 (prefixed with
^if it is the boundary commit) -
Author name
-
Timestamp of the change
-
Line number
-
Line content
The following is a sample git blame output:
^4e3f1d2 (Jane Doe   2023-05-10 14:32:45 +0200 1) public class HelloWorld {
 b7c9a21 (John Smith 2023-06-01 09:12:00 +0200 2)     public static void main(String[] args) {
 b7c9a21 (John Smith 2023-06-01 09:12:00 +0200 3)         System.out.println("Hello, World!");
^4e3f1d2 (Jane Doe   2023-05-10 14:32:45 +0200 4)     }
^4e3f1d2 (Jane Doe   2023-05-10 14:32:45 +0200 5) }
A ^ prefix on the commit SHA-1 indicates the boundary commit, i.e., the first commit that introduced the line into the repository.
16.3. Example: git blame
The following code snippet demonstrates the usage of the git blame command.
# git blame shows the author and commit per
# line of a file
git blame [filename]

# the -L option allows limiting the selection
# for example by line number

# only show lines 1 to 2 in git blame
git blame -L 1,2 [filename]

# ignore whitespace-only changes when assigning blame
git blame -w [filename]

# show the author's email address instead of the name
git blame -e [filename]
16.4. Useful options for git blame
The following table lists commonly used options for the git blame command.
| Option | Description |
|---|---|
|
Ignores whitespace-only changes when assigning blame. This is useful when lines were reformatted without changing their content. |
|
Shows the author’s email address instead of the author name. |
|
Shows the line number in the original commit alongside the current line number. |
|
Restricts the annotation to the given line range. Both line numbers and regular expressions are accepted as range delimiters. |
|
Only blames lines that have changed since the given date. |
17. Commit history of a repository or certain files
Gitk can be used to visualize the history of a repository or certain files.
In some cases using git blame is not sufficient to see all details of certain changes.
You can navigate to the file location in the target git repository and use the gitk [filename] command to see all commits of a file in a clear UI.
In this screenshot we can see all commits of the ShowViewHandler.java file by using the gitk ShowViewHandler.java command:
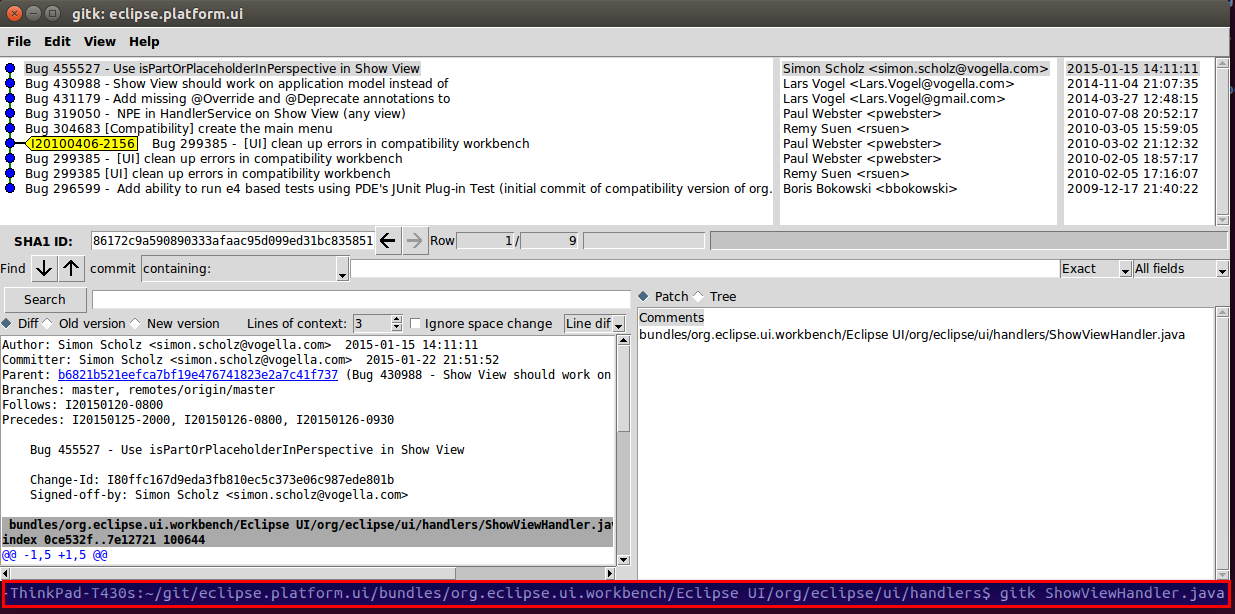
On Linux you can easily install gitk by using the sudo apt-get install gitk command in a terminal.
See https://git-scm.com/docs/gitk for further information.
18. git shortlog for release announcements
The git shortlog command summarizes the git log output.
It groups all commits by author and includes the first line of the commit message.
The -s option suppresses the commit message and provides a commit
count. The -n option sorts the output based on the number of commits
by author.
# gives a summary of the changes by author
git shortlog

# compressed summary
# -s summary, provides a commit count summary only
# -n sorted by number instead of name of the author
git shortlog -sn
This command also allows you to see the commits done by a certain author or committer.
# see the commits by the author "Lars Vogel"
git shortlog --author="Lars Vogel"

# see the commits by the author "Lars Vogel"
# restricted by the last years
git shortlog --author="Lars Vogel" --since=2years

# see the number of commits by the author "Lars Vogel"
git shortlog -s --author="Lars Vogel" --since=2years
19. Stashing changes in Git
Stashing in Git refers to taking all changes made in your working directory and committing them to a separate area known as the stash. Committing to the stash does not create a new commit on the currently checked out branch but instead creates a new stashed commit which includes changes made in the working directory and staged in the index. Once stashing is completed the working directory and the index are reset to the current branch’s head revision. Stashing is common when you want to merge or rebase but do not want to lose your local uncommitted changes but you aren’t quite ready to commit them on the current branch. You can first stash your work, perform the merge or rebase and then apply the stash to get the changes back in your working directory.
19.1. The git stash command
Git provides the git stash command that allows you to record the current state of the working directory and the staging
area and to revert to the last committed revision.
This allows you to pull in the latest changes or to develop an urgent fix. Afterwards, you can restore the stashed changes, which will reapply the changes to the current version of the source code.
19.2. When to use git stash
In general, using the stash command should be the exception in using Git. Typically, you would create new branches for new features and switch between branches. You can also commit frequently in your local Git repository and use interactive rebase to combine these commits later before pushing them to another Git repository.
Even if you prefer not to use branches, you can avoid using the git stash command.
In this case you commit the changes you want to put aside and amend the commit with the next commit.
If you use the approach of creating a commit, you typically put a marker in the commit message to mark it as a draft, e.g., "[DRAFT] implement feature x".
19.3. Example: Using the git stash command
The following commands will save a stash and reapply them after some changes.
# create a stash with uncommitted changes
git stash

# do changes to the source, e.g., by pulling
# new changes from a remote repo

# afterwards, re-apply the stashed changes
# and delete the stash from the list of stashes
git stash pop
It is also possible to keep a list of stashes.
# create a stash with uncommitted changes
git stash save

# see the list of available stashes
git stash list
# result might be something like:
stash@{0}: WIP on main: 273e4a0 Resize issue in Dialog
stash@{1}: WIP on main: 273e4b0 Silly typo in Classname
stash@{2}: WIP on main: 273e4c0 Silly typo in Javadoc

# you can use the ID to apply a stash
git stash apply stash@{0}

# or apply the latest stash and delete it afterwards
git stash pop

# you can also remove a stashed change
# without applying it
git stash drop stash@{0}

# or delete all stashes
git stash clear
19.4. Create a branch from a stash
You can also create a branch for your stash if you want to continue to work on the stashed changes in a branch. This can be done with the following command.
# create a new branch from your stack and
# switch to it
git stash branch newbranchforstash
20. Remove untracked files with git clean
20.1. Removing untracked files
If you have untracked files in your working tree that you want to remove, you can use the git clean command.
|
Be careful with this command. All untracked files are removed if you run this command. You will not be able to restore them, as they are not part of your Git repository. |
20.2. Example: Using git clean
The following commands demonstrate the usage of the git clean command.
# create a new file with content
echo "this is trash to be deleted" > test04

# make a dry-run to see what would happen
# -n is the same as --dry-run
git clean -n

# delete, -f is required if
# variable clean.requireForce is not set to false
git clean -f

# use -d flag to delete new directories
# use -x to delete hidden files, e.g., ".example"
git clean -fdx
21. Revert uncommitted changes in tracked files
The content of any file tracked by Git can be restored from the staging area or a commit.
You can unstage changes so that these are not included in the next commit. This chapter explains how you can do this.
21.1. Remove staged changes from the staging area
Use the git restore --staged [paths] command to remove staged changes from the staging area.
This avoids including these changes in the next commit.
In older versions of Git, git reset [paths] was used for this purpose.
This means that git restore --staged [paths] is the opposite of git add [paths].
The changes are still available in the working tree and you can stage and commit them at a later point.
In the following example you create a new file and change an existing file. Both changes are staged.
# do changes
touch unwantedstaged.txt
echo "more.." >> test02

// add changes to staging area
git add unwantedstaged.txt
git add test02

# see the status
git status
The output of the git status command should look similar to the following.
On branch main
Changes to be committed:
  (use "git reset HEAD <file>..." to unstage)

    modified:   test02
    new file:   unwantedstaged.txt
Remove the changes from the staging area with the following command.
# remove test02 from the staging area
git reset test02

# remove unwantedstaged.txt from the staging area
git reset unwantedstaged.txt
Use the git status command to see the result.
On branch main
Changes not staged for commit:
  (use "git add <file>..." to update what will be committed)
  (use "git restore <file>..." to discard changes in working directory)

    modified:   test02

Untracked files:
  (use "git add <file>..." to include in what will be committed)

    unwantedstaged.txt

no changes added to commit (use "git add" and/or "git commit -a")
The git reset behaves differently depending on the options you provide.
21.2. Remove changes in the working tree
|
Be careful with the following command. It allows you to override the changes in files in your working tree. You will not be able to restore these changes. |
Undesired changes in the working tree that are not staged can be undone with the git restore command.
This command resets the file in the working tree to the latest staged version.
If there are no staged changes, the latest committed version is used for the restore operation.
# restore a file to the last staged or committed version
git restore yourfile.txt|
In older versions of Git, |
For example, you can restore the contents of a directory called data with the following command.
git restore data21.3. Remove changes in the working tree and the staging area
If you want to undo a staged but uncommitted change, you use the git restore --staged --worktree [paths] command.
This version of the command resets both the working tree and the staging area.
The following demonstrates the usage of this to restore a deleted directory.
# restore both staging area and working tree
git restore --staged --worktree [directory]
The --staged parameter instructs the git restore command to also reset the staging area along with the working tree.
21.4. Remove staging area based on last commit change
When you have added the changes of a file to the staging area, you can also revert the changes in the staging area based on the last commit.
# some nonsense change
echo "change which should be removed later" > test01

# add the file to the staging area
git add test01

# restores the file based on HEAD in the staging area
git reset HEAD test01
22. Moving branch pointers with the Git reset command
22.1. Using the git reset command to move branch pointer or the HEAD pointer
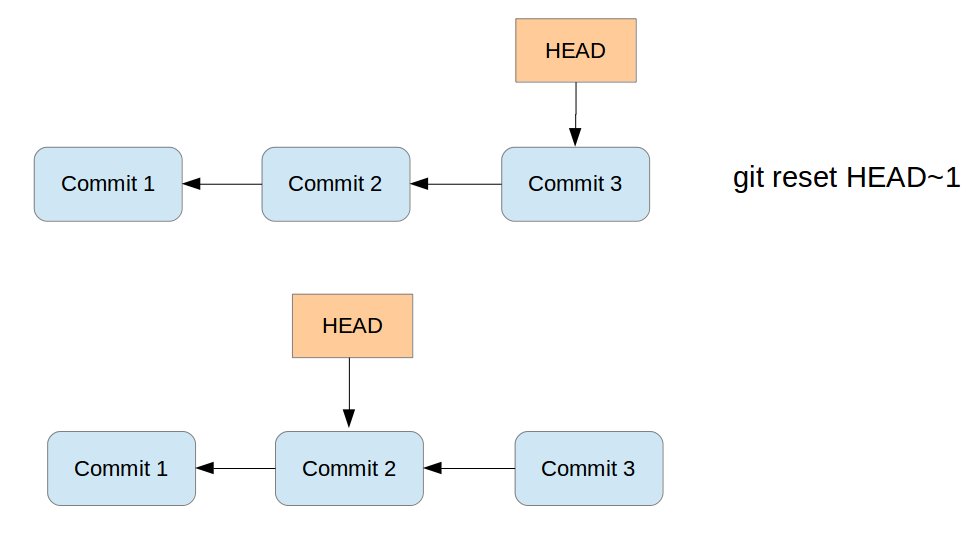
The git reset command allows you to change the commit your HEAD is pointing to (indirectly or directly).
This can for example be used to remove an undesired commit.
If a branch is checked out, this branch pointer will move and HEAD indirectly points to the new commit. If your HEAD points directly to a commit (detached HEAD mode) the HEAD pointer will point to the new commit.
For simplification the following will say that the HEAD pointer moves, independent of whether a branch or a commit is checked out.
The reset command will always move the branch pointer (or the HEAD pointer in case of detached HEAD mode) and update the working tree based on the new commit. The following parameters allow you to define what happens to the current changes in the working tree and changes which were included in the commits between the original commit and the commit now referred to by the HEAD pointer.
-
soft
-
mixed (this is the default if no parameters are defined)
-
hard
Depending on the specified parameters the git reset command performs the following:
-
The HEAD / branch pointer moves to the new commit
-
if
--softis specified-
changes in the working tree are left unchanged
-
the staging area is not updated (all previous committed changes are staged for the next commit)
-
file changes between the original commit and the one you reset to are staged
-
-
if
--mixedparameter (the default) is used:-
changes in the working tree are left unchanged
-
the staging area is set to the new HEAD (the files are not staged)
-
file changes between the original commit and the one you reset shows up as modifications (or untracked files) in your working tree.
-
-
if
--hardparameter is specified:-
resets the staging area and the working tree to the new HEAD. This effectively removes the changes you have done between the original commit and the one you reset to.
-
Use the --mixed or --soft option to keep file changes.
These parameters are listed in the following table.
Reset |
Branch pointer |
Working tree |
Staging area |
soft |
Yes |
No |
No |
mixed (default) |
Yes |
No |
Yes |
hard |
Yes |
Yes |
Yes |
The git reset command does not remove untracked files.
If you have untracked files in your working tree which you want to remove, you can use the git clean command.
22.2. Not moving the HEAD pointer with git reset
If you specify a path via the git reset [path] command, Git does not move the HEAD pointer.
It updates the staging area or also the working tree depending on your specified option.
23. Retrieving files from the history
23.1. View file in different revision
The git show command allows you to see and retrieve files from branches, commits and tags. It allows
seeing the status of these files in the selected branch, commit or tag
without checking them out into your working tree.
By default, this command addresses a file from the root of the
repository, not the current directory. If you want the current directory
then you have to use the ./ specifier. For example, to address the
pom.xml file in the current directory use: ./pom.xml
The following commands demonstrate that. You can also make a copy of the file.
# [reference] can be a branch, tag, HEAD or commit ID
# [file_path] is the file name including path

git show [reference]:[file_path]

# to make a copy to copiedfile.txt

git show [reference]:[file_path] > copiedfile.txt

# assume you have two pom.xml files. One in the root of the Git
# repository and one in the current working directory

# address the pom.xml in the git root folder
git show HEAD:pom.xml

# address the pom in the current directory
git show HEAD:./pom.xml
23.2. Restore a deleted file in a Git repo
You can checkout a file from the commit. To find the commit which
deleted the file you can use the git log or the git ref-list command
as demonstrated by the following commands.
# see history of file
git log -- <file_path>

# restore file based on predecessors the last commit which affected it
# this was the commit which deleted the file
git restore --source=[commit]^ <file_path>

# alternatively use git rev-list
git rev-list -n 1 HEAD -- <file_path>

# afterwards, the same restore based on the predecessors
git restore --source=[commit]^ <file_path>
24. See which commit deleted a file
The git log command allows you to determine which commit deleted a file.
You can use the -- option in git log to see the commit history for a
file, even if you have deleted the file.
# see the changes of a file, works even
# if the file was deleted
git log --full-history -- [file_path]

# limit the output of Git log to the
# last commit, i.e. the commit which delete the file
# -1 to see only the last commit
# use 2 to see the last 2 commits etc
git log --full-history -1 -- [file_path]

# include stat parameter to see
# some statics, e.g., how many files were
# deleted
git log --full-history -1 --stat -- [file_path]
25. Reverting changes introduced with a certain commit
You can undo changes via the git revert command.
This command compares the changes of the commit compared to its parent and reverts these changes.
This may be necessary if a commit introduced incorrect behavior.
The following command demonstrates the usage of the git revert
command.
# revert a commit
git revert commit_id
26. Resetting the working tree based on a commit
26.1. Checkout based on commits and working tree
You can restore arbitrary revisions of your file system via the git switch --detach command followed by a commit reference.
This command resets the working tree to the state described by this commit and puts you in detached HEAD mode.
26.2. Example: Switch to a commit in detached HEAD mode
To checkout a specific commit you can use the following command.
# checkout the older revision via
git switch --detach [commit_id]

# based on the example output this could be
git switch --detach 046474a52e0ba1f1435ad285eae0d8ef19d529bf

# or you can use the abbreviated version
git switch --detach 046474a5|
If you checkout a commit, you are in the detached head mode and commits in this mode are harder to find after you checkout another branch. Before committing it is a good practice to create a new branch. |
27. Recovering commits via the Git reflog command
27.1. Finding commits that are no longer visible on a branch
Commits are not shown by Git if they are no longer directly or indirectly referred to by a pointer, like a branch or tag. Certain git commands remove commits from your view, e.g.: * git reset may remove commits from your current branch and therefore these commits vanish from your view * Amending a commit also removes the commit from your view
For example, assume you have two commits A→ B, where B is the commit after A.
You reset your branch pointer to A, the git log command does not include B anymore.
git reflog command allows you to find such commits by showing the HEAD pointer movements.
27.2. git reflog
Reflog is a mechanism to record the movements of the HEAD and the branches references.
The reflog command gives a history of the complete changes of the HEAD reference.
git reflog
# <output>
# ... snip ...
1f1a73a HEAD@{2}: commit: More chaanges - typo in the commit message
45ca204 HEAD@{3}: commit: These are new changes
cf616d4 HEAD@{4}: commit (initial): Initial commit
The git reflog command also lists commits which you have removed.
|
There are multiple reflogs: one per branch and one for HEAD.
For branches use the |
27.3. Example
The following example shows how you can use git reflog to reset the current local branch to a commit which is not reachable from the current branch anymore.
# assume the  ID for the second commit is
# 45ca2045be3aeda054c5418ec3c4ce63b5f269f7

# resets the head for your tree to the second commit
git reset --hard 45ca2045be3aeda054c5418ec3c4ce63b5f269f7

# see the log
git log

# output shows the history until the 45ca2045be commit

# see all the history including the deletion
git reflog

# <output>
cf616d4 HEAD@{1}: reset: moving to 45ca2045be3aeda054c5418ec3c4ce63b5f269f7
# ... snip ...
1f1a73a HEAD@{2}: commit: More chaanges - typo in the commit message
45ca204 HEAD@{3}: commit: These are new changes
cf616d4 HEAD@{4}: commit (initial): Initial commit

git reset --hard 1f1a73a
28. Remote and local tracking branches
28.1. Remote tracking branches
Your local Git repository contains references to the state of the branches on the remote repositories to which it is connected. These local references are called remote-tracking branches.
You can see your remote-tracking branches with the following command.
# list all remote branches
git branch -r
To update remote-tracking branches without changing local branches you use the git fetch command.
It is safe to delete a remote branch in your local Git repository, this does not affect a remote repository.
The next time you run the git fetch command, the remote branch is recreated.
You can use the following command for that.
# delete remote branch from origin

git branch -d -r origin/[remote_branch]
28.2. Delete a remote branch
To delete the branch in a remote repository use the following command.
# delete branch in a remote repository

git push [remote] --delete [branch]
28.3. Tracking branches
Branches can track another branch. This is called to have an upstream branch and such branches can be referred to as tracking branches.
Tracking branches allow you to use the git pull and git push command directly without specifying the branch and repository.
If you clone a Git repository, your local default branch (e.g., main or master) is created as a tracking branch for the corresponding branch of the origin repository (short: origin/main or origin/master) by Git.
You create new tracking branches by specifying the remote branch during the creation of a branch. The following example demonstrates that.
# create a tracking branch called newbranch
# which tracks origin/newbranch
git switch --track origin/newbranch
Instead of using the git switch command you can also use the git branch command.
# origin/main used as example, but can be replaced

# create branch based on remote branch
git branch [new_branch] origin/main

# use --track,
# default when the start point is a remote-tracking branch
git branch --track [new_branch] origin/main
The --no-track option allows you to specify that you do not want to track a branch.
You can explicitly add a tracking branch with the git branch -u command later.
# instruct Git to create a branch which does
# not track another branch
git branch --no-track [new_branch_notrack] origin/main

# update this branch to track the origin/main branch
git branch -u origin/main [new_branch_notrack]
To see the tracking branches for a remote repository (short: remote) you can use the following command.
# show all remote and tracking branches for origin
git remote show origin
An example output of this might look as follows.
* remote origin
  Fetch URL: ssh://test@git.eclipse.org/gitroot/e4/org.eclipse.e4.tools.git
  Push  URL: ssh://test@git.eclipse.org/gitroot/e4/org.eclipse.e4.tools.git
  HEAD branch: main
  Remote branches:
    integration                tracked
    interm_rc2                 tracked
    main                       tracked
    smcela/HandlerAddonUpdates tracked
  Local branches configured for 'git pull':
    integration rebases onto remote integration
    main        rebases onto remote main
    testing     rebases onto remote main
  Local refs configured for 'git push':
    integration pushes to integration (up to date)
    main        pushes to main        (up to date)
28.4. Forking a repository
In Git hosting services like GitHub or Bitbucket there are two ways to create a repository.
-
Create a new one and push the initial content from a local repository
-
Create a copy of an existing hosted repository
In GitHub, creating a copy is called Forking or creating a fork.
28.5. Pull requests
Servers like GitHub or Bitbucket allow you to synchronize changes between remote repositories via pull request. A pull request is a server-side request to integrate commits from a specified source repository and branch into a target repository and branch.
29. Updating your remote-tracking branches with git fetch
29.1. Fetch
The git fetch command updates your remote-tracking branches, i.e., it updates the local copy
of branches stored in a remote repository. The following command updates
the remote-tracking branches from the repository called origin.
git fetch originThe fetch command only updates the remote-tracking branches and none of the local branches.
It also does not change the working tree of the Git repository.
Therefore, you can run the git fetch command at any point in time.
After reviewing the changes in the remote tracking branch you can merge the changes into your local branches or rebase your local branches onto the remote-tracking branch.
Alternatively, you can also use the git cherry-pick commit_id command
to take over only selected commits.
See Applying a single commit with cherry-pick for information about cherry-pick. See Merging for the merge operation and Rebasing branches. for the rebase command.
29.2. Fetch from all remote repositories
The git fetch command updates only the remote-tracking branches for one remote repository.
In case you want to update the remote-tracking branches of all your remote repositories you can use the following command.
# simplification of the fetch command
# this runs git fetch for every remote repository
git remote update

# the same but remove all stale branches which
# are not in the remote anymore
git remote update --prune
29.3. Compare remote-tracking branch with local branch
The following code shows a few options for how you can compare your branches.
# show the log entries between the last local commit and the
# remote branch
git log HEAD..origin/main

# show the diff for each patch
git log -p HEAD..origin/main

# show a single diff
git diff HEAD...origin/main

# instead of using HEAD you can also
# specify the branches directly
git diff main origin/main
The above commands show the changes introduced in HEAD compared to origin.
If you want to see the changes in origin compared to HEAD, you can switch the arguments or use the -R parameter.
29.4. Rebase your local branch onto the remote-tracking branch
You can rebase your current local branch onto a remote-tracking branch. The following commands demonstrate that.
# assume you want to rebase main based on the latest fetch
# therefore check it out
git switch main

# update your remote-tracking branch
git fetch

# rebase your main onto origin/main
git rebase origin/main|
More information on the rebase command can be found in Rebasing branches. |
29.5. Fetch compared with pull
The git pull command performs a git fetch and git merge (or git rebase based on your Git settings).
The git fetch does not perform any operations on your local branches.
You can always run the fetch command and review the incoming changes.
30. Merging
Git allows you to combine the changes which were created on two different branches. One way to achieve this is merging, which is described in this chapter. You can merge based on branches, tags or commits. Other ways are using rebase or cherry-pick.
This part explains how to merge changes between two different branches under the assumption that no merging conflicts happen. Solving conflicts is covered in What is a conflict during a merge operation?.
30.1. Fast-forward merge
If the commits that are merged are direct successors of the HEAD pointer of the current branch, Git performs a so-called fast forward merge. This fast forward merge only moves the HEAD pointer of the current branch to the tip of the branch which is being merged.
This process is depicted in the following diagram. The first picture assumes that main is checked out and that you want to merge the changes of the branch labeled "branch 1" into your "main" branch. Each commit points to its predecessor (parent).
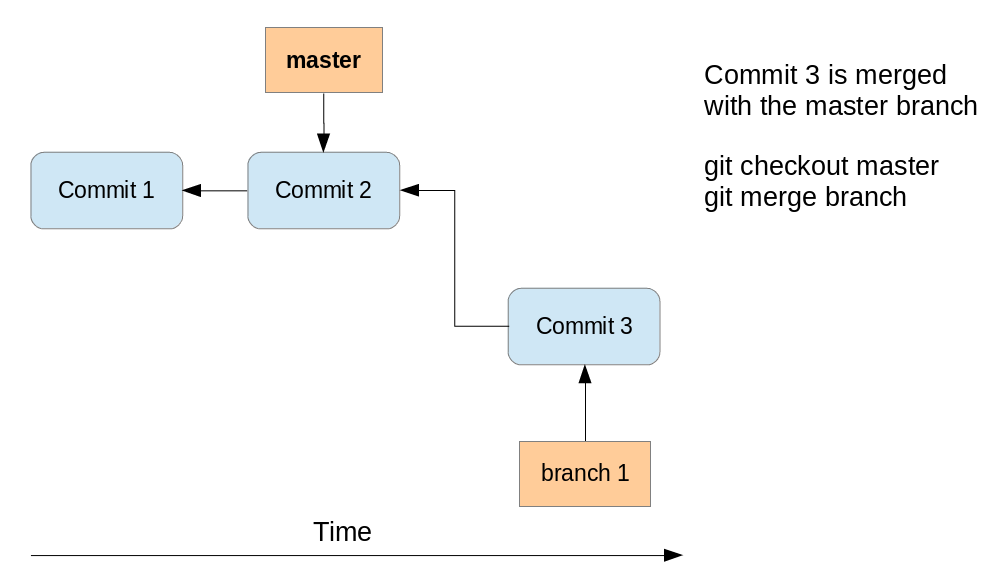
After the fast-forward merge the HEAD points to the main branch pointing to "Commit 3". The "branch 1" branch points to the same commit.
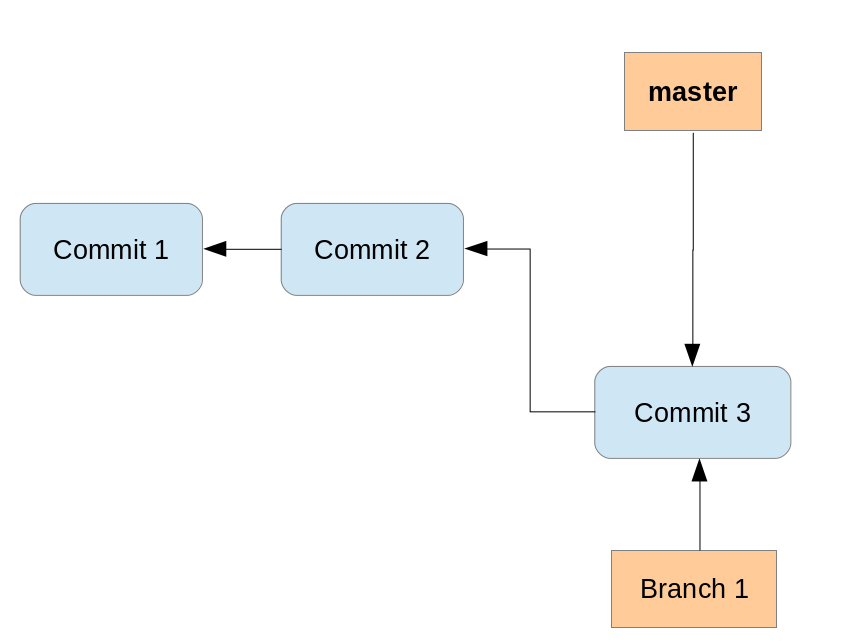
30.2. Merge commit
If commits are merged that are not direct predecessors of the current branch, Git performs a so-called three-way-merge between the latest commits of the two branches, based on the most recent common predecessor of both.
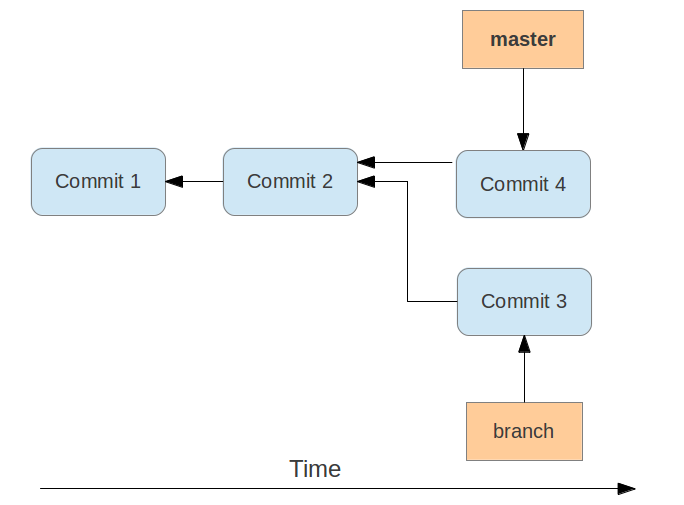
As a result a so-called merge commit is created on the current branch. It combines the respective changes from the two branches being merged. This commit points to both of its predecessors.
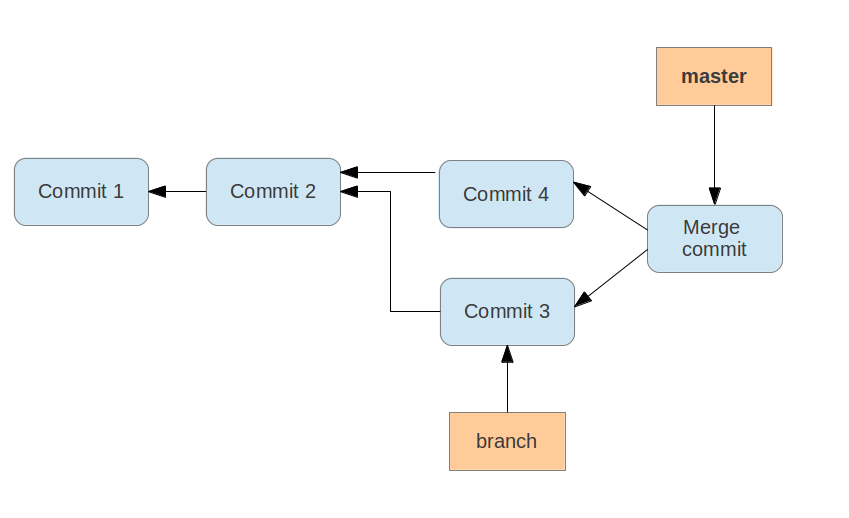
If multiple common predecessors exist, Git uses recursion to create a virtual common predecessor. For this Git creates a merged tree of the common ancestors and uses that as the reference for the 3-way merge. This is called the ort merge strategy (formerly recursive) and is the default merge strategy since Git 2.34.
30.3. Merge strategies - Octopus, Subtree, Ours
If a fast-forward merge is not possible, Git uses a merge strategy. The default strategy called ort (formerly recursive) merge strategy was described in Merge commit.
The Git command line tooling also supports the octopus merge strategy for merges of multiple references. With this operation it can merge multiple branches at once.
The subtree option is useful when you want to merge in another project into a sub-directory of your current project.
It is rarely used and you should prefer the usage of Git submodules.
See Git Submodules for more information.
The ours strategy merges a branch without looking at the changes introduced in this branch.
This keeps the history of the merged branch but ignores the changes introduced in this branch.
You can use the ours merge strategy to document that you have integrated a branch and decided to ignore all changes from this branch.
30.4. Using the git merge command
The git merge command performs a merge.
You can merge changes from one branch to the current active one via the following command.
# syntax: git merge <branch-name>
# merges into your currently checked out branch
git merge testing
30.5. Specifying merge strategies
The -s parameter allows you to specify other merge strategies.
For example, you can specify the ours strategy in which the result of the merge is always that of the current branch head, effectively ignoring all changes from all other branches. This is demonstrated with the following command.
# merge branch "obsolete" ignoring all
# changes in the branch
git merge -s ours obsolete|
Be careful if you use the ours merge strategy, it ignores everything from the branch which is merged. |
The usage of the octopus merge strategy is triggered if you specify more than one reference to merge.
# merge the branch1 and the branch2 using
# changes in the branch
git merge branch1 branch2
30.6. Specifying parameters for the default merge strategy
The default merge strategy (ort, formerly recursive) allows you to specify flags with the -X parameter.
For example, you can specify the ours option.
This option forces conflicting changes to be auto-resolved by favoring the local version.
Changes from the other branch that do not conflict with our local version are preserved in the merge result.
For a binary file, the entire contents are taken from the local version.
|
The |
A similar option to ours is the theirs option.
This option prefers the version from the branch which is merged.
Both options are demonstrated in the following example code.
# merge changes preferring our version
git merge -s recursive -X ours [branch_to_merge]

# merge changes preferring the version from
# the branch to merge
git merge -s recursive -X theirs [branch_to_merge]
Another useful option is the ignore-space-change parameter that ignores whitespace changes.
For more information about the merge strategies and options see Git merge manpage.
30.7. Enforcing the creation of a merge commit
If you prefer to have merge commits even for situations in which Git could perform a fast-forward merge you can use the git merge --no-ff command.
The --no-ff parameter can make sense if you want to record in the history at which time you merged from a maintenance branch to the main branch.
When pulling from a remote repository, prefer doing a rebase to a merge. This will help to keep the history easier to read. A merge commit can be helpful to document that functionality was developed in parallel.
31. Rebasing branches
31.1. Rebasing branches
You can use Git to rebase one branch on another one.
As described, the merge command combines the changes of two branches.
If you rebase a branch called A onto another, the git command takes the changes introduced by the commits
of branch A and applies them based on the HEAD of the other branch.
After this operation the changes in the other branch are also available in branch A.
The process is displayed in the following picture. We want to rebase the branch called branch_1 onto main.
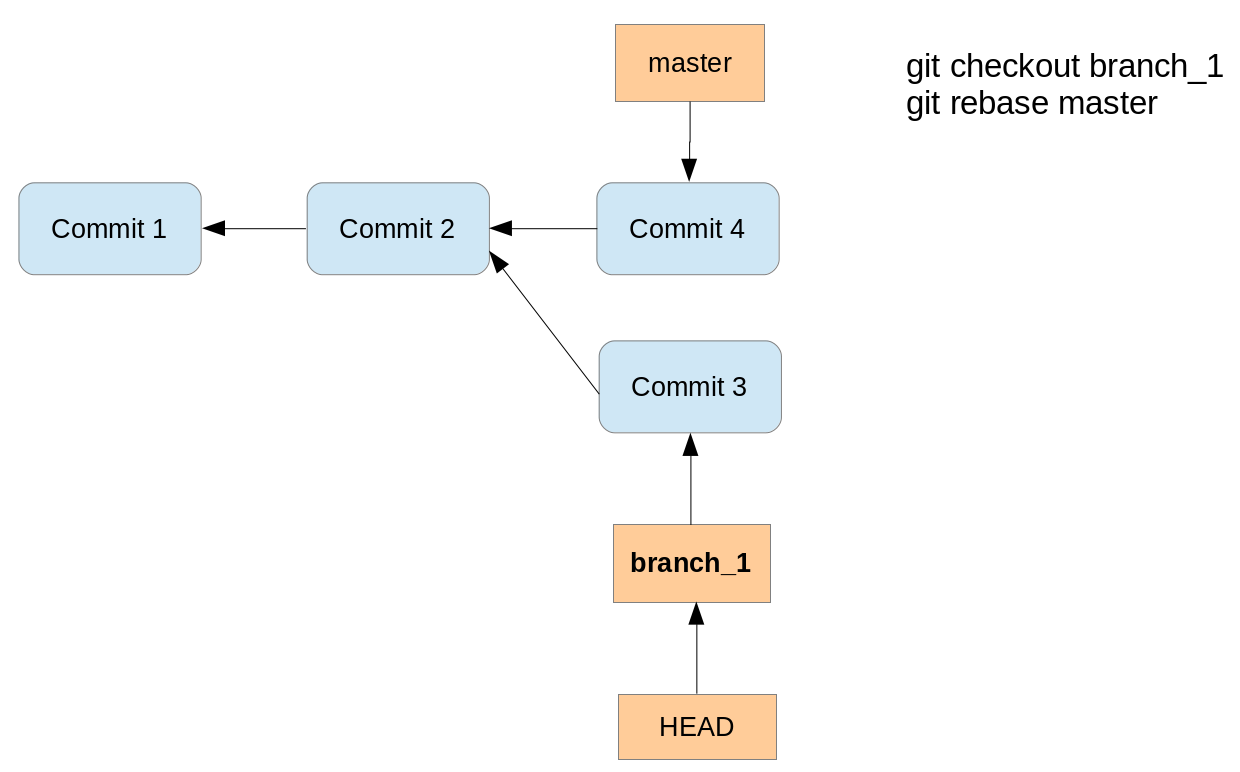
Running the rebase command creates a new commit with the changes of the branch on top of the main branch.
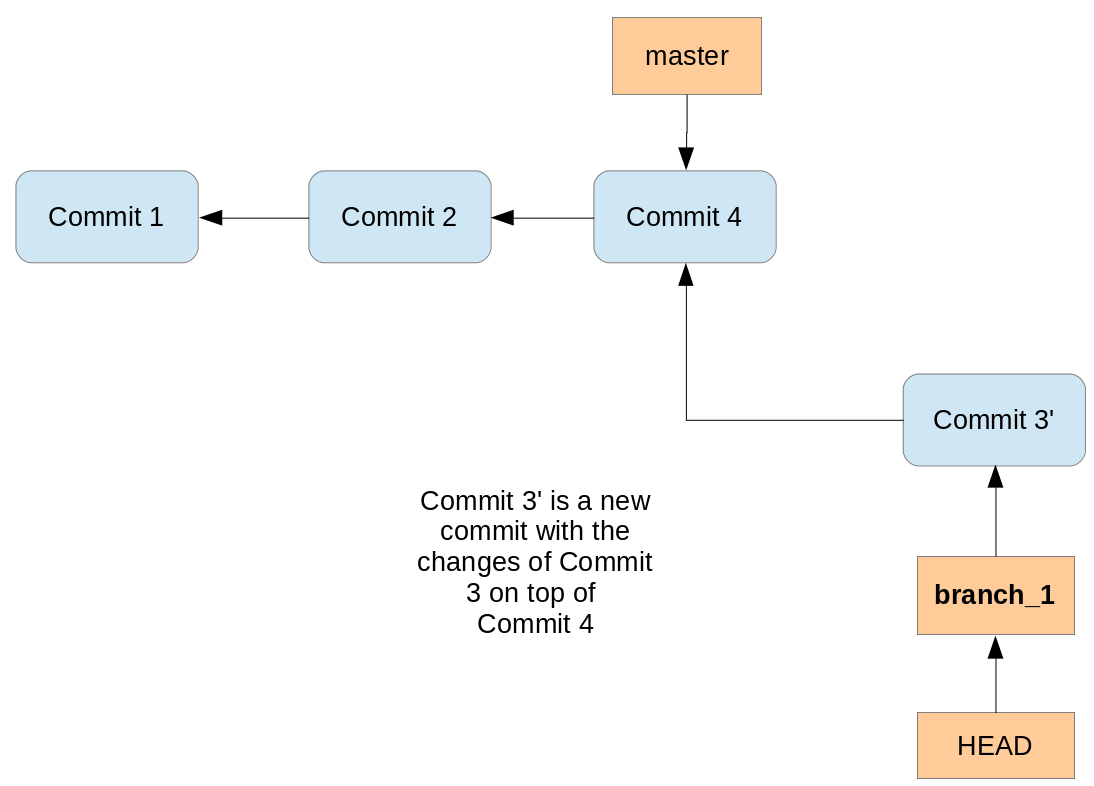
Performing a rebase does not create a merge commit. The final result for the source code is the same as with merge but the commit history is cleaner; the history appears to be linear.
Rebase can be used to forward-port a feature branch in the local Git repository onto the changes of the main branch. This ensures that your feature is close to the tip of the upstream branch until it is finally published.
If you rewrite more than one commit by rebasing, you may have to solve conflicts per commit. In this case the merge operations might be simpler to be performed because you only have to solve merge conflicts once.
Also, if your policy requires that all commits result in correct software you have to test all the rewritten commits since they are "rewritten" by the rebase algorithm. Since merge/rebase/cherry-pick are purely text-based and do not understand the semantics of these texts they can end up with logically incorrect results. Hence, it might be more efficient to merge a long feature branch into upstream instead of rebasing it since you only have to review and test the merge commit.
|
You can use the interactive rebase command to do further changes to your local Git commit history, e.g., combine commits, skip some commits or change their ordering. |
31.2. Good practice for rebase
You should avoid using the Git rebase operation for changes that have been published in other Git repositories. The Git rebase operation creates new commit objects, this may confuse other developers using the existing commit objects.
Assume that a user has a local feature branch and wants to push it to a branch on the remote repository. However, the branch has evolved and therefore pushing is not possible. Now it is a good practice to fetch the latest state of the branch from the remote repository. Afterwards, you rebase the local feature branch onto the remote tracking branch. This avoids an unnecessary merge commit. This rebasing of a local feature branch is also useful to incorporate the latest changes from remote into the local development, even if the user does not want to push right away.
|
Rebasing and amending commits is safe as long as you do not push any of the changes involved in the rebase. For example, when you cloned a repository and worked in this local repository. Rebasing is a great way to keep the history clean before contributing back your modifications. |
|
In case you want to rewrite history for changes you have shared with
others you need to use the |
31.3. Example of a rebase
The following demonstrates how to perform a rebase operation.
# create new branch
git switch -c rebasetest

# create a new file and put it under revision control
touch rebase1.txt
git add . && git commit -m "work in branch"

# do changes in main
git switch main

# make some changes and commit into testing
echo "rebase this to rebasetest later" > rebasefile.txt
git add rebasefile.txt
git commit -m "create new file"

# rebase the rebasetest onto main
git switch rebasetest
git rebase main

# now you can fast forward your branch onto main
git switch main
git merge rebasetest
32. Editing history with the interactive rebase
32.1. Changing the local history with interactive rebase
Git allows you to edit your commit history with functionality called interactive rebase.
For example, you can combine several commits into one commit, reorder or skip commits and edit the commit message.
This is useful as it allows the user to rewrite some commit history (cleaning it up) before pushing the changes to a remote repository.
Interactive rebase allows you to quickly edit a series of commits using the following actions:
| Action | Description |
|---|---|
pick |
includes the selected commit, moving pick entries enables reordering of commits |
skip |
removes a commit |
edit |
amends the commit |
squash |
combines the changes of the commit with the previous commit and combines their commit messages |
fixup |
squashes the changes of a commit into the previous commit discarding the squashed commit’s message |
reword |
similar to pick but allows modifying the commit message |
The setup for the rebase is called the rebase plan. Based on this plan, the actual interactive rebase can be executed.
|
It is safe to use interactive rebase as long as the commits have not been pushed to another repository. As the interactive rebase creates new commit objects, other developers might be confused if you rebase already published changes. |
32.2. Example: Interactive rebase
The following commands create several commits which will be used for the interactive rebase.
# create a new file
touch rebase.txt

# add it to git
git add . && git commit -m "add rebase.txt  to staging area"

# do some silly changes and commit
echo "content" >> rebase.txt
git add . && git commit -m "add content"
echo " more content" >> rebase.txt
git add . && git commit -m "just testing"
echo " more content" >> rebase.txt
git add . && git commit -m "woops"
echo " more content" >> rebase.txt
git add . && git commit -m "yes"
echo " more content" >> rebase.txt
git add . && git commit -m "add more content"
echo " more content" >> rebase.txt
git add . && git commit -m "creation of important configuration file"

# check the git log message
git log
We want to combine the last seven commits. You can do this interactively via the following command.
git rebase -i HEAD~7This command opens your editor of choice and lets you configure the rebase operation by defining which commits to pick, squash or fixup.
The following listing shows an example of the selection.
We pick the last commit, squash 5 commits and fix the sixth commit.
The listing uses the long format of the commands (for example fixup instead of the short form f ) for better readability.
pick 7c6472e rebase.txt added to index
fixup 4f73e68 added content
fixup bc9ec3f just testing
fixup 701cbb5 ups
fixup 910f38b yes
fixup 31d447d added more content
squash e08d5c3 creation of important configuration file

# Rebase 06e7464..e08d5c3 onto 06e7464
#
# Commands:
#  p, pick = use commit
#  r, reword = use commit, but edit the commit message
#  e, edit = use commit, but stop for amending
#  s, squash = use commit, but meld into previous commit
#  f, fixup = like "squash", but discard this commit's log message
#  x, exec = run command (the rest of the line) using shell
#
# These lines can be re-ordered; they are executed from top to bottom.
#
# If you remove a line here THAT COMMIT WILL BE LOST.
# However, if you remove everything, the rebase will be aborted.
33. Using the Git cherry-pick command
33.1. Applying a single commit with cherry-pick
The git cherry-pick command allows you to select the patch which was introduced with an individual commit and apply this patch on another branch.
The patch is captured as a new commit on the other branch.
This way you can select individual changes from one branch and transfer them to another branch.
|
The new commit does not point back to its original commit so do not use cherry-pick blindly since you may end up with several copies of the same change. Most often cherry-pick is either used locally (to emulate an interactive rebase) or to port individual bug fixes done on a development branch into maintenance branches. |
33.2. Example: Using cherry-pick
In the following example you create a new branch and commit two changes.
# create new branch
git switch -c picktest

# create some data and commit
touch pickfile.txt
git add pickfile.txt
git commit -m "adds new file"

# create second commit
echo "changes to file" > pickfile.txt
git commit -a -m "changes in file"
You can check the commit history, for example, with the git log --oneline command.
# see change commit history

git log --oneline

# results in the following output

2fc2e55 changes in file
ebb46b7 adds new file
[MORE COMMITS]
330b6a3 initial commit
The following command selects the first commit based on the commit ID and applies its changes to the main branch. This creates a new commit on the main branch.
git switch main
git cherry-pick ebb46b7
The cherry-pick command can be used to change the order of commits.
git cherry-pick also accepts commit ranges for example in the following command.
git switch main
# pick the last two commits
git cherry-pick picktest~1..picktest~2|
Commit ranges can be used. |
If things go wrong or you change your mind, you can always reset to the previous state using the following command.
git cherry-pick --abort34. Solving merge conflicts
34.1. What is a conflict during a merge operation?
Merge conflicts occur if the same lines in the same file are modified in different branches. A conflict during a merge operation occurs if two commits from different branches have modified the same content and Git cannot automatically determine how both changes should be combined when merging these branches.
This happens for example if the same line in a file has been replaced by two different commits.
If a conflict occurs, Git marks the conflict in the file and the programmer has to resolve the conflict manually. If a merge generates conflicts the repository is in a special state. The conflicts have to be resolved manually and the files must be staged by you to tell Git that the conflict has been resolved.
After resolving it, the developer adds the file to the staging area and commits the change. These steps are required to finish the merge operation.
35. Selecting a certain version of a file with theirs and ours during merge conflicts
Sometimes if a conflict occurs the developer does not want to solve the conflict manually. They decide to keep the original version or the new version of the file.
For this, there are the --theirs and the --ours options on the git checkout command.
The first option keeps the version of the file that you merged in, and the second option keeps the version before the merge operation was started.
|
|
git checkout --ours foo/bar.java
git add foo/bar.java
git checkout --theirs foo/bar.java
git add foo/bar.java36. Example: Solving a conflict during a merge operation
36.1. Create a conflict
In the following example you perform the merge operation. This operation results in a merge conflict which you solve.
It assumes that repo1 and repo2 have the same origin repository defined.
# switch to the first directory
cd ~/repo01
# make changes
echo "Change in the first repository" > mergeconflict.txt
# stage and commit
git add . && git commit -a -m "Will create conflict 1"# switch to the second directory
cd ~/repo02
# make changes
touch mergeconflict.txt
echo "Change in the second repository" > mergeconflict.txt
# stage and commit
git add . && git commit -a -m "Will create conflict 2"
# push to the main repository
git push# switch to the first directory
cd ~/repo01
# now try to push from the first directory
# try to push --> assuming that the same remote repository is used,
# you get an error message
git push
As this push would not result in a fast-forward merge, you receive an error message similar to the following listing.
! [rejected] main -> main (fetch first)
error: failed to push some refs to '../remote-repository.git/'
hint: Updates were rejected because the remote contains work that you do
hint: not have locally. This is usually caused by another repository pushing
hint: to the same ref. You may want to first integrate the remote changes
hint: (e.g., 'git pull ...') before pushing again.
hint: See the 'Note about fast-forwards' in 'git push --help' for details.To solve this, you need to integrate the remote changes into your local repository.
In the following listing the git fetch command gets the changes from the remote repository.
The git merge command tries to integrate it into your local repository.
# get the changes via a fetch
git fetch origin
# now merge origin/main into the local main
# this creates a merge conflict in your
# local repository
git merge origin/mainThis creates the conflict and a message similar to the following.
Auto-merging mergeconflict.txt
CONFLICT (add/add): Merge conflict in mergeconflict.txt
Automatic merge failed; fix conflicts and then commit the result.The resulting conflict is displayed in Review the conflict in the file and solved in Solve a conflict in a file.
|
If you use the |
36.2. Review the conflict in the file
Git marks the conflicts in the affected files. In the example from Create a conflict one file has a conflict and the file looks like the following listing.
<<<<<<< HEAD
Change in the first repository
=======
Change in the second repository
>>>>>>> b29196692f5ebfd10d8a9ca1911c8b08127c85f8The text above the ======= signs is the conflicting change from your current branch and the text below is the conflicting change from the branch that you are merging in.
36.3. Solve a conflict in a file
In this example, you resolve the conflict which was created in Create a conflict and apply the change to the Git repository.
To solve the merge conflict you edit the file manually. The following listing shows a possible result.
Change in the first and second repositoryAfterwards, add the affected file to the staging area and commit the result. This creates the merge commit. You can also push the integrated changes now to the remote repository.
# add the modified file
git add .
# creates the merge commit
git commit -m "Merge changes"
# push the changes to the remote repository
git pushInstead of using the -m option in the above example you can also
use the git commit command without this option. In this case the
command opens your default editor with the default commit message about
the merged conflicts. It is a good practice to use this message.
|
Alternatively, you could use the |
37. Rebase conflicts
37.1. What is a conflict during a rebase operation?
During a rebase operation, several commits are applied onto a certain commit. If you rebase a branch onto another branch, this commit is the last common ancestor of the two branches.
For each commit that is applied it is possible that a conflict occurs.
38. Handling a conflict during a rebase operation
If a conflict occurs during a rebase operation, the rebase operation stops and the developer needs to resolve the conflict. After resolving the conflicts, the developer instructs Git to continue with the rebase operation.
A conflict during a rebase operation is solved similarly to the way a conflict during a merge operation is solved. The developer edits the conflicts and adds the files to the Git index. Afterwards, they continue the rebase operation with the following command.
# rebase conflict is fixed, continue with the rebase operation
git rebase --continueTo see the files that have a rebase conflict use the following command.
# lists the files which have a conflict
git diff --name-only --diff-filter=UYou solve such a conflict the same way as you would solve a merge conflict.
You can also skip the commit which creates the conflict.
# skip commit which creates the conflict
git rebase --skip39. Aborting a rebase operation
You can also abort a rebase operation with the following command.
# abort rebase and recreate the situation before the rebase
git rebase --abort40. Picking theirs or ours for conflicting file
If a file is in conflict, you can instruct Git to take the version from the new commit or the version of commit onto which the new changes are applied.
This is sometimes easier than solving all conflicts manually.
For this you can use the git checkout with the --theirs or --ours flag.
During the conflict --ours points to the file in the commit onto which the new commit is placed, e.g., using this skips the new changes for this file.
|
|
Therefore, to ignore the changes in a commit for a file use the following command.
git checkout --ours foo/bar.java
git add foo/bar.javaTo take the version of the new commit use the following command.
git checkout --theirs foo/bar.java
git add foo/bar.java41. Define alias
41.1. Using an alias
An alias in Git allows you to create a short form of one or several existing Git commands. For example, you can define an alias which is a short form of your own favorite commands or you can combine several commands with an alias.
41.2. Alias examples
The following defines an alias to see the staged changes with the new
git staged command.
git config --global alias.staged 'diff --cached'Or you can define an alias for a detailed git log command.
The following command defines the git ll alias.
git config --global alias.ll 'log --graph --oneline --decorate --all'You can also run external commands.
In this case you start the alias definition with a ! character.
For example, the following defines the git ac command that combines git add . -A and git commit
commands.
# define alias
git config --global alias.act '!git add . -A && git commit'

# to use it
git act -m "message"
42. Git Large File Storage (LFS)
Git Large File Storage (LFS) is an extension that replaces large files in your repository with lightweight pointers, while storing the actual file contents in a separate location.
42.1. How Git LFS works
When you add a file tracked by LFS to your repository, Git LFS replaces its contents with a pointer and stores the file contents in a local Git LFS cache.
When you push new commits to the server, any Git LFS files referenced by the newly pushed commits are transferred from your local Git LFS cache to the remote Git LFS store tied to your Git repository.
When you checkout a commit that contains Git LFS pointers, they are replaced with files from your local Git LFS cache, or downloaded from the remote Git LFS store.
42.2. Setting up Git LFS
To use Git LFS, you need a Git LFS aware host such as GitHub, GitLab, or Bitbucket.
# install Git LFS (on Ubuntu/Debian)
sudo apt-get install git-lfs

# initialize Git LFS in your repository
git lfs install

# track files by extension
git lfs track "*.iso"
git lfs track "*.png"
The git lfs track command creates or updates the .gitattributes file in your repository.
Make sure to commit this file to your repository.
42.3. Common Git LFS commands
# list tracked patterns
git lfs track

# pull LFS files (checkout any missing files)
git lfs pull

# lock a file to prevent others from editing it
git lfs lock images/foo.jpg

# unlock a file
git lfs unlock images/foo.jpg

# force unlock someone else's lock
git lfs unlock images/foo.jpg --force43. Working with multiple working trees using git worktree
43.1. What is git worktree?
The git worktree command allows you to have multiple working trees attached to the same repository.
Each working tree is linked to the repository and can have a different branch checked out.
This is useful when you need to work on multiple branches at the same time without having to switch branches or stash your changes. For example, you can work on a feature branch while simultaneously reviewing or testing a fix on a different branch.
43.2. Advantages over git stash and branch switching
Using git worktree has several advantages over switching branches with git switch or using git stash:
-
You can work on multiple branches simultaneously without losing context.
-
Each worktree has its own working tree and staging area.
-
There is no need to stash or commit incomplete work before switching tasks.
-
All worktrees share the same repository data, so there is minimal additional disk usage.
43.3. Example: Hotfix while working on a feature
Imagine you are in the middle of a large task on your feature-alpha branch.
You have many uncommitted changes and do not want to stash them or create a "temp" commit.
Suddenly, a critical bug is reported on the main branch that needs an immediate fix.
Using git worktree, you can handle this without touching your current progress:
# Create a new worktree for the hotfix (ideally run from the repository root)
git worktree add -b hotfix-bug123 ../hotfix-dir main

# Change to the new directory
cd ../hotfix-dir

# Fix the bug, test it, and commit
git add .
git commit -m "Fix critical bug 123"

# Push the fix
git push origin hotfix-bug123

# Return to your feature work
cd -

# Remove the temporary worktree (use --force if it's not clean)
git worktree remove ../hotfix-dir
This allows you to remain in your original terminal or IDE instance for your feature work while the hotfix is handled in a separate directory.
43.4. Creating a new worktree
To create a new worktree for an existing branch, use the following command.
# create a new worktree for an existing branch
git worktree add ../hotfix-worktree hotfix-branch
This creates a new directory ../hotfix-worktree with the hotfix-branch checked out.
To create a new worktree with a new branch, use the -b option.
# create a new worktree with a new branch
git worktree add -b new-feature ../feature-worktree
43.5. Listing worktrees
To see all worktrees associated with the current repository, use the following command.
git worktree listThis shows the path, the HEAD commit, and the branch name for each worktree.
43.6. Removing a worktree
When you are done with a worktree, you can remove it with the following command.
# remove a worktree (use --force if it's not clean)
git worktree remove ../hotfix-worktree
Alternatively, you can delete the directory manually and then run git worktree prune to clean up stale worktree references.
# clean up references to deleted worktrees
git worktree prune
43.7. Worktree restrictions
Each branch can only be checked out in one worktree at a time. If you try to create a worktree for a branch that is already checked out in another worktree, Git will report an error.
|
Do not delete the main worktree (the original repository directory).
Only linked worktrees created via |
44. Error search with git bisect
44.1. Using git bisect
The git bisect command allows you to run a binary search through the commit history to identify the commit which introduced an issue.
You specify a range of commits and a script that the bisect command uses to identify whether a commit is good or bad.
This script must return 0 if the condition is fulfilled and non-zero if the condition is not fulfilled.
44.2. git bisect example
Create a new Git repository, create the text1.txt file and commit it
to the repository. Do a few more changes, remove the file and again do a
few more changes.
We use a simple shell script which checks the existence of a file. Ensure that this file is executable.
#!/bin/bash
FILE=$1

if [ -f $FILE ];
then
   exit 0;
else
   exit 1;
fi
Afterwards, use the git bisect command to find the bad commit. First
you use the git bisect start command to define a commit known to be
bad (showing the problem) and a commit known to be good (not showing the
problem).
# define that bisect should check
# the last 5 commits
git bisect start HEAD HEAD~5
Afterwards, run the bisect command using the shell script.
# assumes that the check script
# is in a directory above the current
git bisect run ../check.sh test1.txt|
The above commands serve as an example.
The existence of a file can be easier verified with the |
45. Rewriting history with git-filter-repo
45.1. What is git-filter-repo?
git-filter-repo is a versatile tool for rewriting Git repository history.
It is the recommended replacement for the deprecated git filter-branch command.
It allows you to remove files, change email addresses, and restructure repositories with significantly better performance and safety.
git-filter-repo works by creating a new history based on your filter rules.
Because it rewrites commit hashes, it is a destructive operation for the existing history.
|
Rewriting history changes the commit IDs of all modified commits and their descendants. This requires all developers to re-clone the repository or strictly reset their local branches to the new history. Always ensure you have a backup of your repository before running these commands. |
45.2. Installation
git-filter-repo is Python-based.
You can install it via pip:
pip install git-filter-repoOn some Linux distributions, it is also available via the package manager.
45.3. Analyzing repository history
Before making changes, it is useful to analyze the repository to see what creates large file sizes or to identify files to remove.
git filter-repo --analyzeThis command creates a .git/filter-repo/ directory containing reports about:
-
file sizes
-
directory sizes
-
extensions
-
authors
45.4. Removing files from history
To remove a specific file or directory from the entire history of the repository, use the --path or --invert-paths options.
To keep only a specific directory and remove everything else:
git filter-repo --path src/To extract a subdirectory to be the new project root (similar to git filter-branch --subdirectory-filter):
git filter-repo --subdirectory-filter FOLDER-NAMETo remove a specific file (e.g., a file with sensitive data) from history:
git filter-repo --path passwords.txt --invert-paths45.5. Changing author information
You can use a mailmap file to change author names and emails throughout the history.
This is useful for unifying multiple email addresses for the same person or correcting typos.
Create a file named mailmap with the following format:
Correct Name <correct@email.com> Old Name <old@email.com>
Then apply the mailmap:
git filter-repo --mailmap mailmapFor more complex rewriting needs, git-filter-repo supports extensive python-based callbacks.
See the official documentation for details.
== Working with patch files
45.6. What is a patch file?
A patch is a text file that contains changes to other text files in a standardized format.
A patch created with the git format-patch command includes meta-information about the commit
(committer, date, commit message, etc) and also contains the changes introduced in binary data in the commit.
This file can be sent to someone else and the receiver can use it to apply the changes to his local repository. The metadata is preserved.
Alternatively, you could create a diff file with the git diff command, but this diff file does not contain the metadata.
45.7. Create and apply patches
The following example creates a branch, changes several files and creates a commit recording these changes.
# create a new branch
git branch mybranch
# use this new branch
git switch mybranch
# make some changes
touch test05
# change some content in an existing file
echo "new content for test01" >test01
# commit this to the branch
git add .
git commit -m "first commit in the branch"
The next example creates a patch for these changes.
# creates a patch --> git format-patch main
git format-patch origin/main

# this creates the file:
# patch 0001-First-commit-in-the-branch.patch
To apply this patch to your main branch in a different clone of the repository, switch to it and use the git apply command.
# switch to the main branch
git switch main

# apply the patch
git apply 0001-First-commit-in-the-branch.patch
Afterwards, you can commit the changes introduced by the patches and delete the patch file.
# patch is applied to main
# change can be committed
git add .
git commit -m "apply patch"

# delete the patch file
rm 0001-First-commit-in-the-branch.patch|
Use the |
45.8. Create a patch for a selected commit
You can specify the commit ID and the number of patches which should be created. For example, to create a patch for selected commits based on the HEAD pointer you can use the following commands.
# create patch for the last commit based on HEAD
git format-patch -1 HEAD

# create a patch series for the last three commits
# based on head
git format-patch -3 HEAD
46. Git commit and other hooks
46.1. Usage of Git hooks
Git provides commit hooks, e.g., programs that can be executed at a predefined point during the work with the repository. For example, you can ensure that the commit message has a certain format or trigger an action after a push to the server.
These programs are usually scripts and can be written in any language, e.g., as shell scripts or in Perl, Python etc. You can also implement a hook, for example, in C and use the resulting executables. Git calls the scripts based on a naming convention.
46.2. Client and server side commit hooks
Git provides hooks for the client and for the server side.
On the server side you can use the pre-receive and post-receive script to check the input or to trigger actions after the commit.
The usage of a server commit hook requires that you have access to the server.
Hosting providers like GitHub or Bitbucket do not offer this access.
If you create a new Git repository, Git creates example scripts in the .git/hooks directory.
The example scripts end with .sample.
To activate them make them executable and remove the .sample from the filename.
The hooks are documented under the following URL: Git hooks manual page.
46.3. Restrictions
Not all Git server implementations support server side commit hooks. Local hooks in the local repository can be removed by the developer.
47. Handling line endings on different platforms
47.1. Line endings of the different platforms
Every time a developer presses return on the keyboard an invisible character called a line ending is inserted. Unfortunately, different operating systems handle line endings differently.
Linux and Mac use different line endings than Windows. Windows uses a carriage-return and a linefeed character (CRLF), while Linux and Mac only use a linefeed character (LF). This becomes a problem if developers use different operating systems to commit changes to a Git repository.
To avoid having commits with line ending differences in your Git repository you should configure all clients to write the same line ending to the Git repository.
47.2. Configuring line ending settings as developer
On Windows systems you can tell Git to convert line endings during a checkout to CRLF and to convert them back to LF during commit. Use the following setting for this.
# configure Git on Windows to properly handle line endings
git config --global core.autocrlf true
On Linux and Mac you can tell Git to convert CRLF to LF with the following setting.
# configure Git on Linux and Mac to properly handle line endings
git config --global core.autocrlf input
47.3. Configuring line ending settings per repository
You can also configure the line ending handling per repository by adding a special .gitattributes file to the root folder of your Git repository.
If this file is committed to the repository, it overrides the core.autocrlf setting of the individual developer.
In this file you can configure Git to auto detect the line endings.
|
Most Git tools, like the Eclipse IDE or Visual Studio Code, provide support for configuring these settings. The EGit FAQ provides an example for the Eclipse IDE. |
48. Migrating from SVN
To convert Subversion projects to Git you can use a RubyGem called svn2git.
This tool relies on git svn internally and handles the migration complexity.
To install it (on Ubuntu) type:
sudo apt-get install git-svn ruby rubygems

sudo gem install svn2git
Let’s say you have a repository called
https://svn.example.com/repo
with the default layout (trunk, branches, tags) and already prepared a local git repository where you want to put everything. Then navigate to your git directory and use the following commands:
svn2git http://svn.example.com/repo --verbose

svn2git --rebase
The parameter --verbose adds detailed output to the commandline so you can see what is going on including potential errors.
The second svn2git --rebase command aligns your new git repository with the svn import.
You are now ready to push to the web and get forked!
If your svn layout deviates from the standard or other problems occur, seek svn2git --help for documentation on additional parameters.
49. Frequently asked questions
49.1. Can Git handle symlinks?
The usage of symlinks requires that the operating system used by the developers supports them.
Git as version control system can handle symlinks.
If the symlink points to a file, then Git stores the path information it is symlinking to, and the file type. This is similar to a symlink to a directory; Git does not store the contents under the symlinked directory.
50. Further reading on Git
This tutorial is part of a series about the Git version control system. See the other tutorials for more information.
51. Appendix: The details of the commit objects
51.1. Commit object (commit)
Conceptually a commit object (short:commit) represents a version of all files tracked in the repository at the time the commit was created. Commits know their parent(s) and this way capture the version history of the repository.
51.2. Technical details of a commit object
This commit object is addressable via a hash ( SHA-1 checksum ). This hash is calculated based on the content of the files, the content of the directories, the complete history up to the new commit, the committer, the commit message, and several other factors.
This means that Git is safe, you cannot manipulate a file or the commit message in the Git repository without Git noticing that corresponding hash does not fit anymore to the content.
The commit object points to the individual files in this commit via a tree object. The files are stored in the Git repository as blob objects and might be packed by Git for better performance and more compact storage. Blobs are addressed via their SHA-1 hash.
Packing involves storing changes as deltas, compression and storage of many objects in a single pack file. Pack files are accompanied by one or multiple index files which speedup access to individual objects stored in these packs.
A commit object is depicted in the following picture.
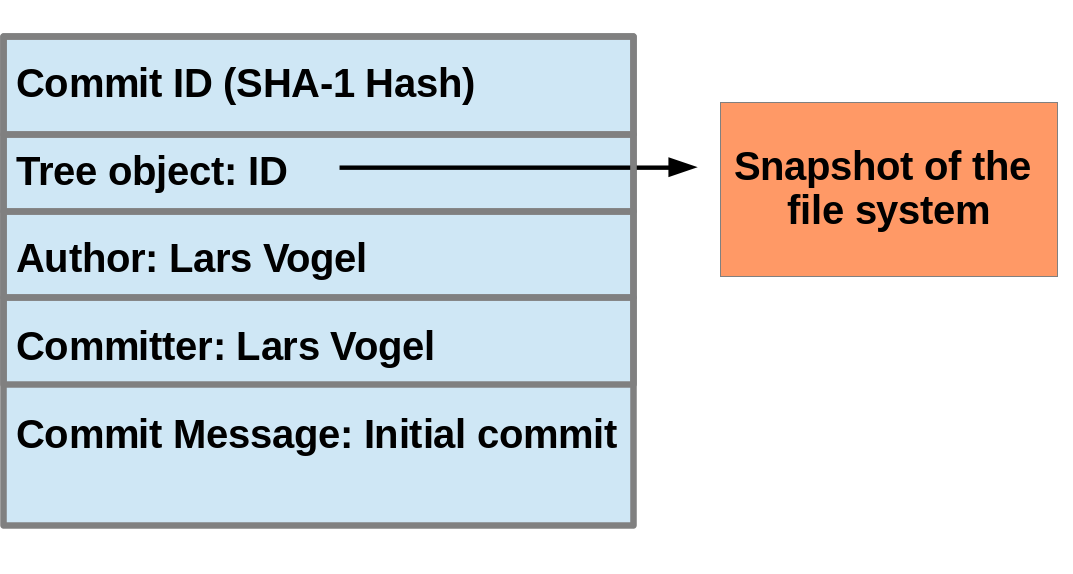
The above picture is simplified. Tree objects point to other tree objects and file blobs. Objects which did not change between commits are reused by multiple commits.
51.3. Hash and abbreviated commit hash
A Git commit object is identified by its hash (SHA-1 checksum). SHA-1 produces a 160-bit (20-byte) hash value. A SHA-1 hash value is typically rendered as a hexadecimal number, 40 digits long.
In a typical Git repository you need fewer characters to uniquely identify a commit object. This short form is called the abbreviated commit hash or abbreviated hash. Sometimes it is also called the shortened SHA-1 or abbreviated SHA-1.
Several commands, e.g., the git log command can be instructed to use the shortened SHA-1 for their output.
52. Commit references
52.1. Predecessor commits, parents and commit references
Each commit has zero or more direct predecessor commits. The first commit has zero parents, merge commits have two or more parents, most commits have one parent.
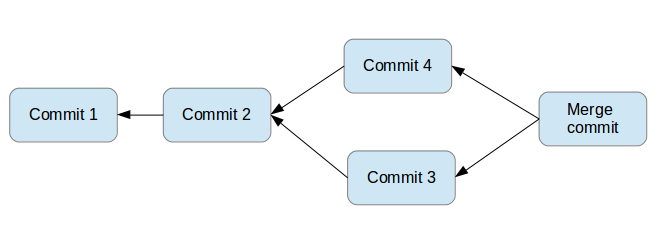
In Git you frequently want to refer to certain commits. For example, you want to tell Git to show you all changes which were done in the last three commits. Or you want to see the differences introduced between two different branches.
Git allows you to address commits via commit reference for this purpose.
A commit reference can be a simple reference (simple ref), in this case it points directly to a commit. This is the case for a commit hash or a tag. A commit reference can also be symbolic reference (symbolic ref, symref). In this case it points to another reference (either simple or symbolic). For example, HEAD is a symbolic ref for a branch, if it points to a branch. HEAD points to the branch pointer and the branch pointer points to a commit.
52.2. Branch references and the HEAD reference
A branch points to a specific commit. You can use the branch name as reference to the corresponding commit. You can also use HEAD to reference the corresponding commit.
52.3. Parent and ancestor commits
You can use ^ (caret) and ~ (tilde) to reference predecessor commit objects from other references. You can also combine the ^ and ~ operators. See Using caret and tilde for commit references for their usage.
The Git terminology is parent for ^ and ancestor for ~.
52.4. Using caret and tilde for commit references
[reference]~1 describes the first predecessor of the commit object accessed via [reference]. [reference]~2 is the first predecessor of the first predecessor of the [reference] commit. [reference]~3 is the first predecessor of the first predecessor of the first predecessor of the [reference] commit, etc.
[reference]~ is an abbreviation for [reference]~1.
For example, you can use the HEAD~1 or HEAD~ reference to access the first parent of the commit to which the HEAD pointer currently points.
[reference]^1 also describes the first predecessor of the commit object accessed via [reference].
For example, the following references point to the same commit:
HEAD^^^
HEAD~~~
HEAD~3
The difference is that [reference]^2 describes the second parent of a commit. A merge commit typically has two predecessors. HEAD^3 means ‘the third parent of a merge’ and in most cases this won’t exist (merges are generally between two commits, though more is possible).
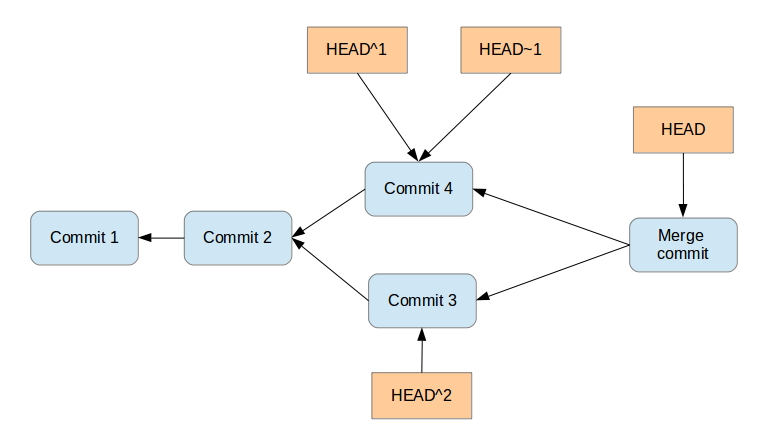
[reference]^ is an abbreviation for [reference]^1.
52.5. Commit ranges with the double dot operator
You can also specify ranges of commits. This is useful for certain Git commands, for example, for seeing the changes between a series of commits.
The double dot operator allows you to select all commits that are reachable from a commit c2 but not from commit c1.
The syntax for this is c1..c2.
A commit A is reachable from another commit B if A is a direct or indirect parent of B.
|
Think of c1..c2 as all commits as of c1 (not including c1) until commit c2. |
For example, you can ask Git to show all commits which happened between HEAD and HEAD~4.
git log HEAD~4..HEADThis also works for branches. To list all commits that are in the master branch but not in the testing branch, use the following command.
git log testing..mainYou can also list all commits that are in the testing but not in the master branch.
git log main..testing52.6. Commit ranges with the triple dot operator
The triple dot operator allows you to select all commits that are reachable either from commit c1 or commit c2 but not from both of them.
This is useful to show all commits in two branches that have not yet been combined.
# show all commits which
# can be reached by main or testing
# but not both
git log main...testing
53. Links and literature
53.1. vogella Java example code
If you need more assistance we offer Online Training and Onsite training as well as consulting