Eclipse Target Platform. Via a target platform you define which set of plug-ins and what version of Eclipse you develop against. This tutorial describes how to setup your target platform for Eclipse Plug-in and RCP development.
1. Defining available Java libraries with the target platform
1.1. Using the target platform to define the available libraries
Before you can start developing Eclipse components, you need to define libraries to compile against.
Eclipse uses target files to define the set of available Java libraries (via JAR files) for Eclipse development. This set is called the target platform and can be used by your plug-in projects in your workspace.
Using a target file to control and specify the available libraries and their versions is a good practice. A target definition file is typically shared between developers to ensure that everyone is using the same foundation for development.
If no target file is defined and activated, the Eclipse IDE itself is used as the target platform, providing its JAR files as libraries. This should be avoided as it makes the development dependent on the specific version of the IDE being used.
1.2. Creating a target platform
You can create a target definition file by navigating to .
You can add new libraries via the Add… button in the Locations section. Different options are supported, for example:
-
Eclipse (p2) update sites
-
File locations
-
Standard Java libraries from Maven repositories (which require an IDE extension)
The following is an example of a target definition file:
<?xml version="1.0" encoding="UTF-8" standalone="no"?>
<?pde version="3.8"?>
<target name="target-platform">
    <locations>
        <location includeAllPlatforms="false" includeConfigurePhase="true" includeMode="planner" includeSource="true" type="InstallableUnit">
            <repository location="https://download.eclipse.org/releases/latest"/>
            <unit id="org.eclipse.equinox.compendium.sdk.feature.group"/>
            <unit id="org.eclipse.equinox.core.feature.feature.group"/>
        </location>
    </locations>
</target>
Entries for Eclipse update sites are defined via the includeMode property, which defines how dependencies of Eclipse components are handled:
-
planner = includes dependencies automatically in the target platform
-
slicer = does not include dependencies automatically in the target platform
| For external libraries prefer the usage of Maven dependencies as described later. |
1.3. Setting a target platform as active
Activating a target platform will download the necessary JAR files, convert them into plug-ins if needed, and make them available for development.
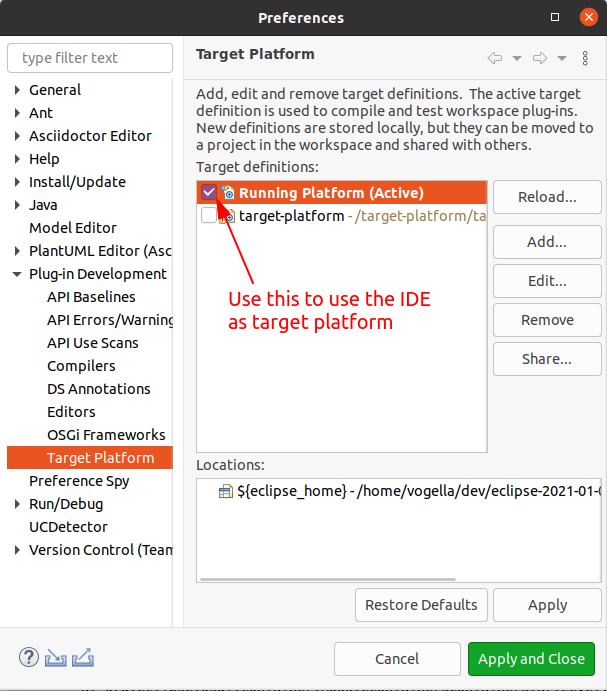
You can activate and switch the target platform in the Eclipse Preferences. Select .
It is possible to activate a target platform via the target file editor with the Set as Active Target Platform link on the first page.
1.4. Update sites for Eclipse components
The Eclipse project offers update sites for different versions.
Use the following URL if you develop against the latest release.
You can develop with a specific release, for example:
-
https://download.eclipse.org/releases/2025-12 2025 December release
-
https://download.eclipse.org/releases/2025-09 2025 September release
-
https://download.eclipse.org/releases/2025-06 2025 June release
-
https://download.eclipse.org/releases/2025-03 2025 March release
-
https://download.eclipse.org/releases/2024-12 2024 December release
-
https://download.eclipse.org/releases/2024-09 2024 September release
2. Versions
It is possible to define the desired version of a library via the version tag, as demonstrated in the following example.
<unit id="org.eclipse.platform.feature.group" version="4.34.0.v20241120-1800"/>To see the available versions, you can use code completion via Ctrl+Space in the version field.
As of the 2024-12 release, the version tag is optional and defaults to 0.0.0.
The default of 0.0.0 defines that any version of the library can be used.
This allows you to change the URL to another release without having to update the individual versions.
3. Exercise: Create a target platform definition file
In this exercise, you create a target definition file to define the available libraries during development.
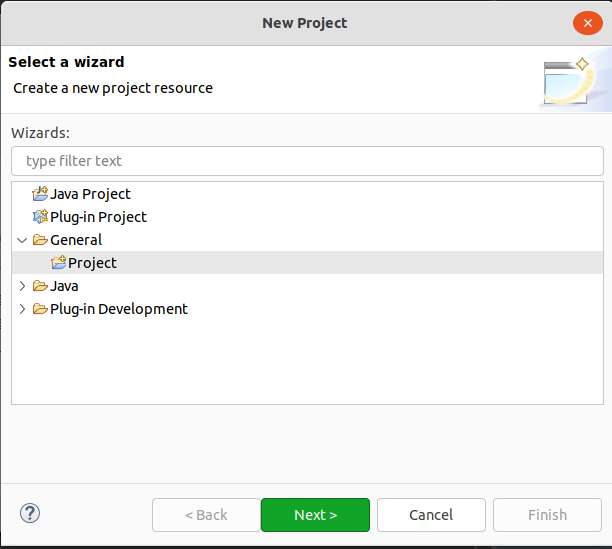
3.1. Create a project of the type general
Create a new General-type project named target-platform via the menu path.

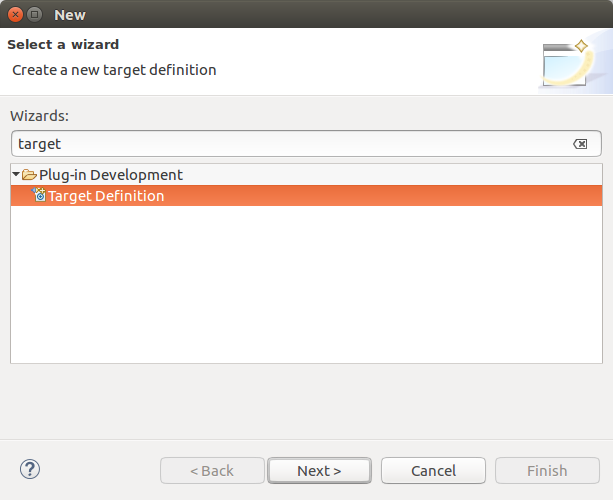
3.2. Create a target definition file
Create a new target definition file via the menu path.
Use target-platform as file name and press the Finish button.
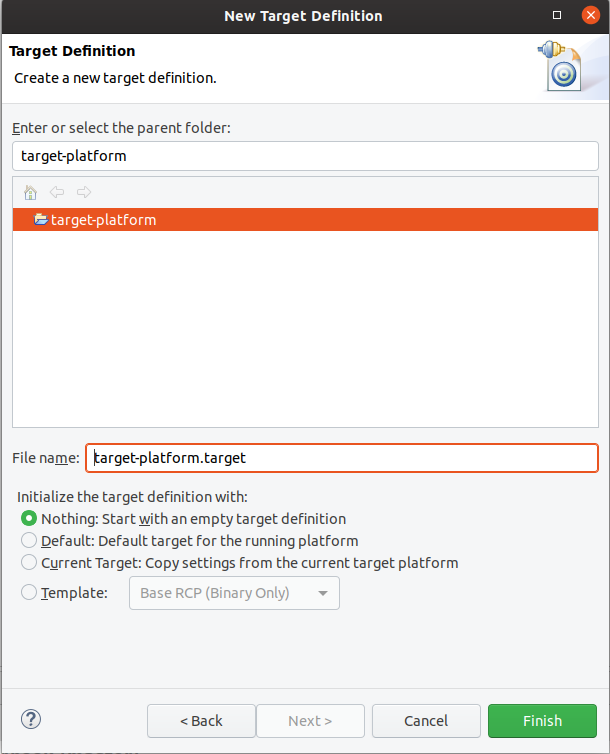
This creates a new file and opens the Target Definition editor.
3.3. Setting up a target platform for RCP or OSGi development
The following describes the definition of two target platforms. One for Eclipse IDE / RCP development and the other one for OSGi development.
3.4. Defining the target platform content for Eclipse RCP development
In this exercise, you add the Eclipse libraries for developing Eclipse RCP applications to your target definition.
Ensure your target definition file is open in the Target Definition editor, then switch to the Source tab of the editor. Copy and paste the following text into the file:
<?xml version="1.0" encoding="UTF-8" standalone="no"?>
<?pde version="3.8"?>
<target name="target-platform">
 <locations>
  <location includeAllPlatforms="false" includeConfigurePhase="true" includeMode="planner" includeSource="true" type="InstallableUnit">
   <repository location="https://download.eclipse.org/releases/2025-12"/>
   <unit id="org.eclipse.equinox.sdk.feature.group"/>
   <unit id="org.eclipse.platform.feature.group"/>
  </location>
 </locations>
</target>
Save the target definition file.
Your repository location points to an Eclipse update site containing Java libraries.
The unit entries define the libraries you want to use.
Maven repositories are not used in this example.
3.5. Exercise: Setting up a target platform for OSGi development
In this exercise, you create a target definition that can be used to develop OSGi-based command line applications.
3.5.1. Add content for OSGi development
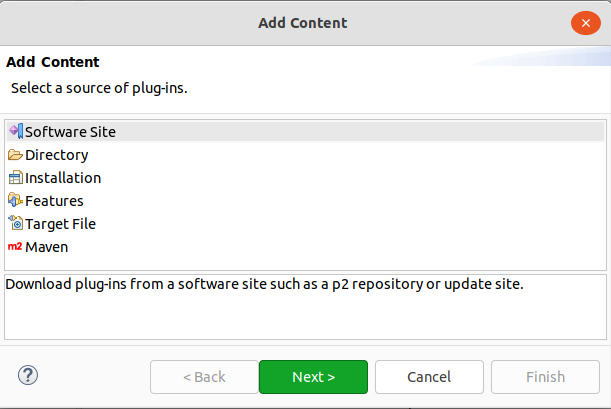
Press the Add… button.

Select Software site in the following dialog.
Depending on your installation, you may see different entries in the dialog, e.g., you may see an additional entry named Maven.
Press the Next button and enter the following URL in the Work with selection box.
https://download.eclipse.org/releases/latest|
https://download.eclipse.org/releases/latest points to the latest Eclipse release, you can select a specific release to build against.
|
Remove the Group by Category flag and add the following components:
| Component | Description |
|---|---|
Equinox Compendium SDK |
Additional OSGi services |
Equinox Core Function |
Basis runtime and functionality of OSGi |
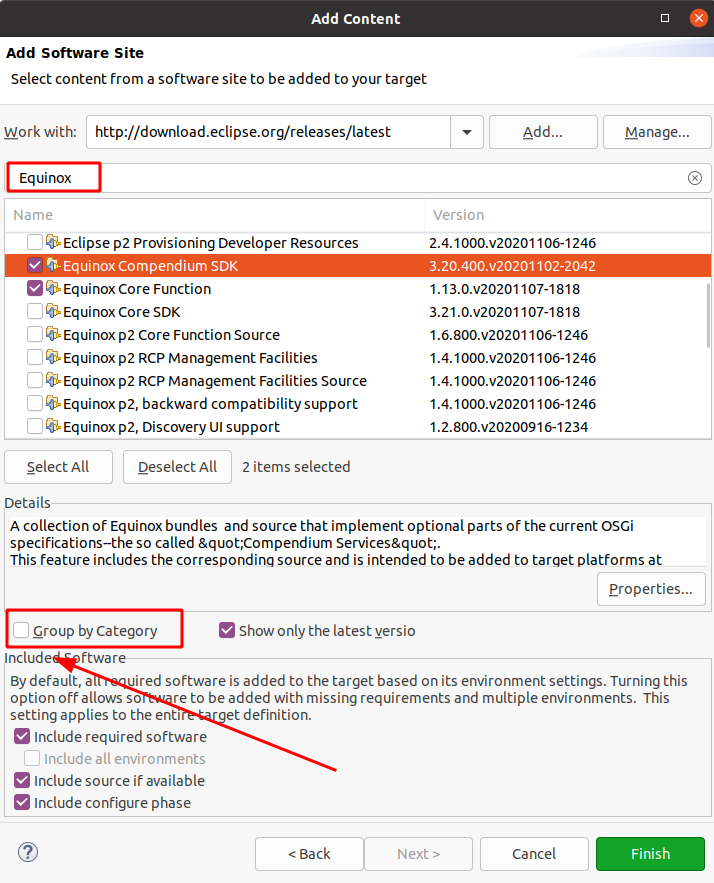
Save the target definition file.
3.6. Example solution for the target platform
If you check the content of the target platform via the Source tab, it should look similar to the following listing.
<?xml version="1.0" encoding="UTF-8" standalone="no"?>
<?pde version="3.8"?>
<target name="target-platform">
    <locations>
        <location includeAllPlatforms="false" includeConfigurePhase="true" includeMode="planner" includeSource="true" type="InstallableUnit">
            <repository location="https://download.eclipse.org/releases/latest"/>
            <unit id="org.eclipse.equinox.compendium.sdk.feature.group"/>
            <unit id="org.eclipse.equinox.core.feature.feature.group"/>
        </location>
    </locations>
</target>
3.7. Activating the target definition file
In the target file editor, select the Definition tab.
After the target is resolved, press the Set as Active Target Platform to activate it.

After activation, this changes to Reload Target Platform.

| See Known issues with the target platform editor if the label does not change. |
|
Avoid using the Eclipse IDE until the target is resolved and activated. Activating a target definition accesses the network. Interrupting this process may result in an inconsistent state of the target platform. |
3.8. Known issues with the target platform editor
The target platform editor has some known issues, which are hard to reproduce and therefore not fixed yet.
-
Label does not change to Reload Target Platform after activation
-
You see an error similar to:
An internal error occurred during: "Resolving "target-platform" target definition".
In both cases, close the target definition editor and restart your Eclipse IDE. Open the target definition file again and activate it again or verify that the status is correct.
Also, in the past, you sometimes had to restart the Eclipse IDE to use a newly added library from your target platform. This issue should be resolved in the latest Eclipse release, but if you encounter it again, try restarting the IDE.
3.9. Optional: Checking the content of the target platform
Use the menu to open the Bundle Repositories view. Use this view to review the available versions of your plug-ins from your target platform. To see details from the selected plug-in you can use the OSGi Resolution view.

3.10. Solving potential issues with the target definition
Your target platform depends on external update sites and the availability of the network. These update sites might change over time, so you should be able to revert your target platform settings in case you face issues.
If you have problems accessing the network, you can temporarily use the Eclipse IDE as a target platform via .
4. Optional exercise: Mirroring p2 update
To avoid long running network operations to server outside the own network, you can mirror p2 update sites.
|
Mirroing with Tycho p2 explains how to mirror an update site with Maven. |
One way is to use Eclipse to mirror a update site, for this you need to mirror the metadata and the artifacts.
The following is an example for Windows, which mirrors the latest update site to C:\Users\Lars\mirror.
./eclipsec -nosplash -verbose -application org.eclipse.equinox.p2.metadata.repository.mirrorApplication -source https://download.eclipse.org/releases/latest -destination C:\Users\Lars\mirror

./eclipsec -nosplash -verbose -application org.eclipse.equinox.p2.artifact.repository.mirrorApplication -source https://download.eclipse.org/releases/latest -destination C:\Users\Lars\mirror./eclipse -nosplash -verbose -application org.eclipse.equinox.p2.metadata.repository.mirrorApplication -source https://download.eclipse.org/releases/latest -destination ~/mirror
./eclipse -nosplash -verbose -application org.eclipse.equinox.p2.artifact.repository.mirrorApplication -source https://download.eclipse.org/releases/latest -destination ~/mirror|
This mirroring can run long. But it still can be useful to do this, as you could upload the mirrored artifacts on a server in your network. This will make the target definition resolution most likely faster for your developers. |
After a successful run, you can change your target platform for the platform features to point to the mirrored p2 update site.
5. Learn more and get support
This tutorial continues on Eclipse RCP online training or Eclipse IDE extensions with lots of video material, additional exercises and much more content.
6. Target platform resources
6.1. vogella Java example code
If you need more assistance we offer Online Training and Onsite training as well as consulting