Eclipse application development practices. This tutorial gives an overview about development practices with the Eclipse 4 application platform.
1. Eclipse development good practices
1.1. Project, package and class names
It is a good practice to use your reverse web domain name as top-level package identifier.
For example, if you own the domain mycompany.com your package namespace would start with com.mycompany.
This avoids name collision with packages contributed by other plug-ins.
The following table suggests good practices for naming conventions for projects, packages and classes.
| Object | Description |
|---|---|
Project Names |
The plug-in project name is the same as the top-level package name. |
Packages |
Plug-ins that contain a lot of user interface components use sub-packages based on the primary purpose of the components.
For example, the |
Class names for model elements |
Use the primary purpose of the model element as a suffix in the class name.
For example, a class used as a part implementation, should be called |
1.2. Naming conventions for model identifiers (IDs)
Every model element allows you to define an ID. This ID is used by the Eclipse framework to identify this model element. Make sure you always maintain an ID for every model element and ensure that these IDs are unique whenever it makes sense. Reusing IDs is sometimes required. For example, you typically use the same ID for the main menu in every window of your application. This allows menu contributions to contribute their menu entries to every window.
Unintentionally using the same ID for a model element may result in unexpected behavior. For example, if you search for an element via the ID.
A good convention is to start IDs with the top-level package name of your project followed by a group descriptor and a name which gives an idea about the purpose of the element. For example, com.vogella.tasks.ui.part.todooverview, where com.vogella.tasks.ui is the top-level package, part is the group descriptor for all visible parts (views and editors) in your application and todooverview gives an idea about the purpose of this part.
Also note that the entire ID is written only in lowercase characters.
Some Eclipse projects also use camel-case for the last part of the ID, but that is more for historical reasons.
1.3. Create isolated components
It is important to separate your application components into isolated modules. This reduces the complexity of development and allows you to reuse these components in different applications.
User interface related and core functionalities should be separated into different plug-ins. For example, if you develop a new SWT widget, you should place this widget in a separate plug-in.
The data model of the application should be kept in its own plug-in. Almost all application plug-ins will depend on this plug-in, therefore keep it as small as possible.
1.4. Usage of your custom extension points
The programming model of modern Eclipse API has reduced the need for using extensions and extension points. Custom extension points still have valid use cases.
If you have multiple plug-ins which should contribute to a defined API, you can still define and use your own extension points.
1.5. Avoid releasing unnecessary API
Eclipse plug-ins explicitly declare their API via their exported packages. Publish only the packages which other plug-ins should use. This way you can change your internal API later without affecting other plug-ins. Avoid exporting packages just for testing.
1.6. Packages vs. plug-in dependencies
OSGi allows you to define dependencies via plug-ins (Require-Bundle) or via packages (Import-Package) in the manifest file.
Dependencies based on packages express an API dependency, as they allow you to exchange the implementing plug-in. Dependencies based on plug-ins imply a dependency on an implementation.
Prefer the usage of package dependencies whenever you intend to exchange the implementing plug-in.
Package dependencies add some complexity to the setup as you usually have more packages than plug-ins. Therefore, some people use plug-in dependencies, if there is only one implementing plug-in and an exchange of this plug-in in the near future is unlikely.
2. Eclipse API best practice
2.1. Application communication
A simple way of propagating user interface selections is the selection service (ESelectionService) of the Eclipse platform.
Use this service to propagate the current selection of a window.
For general scoped communication it is recommended to use the Eclipse context (IEclipseContext).
The event service (IEventBroker) is a good choice, if there is no scope involved in the communication and if the events should not be persisted in the Eclipse context.
The strength of the event service is that arbitrary listeners can listen to events and that the publish and subscribe mechanism is relatively simple.
Frequently, the event service is used together with a modification of the Eclipse context. The following section contains an example for this.
2.2. Example: Using events together with the IEclipseContext
The following example demonstrates the registration for events and how the provided information is used to modify the context.
Assume that on every change of the active part you want to place a
variable called
myactivePartId
into the
IEclipseContext. This can be done via the following code.
// set a context variable
@Inject
@Optional
public void partActivation(
    @UIEventTopic(UIEvents.UILifeCycle.ACTIVATE)
    Event event,
    MApplication application) {

    // determine the context of the application
    MPart activePart = (MPart) event.
            getProperty(UIEvents.EventTags.ELEMENT);
    IEclipseContext context = application.getContext();
    if (activePart != null) {
        context.set("myactivePartId", activePart.getElementId());
    }
}
This context variable can be used to define a visible-when clause that can be used to restrict the visibility of menus and toolbars.
<?xml version="1.0" encoding="UTF-8"?>
<?eclipse version="3.4"?>
<plugin>

   <extension
         id="product"
         point="org.eclipse.core.runtime.products">
      <product
        application="org.eclipse.e4.ui.workbench.swt.E4Application"
        name="to-do">
         <property
          name="applicationXMI"
          value="com.example.e4.rcp.todo/Application.e4xmi">
         `
         <property
               name="appName"
               value="to-do">
         `
      </product>
   </extension>

     <extension
         point="org.eclipse.core.expressions.definitions">
      <definition
            id="com.example.e4.rcp.todo.todooverviewselected">
         <with
               variable="myactivePartId">
            <equals
                  value="com.example.e4.rcp.ui.parts.todooverview">
            </equals>
         </with>
      </definition>
   </extension>

</plugin>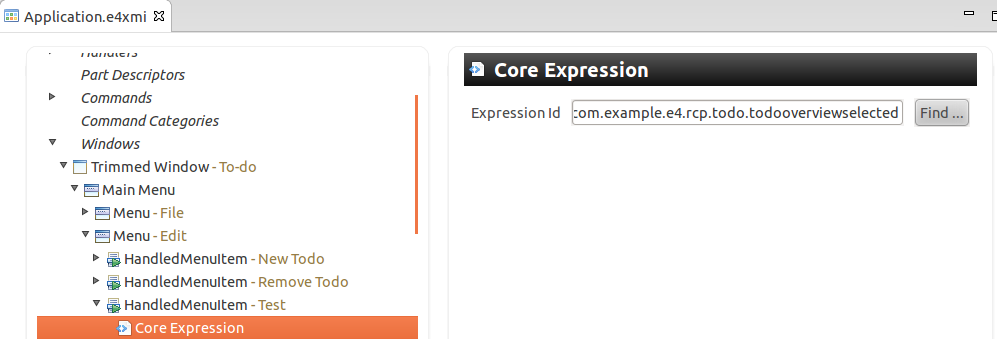
2.3. Which dependency injection approach to use for your implementation
The application can add or modify the behavior of the dependency injection mechanisms. You have several options for this. The most common approaches are the following:
-
OSGi services
-
Context modifications of the Eclipse context
-
Context functions
-
Extended object suppliers for custom annotations
-
Model add-ons
All are valid options for your implementation. The programming model of Eclipse 4 makes it easy to create and use OSGi services. OSGi services do not have access to the Eclipse application context. OSGi services are a good approach for infrastructure services.
Context functions allow you to create objects based on the Eclipse context. They allow you to persist the created object in the context hierarchy. If access to the context is required, you use context functions instead of pure OSGi services.
Storing the key-value pairs in the Eclipse context (as context elements or context variables) allows you to persist them in the hierarchy and to propagate them to elements down in the relevant hierarchy. You can also replace (override) Eclipse platform implementations in the context. For example you can change the default window close handler.
Via extended object suppliers you can define your custom annotations and provide processors for them. Extended object suppliers do not have access to the Eclipse context, but can access data from different sources. For example, you could implement a provider for preferences that are stored in the network instead of the file system.
Model add-ons
allow you to contribute Java objects to the
application
model. A
model add-on typically registers itself to
events from the
IEventBroker
and
can contribute functionality based on these events.
3. Learn more and get support
This tutorial continues on Eclipse RCP online training or Eclipse IDE extensions with lots of video material, additional exercises and much more content.
4. Eclipse 4 resources
4.1. vogella Java example code
If you need more assistance we offer Online Training and Onsite training as well as consulting