Cross component Android testing with UI Automator. This tutorial describes how go backbox testing for Android applications including applications to which you do not have the source code.
1. Cross-component blackbox user interface testing
1.1. Using UI Automator for cross component testing
Functional or black-box user interface testing does test the complete application and not single components of your application.
The Android SDK contains the uiautomator Java library for creating user interface tests and provides an engine to run these user interface tests. Both tools require Android 4.3 (API level 18) on the device that is used for testing.
Androids uiautomator provides the
UiDevice
class to communicate with the device, the
UiSelector
class to search for elements on the screen and the
UiObject
which presents user interface elements and is created based on the
UiSelector
class. The
UiCollection
class allows to select a number of user interface elements at the
same time and
UiScrollable
allows to scroll in a view to find an element.
1.2. Accessing the view information with uiautomatorviewer
Android provides the uiautomatorviewer tool that allows you to analyze the user interface of an application. You can use this tool to find the index, text or attribute of the application.
This tool allows non-programmers to analyze an application and develop tests for it via the uiautomator library. It is depicted in the following screenshot.
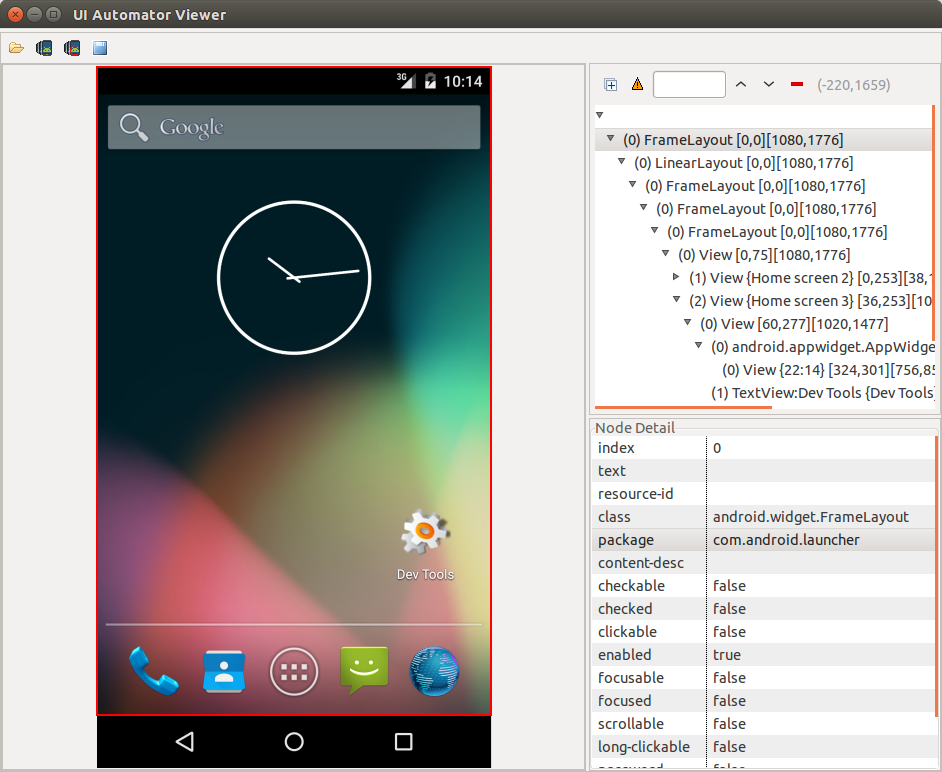
To launch the uiautomatorviewer tool, switch on the command line to the android-sdk/tools/ directory and start the tool via uiautomatorviewer.
2. Making UI Automator available
2.1. Configuration in your project
To use UI Automator for your tests, add the following dependency to the Gradle build file of your app.
You must also specify the
AndroidJUnitRunner
as a value for the
testInstrumentationRunner
parameter in the build.gradle file of your app. The following listing is an example for that.
apply plugin: 'com.android.application'

android {
    compileSdkVersion 19
    buildToolsVersion "23.0.0"

    defaultConfig {
        applicationId "com.vogella.android.test.uiautomator"
        minSdkVersion 19
        targetSdkVersion 23
        versionCode 1
        versionName "1.0"
        testInstrumentationRunner "android.support.test.runner.AndroidJUnitRunner"
    }
    buildTypes {
        release {
            minifyEnabled false
            proguardFiles getDefaultProguardFile('proguard-android.txt'), 'proguard-rules.pro'
        }
    }
}

dependencies {
    androidTestCompile 'com.android.support.test:runner:0.3'
    androidTestCompile 'junit:junit:4.12'
    testCompile 'junit:junit:4.12'
    androidTestCompile 'org.hamcrest:hamcrest-library:1.3'
    androidTestCompile 'com.android.support.test:runner:0.3'
    androidTestCompile 'com.android.support.test:rules:0.3'
    androidTestCompile 'com.android.support.test.uiautomator:uiautomator-v18:2.1.1'
}
It is also recommended turning of the animation on the Android device which is used for testing. _
2.2. Location of your tests
UI Automator tests must be located by default in the app/src/androidTest folder.
2.3. Wrting test
Similar to Espresso tests, UI Automator tests should be annotated with the
@RunWith(AndroidJUnit4.class)
test runner and use
ActivityTestRule to configure itself.
3. Exercise UI Automator
3.1. Create project and adjust Gradle build file
Create a new project with the
com.example.android.testing.uiautomator
top level project name.
Change the Gradle build file to the following.
apply plugin: 'com.android.application'

android {
    compileSdkVersion 19
    buildToolsVersion "23.0.0"

    defaultConfig {
        applicationId "com.vogella.android.test.uiautomator"
        minSdkVersion 19
        targetSdkVersion 23
        versionCode 1
        versionName "1.0"
        testInstrumentationRunner "android.support.test.runner.AndroidJUnitRunner"
    }
    buildTypes {
        release {
            minifyEnabled false
            proguardFiles getDefaultProguardFile('proguard-android.txt'), 'proguard-rules.pro'
        }
    }
}

dependencies {
    androidTestCompile 'com.android.support.test:runner:0.3'
    androidTestCompile 'junit:junit:4.12'
    testCompile 'junit:junit:4.12'
    androidTestCompile 'org.hamcrest:hamcrest-library:1.3'
    androidTestCompile 'com.android.support.test:runner:0.3'
    androidTestCompile 'com.android.support.test:rules:0.3'
    androidTestCompile 'com.android.support.test.uiautomator:uiautomator-v18:2.1.1'
}
3.2. Create test
Create the following test in your _androidTest folder.
package com.vogella.android.test.uiautomator;

import android.content.Intent;
import android.content.pm.PackageManager;
import android.content.pm.ResolveInfo;
import android.support.test.InstrumentationRegistry;
import android.support.test.rule.ActivityTestRule;
import android.support.test.runner.AndroidJUnit4;
import android.support.test.uiautomator.By;
import android.support.test.uiautomator.UiDevice;
import android.support.test.uiautomator.UiObject;
import android.support.test.uiautomator.UiObjectNotFoundException;
import android.support.test.uiautomator.UiScrollable;
import android.support.test.uiautomator.UiSelector;
import android.support.test.uiautomator.Until;

import org.hamcrest.Matchers;
import org.junit.Before;
import org.junit.Rule;
import org.junit.Test;
import org.junit.runner.RunWith;

import static org.hamcrest.Matchers.*;
import static org.junit.Assert.*;

@RunWith(AndroidJUnit4.class)
public class MyUiAutomatorTest {
    @Rule
    public ActivityTestRule<MainActivity> mActivityRule
        = new ActivityTestRule<MainActivity>(MainActivity.class);

    private UiDevice mDevice;

    @Before
    public void setUp() {
        // Initialize UiDevice instance

        mDevice = UiDevice.getInstance(InstrumentationRegistry.getInstrumentation());
        // Start from the home screen
        mDevice.pressHome();

        mDevice.wait(Until.hasObject(By.pkg(getLauncherPackageName()).depth(0)), 1000);
    }

    @Test
    public void checkSettings() throws UiObjectNotFoundException {

        // Simulate a short press on the HOME button.
        mDevice.pressHome();

        // We’re now in the home screen. Next, we want to simulate
        // a user bringing up the All Apps screen.
        // If you use the uiautomatorviewer tool to capture a snapshot
        // of the Home screen, notice that the All Apps button’s
        // content-description property has the value “Apps”. We can
        // use this property to create a UiSelector to find the button.

        UiObject allAppsButton = mDevice.findObject(new UiSelector().description("Apps"));

        // Simulate a click to bring up the All Apps screen.
        allAppsButton.clickAndWaitForNewWindow();

        // In the All Apps screen, the Settings app is located in
        // the Apps tab. To simulate the user bringing up the Apps tab,
        // we create a UiSelector to find a tab with the text
        // label “Apps”.
        UiObject appsTab = mDevice.findObject(new UiSelector().text("Apps"));

        // Simulate a click to enter the Apps tab.
        appsTab.click();

        // Next, in the apps tabs, we can simulate a user swiping until
        // they come to the Settings app icon. Since the container view
        // is scrollable, we can use a UiScrollable object.
        UiScrollable appViews = new UiScrollable(
                new UiSelector().scrollable(true));

        // Set the swiping mode to horizontal (the default is vertical)
        appViews.setAsHorizontalList();

        // create a UiSelector to find the Settings app and simulate
        // a user click to launch the app.
        UiObject settingsApp = appViews
                .getChildByText(new UiSelector()
                                .className(android.widget.TextView.class.getName()),
                        "Settings");
        settingsApp.clickAndWaitForNewWindow();

        // Validate that the package name is the expected one
        UiObject settingsValidation = new UiObject(
                new UiSelector()
                        .packageName("com.android.settings"));
        assertThat(settingsValidation.exists(), equalTo(true));
    }

    private String getLauncherPackageName() {
        // Create launcher Intent
        final Intent intent = new Intent(Intent.ACTION_MAIN);
        intent.addCategory(Intent.CATEGORY_HOME);

        // Use PackageManager to get the launcher package name
        PackageManager pm = InstrumentationRegistry.getContext().getPackageManager();
        ResolveInfo resolveInfo = pm.resolveActivity(intent, PackageManager.MATCH_DEFAULT_ONLY);
        return resolveInfo.activityInfo.packageName;
    }
}
3.3. Validate
Run your test and validate that it works.
4. Android testing resources
4.1. vogella Java example code
If you need more assistance we offer Online Training and Onsite training as well as consulting