This tutorial describes how to use the RecyclerView widget in Android applications.
1. Android and list or grids
1.1. Using lists or grids in Android
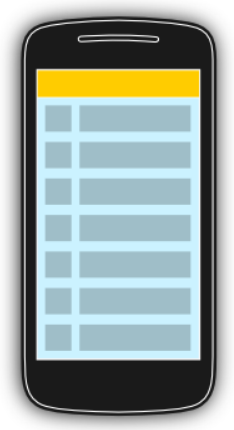
The display of elements in a list or grids is a common pattern in mobile applications. The user sees a collection of items and can scroll through them. The collection of items can be a list, a grid or another structured representations of data. Such an activity is depicted in the following picture.
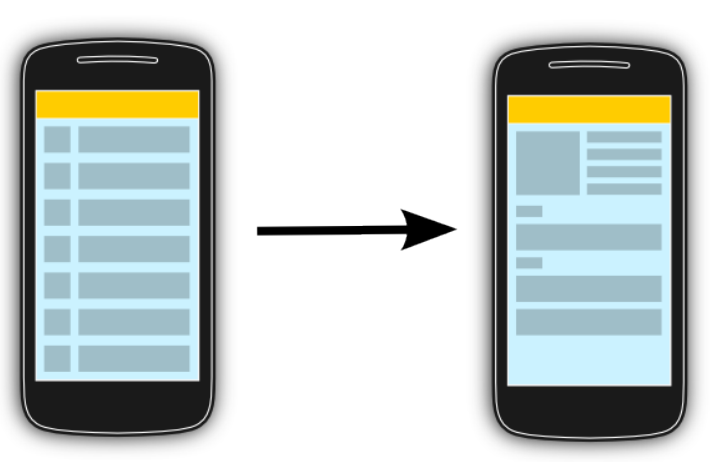
The user interacts with the collection of items via touch events or the toolbar. Individual items can be selected. This selection may update the toolbar or may trigger a detailed screen based on the selection. The following graphic sketches that.
1.2. Using RecyclerView
The RecyclerView class supports the display of a collection of data.
It is a modernized version of the ListView and the GridView classes provided by the Android framework.
Recycler view addresses several issues that the existing widgets have.
It enforced a programming style that results in good performance.
It also comes with default animations for removing and adding elements.
RecyclerView allow to use different layout managers for positioning items.
Recycler view uses a ViewHolder to store references to the views for one entry in the recycler view.
A ViewHolder class is a static inner class in your adapter which holds references to the relevant views.
With these references your code can avoid the time-consuming findViewById() method to update the widgets with new data.
1.3. Adapters
An adapter manages the data model and adapts it to the individual entries in the widget.
It extends the RecyclerView.Adapter class and is assigned to the recycler view via the RecyclerView.setAdapter method.
The input to the adapter of an recycler view can be any arbitrary Java objects.
Based on this input the adapter must return the total number of items via its getItemCount() method.
The adapter prepares the layout of the items by inflating the correct layout for the individual data elements.
This work is done in the onCreateViewHolder method.
It returns an object of type ViewHolder per visual entry in the recycler view.
This instance is used to access the views in the inflated layout.
The onCreateViewHolder method is only called then a new view must be created.
Every visible entry in a recycler view is filled with the correct data model item by the adapter.
Once a data item becomes visible, the adapter assigns this data to the individual widgets that he inflated earlier.
This work in done in the onBindViewHolder method.
For example, an entry in a list may have an image on the left side and two text lines in the middle as depicted in the following graphic.

A layout file for a such a line might look like the following.
<RelativeLayout xmlns:android="http://schemas.android.com/apk/res/android"
    android:layout_width="fill_parent"
    android:layout_height="?android:attr/listPreferredItemHeight"
    android:padding="6dip" >

    <ImageView
        android:id="@+id/icon"
        android:layout_width="wrap_content"
        android:layout_height="fill_parent"
        android:layout_alignParentBottom="true"
        android:layout_alignParentTop="true"
        android:layout_marginRight="6dip"
        android:contentDescription="TODO"
        android:src="@drawable/ic_launcher" />

    <TextView
        android:id="@+id/secondLine"
        android:layout_width="fill_parent"
        android:layout_height="26dip"
        android:layout_alignParentBottom="true"
        android:layout_alignParentRight="true"
        android:layout_toRightOf="@id/icon"
        android:ellipsize="marquee"
        android:maxLines="1"
        android:text="Description"
        android:textSize="12sp" />

    <TextView
        android:id="@+id/firstLine"
        android:layout_width="fill_parent"
        android:layout_height="wrap_content"
        android:layout_above="@id/secondLine"
        android:layout_alignParentRight="true"
        android:layout_alignParentTop="true"
        android:layout_alignWithParentIfMissing="true"
        android:layout_toRightOf="@id/icon"
        android:gravity="center_vertical"
        android:text="Example application"
        android:textSize="16sp" />

</RelativeLayout>
1.4. Gradle dependency to use recycler view
The RecyclerView widget is delivered as library and can be used as of API 7 level or higher.
Add a dependency to the latest version of this library to your Gradle build file to use it.
dependencies {
    ...
    implementation "com.android.support:recyclerview-v7:25.3.1"
}
1.5. Default layout manager
The layout manager decides how the data in the RecyclerView is displayed.
The recycler view library provides the following build-in layout managers.
-
LinearLayoutManager shows items in a vertical or horizontal scrolling list.
-
GridLayoutManager shows items in a grid.
-
StaggeredGridLayoutManager shows items in a staggered grid.
1.6. Relevant implementation classes to use RecyclerView
The implementation of RecyclerView requires a few classes to be implemented.
The most important classes are listed in the following table
| Class | Purpose | Optional |
|---|---|---|
Adapter |
Provides the data and responsible for creating the views for the individual entry |
Required |
ViewHolder |
Contains references for all views that are filled by the data of the entry |
Required |
LayoutManager |
Contains references for all views that are filled by the data of the entry |
Required, but default implementations available |
ItemDecoration |
Responsible for drawing decorations around or on top of the view container of an entry |
Default behavior, but can be overridden |
ItemAnimator |
Responsible to define the animation if entries are added, removed or reordered |
Default behavior, but can be overridden |
You can also provide your custom implementations for the layout managers and animations.
1.7. Handling click events in recycler view
Touch events, like clicking should be handled by the views in the recycler view. If the view should trigger something in the object in which it is used (activity or fragment), you can pass via the constructor of the adapter to it. This allows the adapter to store a reference to the object and call its methods for feedback.
1.8. Layouts in recycler view
The adapter needs to provide the view hierarchy for each entry. Typical this is done by inflating an XML layout file.
|
Use |
This root of the layout is typically a ViewGroup (layout manager) and contains several other views.
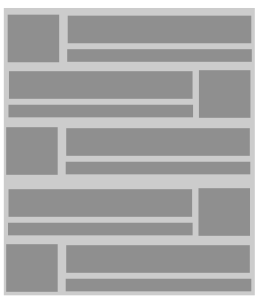
The following graphic shows a list with different layouts for odd and even rows.
Within the getItemViewType method the recycler view determines which type should be used for data.
The framework calls automatically the onCreateViewHolder method if needed for this type.
In this method you inflate the correct layout for the type and return a fitting view holder.
1.9. Custom animations
To customize the animations in the RecyclerView, implement your own animation by extending the
RecyclerView.ItemAnimator
class and use the RecyclerView.setItemAnimator() method to assign it
to your widget.
1.10. Filtering and sorting
Filtering and sorting of the data is handled by the adapter. You need to implement the logic in your custom adapter implementation.
1.11. Data updates in the adapter
The notifyItemInserted(position) method on the adapter can be used to notify the view that a new entry has been inserted at a certain position.
The notifyItemRemoved(position); method can be used to notify the view that a entry has been deleted in a certain position.
1.12. Swipe support for RecyclerView
The ItemTouchHelper class that makes swipe-to-dismiss and drag and drop simple to implement.
Implement the onMove method for drag and drop and the onSwiped for swip support.
See Exercise Add swipe to dismiss support to your Recyclerview for an example implementation.
2. Exercise: Use RecyclerView in a new Android application
In this exercise, you create a project that uses the RecyclerView class to display a list.
2.1. Create project and add the Gradle dependency
Create a new Android project using the com.vogella.android.recyclerview top-level package name.
Add the following dependency to your Gradle build file.
dependencies {
    ...
    implementation "com.android.support:recyclerview-v7:25.3.1"
}
2.2. Create layout files
Create or update the layout file called activity_main.xml so that it contains the RecyclerView
<?xml version="1.0" encoding="utf-8"?>
<RelativeLayout xmlns:android="http://schemas.android.com/apk/res/android"
    android:layout_width="match_parent"
    android:layout_height="match_parent" >

    <!-- A RecyclerView with some commonly used attributes -->

    <android.support.v7.widget.RecyclerView
        android:id="@+id/my_recycler_view"
        android:layout_width="match_parent"
        android:layout_height="match_parent"
        android:scrollbars="vertical" />

    <ImageView
        android:id="@+id/imageView1"
        android:layout_width="wrap_content"
        android:layout_height="wrap_content"
        android:layout_alignParentBottom="true"
        android:layout_alignParentRight="true"
        android:layout_marginBottom="12dp"
        android:layout_marginRight="12dp"
        android:elevation="2dp"
        android:src="@android:drawable/ic_menu_add" />

</RelativeLayout>
Note: The ImageView has the android:elevation attribute set, this instructs Android to draw a shadow for it.
Also create a layout called row_layout to use in each item.
<?xml version="1.0" encoding="utf-8"?>
<RelativeLayout xmlns:android="http://schemas.android.com/apk/res/android"
    android:layout_width="fill_parent"
    android:layout_height="?android:attr/listPreferredItemHeight"
    android:padding="6dip" >

    <ImageView
        android:id="@+id/icon"
        android:layout_width="wrap_content"
        android:layout_height="fill_parent"
        android:layout_alignParentBottom="true"
        android:layout_alignParentTop="true"
        android:layout_marginRight="6dip"
        android:contentDescription="TODO"
        android:src="@mipmap/ic_launcher" />

    <TextView
        android:id="@+id/secondLine"
        android:layout_width="fill_parent"
        android:layout_height="26dip"
        android:layout_alignParentBottom="true"
        android:layout_alignParentRight="true"
        android:layout_toRightOf="@id/icon"
        android:ellipsize="marquee"
        android:maxLines="1"
        android:text="Description"
        android:textSize="12sp" />

    <TextView
        android:id="@+id/firstLine"
        android:layout_width="fill_parent"
        android:layout_height="wrap_content"
        android:layout_above="@id/secondLine"
        android:layout_alignParentRight="true"
        android:layout_alignParentTop="true"
        android:layout_alignWithParentIfMissing="true"
        android:layout_toRightOf="@id/icon"
        android:gravity="center_vertical"
        android:text="Example application"
        android:textSize="16sp" />

</RelativeLayout>
Create the following adapter class.
package com.vogella.android.recyclerview;

import java.util.ArrayList;
import java.util.List;

import android.support.v7.widget.RecyclerView;
import android.view.LayoutInflater;
import android.view.View;
import android.view.View.OnClickListener;
import android.view.ViewGroup;
import android.widget.TextView;

public class MyAdapter extends RecyclerView.Adapter<MyAdapter.ViewHolder> {
    private List<String> values;

    // Provide a reference to the views for each data item
    // Complex data items may need more than one view per item, and
    // you provide access to all the views for a data item in a view holder
    public class ViewHolder extends RecyclerView.ViewHolder {
        // each data item is just a string in this case
        public TextView txtHeader;
        public TextView txtFooter;
        public View layout;

        public ViewHolder(View v) {
            super(v);
            layout = v;
            txtHeader = (TextView) v.findViewById(R.id.firstLine);
            txtFooter = (TextView) v.findViewById(R.id.secondLine);
        }
    }

    public void add(int position, String item) {
        values.add(position, item);
        notifyItemInserted(position);
    }

    public void remove(int position) {
        values.remove(position);
        notifyItemRemoved(position);
    }

    // Provide a suitable constructor (depends on the kind of dataset)
    public MyAdapter(List<String> myDataset) {
        values = myDataset;
    }

    // Create new views (invoked by the layout manager)
    @Override
    public MyAdapter.ViewHolder onCreateViewHolder(ViewGroup parent,
                                                   int viewType) {
        // create a new view
        LayoutInflater inflater = LayoutInflater.from(
                parent.getContext());
        View v =
                inflater.inflate(R.layout.row_layout, parent, false);
        // set the view's size, margins, paddings and layout parameters
        ViewHolder vh = new ViewHolder(v);
        return vh;
    }

    // Replace the contents of a view (invoked by the layout manager)
    @Override
    public void onBindViewHolder(ViewHolder holder, final int position) {
        // - get element from your dataset at this position
        // - replace the contents of the view with that element
        final String name = values.get(position);
        holder.txtHeader.setText(name);
        holder.txtHeader.setOnClickListener(new OnClickListener() {
            @Override
            public void onClick(View v) {
                remove(position);
            }
        });

        holder.txtFooter.setText("Footer: " + name);
    }

    // Return the size of your dataset (invoked by the layout manager)
    @Override
    public int getItemCount() {
        return values.size();
    }

}
Now you can configure the RecyclerView in your activity.
package com.vogella.android.recyclerview;

import android.app.Activity;
import android.os.Bundle;
import android.support.v7.widget.LinearLayoutManager;
import android.support.v7.widget.RecyclerView;

import java.util.ArrayList;
import java.util.List;

public class MainActivity extends Activity {
    private RecyclerView recyclerView;
    private RecyclerView.Adapter mAdapter;
    private RecyclerView.LayoutManager layoutManager;

    @Override
    protected void onCreate(Bundle savedInstanceState) {
        super.onCreate(savedInstanceState);
        setContentView(R.layout.activity_main);
        recyclerView = (RecyclerView) findViewById(R.id.my_recycler_view);
        // use this setting to
        // improve performance if you know that changes
        // in content do not change the layout size
        // of the RecyclerView
        recyclerView.setHasFixedSize(true);
        // use a linear layout manager
        layoutManager = new LinearLayoutManager(this);
        recyclerView.setLayoutManager(layoutManager);
        List<String> input = new ArrayList<>();
        for (int i = 0; i < 100; i++) {
            input.add("Test" + i);
        }// define an adapter
        mAdapter = new MyAdapter(input);
        recyclerView.setAdapter(mAdapter);
    }
}
3. Exercise Add swipe to dismiss support to your Recyclerview
We want to implement swipe to dismiss so that the user can swipe elements out.
3.1. Implement the following coding after your recyclerview declaration.
The following example code adds swipe to dismiss to your recyclerview.
// put this after your definition of your recyclerview
// input in your data mode in this example a java.util.List, adjust if necessary
// adapter is your adapter
 ItemTouchHelper.SimpleCallback simpleItemTouchCallback =
                new ItemTouchHelper.SimpleCallback(0, ItemTouchHelper.LEFT | ItemTouchHelper.RIGHT) {
                    @Override
                    public boolean onMove(RecyclerView recyclerView, RecyclerView.ViewHolder viewHolder, RecyclerView.ViewHolder
                            target) {
                        return false;
                    }
                    @Override
                    public void onSwiped(RecyclerView.ViewHolder viewHolder, int swipeDir) {
                        input.remove(viewHolder.getAdapterPosition());
                        adapter.notifyItemRemoved(viewHolder.getAdapterPosition());
                    }
                };
        ItemTouchHelper itemTouchHelper = new ItemTouchHelper(simpleItemTouchCallback);
        itemTouchHelper.attachToRecyclerView(recyclerView);
3.2. Validate
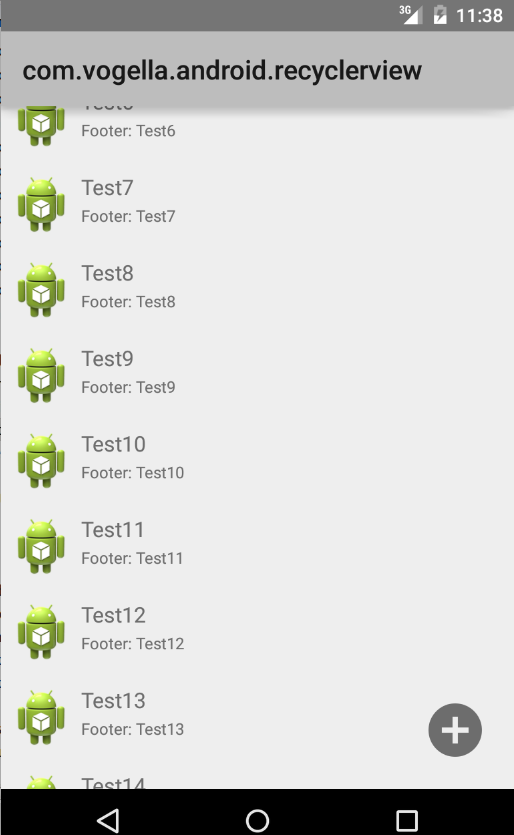
Start your application and ensure that you can remove items in your list with a swipe gesture.
4. Optional exercise: Use Swipe to refresh in your list fragment
Add Swipe to refresh to your list fragment.
4.1. Implement swipe to refresh
You found the following code in the Internet. Try to adjust it to add it your recycler view implementation.
|
This code is just example code. You need to adjust this code to fit to your example. |
dependencies {
    implementation 'com.android.support:support-v4:25.4.0'
}
<android.support.v4.widget.SwipeRefreshLayout
xmlns:android="https://schemas.android.com/apk/res/android"
android:id="@+id/swiperefresh"
android:layout_width="match_parent"
android:layout_height="match_parent">
<android.support.v7.widget.RecyclerView
android:id="@+id/my_recycler_view"
android:layout_width="match_parent"
android:layout_height="match_parent"
android:scrollbars="vertical" />
</android.support.v4.widget.SwipeRefreshLayout>| Even if you provide the swipe-to-refresh design pattern, you should still add a refresh button to your overflow menu in your toolbar to support the refresh for users unable to swipe. |
In the SwipeRefreshLayout.OnRefreshListener method you implement the logic to update your view.
mySwipeRefreshLayout.setOnRefreshListener(
    new SwipeRefreshLayout.OnRefreshListener() {
        @Override
        public void onRefresh() {
            doYourUpdate();
        }
    }
);


private void doYourUpdate() {
   // TODO implement a refresh
   setRefreshing(false); // Disables the refresh icon
}
4.2. Validate
Start your application and pull down your list. The refresh indicator should be shown and should vanish after the update happens. You may want to add a test delay to the data refresh to ensure you can see the update.
5. Recycler view resources
5.1. vogella Java example code
If you need more assistance we offer Online Training and Onsite training as well as consulting