This tutorial helps understanding the Android lifecycle.
1. Managing the application lifecycle
1.1. The out-of-memory killer
To manage limited system resources the Android system can terminate running applications. Each application is started in a new process with a unique ID under a unique user. If the Android system needs to free up resources it follows a simple set of rules.
If the Android system needs to terminate processes it follows the following priority system.
| Process status | Description | Priority |
|---|---|---|
Foreground |
An application where the user is interacting with an activity, or that has a service bound to it.
Also if a service is executing one of its lifecycle methods or a broadcast receiver that runs its |
1 |
Visible |
User is not interacting with the activity, but the activity is still (partially) visible or the application has a service which is used by a inactive but visible activity. |
2 |
Service |
Application with a running service which does not qualify for 1 or 2. |
3 |
Background |
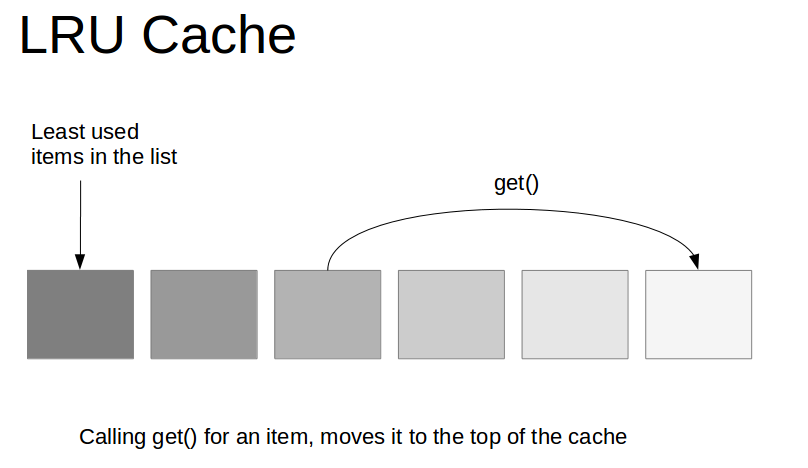
Application with only stopped activities and without a service or executing receiver. Android keeps them in a least recent used (LRU) list and if requires terminates the one which was least used. |
4 |
Empty |
Application without any active components. |
5 |
All processes in the empty list are added to a least recently used list (LRU list). The processes that are at the beginning of this lists will be the ones killed by the out-of-memory killer. If an application is restarted by the user, its gets moved to the end of this queue. If it reaches the lowest prio again, as indicated by the following graphic.
1.2. Application
You can specify a custom application class in your Android manifest file.
The application object is already the first components started. It is also always the last component of the application, which is terminated.
This object provides the following main life-cycle methods:
-
onCreate()- called before the first components of the application starts -
onLowMemory()- called when the Android system requests that the application cleans up memory -
onTrimMemory()- called when the Android system requests that the application cleans up memory. This message includes an indicator in which position the application is. For example, the constant TRIM_MEMORY_MODERATE indicates that the process is around the middle of the background LRU list; freeing memory can help the system keep other processes running later in the list for better overall performance. -
onTerminate()- only for testing, not called in production -
onConfigurationChanged()- called whenever the configuration changes
|
Wondering about the lifecycle of the content provider?
Once accessed a content provider is never stopped individually. It stops, once if the whole application process is determined. |
2. Activity lifecycle
2.1. States of an activity
An activity is in different states, depending how it interacts with the user.
| State | Description |
|---|---|
Running |
Activity is visible and interacts with the user. |
Paused |
Activity is still visible but partially obscured, instance is running but might be killed by the system. |
Stopped |
Activity is not visible, instance is running but might be killed by the system. |
Killed |
Activity has been terminated by the system of by a call to its |
2.2. The live cycle methods
Activities have a predefined life-cycle and which certain methods are called.
| Method | Purpose |
|---|---|
|
Called then the activity is created. Used to initialize the activity, for example create the user interface. |
|
Called if the activity get visible again and the user starts interacting with the activity again. Used to initialize fields, register listeners, bind to services, etc. |
|
Called once another activity gets into the foreground. Always called before the activity is not visible anymore. Used to release resources or save application data. For example, you unregister listeners, intent receivers, unbind from services or remove system service listeners. |
|
Called once the activity is no longer visible.
Time or CPU intensive shut-down operations, such as writing information to a database should be down in the |
The flow of these methods is depicted in the following diagram.
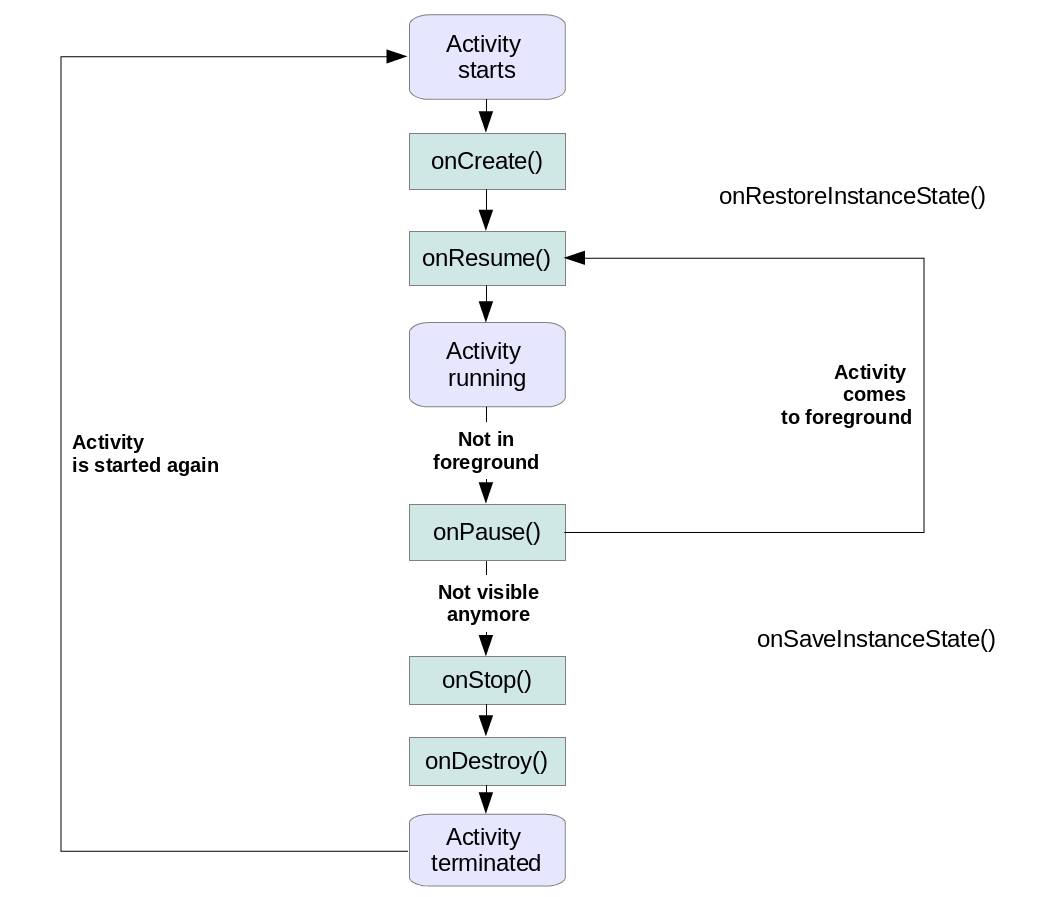
|
Android has more lifecycle methods, but not all of these methods are guaranteed to be called.
For example, the |
For more information on the other methods see Official Activity lifecycle documentation.
2.3. Termination of activities
If a configuration change occurs, Android restarts the currently visible activity.
Also, if Android kills the Application process, all activities are terminated. Before that termination their corresponding life-cycle methods are called.
The onPause() method is typically used to stop framework listeners and UI updates.
The onStop() method is used to save application data.
These methods are guaranteed to be called before the activity is terminated.
If the user switches back to application which has been terminated by the system, it is restarted.
Also its activity stack is recreated.
The onResume() is used to register again listeners and to trigger UI updates based on the saved data.
The activity and application needs to ensure that its state and date is saved and that this data is restored correctly.
|
It is a common misunderstanding that the out-of-memory killer from Android also kills individual activities. However, Dianne Hackborn from the core Android team involved in the out of memory killer implementation clarified that the Android system only kill processes and not individual activities. See Dianas Answer on Stackoverflow. |
2.4. Activity instance state
Instance state describes the UI state of an activity. This is non-persistent application data. It is passed between activities restarts due to a configuration change. The activity is responsible for saving and restoring its instance state.
The onSaveInstanceState() can be used to store this instance state as a Bundle.
A Bundle can contain:
-
primitive data types
-
Strings
-
objects that are of the
ParcelableorSerialisabletype -
Arrays of the above types
The persisted Bundle data is passed at restart of the activity to the onCreate() method and onRestoreInstanceState() as parameter.
|
If you override For this, the layout needs to define id’s for these views. |
The onRestoreInstanceState() or the onCreate() methods can be used to recreate the instance scope.
Prefer using the onRestoreInstanceState() method for restoring the instance state.
This approach separates the initial setup from restoring the state.
|
If the user interacts with an activity and presses the
Back button or if the
finish()
method of an activity is called, the activity is removed from the
current activity stack and recycled. In this case there is no instance
state to save and the
onSaveInstanceState()
method is not called.
If the user presses the Home button, the activity instance state must be saved.
The onSaveInstanceState() method is called.
If the user switches again to the activity and if Android terminated it, its activity stack is recreated.
The saved bundle is then provided to the onRestoreInstanceState() and onCreate() methods.
2.5. Persisting data across configuration changes
The Android Architecture Components libraries provide a simple and stable way to persist data across application restarts.
An instance of ViewModel is responsible for preparing and persisting the data for the UI.
The ViewModel is automatically retained during configuration changes.
When the owner activity or fragment is finished, the onCleared() method on the ViewModel is called.
In this method the ViewModel can clean up its resources.
The data it holds is immediately available to the next activity or fragment instance.
Combined with MutableLiveData is can be used to asynchronously read data and notify observers if the data changes.
This shared observable data can also be used for fragment communication.
One fragment sets the data, and the other fragments observes the data. This results in a simple communication pattern for fragments.
3. Exercise: Tracing the lifecycle with notifications
In this exercise, you create an application that allows you to observe the lifecycle calls of the Android system to your Android application.
3.1. Create project
Create a new project with the top-level package name com.vogella.android.lifecycle.activity.
Create the following class that is used to report lifecycle events via notifications.
package com.vogella.android.lifecycle.activity;

import android.app.Activity;
import android.app.Notification;
import android.app.NotificationChannel;
import android.app.NotificationManager;
import android.os.Build;
import android.os.Bundle;

public class TracerActivity extends Activity {

    public static final String TRACER = "tracer";

    @Override
    protected void onCreate(Bundle savedInstanceState) {
        super.onCreate(savedInstanceState);
        createChannel();
        notify("onCreate");
    }

    @Override
    protected void onPause() {
        super.onPause();
        notify("onPause");
    }

    @Override
    protected void onResume() {
        super.onResume();
        notify("onResume");
    }

    @Override
    protected void onStop() {
        super.onStop();
        notify("onStop");
    }

    @Override
    protected void onDestroy() {
        super.onDestroy();
        notify("onDestroy");
    }

    @Override
    protected void onRestoreInstanceState(Bundle savedInstanceState) {
        super.onRestoreInstanceState(savedInstanceState);
        notify("onRestoreInstanceState");
    }

    @Override
    protected void onSaveInstanceState(Bundle outState) {
        super.onSaveInstanceState(outState);
        notify("onSaveInstanceState");
    }

    private void notify(String methodName) {
        String name = this.getClass().getName();
        String[] strings = name.split("\\.");
        Notification.Builder notificationBuilder;

        if (Build.VERSION.SDK_INT >= Build.VERSION_CODES.O) {
            notificationBuilder = new Notification.Builder(this, TRACER);
        } else {
            //noinspection deprecation
            notificationBuilder = new Notification.Builder(this);
        }

        Notification notification = notificationBuilder
                .setContentTitle(methodName + " " + strings[strings.length - 1])
                .setAutoCancel(true)
                .setSmallIcon(R.mipmap.ic_launcher)
                .setContentText(name).build();
        NotificationManager notificationManager =
                (NotificationManager) getSystemService(NOTIFICATION_SERVICE);
        notificationManager.notify((int) System.currentTimeMillis(), notification);
    }

    private void createChannel() {
        NotificationManager mNotificationManager = getSystemService(NotificationManager.class);
        // The id of the channel.
        String id = TRACER;
        // The user-visible name of the channel.
        CharSequence name = "Activity livecycle tracer";
        // The user-visible description of the channel.
        String description = "Allows to trace the activity lifecycle";
        int importance = NotificationManager.IMPORTANCE_HIGH;
        NotificationChannel mChannel = new NotificationChannel(id, name, importance);
        // Configure the notification channel.
        mChannel.setDescription(description);

        mNotificationManager.createNotificationChannel(mChannel);
    }
}
3.2. Create your activities
Create two activities which extend this one.
Also create a layout for the SecondActivity.
package com.vogella.android.lifecycle.activity;

import android.os.Bundle;
import android.app.Activity;
import android.view.Menu;

public class SecondActivity extends TracerActivity {

    @Override
    protected void onCreate(Bundle savedInstanceState) {
        super.onCreate(savedInstanceState);
        setContentView(R.layout.activity_second);
    }
}
The first activity should allow to start the second one via an Intent.
Adjust the layout accordingly.
package com.vogella.android.lifecycle.activity;

import android.content.Intent;
import android.os.Bundle;
import android.view.View;

public class MainActivity extends TracerActivity {

    @Override
    protected void onCreate(Bundle savedInstanceState) {
        super.onCreate(savedInstanceState);
        setContentView(R.layout.activity_main);
    }

    public void onClick(View view) {
        Intent intent = new Intent(this, SecondActivity.class);
        startActivity(intent);
    }

}| Ensure that both activities are registered in the Android manifest and that your MainActivity is used as the main entry point. |
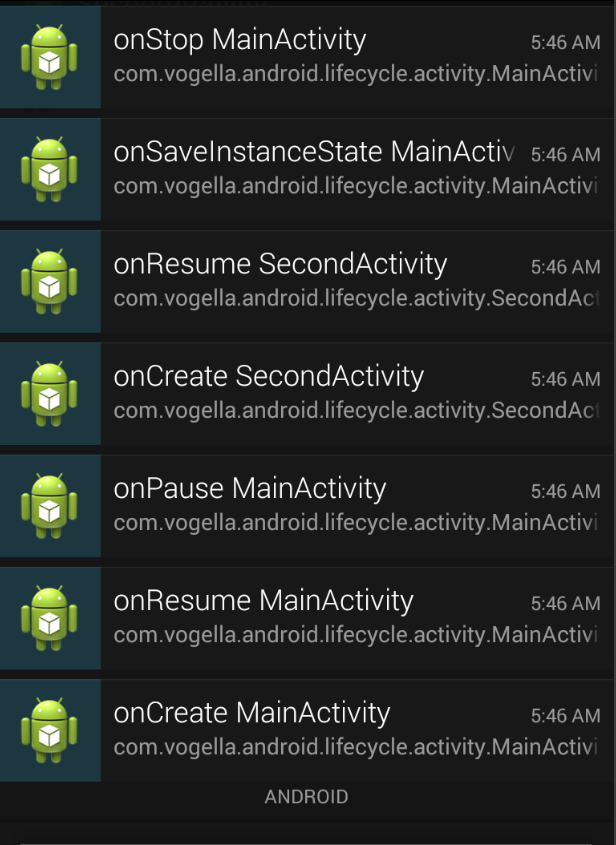
3.3. Testing
Start your application and trigger the second activity. Review the notifications and ensure you know why this order of things are happening.
Press the Back button on the second activity.
Validate that onSaveInstanceState() is not called.
Explain why it is not called.
Press the home button on the second activity.
Validate that onSaveInstanceState() is called.
Explain why it is called.
Start the second activity. Switch the orientation of your emulator and see which lifecycle methods of the activity are called. Is the first activity also re-created or only the second one?
Activate the Don’t keep activities setting in the Developer Options.
Test again which methods are called.
3.4. Instance state
Create a string array and add a Spinner view to your first activity using this array.
The following lists the strings.xml and the layout file used by the first activity.
<?xml version="1.0" encoding="utf-8"?>
<resources>

    <string name="app_name">Lifecycle</string>
    <string name="action_settings">Settings</string>
    <string name="hello_world">Hello world!</string>
    <string-array name="operating_systems">
        <item >Ubuntu</item>
        <item >Android</item>
        <item >iOS</item>
    </string-array>

</resources>
<LinearLayout xmlns:android="http://schemas.android.com/apk/res/android"
xmlns:tools="http://schemas.android.com/tools"
android:id="@+id/LinearLayout1"
android:layout_width="match_parent"
android:layout_height="match_parent"
android:orientation="vertical"
tools:context=".MainActivity" >
<Spinner
android:id="@+id/spinner"
android:layout_width="wrap_content"
android:layout_height="wrap_content"
android:layout_marginRight="58dp"
android:entries="@array/operating_systems" />
<Button
android:id="@+id/button1"
android:layout_width="wrap_content"
android:layout_height="wrap_content"
android:onClick="onClick"
android:layout_gravity="bottom"
android:text="Start new Activity" />
</LinearLayout>Android restores the state of a spinner automatically. Validate that the selection of the spinner is saved and restored between configuration changes by the Android system. Android does that for spinners with a fixed input based on the layout file.
Remove now the fixed array assignment in the layout and assign it to the Spinner via source code.
// configure the spinner in code
Spinner spinner = (Spinner) findViewById(R.id.spinner);
String[] values = getResources().getStringArray(R.array.operating_systems);
ArrayAdapter<String> adapter =
    new ArrayAdapter<String>(this, android.R.layout.simple_list_item_1, values);
spinner.setAdapter(adapter);
Remove the fixed assignment in your layout file.
<LinearLayout xmlns:android="http://schemas.android.com/apk/res/android"
    xmlns:tools="http://schemas.android.com/tools"
    android:id="@+id/LinearLayout1"
    android:layout_width="match_parent"
    android:layout_height="match_parent"
    android:orientation="vertical"
    tools:context=".MainActivity" >

    <Spinner
        android:id="@+id/spinner"
        android:layout_width="wrap_content"
        android:layout_height="wrap_content"
        android:layout_marginRight="58dp"
        />

    <Button
        android:id="@+id/button1"
        android:layout_width="wrap_content"
        android:layout_height="wrap_content"
        android:onClick="onClick"
        android:layout_gravity="bottom"
        android:text="Start new Activity" />

</LinearLayout>
Validate that in this case the position in the spinner is still automatically restored.
4. Exercise: Use ViewModel to persist data during configuration changes
In this exercise, you create an application that use the ViewModel to share state.
4.1. Create project
Create a new project with the top-level package name com.vogella.android.viewmodel.
4.2. Add dependencies
In main build.gradle file.
allprojects {
    repositories {
        jcenter()
        google()

    }
}
Add the view model dependency to your app/build.gradle file.
dependencies {
   implementation "android.arch.lifecycle:runtime:1.1.1"
   implementation "android.arch.lifecycle:extensions:1.1.1"
   annotationProcessor "android.arch.lifecycle:compiler:1.1.1"
   implementation 'com.android.support:appcompat-v7:26.1.0'
    // more stuff
}
4.3. Implement class
Create the following class to demonstrate the usage of ViewModel.
package com.vogella.android.viewmodel;


import java.util.Date;

public class Task {

    public final long id;
    public String summary;
    public String description;
    public boolean done;
//    public Date dueDate;


    public Task(long id, String summary, String description, boolean done) {
        this.id = id;
        this.summary = summary;
        this.description = description;
        this.done = done;
//        this.dueDate = dueDate;
    }

    public static TaskBuilder builder(){
        return new TaskBuilder();
    }

    public static class TaskBuilder {
        private long id;
        private String summary = "";
        private String description = "";
        private boolean done = false;
        private Date dueDate;

        public TaskBuilder setId(long id) {
            this.id = id;
            return this;
        }

        public TaskBuilder setSummary(String summary) {
            this.summary = summary;
            return this;
        }

        public TaskBuilder setDescription(String description) {
            this.description = description;
            return this;
        }

        public TaskBuilder setDone(boolean done) {
            this.done = done;
            return this;
        }

        public TaskBuilder setDueDate(Date dueDate) {
            this.dueDate = new Date(dueDate.getTime());
            return this;
        }

        public Task build() {
            return new Task(id, summary, description, done);
        }
    }

    @Override
    public String toString() {
        return "Task{" +
                "id=" + id +
                ", summary='" + summary + '\'' +
                ", description='" + description + '\'' +
                ", done=" + done +
                '}';
    }
}
package com.vogella.android.viewmodel;
import android.arch.lifecycle.LiveData;
import android.arch.lifecycle.MutableLiveData;
import android.arch.lifecycle.ViewModel;
import java.util.ArrayList;
import java.util.List;
public class MyViewModel extends ViewModel {
private MutableLiveData<List<Task>> tasks;
public LiveData<List<Task>> getTasks() {
if (tasks == null) {
tasks = new MutableLiveData<List<Task>>();
loadTasks();
}
return tasks;
}
private void loadTasks() {
try {
Thread.sleep(5000);
} catch (InterruptedException e) {
e.printStackTrace();
}
List<Task> list = new ArrayList<>();
Task task = Task.builder().setId(1).setSummary("Testing ViewModel").build();
list.add(task);
tasks.setValue(list);
// do async operation to fetch users
}
}package com.vogella.android.viewmodel;
import android.arch.lifecycle.Observer;
import android.arch.lifecycle.ViewModelProviders;
import android.os.Bundle;
import android.support.v7.app.AppCompatActivity;
import android.widget.TextView;
import java.util.List;
public class MainActivity extends AppCompatActivity {
@Override
protected void onCreate(Bundle savedInstanceState) {
super.onCreate(savedInstanceState);
setContentView(R.layout.activity_main);
final MyViewModel model = ViewModelProviders.of(this).get(MyViewModel.class);
model.getTasks().observe(MainActivity.this, new Observer<List<Task>>() {
@Override
public void onChanged(List<Task> users) {
// update UI
TextView textView = findViewById(R.id.result);
textView.setText(model.getTasks().getValue().get(0).toString());
}
});
}
}4.4. Validate
Start your application. At start the data should be displayed with a delay. Rotate the devise, the data should be displayed immediately.
5. Android ActionBar Resources
include::../10_Include/sourcejava.adoc[]
If you need more assistance we offer Online Training and Onsite training as well as consulting