Using Intents in Android. This tutorials describes the usage of intents to communicate between Android components.
1. Starting other Android components via intents
1.1. What are intents?
Android application components can connect to other Android applications.
This connection is based on a task description represented by an Intent object.
Intents are asynchronous messages that allow application components to request functionality from other Android components. Intents allow you to interact with components from the same applications as well as with components contributed by other applications. For example, an activity can start an external activity for taking a picture.
Intents are objects of the android.content.Intent type.
Your code can send them to the Android system defining the components you are targeting.
For example, via the startActivity() method you can define that the intent should be used to start an activity.
An intent can contain data via a Bundle.
This data can be used by the receiving component.
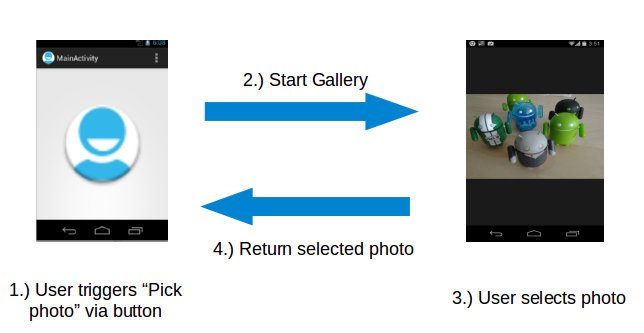
In Android the reuse of other application components is a concept known as task. An application can access other Android components to achieve a task. For example, from a component of your application you can trigger another component in the Android system, which manages photos, even if this component is not part of your application. In this component you select a photo and return to your application to use the selected photo.
Such a flow of events is depicted in the following graphic.
1.2. Starting activities or services
To start an activity, use the method startActivity(intent).
This method is defined on the Context object which Activity extends.
The following code demonstrates how you can start another activity via an intent.
# Start the activity connect to the
# specified class

Intent i = new Intent(this, ActivityTwo.class);
startActivity(i);
Activities that are started by other Android activities are called sub-activities. This wording makes it easier to describe which activity is meant.
To start a services via intents, use the startService(Intent) method call.
1.3. Sending out explicit or implicit intents
Android supports explicit and implicit intents. An application can define the target component directly in the intent (explicit intent) or ask the Android system to evaluate registered components based on the intent data(implicit intents).
Explicit intents explicitly define the component that should be called by the Android system, by using the Java class as identifier. Explicit intents are typically used within an application as the classes in an application are controlled by the application developer. The following shows how to create an explicit intent and send it to the Android system to start an activity.
Intent i = new Intent(this, ActivityTwo.class);
i.putExtra("Value1", "This value one for ActivityTwo ");
i.putExtra("Value2", "This value two ActivityTwo");
Implicit intents specify the action which should be performed and optionally data that provides content for the action. If an implicit intent is sent to the Android system, it searches for all components that are registered for the specific action and the fitting data type. If only one component is found, Android starts this component directly. If several components are identified by the Android system, the user will get a selection dialog and can decide which component should be used for the intent.
For example, the following tells the Android system to view a webpage. All installed web browsers should be registered to the corresponding intent data via an intent filter.
Intent i = new Intent(Intent.ACTION_VIEW, Uri.parse("https://www.vogella.com/"));
startActivity(i);
1.4. Determine valid intent receivers
Sometimes you want to determine if a component has registered for an intent. For example, you want to check if a certain intent receiver is available and in case a component is available, you enable a functionality in your application.
This check can be done via the PackageManager class.
The following example code checks if a component has registered for a certain intent. Construct your intent as you are desired to trigger it and pass it to the following method.
public static boolean isIntentAvailable(Context ctx, Intent intent) {
    final PackageManager mgr = ctx.getPackageManager();
    List<ResolveInfo> list =
        mgr.queryIntentActivities(intent,
            PackageManager.MATCH_DEFAULT_ONLY);
    return list.size() > 0;
}
Based on the result you can adjust your application. For example, you could disable or hide certain menu items.
1.5. Intents as event triggers
Intents can be used to send broadcast messages into the Android system. A broadcast receiver can register to an event and is notified if such an event is sent.
Your application can register to system events, e.g., a new email has arrived, system boot is complete or a phone call is received and react accordingly.
2. Data transfer between activities
2.1. Data transfer to the target component
An intent contains certain header data, e.g., the desired action, the type, etc.
Optionally an intent can also contain additional data based on an instance of the Bundle class that can be retrieved from the intent via the getExtras() method.
You can also add data directly to the Bundle via the overloaded putExtra() methods of the Intent objects.
Extras are key-value pairs. The key is always of type String.
As a value you can use the primitive data types (int, float, …) plus objects of type String, Bundle, Parcelable and Serializable.
The receiving component can access this information via the getAction() and getData() methods on the Intent object.
This Intent object can be retrieved via the getIntent() method.
The component that receives the intent can use the getIntent().getExtras() method call to get the extra data.
That is demonstrated in the following code snippet.
Bundle extras = getIntent().getExtras();
if (extras == null) {
    return;
}
// get data via the key
String value1 = extras.getString(Intent.EXTRA_TEXT);
if (value1 != null) {
    // do something with the data
}
2.2. Retrieving result data from a sub-activity
An activity can be closed via the back button on the phone.
In this case the finish() method is performed.
If the activity was started with the startActivity(Intent) method call, the caller requires no result or feedback from the activity which now is closed.
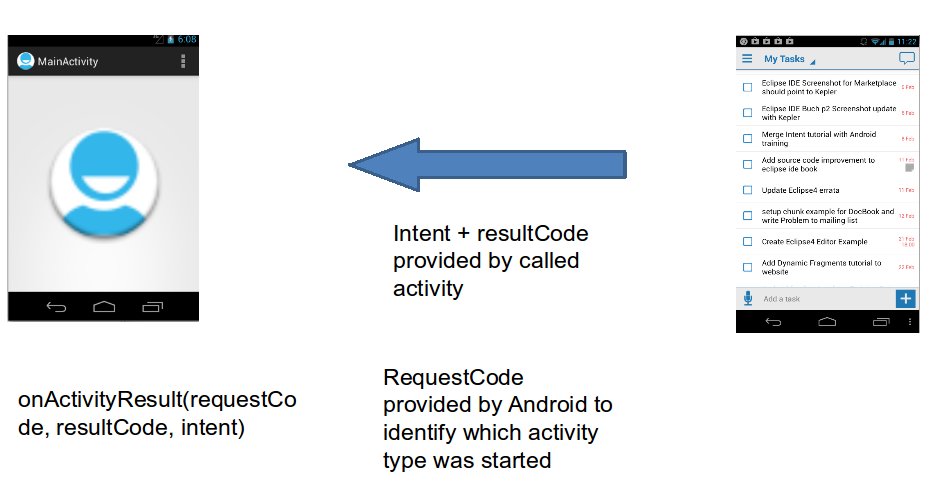
If you start the activity with the startActivityForResult() method call, you expect feedback from the sub-activity.
Once the sub-activity ends, the onActivityResult() method on the sub-activity is called and you can perform actions based on the result.
In the startActivityForResult() method call you can specify a result code to determine which activity you started.
This result code is returned to you.
The started activity can also set a result code which the caller can use to determine if the activity was canceled or not.
The sub-activity uses the finish() method to create a new intent and to put data into it.
It also sets a result via the setResult() method call.
The following example code demonstrates how to trigger an intent with the startActivityForResult() method.
public void onClick(View view) {
    Intent i = new Intent(this, ActivityTwo.class);
    i.putExtra("Value1", "This value one for ActivityTwo ");
    i.putExtra("Value2", "This value two ActivityTwo");
    // set the request code to any code you like,
    // you can identify the callback via this code
    startActivityForResult(i, REQUEST_CODE);
}
If you use the startActivityForResult() method, then the started activity is called a sub-activity.
If the sub-activity is finished, it can send data back to its caller via an Intent.
This is done in the finish() method.
@Override
public void finish() {
    // Prepare data intent
    Intent data = new Intent();
    data.putExtra("returnKey1", "Swinging on a star. ");
    data.putExtra("returnKey2", "You could be better then you are. ");
    // Activity finished ok, return the data
    setResult(RESULT_OK, data);
    super.finish();
}
Once the sub-activity finishes, the onActivityResult() method in the calling activity is called.
@Override
protected void onActivityResult(int requestCode, int resultCode, Intent data) {
    if (resultCode == RESULT_OK && requestCode == REQUEST_CODE) {
        if (data.hasExtra("returnKey1")) {
            Toast.makeText(this, data.getExtras().getString("returnKey1"),
                Toast.LENGTH_SHORT).show();
        }
    }
}
3. Registering for intents via intent filters
Intents are used to signal to the Android system that a certain event has occurred. Intents often describe the action which should be performed and provide data upon which such an action should be done. For example, your application can start a browser component for a certain URL via an intent. This is demonstrated by the following example.
String url = "https://www.vogella.com/";
Intent i = new Intent(Intent.ACTION_VIEW);
i.setData(Uri.parse(url));
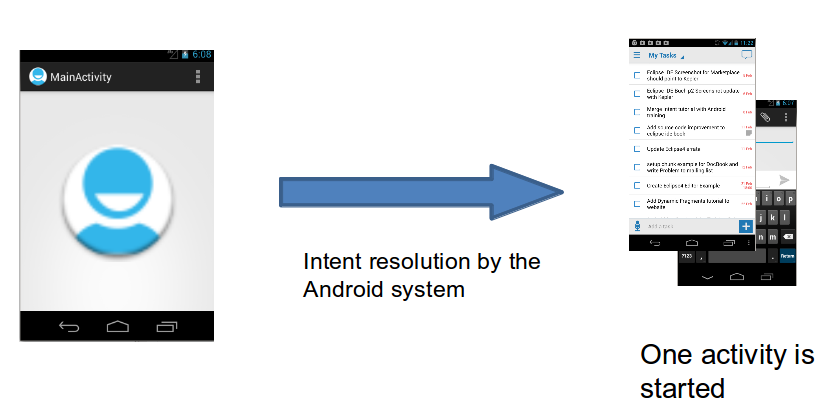
startActivity(i);But how does the Android system identify the components that can react to a certain intent?
A component can register itself via an intent filter for a specific action and specific data. An intent filter specifies the types of intents to which an activity, service, or broadcast receiver can respond to by declaring the capabilities of a component.
Android components register intent filters either statically in the AndroidManifest.xml or in case of a broadcast receiver also dynamically via code. An intent filter is defined by its category, action and data filters. It can also contain additional metadata.
If an intent is sent to the Android system, the Android platform runs a receiver determination. It uses the data included in the intent. If several components have registered for the same intent filter, the user can decide which component should be started.
You can register your Android components via intent filters for certain events. If a component does not define one, it can only be called by explicit intents. This chapter gives an example for registering a component for an intent. The key for this registration is that your component registers for the correct action, mime-type and specifies the correct metadata.
If you send such an intent to your system, the Android system determines all registered Android components for this intent. If several components have registered for this intent, the user can select which one should be used.
3.1. Example: Register an activity as browser
The following code will register an Activity for the Intent which is triggered when someone wants to open a webpage.
<activity android:name=".BrowserActivitiy"
          android:label="@string/app_name">
  <intent-filter>
     <action android:name="android.intent.action.VIEW" />
     <category android:name="android.intent.category.DEFAULT" />
     <data android:scheme="http"/>
  </intent-filter>
</activity>
3.2. Example: Register an activity for the share intent
The following example registers an activity for the ACTION_SEND intent.
It declares itself only relevant for the text/plain mime type.
<activity
    android:name=".ActivityTest"
    android:label="@string/app_name" >
    <intent-filter>
      <action android:name="android.intent.action.SEND" />

      <category android:name="android.intent.category.DEFAULT" />

      <data android:mimeType="text/plain" />

    </intent-filter>

</activity>
If a component does not define an intent filter, it can only be called by explicit intents.
4. Pre-requistes for the following exercise
The following exercise demonstrates the usage of intents to start a sub-activities and how exchange data between them. It assume that you are either capable of creating activities or that you have finished the exercise described in https://www.vogella.com/tutorials/Android/article.html#exercise_first_ui_interface.
5. Exercise: Activity communication with intents
5.1. Create project and main layout
Create or reuse a new Android project with the com.vogella.android.testapp package.
This application has an activity called CreateUserActivity.
5.2. Create data model
Create a new class named User that takes the provided name and gender.
package com.vogella.android.testapp;

public class User {

    public static String USER_NAME = "username";
    public static String USER_GENDER = "gender"; // true -> male // false -> female
    public static String USER_SKILL_POINTS= "skillPoints";
    public String name;
    public boolean gender;
    public int skillPoints;

    public User(String name, boolean gender) {
        this.name = name;
        this.gender = gender;
        this.skillPoints = 0;
    }
}
5.3. Create a new layout file
Create a new layout file called activity_user_overview.xml that allows you to display the data of a user.
The following screenshot can be used a inspiration.
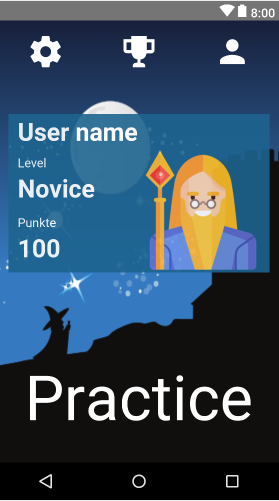
|
For the following layout, only the text widget labeled |
The simplified layout file of this activity might look like the following.
<RelativeLayout xmlns:android="http://schemas.android.com/apk/res/android"
                xmlns:app="http://schemas.android.com/apk/res-auto"
                xmlns:tools="http://schemas.android.com/tools"
                android:layout_width="match_parent"
                android:layout_height="match_parent"
    >

    <TextView
        android:id="@+id/userlabel"
        android:layout_width="wrap_content"
        android:layout_height="wrap_content"
        android:layout_margin="16dp"
        android:text="User name"
        android:textSize="24sp"
        />

    <TextView
        android:id="@+id/username"
        android:layout_width="wrap_content"
        android:layout_height="wrap_content"
        android:layout_alignStart="@+id/userlabel"
        android:layout_below="@+id/userlabel"
        android:ems="10"
        android:inputType="textPersonName"
        android:text="the name"
        android:textSize="36sp"
        />


    <TextView
        android:id="@+id/button_learn"
        android:layout_width="wrap_content"
        android:layout_height="wrap_content"
        android:layout_alignStart="@+id/username"
        android:layout_below="@+id/username"
        android:layout_marginTop="45dp"
        android:onClick="onClick"
        android:text="Practice"
        android:textSize="60dp"
        />

</RelativeLayout>
5.4. Create additional activity
Create a new class called UserOverviewActivity based on the following example code.
package com.vogella.android.testapp;

import android.os.Bundle;
import android.support.v7.app.AppCompatActivity;

public class UserOverviewActivity extends AppCompatActivity {

    @Override
    protected void onCreate(Bundle savedInstanceState) {
        super.onCreate(savedInstanceState);
        setContentView(R.layout.activity_user_overview);
    }
}
Add the new activity to the AndroidManifest.xml file.
Ensure that this is the main entry point for the user (via the intent-filter).
The CreateUserActivity activity cannot be started anymore by the user directly.
<?xml version="1.0" encoding="utf-8"?>
<manifest xmlns:android="http://schemas.android.com/apk/res/android"
          package="com.vogella.android.testapp">

    <application
        android:allowBackup="true"
        android:icon="@mipmap/ic_launcher"
        android:label="@string/app_name"
        android:roundIcon="@mipmap/ic_launcher_round"
        android:supportsRtl="true"
        android:theme="@style/AppTheme">
        <activity android:name=".UserOverviewActivity">
            <intent-filter>
                <action android:name="android.intent.action.MAIN"/>

                <category android:name="android.intent.category.LAUNCHER"/>
            </intent-filter>
        </activity>
        <activity android:name=".CreateUserActivity">
        </activity>
    </application>

</manifest>
5.5. Start sub-activity providing some data
If your application is started, start the CreateUserActivity via the startActivityForResult method call.
|
In the finished version of the app, you would of course persists the user and reload it. In this case the create user activity would only be started if no user was found. |
The following code gives some pointers on how to solve this.
Solve the TODO’s in the source code so that the activity is started from the onClick() method.
package com.vogella.android.testapp;

import android.app.Activity;
import android.content.Intent;
import android.os.Bundle;
import android.support.v7.app.AppCompatActivity;

public class UserOverviewActivity extends AppCompatActivity {

    public static final int SUB_ACTIVITY_CREATE_USER = 10;
    private User user;

    @Override
    protected void onCreate(Bundle savedInstanceState) {
        super.onCreate(savedInstanceState);
        setContentView(R.layout.activity_user_overview);

        // TODO check persistence if user exists and load the existing one
        boolean userExists=false;
        // if no user found, create a new one
        if (!userExists){

            Intent intent = new Intent(this, CreateUserActivity.class);
            startActivityForResult(intent, SUB_ACTIVITY_CREATE_USER);
        }
    }

    // This is the callback for the started sub-activities
    @Override
    protected void onActivityResult(int requestCode, int resultCode, Intent data) {
        if (requestCode == SUB_ACTIVITY_CREATE_USER && resultCode == Activity.RESULT_OK) {
            Bundle extras = data.getExtras();
            if (extras != null) {
                String name = extras.getString(User.USER_NAME);
                boolean gender = extras.getBoolean(User.USER_GENDER);
                user = new User(name, gender);
                updateUserInterface();
            }
        }
    }

    private void updateUserInterface() {
        // TODO show the new user values in the UI
    }


}
5.6. Return the user data from the CreateUserActivity to the OverviewActivity
Return the selected data to the OverviewActivity.
package com.vogella.android.testapp;
import android.content.Intent;
import android.os.Bundle;
import android.support.v7.app.AppCompatActivity;
import android.view.View;
import android.widget.EditText;
public class CreateUserActivity extends AppCompatActivity {
private EditText userName;
@Override
protected void onCreate(Bundle savedInstanceState) {
super.onCreate(savedInstanceState);
setContentView(R.layout.activity_create_user);
userName = (EditText) findViewById(R.id.username);
View viewById = findViewById(R.id.female);
viewById.setAlpha(0.4f);
}
// TODO more code
public void onClick(View view) {
finish();
}
@Override
public void finish() {
Intent intent = new Intent();
intent.putExtra(User.USER_NAME, userName.getText().toString());
// TODO replace with real value
intent.putExtra(User.USER_GENDER, true); // hard-code value for testing
setResult(RESULT_OK, intent);
super.finish();
}
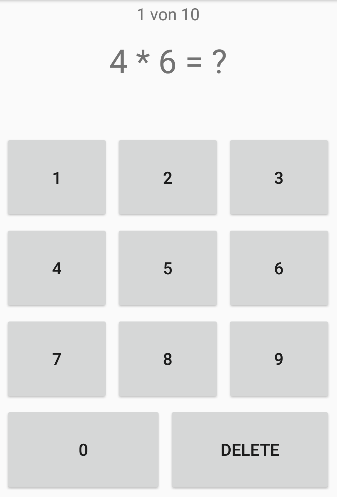
}5.7. Add LearnActivity activity to your application
Add another activity called LearnActivity to your application.
This activity should allow to practice some math.
Use the following screenshot as inspiration and build a similar user interface.
In Android you frequently add the implementing class as callback class. This can be useful if you have lots of buttons. For example, to register your activity as callback for the view, you can use the following snippet.
package com.vogella.android.testapp;

import android.os.Bundle;
import android.os.PersistableBundle;
import android.support.annotation.Nullable;
import android.support.v7.app.AppCompatActivity;
import android.view.View;

import java.util.Arrays;
import java.util.List;

public class LearnActivity extends AppCompatActivity implements View.OnClickListener {

    @Override
    public void onCreate(@Nullable Bundle savedInstanceState) {
        super.onCreate(savedInstanceState);
        setContentView(R.layout.activity_learn);
        List<Integer> buttons = Arrays.asList(R.id.one, R.id.two, R.id.three,
                R.id.four, R.id.five, R.id.six, R.id.seven,
                R.id.eight, R.id.nine, R.id.zero, R.id.delete);
        for(Integer i: buttons) {
            View b = findViewById(i);
            b.setOnClickListener(this); // calling onClick() method

        }
    }

    public void onClick(View view) {
    switch (view.getId()) {
      // TODO your logic to evaluate the indivual button
    }
}
}
5.8. Allow to start the learning activity
Allow to start this activity from the UserOverviewActivity via the Practice text view.
Pass the user name and its current skillPoints as extra data to it.
In the learn activity get the Bundle with the intent data via the getIntent().getExtras() method call.
Get the value of the passed extra with the extras.getString(key) and extras.getInt(key) method on the bundle object.
package com.vogella.android.testapp;

import android.app.Activity;
import android.content.Intent;
import android.os.Bundle;
import android.support.v7.app.AppCompatActivity;
import android.view.View;
import android.widget.Toast;

public class UserOverviewActivity extends AppCompatActivity {

    public static final int SUB_ACTIVITY_CREATE_USER = 10;
    public static final int SUB_ACTIVITY_LEARN = 20;
    private User user;

    @Override
    protected void onCreate(Bundle savedInstanceState) {
        super.onCreate(savedInstanceState);
        setContentView(R.layout.activity_user_overview);

        // TODO check persistence if user exists and load the existing one
        boolean userExists=false;
        // if no user found, create a new one
        if (!userExists){

            Intent intent = new Intent(this, CreateUserActivity.class);
            startActivityForResult(intent, SUB_ACTIVITY_CREATE_USER);
        }
    }

    public void onClick(View view) {
        Intent intent = new Intent(this, LearnActivity.class);
        intent.putExtra(User.USER_SKILL_POINTS, user.skillPoints);
        startActivityForResult(intent, SUB_ACTIVITY_LEARN);
    }


    @Override
    protected void onActivityResult(int requestCode, int resultCode, Intent data) {
        if (requestCode == SUB_ACTIVITY_CREATE_USER && resultCode == Activity.RESULT_OK) {
            Bundle extras = data.getExtras();
            if (extras != null) {
                String name = extras.getString(User.USER_NAME);
                boolean gender = extras.getBoolean(User.USER_GENDER);
                user = new User(name, gender);
                updateUserInterface();
            }
        }
        if (resultCode == RESULT_OK && requestCode == SUB_ACTIVITY_LEARN) {
            if (data.hasExtra("skillLevel")) {
                int result = data.getExtras().getInt("skillLevel");
                user.skillPoints = result;
                Toast.makeText(this, "New Skill level " + String.valueOf(result), Toast.LENGTH_SHORT).show();
            }
        }

    }

    private void updateUserInterface() {
        Toast.makeText(this, "User " + user.name, Toast.LENGTH_LONG).show();
        // TODO show the new user values in the UI
    }


}
5.9. Return data from LearnActivity
Transfer data back from your LearnActivity to the UserOverviewActivity once the user selects the Back button.
Once finished return the new skillPoints to the calling application.
For this, implement the finish() method in the LearnActivity class.
A simple version of this logic can be found in the following code.
package com.vogella.android.first;

import android.app.Activity;
import android.content.Intent;
import android.os.Bundle;

public class LearnActivity extends Activity {

    int skillLevel;

    @Override
    protected void onCreate(Bundle savedInstanceState) {
        super.onCreate(savedInstanceState);
        setContentView(R.layout.activity_learn);
        skillLevel = getIntent().getExtras().getInt("skillLevel");
    }

    // more code for the training logic
    // avoided here for brevity

    @Override
    public void finish() {

        Intent intent = new Intent();

        skillLevel = skillLevel + 5;
        intent.putExtra("skillLevel", skillLevel);

        setResult(RESULT_OK, intent);

        super.finish();
    }
}
5.10. Show the new skill data in the OverviewActivity
If the skillPoints have increase by 10 points, show a Toast from the UserOverviewActivity to the user with a positive message.
Use the startActivityForResult() method in OverviewActivity to start the sub-activity.
This allows you to use the onActivityResult() method to receive data from the sub-activity.
Extract the extra data with the received bundle.
Show a Toast with the extra data to validate that you correctly received it.
The following code contains some pointer on how to solve that.
package com.vogella.android.intent.explicit;

import android.support.v7.app.AppCompatActivity;
import android.content.Intent;
import android.os.Bundle;
import android.view.View;
import android.widget.EditText;

public class UserOverviewActivity extends AppCompatActivity {

    int skillLevel = 0;
    // constant to determine which sub-activity returns
    private static final int REQUEST_LEARN_MATH = 10;

    @Override
    protected void onCreate(Bundle savedInstanceState) {
        super.onCreate(savedInstanceState);
        setContentView(R.layout.activity_overview);
        String username = getIntent().getExtras().getString("username");
        TextView textView = findViewById(R.id.username);
        textView.setText(username);

    }

    public void onClick(View view) {
        Intent i = new Intent(this, LearnActivity.class);
        i.putExtra("skillLevel", skillLevel);
        // TODO 2.. now use
        // startActivityForResult(i, REQUEST_LEARN_MATH);
    }

    // TODO 3 Implement this method
    // assumes that "skillLevel" is used as key to return the result

    @Override
    protected void onActivityResult(int requestCode, int resultCode, Intent data) {
        if (resultCode == RESULT_OK && requestCode == REQUEST_LEARN_MATH) {
            if (data.hasExtra("skillLevel")) {
                int result = data.getExtras().getInt("skillLevel");
                skillLevel = result;
                Toast.makeText(this, "New Skill level " + String.valueOf(result), Toast.LENGTH_SHORT).show();
            }
        }
    }
}
5.11. Validate
Create a user in your application and start the training.
Return to the overview application and start the training again.
Return again to the overview application.
The skillpoints displayed in the Toast should increase with each training.
6. Exercise: Use the share intent
Continue to use the applicatin from the previous exercise.
Obviously, you need a way to share you skills with your friends in your favorite social network.
Extend the layout of your activity with another button.
A click on this Button should allow to share the value of the current skillPoints.
The value for sending data via other applications is defined via the Intent.ACTION_SEND constant.
To share data, create a new method called public void shareData(View view) based on the following snippet in your activity.
Intent sharingIntent = new Intent(Intent.ACTION_SEND);
sharingIntent.setType("text/plain");
sharingIntent.putExtra(android.content.Intent.EXTRA_TEXT, "REPLACE WITH YOUR skillPoints");

startActivity(sharingIntent);
Connect this method with a new button via the android:onClick property in your layout.
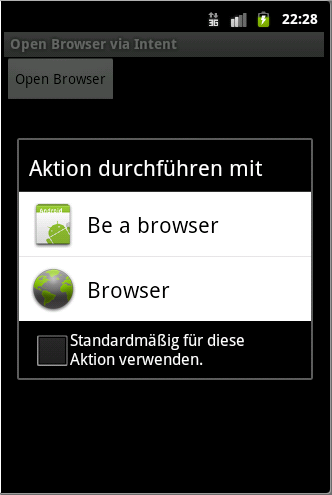
Run this application and select your button.
|
On the Android emulator it might be that only one application has registered for the intent and is started directly. |
7. Exercise: Picking an image via an intent
The following exercise demonstrates picking an image from any registered photo application on Android via an intent.
7.1. Create project
Create a new Android project with the package name com.vogella.android.imagepick and one activity called ImagePickActivity.
Add an ImageView to hold an photo of the user to your MainActivity.
<?xml version="1.0" encoding="utf-8"?>
<RelativeLayout xmlns:android="http://schemas.android.com/apk/res/android"
                xmlns:app="http://schemas.android.com/apk/res-auto"
                xmlns:tools="http://schemas.android.com/tools"
                android:layout_width="match_parent"
                android:layout_height="match_parent"
    >
    <!-- more... -->
   <ImageView
        android:id="@+id/userpicture"
        android:layout_width="80dp"
        android:layout_height="80dp"
        android:layout_alignParentEnd="true"
        android:layout_alignTop="@+id/userlabel"
        android:src="@drawable/ic_image"
        android:onClick="pickImage"
        android:scaleType="fitCenter"
        />

</RelativeLayout>
Change your activity class according to the following coding.
package com.vogella.android.first;

import android.app.Activity;
import android.content.Intent;
import android.graphics.Bitmap;
import android.graphics.BitmapFactory;
import android.os.Bundle;
import android.view.View;
import android.widget.EditText;
import android.widget.ImageView;
import android.widget.RadioGroup;

import java.io.IOException;
import java.io.InputStream;

public class MainActivity extends Activity {

    boolean male = true;
    private static final int REQUEST_IMAGE_PICK = 1;
    private Bitmap bitmap;
    private ImageView profilePicture;

    @Override
    protected void onCreate(Bundle savedInstanceState) {
        super.onCreate(savedInstanceState);
        setContentView(R.layout.activity_main);
        profilePicture = findViewById(R.id.userpicture);
        final ImageView imageView = findViewById(R.id.userimage);
        final RadioGroup group1 = (RadioGroup) findViewById(R.id.gender);
        group1.setOnCheckedChangeListener(new RadioGroup.OnCheckedChangeListener() {
            @Override
            public void onCheckedChanged(RadioGroup group, int checkedId) {
                switch (checkedId) {
                    case R.id.male:
                        imageView.setImageResource(R.drawable.maleprofile);
                        male = true;
                        break;
                    case R.id.female:
                        imageView.setImageResource(R.drawable.femaleprofile);
                        male = true;
                        break;
                }
            }
        });
    }

    public void onClick(View view) {
        EditText input = (EditText) findViewById(R.id.username);
        String string = input.getText().toString();
        Intent intent = new Intent(this, OverviewActivity.class);
        intent.putExtra("username", string);
        startActivity(intent);
    }

    public void pickImage(View View) {
        Intent intent = new Intent();
        intent.setType("image/*");
        intent.setAction(Intent.ACTION_GET_CONTENT);
        intent.addCategory(Intent.CATEGORY_OPENABLE);
        startActivityForResult(intent, REQUEST_IMAGE_PICK);
    }

    @Override
    protected void onActivityResult(int requestCode, int resultCode, Intent data) {
        if (requestCode == REQUEST_IMAGE_PICK && resultCode == Activity.RESULT_OK)
            try (InputStream stream = getContentResolver().openInputStream(data.getData());) {
                // recyle unused bitmaps
                if (bitmap != null) {
                    bitmap.recycle();
                }

                bitmap = BitmapFactory.decodeStream(stream);

                profilePicture.setImageBitmap(bitmap);
            } catch (IOException e) {
                e.printStackTrace();
            }
    }

}
7.2. Validate
If you run this application, you can select an image from your image library on your Android phone and assign it to your ImageView.
8. Exercise: Register an activity as browser
8.1. Target
In the following exercise, you register an activity as browser.
This means, if an intent is triggered when someone wants to view an URL starting with http, your activity will be available to process this intent.
The example activity downloads the HTML source of this page and displays it in a TextView.
8.2. Create project
Create an Android project with the package name com.vogella.android.intent.browserfilter and an activity called BrowserActivity.
8.3. Register activity as browser
Register your activity to the Intent.Action_VIEW action and the scheme "http" via the following changes in your AndroidManifest.xml file.
Ensure that your manifest also declares the permission to access the Internet.
<?xml version="1.0" encoding="utf-8"?>
<manifest xmlns:android="http://schemas.android.com/apk/res/android"
    package="com.vogella.android.intent.browserfilter"
    android:versionCode="1"
    android:versionName="1.0" >

    <uses-sdk android:minSdkVersion="15" />

    <uses-permission android:name="android.permission.INTERNET" >
    </uses-permission>

    <application
        android:icon="@drawable/icon"
        android:label="@string/app_name" >
        <activity
            android:name=".BrowserActivity"
            android:label="@string/app_name" >
            <intent-filter>
                <action android:name="android.intent.action.VIEW" />

                <category android:name="android.intent.category.DEFAULT" />

                <data android:scheme="http" />
            </intent-filter>
        </activity>
    </application>

</manifest>
Change the corresponding layout file according to the following listing.
<?xml version="1.0" encoding="utf-8"?>
<LinearLayout xmlns:android="http://schemas.android.com/apk/res/android"
    android:orientation="vertical"
    android:layout_width="match_parent"
    android:layout_height="match_parent"
    >
<TextView
    android:layout_width="match_parent"
    android:layout_height="wrap_content"
    android:id="@+id/textView"/>
</LinearLayout>
Change your activity class to the following code.
package com.vogella.android.intent.browserfilter;

import java.io.BufferedReader;
import java.io.InputStreamReader;
import java.net.URL;

import android.app.Activity;
import android.content.Intent;
import android.net.Uri;
import android.os.Bundle;
import android.os.StrictMode;
import android.widget.TextView;

public class BrowserActivity extends Activity {
    @Override
    public void onCreate(Bundle savedInstanceState) {
        super.onCreate(savedInstanceState);

        // To keep this example simple, we allow network access
        // in the user interface thread
        StrictMode.ThreadPolicy policy = new StrictMode.ThreadPolicy.Builder()
                .permitAll().build();
        StrictMode.setThreadPolicy(policy);

        setContentView(R.layout.main);
        Intent intent = getIntent();
        TextView text = (TextView) findViewById(R.id.textView);
        // To get the action of the intent use
        String action = intent.getAction();
        if (!action.equals(Intent.ACTION_VIEW)) {
            throw new RuntimeException("Should not happen");
        }
        // To get the data use
        Uri data = intent.getData();
        URL url;
        try {
            url = new URL(data.getScheme(), data.getHost(), data.getPath());
            BufferedReader rd = new BufferedReader(new InputStreamReader(
                    url.openStream()));
            String line = "";
            while ((line = rd.readLine()) != null) {
                text.append(line);
            }

        } catch (Exception e) {
            e.printStackTrace();
        }

    }
}
8.4. Validate
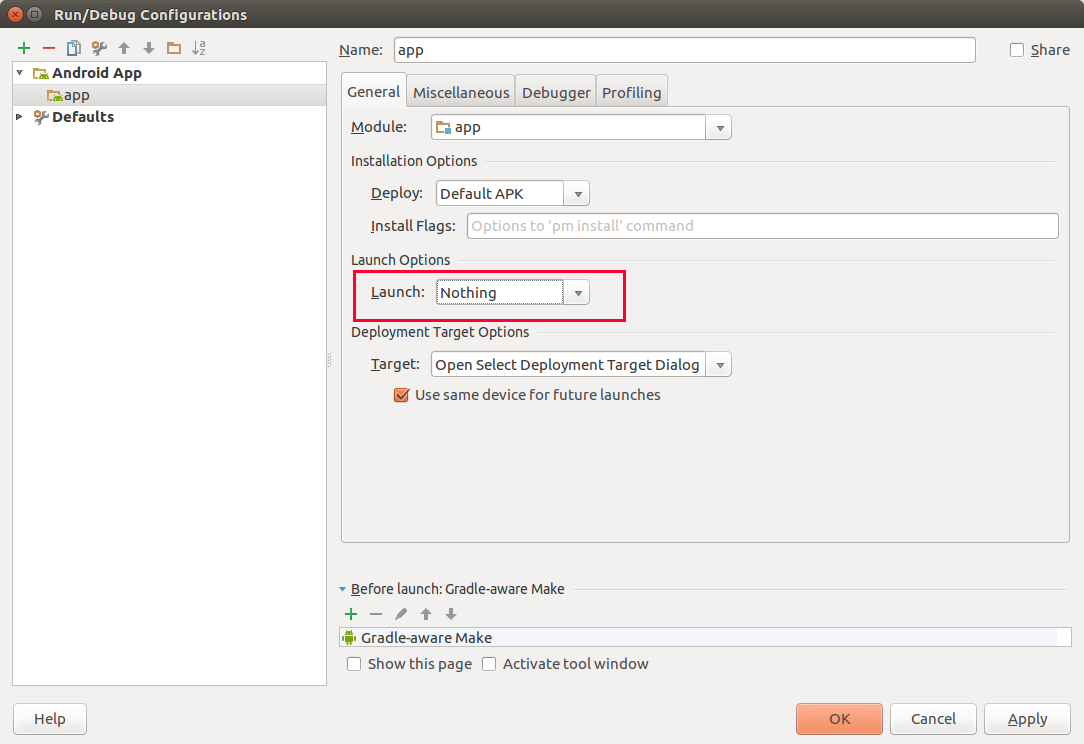
Install your application. For this you need to configure Android Studio that you do not have a default activity.
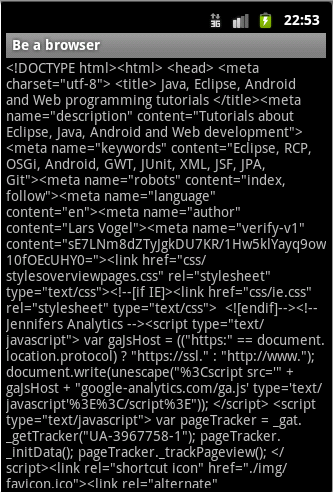
If you trigger an intent to open an URL, the user should be able to select your custom browser implementation. Trigger for this purpose the following intent from one of your Android applications by adding for example an additional button to the application that can trigger the code.
intent = new Intent(Intent.ACTION_VIEW,Uri.parse("https://www.vogella.com/"));
startActivity(intent);
If you select your component, the HTML code is loaded and displayed into your TextView.
8.5. Optional: Make it a real browser
Replace your TextView with a WebView to create a "real" browser.
The WebView does the loading of the HTTP request for you.
Simply assign the URL via the loadUrl method to it.
|
9. Exercise: Use different implicit intents
The following exercise demonstrates the usage of implicit intents to trigger activities in your Android system.
9.1. Create project
Create a new Android application with the package name de.vogella.android.intent.implicit and an activity called CallIntentsActivity.
In this example, you use a Spinner view to select which intent is triggered.
For the content of the Spinner you define static values.
Create the following intents.xml file in the res/values folder.
<resources>
    <string-array name="intents">
        <item>Open Browser</item>
        <item>Dial</item>
        <item>Show Map</item>
        <item>Search on Map</item>
        <item>Take picture</item>
        <item>Show contacts</item>
        <item>Edit first contact</item>
    </string-array>

</resources>
Change the layout file of the activity to the following.
<?xml version="1.0" encoding="utf-8"?>
<GridLayout xmlns:android="http://schemas.android.com/apk/res/android"
    android:layout_width="match_parent"
    android:layout_height="match_parent"
    android:alignmentMode="alignBounds"
    android:columnCount="1" >

      <Spinner
        android:id="@+id/spinner"
        android:layout_gravity="fill_horizontal"
        android:drawSelectorOnTop="true"
        >
      </Spinner>

    <Button
        android:id="@+id/trigger"
        android:onClick="onClick"
        android:text="Trigger Intent">
    </Button>


</GridLayout>
To be able to use certain intents, you need to add the required permission in your AndroidManifest.xml file. Ensure that your AndroidManifest.xml contains the permissions from the following listing.
<?xml version="1.0" encoding="utf-8"?>
<manifest xmlns:android="http://schemas.android.com/apk/res/android"
    package="de.vogella.android.intent.implicit"
    android:versionCode="1"
    android:versionName="1.0" >

    <uses-sdk android:minSdkVersion="15" />

    <uses-permission android:name="android.permission.CALL_PHONE" >
    </uses-permission>
    <uses-permission android:name="android.permission.READ_CONTACTS" >
    </uses-permission>
    <uses-permission android:name="android.permission.INTERNET"/>

    <application
        android:icon="@drawable/icon"
        android:label="@string/app_name" >
        <activity
            android:name=".CallIntentsActivity"
            android:label="@string/app_name" >
            <intent-filter>
                <action android:name="android.intent.action.MAIN" />

                <category android:name="android.intent.category.LAUNCHER" />
            </intent-filter>
        </activity>
    </application>

</manifest>
Change your activity class to the following code.
package de.vogella.android.intent.implicit;

import android.app.Activity;
import android.content.Intent;
import android.net.Uri;
import android.os.Bundle;
import android.view.View;
import android.widget.ArrayAdapter;
import android.widget.Spinner;
import android.widget.Toast;

public class CallIntentsActivity extends Activity {
    private Spinner spinner;

    /** Called when the activity is first created. */
    @Override
    public void onCreate(Bundle savedInstanceState) {
        super.onCreate(savedInstanceState);
        setContentView(R.layout.activity_main);
        spinner = (Spinner) findViewById(R.id.spinner);
        ArrayAdapter adapter = ArrayAdapter.createFromResource(this,
                R.array.intents, android.R.layout.simple_spinner_item);
        adapter.setDropDownViewResource(android.R.layout.simple_spinner_dropdown_item);
        spinner.setAdapter(adapter);
    }

    public void onClick(View view) {
        int position = spinner.getSelectedItemPosition();
        Intent intent = null;
        switch (position) {
        case 0:
            intent = new Intent(Intent.ACTION_VIEW,
                    Uri.parse("https://www.vogella.com/"));
            break;
        case 1:
            intent = new Intent(Intent.ACTION_DIAL,
                    Uri.parse("tel:(+49)12345789"));
            break;
        case 2:
            intent = new Intent(Intent.ACTION_VIEW,
                    Uri.parse("geo:50.123,7.1434?z=19"));
            break;
        case 3:
            intent = new Intent(Intent.ACTION_VIEW,
                    Uri.parse("geo:0,0?q=query"));
            break;
        case 4:
            intent = new Intent("android.media.action.IMAGE_CAPTURE");
            break;
        case 5:
            intent = new Intent(Intent.ACTION_VIEW,
                    Uri.parse("content://contacts/people/"));
            break;
        case 6:
            intent = new Intent(Intent.ACTION_EDIT,
                    Uri.parse("content://contacts/people/1"));
            break;

        }
        if (intent != null) {
            startActivity(intent);
        }
    }
}
9.2. Validate
If you start your application, you see a list of buttons and if you press one of the buttons, your defined activities are started.
| Note that you did not specify any receiving application, only the action that should be done. This allows you to define loosely coupled tasks that use components of different applications. |
10. Android Intent resources
Nothing maintained.
10.1. vogella Java example code
If you need more assistance we offer Online Training and Onsite training as well as consulting