Android Drawables. This tutorial describes the usage of Drawables in Android.
1. What are Drawables?
A
Drawable
resource is a general concept for a graphic that can
be drawn. The
simplest case is a graphical file (bitmap), which would be represented
in Android
via a
BitmapDrawable
class.
Every Drawable is stored as individual files in one of the res/drawable folders. Typically you would store bitmaps for different resolutions in the -mdpi, -hdpi, -xhdpi, -xxhdpi subfolders of res/drawable. The ADT project creation wizard creates these folders by default. If these bitmaps are provided in different folder, the Android system selects the correct one automatically based on the device configuration.
If you do not provide bitmaps for all supported resolutions, the Android system scales the closest fit up or down. This is typically undesired as the bitmap might get blury.
In addition to graphical files, Android supports XML drawables and 9-patch graphics. XML drawables are used to describe shapes (color, border, gradient), state, transitions and more.
9-patch graphics are used to define which part of a graphic should be stretched if the view that uses this graphic is larger than the graphic.
Drawables can also be written in Java code. Every object which
implements
Drawable
can be used as a
Drawable in code.
2. Using drawables for views
Drawables
are referred to
in XML
via
@drawable/filename
whereby
filename
filename is the filename without the file extension. For example, to
access the
res/drawable/hello.png
Drawable, you would use
@drawable/hello
as demonstrated in the following snippet.
<TextView xmlns:android="http://schemas.android.com/apk/res/android"
    android:id="@+id/textView1"
    android:layout_width="wrap_content"
    android:layout_height="wrap_content"
    android:background="@drawable/hello"
    android:text="@string/hello_world" />
In code you can also assign
drawables
to views. Most
views
accept an resource ID as input parameter. For
example the following
code shows how to set a
drawables
as background to an
ImageView.
ImageView imageView = (ImageView) findViewById(R.id.image);
imageView.setImageResource(R.drawable.hello);
3. Loading Bitmaps and Drawables
Android allows you to use the
Bitmap
class for working with bitmaps. This section explain how to create
Bitmap
objects via Java code and how to convert
Bitmap
into
Drawable
objects and vice versa.
If required you can
load any accessible
bitmap file
in your code and
convert them into
Drawables
objects.
The following example code shows how to create an
Bitmap
object for the
assets
folder and assign it to an
ImageView.
        AssetManager manager = getAssets();

        // read a Bitmap from Assets
        InputStream open = null;
        try {
            open = manager.open("logo.png");
            Bitmap bitmap = BitmapFactory.decodeStream(open);
            // Assign the bitmap to an ImageView in this layout
            ImageView view = (ImageView) findViewById(R.id.imageView1);
            view.setImageBitmap(bitmap);
        } catch (IOException e) {
            e.printStackTrace();
        } finally {
            if (open != null) {
                try {
                    open.close();
                } catch (IOException e) {
                    e.printStackTrace();
                }
            }
        }
You can also access the Drawables
from your
res/drawable
folder as
Bitmap
objects in your source code.
The following code demonstrates this.
Bitmap b = BitmapFactory.decodeResource(getResources(), R.drawable.ic_action_search); You can create a scale bitmap based on a new weight and height definition in pixel.
Bitmap originalBitmap = <initial setup>;

Bitmap resizedBitmap =
   Bitmap.createScaledBitmap(originalBitmap, newWidth, newHeight, false);
To convert a
Bitmap
object
into a
Drawable
you can use the following code.
# Convert Bitmap to Drawable
Drawable d = new BitmapDrawable(getResources(),bitmap);
4. XML Drawables
4.1. Shape Drawables
Shape Drawables are XML files that allow to define a geometric
object with colors, borders and gradients that can get assigned to
Views. The advantage of using XML Shape Drawables is that they
automatically adjust to the correct size.
The following listing shows an example of a Shape Drawable.
<?xml version="1.0" encoding="UTF-8"?>
<shape
    xmlns:android="http://schemas.android.com/apk/res/android"
    android:shape="rectangle">
    <stroke
        android:width="2dp"
        android:color="#FFFFFFFF" />
    <gradient
        android:endColor="#DDBBBBBB"
        android:startColor="#DD777777"
        android:angle="90" />
    <corners
        android:bottomRightRadius="7dp"
        android:bottomLeftRadius="7dp"
        android:topLeftRadius="7dp"
        android:topRightRadius="7dp" />
</shape>
You could for example assign that drawable to the background property of your layout.
<?xml version="1.0" encoding="utf-8"?>
<LinearLayout xmlns:android="http://schemas.android.com/apk/res/android"
    android:layout_width="match_parent"
    android:layout_height="match_parent"
    android:background="@drawable/myshape"
    android:orientation="vertical" >

    <EditText
        android:id="@+id/editText1"
        android:layout_width="match_parent"
        android:layout_height="wrap_content"
     >
    </EditText>

    <RadioGroup
        android:id="@+id/radioGroup1"
        android:layout_width="match_parent"
        android:layout_height="wrap_content" >

        <RadioButton
            android:id="@+id/radio0"
            android:layout_width="wrap_content"
            android:layout_height="wrap_content"
            android:checked="true"
            android:text="@string/celsius" >
        </RadioButton>

        <RadioButton
            android:id="@+id/radio1"
            android:layout_width="wrap_content"
            android:layout_height="wrap_content"
            android:text="@string/fahrenheit" >
        </RadioButton>
    </RadioGroup>

    <Button
        android:id="@+id/button1"
        android:layout_width="wrap_content"
        android:layout_height="wrap_content"
        android:text="@string/calc"
        android:onClick="myClickHandler">
    </Button>

</LinearLayout>
4.2. State Drawables
State drawables allow to define states. For each state a
different
drawable can get assigned to the
View. For example, the
following
defines different drawables for a button
depending on its
state.
<?xml version="1.0" encoding="utf-8"?>
<selector xmlns:android="http://schemas.android.com/apk/res/android">

    <item android:drawable="@drawable/button_pressed"
        android:state_pressed="true" />
    <item android:drawable="@drawable/button_checked"
        android:state_checked="true" />
    <item android:drawable="@drawable/button_default" />

</selector>
4.3. Transition Drawables
Transition Drawables allow to define transitions that can be triggered in the coding.
<?xml version="1.0" encoding="utf-8"?>
<transition xmlns:android="http://schemas.android.com/apk/res/android">
    <item android:drawable="@drawable/first_image" />
    <item android:drawable="@drawable/second_image" />
</transition>
final ImageView image = (ImageView) findViewById(R.id.image);
final ToggleButton button = (ToggleButton) findViewById(R.id.button);
button.setOnClickListener(new OnClickListener() {
@Override
public void onClick(final View v) {
TransitionDrawable drawable = (TransitionDrawable) image.getDrawable();
if (button.isChecked()) {
drawable.startTransition(500);
} else {
drawable.reverseTransition(500);
}
}
});5. Vector drawables
As of API level 21 you can use vector drawables in your Android application. These are similar to SVG files but with a limited scope. Using vector drawables automatically scale to the density of the device. The following listing demonstrates its usage in the vectordrawable.xml file.
 <vector xmlns:android="http://schemas.android.com/apk/res/android"
     android:height="64dp"
     android:width="64dp"
     android:viewportHeight="600"
     android:viewportWidth="600" >
     <group
         android:name="rotationGroup"
         android:pivotX="300.0"
         android:pivotY="300.0"
         android:rotation="45.0" >
         <path
             android:name="v"
             android:fillColor="#000000"
             android:pathData="M300,70 l 0,-70 70,70 0,0 -70,70z" />
     </group>
 </vector>
Android also support animated vector drawables via the AnimatedVectorDrawable class.
It allows to combine vector drawables with animations.
With vector drawables you can create different images and morph between them and can start and stop it via your code.
You cannot control the animation nor pause the animation at a particular frame.
Vector drawables are also available for older platform via the support library as VectorDrawableCompat.
https://shapeshifter.design/ provides online tooling to create animated vector drawables.
6. Animation Drawables
You can also define an animation drawables and assign it to a View via the setBackgroundResource() method.
<!-- Animation frames are phase*.png files inside the
 res/drawable/ folder -->
 <animation-list android:id="@+id/selected" android:oneshot="false">
    <item android:drawable="@drawable/phase1" android:duration="400" />
    <item android:drawable="@drawable/phase2" android:duration="400" />
    <item android:drawable="@drawable/phase3" android:duration="400" />
 </animation-list>
ImageView img = (ImageView)findViewById(R.id.yourid);
img.setBackgroundResource(R.drawable.your_animation_file);
// Get the AnimationDrawable object.
AnimationDrawable frameAnimation = (AnimationDrawable) img.getBackground();
// Start the animation (looped playback by default).
frameAnimation.start();Alternatively, you can implement a class that extends Drawable and implements Animatable.
7. 9 Patch Drawables
9 Patch drawables are Drawables that have a one pixel additional border. On the top and left you define the area which should be scaled if the Drawable is to small for the view. This is the stretch area.
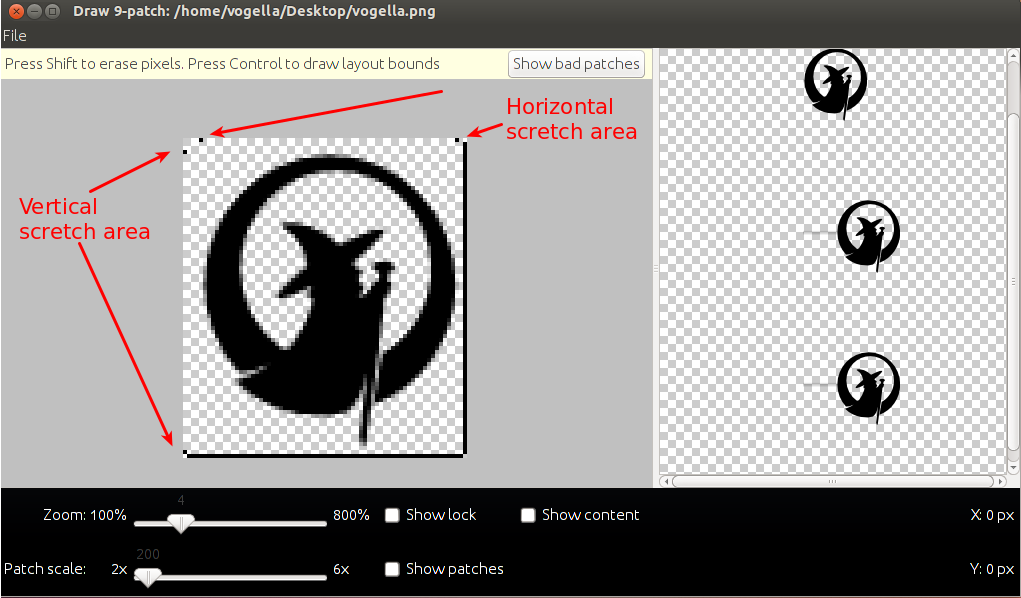
On the right and bottom side you define the area where a text should
be
placed
if this
Drawable
is used on a
view
that can write text on it, e.g., a Button.
The ADT supplies the
draw9patch
program in the
android-sdk/tools
installation folder, which makes it easy to
create
9 Patch drawables.
8. Custom Drawables
You can also create custom Drawable that can use the Canvas API for their display. For these drawables you can use the full Canvas API to design them to your need.
9. Exercise: Create Custom rounded corner drawable
|
This example is based on Blog post from Roman Guy. |
Create a new Android project based on the Empty Activity template with the top-level package name com.vogella.android.drawables.custom.
Create the following custom Drawable class.
package com.vogella.android.drawables.custom;

import android.graphics.Bitmap;
import android.graphics.BitmapShader;
import android.graphics.Canvas;
import android.graphics.ColorFilter;
import android.graphics.Paint;
import android.graphics.PixelFormat;
import android.graphics.RectF;
import android.graphics.Shader;
import android.graphics.drawable.Drawable;

public class MyRoundCornerDrawable extends Drawable {

    private Paint paint;

    public MyRoundCornerDrawable(Bitmap bitmap) {
        BitmapShader shader;
        shader = new BitmapShader(bitmap, Shader.TileMode.CLAMP, Shader.TileMode.CLAMP);
        paint = new Paint();
        paint.setAntiAlias(true);
        paint.setShader(shader);
    }

    @Override
    public void draw(Canvas canvas) {
        int height = getBounds().height();
        int width = getBounds().width();
        RectF rect = new RectF(0.0f, 0.0f, width, height);
        canvas.drawRoundRect(rect, 30, 30, paint);
    }

    @Override
    public void setAlpha(int alpha) {
        paint.setAlpha(alpha);
    }

    @Override
    public void setColorFilter(ColorFilter cf) {
        paint.setColorFilter(cf);
    }

    @Override
    public int getOpacity() {
        return PixelFormat.TRANSLUCENT;
    }

}
To use it change your activity_main layout file to the following.
<RelativeLayout xmlns:android="http://schemas.android.com/apk/res/android"
    xmlns:tools="http://schemas.android.com/tools"
    android:layout_width="match_parent"
    android:layout_height="match_parent"
    tools:context=".MainActivity" >

    <ImageView
        android:id="@+id/image"
        android:layout_width="fill_parent"
        android:layout_height="fill_parent"
        android:layout_centerHorizontal="true"
        android:layout_centerVertical="true"
        android:contentDescription="TODO" />

</RelativeLayout>
Change your MainActivity class to the following.
The code assumes that you have a bitmap in your raw folder called dog.png.
package com.vogella.android.drawables.custom;

import java.io.InputStream;

import android.app.Activity;
import android.graphics.Bitmap;
import android.graphics.BitmapFactory;
import android.os.Bundle;
import android.view.Menu;
import android.widget.ImageView;

public class MainActivity extends Activity {

    @Override
    protected void onCreate(Bundle savedInstanceState) {
        super.onCreate(savedInstanceState);
        setContentView(R.layout.activity_main);
        ImageView button = (ImageView) findViewById(R.id.image);
        InputStream resource = getResources().openRawResource(R.raw.dog);
        Bitmap bitmap = BitmapFactory.decodeStream(resource);
        button.setBackground(new MyRoundCornerDrawable(bitmap));
    }

}
10. Android Drawables resources
https://lewismcgeary.github.io/posts/animated-vector-drawable-pathMorphing/ PathMorphing with AnimatedVectorDrawables in Android
See https://blog.sqisland.com/2014/10/first-look-at-animated-vector-drawable.html Blog post with examples for animated vector graphics
10.1. vogella Java example code
If you need more assistance we offer Online Training and Onsite training as well as consulting