This tutorial describes how to create Android applications. It follows a tutorial based approch in which you iteratively create Android applications to learn the base concepts.
1. High-level overview of Android development
Android is an operating system based on the Linux kernel. Android is developed in the Android Open Source Project (AOSP). This project is lead by Google.
The Android operating system can be divided into the four areas as depicted in the following graphic. An Android application developer typically works with the two layers on top to create new Android applications.
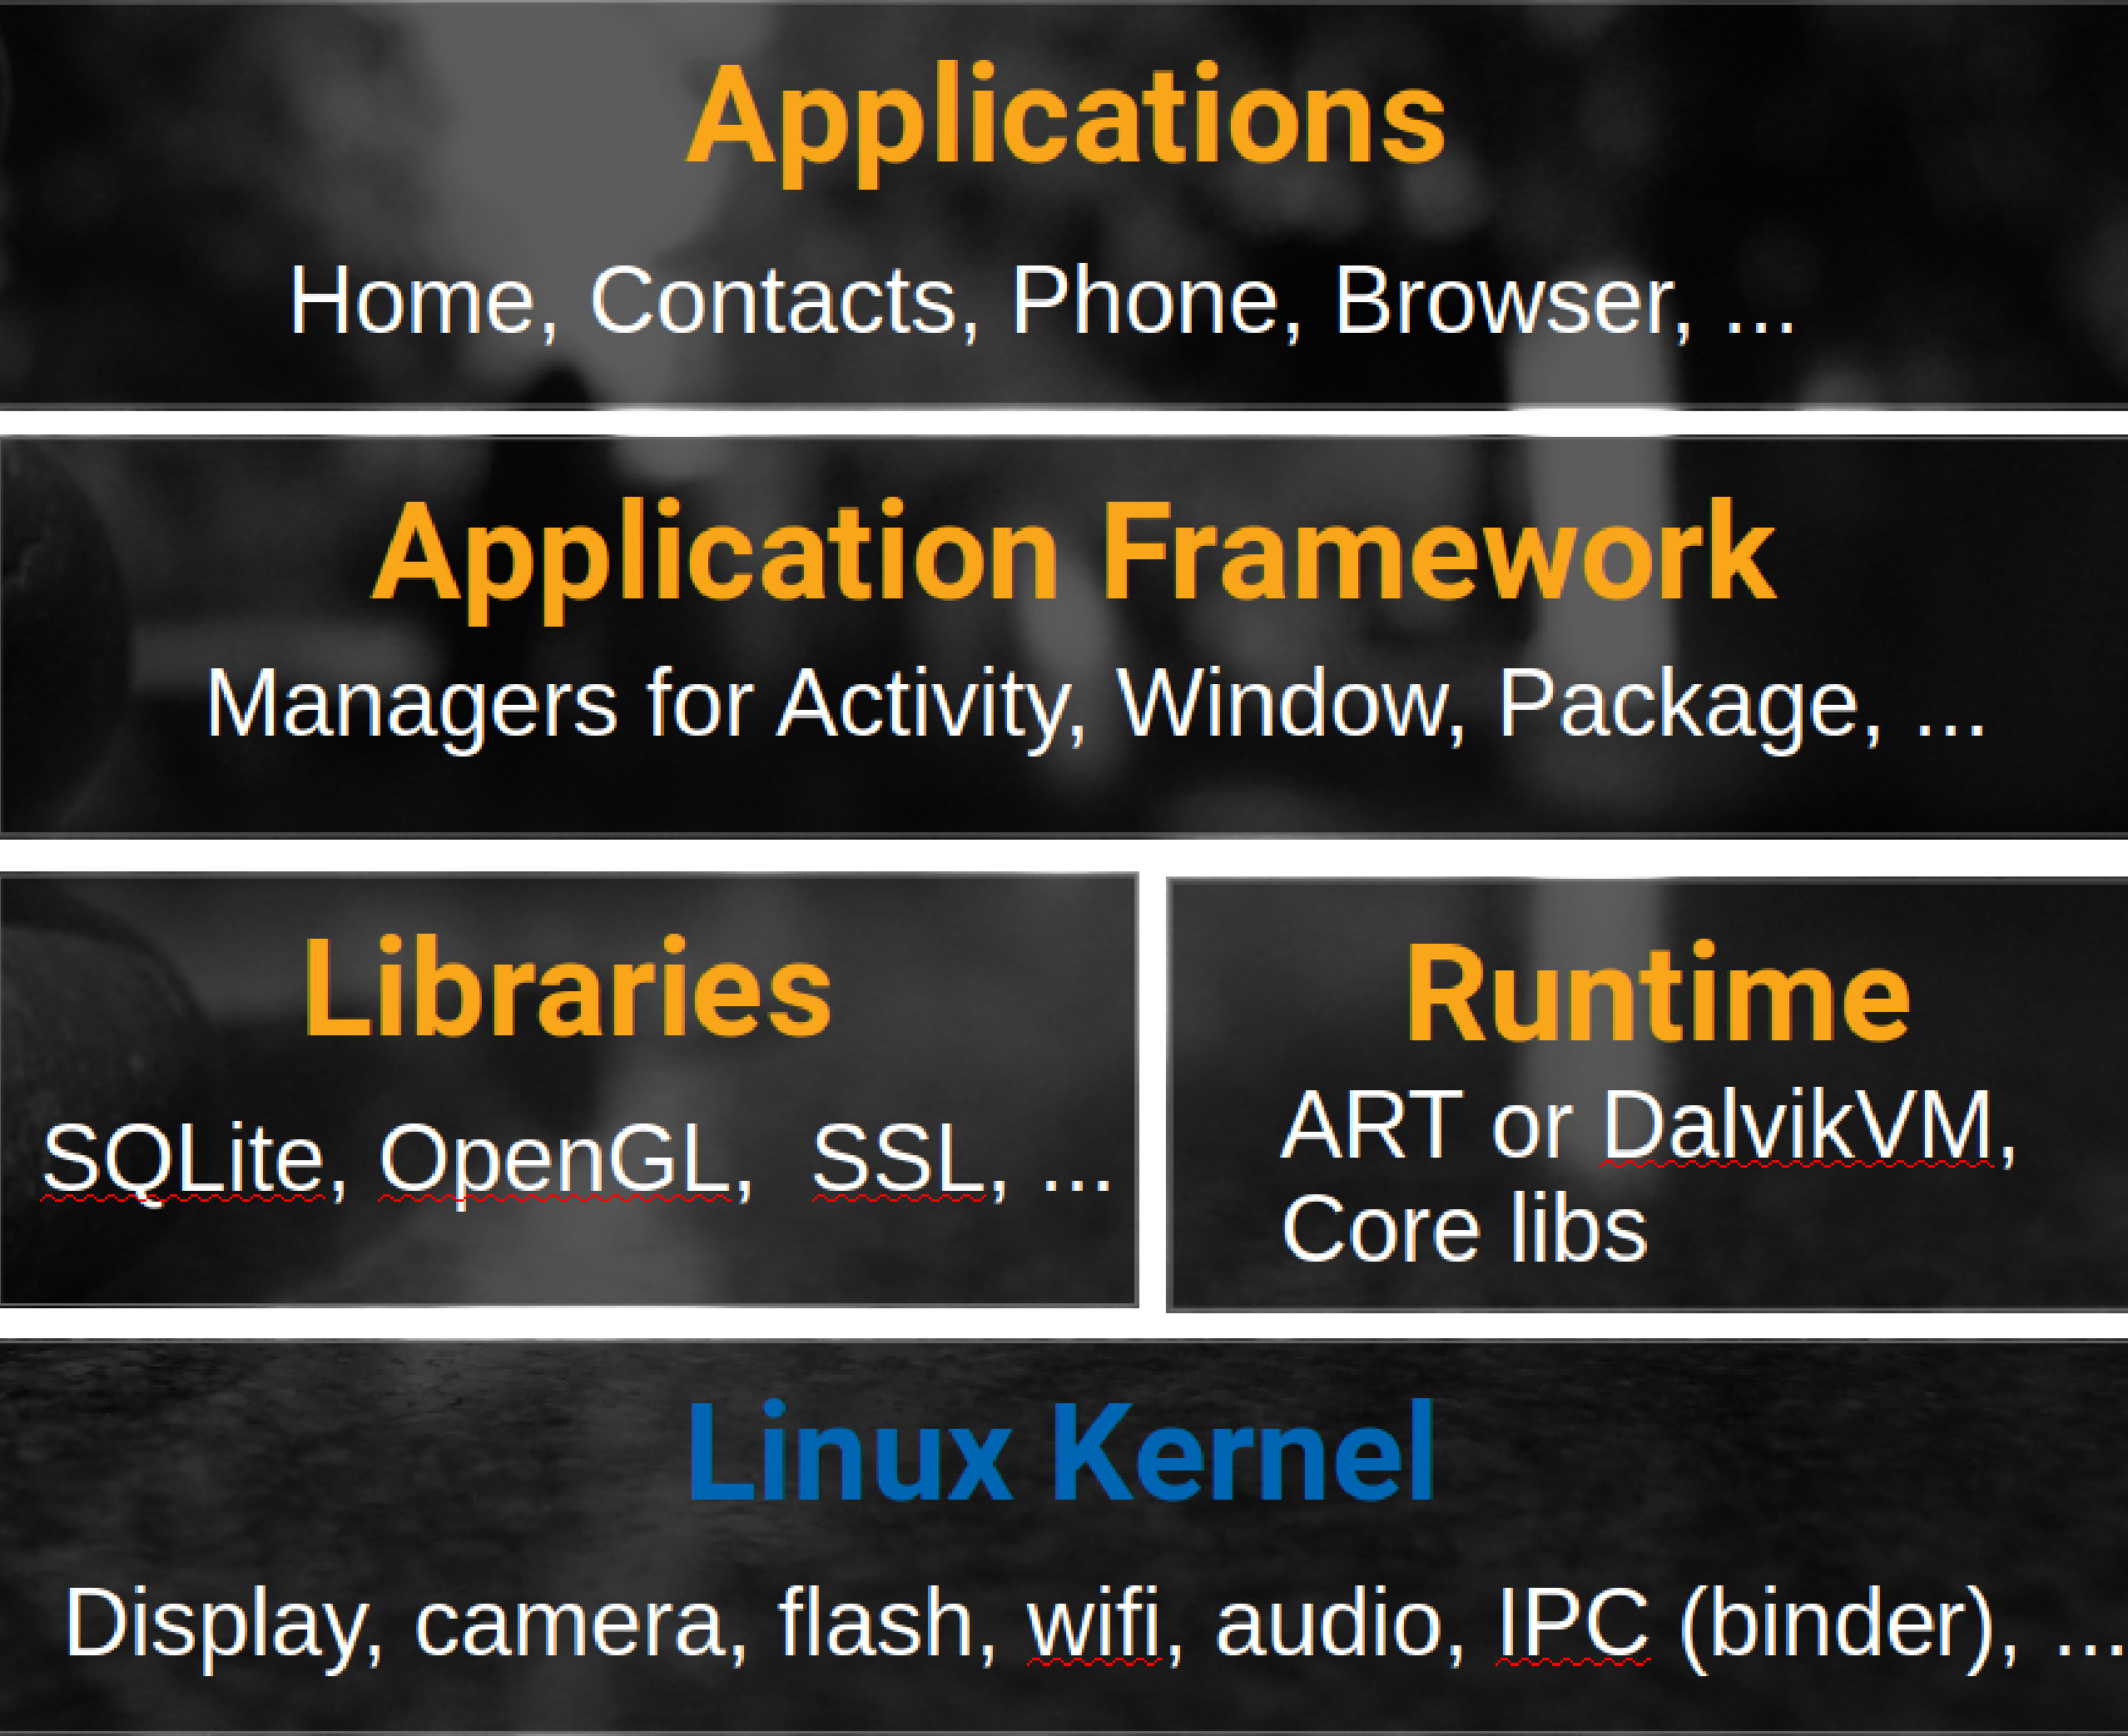
The levels can be described as:
-
Applications - Contains the applications, like the Browser, Camera, Gallery, Music and Phone
-
Application framework - An API that allows high-level interactions with the Android system
-
Libraries and runtime - The libraries for many common framework functions, like graphic rendering, data storage, web browsing. Also contains the Android runtime, as well as the core Java libraries for running Android applications.
-
Linux kernel - Communication layer for the underlying hardware.
2. Exercise - Android Studio overview and installation
2.1. Download and installation of Android Studio
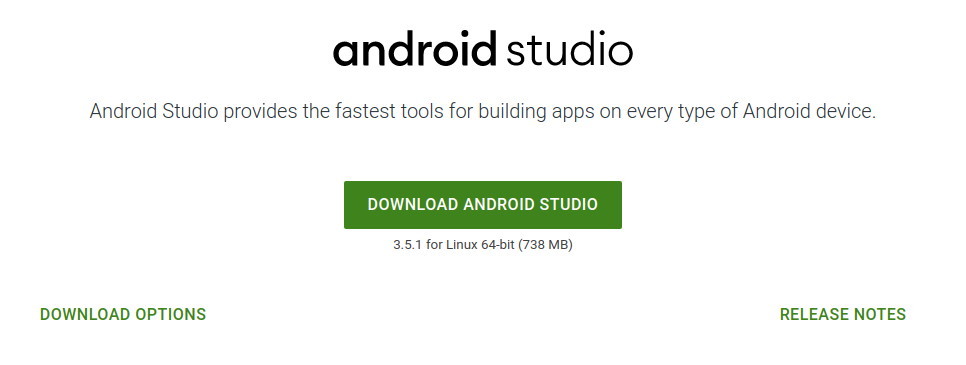
Download Android Studio from the Android Studio website.
Installation for Windows is simple, just launch the .exe you downloaded. On Max OSX drag and drop Android Studio into the Applications folder.
On Linux unpack the downloaded ZIP file into an appropriate location for your applications. To launch Android Studio, navigate to the android-studio/bin/ directory in a terminal and execute studio.sh.
2.2. First startup
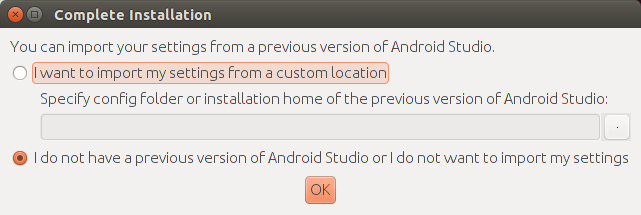
The first time you start a new Android Studio installation, you have the option to import your existing settings.
Afterwards, click through the setup guide.
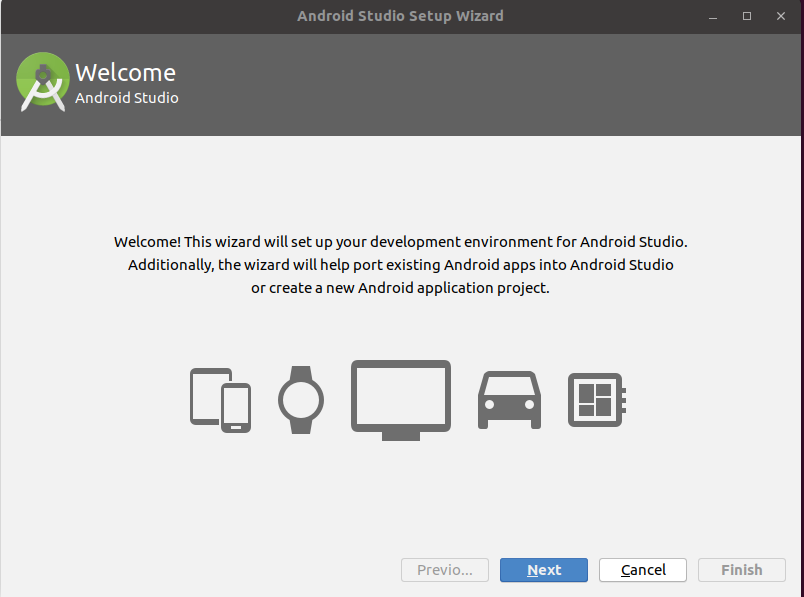
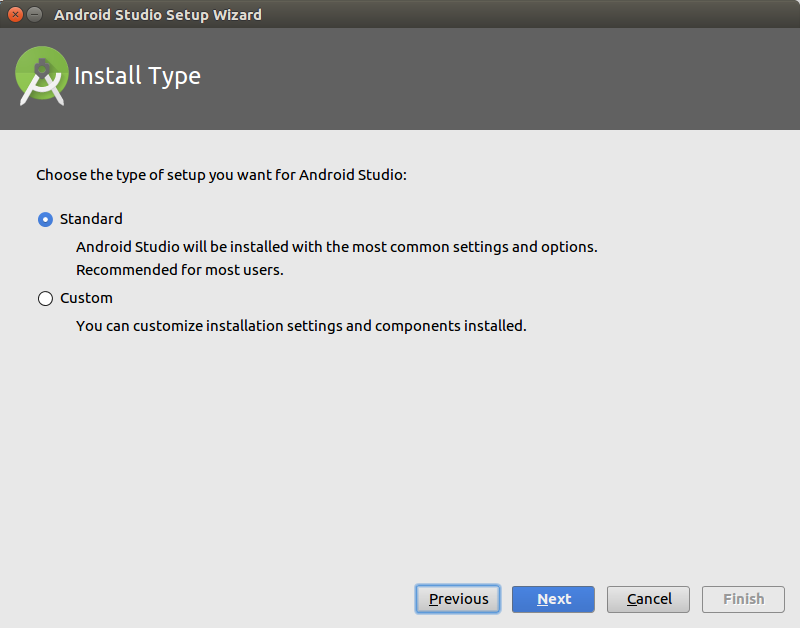
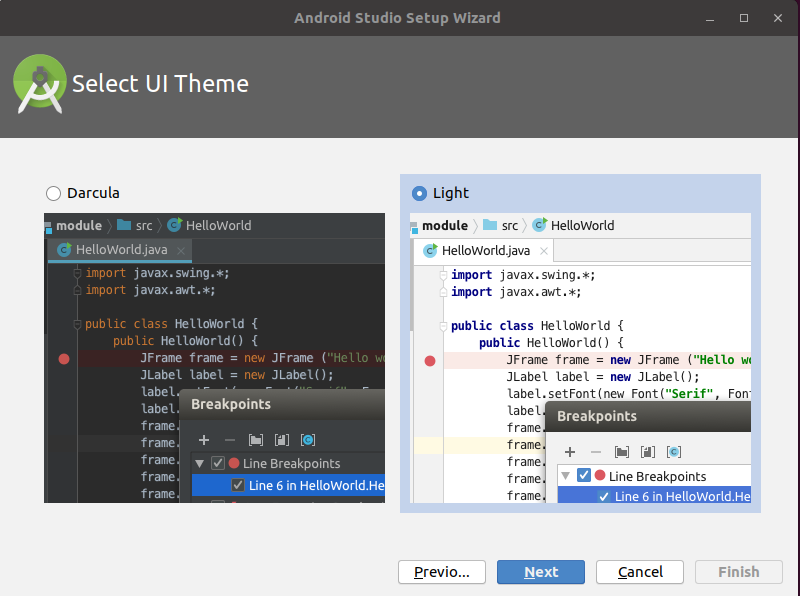
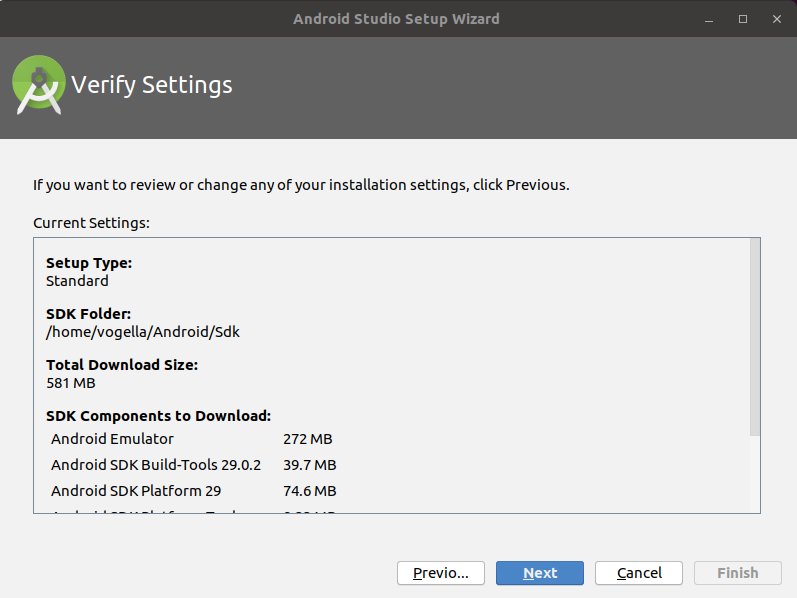
Once you reach the last page, press the Finish button.
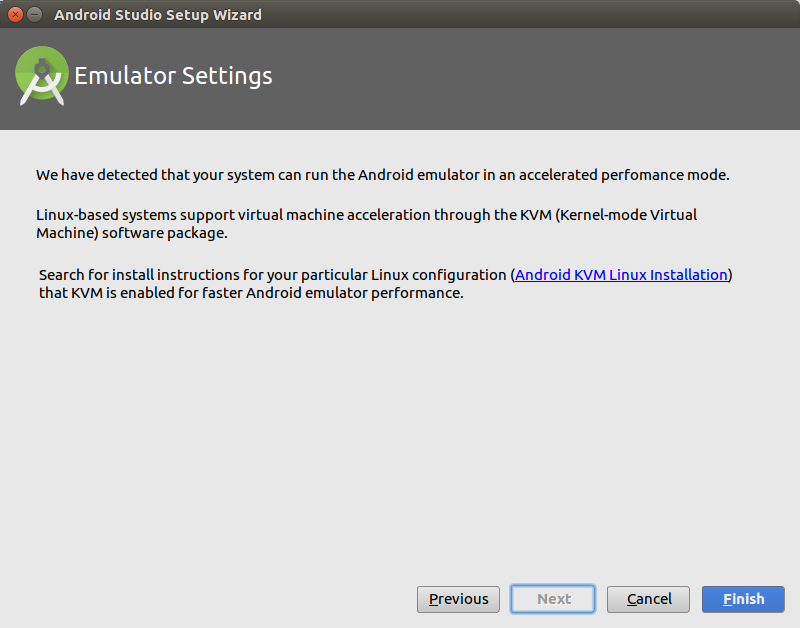
You should now be able to start using Android Studio by clicking on the "Start a new Andorid Studio project".
If you are using a proxy, see Configuring the proxy server, otherwise you can skipt this part. If you have problems setting up the Intel based emulator, see
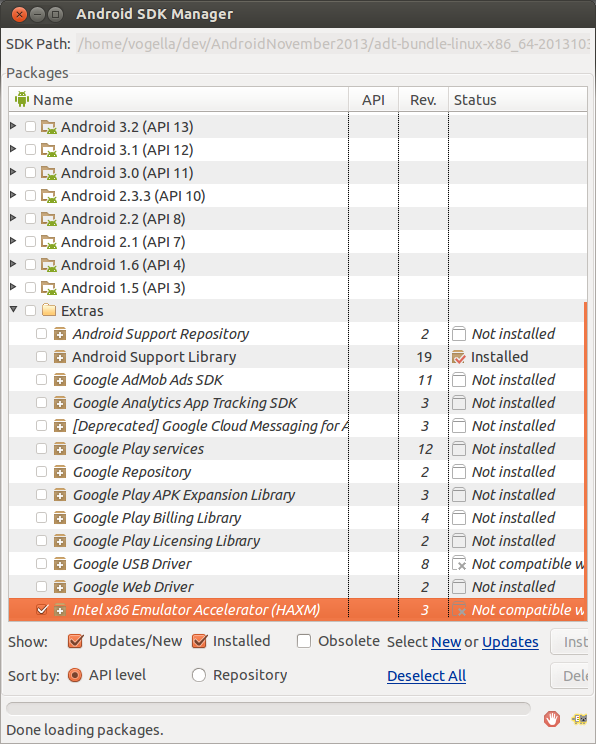
2.3. Installation of Android SDKs
The Android SDK manager allows you to install and delete specific Android OS versions.
Select or the SDK Manager icon in the toolbar of Android Studio to open the Android SDK manager.

In the Android SDK manager select the version of desired Android version the tree and press the Install button. The following screenshot shows the selection for the API 18 version of Android.
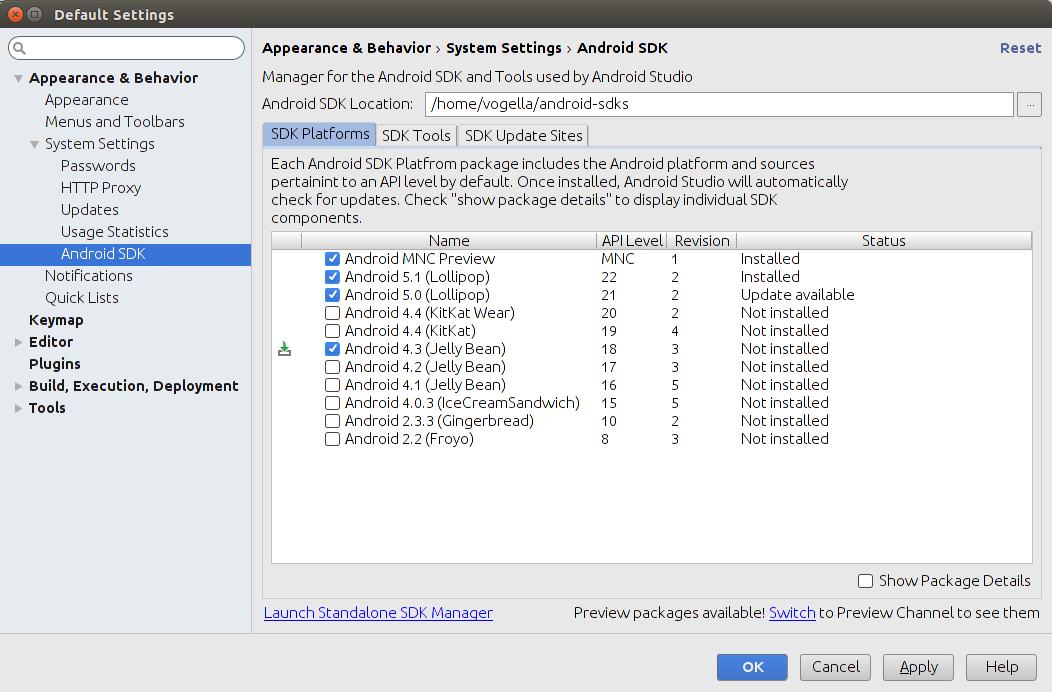
Press the OK button to start he installation.
The SDK Platforms tab is used to install API versions, which the SDK Tools is used to install the development tools.
2.4. Configuring the proxy server
If you are using a proxy sever you need to configure it.
From the menu bar, click (on a Mac, click .
In the left pane, click Appearance & Behavior > System Settings > HTTP Proxy. The HTTP Proxy page appears.
For project-wide HTTP proxy settings, set the proxy settings in the gradle/gradle.properties file.
systemProp.http.proxyHost=proxy.company.com
systemProp.http.proxyPort=443
systemProp.http.proxyUser=username
systemProp.http.proxyPassword=password
systemProp.http.auth.ntlm.domain=domain

systemProp.https.proxyHost=proxy.company.com
systemProp.https.proxyPort=443
systemProp.https.proxyUser=username
systemProp.https.proxyPassword=password
systemProp.https.auth.ntlm.domain=domain
See Android Studio configuration for details.
3. Intel emulator
3.1. Installation of the Intel emulator on Windows
At the time of this writing your also need to download and install extra drivers for MS windows.
After the download you find the driver in your Android installation directory in the extras/intel folder.
You need to install the drivers by running the .exe file.
|
This additional installation step is required on Window to accelerate the Intel emulator. Only downloading the driver via the Android does not make a difference. |
After the installation, you can create a new AVD based on the Intel emulator. The emulator does start faster and is way faster during the execution of your Android application.
3.1.1. Installation of the Intel emulator on Linux
Linux requires a more complex setup. For a detailed installation description see the Intel emulator installation guide which also includes detailed instructions for Windows.
4. Exercise: Create a virtual device (AVD)
To deploy and run your Android application, define a new Android virtual device (AVD) via Android Studio.
You can create new AVDs either:
-
before creating your first Android project
-
after your created an Android project
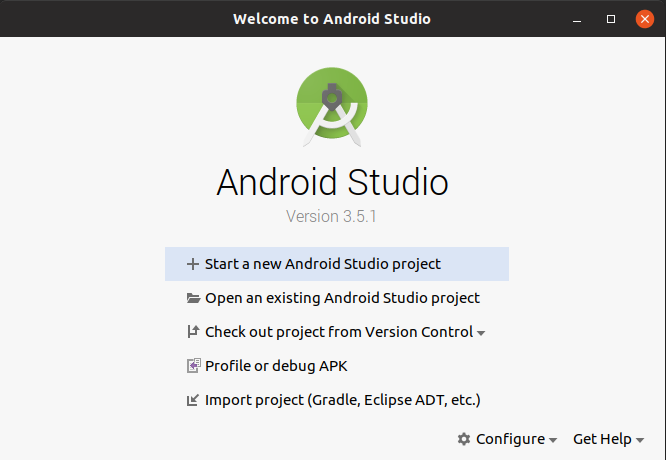
If you have not yet created a project, start Android Studio and wait until its Welcome to Android Studio screen appears. Near the bottom there is a Configure menu entry.
| You may have to resize the dialog to see this entry. |
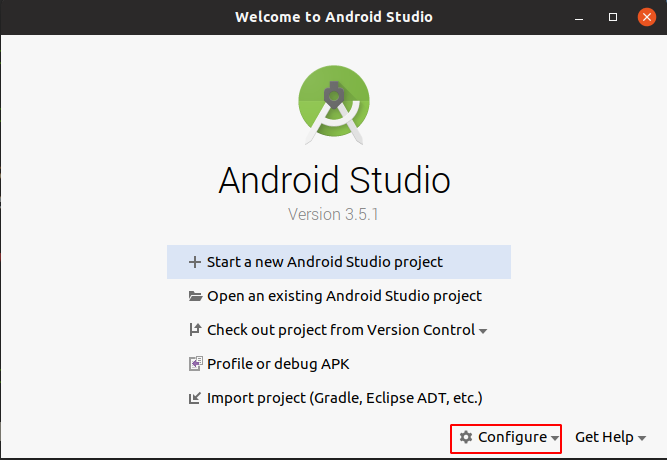
Click it and open the AVD Manager.
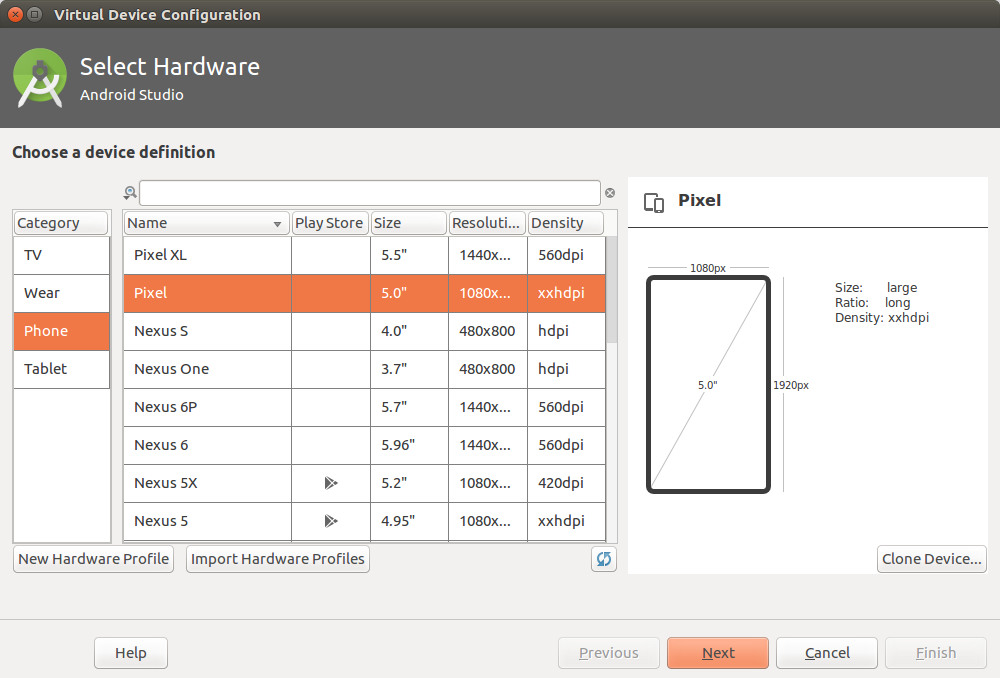
If you already created and Android project, open the AVD Manager via the menu entry. Define a AVD by pressing the + Create Virtual Device… button.
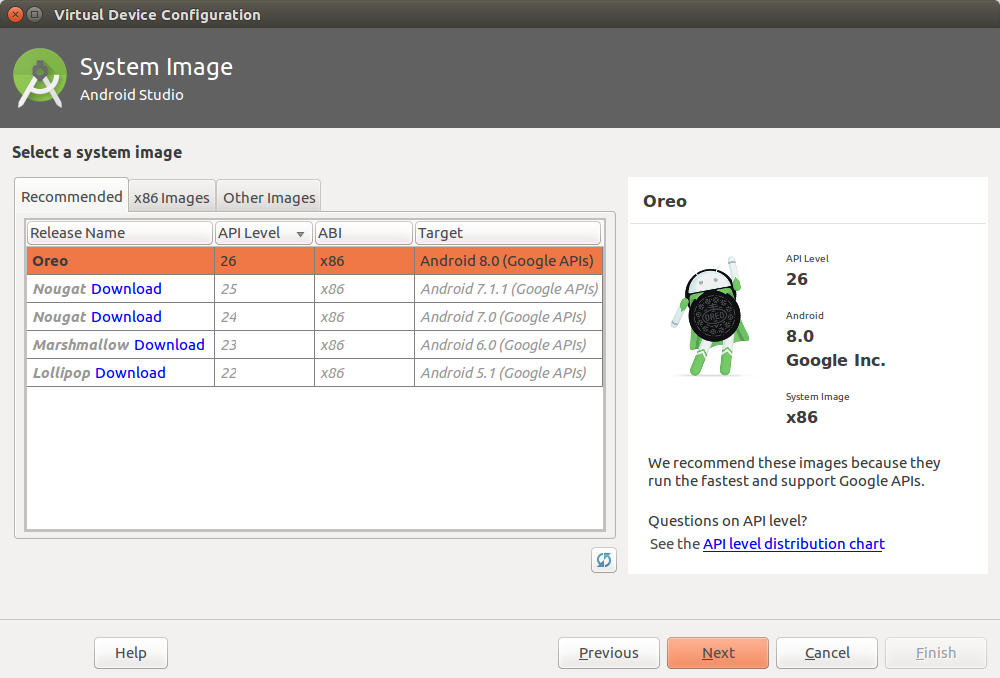
Select values similar to the following screenshots.
On the next screen select the latest API level for your AVD. You may need to select the option for additional images as highlighted in the following screenshot.
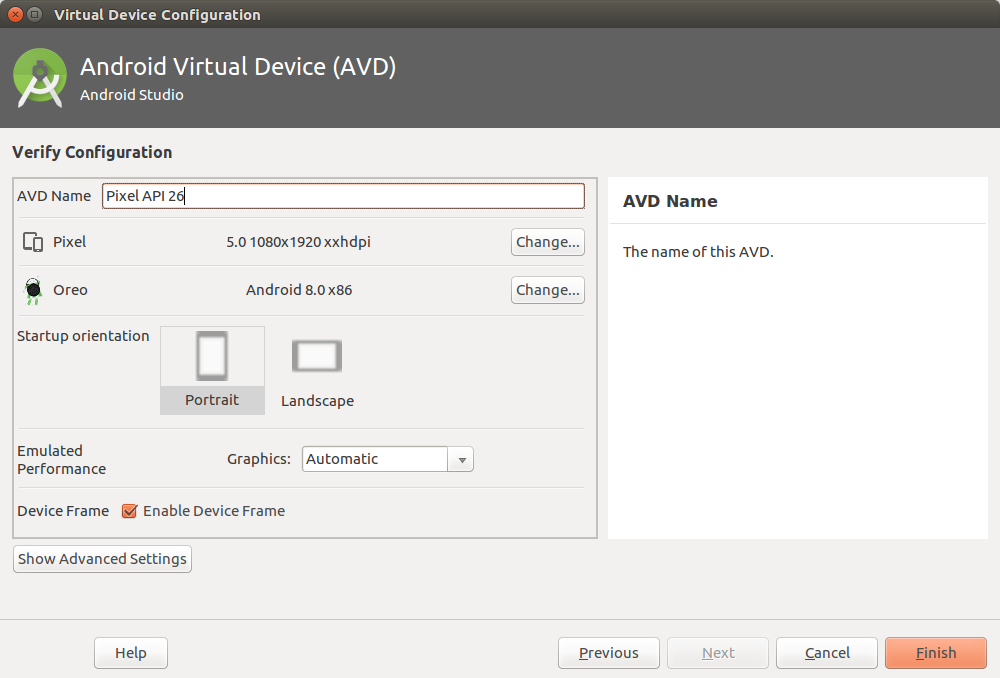
Afterwards, press the Finish button. This will create the AVD configuration and display it under the list of available virtual devices.
4.1. Start your virtual device
Select your new virtual device and press the Play button.
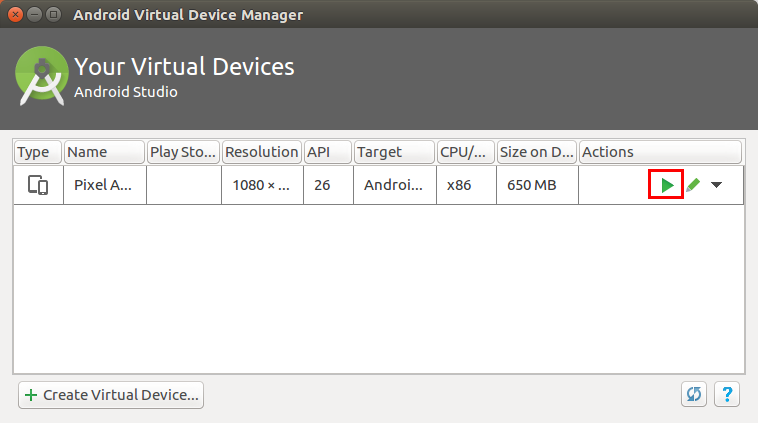
You can now ready to deploy and run your application on this virtual device.
5. Exercise: Getting started with Android Studio
In this exercise, you create an Android project and start it on an Android virtual device.
5.1. Create a new Android project
Press the Start a new Android Studio project link to get started. Alternatively, you can select the entry from the menu, if you already created a project earlier.
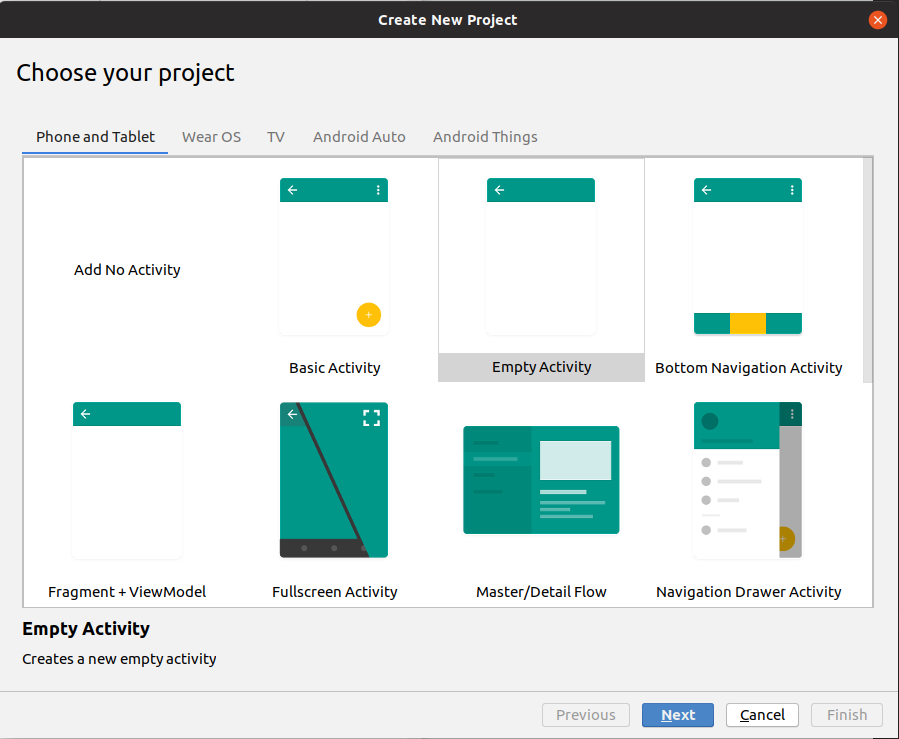
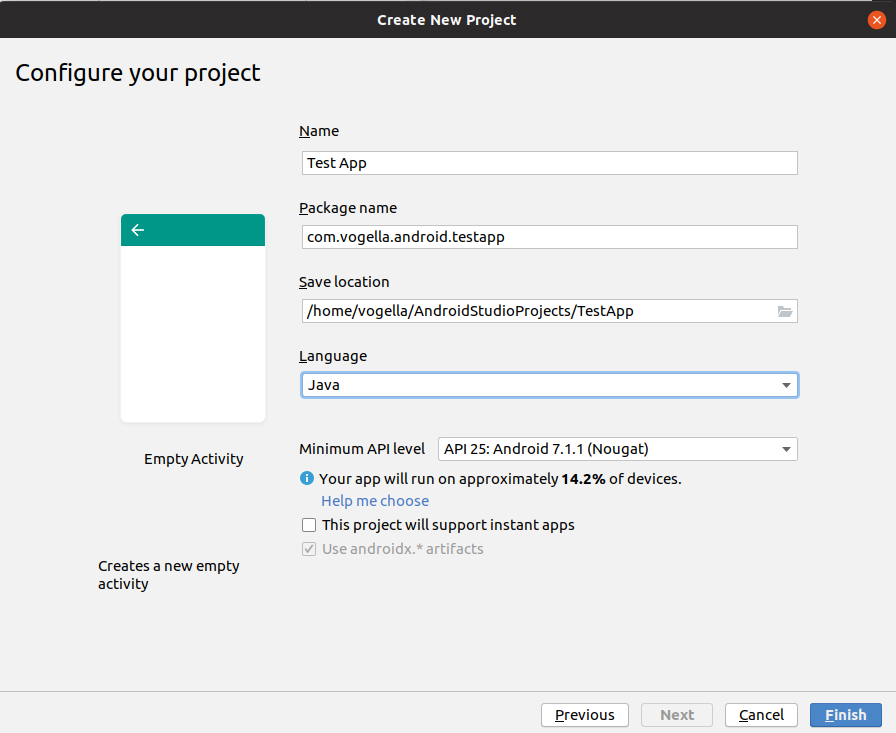
Use the following data of input for your project.
| Property | Value |
|---|---|
Used Template |
Empty Activity |
|Application name |Test App
|Package Name |com.vogella.android.testapp
|Language |Java
|Minimum API level |Latest
|
Android Studio automatically downloads required SDK versions. Depending on your installation, you may see additional dialogs. |
5.2. Review the generated project
Review the generated project structure and files.

As a next step you will create a virtual device to run your program on this.
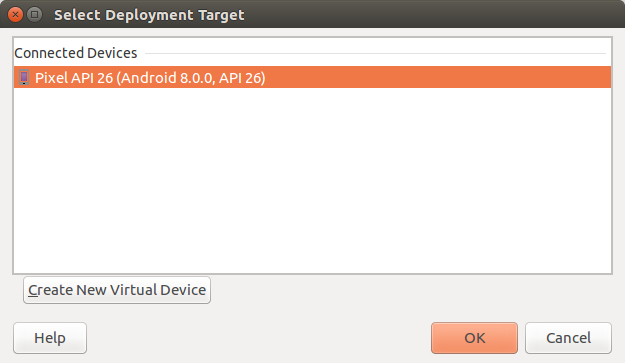
6. Start the application on your virtual device
Select to start your application. This opens a dialog in which you can select your device to deploy your application to.
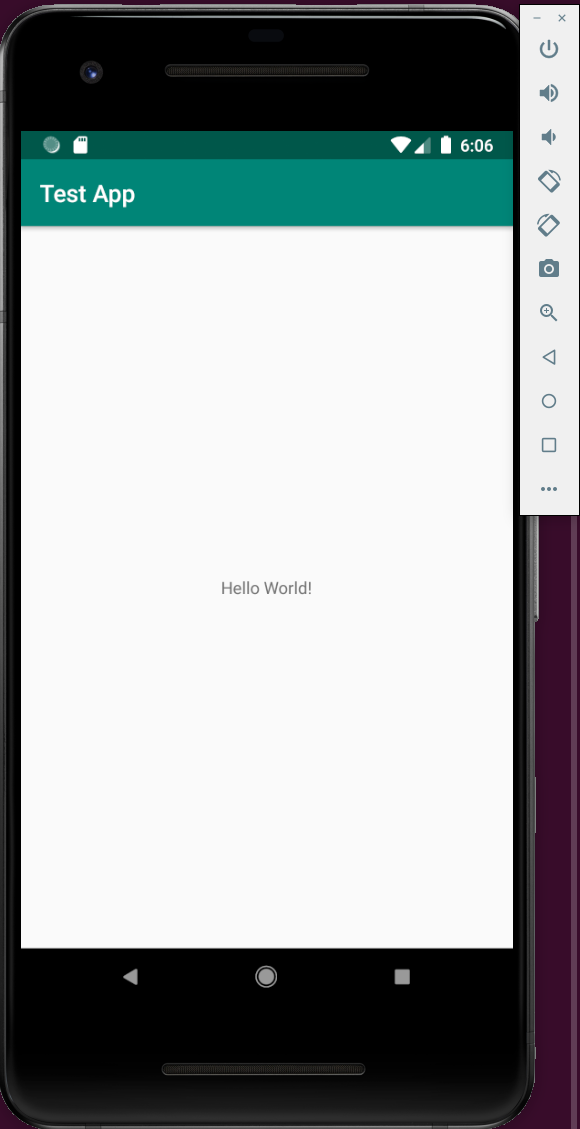
After a while your application should start on the virtual device.
7. Using views and view groups to design the user interface
7.1. Views - The widgets in Android
A view in Android represents a widget, e.g., a button, or a layout manager.
All views in Android extend the android.view.View class.
The Android SDK provides standard views, for example the Button, TextView and EditText classes.
The main packages for views are:
-
android.viewfor all base classes -
android.widgetfor the default widgets
Additional libraries provide more complex widgets, for example, RecyclerView.
View allows to add data to each widget via the setTag(Object) and setTag (int key, Object tag).
To retrieve this information use the getTag() and getTag(int key) methods.
7.2. View groups - Layout manager for the view arrangement
A layout manager is responsible for the layout of itself and its child views.
The base class for these layout managers is the android.view.ViewGroup class.
Layout managers can be nested to create complex layouts.
The most relevant layout managers in Android are:
-
ConstraintLayout - provided by an extra library -
LinearLayout -
FrameLayout -
RelativeLayout -
GridLayout
All layout manager can be configured via attributes. Children can also define attributes which may be evaluated by their parent layout.
|
Performance considerations with layouts
Calculating the layout and drawing the views is a resource intensive operation. You should use the simplest layout possible to achieve good performance. For example, you should avoid nesting layout managers too deeply or avoid using complex layout managers in case a simple layout manager is sufficient. A fast and still powerful layout manager in |
7.3. Layout files
Android activities define their user interface with views (widgets) and fragments.
This user interface can be defined via XML layout resource files in the /res/layout folder or via Java code.
You can also mix both approaches.
Defining layouts via XML layout files is the preferred way. This separates the programming logic from the layout definition. It also allows the definition of different layouts for different devices.
A layout resource file is referred to as layout.
A layout specifies the ViewGroups, Views, their relationship and their attributes via an XML representation.
The following code is an example for a simple layout file.
<RelativeLayout xmlns:android="http://schemas.android.com/apk/res/android"
xmlns:tools="http://schemas.android.com/tools"
android:layout_width="match_parent"
android:layout_height="match_parent"
>
<TextView
android:id="@+id/mytext"
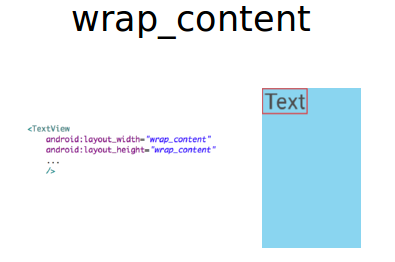
android:layout_width="wrap_content"
android:layout_height="wrap_content"
android:text="@string/hello_world" />
</RelativeLayout>A layout is assigned to an activity via the setContentView() method calls, as demonstrated in the following example code.
package com.vogella.android.first;

import android.os.Bundle;
import android.app.Activity;
import android.view.Menu;

public class MainActivity extends Activity {

    @Override
    protected void onCreate(Bundle savedInstanceState) {
        super.onCreate(savedInstanceState);
        setContentView(R.layout.activity_main);
    }

}
Children can specify their desired width and height via the following attributes.
-
android:layout_width- Defines the width of the widget. -
android:layout_height- Defines the height of the widget.
Views can define their size.
This can be done in units of measurement or via predefined layout values.
For example, as 100dp.
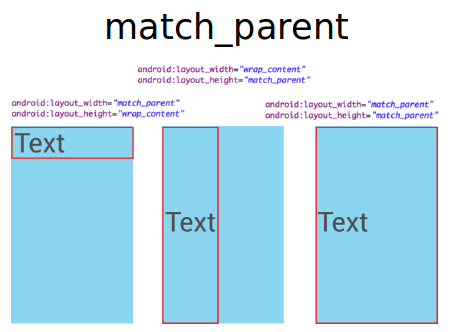
The match_parent value tells the application to maximize the widget in its parent.
The wrap_content value tells the layout to allocate the minimum amount so that the widget is rendered correctly.
The effect of these elements is demonstrated in the following graphics.
8. Layout manager
8.1. ConstraintLayout
ConstraintLayout is provided by an external library.
It allows you to use a flat view hierarchy and has great performance.
The design tools support constraint layout well.
New projects should prefer the usage of constraint layout.
ConstraintLayout allows you to define constraints for views.
The following xml file shows an example how to use the ConstraintLayout
<?xml version="1.0" encoding="utf-8"?>
<android.support.constraint.ConstraintLayout
    xmlns:android="http://schemas.android.com/apk/res/android"
    xmlns:app="http://schemas.android.com/apk/res-auto"
    android:layout_width="match_parent"
    android:layout_height="match_parent">

    <TextView
        android:id="@+id/text"
        android:layout_width="wrap_content"
        android:layout_height="wrap_content"
        android:layout_marginTop="16dp"
        android:text="TextView1"
        app:layout_constraintLeft_toLeftOf="parent"
        app:layout_constraintRight_toRightOf="parent"
        app:layout_constraintTop_toTopOf="parent" />

    <TextView
        android:layout_width="wrap_content"
        android:layout_height="wrap_content"
        android:layout_marginTop="16dp"
        android:text="TextView2"
        app:layout_constraintLeft_toLeftOf="@id/text"
        app:layout_constraintRight_toRightOf="@id/text"
        app:layout_constraintTop_toBottomOf="@id/text" />

</android.support.constraint.ConstraintLayout>
In the Layout Editor this is shown as follows
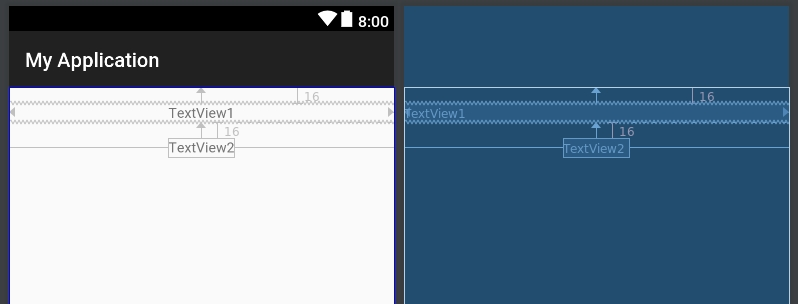
Using the above constraints for TextView1 its left, right and top edges are aligned to their respective parent edge.
By setting the width of TextView1 to 0dp the view expands to fulfill its horizontal constraints.
The position of TextView2 is dependent on the position of TextView1 but in contrast to TextView1, TextView2 only expands to fit its contents (using wrap_content).
|
In |
There are several attributes in ConstraintLayout to define the size or position of a view.
-
ratio: To size elements you can define an aspect ratio (e.g.,
16:9). To define an aspect ratio one dimension has to be set to0dp(match constraints). In xml you can useapp:layout_constraintDimensionRatio. -
barriers: To align elements which size change dynamically you can define a barrier.
-
chains: To position multiple elements at once you can define a chain. A chain groups multiple elements.
8.2. FrameLayout
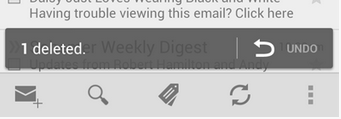
FrameLayout is a layout manager which draws all child elements on top of each other.
This allows to create nice visual effects.
The following screenshot shows the Gmail application that uses FrameLayout to display several button on top of another layout.
8.3. LinearLayout
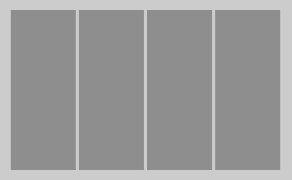
LinearLayout puts all its child elements into a single column or row depending on the android:orientation attribute.
Possible values for this attribute are horizontal and vertical.
horizontal is the default value.
If horizontal is used, the child elements are layouted as indicated by the following picture.
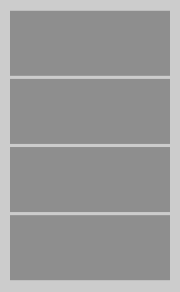
Vertical would result in a layout as depicted in the following picture.
LinearLayout can be nested to achieve more complex layouts.
LinearLayout supports assigning a weight to individual children via the android:layout_weight layout parameter.
This value specifies how much of the extra space in the layout is allocated to the corresponding view.
If, for example, you have two widgets and the first one defines a layout_weight of 1 and the second of 2.
The first gets 1/3 of the available space and the other one 2/3.
You can also set the layout_width to zero to always have a certain ratio.
8.4. RelativeLayout
RelativeLayout allows positioning the widget relative to each other.
This can be used for complex layouts.
RelativeLayout is a complex layout manager and should only be used if such a complex layout is required, as it performs a resource intensive calculation to layout its children.
A simple usage for RelativeLayout is if you want to center a single component.
Just add one component to the RelativeLayout and set the android:layout_centerInParent attribute to true.
<?xml version="1.0" encoding="utf-8"?>
<RelativeLayout xmlns:android="http://schemas.android.com/apk/res/android"
android:layout_width="match_parent"
android:layout_height="match_parent"
android:orientation="vertical" >
<ProgressBar
android:id="@+id/progressBar1"
style="?android:attr/progressBarStyleLarge"
android:layout_width="wrap_content"
android:layout_height="wrap_content"
android:layout_centerInParent="true"
/>
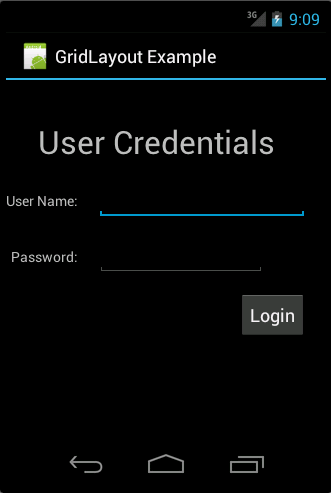
</RelativeLayout>8.5. GridLayout
GridLayout allows you to organize views into a grid / table.
GridLayout separates its drawing area into: rows, columns, and cells.
You can specify how many columns the grid should have.
For each view you can specify in which row and column it should be placed and how many columns and rows it should use.
If not specified, GridLayout uses defaults, e.g., one column, one row and the view position depends on the order of the declaration.
The following layout file defines a layout using GridLayout.
<?xml version="1.0" encoding="utf-8"?>
<GridLayout xmlns:android="http://schemas.android.com/apk/res/android"
    android:id="@+id/GridLayout1"
    android:layout_width="match_parent"
    android:layout_height="match_parent"
    android:columnCount="4"
    android:useDefaultMargins="true" >

    <TextView
        android:layout_column="0"
        android:layout_columnSpan="3"
        android:layout_gravity="center_horizontal"
        android:layout_marginTop="40dp"
        android:layout_row="0"
        android:text="User Credentials"
        android:textSize="32dip" />

    <TextView
        android:layout_column="0"
        android:layout_gravity="right"
        android:layout_row="1"
        android:text="User Name: " >
    </TextView>

    <EditText
        android:id="@+id/input1"
        android:layout_column="1"
        android:layout_columnSpan="2"
        android:layout_row="1"
        android:ems="10" />

    <TextView
        android:layout_column="0"
        android:layout_gravity="right"
        android:layout_row="2"
        android:text="Password: " >
    </TextView>

    <EditText
        android:id="@+id/input2"
        android:layout_column="1"
        android:layout_columnSpan="2"
        android:layout_row="2"
        android:inputType="textPassword"
        android:ems="8" />

    <Button
        android:id="@+id/button1"
        android:layout_column="2"
        android:layout_row="3"
        android:text="Login" />

</GridLayout>
This creates a user interface similar to the following screenshot.
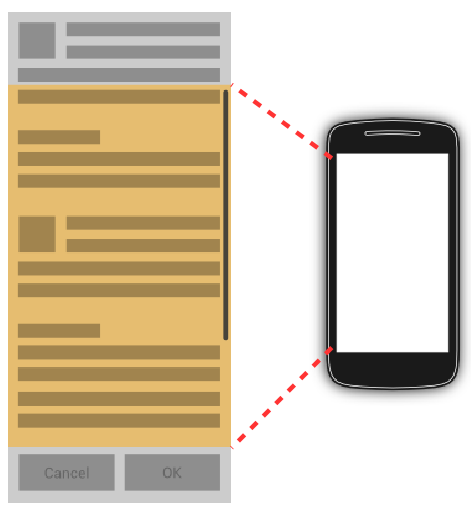
9. ScrollView
The ScrollView or the HorizontalScrollView class is useful to make views available, even if they do not fit onto the screen.
A scroll view can contain one view, e.g., a layout manager containing more views.
If the child view is too large, scroll view allows scrolling the content.
The following code shows an example layout file that uses a ScrollView.
<?xml version="1.0" encoding="utf-8"?>
<ScrollView xmlns:android="http://schemas.android.com/apk/res/android"
    android:layout_width="match_parent"
    android:layout_height="match_parent"
    android:fillViewport="true"
    android:orientation="vertical" >

    <TextView
        android:id="@+id/TextView01"
        android:layout_width="wrap_content"
        android:layout_height="wrap_content"
        android:paddingLeft="8dip"
        android:paddingRight="8dip"
        android:paddingTop="8dip"
        android:text="This is a header"
        android:textAppearance="?android:attr/textAppearanceLarge" >
    </TextView>

</ScrollView>
The android:fillViewport="true" attribute ensures that the scrollview is set to the full screen even if the elements are smaller than one screen.
10. Using resources in Android applications
Previously, you learned about layout files, which a static XML files. In this chapter you learn about other static resource files
10.1. Resource files
Static resources like images and XML configuration files are used in Android applications.
Resource files must be placed in the /res directory of your application in a predefined sub-folder. The specific sub-folder depends on type of resource which is stored. You can also append additional qualifiers to the folder name. These are called resource qualifiers. These qualifiers indicate that the related resources should be used for special device configurations. For example, you can specify that a layout file is only valid for a certain screen size.
The following table gives an overview of the supported resources and their standard folder prefixes.
| Resource | Folder | Description |
|---|---|---|
Drawables |
/res/drawables |
Images (e.g., png or jpeg files)or vector drawables or XML files which scale automatically with the density of the Android device |
Simple Values |
/res/values |
Used to define strings, colors, dimensions, styles and static arrays of strings or integers via XML files. By convention each type is stored in a separate file, e.g., strings are defined in the res/values/strings.xml file. |
Layouts |
/res/layout |
XML files with layout descriptions are used to define the user interface for activities and fragments. |
Styles and themes |
/res/values |
Files which define the appearance of your Android application. |
Animations |
/res/animator |
Defines animations in XML for the animation API that allows to animate arbitrary properties of objects over time. |
Raw data |
/res/raw |
Arbitrary files saved in their raw form. You access them via an |
Menus |
/res/menu |
Defines the actions that can be used in the toolbar of the application. |
For example, the following values.xml file in the /res/values folder defines several resources. It defines a few String constants, a String array, a color and a dimension.
<?xml version="1.0" encoding="utf-8"?>
<resources>

    <string name="app_name">Test</string>
    <string name="action_settings">Settings</string>
    <string name="hello_world">Hello world!</string>

    <string-array name="operationsystems">
        <item>Ubuntu</item>
        <item>Android</item>
        <item>Microsoft Windows</item>
    </string-array>

    <color name="red">#ffff0000</color>

    <dimen name="mymargin">10dp</dimen>

</resources>
10.2. Resource files and R.java
Every relevant resource in the res folder, gets an ID assigned by the Android build system. The Android tooling generates a R.java file that contains the generated values. These references are static integer values.
If you add a new resource file, the corresponding reference is automatically created in a R.java file. Manual changes in the R.java file are not necessary and are overwritten by the tooling. The Android system provides methods to access the corresponding resource files via these IDs.
For example, to access a String with the R.string.yourString ID you would use the getString(R.string.yourString)
method.
This method is defined via the Context class.
10.3. Good practices for resources IDs
If a view needs to be accessed via Java or XML code, you have to give the view a unique ID via the android:id attribute.
To assign a new ID to a view use the android:id attribute of the corresponding element in the layout file.
The Android SDK uses the camel-case notation for its IDs, e.g., buttonRefresh.
It is a good practice to follow this approach.
The following shows an example in which a button gets the button1 ID assigned via the android:id="@+id/button1" parameter.
By conversion this statement creates a new ID if necessary in the R.java file and assigns the defined ID to the corresponding view.
<Button
    android:id="@+id/button1"
    android:layout_width="wrap_content"
    android:layout_height="wrap_content"
    android:text="Show Preferences" >
</Button>|
It is possible to define IDs in one central configuration file. This file is typically called ids.xml and placed in the /res/values folder. This allows you to use the predefined ID in your layout file. If you want to define the ID in a separate file, you first need to remove the @+id entries in your layout files. Otherwise, you get an error messages that these files have already been created. The following listing shows an example for such a file. |
10.4. System resources
Android also provides resources.
These are called system resources.
System resources are distinguished from local resources by the android namespace prefix.
For example, android.R.string.cancel defines the platform string for a cancel operation.
10.5. References to resources in code
The Resources class allows to access individual resources.
An instance of the Resources class can be retrieved via the getResources() method of the Context class.
As activities and services extend the Context class, you can directly use this method in implementations of these components.
An instance of the Resources class is also required by other Android framework classes.
For example, the following code shows how to create a Bitmap file from a reference ID.
// BitmapFactory requires an instance of the Resource class
BitmapFactory.decodeResource(getResources(), R.drawable.ic_action_search);
10.6. Accessing views from the layout in an activity
In your activity (and fragment) code you frequently need to access the views to access and modify their properties.
In an activity you can use the findViewById(id) method call to search for a view in the current layout.
The id is the ID attribute of the view in the layout.
The usage of this method is demonstrated by the following code.
@Override
protected void onCreate(Bundle savedInstanceState) {
    super.onCreate(savedInstanceState);
    setContentView(R.layout.activity_main);
    TextView textView = (TextView) findViewById(R.id.mytext);

    // TODO do something with the TextView
}
It is also possible to search in a view hierarchy with the findViewById(id) method, as demonstrated in the following code snippet.
// search in the layout of the activity
LinearLayout linearLayout = (LinearLayout) findViewById(R.id.mylayout);

// afterwards search in linearLayout for another view
TextView textView = (TextView) linearLayout.findViewById(R.id.mytext);

// note, you could have directly searched for R.id.mytext, the above coding
// is just for demonstration purposes|
You could also build a utility method which makes access to views easier. This would allow you to find the view without explicit cast in your view hierarchy. |
10.7. Reference to resources in XML files
In your XML files, for example, your layout files, you can refer to other resources via the @ sign.
For example, if you want to refer to a color, which is defined in an XML resource, you can refer to it via @color/your_id.
Or if you defined a String with the "titlepage" key in an XML resource, you could access it via @string/titlepage
To use an Android system resource, include the android namespace into the references, e.g., android.R.string.cancel.
10.8. Providing other resources via the assets directory
The res directory contains structured values which predefined semantics for the Android platform. The assets directory can be used to store data. You can access files stored in this folder based on their path. The assets directory also allows you to have sub-folders.
|
You could also store unstructured data in the /res/raw folder. But it is considered good practice to use the assets directory for such data. |
You access this data via the AssetsManager which you can access via the getAssets() method from an instance of the Context class.
The AssetsManager class allows you to read a file in the assets folder as InputStream with the open() method.
The following code shows an example for this.
// get the AssetManager
AssetManager manager = getAssets();

// read the "logo.png" bitmap from the assets folder
InputStream open = null;
try {
    open = manager.open("logo.png");
    Bitmap bitmap = BitmapFactory.decodeStream(open);
    // assign the bitmap to an ImageView in this layout
    ImageView view = (ImageView) findViewById(R.id.imageView1);
    view.setImageBitmap(bitmap);
    } catch (IOException e) {
        e.printStackTrace();
    } finally {
        if (open != null) {
            try {
                open.close();
            } catch (IOException e) {
                e.printStackTrace();
            }
        }
}
11. Exercise: Your first interactive user interface
11.1. Review generated layout
Continue to use your project which you created earlier with the com.vogella.android.testapp package.
Open the activity_main.xml layout file located in the res/layout folder.
This file is used in the generated activity class via the setContentView reference.
Investigate the XML layout in the visual editor as well in as the XML structure.
11.2. Rename your activity
MainActivity is not a descriptive name.
Change the class name to CreateUserActivity.java.
Ensure the AndroidManifest.xml entry is updated and rename also its layout file from activity_main.xml to activity_create_user.xml.
Ensure that you update the reference to the layout file in the onCreate method call in CreateUserActivity.
11.3. Build an initial user interface
Remove all views, except the top level entry which is the layout manager. In the visual design mode you can remove a view by right-clicking it and by selecting the Delete entry for the context menu.
|
ConstraintLayout is the preferred layout manager for modern apps, but it is heavily based on the graphical layout editor. Therefore, we start with using simpler layout managers that can also be easy edited via XML. |
If necessary, change the layout manager to RelativeLayout.
The result layout file should look similar to the following file.
<?xml version="1.0" encoding="utf-8"?>
<RelativeLayout
    xmlns:android="http://schemas.android.com/apk/res/android"
    xmlns:app="http://schemas.android.com/apk/res-auto"
    xmlns:tools="http://schemas.android.com/tools"
    android:layout_width="match_parent"
    android:layout_height="match_parent"
    >


</RelativeLayout>|
Android Studio changes its templates frequently, so your layout file might look at bit different. For the purpose of the exercises, the layout file must not be exactly the same, as long as the result looks similar. |
Add a TextView, a Plain Text (EditText) and a Button to your layout. The easiest way is to find these elements in the Palette and drag and drop them into your layout.
Use the text (XML) editor to change the ID of the new EditText field to username.
In the XML file this looks like @+id/username.
Change the button text to Create via the android:text property in your layout file.
Assign the name onClick to the android:onClick property of your Button.
|
This defines that a |
After these changes your layout file should be similar to the following code.
<RelativeLayout xmlns:android="http://schemas.android.com/apk/res/android"
                xmlns:tools="http://schemas.android.com/tools"
                android:layout_width="match_parent"
                android:layout_height="match_parent"
    >

    <TextView
        android:id="@+id/userlabel"
        android:layout_width="wrap_content"
        android:layout_height="wrap_content"
        android:layout_margin="16dp"
        android:text="User"
        android:textSize="24sp"
        />

    <EditText
        android:id="@+id/username"
        android:layout_width="wrap_content"
        android:layout_height="wrap_content"
        android:layout_alignStart="@+id/userlabel"
        android:layout_below="@+id/userlabel"
        android:ems="10"
        android:inputType="textPersonName"
        android:text=""
        android:textSize="36sp"
        />

    <Button
        android:id="@+id/createUserButton"
        android:layout_width="wrap_content"
        android:layout_height="wrap_content"
        android:layout_alignParentEnd="true"
        android:layout_margin="16dp"
        android:layout_below="@+id/username"
        android:text="Create"
        android:onClick="onClick"
        />

</RelativeLayout>|
You see some warning messages in the editor, e.g., because you used hard-codes strings. These can be ignored for small demo applications. |
If you run your application and press the button your application crashes because you still need to adjust your activity.
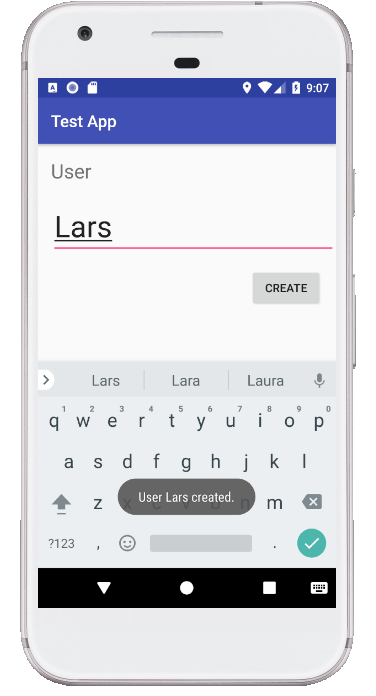
11.4. Display text from your user field as a popup
In your activity class implement the public void onClick (View view) method.
Use the findViewById(id) method with the correct id and cast the returned object into EditText.
EditText text = findViewById(R.id.username);
// on older Android versions you may have to add the cast
// EditText text = (EditText) findViewById(id)
You can get the right id via the R class.
Use the text.getText().toString() method to read the string in the editor field and add the text to your Toast message.
// imports for information

import android.app.Activity;
import android.os.Bundle;
import android.view.View;
import android.widget.EditText;
import android.widget.Toast;

// as before

public void onClick(View view) {
    EditText input = (EditText) findViewById(R.id.username);
    String string = input.getText().toString();
    Toast.makeText(this, "User " + string + " created.", Toast.LENGTH_LONG).show();
}
11.5. Validate popup message
Start your application and ensure that the message displays the text which the text field contains.
11.6. Enable Java 8 features
To be able to use Java 8 features like lambda expressions, add the compileOptions closure to your app/build.gradle file in the android closure.
android {
  compileOptions {
        sourceCompatibility JavaVersion.VERSION_1_8
        targetCompatibility JavaVersion.VERSION_1_8
    }
   // more settings
}
12. Exercise: Adding radio buttons
Continue to use your project which you extended before exercise. In this exercise, you add radio buttons for the gender selection.
12.1. Download two images from the Internet
To create the desired layout you need two images (male and female) for the gender.
Use the Internet to find two fitting icons.
|
At the time of this writing https://www.clipsafari.com/ or https://www.shareicon.net/ free icons. |
Place these two images into your drawable resource folder.
Now you are ready to create the layout.
12.2. Add radio group and radio buttons to your layout
Open your layout file and add a radio group with two radio buttons to your layout.
Assign IDs to them, based on the following table.
| ID | View |
|---|---|
gender |
Radio Group |
male |
First radio button |
female |
Second radio button |
The resulting layout file should be similar to the following listing.
<RelativeLayout xmlns:android="http://schemas.android.com/apk/res/android"
                xmlns:tools="http://schemas.android.com/tools"
                android:layout_width="match_parent"
                android:layout_height="match_parent"
    >

    <TextView
        android:id="@+id/userlabel"
        android:layout_width="wrap_content"
        android:layout_height="wrap_content"
        android:layout_margin="16dp"
        android:text="User"
        android:labelFor="@id/username"
        android:textSize="24sp"
        />

    <EditText
        android:id="@+id/username"
        android:layout_width="wrap_content"
        android:layout_height="wrap_content"
        android:layout_alignStart="@+id/userlabel"
        android:layout_below="@+id/userlabel"
        android:ems="10"
        android:inputType="textPersonName"
        android:text=""
        android:textSize="36sp"
        />

    <RadioGroup
        android:id="@+id/gender"
        android:layout_below="@id/username"
        android:layout_width="match_parent"
        android:layout_height="wrap_content"
        android:orientation="horizontal"
        android:layout_marginTop="16dp">

        <RadioButton
            android:id="@+id/female"
            android:button="@drawable/female"
            android:layout_width="wrap_content"
            android:layout_height="wrap_content"
            android:text="Female" >
        </RadioButton>

        <RadioButton
            android:id="@+id/male"
            android:button="@drawable/male"
            android:layout_width="wrap_content"
            android:layout_height="wrap_content"
            android:checked="true"

            android:text="Male" >
        </RadioButton>

    </RadioGroup>
    <Button
        android:id="@+id/createUserButton"
        android:layout_width="wrap_content"
        android:layout_height="wrap_content"
        android:layout_alignParentEnd="true"
        android:layout_margin="16dp"
        android:layout_below="@+id/gender"
        android:text="Create"
        android:onClick="onClick"
        />

</RelativeLayout>|
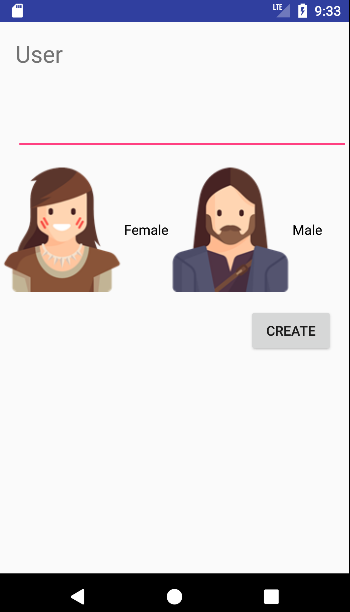
The |
The resulting layout should look like the following screenshot.
12.3. Register listener to your radiogroup
Listen to the selecton of the radio group.
|
You can use the following code as template to implement the listener. |
12.4. Add the selected button to your Toast
Now add the gender to your toast. As this is easy to implement, no example code is given.
12.5. Validate
Run your application and select the different radio button.
Display your Toast and ensure the correct data (user name and gender) is displayed.
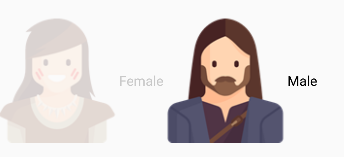
12.6. Optional: Change alpha value to indicate the selection
Adjust the alpha value of the radio button which is not selected to indicate which button was selected.
13. Exercise: Create a temperature converter
In this exercise, you learn how to create and consume Android resources.
This application is available on Google Play under the following URL: https://play.google.com/store/apps/details?id=de.vogella.android.temperature
You can also scan the following barcode with your Android phone to install it via the Google Play application.

13.1. Create Project
Create a new Android project with the following data.
| Property | Value |
|---|---|
Application Name |
Temperature Converter |
Package name |
com.vogella.android.temperatureconverter |
Minimum SDK |
Latest Android release |
Template |
Empty Activity |
Activity |
MainActivity |
Layout |
activity_main |
Backwards Compatibility (AppCompat) |
false (not selected) |
13.2. Create attributes
Select the res/values/strings.xml file to open the editor for this file. Add the Color and String definitions to the file as described by the following table.
| Type | Name | Value |
|---|---|---|
Color |
myColor |
#F5F5F5 |
String |
celsius |
to Celsius |
String |
fahrenheit |
to Fahrenheit |
String |
calc |
Calculate |
Afterwards, the file should look similar the following.
<?xml version="1.0" encoding="utf-8"?>
<resources>

    <string name="app_name">Temperature Converter</string>
    <string name="action_settings">Settings</string>
    <string name="hello_world">Hello world!</string>
    <color name="myColor">#F5F5F5</color>
    <string name="celsius">to Celsius</string>
    <string name="fahrenheit">to Fahrenheit</string>
    <string name="calc">Calculate</string>

</resources>
13.3. Creating the layout
Open the res/layout/activity_main.xml file.
Remove any existing view from your layout, either directly from the XML source or via the graphical editor.
Afterwards, add a LinearLayout with one EditText as child.
Afterwards, add a RadioGroup with two radio buttons and a button to your layout.
Do this either directly in the XML file or via the graphical editor.
A simple way of organizing the components is to drag and drop them onto the Component Tree view.
The result should look like the following screenshots. The first one shows the component view the second one the preview.

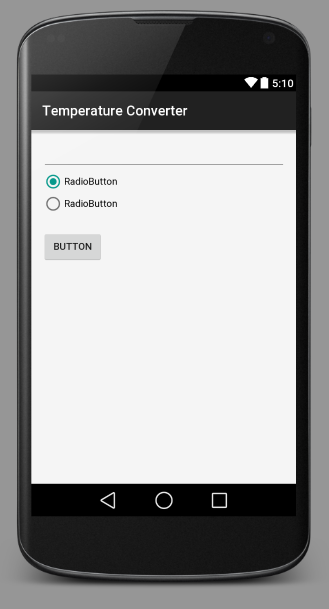
Switch to the XML tab of your layout file and verify that the file looks similar to the following listing.
|
The Android tools team changes the generated code from time to time, so your XML might look slightly different. |
<LinearLayout xmlns:android="http://schemas.android.com/apk/res/android"
    xmlns:tools="http://schemas.android.com/tools"
    android:layout_width="match_parent"
    android:layout_height="match_parent"
    android:orientation="vertical"
    android:background="@color/myColor">


    <EditText
        android:layout_width="match_parent"
        android:layout_height="wrap_content"
        android:id="@+id/editText1" />

    <RadioGroup
        android:id="@+id/radioGroup1"
        android:layout_width="wrap_content"
        android:layout_height="wrap_content"
        android:layout_alignStart="@+id/editText1"
        android:layout_below="@+id/editText1">

        <RadioButton
            android:id="@+id/radio0"
            android:layout_width="wrap_content"
            android:layout_height="wrap_content"
            android:checked="true"
            android:text="RadioButton" />

        <RadioButton
            android:id="@+id/radio1"
            android:layout_width="wrap_content"
            android:layout_height="wrap_content"
            android:text="RadioButton" />
    </RadioGroup>

    <Button
        android:id="@+id/button1"
        android:layout_width="wrap_content"
        android:layout_height="wrap_content"
        android:layout_alignStart="@+id/radioGroup1"
        android:layout_below="@+id/radioGroup1"
        android:layout_marginTop="22dp"
        android:text="Button" />

</LinearLayout>|
You see some warning messages. You fix these in the following section of this exercise. |
13.4. Edit view properties
Switch to the XML representation of the file and assign the @string/celsius value to the android:text property of the first radio button.
Assign the fahrenheit string attribute to the text property of the second radio button.
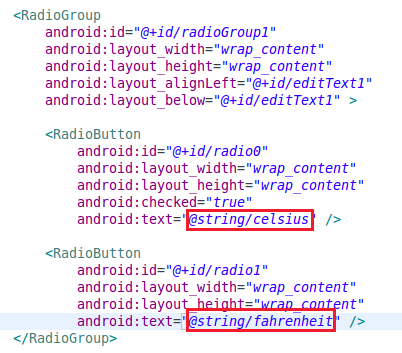
Ensure that the checked property is set to true for the first RadioButton.
Assign @string/calc to the text property of your button and assign the value onClick to the onClick property.
Set the inputType property to numberSigned and numberDecimal on the EditText.
As an example you can use the last line in the following XML snippet.
Also change its ID to "inputValue".
<EditText
  android:id="@+id/inputValue"
  android:layout_width="match_parent"
  android:layout_height="wrap_content"
  android:layout_alignParentEnd="true"
  android:layout_below="@+id/textView"
  android:ems="10"
  android:inputType="numberSigned|numberDecimal" />
All your user interface components are contained in a layout.
Assign the background color to this Layout.
Select Color and then select myColor in the dialog.
As an example, you can use the last line in the following XML snippet.
<LinearLayout xmlns:android="http://schemas.android.com/apk/res/android"
    xmlns:tools="http://schemas.android.com/tools"
    android:layout_width="match_parent"
    android:layout_height="match_parent"
    android:orientation="vertical"
    android:background="@color/myColor">
Afterwards, the background should change to the whitesmoke color. It might be difficult to see the difference.
Switch to the activity_main.xml tab and verify that the XML is correct.
<LinearLayout xmlns:android="http://schemas.android.com/apk/res/android"
    xmlns:tools="http://schemas.android.com/tools"
    android:layout_width="match_parent"
    android:layout_height="match_parent"
    android:orientation="vertical"
    android:background="@color/myColor">


    <EditText
        android:layout_width="match_parent"
        android:layout_height="wrap_content"
        android:id="@+id/inputValue"
        android:inputType="numberSigned|numberDecimal"/>

    <RadioGroup
        android:id="@+id/radioGroup1"
        android:layout_width="wrap_content"
        android:layout_height="wrap_content"
        android:layout_alignStart="@+id/editText1"
        android:layout_below="@+id/editText1">

        <RadioButton
            android:id="@+id/radio0"
            android:layout_width="wrap_content"
            android:layout_height="wrap_content"
            android:checked="true"
            android:text="@string/celsius" />

        <RadioButton
            android:id="@+id/radio1"
            android:layout_width="wrap_content"
            android:layout_height="wrap_content"
            android:text="@string/fahrenheit" />
    </RadioGroup>

    <Button
        android:id="@+id/button1"
        android:layout_width="wrap_content"
        android:layout_height="wrap_content"
        android:layout_alignStart="@+id/radioGroup1"
        android:layout_below="@+id/radioGroup1"
        android:layout_marginTop="22dp"
        android:text="@string/calc"
        android:onClick="onClick"/>

</LinearLayout>
13.5. Create utiliy class
Create the following utility class to convert from celsius to fahrenheit and vice versa.
package com.vogella.android.temperatureconverter;

public class ConverterUtil {
    // converts to celsius
    public static float convertFahrenheitToCelsius(float fahrenheit) {
        return ((fahrenheit - 32) * 5 / 9);
    }

    // converts to fahrenheit
    public static float convertCelsiusToFahrenheit(float celsius) {
        return ((celsius * 9) / 5) + 32;
    }
}
13.6. Change the activity code
Change the MainActivity to the following
package com.vogella.android.temperatureconverter;
import android.app.Activity;
import android.os.Bundle;
import android.view.View;
import android.widget.EditText;
import android.widget.RadioButton;
import android.widget.Toast;
public class MainActivity extends Activity {
private EditText text;
@Override
public void onCreate(Bundle savedInstanceState) {
super.onCreate(savedInstanceState);
setContentView(R.layout.activity_main);
text = (EditText) findViewById(R.id.inputValue);
}
// this method is called at button click because we assigned the name to the
// "OnClick" property of the button
public void onClick(View view) {
switch (view.getId()) {
case R.id.button1:
RadioButton celsiusButton = (RadioButton) findViewById(R.id.radio0);
RadioButton fahrenheitButton = (RadioButton) findViewById(R.id.radio1);
if (text.getText().length() == 0) {
Toast.makeText(this, "Please enter a valid number",
Toast.LENGTH_LONG).show();
return;
}
float inputValue = Float.parseFloat(text.getText().toString());
if (celsiusButton.isChecked()) {
text.setText(String
.valueOf(ConverterUtil.convertFahrenheitToCelsius(inputValue)));
celsiusButton.setChecked(false);
fahrenheitButton.setChecked(true);
} else {
text.setText(String
.valueOf(ConverterUtil.convertCelsiusToFahrenheit(inputValue)));
fahrenheitButton.setChecked(false);
celsiusButton.setChecked(true);
}
break;
}
}
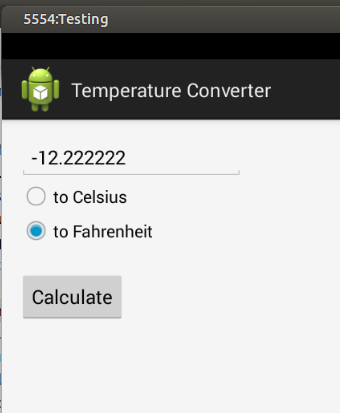
}13.7. Start the application
Start your Android application and type in a number, select your conversion and press the button. The result should be displayed and the other option should get selected.
14. Important resources selectors
Android devices comes in a variety of different configurations in the sense of size, screen pixel density, language settings, etc. Android supports the automatic selection of resources fitting to the device configuration.
For this, you provide different resources in predefined sub-folders in the res directory.
The suffix name of a sub-folder defines the device configuration for which it is valid, e.g., orientation, resolution, languages).
14.1. Screen density
Screens of Android devices are different in terms of resolution and in terms of density of the pixels on the screen. In case of a different screen densities the same length of a user interface component consists of a different amount of pixels.
For example, if you specify the pixels directly, you might get the following result on a device with a relatively low number of pixels.
Using the same number of pixels on a device with more pixels might lead to an unusable graphical user interface.
For this reason you should provide graphical resources, e.g., the laucher and action bar icons in different resolutions. This can be done by using resource qualifiers based on the pixel desity.
You can use the density as resource qualifier. Android support the following selections. The baseline is 160 dots per inch (dpi). If for example the Android device has 320 dpi, the Drawable from the drawable-hdpi is selected.
| Density selector | Equals |
|---|---|
ldpi |
160 dpi x 0.75 |
mdpi |
160 dpi |
hdip |
1.5 x 160 dpi = 240 dpi |
xhdpi |
2 x 160 dpi = 320 dpi |
xxhdpi |
3 x 160 dpi = 480 dpi |
xxxhdpi |
4 x 160 dpi = 640 dpi |
14.2. Icon sizes
You should provide your launcher, action bar and notification bar icons in the important five size.
| Icons | mdpi | hdpi | xhdpi | xxhdpi | xxxhdpi |
|---|---|---|---|---|---|
Launcher icon |
48 px |
72 px |
96 px |
144 px |
192 px |
Action bar icon |
32 px |
48 px |
64 px |
96 px |
128 px |
Notification icon |
24 px |
36 px |
48 px |
72 px |
96 px |
The launch icon should also be provide in 512x512 px for the published application in Google Play.
14.3. Using orientation as resource qualifier
Assume, for example that you want to use a special layout for your activity in landscape mode and that the layout file is called activity_main.xml. In this case you create the res/layout-land folder and place the new layout file with the same name (activity_main.xml) in this folder.
14.4. Android version qualifiers
A typical selection you use in your application, is the selection based on Android version, which is based on the -v[minimum API level] qualifier.
For example, this way you can provide different styling and themes based on the Android API revision.
A typical example for using this qualifier is to define the styling based on the Android version.
14.5. Width and height related qualifiers
Another typical selection is the smallest available width selection or the available width selection. The smallest available width is the shortest of the screen’s available height and the available width is the actual width based on the orientation of the device.
The width selection can, for example, be used to provide different layouts based on the width of the device.
This selection is based on -sw[Number]dp (Smallest) or -w[Number]dp qualifier, where [Number] stands for the number of device independent pixels.
For example, a 7inch tablet typically has at least 600dp and you could provide layouts for it via the res/layout-sw600dp/ selector.
14.6. More resource qualifiers
The other resource qualifiers are described on the Alternative resources webpage.
14.7. Strings and translations
14.7.1. Strings and translations
You can also use resource selectors for your values folder with contains, for example, your string values. Use the values-qualifier folder for this.
For example, to provide English and German text resources, use the values-en and values-de folder.
14.7.2. Plurals
Android supports Plurals.
Plurals are XML based resources that allow to handle different quantities.
This way you can select the right text based on the quantity.
In your XML file you specify values for the quantities “zero”, “one”, “two”, “many”, “few”, “many”, “other” and in your code you use the getQuantityString() method to get the correct value.
You can also format strings.
If now Strings are formated then you pass in the plural resources and the number.
If Objects should be used for formating you pass them as additional parameters.
<?xml version="1.0" encoding="utf-8"?>
<resources>
    <plurals
        name="tutorials">
        <item quantity="zero">no Tutorial </item>
        <item quantity="one">one Tutorial </item>
        <item quantity="other">%d  Tutorials</item>
    </plurals>
</resources>
For example, the following will define a plural. This file needs to be in the “res/values” directory and in this example it is called “plurals”.
// number is defined somewhere before this
// number =....
// get the Resources
Resources res = getResources();
// get the
String quantityString = res.getQuantityString(R.plurals.tutorials,
    number, number);
// do something with it...
Note that the selection is made based on grammatical necessity. A string for zero in English will be ignored even if the quantity is 0, because 0 isn’t grammatically different from 2, or any other number except 1 (“no tutorial”, “one tutorial”, “two tutorials”, and so on).
15. Defining the size of UI components in layout files
15.1. Fixed or relative dimensions
Android allows you to define the size of user interface components in fixed or relative dimensions in the layout files. Always use relative dimensions in your Android application, as this allows your UI to adapt to the actual device resolution.
15.2. Using dp as relative dimension
The unit of measurement which should be used is dp.
dp is short for dip (device independent pixel).
|
dp refers to one pixel on an Android device with 160dpi (dots per inch).
This is the density of the first available Android device (G1).
This size is also known asmdpi (medium dots per inch).
If you specify the size in dp, Android automatically scale your user interface component, depending on the device.
On a mdpi (a.k.a. medium density) device one dp is the same as one pixel.
A dp on ldpi (low density) device is smaller (approx. 120dip).
On a hdpi (high density) device it is larger (approx. 240dpi).
Therefore a dp occupies approximately the same physical space on every device.
You can use dp in your resources, e.g., layout files.
15.3. Using sp to scale with the user text preferences
If the unit should scale with text preference settings of the user, choose the sp unit of measurement.
This unit is similar to dp, but it is also scaled by the user preference.
If the users select to increase the font size in this settings, views that use sp are scaled accordingly.
15.4. Defining the size of UI components in source code
The Android API frequently requires you to specify a size in pixels and does not accept dp as input.
In this case you need to transform your desired dp into actual pixels.
You can use the following method to calculate the right amount of pixels for a dimension specified in dp.
public int convertToPixelFromDp(int dpInput) {
    // get the screen's density scale
    final float scale = getResources().getDisplayMetrics().density;
    // convert the dps to pixels, based on density scale
    return (int) (dpInput * scale + 0.5f);
}
The density for the current device can be queried with the following method call.
getResources().getConfiguration().densityDpi;16. Deployment
16.1. Options for deployment
Android applications must be signed before they can get installed. During development the application is signed with a debug key. For all other channels, you need to sign the Android apk with a self-created signature key.
You have different options for deploying your application on an Android device:
-
deploy the application via USB in test mode onto your device
-
access the signed apk file via a browser or email
-
or use one of the many Android markets
The following description highlights the most common ones.
16.2. Export your application using Android Studio
Use the menu entry to start the export from Android Studio.
16.3. Install the application via email or webserver
Android also allows to install applications directly. Just click on a link that points to an .apk file, e.g., in an email attachment or on a webpage.
Android will prompt the user to install this application.
This requires a setting on the Android device that allows the installation of non-market application. On older devices this setting can be found under the Security settings. Modern devices will ask the user at runtime. The email distribution may require that the native Gmail app is used.
16.4. Google Play
Google offers the Google Play service, a marketplace in which programmers can offer their application to Android users. Customers use the Google Play application that allows them to buy and install applications from the Google Play service.
Google Play also offers an update service. If an application developer uploads a new version of his application to Google Play, this service notifies existing users about the available update.
Google Play provides access to services and libraries for Android application programmers, too. For example, it provides a service to use and display Google Maps. Providing these services via Google Play has the advantage that they are available for older Android releases. Google can update them without the need for an update of the Android release on the phone.
Google Play requires a one time fee, currently 25 Dollar. After that payment, the developer can upload his application and the required icons, via Google Play Publishing.
Google performs some automatic scanning of applications, but no approval process is in place. All application, which do not contain malware, are published. Usually a few minutes after upload, the application is available.
|
Please note that you need to use the same signature key in Google Play to update your application. If you lose the key, you will NOT be able to update your application ever again. Make sure to backup your key. |
16.5. Restricting your application to certain device types
The application can define which hardware of software features it requires.
This can be done via an <uses-feature> declaration in the manifest file.
The android:required property for this attribute defines if such a feature is mandatory or optional.
Examples for such definitions are the presence of a certain hardware sensor or the availability of a camera. See Official usage features documentation
17. Exercise - Deployment of your application using Gradle
In this exercise, you deploy your application using Gradle.
17.1. Generate signing key
Ensure you have keytool from your JDK installation in the environment path.
Run the following commands.
keytool -genkey -v -keystore test.keystore -alias testkey -keyalg RSA -keysize 4096 -sigalg SHA512withRSA -dname "cn=Test,ou=Test,c=CA" -validity 10000
keytool -importkeystore -srckeystore test.keystore -destkeystore test.keystore -deststoretype pkcs12
This generates a key with pkcs12 encryption. This key can be used to sign your application.
|
Keep in mind that you need to use the same key if you want to update the application. Store you key safely! |
17.2. Add key to your Gradle build file
Adjust your app/build.gradle build file to contain a reference to your key.
Adjust the storeFile to point to your keystore file.
android {
signingConfigs {
config {
keyAlias 'testKey'
keyPassword 'testing'
storeFile file('/home/vogella/temp/test.keystore')
storePassword 'testing1'
}
}
lintOptions {
checkReleaseBuilds false
// Or, if you prefer, you can continue to check for errors in release builds,
// but continue the build even when errors are found:
abortOnError false
}
// more stuff
buildTypes {
release {
minifyEnabled false
proguardFiles getDefaultProguardFile('proguard-android.txt'), 'proguard-rules.pro'
signingConfig signingConfigs.config
}
// more stuff
}
// more stuff
}
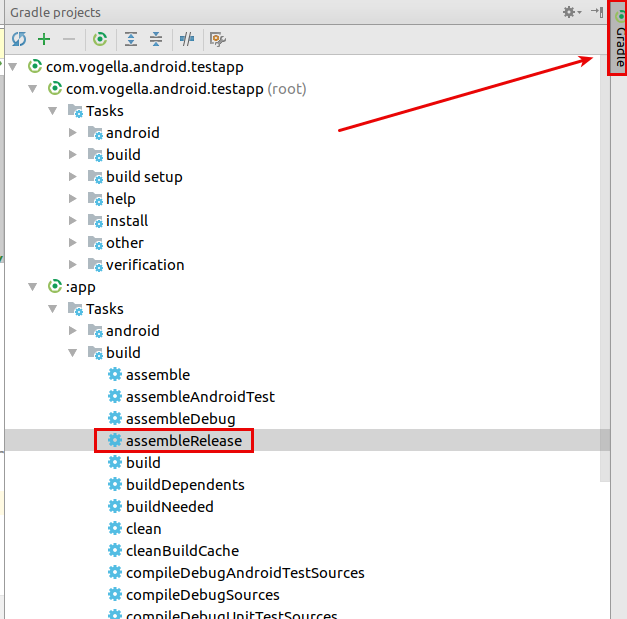
// more stuff17.3. Deploy via Gradle
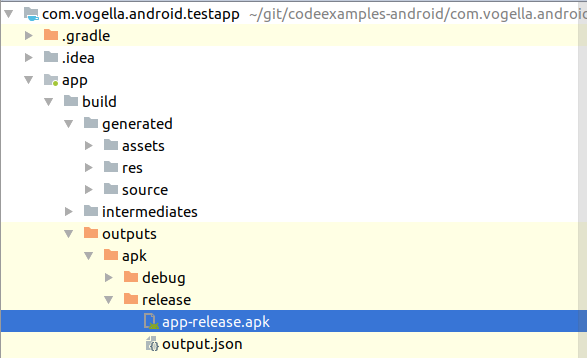
Run the assembleRelease task via the command line or via your IDE.
You find the signed release in your app/build folder.
17.4. Optional Secure your password
Create a file named keystore.properties in the root directory of your project. This file should contain your signing information, as follows:
storePassword=myStorePassword
keyPassword=mykeyPassword
keyAlias=myKeyAlias
storeFile=myStoreFileLocation|
Most likely you do not want to commit this file to your Git repository.
If that is true, add it to the |
In your module’s build.gradle file, add code to load your keystore.properties file before the android {} block.
// Create a variable called keystorePropertiesFile, and initialize it to your
// keystore.properties file, in the rootProject folder.
def keystorePropertiesFile = rootProject.file("keystore.properties")

// Initialize a new Properties() object called keystoreProperties.
def keystoreProperties = new Properties()

// Load your keystore.properties file into the keystoreProperties object.
keystoreProperties.load(new FileInputStream(keystorePropertiesFile))

android {
    ...
}
You can now refer to your properties in your config closure.
android {
    signingConfigs {
        config {
            keyAlias keystoreProperties['keyAlias']
            keyPassword keystoreProperties['keyPassword']
            storeFile file(keystoreProperties['storeFile'])
            storePassword keystoreProperties['storePassword']
        }
    }
    // more stuff
  }
18. Appendix Android versions
The Android operating system is published in different versions.
18.1. Android application
An Android application (app) is a single installable unit that can be started and used independently. An Android application consists of configuration files, Java source and resource files. You can define the following components in your configuration files:
| Component | Description |
|---|---|
Application |
An Android application can have one If not explicitly defined, Android creates a default application object for your application. |
Activity |
An activity is the visual representation of an Android application. An Android application can have several activities. Activities use views and fragments to create their user interface and to interact with the user. |
Service |
A service performs tasks without providing a user interface. They can communicate with other Android components and send notifications to the user. For example, a broadcast receiver cannotify the user via the notification framework in Android. |
Broadcast receiver (short: receiver) |
A receiver can be registered to listen to system messages and intents. A receiver gets notified by the Android system if the specified event occurs. For example, you can register a receiver for the event that the Android system finished the boot process. Or you can register for the event that the state of the phone changes, e.g., someone is calling. |
Content provider (short: provider) |
A provider defines a structured interface to application data. A provider can be used for accessing data within one application, but can also be used to share data with other applications. Android contains an SQLite database which is frequently used in conjunction with a content provider. The SQLite database would store the data, which would be accessed via the provider. |
18.2. Configuration via the manifest file
The components, settings and metadata of an Android application are described in the AndroidManifest.xml file. This file is known as the manifest file or the manifest. The manifest is read by the Android system during installation of the application. The Android system evaluates it and determines the capabilities of the application.
Activities, services and content provider components of the application must be statically declared in this file. Broadcast receiver can either defined here or registered dynamically at runtime.
The Gradle build system can modify the manifest file at build time. For example, the application version is typically supplied by the Gradle build file.
The following listing shows an example for a simple Android manifest file.
<manifest xmlns:android="http://schemas.android.com/apk/res/android"
    package="com.example.android.rssreader"
    android:versionCode="1"
    android:versionName="1.0" >
    <uses-permission android:name="android.permission.INTERNET" />

    <application
        android:name="RssApplication"
        android:allowBackup="false"
        android:icon="@drawable/ic_launcher"
        android:label="@string/app_name"
        android:theme="@style/AppTheme" >
        <activity
            android:name="RssfeedActivity"
            android:label="@string/title_activity_main" >
            <intent-filter>
                <action android:name="android.intent.action.MAIN" />

                <category android:name="android.intent.category.LAUNCHER" />
            </intent-filter>
        </activity>
        <activity
            android:name=".DetailActivity"
            android:label="Details" >
        </activity>
        <activity android:name="MyPreferenceActivity" >
        </activity>

        <service android:name="RssDownloadService" >
        </service>
    </application>

</manifest>
19. Android Developer Tools
The Android Software Development Kit (Android SDK) and the Gradle tooling contains the necessary tools to Compile, package, deploy and start Android application.
Google provides a specialized IDE called Android Studio to perform development tasks.
The Android SDK contains the Android debug bridge (adb). adb is a tool that allows you to connect to a virtual or real Android device. This allows managing the device or debugging your application.
20. Devices support
20.1. Using a real Android device for testing
To use a normal Android device, connect your device to your development machine (via USB). On your Android device turn on USB Debugging. Select , then enable the USB-Debugging option.
You may also need to install the driver for your mobile phone. Linux and macOS usually work out of the box while MS Windows typically requires the installation of a driver.
|
The minimum Android version of your Android application needs to fit to the Android version on your device. |
If you have several devices connected to your computer, you can select which one should be used. If only one device is connected, the application is automatically deployed on this device.
20.2. Using the Android emulator and Android Virtual Device
The Android tooling contains an Android device emulator. This emulator can be used to run an Android Virtual Device (AVD).
These AVDs allow you to test your applications on selected Android devices without access to the real hardware. Virtual devices give you the possibility to test your application for selected Android versions and a specific configurations. Even if you have a physical Android device available, you should get familiar with the creation and usage of AVDs.
During the creation of your AVD you define the configuration for the virtual device. This includes, for example, the resolution, the Android API version and the density of your display.
You can define multiple AVDs with different configurations and start them in parallel.
|
If you stop and AVD during startup process the AVD might get corrupted. The first start may take long, e.g., several minutes on an older machine. On a modern machine it typically takes less than a minute for a new AVD to start. |
After the AVD has started, you can control the GUI with the mouse. The emulator also provides access to the phone buttons via a menu on the right side of the emulator.
Once started, do not stop the AVD during your development. If you change your application and want to test a new version, you re-deploy your application on the AVD.
An AVD created for Android contains the programs from the Android Open Source Project. An AVD created for the Google API’s contains additional Google specific code. AVDs created for the Google API allow you to test applications that use Google Play services, e.g., the new Google maps API or the new location services.
|
During the creation of an emulator you can choose if you either want Snapshot or Use Host GPU enabled. If you select the Snapshot option, the second time you start the device it is started fast, because the AVD stores its state if you close it. If you select Use Host GPU the AVD uses the graphics card of your host computer directly which makes the rendering on the emulated device much faster. 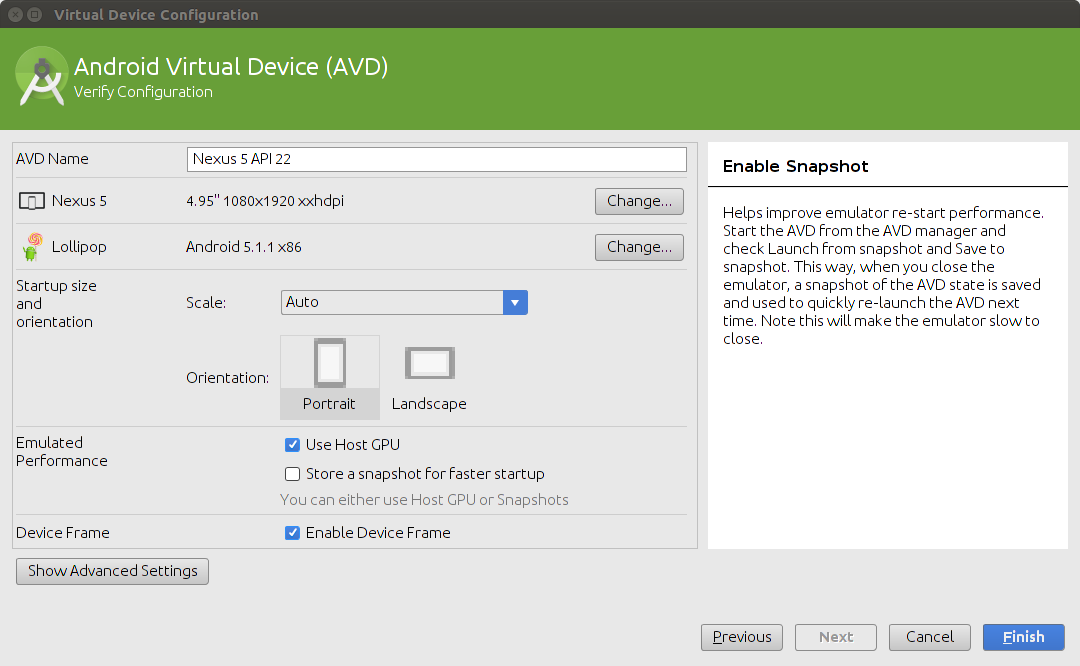 |
|
Using ARM CPU or Intels CPU architecture
If possible, select an AVD with an image based on the ARM CPU architecture or based on the Intel CPU architecture. An Android virtual device that uses the Intel system image is much faster in execution. Intel based images sometimes do not work on certain machines, in this case try an ARM based system image. ARM based system image tend to work on more computers. 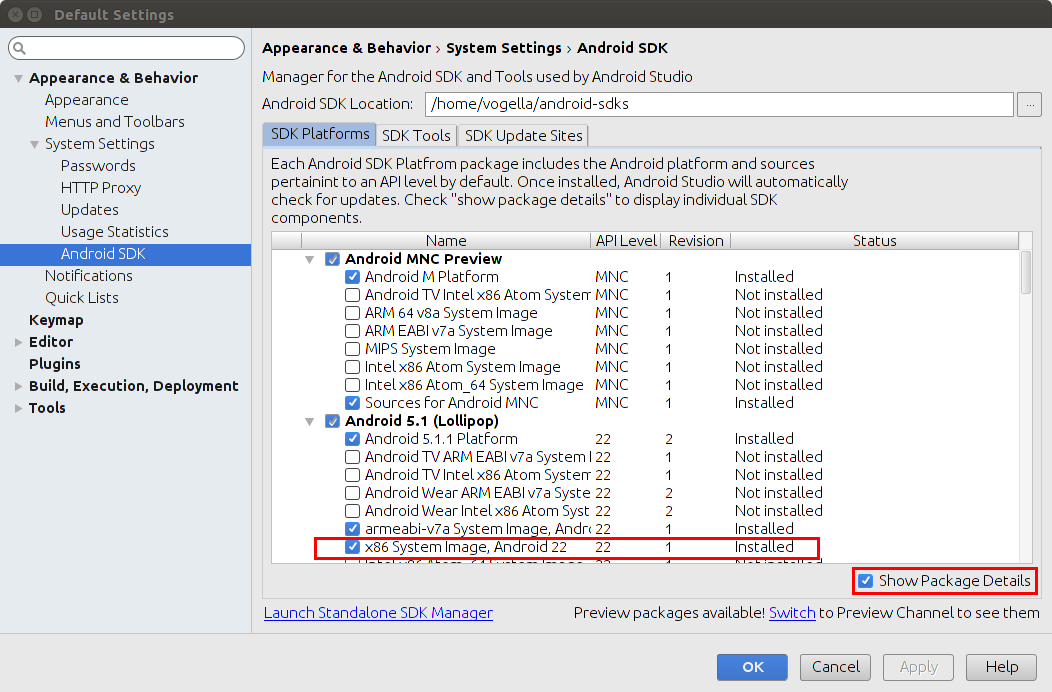 |
The following table gives an overview of the available versions.
| Code name | Version | API level |
|---|---|---|
Pie |
9.0 |
28 |
Oreo |
8.0 -8.1 |
26 - 27 |
Nougat |
7.0 – 7.1.1 |
24 -25 |
Marshmallow |
6.0 |
23 |
Lollipop |
5.1 |
22 |
Lollipop |
5.0 |
21 |
KitKat |
4.4 - 4.4.4 |
19 |
Jelly Bean |
4.1.x - 4.3.x |
16 - 18 |
Ice Cream Sandwich |
4.0.1 - 4.0.4 |
14 - 15 |
Honeycomb |
3.2.x |
13 |
Honeycomb |
3.0 - 3.1 |
11 - 12 |
Gingerbread |
2.3 - 2.3.7 |
9-10 |
Froyo |
2.2.x |
8 |
Eclair |
2.1 |
7 |
Eclair |
2.0 - 2.0.1 |
5 -6 |
Donut |
1.6 |
4 |
Cupcake |
1.5 |
3 |
(no code name) |
1.1 |
2 |
(no code name) |
1.0 |
1 |
21. Appendix Important entries in the Android manifest file
21.1. Declaration of version, package and Android components
The package attribute defines the base package for the Java objects referred to in this file.
If a Java object lies within a different package, it must be declared with the full qualified package name.
Google Play requires that every Android application uses an unique package name. It is a good practice to use your reverse domain name here. This avoids collisions with other Android applications.
android:versionName and android:versionCode specify the version of your application.
versionName is what the user sees and can be any string.
versionCode must be an integer.
Google Play determines based on this number if an update is necessary.
You typically start this version with "1" and increase it by one, if you deploy a new version.
If you are developing, the Android development tooling allows deploying a new version if the application code has changed, you do not need to increase the version for that.
The <application> section allows defining metadata for your application and optionally define an explicit application class.
It is also a container for declaring other Android components.
The <activity> tag defines an activity.
The name attribute points to class, which (if not fully qualified) is relative to the package defined in the`package` attribute.
The intent filter section allows registering a components for certain actions and categories.
For example, the android:name="android.intent.action.MAIN" action defines that an activity can be started by the user.
The category android:name="android.intent.category.LAUNCHER" parameter tells the Android system to add the activity to the launcher.
The <@string/app_name> value refers to resource files that contain the string.
Similar to the <activity> tag, you can use the <service>, <receiver> and <provider> tags for the other Android components.
21.2. Minimum and target SDK
|
These values are specified via the Gradle build file for modern Android applications. |
The uses-sdk section in the manifest allows you to specify the minSdkVersion and targetSdkVersion version of your application.
| Value | Description |
|---|---|
minSdkVersion |
Define the minimum version of Android your application works on. This attribute is used as a filter in applications stores Play. A user cannot install your application on a device with a lower API level than specified in this attribute. |
targetSdkVersion |
Specifies the version on which you tested and developed. If it is not equal to the API version of the Android device, the Android system might apply forward- or backward-compatibility changes. It is a good practice to always set this to the latest Android API version to take advantages of changes in the latest Android improvements. |
21.3. Permissions
Your application must declare that it requires a permission with the <uses-permission> tag.
For example, if the application requires network access, it must be specified here.
Certain permissions, like network access, are granted automatically on Android 6.0 or higher systems. Other permissions must be confirmed by the users to become active.
It can also declare its own permissions with the <permission> tag.
21.4. Required device configuration
The uses-configuration section in the manifest allows you to specify required input methods for your device.
For example, the following snippet would require that the device has a hardware keyboard.
<uses-configuration android:reqHardKeyboard="true"/>The uses-feature section allows you to specify the required hardware configuration
for your
device. For example, the following snippet
would
require that
the
device
has a camera.
<uses-feature android:name="android.hardware.camera" />21.5. Installation location
Via the installLocation attribute of your application you can specify that your application can be installed on the external storage of the device.
Use auto or preferExternal to permit this.
In reality this option is rarely used. An application installed on the external storage is stopped once the device is connected to a computer and mounted as USB storage.
21.6. More info
You find more information about the attributes and sections of the manifest see https://developer.android.com/guide/topics/manifest/manifest-intro.html.
22. Android online resources
22.4. vogella Java example code
If you need more assistance we offer Online Training and Onsite training as well as consulting