XSLT with Eclipse and Java. This articles explains how to do a XSLT transformations on the command line or via the Eclipse XSL project or Java with Saxon.
1. XSLT
XSLT allows converting XML into other formats. XSLT stands for Extensible Stylesheet Language for Transformations. You typically run XLST from the command line but there is also tooling available for graphical tools, like the Eclipse IDE.
For an introduction to XML please see Java and XML Tutorial.
| Xsl instruction | Description |
|---|---|
|
Specifies the output of the transformation, e.g., xml or html |
|
Parameters can be passed to xsl transformation, e.g., by using Saxon |
|
Specifies a template, which will be automatically applied to the root element |
|
Specifies a template, which can be addressed by its name |
|
Used to copy the original content of a selected xml element |
|
Can be used to loop over a collection of xml elements, e.g., all child /training xml elements. |
|
Can be used to loop over a collection param, e.g., the param from above |
2. XSLT installation under Linux
Under Linux the xsltproc command line tool is available.
If it is missing in your installation, you can install it via the following command under Ubuntu.
sudo apt-get install xsltproc3. Your first transformation - copy
We start first with the simplest transformation possible; no transformation at all.
Create a new directory called com.vogella.xslt.first.
Create a folder files.
Create the following XML file source.xml in the files folder.
<?xml version="1.0"?>
    <!-- This is a comment -->
<people>
    <address type="personal">
        <name>Lars </name>
        <street> Test </street>
        <telephon number="0123" />
    </address>
    <address type="personal">
        <name>Joe </name>
        <street> Test2 </street>
        <telephon number="1234" />
    </address>
    <address type="business">
        <name>Jim</name>
        <street> Test3 </street>
        <telephon number="2345" />
    </address>
</people>
Create the following
transform.xsl
file
in the
files
folder.
<?xml version="1.0"?>
<xsl:stylesheet xmlns:xsl="http://www.w3.org/1999/XSL/Transform"
    version="1.0">

    <xsl:output method="xml" />

    <xsl:template match="node()">
        <xsl:copy>
            <xsl:copy-of select="@*" />
            <xsl:apply-templates />
        </xsl:copy>
    </xsl:template>
</xsl:stylesheet>
To run the transformation, use the following command on the command line.
xsltproc --output result.xml files/transform.xsl files/sources.xmlReview the generated result.xml file.
It should be a copy of the input file.
4. Your first transformation
We want to do a real transformation.
Create the following transform2.xsl and run it with the same input file.
<?xml version="1.0"?>
<xsl:stylesheet xmlns:xsl="http://www.w3.org/1999/XSL/Transform"
    version="1.0">

    <xsl:output method="xml" />

    <!-- Copy everything -->
    <xsl:template match="node()">
        <xsl:copy>
            <xsl:copy-of select="@*" />
            <xsl:apply-templates />
        </xsl:copy>
    </xsl:template>

    <!-- Do some adjustments for the address -->
    <xsl:template match="address">
        <xsl:element name="place-where-person-live">
            <xsl:apply-templates />
        </xsl:element>
    </xsl:template>

    <!-- Put the name in a <hubba> tag -->
    <xsl:template match="name">
        <xsl:element name="name">
            <hubba>
                <xsl:apply-templates />
            </hubba>
        </xsl:element>
    </xsl:template>
</xsl:stylesheet>
The result should look like the following.
<?xml version="1.0" encoding="UTF-8"?><people>
    <place-where-person-live>
        <name><hubba>Lars </hubba></name>
        <street> Test </street>
        <telephon number="0123"/>
    </place-where-person-live>
    <place-where-person-live>
        <name><hubba>Joe </hubba></name>
        <street> Test2 </street>
        <telephon number="1234"/>
    </place-where-person-live>
    <place-where-person-live>
        <name><hubba>Jim</hubba></name>
        <street> Test3 </street>
        <telephon number="2345"/>
    </place-where-person-live>
</people>
5. Using Eclipse
5.1. Eclipse XSLT installation
The Eclipse XSL Project allows to edit XSLT files and perform interactive XSL transformations in Eclipse.
In case you want to use Eclipse to perform your transformation you can install the Eclipse XSL Developer plugin via the Eclipse update manager.
5.2. XSLT transformations with Eclipse
This chapter explains how to use the Eclipse tooling to do your XLS transformation.
We again use the simplest transformation of just copying the data.
Create a new project of type General in Eclipse called de.vogella.xslt.first.
Create a folder files.
Create the following XML file source.xml in the folder files.
<?xml version="1.0"?>
    <!-- This is a comment -->
<people>
    <address type="personal">
        <name>Lars </name>
        <street> Test </street>
        <telephon number="0123" />
    </address>
    <address type="personal">
        <name>Joe </name>
        <street> Test2 </street>
        <telephon number="1234" />
    </address>
    <address type="business">
        <name>Jim</name>
        <street> Test3 </street>
        <telephon number="2345" />
    </address>
</people>
Create the following transform.xsl file in the files folder.
<?xml version="1.0"?>
<xsl:stylesheet xmlns:xsl="http://www.w3.org/1999/XSL/Transform"
version="1.0">
<xsl:output method="xml" />
<xsl:template match="node()">
<xsl:copy>
<xsl:copy-of select="@*" />
<xsl:apply-templates />
</xsl:copy>
</xsl:template>
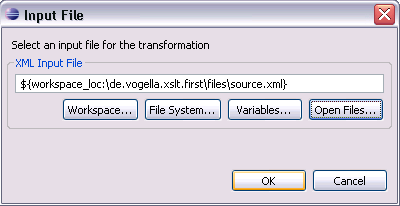
</xsl:stylesheet>Select your xsl file and run it as XSL application.
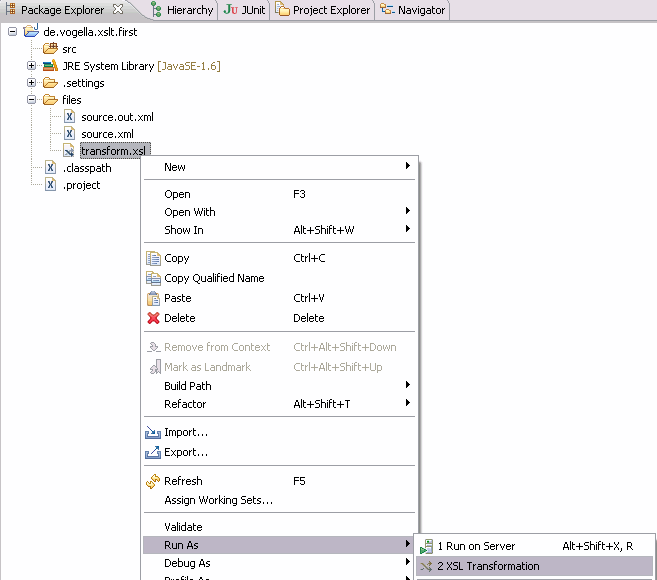
Select Open Files… and select source.xml.
Press OK to run it.
Review the result source.out.xml
6. Using Java and Saxon
6.1. Adding Saxon dependency
Saxon HE can be found here: https://mvnrepository.com/artifact/net.sf.saxon/Saxon-HE/9.8.0-12
Using Apache Maven
<dependency>
    <groupId>net.sf.saxon</groupId>
    <artifactId>Saxon-HE</artifactId>
    <version>9.8.0-12</version>
</dependency
Using Gradle
compile group: 'net.sf.saxon', name: 'Saxon-HE', version: '9.8.0-12'6.2. XSL transformation with XML input
Create a new Gradle or Maven project with the Saxon-HE and add the following input.xml file to the project:
<?xml version="1.0" encoding="UTF-8"?>
<vogellacompany>
    <online-trainings>
        <training name="Android Development" />
        <training name="Eclipse IDE extensions" />
        <training name="Rich Client Platform" />
    </online-trainings>
</vogellacompany>
And add the following transformation.xsl file to the project:
<?xml version="1.0" encoding="UTF-8"?>
<xsl:stylesheet version="2.0"
    xmlns:xsl="https://www.w3.org/1999/XSL/Transform"
    xmlns:xs="https://www.w3.org/2001/XMLSchema"
    xmlns:fn="https://www.w3.org/2005/xpath-functions">
    <xsl:output method="html" />

    <xsl:template match="/">
        <html>
            <body>
                <h2>Vogella Trainings</h2>
                <xsl:apply-templates />
            </body>
        </html>
    </xsl:template>

    <xsl:template match="online-trainings">
        <ul>
            <xsl:apply-templates />
        </ul>
    </xsl:template>

    <xsl:template match="training">
        <li>
            <xsl:value-of select="@name" />
        </li>
    </xsl:template>
</xsl:stylesheet>
Then create a Main class that uses Saxon to transform the input.xml file to a result.html file.
public static void main(String[] args) {
    Processor proc = new Processor(false);
    XsltCompiler comp = proc.newXsltCompiler();

    ClassLoader classLoader = XsltService.class.getClassLoader();
    // load xsl file from java project
    InputStream xsl = classLoader.getResourceAsStream("transformation.xsl");
    // load xml file from java project
    InputStream xmlInput = classLoader.getResourceAsStream("input.xml");
    try {
        XsltExecutable exp = comp.compile(new StreamSource(xsl));

        XdmNode source = proc.newDocumentBuilder().build(new StreamSource(xmlInput));

        String outputDir = System.getProperty("user.home");
        // create a result.html file as result in the user home directory
        Serializer out = proc.newSerializer(new File(outputDir, "result.html"));
        out.setOutputProperty(Serializer.Property.METHOD, "html");
        out.setOutputProperty(Serializer.Property.INDENT, "yes");
        XsltTransformer trans = exp.load();
        trans.setInitialContextNode(source);
        trans.setDestination(out);
        trans.transform();
    } catch (SaxonApiException e) {
        e.printStackTrace();
    }
}
The result.html file in the user home directory will look like this:
<html xmlns:xs="https://www.w3.org/2001/XMLSchema"
      xmlns:fn="https://www.w3.org/2005/xpath-functions">
   <body>
      <h2>Vogella Trainings</h2>
         <ul>
               <li>Android Development</li>
               <li>Eclipse IDE extensions</li>
               <li>Rich Client Platform</li>
         </ul>
   </body>
</html>
7. Links and literature
7.1. vogella Java example code
If you need more assistance we offer Online Training and Onsite training as well as consulting