This tutorial describes the usage of SWT for building user interfaces.
1. SWT overview
1.1. Using SWT and JFace
The Standard Widget Toolkit (SWT) is a Java-based user interface library for developing desktop applications. SWT supports Windows, Linux, and macOS.
It provides many standard widgets, such as buttons and text fields, as well as the option to create custom widgets.
SWT uses the native widgets of the platform whenever possible. The native widgets of the operating system are accessed by the SWT framework via the Java Native Interface (JNI). If a widget is not natively available on a platform, SWT emulates this widget on that platform.
JFace adds additional functionality on top of SWT, making it easier to use. In this description, we use the JFace builder API on top of the SWT API to simplify the creation of SWT-based user interfaces.
1.2. Display and Shell
The Display and Shell classes are key components of SWT applications.
An org.eclipse.swt.widgets.Shell class represents a window.
The org.eclipse.swt.widgets.Display class is responsible for managing event loops, fonts, and colors.
It also controls communication between the user interface thread and other threads.
Display is therefore the basis for all SWT functionality.
Every SWT application requires at least one Display and one or more Shell instances.
1.3. Event loop
An event loop transfers user input events from the underlying native operating system widgets to the SWT event system.
The programmer explicitly starts and checks the event loop to update the user interface.
The loop calls the readAndDispatch() method, which retrieves events from the native operating system event queue and dispatches them to the SWT event system.
Without this loop, the application will terminate immediately.
The loop is executed until the main shell is closed.
For example, the following creates an SWT application that sets up and executes the event loop.
Display display = new Display();
Shell shell = new Shell(display);
shell.open();

while (!shell.isDisposed()) { (1)
    if (!display.readAndDispatch()) { (2)
        display.sleep(); (3)
    }
}

// disposes all associated windows and their components
display.dispose();| 1 | run the event loop as long as the window is open |
| 2 | read the next OS event queue and transfer it to an SWT event |
| 3 | if there are currently no other OS events to process, sleep until the next OS event is available |
If SWT is used for an Eclipse IDE plug-in or an Eclipse RCP application, the event loop is provided by the Eclipse framework.
1.4. Using SWT in a Java project
The SWT and JFace libraries are provided as JAR files and are also available via Maven Central for Maven and Gradle builds. The SWT library can be found at https://mvnrepository.com/artifact/org.eclipse.platform/org.eclipse.swt.
You must specify the osgi.platform property in your POM file to use the correct version of the SWT library for your operating system.
To use the dependency in your Maven project, add the following to your POM file.
<properties>
    <osgi.platform>gtk.linux.x86_64</osgi.platform>
    <maven.compiler.release>21</maven.compiler.release>
</properties>
<dependencies>
    <dependency>
        <groupId>org.eclipse.platform</groupId>
        <artifactId>org.eclipse.swt</artifactId>
        <version>3.129.0</version> (1)
    </dependency>
</dependencies>| 1 | Use the latest version of the SWT library available at https://mvnrepository.com/artifact/org.eclipse.platform/org.eclipse.swt. |
The supported values for the osgi.platform are listed in the following table.
| osgi.platform | Description |
|---|---|
win32.win32.x86_64 |
Windows 64-bit |
gtk.linux.x86_64 |
Linux 64-bit with GTK |
gtk.linux.aarch64 |
Linux ARM 64-bit with GTK |
macosx.cocoa.x86_64 |
macOS 64-bit (Intel) with Cocoa |
macosx.cocoa.aarch64 |
macOS ARM 64-bit (Apple Silicon) with Cocoa |
For correct dependency resolution, you need to specify the osgi.platform during the build process.
$ mvn clean verify -Dosgi.platform=gtk.linux.x86_641.5. Using SWT in an Eclipse plug-in
The SWT JAR files contain OSGi metadata and therefore can also be used for Eclipse plug-in development.
To use SWT in your Eclipse plug-in, add a dependency on org.eclipse.swt in the manifest file.
Manifest-Version: 1.0
Bundle-ManifestVersion: 2
Bundle-Name: Swt
Bundle-SymbolicName: com.vogella.swt
Bundle-Version: 1.0.0.qualifier
Bundle-Vendor: VOGELLA
Automatic-Module-Name: com.vogella.swt
Bundle-RequiredExecutionEnvironment: JavaSE-21
Require-Bundle: org.eclipse.swt,
org.eclipse.jface|
In the above example, adding |
2. Exercise: Use the SWT library in a Java project
Create a new Java project named com.example.swt.widgets.
Create a new lib folder in your project.
Download the SWT library from the Eclipse download page. Navigate to the download page of the latest stable Eclipse release.

Scroll down to the SWT binaries and download the correct version for your Java and OS version.
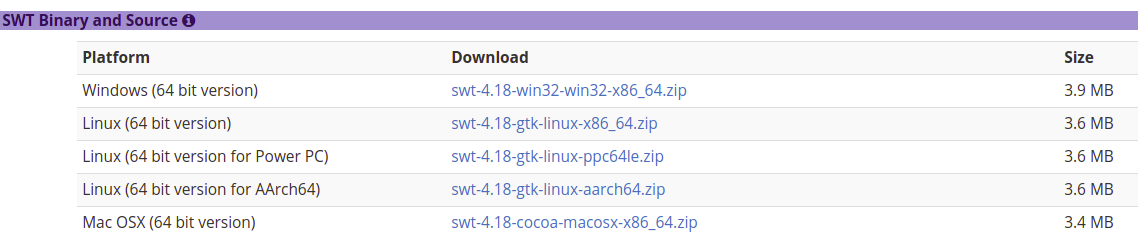
Copy the swt.jar library and the src.zip file to the lib folder in your project.
Add the library to the classpath of the project.
Attach the src.zip source zip file to the library.
Use the Open Type dialog to open the 'Shell' class.
If everything has been done correctly, you will see the source code of the 'Shell' class.
3. Exercise: Use the SWT library in a Maven project
This exercise shows how to use the SWT library in a Maven project.
Create the following pom.xml file.
<project xmlns="https://maven.apache.org/POM/4.0.0"
    xmlns:xsi="https://www.w3.org/2001/XMLSchema-instance"
    xsi:schemaLocation="https://maven.apache.org/POM/4.0.0 https://maven.apache.org/maven-v4_0_0.xsd">
    <modelVersion>4.0.0</modelVersion>
    <groupId>com.vogella</groupId>
    <artifactId>swt.standalone</artifactId>
    <packaging>jar</packaging>
    <version>1.0-SNAPSHOT</version>
    <name>swt.standalone</name>
    <properties>
        <osgi.platform>gtk.linux.x86_64</osgi.platform>
        <maven.compiler.release>21</maven.compiler.release>
    </properties>
    <dependencies>
        <dependency>
            <groupId>org.eclipse.platform</groupId>
            <artifactId>org.eclipse.swt</artifactId>
            <version>3.129.0</version>
        </dependency>
    </dependencies>
</project>
Create the src/main/java/com/vogella folder.
Copy the code snippet from https://github.com/eclipse-platform/eclipse.platform.swt/blob/master/examples/org.eclipse.swt.snippets/src/org/eclipse/swt/snippets/Snippet1.java into your src/main/java/com/vogella folder.
Run this snippet using the Run as menu.
Run the following command to create the JAR file.
$ mvn clean verify -Dosgi.platform=gtk.linux.x86_64Replace the osgi.platform value with the one that matches your operating system.
To run the JAR file, use the following command.
mvn exec:java -Dexec.mainClass="com.vogella.Snippet1" -Dosgi.platform=gtk.linux.x86_644. SWT Widgets
4.1. Available widgets in the SWT library
SWT widgets are located in the packages org.eclipse.swt.widgets and org.eclipse.swt.custom.
Widgets extend either the Widget or the Control class.
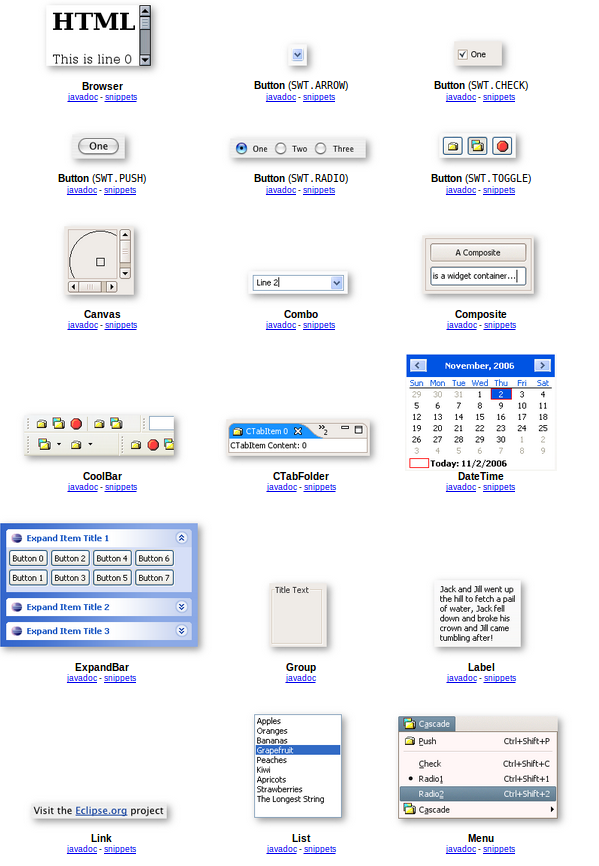
Several of these widgets are depicted in the following screenshot of the SWT widget homepage.
The Composite class is a container for other widgets.
The Group class is another container that can contain other widgets.
It also draws a border around itself and allows you to set a header for the grouped widgets.
4.2. Constructing and configuring widgets
SWT widgets, except for the Shell object, are always constructed with a parent widget that contains them.
The second parameter of the widget constructor contains the style bits. Depending on the provided style bits, the widget adjusts its look and feel as well as its behavior. Each widget documents the supported style bits in its Javadoc.
The possible style bits are predefined in the SWT class.
If no special style is required, you can pass SWT.NONE.
For example, the following code snippet creates a push button or a checkbox, depending on the passed style flags.
Button b1 = new Button(shell, SWT.PUSH);

Button b2 = new Button(shell, SWT.CHECK);
After construction, the widget offers methods to configure its behavior.
Button b1 = new Button(parent, SWT.PUSH);
b1.setText("Press me");
b1.addSelectionListener(SelectionListener.widgetSelectedAdapter(e-> System.out.println("Pressed")));
JFace offers a builder API for multiple SWT widgets that simplifies the creation of widgets. The above example can be rewritten as follows:
WidgetFactory.button(SWT.PUSH).text("Press me").onSelect(e-> System.out.println("Pressed")).create(parent);Or in case you use a static import for WidgetFactory.
import static org.eclipse.jface.widgets.WidgetFactory.button;
// more code
button(SWT.PUSH).text("Press me").onSelect(e-> System.out.println("Pressed")).create(parent);
4.3. Custom widgets and native widgets
SWT provides custom-drawn widgets in org.eclipse.swt.custom package for cases in which the native widgets are not sufficient for the needs of SWT.
For example, the CCombo class allows you to set the height of the widget, which the Combo class does not support.
Custom-drawn widgets usually start with the additional prefix C to indicate that they are custom widgets, e.g., CCombo.
Another example is StyledText, a class that provides advanced features for displaying text, e.g., drawing a background.
Widgets in org.eclipse.swt.widgets are implemented with platform-specific code.
On the other hand, widgets from the package org.eclipse.swt.custom are implemented in pure Java.
Custom widgets are not supposed to use the internal classes of SWT as these classes may be different on the various platforms.
Every custom widget should extend the Composite or Canvas class.
API compliance is guaranteed only for these base classes.
If the new custom widget is supposed to contain other widgets, it should extend Composite.
Otherwise, it should extend the Canvas class.
4.4. Memory management
SWT widgets retain a reference to the native widget. Such references are not automatically released by the system.
When a container, such as a Shell, is disposed of, it automatically releases all its children.
For certain widgets, you must explicitly call their dispose() method when they are no longer needed.
These are the following widgets:
-
Cursor -
Display -
Font -
GC -
Image -
Printer -
Region.
|
JFace provides a way to dispose of such objects based on another widget, via the |
4.5. Event Listener
You can register listeners for specific events on SWT controls.
For example, a ModifyListener to listen to changes in a Text widget or a SelectionListener for selection (click) events on a Button widget.
The pure SWT implementation uses add followed by the type of event.
For example:
Button button =  new Button(shell, SWT.PUSH);
button.setText("Press me");

//register listener for the selection event
button.addSelectionListener(SelectionListener.widgetSelectedAdapter(e -> System.out.println("Called!")));
FocusListener is another example for such a listener interface.
|
The
For example, the |
The JFace builder API simplifies event registration by providing methods that accept a lambda for certain events.
import static org.eclipse.jface.widgets.WidgetFactory.button;
// more code
button(SWT.PUSH).text("Press me").onSelect(e-> System.out.println("Pressed")).create(parent);
If you want to add a listener to the whole application, you can use the Display class.
For example, to add a global mouse listener use Display.addFilter(SWT.MouseMove, listener).
If you add filters to the Display you may interfere with existing listeners.
Ensure that you test your code accordingly.
4.6. Colors in SWT
Colors can be defined in SWT or system colors can be reused.
Device device = Display.getCurrent();
Color red = new Color (device, 255, 0, 0);

// Using system colors

Display display = Display.getCurrent();
Color blue = display.getSystemColor(SWT.COLOR_BLUE);
Color listBackground = display.getSystemColor(SWT.COLOR_LIST_BACKGROUND);
If you create colors, you do NOT need to call dispose() since the Eclipse 2020-06 release.
5. Optional exercise: Use SWT in a standalone Java application
In this exercise, you create a plug-in that allows you to create small standalone Java applications using SWT. This can be useful, for example, for testing SWT widgets.
5.1. Create new plug-in and add dependencies
Create a new plug-in project called com.example.swt.widgets via .
Enter the data in the wizard similar to the screenshot below. Make sure you deselect the following options:
-
Select No for Would you like to create a rich client application?
-
Uncheck This plug-in will make contributions to the UI
-
Uncheck Generate an activator, a Java class that controls the plug-in’s lifecycle
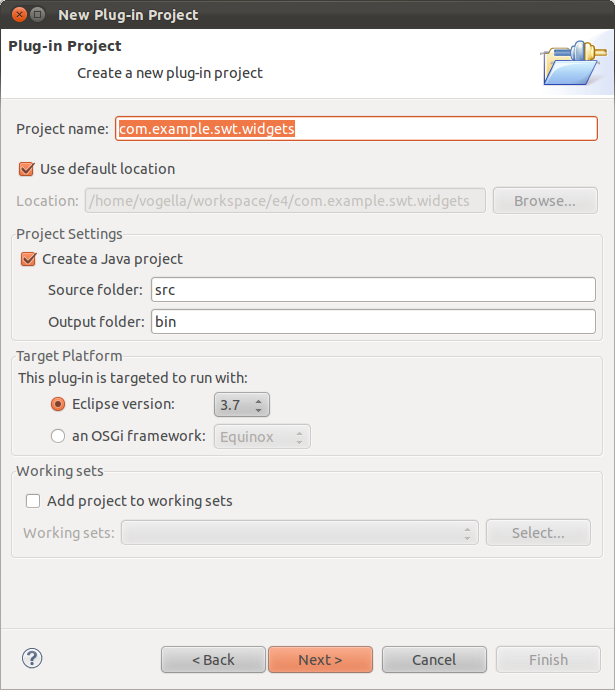

Press the Finish button on the second page of the wizard.
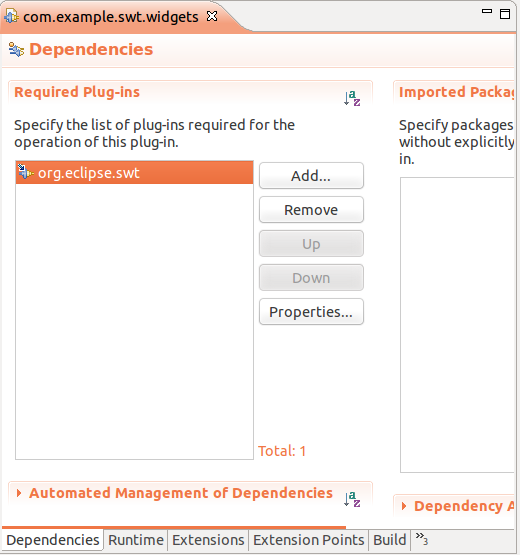
Open the MANIFEST.MF file in the META-INF folder and select the Dependencies tab.
Press the Add… button in the Required Plug-ins part and enter org.eclipse.swt as a dependency.
5.2. Create a standalone SWT application
Create the following class for a simple SWT application.
package com.example.swt.widgets;

import org.eclipse.swt.layout.FillLayout;
import org.eclipse.swt.widgets.Display;
import org.eclipse.swt.widgets.Shell;

public class FirstSWTApplication {

    public static void main(String[] args) {
        Display display = new Display();

        Shell shell = new Shell(display);
        shell.setLayout(new FillLayout());

        //TODO add some widgets to the Shell
        shell.open();
        while (!shell.isDisposed()) {
            if (!display.readAndDispatch()) {
                display.sleep();
            }
        }
        display.dispose();
    }
}
To start your application, right-click on your Java class, and select . You start your application and it shows you an empty window.
Change the TODO in the code to the following.
package com.example.swt.widgets;

import org.eclipse.swt.SWT;
import org.eclipse.swt.layout.FillLayout;
import org.eclipse.swt.widgets.Display;
import org.eclipse.swt.widgets.Label;
import org.eclipse.swt.widgets.Shell;
import org.eclipse.swt.widgets.Text;

public class FirstSWTApplication {

    public static void main(String[] args) {
        Display display = new Display();

        Shell shell = new Shell(display);
        shell.setLayout(new FillLayout());


        Label label = new Label(shell, SWT.BORDER);
        label.setText("This is a label:");
        label.setToolTipText("This is the tooltip of this label");

        Text text = new Text(shell, SWT.NONE);
        text.setText("This is the text in the text widget");
        text.setBackground(display.getSystemColor(SWT.COLOR_BLACK));
        text.setForeground(display.getSystemColor(SWT.COLOR_WHITE));

        // set widgets size to their preferred size
        text.pack();
        label.pack();


        (1)
        shell.open();
        while (!shell.isDisposed()) {
            if (!display.readAndDispatch()) {
                display.sleep();
            }
        }
        display.dispose();
    }
}| 1 | This is where the TODO comment was |
|
Make sure you use |
If you now start the application you will get a Shell with two Widgets included.

5.3. Add an SWT Button
Add a Button widget to your application and assign a SelectionListener to it.
If the button is pressed, write "Called!" to the console.
Button button =  new Button(shell, SWT.PUSH);
button.setText("Press me");

//register listener for the selection event
button.addSelectionListener(SelectionListener.widgetSelectedAdapter(e -> System.out.println("Called!")));
6. Positioning widgets
6.1. Manually placing widgets on a Composite
Controls must be placed inside their container.
You can manually define their position and size using the setBounds method.
This method allows you to specify the starting position, width, and height.
The coordinates start at the top-left corner of the containing Composite.
package com.vogella.swt.widgets.layout;
import org.eclipse.swt.SWT;
import org.eclipse.swt.events.MouseEvent;
import org.eclipse.swt.events.MouseListener;
import org.eclipse.swt.widgets.Display;
import org.eclipse.swt.widgets.Label;
import org.eclipse.swt.widgets.Shell;
public class SWTLayoutPositionTracker {
static String newLine = System.getProperty("line.separator");
private static Label positionLabel;
private static Shell shell;
public static void main(String[] args) {
Display display = new Display();
shell = new Shell(display);
positionLabel = new Label(shell, SWT.BORDER);
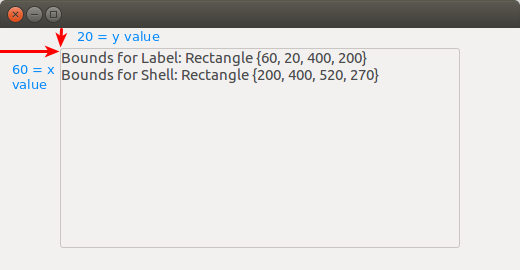
int x= 60;
int y=20;
int width =400;
int height=200;
positionLabel.setBounds(x, y, width, height);
int toolbarSize = 30;
shell.setBounds(200, 400, width+2*x , height + 2*y +toolbarSize);
shell.open();
shell.addMouseMoveListener(e -> showSize(e));
positionLabel.addMouseMoveListener(e -> showSize(e));
while (!shell.isDisposed()) {
if (!display.readAndDispatch())
display.sleep();
}
display.dispose();
}
public static void showSize(MouseEvent e) {
int x = e.x;
int y = e.y;
String s = "Bounds for Label: " + positionLabel.getBounds() + newLine;
s+= "Bounds for Shell: " + shell.getBounds() + newLine;
s+= "Mouse pointer: " + x + " " + y;
positionLabel.setText(s);
}
}|
|
6.2. The role of a layout manager
A layout manager is responsible for arranging the widgets within a container, such as a Composite.
SWT offers several standard layout managers.
The following table provides an overview of them.
| Layout Manager | Description |
|---|---|
AbsoluteLayout |
Allows you to specify the exact position, width, and height of components. As user interfaces may be used on screens with different sizes, this layout manager should generally be avoided. |
FillLayout |
Arranges equal-sized widgets in a single row or column. |
RowLayout |
Arranges the widgets in rows or columns and allows you to control the layout with options such as wrap, spacing, and fill. |
GridLayout |
Arranges widgets in a grid. |
BorderLayout |
Allows you to arrange the widgets in different regions, SWT.TOP, SWT.CENTER, SWT.LEFT, SWT.RIGHT, SWT.BOTTOM. |
FormLayout |
Arranges the widgets with the help of the associated attachments. |
StackLayout |
This layout stacks all the controls on top of each other and resizes all controls to have the same size and location.
The control specified in |
If you assign a layout manager to a control, you no longer need to call pack().
You can call the pack() method if a control has no layout.
You typically call pack() on a container to make it resize to fit its contents, regardless of whether layout managers are used.
6.3. Layout Data
Each SWT widget can have a layout specific settings class assigned to it, e.g., GridData for a GridLayout.
This allows the developer to control the arrangement of the widgets within the layout.
In the following example, you specify that a widget should span two columns in a GridLayout.
button = new Button(parent, SWT.PUSH);
GridData gridData = new GridData();
gridData.horizontalSpan = 2;
button.setLayoutData(gridData);| The layout data used must match the layout manager; otherwise, an exception is thrown at runtime. |
The layout will be automatically calculated when the container is displayed.
You can tell a Composite to recalculate its layout with the composite.requestLayout() method.
| Layout data objects should not be reused as the layout manager expects that every user interface element has a unique layout data object. |
6.4. FillLayout
FillLayout divides the available space provided by the container equally to all widgets.
It can arrange the widgets either horizontally (SWT.HORIZONTAL) or vertically (SWT.VERTICAL).
It also allows you to set the space between the widgets (attribute spacing) and the margins of the widgets to the container via the marginWidth and marginHeight attributes.
6.5. RowLayout
RowLayout orders UI components in a row (SWT.HORIZONTAL) or in a column (SWT.VERTICAL).
RowLayout supports wrapping of widgets (property wrap) by default.
Via the pack property, you can define if widgets have their preferred size (default) or if they grab the available space.
It is also possible to set margins at the top, bottom, left, and right.
If you set justify, the widgets will be spread throughout the available space.
Each element can specify its height and width using a RowData element.
6.6. GridLayout
GridLayout allows you to arrange the user interface components in a Grid with a certain number of columns.
It is also possible to specify column and row spanning.
You can use new GridData() and assign properties to the new object.
Alternatively, you can use one of its richer constructors to define certain attributes during construction.
For example, via the following constructor:
new GridData(horizontalAlignment,
    verticalAlignment,
    grabExcessHorizontalSpace,
    grabExcessVerticalSpace,
    horizontalSpan,
    verticalSpan)
The most important attributes are defined in the following table.
| Parameter | Description |
|---|---|
horizontalAlignment |
Defines how the control is positioned horizontally within a cell (one of:
|
verticalAlignment |
Defines how the control is positioned vertically within a cell (one of:
|
grabExcessHorizontalSpace |
Defines whether the control is extended by the layout manager to take all the remaining horizontal space. |
grabExcessVerticalSpace |
Defines whether the control grabs any remaining vertical space. |
horizontalSpan |
Defines the number of column cells that the control takes. |
verticalSpan |
Defines the number of row cells that the control will take up. |
heightHint |
Defines the preferred height in pixels. |
widthHint |
Defines the preferred width in pixels. |
If the widget has the grabExcessHorizontalSpace attribute set to true, it will grab available space in its container.
SWT.FILL tells the widget to fill the available space.
Therefore, grabExcessHorizontalSpace and SWT.FILL are often used together.
6.7. Using GridDataFactory
The GridDataFactory class can be used to create GridData objects.
This class provides a convenient shorthand for creating and initializing these objects.
The following listing demonstrates its usage and compares it with the direct usage of GridData.
// listBox is an SWT widget

// GridDataFactory version
GridDataFactory.fillDefaults().grab(true, true).hint(150, 150).applyTo(listBox);

// Equivalent SWT version
GridData listBoxData = new GridData(GridData.FILL_BOTH);
listBoxData.widthHint = 150;
listBoxData.heightHint = 150;
listBoxData.minimumWidth = 1;
listBoxData.minimumHeight = 1;
listBox.setLayoutData(listBoxData);
The Javadoc of this class contains several examples for it.
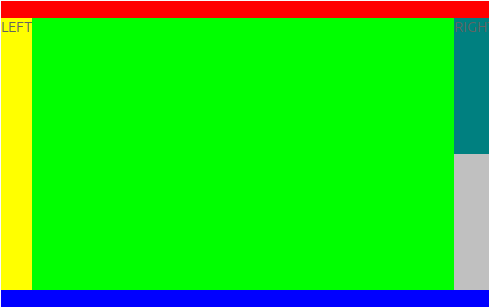
6.8. BorderLayout
BorderLayout allows you to place widgets in different regions via the BorderData#region.
-
SWT.TOP
-
SWT.CENTER
-
SWT.LEFT
-
SWT.RIGHT
-
SWT.BOTTOM
The top, left, right, and bottom widgets get their necessary space; the rest is available for the widgets placed in the center.
The usage is demonstrated here, in which a given Composite uses this layout.
      var layoutManager = new BorderLayout();
      var display = Display.getDefault();
      parent.setLayout(layoutManager);
      // TOP
      var topLabel = new Label(parent, SWT.NONE);
      topLabel.setBackground(display.getSystemColor(SWT.COLOR_RED));
      topLabel.setLayoutData(new BorderData(SWT.TOP));

      // CENTER
      var centerLabel = new Label(parent, SWT.NONE);
      centerLabel.setBackground(display.getSystemColor(SWT.COLOR_GREEN));
      centerLabel.setLayoutData(new BorderData(SWT.CENTER));

      // BOTTOM
      var bottomLabel = new Label(parent, SWT.NONE);
      bottomLabel.setBackground(display.getSystemColor(SWT.COLOR_BLUE));
      bottomLabel.setLayoutData(new BorderData(SWT.BOTTOM));

      // LEFT
      var leftLabel = new Label(parent, SWT.NONE);
      leftLabel.setText("LEFT");
      leftLabel.setBackground(display.getSystemColor(SWT.COLOR_YELLOW));
      leftLabel.setLayoutData(new BorderData(SWT.LEFT));

      // RIGHT we have two widgets
      var rightLabel1 = new Label(parent, SWT.NONE);
      rightLabel1.setText("RIGHT");
      rightLabel1.setBackground(display.getSystemColor(SWT.COLOR_DARK_CYAN));
      rightLabel1.setLayoutData(new BorderData(SWT.RIGHT));

      var rightLabel2 = new Label(parent, SWT.NONE);

      rightLabel2.setBackground(display.getSystemColor(SWT.COLOR_GRAY));
      rightLabel2.setLayoutData(new BorderData(SWT.RIGHT));
The result looks similar to the following screenshot.
6.9. FormLayout
FormLayout works by creating FormAttachments for each side of the widget, and storing them in the layout data.
The specific side of the widget is attached either to a position in the parent Composite or to another widget within the layout.
This allows you to control on a detailed level the placement of individual widgets within the layout.
6.10. Adding and removing children from a Composite
You can add children at runtime to a Composite.
By default, they are placed after the existing controls, but you can reposition them via the moveAbove and moveBelow method calls.
To remove a child from a layout, call its dispose method.
To update the parent composite after you have removed or added children, call its requestLayout method.
The following is an example of how to dynamically create new rows in an existing layout and how to remove these rows.
package com.vogella.swt.widgets.layout;

import java.util.ArrayList;
import java.util.List;

import org.eclipse.swt.SWT;
import org.eclipse.swt.events.MouseAdapter;
import org.eclipse.swt.events.MouseEvent;
import org.eclipse.swt.events.SelectionAdapter;
import org.eclipse.swt.events.SelectionEvent;
import org.eclipse.swt.graphics.Color;
import org.eclipse.swt.layout.FillLayout;
import org.eclipse.swt.layout.GridData;
import org.eclipse.swt.layout.GridLayout;
import org.eclipse.swt.widgets.Button;
import org.eclipse.swt.widgets.Composite;
import org.eclipse.swt.widgets.Display;
import org.eclipse.swt.widgets.Label;
import org.eclipse.swt.widgets.MessageBox;
import org.eclipse.swt.widgets.Shell;

public class SWTDynamicLayoutChanges {

    static int number = 0;
    private static List<Color> colors;
    private static int colorIndex;

    public static void main(String[] args) {

        Display display = new Display();
        Shell shell = new Shell(display);
        colorIndex = 0;
        colors = new ArrayList<>();
        colors.add(Display.getDefault().getSystemColor(SWT.COLOR_RED));
        colors.add(Display.getDefault().getSystemColor(SWT.COLOR_GREEN));
        colors.add(Display.getDefault().getSystemColor(SWT.COLOR_YELLOW));
        colors.add(Display.getDefault().getSystemColor(SWT.COLOR_CYAN));
        colors.add(new Color (Display.getDefault(), 122, 122, 122));
        colors.add(new Color (Display.getDefault(), 255, 51, 227));
        colors.add(new Color (Display.getDefault(), 27, 82, 255));
        colors.add(new Color (Display.getDefault(), 240, 201, 27));
        colors.add(new Color (Display.getDefault(), 188, 188, 188));
        colors.add(Display.getDefault().getSystemColor(SWT.COLOR_DARK_MAGENTA));

        GridLayout gridLayout = new GridLayout(1, false);
        gridLayout.marginWidth = 0;
        gridLayout.marginHeight = 0;
        gridLayout.verticalSpacing = 0;
        gridLayout.horizontalSpacing = 0;
        shell.setLayout(gridLayout);

        Composite top = new Composite(shell, SWT.NONE);
        GridData d1 = new GridData(SWT.FILL, SWT.FILL, true, true);
        top.setLayoutData(d1);
        top.setBackground(Display.getDefault().getSystemColor(SWT.COLOR_GREEN));

        createLayer(shell);
        createLayer(shell);
        createLayer(shell);

        shell.setBounds(100, 100, 800, 600);
        shell.open();

        while (!shell.isDisposed()) {
            if (!display.readAndDispatch())
                display.sleep();
        }
        display.dispose();
    }

    private static Composite createLayer(Composite parent) {

        Composite layer = new Composite(parent, SWT.NONE);
        layer.setLayout(new FillLayout());
        for (int i = 0; i < 10; i++) {
            Label label = new Label(layer, SWT.NONE);
            label.setText("I go \u26F7");
            label.addMouseListener(new MouseAdapter() {

                @Override
                public void mouseDown(MouseEvent e) {
                    Shell shell =Display.getDefault().getActiveShell();
                    MessageBox dialog =
                            new MessageBox(shell, SWT.ICON_QUESTION | SWT.OK| SWT.CANCEL);
                    dialog.setText("My info");
                    dialog.setMessage("Do you want to do this?");
                    dialog.open();
                }
            });
        }
        Button removeButton = new Button(layer, SWT.PUSH);
        removeButton.setText("Remove");
        removeButton.addSelectionListener(new SelectionAdapter() {
            @Override
            public void widgetSelected(SelectionEvent e) {
                layer.dispose();
                parent.requestLayout();
            }
        });

        Button addButton = new Button(layer, SWT.PUSH);
        addButton.setText("Add");
        addButton.addSelectionListener(new SelectionAdapter() {
            @Override
            public void widgetSelected(SelectionEvent e) {
                Composite composite = createLayer(parent);
                composite.moveAbove(addButton.getParent());
                parent.requestLayout();
            }
        });

        GridData d2 = new GridData(SWT.FILL, SWT.TOP, true, false);
        layer.setLayoutData(d2);
        if (colorIndex > colors.size()-1 ) {
            colorIndex = 0;
        }
        layer.setBackground(colors.get(colorIndex++));
        return layer;
    }
}
6.11. Triggering a re-layout of a Composite
As of Eclipse 4.7 you should use the requestLayout() method call on the Composite class, as this triggers an asynchronous layout call.
The Composite widget also defines the layout() method which triggers a synchronous layout.
The layout() method will recursively call layout() on child composites as well.
Prefer using requestLayout() on the individual composites if necessary, as this is faster.
The layout() method also accepts child widgets and flags.
| Flag | Description |
|---|---|
SWT.ALL |
Flag forces all descendants to be marked for layout.
The usage of this flag is generally discouraged.
If it is actually doing something, it could be replaced by a series of calls to |
SWT.CHANGED |
The flag causes subsequent calls to |
6.12. Example: Using GridLayout manager
The following example demonstrates the usage of the GridLayout class in the com.example.swt.widgets project.
package com.example.swt.widgets.layouts;

import org.eclipse.swt.SWT;
import org.eclipse.swt.layout.GridData;
import org.eclipse.swt.layout.GridLayout;
import org.eclipse.swt.layout.RowLayout;
import org.eclipse.swt.widgets.Button;
import org.eclipse.swt.widgets.Composite;
import org.eclipse.swt.widgets.Display;
import org.eclipse.swt.widgets.Group;
import org.eclipse.swt.widgets.Label;
import org.eclipse.swt.widgets.Shell;
import org.eclipse.swt.widgets.Spinner;
import org.eclipse.swt.widgets.Text;

public class GridLayoutSWT {
    public static void main(String[] args) {
        Display display = new Display();
        Shell shell = new Shell(display);
        GridLayout layout = new GridLayout(2, false);

        // set the layout to the shell
        shell.setLayout(layout);

        // create a label and a button
        Label label = new Label(shell, SWT.NONE);
        label.setText("A label");
        Button button = new Button(shell, SWT.PUSH);
        button.setText("Press Me");

        // create a new label that will span two columns
        label = new Label(shell, SWT.BORDER);
        label.setText("This is a label");
        // create new layout data
        GridData data = new GridData(SWT.FILL, SWT.TOP, true, false, 2, 1);
        label.setLayoutData(data);

        // create a new label which is used as a separator
        label = new Label(shell, SWT.SEPARATOR | SWT.HORIZONTAL);

        // create new layout data
        data = new GridData(SWT.FILL, SWT.TOP, true, false);
        data.horizontalSpan = 2;
        label.setLayoutData(data);

        // creates a push button
        Button b = new Button(shell, SWT.PUSH);
        b.setText("New Button");

        data = new GridData(SWT.LEFT, SWT.TOP, false, false, 2, 1);
        b.setLayoutData(data);

         // create a spinner with min value 0 and max value 1000
        Spinner spinner = new Spinner(shell, SWT.READ_ONLY);
        spinner.setMinimum(0);
        spinner.setMaximum(1000);
        spinner.setSelection(500);
        spinner.setIncrement(1);
        spinner.setPageIncrement(100);
        GridData gridData = new GridData(SWT.FILL, SWT.FILL, true, false);
        gridData.widthHint = SWT.DEFAULT;
        gridData.heightHint = SWT.DEFAULT;
        gridData.horizontalSpan = 2;
        spinner.setLayoutData(gridData);

        Composite composite = new Composite(shell, SWT.BORDER);
        gridData = new GridData(SWT.FILL, SWT.FILL, true, false);
        gridData.horizontalSpan = 2;
        composite.setLayoutData(gridData);
        composite.setLayout(new GridLayout(1, false));

        Text txtTest = new Text(composite, SWT.NONE);
        txtTest.setText("Testing");
        gridData = new GridData(SWT.FILL, SWT.FILL, true, false);
        txtTest.setLayoutData(gridData);

        Text txtMoreTests = new Text(composite, SWT.NONE);
        txtMoreTests.setText("Another test");

        Group group = new Group(shell, SWT.NONE);
        group.setText("This is my group");
        gridData = new GridData(SWT.FILL, SWT.FILL, true, false);
        gridData.horizontalSpan = 2;
        group.setLayoutData(gridData);
        group.setLayout(new RowLayout(SWT.VERTICAL));
        Text txtAnotherTest = new Text(group, SWT.NONE);
        txtAnotherTest.setText("Another test");

        // Children of this widget should get a fixed size
        Composite fixedElements = new Composite(shell, SWT.BORDER);
        gridData = new GridData(SWT.FILL, SWT.FILL, true, false);
        gridData.horizontalSpan = 2;
        fixedElements.setLayoutData(gridData);
        fixedElements.setLayout(new GridLayout(2, false));
        Label label2 = new Label(fixedElements, SWT.BORDER);
        GridData layoutData = new GridData(SWT.BEGINNING, SWT.CENTER, false, false);
        layoutData.widthHint=200;
        label2.setLayoutData(layoutData);
        label2.setText("Fixed");
        Label label3 = new Label(fixedElements, SWT.BORDER);
        GridData layoutData2 = new GridData(SWT.BEGINNING, SWT.CENTER, false, false);
        layoutData2.widthHint=20;
        label3.setLayoutData(layoutData2);
        label3.setText("Small but still fixed");

        shell.pack();
        shell.open();
        while (!shell.isDisposed()) {
            if (!display.readAndDispatch()) {
                display.sleep();
            }
        }
        display.dispose();
    }
}
Start your application. The expected output is shown in the screenshot below.
Resize the window and observe how the arrangement of the widgets changes.
6.13. Example: Using GridLayout to assign a fixed ratio to its children
The following example shows how the first child of the grid layout receives 25% of the available space, while the other receives 75%. Since GridLayout only supports fixed sizes, you must register a resize listener on its container.
package com.example.swt.widgets.layouts;

import org.eclipse.swt.SWT;
import org.eclipse.swt.graphics.Point;
import org.eclipse.swt.layout.GridData;
import org.eclipse.swt.layout.GridLayout;
import org.eclipse.swt.widgets.Composite;
import org.eclipse.swt.widgets.Display;
import org.eclipse.swt.widgets.Shell;

public class GridLayoutWithFixedColumnDistribution {
    public static void main(String[] args)
    {
        Display display = Display.getDefault();
        Shell shell = new Shell(display);
        shell.setLayout(new GridLayout(2, false));

        Composite left = new Composite(shell, SWT.BORDER);
        Composite right = new Composite(shell, SWT.BORDER);

        GridData leftData = new GridData(SWT.FILL, SWT.FILL, true, true);
        GridData rightData = new GridData(SWT.FILL, SWT.FILL, true, true);

        left.setLayoutData(leftData);
        right.setLayoutData(rightData);

        shell.addListener(SWT.Resize, arg0 -> {
            Point size = shell.getSize();

            leftData.widthHint = (int) (size.x * 0.75);
            rightData.widthHint = size.x - leftData.widthHint;

            System.out.println(leftData.widthHint + " + " + rightData.widthHint + " = " + size.x);
        });

        shell.open();
        shell.requestLayout();

        while (!shell.isDisposed())
        {
            if (!display.readAndDispatch())
                display.sleep();
        }
        display.dispose();
    }
}
7. Other SWT examples
The following code snippets provide examples of how to use SWT. You are not expected to read through all of them; they are provided as reference in case you need a code example while coding.
7.1. Tab order of elements
The tab order is the order in which elements are selected when switching between them with the Tab key.
You can specify the tab order of controls via the setTabList() method of a Composite.
For this, you provide an array of the controls, where the order of the controls in the array specifies the tab order.
package com.example.swt.widgets


import org.eclipse.swt.SWT;
import org.eclipse.swt.layout.RowLayout;
import org.eclipse.swt.widgets.Button;
import org.eclipse.swt.widgets.Control;
import org.eclipse.swt.widgets.Display;
import org.eclipse.swt.widgets.Shell;

public class TabExample {
    public static void main(String[] args) {
        Display display = Display.getDefault();
        Shell shell = new Shell(display);
        shell.setLayout(new RowLayout());
        Button b1 = new Button(shell, SWT.PUSH);
        b1.setText("Button1");
        Button b2 = new Button(shell, SWT.PUSH);
        b2.setText("Button2");
        Button b3 = new Button(shell, SWT.PUSH);
        b3.setText("Button3");

        Control[] controls = new Control[] { b2, b1, b3 };
        shell.setTabList(controls);
        shell.pack();
        shell.open();
        while (!shell.isDisposed()) {
            if (!display.readAndDispatch()) {
                display.sleep();
            }
        }
        display.dispose();
    }
}| Defining a tab order for your controls is important to increase accessibility and to allow advanced users quick navigation. |
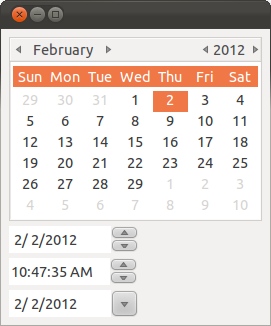
7.2. DateTime widget
The following code demonstrates how to use the DateTime widget.
package com.vogella.swt.widgets;

import org.eclipse.swt.SWT;
import org.eclipse.swt.layout.GridLayout;
import org.eclipse.swt.layout.RowLayout;
import org.eclipse.swt.widgets.Composite;
import org.eclipse.swt.widgets.DateTime;
import org.eclipse.swt.widgets.Display;
import org.eclipse.swt.widgets.Shell;

public class DateTimeExample {

    public static void main(String[] args) {

        // setup the SWT window
        Display display = new Display();
        final Shell shell = new Shell(display);
        shell.setLayout(new RowLayout());

        // initialize a parent composite with a grid layout manager
        Composite parent = new Composite(shell, SWT.NONE);
        GridLayout gridLayout = new GridLayout();
        gridLayout.numColumns = 1;
        parent.setLayout(gridLayout);
        DateTime calendar = new DateTime(parent, SWT.CALENDAR);
        DateTime date = new DateTime(parent, SWT.DATE);
        DateTime time = new DateTime(parent, SWT.TIME);
        // Date Selection as a drop-down
        DateTime dateD = new DateTime(parent, SWT.DATE | SWT.DROP_DOWN);

        shell.pack();
        shell.open();
        while (!shell.isDisposed()) {
            if (!display.readAndDispatch())
                display.sleep();
        }
        // tear down the SWT window
        display.dispose();
    }
}
7.3. Image
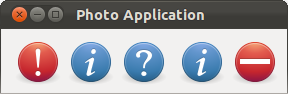
Images can be displayed using labels. The following class demonstrates this using some system images.
package com.vogella.swt.widgets;

import java.util.ArrayList;
import java.util.List;

import org.eclipse.swt.SWT;
import org.eclipse.swt.graphics.Image;
import org.eclipse.swt.layout.GridLayout;
import org.eclipse.swt.layout.RowLayout;
import org.eclipse.swt.widgets.Composite;
import org.eclipse.swt.widgets.Display;
import org.eclipse.swt.widgets.Label;
import org.eclipse.swt.widgets.Shell;

public class Photo {

    public static void main(String[] args) {

        // setup the SWT window
        Display display = new Display();
        final Shell shell = new Shell(display);
        shell.setLayout(new RowLayout());
        shell.setText("Photo Application");

        // initialize a parent composite with a grid layout manager
        // with 5 columns
        Composite parent = new Composite(shell, SWT.NONE);
        GridLayout gridLayout = new GridLayout();
        gridLayout.numColumns = 5;
        parent.setLayout(gridLayout);

        // Get the Display default icons
        List<Image> imageList = new ArrayList<Image>();

        imageList.add(display.getSystemImage(SWT.ICON_WARNING));
        imageList.add(display.getSystemImage(SWT.ICON_WORKING));
        imageList.add(display.getSystemImage(SWT.ICON_QUESTION));
        imageList.add(display.getSystemImage(SWT.ICON_INFORMATION));
        imageList.add(display.getSystemImage(SWT.ICON_ERROR));

        for (Image image : imageList) {
            Label label = new Label(parent, SWT.NONE);
            label.setImage(image);
        }
        // show the SWT window

        shell.pack();
        shell.open();

        while (!shell.isDisposed()) {
            if (!display.readAndDispatch())
                display.sleep();
        }
        // tear down the SWT window
        display.dispose();
        // if you do not use system images you would have to release them
        // not necessary in this example
        // for (Image image : imageList) {
        //    if (image != null) {
        //     image.dispose();
        //    }
        //    }
    }
}
The expected output is shown in the screenshot below.
You can also load your own images from disk; just remember to dispose of them later.
The code assumes that you have a file named my_image.png in a subfolder of your current package called images.
new Image(getDisplay(), getClass().getResourceAsStream("images/my_image.png"));7.4. Table
Create the following class.
package de.vogella.swt.table;

import org.eclipse.swt.SWT;
import org.eclipse.swt.layout.GridData;
import org.eclipse.swt.layout.GridLayout;
import org.eclipse.swt.widgets.Display;
import org.eclipse.swt.widgets.Shell;
import org.eclipse.swt.widgets.Table;
import org.eclipse.swt.widgets.TableColumn;
import org.eclipse.swt.widgets.TableItem;

public class SWTTable {
    public static void main(String[] args) {
        Display display = new Display();
        Shell shell = new Shell(display);
        shell.setLayout(new GridLayout());

        Table table = new Table(shell, SWT.MULTI | SWT.BORDER | SWT.FULL_SELECTION);
        table.setLinesVisible(true);
        table.setHeaderVisible(true);
        GridData data = new GridData(SWT.FILL, SWT.FILL, true, true);
        data.heightHint = 200;
        table.setLayoutData(data);

        String[] titles = { "First Name", "Last Name", "Age" };
        for (int i = 0; i < titles.length; i++) {
            TableColumn column = new TableColumn(table, SWT.NONE);
            column.setText(titles[i]);
            table.getColumn(i).pack();
        }

        for (int i = 0 ; i<= 50 ; i++){
            TableItem item = new TableItem(table, SWT.NONE);
            item.setText (0, "Person " +i );
            item.setText (1, "LastName " +i );
            item.setText (2, String.valueOf(i));
        }

        for (int i=0; i<titles.length; i++) {
            table.getColumn (i).pack ();
        }
        shell.pack();
        shell.open();
        while (!shell.isDisposed()) {
            if (!display.readAndDispatch()) {
                display.sleep();
            }
        }
    }
}
If you run this application, it displays a table.
7.5. Tree and Menu
Create the following class.
package com.vogella.swt.widgets;

import static org.eclipse.swt.events.SelectionListener.widgetSelectedAdapter;

import org.eclipse.swt.SWT;
import org.eclipse.swt.layout.FillLayout;
import org.eclipse.swt.widgets.Display;
import org.eclipse.swt.widgets.Menu;
import org.eclipse.swt.widgets.MenuItem;
import org.eclipse.swt.widgets.Shell;
import org.eclipse.swt.widgets.Tree;
import org.eclipse.swt.widgets.TreeItem;

public class TreeMenuTest {
    public static void main(String[] args) {
        Display display = Display.getDefault();
        Shell shell = new Shell(display);
        shell.setLayout(new FillLayout());
        final Tree tree = new Tree(shell, SWT.V_SCROLL);
        for (int i = 0; i < 5; i++) {
            TreeItem item = new TreeItem(tree, SWT.NONE);
            item.setText(String.valueOf(i));
            for (int j = 0; j < 3; j++) {
                TreeItem subItem = new TreeItem(item, SWT.NONE);
                subItem.setText(String.valueOf(i) + " " + String.valueOf(j));
            }
        }
        tree.pack();
        Menu menu = new Menu(tree);
        MenuItem menuItem = new MenuItem(menu, SWT.NONE);
        menuItem.setText("Print Element");

        menuItem.addSelectionListener(widgetSelectedAdapter( e->  System.out.println(tree.getSelection()[0].getText())));

        tree.setMenu(menu);
        shell.setSize(400, 200);
        shell.open();
        while (!shell.isDisposed()) {
            if (!display.readAndDispatch()) {
                display.sleep();
            }
        }
    }
}
If you run this application, it displays a tree. Right-click any item to display the context menu.
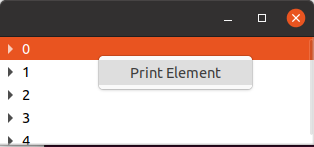
If you select the menu, the text of the selected item will be printed to the console.
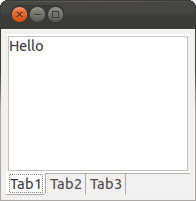
7.6. CTabFolder
CTabFolder and CTabItem let you create a tabbed container where each page is accessible through a tab.
This widget supports background colors, which the TabFolder and TabItem widget do not support.
package com.vogella.swt.widgets.ctabfolder;

import org.eclipse.swt.SWT;
import org.eclipse.swt.custom.CTabFolder;
import org.eclipse.swt.custom.CTabItem;
import org.eclipse.swt.layout.GridData;
import org.eclipse.swt.layout.GridLayout;
import org.eclipse.swt.widgets.Display;
import org.eclipse.swt.widgets.Shell;
import org.eclipse.swt.widgets.Text;

public class CTabFolderExample {
    public static void main(String[] args) {
        Display display = new Display();
        Shell shell = new Shell(display);
        shell.setLayout(new GridLayout());
        // SWT.BOTTOM to show at the bottom
        CTabFolder folder = new CTabFolder(shell, SWT.BOTTOM);
        GridData data = new GridData(SWT.FILL,
                SWT.FILL, true, true,
                2, 1);
        folder.setLayoutData(data);
        folder.setSelectionForeground(display.getSystemColor(SWT.COLOR_RED));
        CTabItem cTabItem1 = new CTabItem(folder, SWT.NONE);
        cTabItem1.setText("Tab1");
        CTabItem cTabItem2 = new CTabItem(folder, SWT.NONE);
        cTabItem2.setText("Tab2");
        CTabItem cTabItem3 = new CTabItem(folder, SWT.NONE);
        cTabItem3.setText("Tab3");

        Text text = new Text(folder, SWT.BORDER);
        text.setText("Hello");
        cTabItem1.setControl(text);

        shell.pack();
        shell.open();
        while (!shell.isDisposed()) {
            if (!display.readAndDispatch()) {
                display.sleep();
            }
        }
    }
}
If you run this application, you will see several tabbed cards. The SWT.BOTTOM style bit on the folder widget makes the tab appear at the bottom.
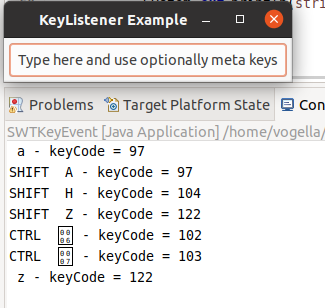
7.7. Key bindings for SWT widgets
You can add KeyListener to an SWT widget via the addKeyListener method.
This method receives a KeyEvent object.
The e object provides, for example:
-
e.character: which char was pressed -
e.stateMask: which modifier keys were pressed (CTRL, ALT, SHIFT, COMMAND, ALT_GR) -
keyCode: integer representation of the key based on constants defined in the SWT class.
The following source code demonstrates how to register a KeyListener with an SWT widget and how to evaluate the event.
package com.vogella.swt.widgets;

import org.eclipse.swt.SWT;
import org.eclipse.swt.events.KeyEvent;
import org.eclipse.swt.events.KeyListener;
import org.eclipse.swt.layout.GridLayout;
import org.eclipse.swt.widgets.Button;
import org.eclipse.swt.widgets.Display;
import org.eclipse.swt.widgets.Shell;

public class SWTKeyEvent {
    public static void main(String[] args) {
        Display display = new Display();
        Shell shell = new Shell(display);
        shell.setText("KeyListener Example");
        shell.setLayout(new GridLayout());

        Button button = new Button(shell, SWT.CENTER);
        button.setText("Type here and optionally use meta keys");
        button.addKeyListener(KeyListener.keyPressedAdapter(e-> handleKeyEvent(e)));

        shell.pack();
        shell.open();

        while (!shell.isDisposed()) {
            if (!display.readAndDispatch())
                display.sleep();
        }
        display.dispose();
    }

    private static void handleKeyEvent(KeyEvent e) {
        String string = "";

        // check click together?
        if ((e.stateMask & SWT.ALT) != 0)
            string += "ALT ";
        if ((e.stateMask & SWT.CTRL) != 0)
            string += "CTRL ";
        if ((e.stateMask & SWT.SHIFT) != 0)
            string += "SHIFT ";

        if (e.keyCode == SWT.BS) {
            string += "BACKSPACE ";
        }

        if (e.keyCode == SWT.ESC) {
            string += "ESCAPE ";
        }

        // check characters (digits are from 48 to 57)
        if ((e.keyCode >= 97 && e.keyCode <= 122) || (e.keyCode >= 48 && e.keyCode <= 57)) {
            string += " " + e.character + " - keyCode = " + e.keyCode;
        }

        if (!string.equals("")) {
            System.out.println(string);
        }
    }
}
If you run this application and move the cursor over the button widget and type, you should see the output in the Console view.
7.8. Global filtering of user interface events
You can use the addFilter method from the Display class to filter globally for events as long as your application has focus.
The following code demonstrates this.
package de.vogella.swt.listener;

import org.eclipse.swt.SWT;
import org.eclipse.swt.widgets.Display;
import org.eclipse.swt.widgets.Event;
import org.eclipse.swt.widgets.Listener;
import org.eclipse.swt.widgets.Shell;

public class GlobalListener {

    public static void main(String[] args) {
        Display display = new Display();
        Shell shell = new Shell(display);
        shell.open();
        display.addFilter(SWT.KeyDown, new Listener() {
            @Override
            public void handleEvent(Event event) {
                char c = event.character;
                System.out.println(c);
            }
        });

        while (!shell.isDisposed()) {
            if (!display.readAndDispatch())
                display.sleep();
        }
    }
}
7.9. Fonts in SWT
You can change the font of text in SWT.
You do this by creating a Font and applying it to the desired control.
Label label = new Label(parent, SWT.NONE);
Font font = new Font(label.getDisplay(), new FontData("Mono", 10, SWT.ITALIC));
label.setFont(font);
label.setText("Some text");
To modify the current font you can retrieve the FontData, change it, and create a new Font from it.
Label label = new Label(parent, SWT.NONE);
FontData fontData = label.getFont().getFontData()[0];
// we can change this since getFontData() creates a new FontData instance
fontData.setStyle(SWT.ITALIC);
label.setFont(new Font(label.getDisplay(), fontData));
You can deploy and use custom fonts for your application. To use a custom font, you have to load it with the Display.
boolean fontLoaded = Display.getDefault().loadFont("fonts/CustomFont.ttf");
if (fontLoaded) {
    Font font = new Font(Display.getDefault(), "Custom Font", 12, SWT.NORMAL);
    label.setFont(font);
}| Please remember that fonts do not get automatically disposed with the widget that uses them. |
7.10. Unicode in SWT
SWT supports the display of Unicode characters.
Depending on your OS and default font, you might have to change the font of your control to a font that supports Unicode characters.
Label label = new Label(parent, SWT.NONE);
label.setFont(new Font(Display.getCurrent(), "Arial Unicode MS", 12, SWT.NORMAL));
label.setText("Follow your \u2764!");
8. SWT builder API via JFace
The JFace library adds a builder API to SWT widgets, providing a concise and modern way to build SWT-based user interfaces.
The following example shows how to use the ButtonFactory to create a new button.
import static org.eclipse.jface.widgets.ButtonFactory.newButton;
....

newButton(SWT.PUSH).text("Press me").onSelect(e-> System.out.print("Testing")).create(shell);
9. SWT snippets and examples
The SWT Snippets are examples of stand-alone SWT applications using various SWT widgets.
You can copy these snippets and paste them directly into a project with an SWT dependency inside the Eclipse IDE. Each snippet contains a main method, allowing it to be started directly.
|
You can paste classes from the clipboard onto a project or package. Eclipse automatically creates the Java class based on the content of the clipboard. |
The SWT Examples page provides test programs for widgets and custom-drawn SWT widgets.
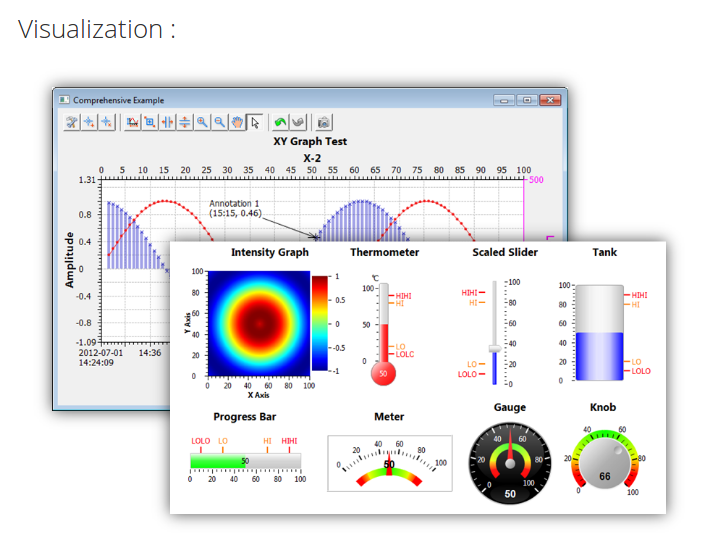
10. The Nebula widgets
The Eclipse Nebula project provides additional widgets for SWT. For example, it offers several visualization widgets, as shown in the following screenshot.
See https://github.com/EclipseNebula/nebula/blob/master/docs/Widgets.md for an overview of the available widgets.
To use these widgets in your application, add their update site to your target platform.
11. Learn more and get support
This tutorial continues on Eclipse RCP online training or Eclipse IDE extensions with lots of video material, additional exercises and much more content.
12. SWT resources
SWT Widgets - Webpage showing all SWT widgets with links to examples and Javadoc
SWT Snippets - Short examples demonstrating the usage of the SWT API
SWT Development Tools - Tools include Sleak (analyze memory leaks in SWT graphics resources) and the SWT Spy plug-in, which prints out information about the SWT widget under the cursor.
12.1. vogella Java example code
If you need more assistance we offer Online Training and Onsite training as well as consulting