This article describes how to create and use Eclipse Wizards. It is based on the Eclipse 4.4 release but covers the Eclipse 3.x releases.
1. Eclipse Wizards
1.1. Definition of an Eclipse wizard
In Eclipse, a wizard is commonly used for the creation of new elements, imports or exports. It can be used for the execution of any task involving a sequential series of steps. A wizard should be used if there are many steps in the task, and they must be completed in a specific order.
Wizards are meant to take the hassle out of standard, repetitive, or tedious user tasks. When you start a wizard, a new modal window opens. This window blocks the remaining user interface until the user finishes the task in the wizard or cancels the wizard.
The following screenshot shows the second page of a wizard.
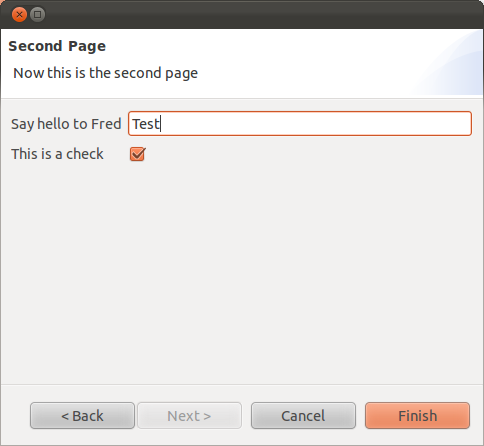
| JFace orders the buttons differently depending on the platform. |
1.2. Wizards and WizardPages
The Wizard class from the org.eclipse.jface.wizard package provides the functionality to build custom wizards.
This class controls the navigation between the different pages and provides the base user interface, for example, an area for error and information messages.
A wizard contains one or several pages of the type WizardPage.
Such a page is added to a Wizard object via the addPage() method.
A WizardPage must create a new Composite in its createControl() method.
This new Composite must use the Composite of the method parameter as parent.
It must call the setControl() method with this new Composite as parameter.
If this is omitted, Eclipse will throw an error.
1.3. Starting the Wizard
To open a wizard, use the WizardDialog class from the org.eclipse.jface.wizard package.
WizardDialog dialog = new WizardDialog(shell, new YourWizardClass());
dialog.open();
Typically, a wizard is opened via a menu or toolbar entry or via a SelectionListener on a button.
1.4. Changing the page order
To control the order of the WizardPage object, you can override the getNextPage() method in the Wizard.
This allows you to change the order of the pages depending on the data in the wizard and pages.
The following code snippet demonstrates this approach.
// task is an object available in the wizard

private CreateTaskPage1 page1 = new CreateTaskPage1(task);
private CreateTaskPage2 page2 = new CreateTaskPage2();
private CreateTaskPage3 specialPage = new CreateTaskPage3(task);

@Override
public void addPages() {
  addPage(page1);
  addPage(page2);
  addPage(specialPage);
}

@Override
public IWizardPage getNextPage(IWizardPage currentPage) {
    if (todo.isDone()) {
       return specialPage;
    }
    if (currentPage == page1) {
        return page2;
    }
    return null;
}
1.5. Working with data in the wizard
To use the same data in different pages of your wizard, pass them to the wizard pages via their constructor parameters.
The isVisible() method is called whenever the WizardPage either becomes visible or invisible.
Call the super.isVisible() method and check the current status of the page.
If the page is visible, assign the data of your object to the user interface components.
1.6. Updating the Wizard buttons from a WizardPage
The WizardPage class defines the canFlipToNextPage() and setPageComplete() methods to control whether the Next or the Finish button in the wizard becomes active.
The Wizard class defines the canFinish() method in which you can define if the wizard can be completed.
If the status changes, you can update the buttons in the Wizard (e.g., the Next and the Finish button) from a WizardPage via the getWizard().getContainer().updateButtons() method call.
1.7. Adding your wizard to the New, Import and Export commands
In Eclipse 3.x you can register a wizard via the org.eclipse.ui.newWizards extension point.
This adds your wizard to the standard dialog for new projects that can be used via the command org.eclipse.ui.newWizard.
This is possible for the export and import wizard commands.
2. Exercise: Wizards Example
The following gives an example of a wizard with two pages.
Create the following MyPageOne and MyPageTwo classes.
package de.vogella.rcp.intro.wizards.wizard;

import org.eclipse.jface.wizard.WizardPage;
import org.eclipse.swt.SWT;
import org.eclipse.swt.events.KeyEvent;
import org.eclipse.swt.events.KeyListener;
import org.eclipse.swt.layout.GridData;
import org.eclipse.swt.layout.GridLayout;
import org.eclipse.swt.widgets.Composite;
import org.eclipse.swt.widgets.Label;
import org.eclipse.swt.widgets.Text;

public class MyPageOne extends WizardPage {
    private Text text1;
    private Composite container;

    public MyPageOne() {
        super("First Page");
        setTitle("First Page");
        setDescription("Fake Wizard: First page");
    }

    @Override
    public void createControl(Composite parent) {
        container = new Composite(parent, SWT.NONE);
        GridLayout layout = new GridLayout();
        container.setLayout(layout);
        layout.numColumns = 2;
        Label label1 = new Label(container, SWT.NONE);
        label1.setText("Put a value here.");

        text1 = new Text(container, SWT.BORDER | SWT.SINGLE);
        text1.setText("");
        text1.addKeyListener(new KeyListener() {

            @Override
            public void keyPressed(KeyEvent e) {
            }

            @Override
            public void keyReleased(KeyEvent e) {
                if (!text1.getText().isEmpty()) {
                    setPageComplete(true);

                }
            }

        });
        GridData gd = new GridData(GridData.FILL_HORIZONTAL);
        text1.setLayoutData(gd);
        // required to avoid an error in the system
        setControl(container);
        setPageComplete(false);

    }

    public String getText1() {
        return text1.getText();
    }
}
package de.vogella.rcp.intro.wizards.wizard;
import org.eclipse.jface.wizard.WizardPage;
import org.eclipse.swt.SWT;
import org.eclipse.swt.events.KeyEvent;
import org.eclipse.swt.events.KeyListener;
import org.eclipse.swt.layout.GridData;
import org.eclipse.swt.layout.GridLayout;
import org.eclipse.swt.widgets.Button;
import org.eclipse.swt.widgets.Composite;
import org.eclipse.swt.widgets.Label;
import org.eclipse.swt.widgets.Text;
public class MyPageTwo extends WizardPage {
private Text text1;
private Composite container;
public MyPageTwo() {
super("Second Page");
setTitle("Second Page");
setDescription("Now this is the second page");
setControl(text1);
}
@Override
public void createControl(Composite parent) {
container = new Composite(parent, SWT.NONE);
GridLayout layout = new GridLayout();
container.setLayout(layout);
layout.numColumns = 2;
Label label1 = new Label(container, SWT.NONE);
label1.setText("Say hello to Fred");
text1 = new Text(container, SWT.BORDER | SWT.SINGLE);
text1.setText("");
text1.addKeyListener(new KeyListener() {
@Override
public void keyPressed(KeyEvent e) {
// TODO Auto-generated method stub
}
@Override
public void keyReleased(KeyEvent e) {
if (!text1.getText().isEmpty()) {
setPageComplete(true);
}
}
});
GridData gd = new GridData(GridData.FILL_HORIZONTAL);
text1.setLayoutData(gd);
Label labelCheck = new Label(container, SWT.NONE);
labelCheck.setText("This is a check");
Button check = new Button(container, SWT.CHECK);
check.setSelection(true);
// required to avoid an error in the system
setControl(container);
setPageComplete(false);
}
public String getText1() {
return text1.getText();
}
}Create the following class named MyWizard.
package de.vogella.rcp.intro.wizards.wizard;

import org.eclipse.jface.wizard.Wizard;


public class MyWizard extends Wizard {

    protected MyPageOne one;
    protected MyPageTwo two;

    public MyWizard() {
        super();
        setNeedsProgressMonitor(true);
    }

    @Override
    public String getWindowTitle() {
        return "Export My Data";
    }

    @Override
    public void addPages() {
        one = new MyPageOne();
        two = new MyPageTwo();
        addPage(one);
        addPage(two);
    }

    @Override
    public boolean performFinish() {
        // Print the result to the console
        System.out.println(one.getText1());
        System.out.println(two.getText1());

        return true;
    }
}
To show the wizard you could, for example, add a Button to your part and call the Wizard via a SelectionListener on the Button.
Button button = new Button(parent, SWT.PUSH);
button.setText("Open Wizard");
button.addSelectionListener(new SelectionAdapter() {
    @Override
    public void widgetSelected(SelectionEvent e) {
        WizardDialog wizardDialog = new WizardDialog(parent.getShell(),
            new MyWizard());
        if (wizardDialog.open() == Window.OK) {
            System.out.println("Ok pressed");
        } else {
            System.out.println("Cancel pressed");
        }
    }
});
3. Exercise: Adding a wizard to the IDE
Provide a wizard in the New dialog of the Eclipse IDE.
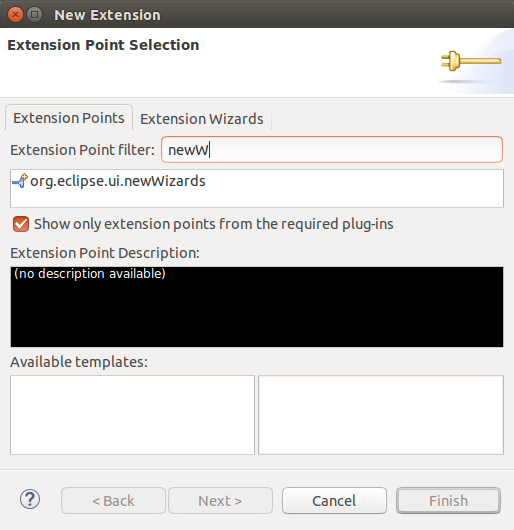
3.1. Using the org.eclipse.ui.newWizards extension point
When a wizard should be provided as new wizard in the New dialog, the org.eclipse.ui.newWizards extension point has to be used.
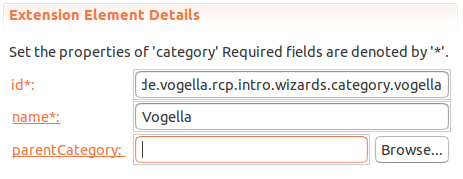
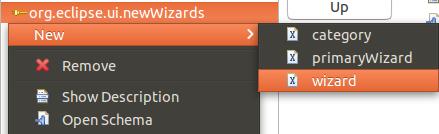
Add a category to this extension point.
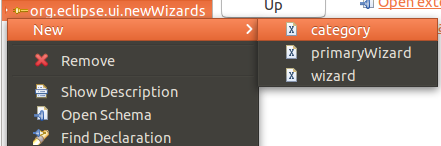
This category should be called Vogella.
Add a wizard to this extension point.
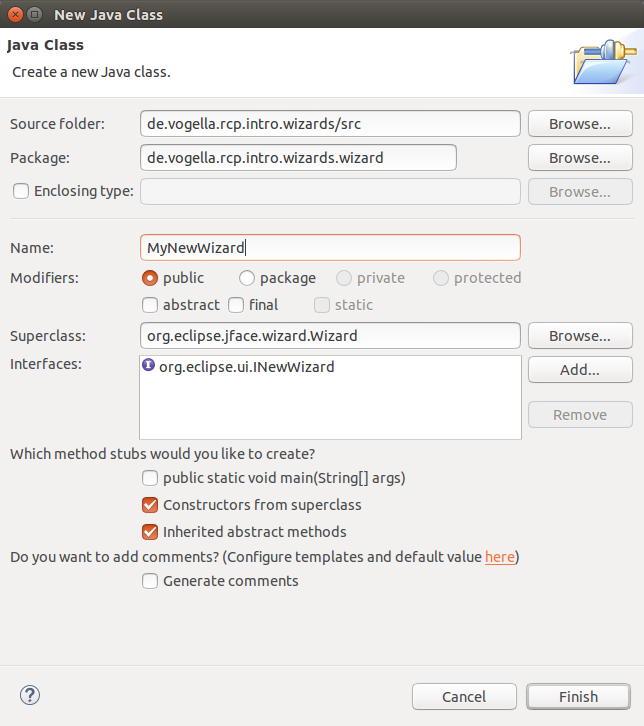
When clicking on the class: hyperlink of the wizard entry, the following dialog will appear. Use the data depicted on the image.
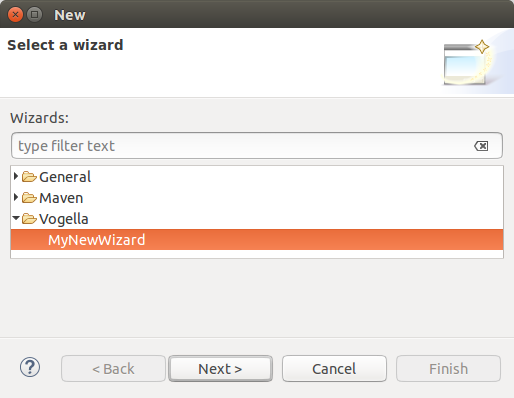
The result will look like this:

3.2. Implement the INewWizard interface
The MyNewWizard implementation will look similar to this:
package de.vogella.rcp.intro.wizards.wizard;

import org.eclipse.jface.viewers.IStructuredSelection;
import org.eclipse.jface.wizard.Wizard;
import org.eclipse.ui.INewWizard;
import org.eclipse.ui.IWorkbench;

public class MyNewWizard extends Wizard implements INewWizard {

    public MyNewWizard() {
    }

    // ...
    // other MyWizard code
    // ...

    @Override
    public void init(IWorkbench workbench, IStructuredSelection selection) {
        // initialize wizard with workbench and the current selection

    }

    @Override
    public boolean performFinish() {
        return false;
    }

}
3.3. Validate
Optionally the two wizard pages from previous exercises can be added to this new wizard.
Start an Eclipse IDE and open the New dialog by using the menu or press Ctrl+N and choose the MyNewWizard wizard.
4. Exercise: Eclipse IDE Import Wizard
In this exercise, you provide a wizard in the Import dialog of the Eclipse IDE.
4.1. Implement an import wizard
Implementing an import wizard is pretty similar to implementing a new wizard.
The main difference is that the org.eclipse.ui.importWizards extension point and the IImportWizard interface have to be used.
4.2. Validate
Optionally the two wizard pages from previous exercises can be added to this new wizard.
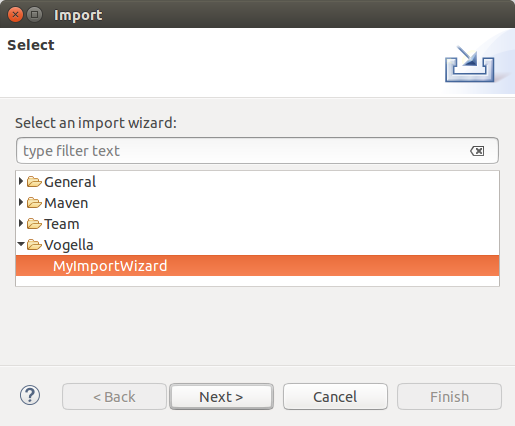
Start an Eclipse IDE and open the Import dialog by using the menu and choose the MyImportWizard wizard.
5. Eclipse Wizard Resources
5.1. vogella Java example code
If you need more assistance we offer Online Training and Onsite training as well as consulting