This tutorial introduces you to the programming model of Eclipse RCP applications.
1. Introduction to Eclipse-based applications
Eclipse RCP (Rich Client Platform) applications leverage the Eclipse framework to build feature-rich, standalone desktop applications.
An Eclipse application consists of individual software components called plug-ins, which can use and extend other plug-ins. For instance, a plug-in can add new entries to a menu defined by another plug-in.
The Eclipse IDE can be viewed as a special Eclipse RCP application focused on supporting software development. For example, the Java development tools (JDT) provide functionality for developing Java applications.
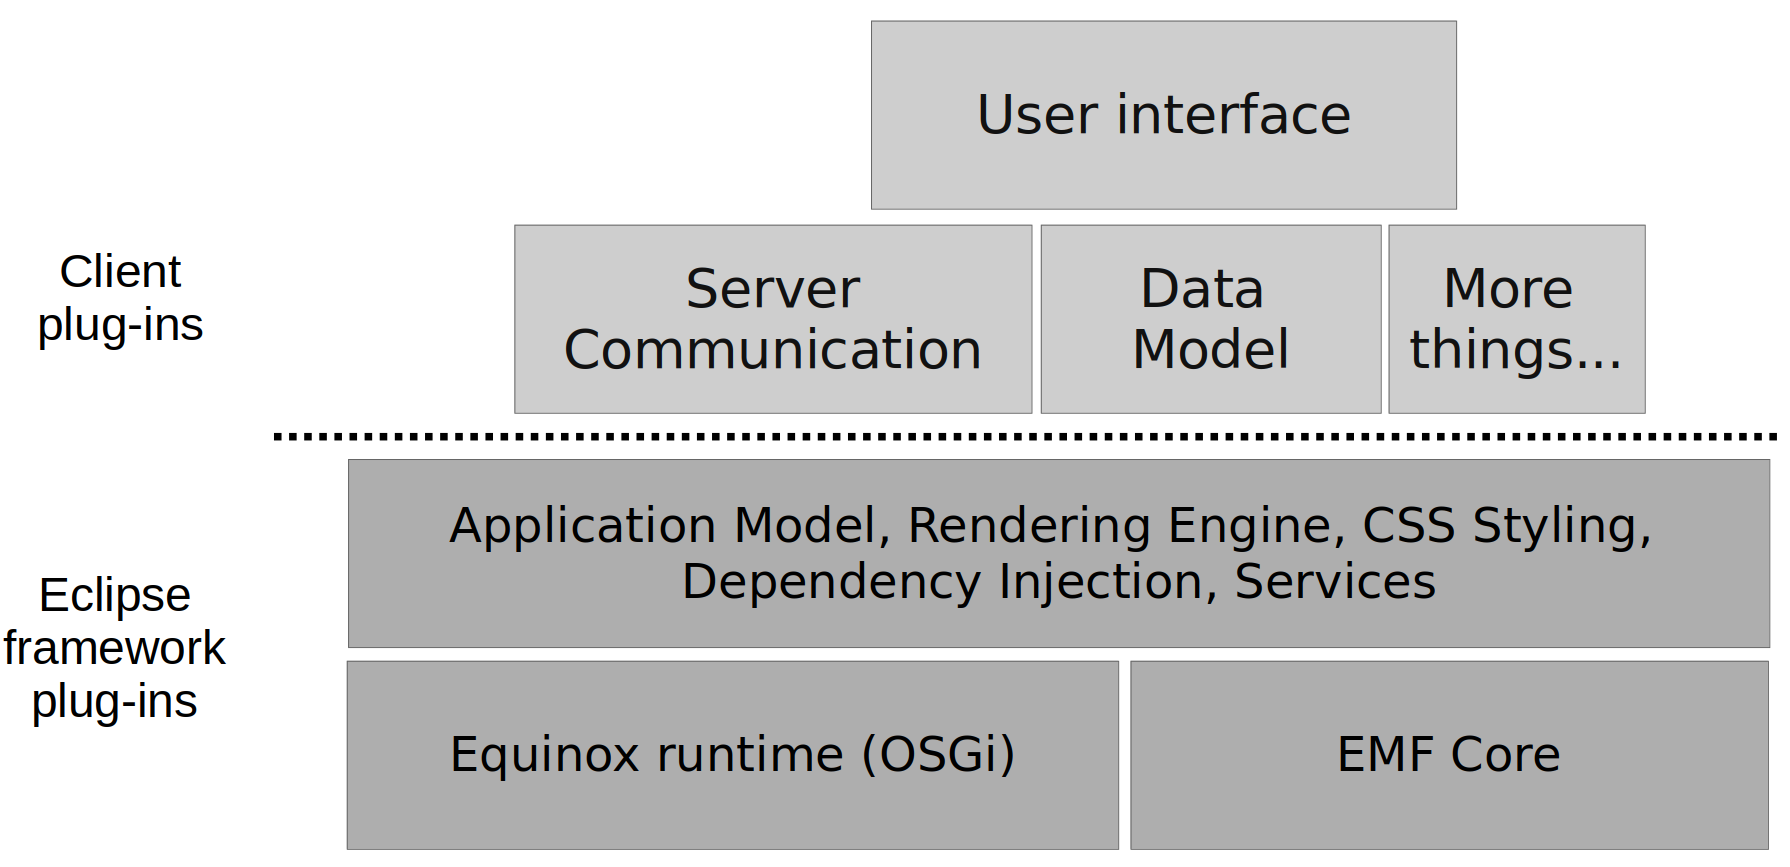
An Eclipse RCP application typically uses the same base components as the Eclipse IDE. On top of these, the RCP client developer adds application-specific components. This is depicted in the following diagram.
2. Why use Eclipse RCP
Desktop applications are still core tools that drive companies.
Companies frequently use desktop applications to handle their internal processes. Their software often requires a complex user interface and is frequently developed in-house, even if software development is not their primary business. These companies rarely have a large software development team dedicated to maintaining and updating their in-house software.
To develop these in-house applications, companies typically prefer solutions that are easy to use, provide a rich API, and ensure a stable application programming interface (API). They require their selected framework to be easy to maintain, especially if they use the software to support their main line of work.
Eclipse RCP excels in this space.
Customers choose Eclipse RCP because the Eclipse framework:
-
forms the foundation of multiple successful IDEs
-
is stable and widely used, which is an important indicator that it will be supported for many years to come
-
provides native user interface components that are fast and reliable
-
has a strong modular approach, allowing developers to design component-based systems
-
is the foundation for products of companies such as Red Hat, IBM, Microsoft, and SAP, ensuring that the Eclipse framework remains flexible, fast, and continues to evolve
Additionally, the Eclipse platform fosters a large community of individuals who provide support, information, and extensions to the Eclipse framework. It enables customers to contribute to the framework to meet their specific needs.
The Eclipse development team makes a significant effort to keep its API stable, enabling developers to use, update, and maintain it with minimal effort. Moreover, the Eclipse API is constantly enhanced and improved, which benefits RCP users with every release.
3. Examples of existing Eclipse RCP applications
Eclipse RCP applications are frequently used as feature-rich desktop applications within companies. Therefore, only a few of these applications are publicly available. This section provides examples of RCP applications to illustrate the capabilities of the Eclipse framework.
Portfolio Performance is an open-source RCP application primarily developed by Andreas Buchen. The Portfolio Performance application is an open-source tool designed for tracking, analyzing, and visualizing investment portfolios. It provides detailed insights into portfolio performance, asset allocation, and returns over time through customizable charts and reports.
Visit https://www.portfolio-performance.info/ for more information.


The 4diac IDE, part of the Eclipse 4diac™ project, supports the development of automation systems that comply with the IEC 61499 standard. This software is widely used in the industry and by researchers exploring IEC 61499.
Visit https://github.com/eclipse-4diac/4diac-ide for more information.


OpenChrom® is an open-source software application for analyzing chromatographic, mass spectrometric, and spectroscopic data in chemical analytics. The software is used in both quality control and research and development. The Lablicate GmbH offers commercial extensions for this product.
Visit https://www.openchrom.net and https://www.lablicate.com for more information.


4. Installation
4.1. Download the Eclipse IDE
To develop Eclipse plug-ins and applications, you need to download an Eclipse IDE suitable for this task. The Eclipse project offers multiple downloads specifically for this purpose. The most commonly used options are:
-
The Eclipse SDK - minimal functionality needed for Eclipse-based development, SDK stands for Software Development Kit
-
The Eclipse IDE for Eclipse Committers package provides additional functionality such as Git support
Download one of these. The Eclipse IDE for Eclipse Committers package includes a Java runtime; no additional download is needed.
We describe two alternatives:
-
the SDK download (recommended)
-
Eclipse IDE for Eclipse Committers
| The appearance of the download page may change over time. |
4.1.1. Alternative 1: Download the Eclipse SDK
Download the latest version from https://download.eclipse.org/eclipse/downloads/ by clicking the link for the most recent release (the version with the highest number) on the SDK download page. The download section will look similar to the screenshot below.

The download is a compressed archive containing multiple files. The format depends on your platform:
-
Windows uses the zip format
-
Linux uses the tar.gz format
-
macOS uses the DMG (Disk Image) format.
The Eclipse SDK does not include a Java runtime; you need to provide this separately.
4.1.2. Alternative 2: Download the Eclipse IDE for Eclipse Committers package
Eclipse provides pre-built packages that can be used.
Download the installer for the Eclipse IDE for Eclipse Committers package from the Eclipse packages website.

This download includes a Java runtime; you do not need to install one separately.
You can use the Eclipse installer to install this package. The installer is useful if you want to download several versions of Eclipse. It uses a shared installation pool for common plug-ins, which reduces the required space.
5. Exercise: Create an RCP application using the Eclipse wizard
In the following exercise, you will create an Eclipse RCP application using a template and launch it via the IDE. The generated files are not yet explained, but this should enable you to see a running application and review the involved configuration files.
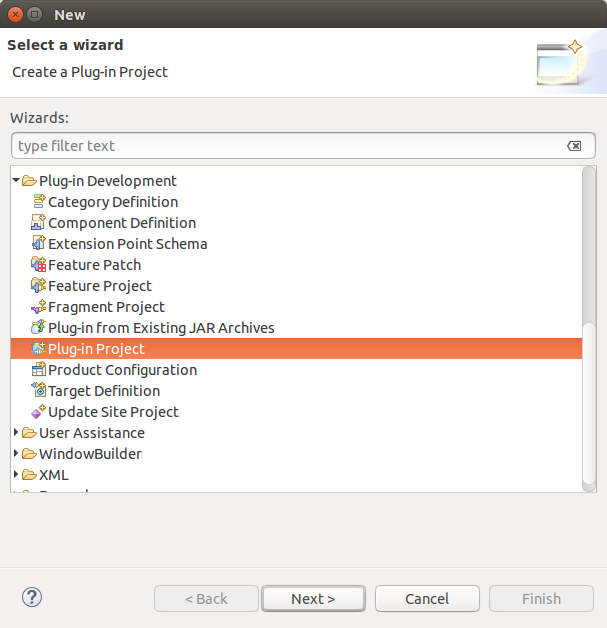
5.1. Create project
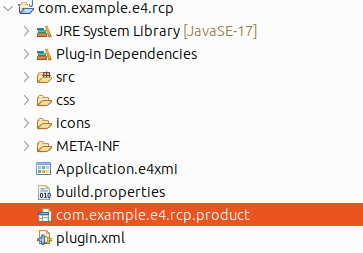
Create a project named com.example.e4.rcp using the menu entry.
Use the settings similar to the following screenshots.
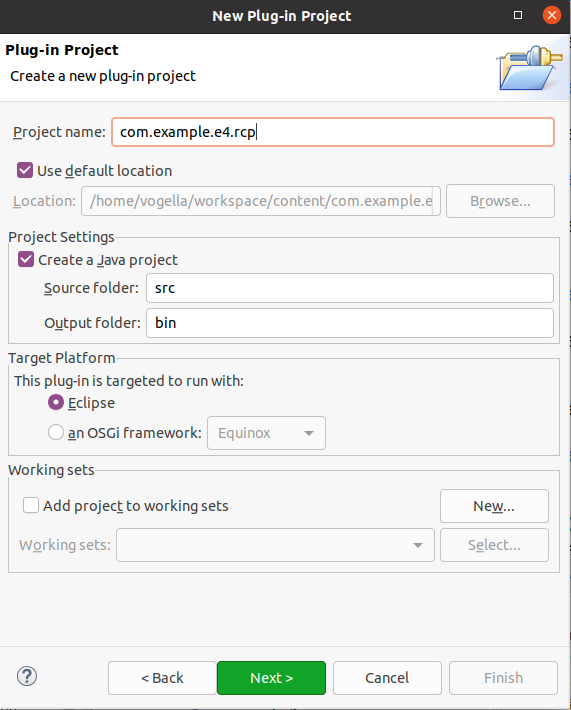
Press Next.

Press Next.
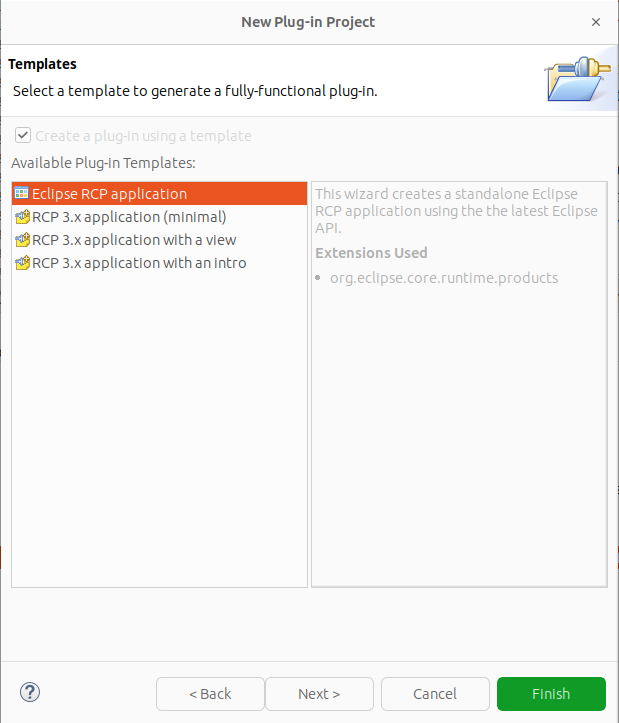
Press Next.
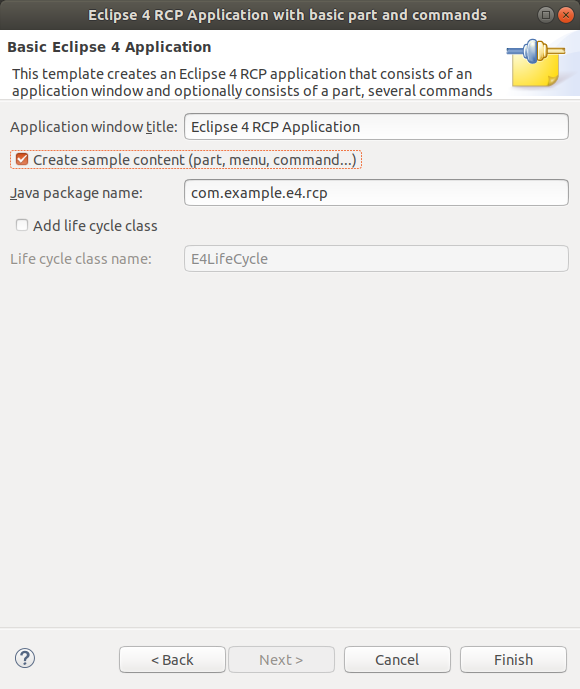
On the last wizard page, select the Create sample content (parts, menu, etc.) flag. Via this flag, you configure that the generated application has example content, e.g., a view and some menu and toolbar entries.
|
The wizard adds the |
5.2. Launch the application using the product file
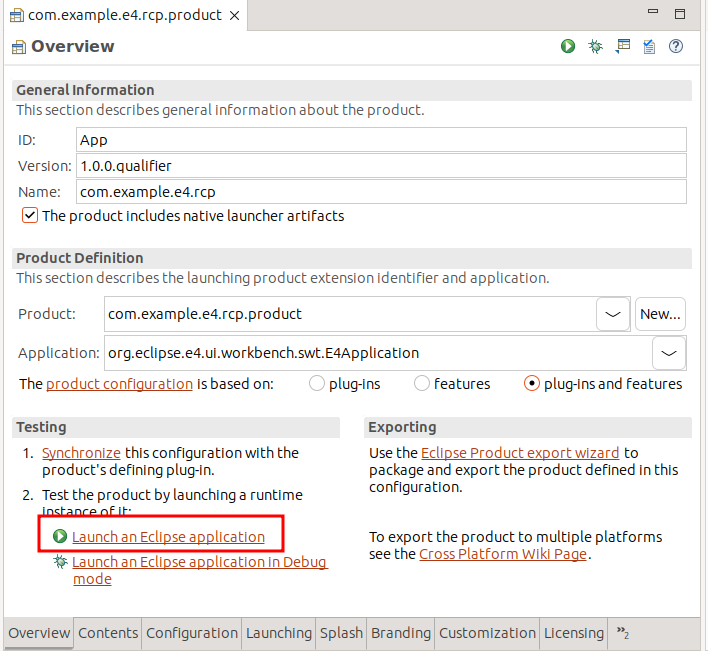
Open the generated product file by double-clicking on the product file.
Switch to the Overview tab in the editor and press the Launch an Eclipse application hyperlink to start your application. This option is highlighted in the screenshot below.
5.3. Validate
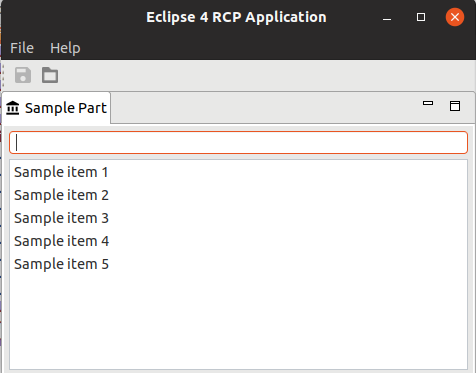
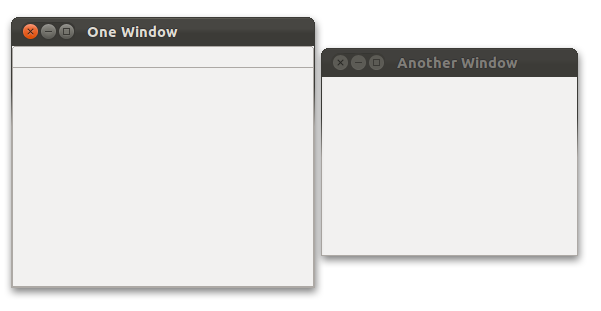
As a result, your Eclipse application should start. The application should look similar to the following screenshot.
5.4. Error analysis
If you see an empty window, it means you pressed the Finish button prematurely (after selecting the template) or forgot to select the Create sample content flag on the last tab.
To fix this, delete the generated plug-in and create it again, making sure to select the correct values as described in Exercise: Create an RCP application using the Eclipse wizard.
6. Describing the structure of an Eclipse application
The structure of an Eclipse application is described via an application model. At startup, this application model is constructed based on multiple configuration files and adjusted by code logic resulting in a runtime application model. This runtime application model is the basis for the running application and it is kept in sync with the application during runtime by the framework.

This model contains the parts of the application as individual model elements and their hierarchical relationship. Some of these model elements are visible to the user. For example, windows, parts (views and editors), menus, toolbars. Other elements are not directly visible to the user, for example, handlers, commands, and key bindings.
Each model element has attributes that describe its current state, e.g., the size and the position of a window. The application model expresses the relationship between model elements via a hierarchy. If necessary, a model element can contain links to Java classes or static resources. For example, a part contains a link to the Java classes that are initialized when the part becomes visible.
The base of the application model is typically defined as a static file.
For an Eclipse RCP application this file is, by default, called Application.e4xmi and located in the main directory of the plug-in that defines the product extension.
The Eclipse IDE ships with its own base application file provided by the Eclipse Platform.
This file is read at application startup and is used to construct the initial application model. Changes to the model are persisted, and if a changed model is present, the application is restored from this model the next time it is started.
The application model is extensible, e.g., other plug-ins can contribute to it via model processors and model fragments.
During startup, the Eclipse framework parses the available information about the application model (Application.e4xmi, persisted user changes and model contributions). It stores the available information and their hierarchy in Java objects at runtime. These objects are called model objects and at runtime, they represent the attributes from the model elements.
An Eclipse IDE runtime or an Eclipse RCP application running in compatibility mode adds additional model elements based on other configuration data, like view contributions via plugin.xml.
6.1. Connecting model elements to classes and resources
Model elements can point to a class or to a static resource via a Uniform Resource Identifier (URI). For this purpose, Eclipse supports two URI patterns. In most cases, Eclipse instantiates the referred objects or resources lazily. For example, the classes for a part are instantiated when the part becomes visible.
The following table describes the supported URI patterns. The example assumes that the bundle is called test for brevity.
| Pattern | Description |
|---|---|
Example:
|
Identifier for a Java class.
It consists of the following parts: |
Example:
|
Used to identify resources.
Identifier for a resource in a plug-in.
|
For example, a part has a Class URI attribute that points to a Java class via the bundleclass:// URI.
This class provides the specific implementation of the part.
An example for a static resource reference is the Icon URI attribute of a part.
This attribute can point to an icon that is used for the part.
6.2. Overview of the model objects
The following text provides an overview of the available model elements in the application model.
6.2.1. Application
The application object is represented as an MApplication object at runtime and serves as the root of the application.
6.2.2. Windows
Eclipse applications consist of one or more windows, their model representation is an MWindow or the MTrimmedWindow object.
MTrimmedWindow can contain trimbars (that can hold toolbars).
6.2.3. Parts
Parts are user interface components that allow you to navigate and modify data.
Their model representation is an MPart.
Parts can be stacked or positioned next to each other depending on the container into which they are dropped. A part can have a drop-down menu, context menus, and a toolbar.

Parts can be classified as views and editors.
Views are typically used to display and modify a set of data, such as a tree or table of data elements. If the view allows you to change data, this change is typically directly applied to the underlying data structure without the need to save explicitly.
For example, the Project Explorer view in the Eclipse IDE allows you to browse a set of files. If you rename a file via the Project Explorer view, the file name is directly changed on the file system.
Editors are typically used to modify a single data element. To apply the changes made in an editor to the data structure, the user must explicitly save the editor content.
For example, the Java editor is used to modify Java source files. Changes to the source file are applied once the user selects the Save button. A dirty editor tab is marked with an asterisk to the left of the name of the modified file.

6.2.4. Available part containers
Parts can be directly assigned to a window or a perspective. They can be grouped and arranged using stacks (Part Stack) or sash containers (Part Sash Container).
A part stack arranges its children like a browser. It contains a stack of parts and shows their headers while the content of one part is displayed. The user can switch to another part by selecting the corresponding tab.
A part sash container displays all its children at the same time either horizontally or vertically aligned.
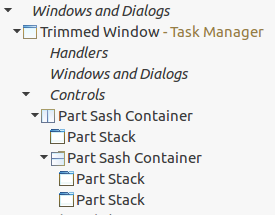
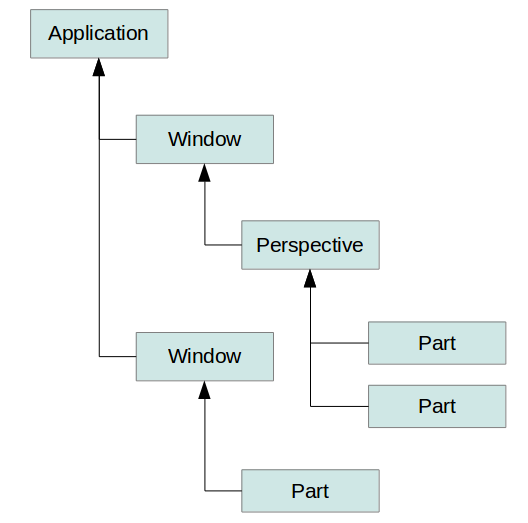
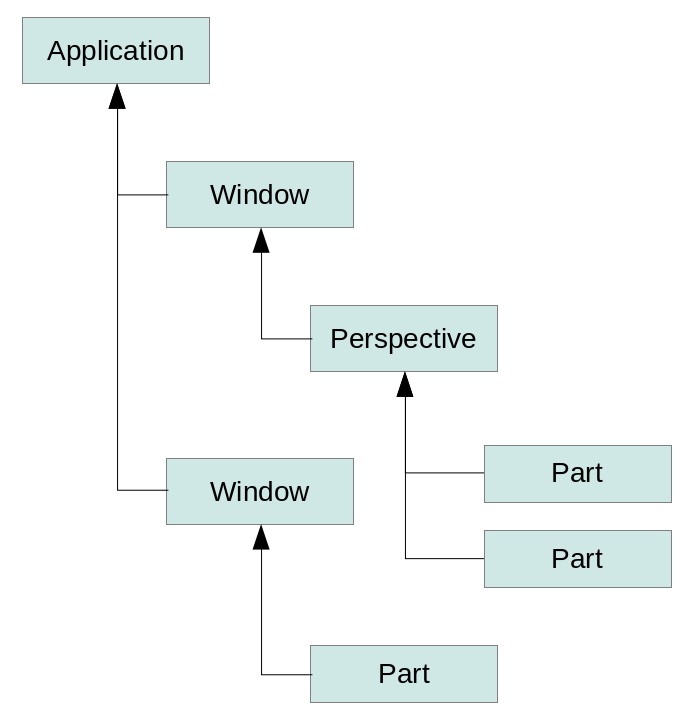
The following screenshot shows a simple Eclipse application layout using two part sash containers and three part stacks.
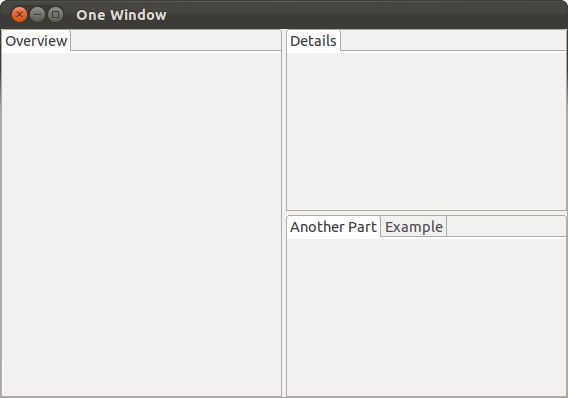
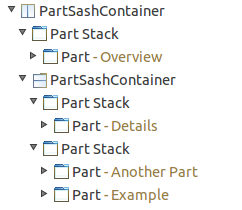
On the top of this layout there is a part sash container that contains another part sash container and one part stack. These two elements are displayed side by side. The part sash container on the next level contains two part stacks. The hierarchy is depicted in the following graphic.
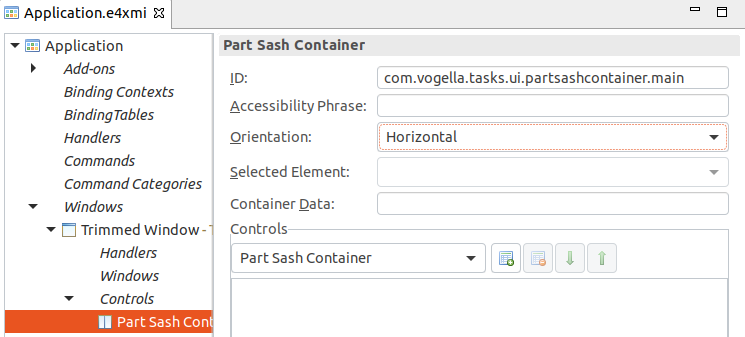
You can use the Container Data attribute on a child of a part sash container to assign a layout weight. This layout weight is interpreted as the relative space the corresponding child element should get assigned in the part sash container. The setting is depicted in the following screenshot.
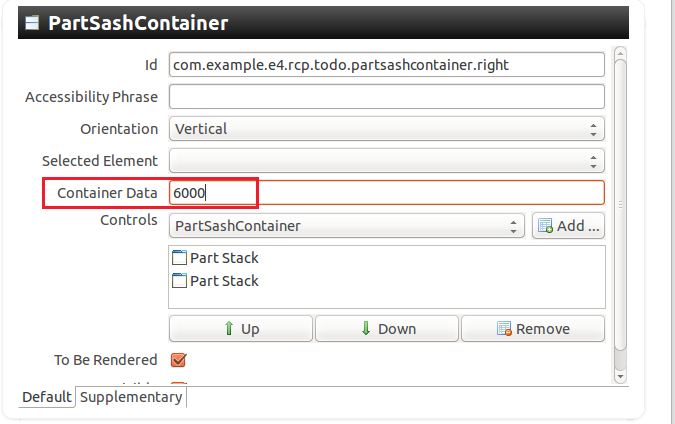
If you set the Container Data for one element, you must define it for all the other elements as well. Otherwise, the missing values are interpreted as high, and these elements take up all available space.
| The initial total of all the container data values is maintained when elements in the sash are moved. To allow fine-grained dragging, this total must be commensurate with the screen resolution. A value that is too low (i.e., 50 / 50) causes the part to be moved multiple pixels per sash unit, which the user will perceive as a jerky movement. Therefore, use a sufficiently high value, e.g., 10000. |
6.2.5. Perspectives
A perspective is an optional container for other part containers and parts.
It is represented by MPerspective objects that must be placed in an MPerspectiveStack object.
Only one of the perspectives in a perspective stack can be activated and made visible.
It is possible to have shared elements between perspectives.
For example, the Eclipse IDE uses perspectives to provide view arrangements appropriate for different tasks, like development or debugging.
Switching perspectives can be done via the EPartService service provided by the Eclipse platform.
6.2.6. Table overview of available model objects
The following table lists the types of the important model objects.
| Model element | Description |
|---|---|
MApplication |
Describes the application object. All other model elements are contained in this object. |
MAddon |
A self-contained component typically without user interface. It can register for events in the application lifecycle and handle these events. |
MWindow |
Represents a window in your application. |
MTrimmedWindow |
Similar to MWindow but it allows containing toolbars for the windows (via the TrimBars model elements). |
MPerspective |
Represents a different layout of parts to be shown inside the window. Should be contained in a MPerspectiveStack. |
MPart |
Represents the model element part, such as a view or an editor. |
MDirtyable |
Property of MPart that can be injected. If set to true, this property informs the Eclipse platform that this part contains unsaved data, i.e., it is dirty. In a handler you can query this property to provide a save option. |
MPartDescriptor |
MPartDescriptor is a template for new parts. A new part based on this part descriptor can be created and shown via the Eclipse framework. |
Snippets |
Snippets can be used to pre-configure model parts that you want to create during runtime. You can use the Eclipse framework to clone such a snippet and use the resulting object to attach it to the application model at runtime. |
7. Extending the application model from other plug-ins
7.1. Contributions
Every plug-in can contribute to the application model via:
-
Static contributions - contributed via text files; these extensions are called fragments or model fragments.
-
Dynamic contributions - contributed via Java classes; these extensions are called processors or model processors.
These model contributions must be registered via the org.eclipse.e4.workbench.model extension point.
They are read during startup and are used to build the runtime application model.
This runtime application model reflects your current application. Changes during the application’s runtime are written back to the model. For example, if the user positions a part into another stack via drag and drop.
If the Eclipse application is closed, these changes are recorded and saved in the workbench.xmi file.
This file is located in the .metadata/.plugins/org.eclipse.e4.workbench folder.
If certain model elements should not be persisted during shutdown, you can add the constant persistState defined via IWorkbench.PERSIST_STATE to the persistedState of the model element.
You can change the application via your code by changing the model elements. The Eclipse platform has listeners registered on most parts of the model, and updates the application if you change the model.
|
The persisted state of the application model can be deleted at the start of your application using the clearPersistedState parameter as a launch parameter. In most cases, this is undesirable behavior for an exported application and is only used during development. |
|
Comparison with Eclipse 3.x
The programming model of Eclipse 3.x primarily uses extension points to define contributions to the application. These extensions define new parts, new menus, etc. In modern Eclipse applications you use fragments and processors. |
7.2. Model fragments
A model fragment is a file that typically ends with the .e4xmi extension. It specifies additional model elements and which model element it extends. For example, a fragment can contribute a new menu containing several new menu entries to the main menu of the application.
In the fragment the Feature Name is a link to the model element that you want to extend. The following table lists some Feature Name values and their purposes.
| You want to contribute to a | Feature Name | Element Id |
|---|---|---|
Command to the application |
commands |
ID of your application |
Handler to the application |
handlers |
ID of your application |
New MenuItem / HandledMenuItem to existing menu |
children |
ID of the menu |
New menu to the main menu of the window |
children |
ID of your main menu |
New Part to existing PartStack |
children |
ID of your PartStack |
If you want to contribute to an element of the application model you can:
-
specify the ID of the element to which you are contributing
-
use an XPath expression to describe the model element that should be extended
The following table gives several examples of how you can use XPath expressions to define the model element you want to extend.
| XPath | Element in Application Model |
|---|---|
xpath:/ |
The slash (/) always addresses the root element of an XML file, which is always the MApplication element. |
xpath://mainMenu |
Contribute to the main menu. |
xpath://mainMenu/children |
Contribute to all children of the main menu, e.g., to every menu in it. |
xpath://mainMenu/*[1] |
Contribute to the first child of the main menu. In most applications this would be the menu:File menu. |
xpath://mainMenu/[@[local-name()='type' and .='menu:Menu']] |
Contribute to the first menu of the main menu. This XPath is more detailed than the one above since it requires that the main menu child is of type menu:Menu. In most applications this would be the menu:File menu. |
xpath://trimBars[@side="Bottom"] |
Contribute to the bottom trimbar. |
xpath://trimBars[not(@side)] |
Contribute to the top trimbar.
When the |
xpath://children[@*[local-name()='type' and .='basic:Part']] |
Contribute to a |
xpath://children[@*[local-name()='type' and .='basic:Part']][./tags = 'Editor'] |
Contribute to a |
7.3. Position of new model elements
Fragments define the desired position of new model elements via the Position in List attribute. The following values are allowed:
| Value | Description |
|---|---|
first |
Positions the element at the beginning of the list. |
index:theIndex |
Places the new model elements at position theIndex. Example: index:0 |
before:theOtherElementsId |
Places the new model elements before the model element with the ID theOtherElementsId. |
after:theOtherElementsId |
Places the new model elements after the model element with the ID theOtherElementsId. |
Fragments of independent plug-ins are processed in the order of the dependencies in the MANIFEST.MF file.
Therefore, the use of first and index might not always give the desired result.
7.4. Model processors
With a processor you can modify the application model via program code during the start of the application. This enables the dynamic creation, removal or modification of model elements.
8. Exercise: Create an Eclipse RCP application
In this exercise, you create a standard Eclipse plug-in. Afterwards, you convert the generated plug-in into an Eclipse RCP application. This plug-in is used as the basis for your user interface components.
Depending on your previous work, you may see additional or fewer projects compared to the screenshots.
|
To avoid confusion with earlier generated projects, you may want to close them. Closed projects are ignored during development. To close a project, right-click on it and select Close Project from the context menu. To open it again, right-click on it again and select Open Project. |
|
Do not close the project that contains your target definition file; otherwise your target platform will become invalid. |
8.1. Creating a plug-in project
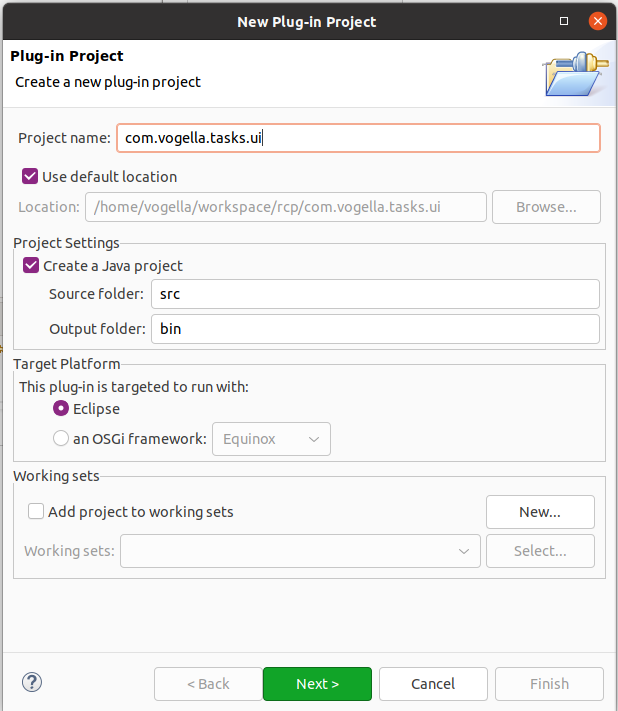
Create a new plug-in project via the menu entry with the com.vogella.tasks.ui name.
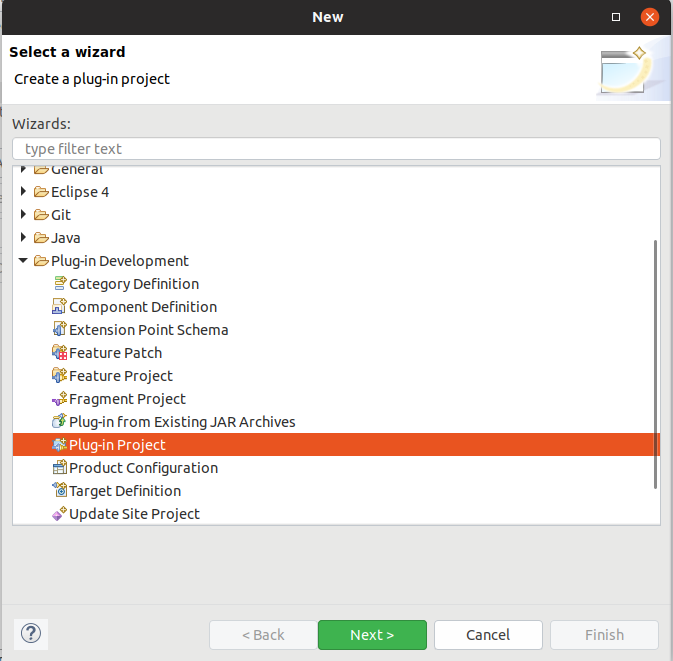
On the first wizard page enter com.vogella.tasks.ui as project name and press the Next button.
On the next wizard page ensure that the following settings are made:
-
Select No at the Would you like to create a rich client application? option
-
Uncheck the This plug-in will make contributions to the UI option
-
Uncheck the Generate an activator option
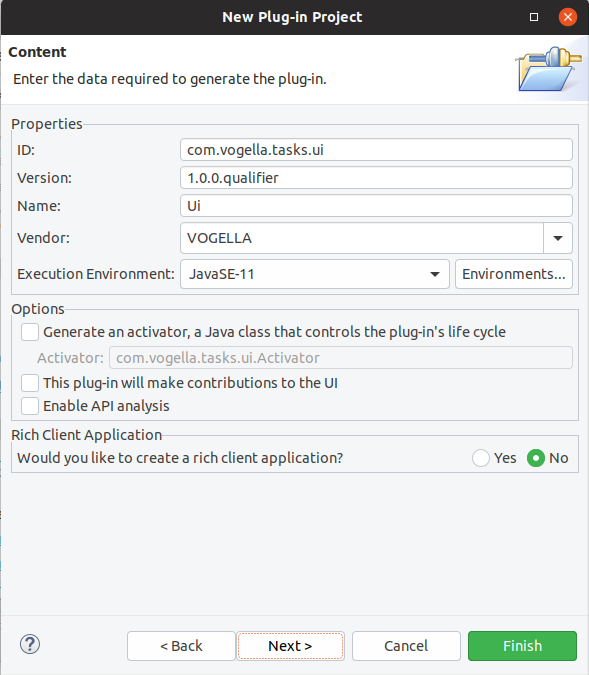
Press the Finish button.
If you click the Next button instead of Finish, the wizard shows you a template selection page. Do NOT select a template and finish the wizard.
8.2. Review the generated project
Open the project and verify that the src folder contains no Java classes.
Open the META-INF\MANIFEST.MF file.
In the manifest editor switch to the Dependencies tab and ensure that there are no entries.

8.3. Create a feature project
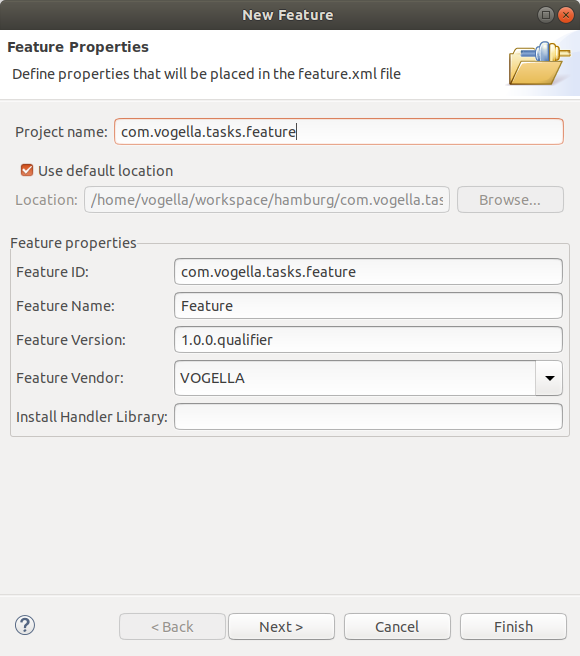
Create a new feature project named com.vogella.tasks.feature via .
You can press the Finish button on the first wizard page.
Afterwards, select the Included Plug-ins tab in the editor of the feature.xml file.
Press the Add… button and include the com.vogella.tasks.ui plug-in into this feature.
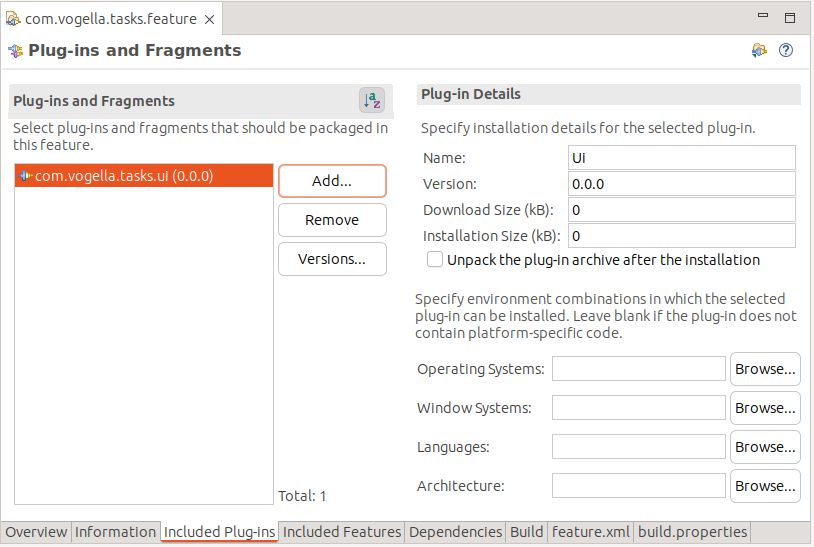
|
Ensure you have added the plug-in on the Included Plug-ins tab to include it in your feature. Using the Dependencies tab is incorrect for this exercise. |
8.4. Create a project to host the product configuration file
Create a new project named com.vogella.tasks.product via the menu entry.
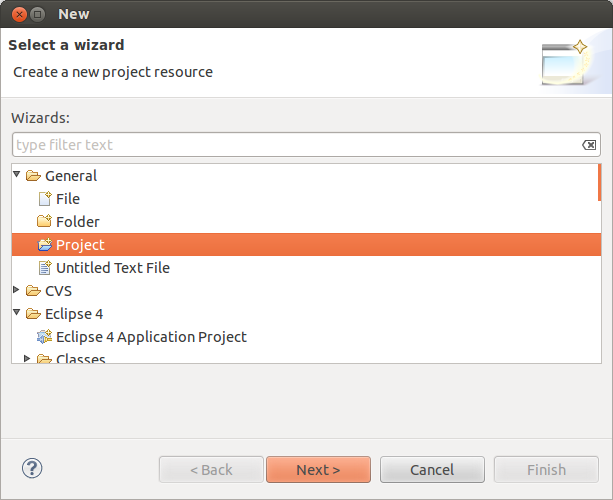
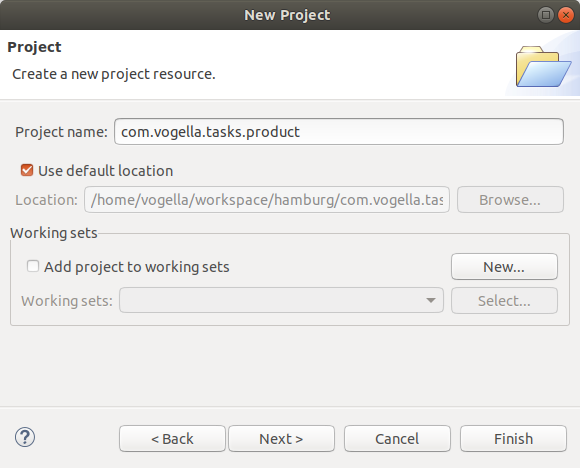
Press Finish.
8.5. Create a product configuration file
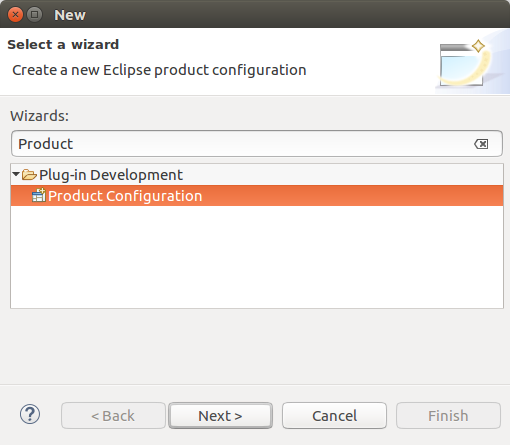
Right-click on the com.vogella.tasks.product project and select .
Create a product configuration file named taskmanagement.product inside the com.vogella.tasks.product folder.
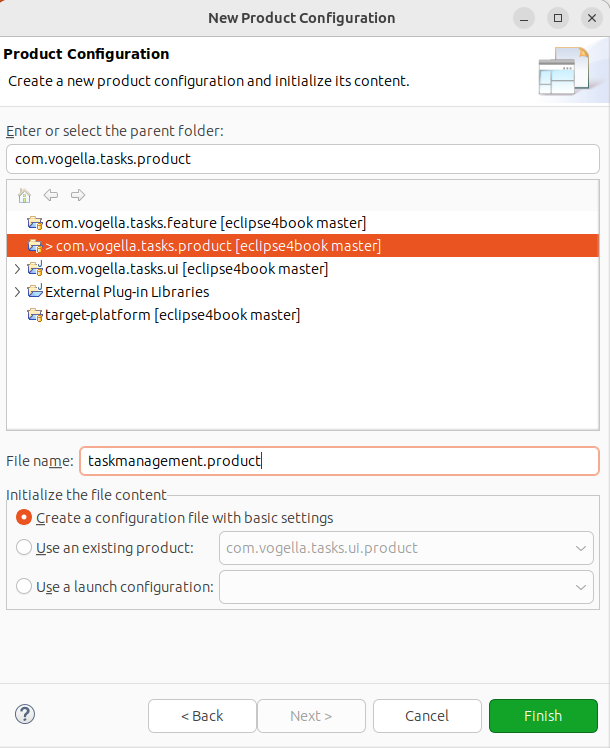
Press the Finish button. The file is created and opened in an editor.
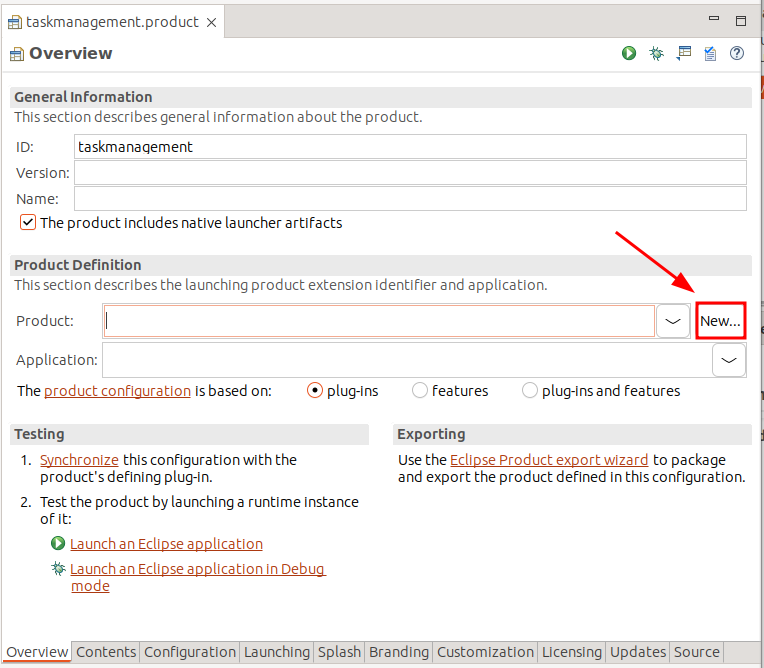
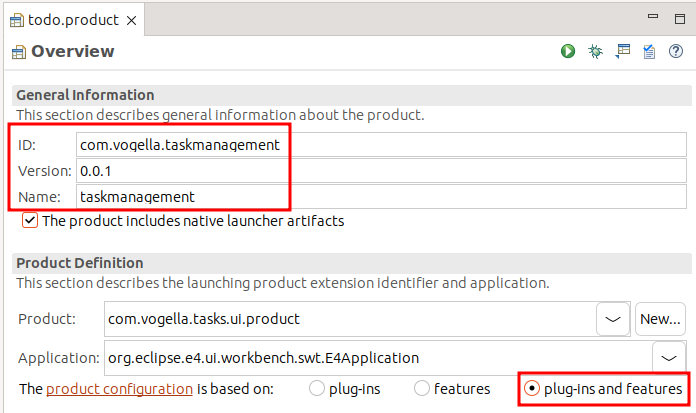
Press the New… button on the Overview tab of the product editor.
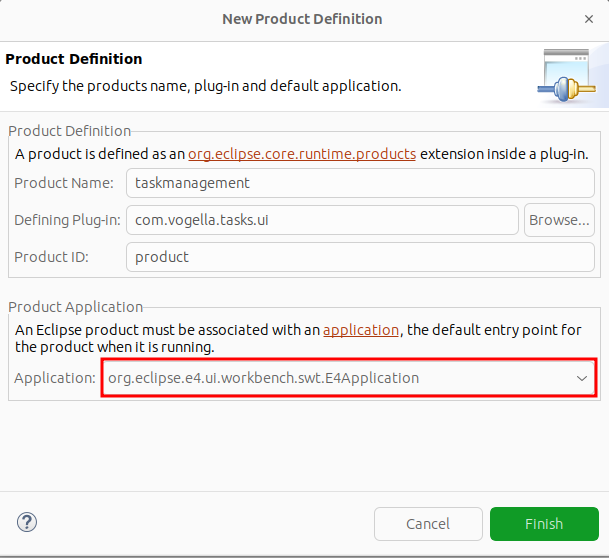
Use the following data:
-
taskmanagementas the Product Name -
com.vogella.tasks.uias the Defining Plug-in -
productas the Product ID -
org.eclipse.e4.ui.workbench.swt.E4Applicationin the Application combo box.
Ensure that an ID, version, and name are set.
Version should be set to 1.0.0.
Also ensure that you have selected that the product configuration is based on plug-ins and features.
8.6. Enter the feature as content into the product
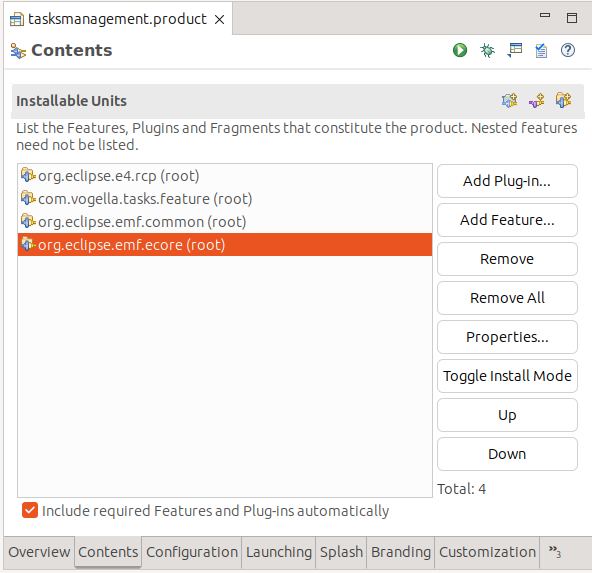
Select the Contents tab and add the following features via the Add Feature… button.
-
org.eclipse.e4.rcp -
com.vogella.tasks.feature
The expected output is shown in the screenshot below.
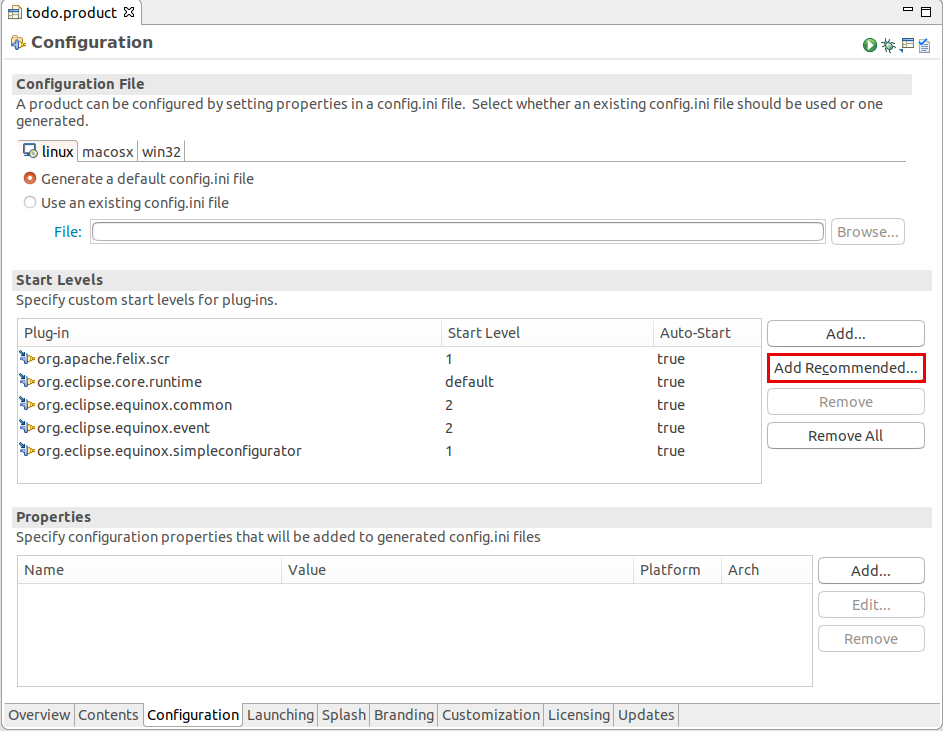
8.7. Configure the start levels
Switch to the Configuration tab in the product editor and press the Add Recommended… button. These settings are, for example, used by the Maven/Tycho build system; hence, it is good practice to configure them.
8.8. Create an application model
Create an application model file in your com.vogella.tasks.ui plug-in via the
menu entry.
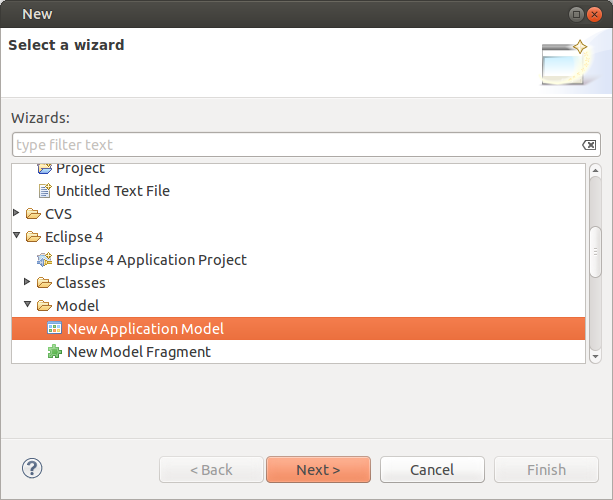
Enter your com.vogella.tasks.ui application plug-in as the container and use the file name suggested by the wizard.
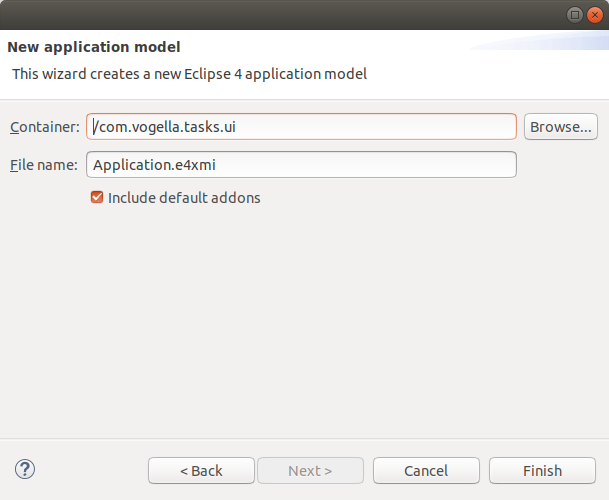
Press the Finish button to create the application model file and to open it in an editor.
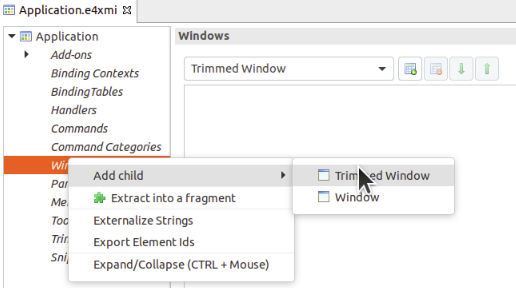
8.9. Add a window to the application model
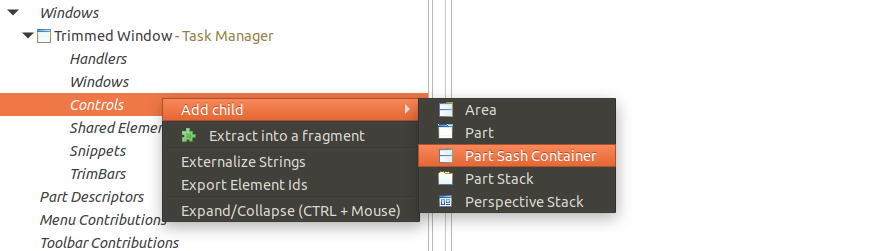
Add one window to your application model.
Right-click on the Windows node, and select Trimmed Window as depicted in the following screenshot.
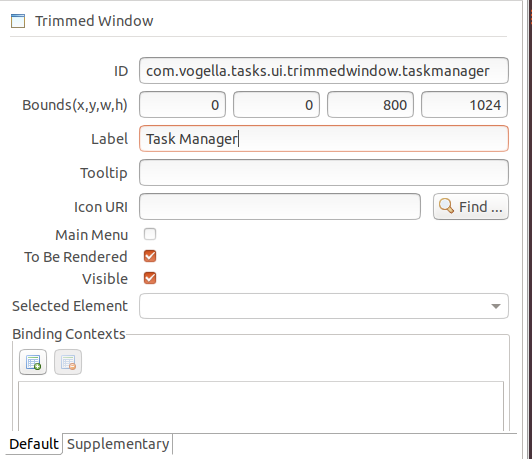
Enter the com.vogella.tasks.ui.trimmedwindow.taskmanager ID, the position and size of the window, and a label as shown in the screenshot below.
8.10. Delete persisted UI state at startup
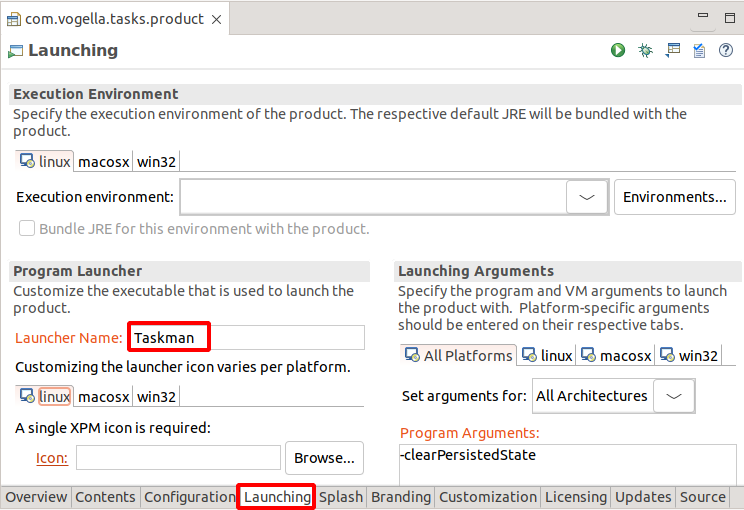
If you start and close your application, the last state of the application is persisted by the framework and restored the next time you start this application. This is undesirable during development, as the latest state from the application model file should be used. To ensure that the latest version of your application model is always used, add the following parameter to your product file on the Launching tab.
-clearPersistedStateThe following screenshot shows this setting in the product configuration file.
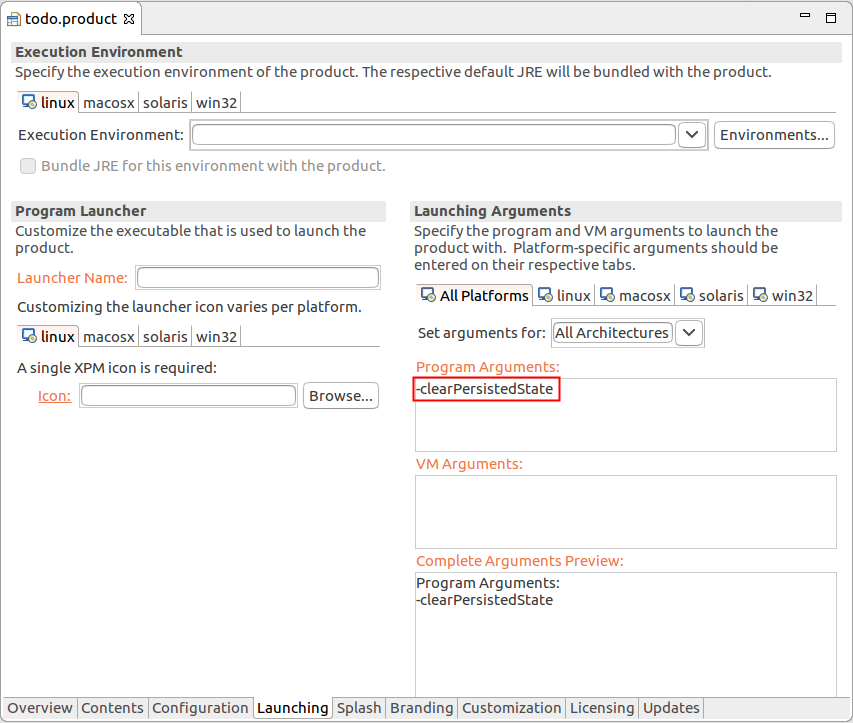
|
Ensure that you used the - sign and that the parameter is typed correctly. It must be: -clearPersistedState |
8.11. Set the launcher name
Your command line build, which you will configure later, should create an executable named Taskman. On the Launching tab of your product file, enter Taskman in the Launcher Name field.
8.12. Start the application and validate the result
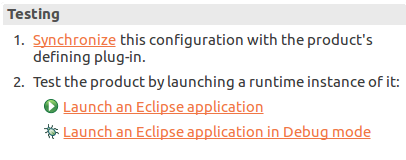
Open the product file and select the Overview tab. Press the Launch an Eclipse application hyperlink in the Testing section.
Validate that your application starts. You should see an empty window that can be moved, resized, minimized, maximized, and closed.
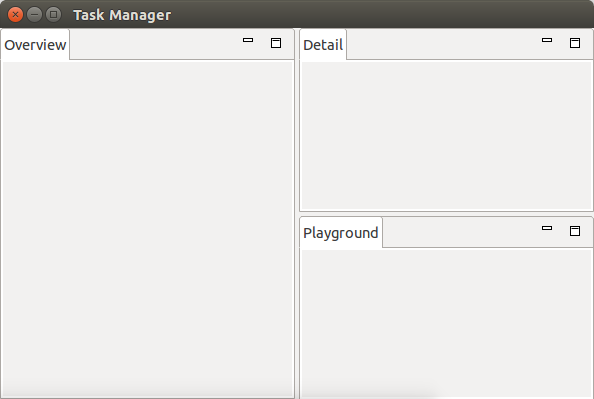
8.13. Desired user interface
In this exercise, you create the basis of the application user interface. At the end of this exercise, your user interface should look similar to the following screenshot.
Open the Application.e4xmi file in the Eclipse model editor via a double-click or right-click on it and select the Open With menu.
8.13.1. Add part sash and part stack containers
Select Controls below the window and add a part sash container element.
Change its Orientation attribute to Horizontal and enter the com.vogella.tasks.ui.partsashcontainer.main value into the ID field.
Add a part stack as the first child to your part sash container element.
Reselect the parent part sash container and add a part sash container element. Add two part stacks to this new element.
After these changes, your application model should look similar to the following screenshot.
8.13.2. Create the parts
Add one part to each stack, via right-clicking on each part stack and selecting the menu entry. Use the IDs and labels from the following table.
|
Enter the name first. The ID should be adjusted based on the name if the label was empty. |
| Label | ID Suffix |
|---|---|
Overview |
com.vogella.tasks.ui.part.overview |
Details |
com.vogella.tasks.ui.part.details |
Playground |
com.vogella.tasks.ui.part.playground |
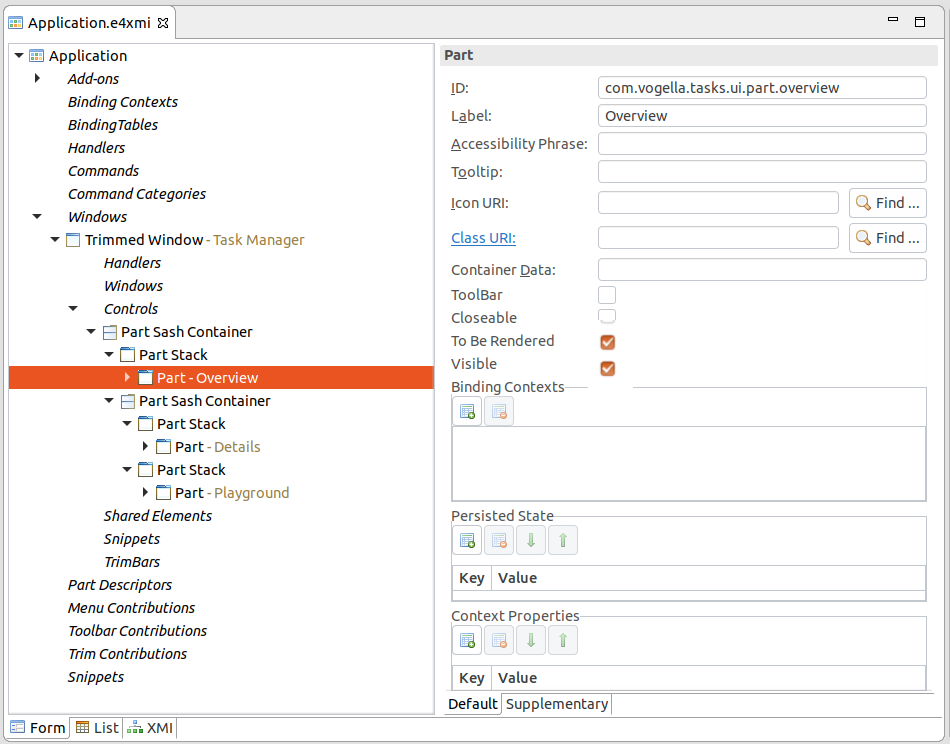
The final structure of your application model should be similar to the following screenshot. In the screenshot, the overview part is selected in the tree, and hence you see its data.
8.13.3. Validate the user interface
Start your product and validate that the user interface looks as planned. See Desired user interface for the desired result.
Reassign your model elements, if required. The model editor supports drag and drop for reassignment.
Also note that you can already see the structure, even though you have not created any Java classes so far.
8.14. Define the API that can be used
To use classes from other plug-ins in a plug-in, you need to add dependencies to them in the MANIFEST.MF file of the plug-in.
In this exercise, you will prepare to use classes from another plug-in.
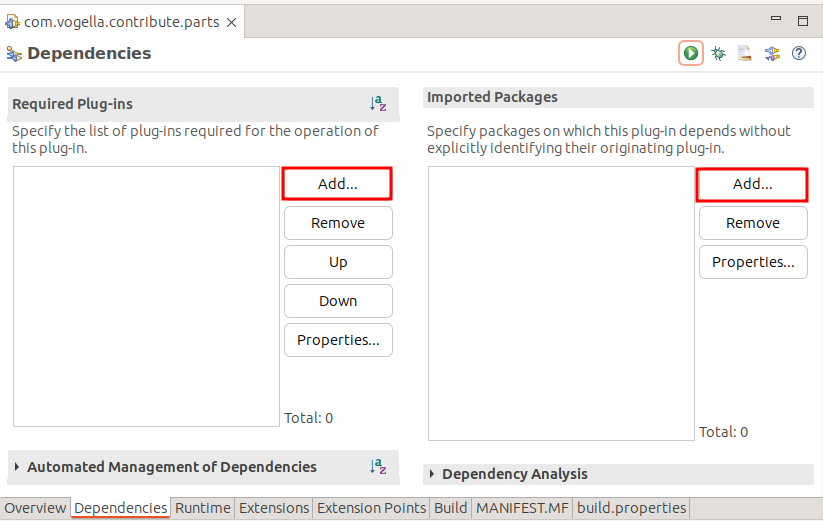
Open the META-INF/MANIFEST.MF file in your com.vogella.tasks.ui plug-in and select the Dependencies tab.
Use the Add… button in the Required Plug-ins section to add the following plug-ins as dependencies:
-
org.eclipse.core.runtime -
org.eclipse.jface -
org.eclipse.e4.core.di -
org.eclipse.e4.ui.workbench -
org.eclipse.e4.ui.di -
org.eclipse.e4.core.di.extensions -
org.eclipse.e4.core.contexts
The org.eclipse.jface plug-in also provides access to the org.eclipse.swt plug-in (as it re-exports its packages).
|
Use the Add… button in the Imported Packages section to add the following plug-ins as dependencies:
-
jakarta.annotation -
jakarta.inject
The result should be similar to the following screenshot (version may differ).

| The added version numbers are minimum versions, allowing you to use a newer version of the plug-in while preventing the use of an older version that may lack the required API. |
You can see the resulting changes on the MANIFEST.MF tab of the manifest editor. The following is a potential solution (plug-in versions have been removed from the listing)
Manifest-Version: 1.0
Bundle-ManifestVersion: 2
Bundle-Name: Ui
Bundle-SymbolicName: com.vogella.tasks.ui;singleton:=true
Bundle-Version: 1.0.0.qualifier
Bundle-Vendor: VOGELLA
Automatic-Module-Name: com.vogella.tasks.ui
Bundle-RequiredExecutionEnvironment: JavaSE-21
Require-Bundle: org.eclipse.core.runtime,
 org.eclipse.jface,
 org.eclipse.e4.core.di,
 org.eclipse.e4.ui.workbench,
 org.eclipse.e4.ui.di,
 org.eclipse.e4.core.di.extensions,
 org.eclipse.e4.core.contexts
Import-Package: jakarta.annotation,
 jakarta.inject
8.15. Create Java classes and connect with the parts
8.15.1. Create a new package and some Java classes
Create the com.vogella.tasks.ui.parts package in the application plug-in.
Create the following three Java classes in this package:
-
TodoOverviewPart
-
TodoDetailsPart
-
PlaygroundPart
These classes should not extend another class, nor should they implement any interface.
|
You can create the classes by clicking on the Class URI hyperlink in the detail pane of the model editor for the part. This connects the created class to the model object. If you do this, you can skip Connect the Java classes with the parts. |
Add a constructor to each class that prints the class name to the console.
The following code shows the TodoDetailsPart class.
package com.vogella.tasks.ui.parts;

public class TodoDetailsPart {
    public TodoDetailsPart() {
        System.out.println(this.getClass().getSimpleName());
    }
}
8.15.2. Connect the Java classes with the parts
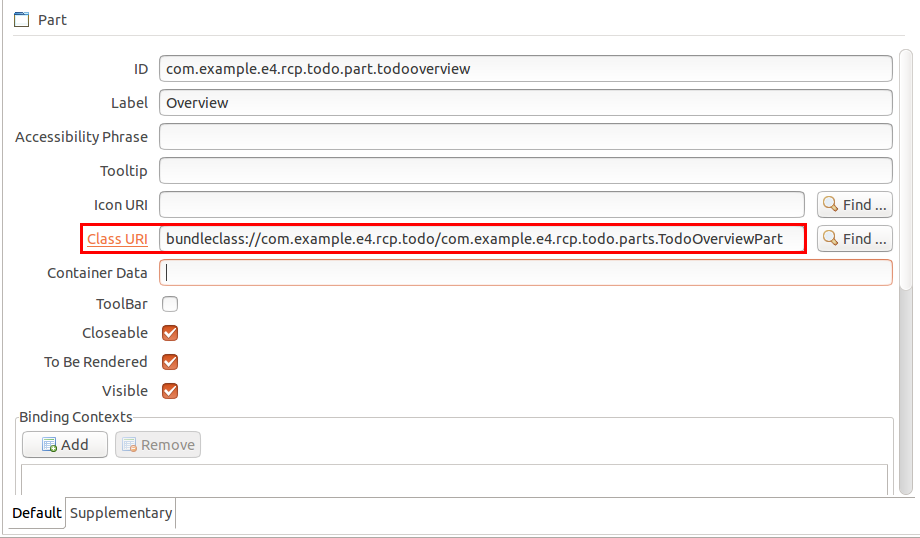
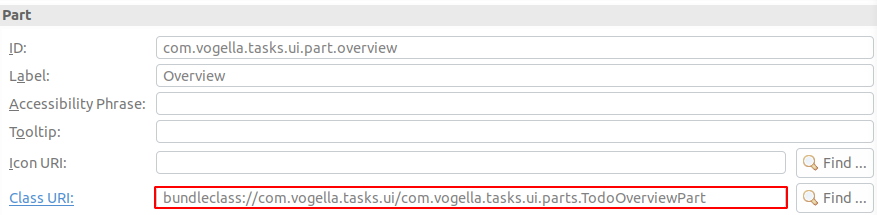
In your application model connect the class with the corresponding part model element. You can do this via the Class URI property of the part model element.
|
The model editor allows you to search for an existing class via the Find… button. The initial list of Contribution Classes is empty, start typing in the Class Name field to see the results. |
The following table gives an overview of which elements should be connected.
| Class | Part ID suffix |
|---|---|
TodoOverviewPart |
com.vogella.tasks.ui.part.overview |
TodoDetailsPart |
com.vogella.tasks.ui.part.details |
PlaygroundPart |
com.vogella.tasks.ui.part.playground |
The following screenshot shows the result for the overview part.
8.15.3. Validate
Start your application. It should start, but you should see no difference in the user interface.
To validate the creation of model objects at runtime, check the Console view for System.out.println() output.
9. More exercises, examples and videos
See Commercial Eclipse RCP training for explanation and demo videos, more content and exercises.
10. Creating (Simple) Plug-ins
The Eclipse IDE provides multiple templates and options for creating plug-ins. These templates and options add code or configuration elements to the generated code and often help you complete tasks more quickly. In this tutorial, we typically want to maintain control and understand what we are doing, so we often avoid these additional options.
If you are asked to create a simple plug-in via the menu entry, use the following options:
-
No activator
-
No contributions to the user interface
-
Not a rich client application
-
Generated without a template
11. Exercise: Contributing a part descriptor via model fragments
In this exercise, you create a model fragment to contribute a part descriptor. This extension can be used in the Eclipse IDE or an RCP application.
11.1. Create a new plug-in
Create a simple plug-in project named com.vogella.contribute.parts.
The following description abbreviates the plug-in name to the contribute.parts plug-in.
11.2. Add the dependencies
In the MANIFEST.MF file select the Dependencies tab.
Add the following entries as plug-in dependencies to your contribute.parts plug-in.
-
org.eclipse.core.runtime
-
org.eclipse.jface (that provides org.eclipse.swt)
-
org.eclipse.e4.core.di
-
org.eclipse.e4.ui.workbench
-
org.eclipse.e4.ui.di
Also add the following package dependencies.
-
jakarta.annotation
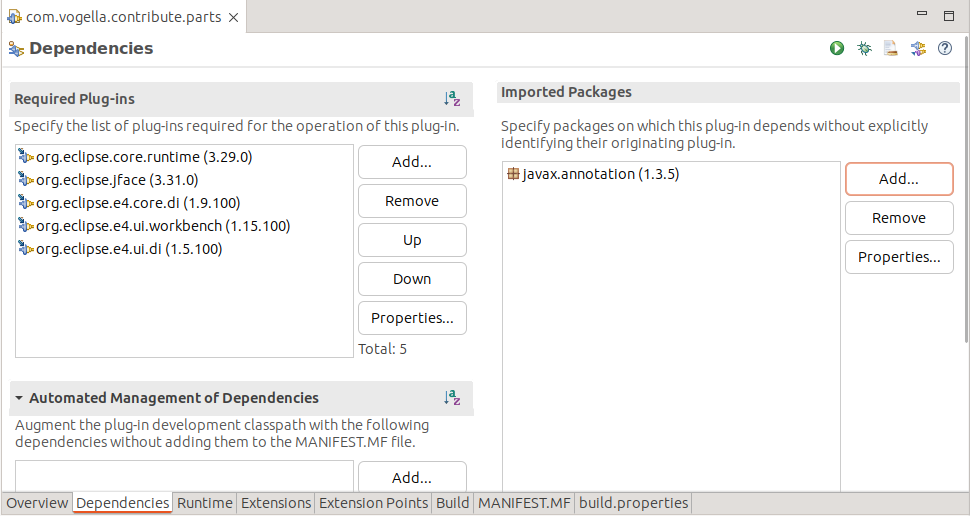
The manifest should look similar to the following listing. Version numbers have been removed as they change frequently.
Manifest-Version: 1.0
Bundle-ManifestVersion: 2
Bundle-Name: Parts
Bundle-SymbolicName: com.vogella.contribute.parts
Bundle-Version: 1.0.0.qualifier
Bundle-Vendor: VOGELLA
Automatic-Module-Name: com.vogella.contribute.parts
Bundle-RequiredExecutionEnvironment: JavaSE-21
Require-Bundle: org.eclipse.core.runtime,
 org.eclipse.jface,
 org.eclipse.e4.core.di,
 org.eclipse.e4.ui.workbench,
 org.eclipse.e4.ui.di
Import-Package: jakarta.annotation
11.3. Enable activation
Set the Activate this plug-in when one of its classes is loaded flag in the MANIFEST. This enables the registration of the fragment via the MANIFEST.MF
11.4. Create a part implementation
Create the following class.
package com.vogella.contribute.parts;

import jakarta.annotation.PostConstruct;

import org.eclipse.jface.widgets.TextFactory;
import org.eclipse.swt.SWT;
import org.eclipse.swt.widgets.Composite;

public class AdditionalInformationPart {
    @PostConstruct
    public void postConstruct(Composite parent) {
        TextFactory.newText(SWT.BORDER |SWT.MULTI).create(parent);
    }
}
11.5. Create a model fragment
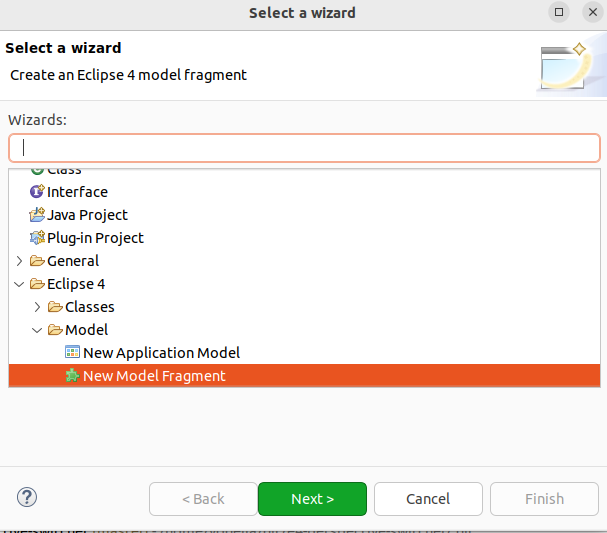
Create a new model fragment via the menu entry.
Select the contribute.parts plug-in as the container and use parts.e4xmi as the name for the file.
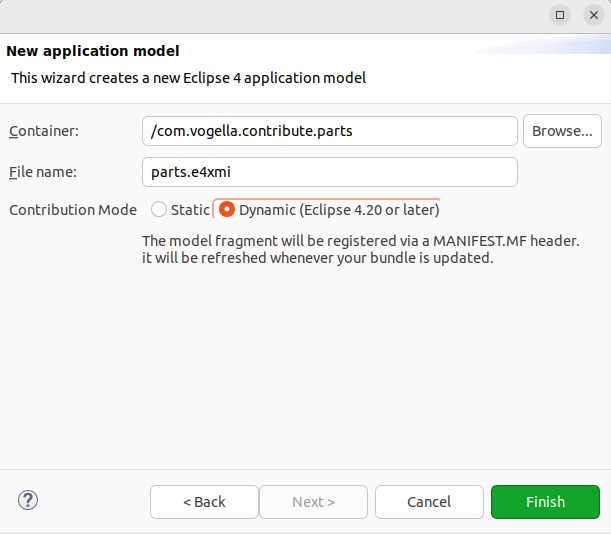
Press the Finish button.
11.6. Validate that the fragment is registered via the MANIFEST.MF
The model fragment creation wizard automatically adds the Model-Fragment key to your MANIFEST.MF file for registration.
To review this, open the MANIFEST.MF file and select the MANIFEST.MF tab in the editor.
The resulting file should look similar to the following code, the versions have been removed in this listing, as the versions you see depend on the release you are using.
Manifest-Version: 1.0
Bundle-ManifestVersion: 2
Bundle-Name: Parts
Bundle-SymbolicName: com.vogella.contribute.parts
Bundle-Version: 1.0.0.qualifier
Bundle-Vendor: VOGELLA
Require-Bundle: org.eclipse.core.runtime,
 org.eclipse.jface,
 org.eclipse.e4.core.di,
 org.eclipse.e4.ui.workbench,
 org.eclipse.e4.ui.di,
 org.eclipse.e4.ui.model.workbench
Bundle-RequiredExecutionEnvironment: JavaSE-21
Automatic-Module-Name: com.vogella.contribute.parts
Model-Fragment: parts.e4xmi
Import-Package: jakarta.annotation
Bundle-ActivationPolicy: lazy
11.7. Adding model elements
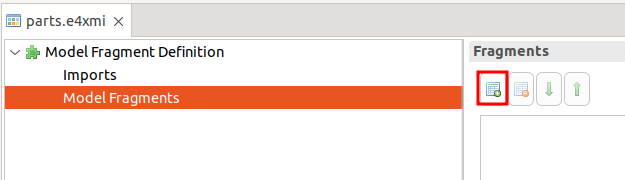
Open the parts.e4xmi file in its editor. Select the Model Fragments node and press the Add button.
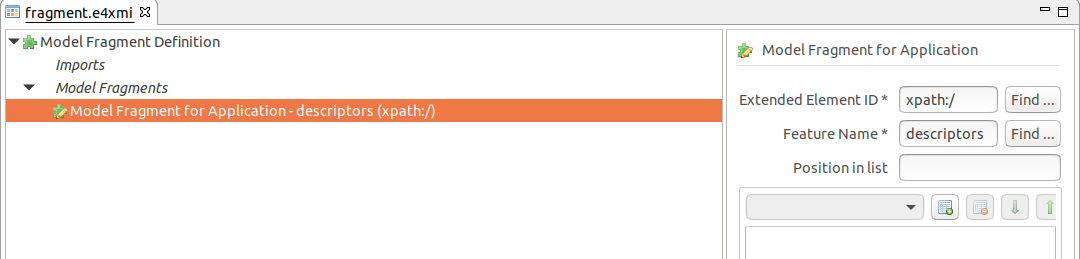
Use xpath:/ as extended element id and descriptors as Feature name.
Right-click on this entry and select .
Select the Part Descriptor and press the Find button for the Class URI field.
Choose the AdditionalInformationPart class.
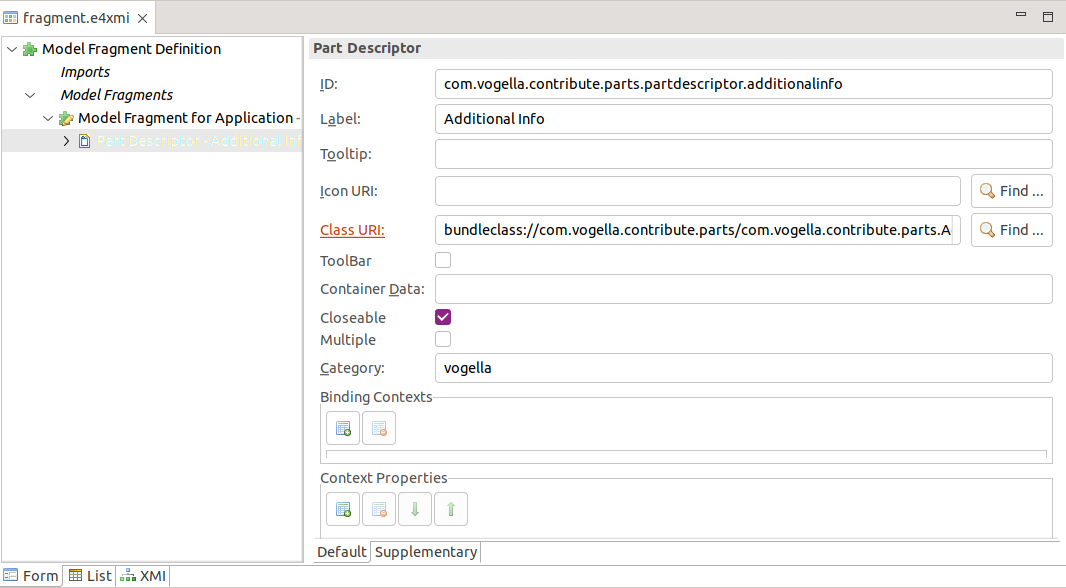
The generated entry should look like the following code:
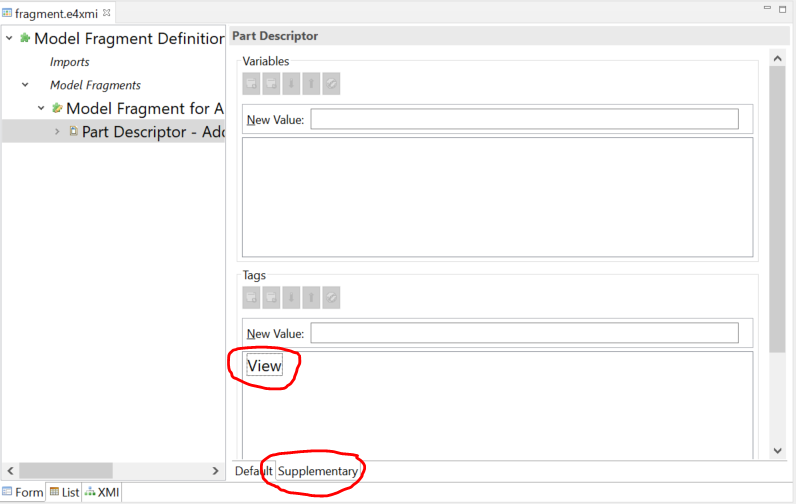
bundleclass://com.vogella.contribute.parts/com.vogella.contribute.parts.AdditionalInformationPartNow switch to the Supplementary tab and add the following tag:
-
View
|
To add a tag, enter it and press the Add button, after entering the text. |
|
The |
11.8. Update product
Add the new plug-ins to your feature and start via the product file.
11.9. Validate
As you created a part descriptor, this element will not be visible in the RCP application.
Add the Eclipse model spy to your runtime application and ensure that you see the part descriptor.
Optionally create a new direct menu item via the fragment to open this part descriptor.
12. Dependency injection in Eclipse
12.1. Define class dependencies in Eclipse
The programming model in Eclipse supports constructor, method and field injection.
This was originally defined in the Java Specification Request 330 (JSR 330) and has been moved to the Jakarta namespace.
The most important annotations are covered in Annotations to define class dependencies in Eclipse, other more specialized annotations are covered in their corresponding chapters.
The Eclipse dependency framework verifies that the key and the type of the injected object are valid.
For example, if you specify that you want to have an object of type Task for the "xyz" key, as shown in the following field declaration, the framework will only inject an object if it finds one with an assignable type.
@Inject @Named("xyz") Todo todo;12.2. Annotations to define class dependencies in Eclipse
The following table gives an overview of dependency injection related annotations based on JSR 330 and the Eclipse specific ones.
| Annotation | Description |
|---|---|
|
Defined by JSR 330, can be added to a field, a constructor or a method. The Eclipse framework tries to inject the corresponding objects into the fields or the parameters of the instance. |
|
Defined by JSR 330, defines the key for the value which should be injected.
By default, the fully qualified class name is used as the key.
Several keys for default values are defined as constants in the |
|
Eclipse specific annotation, marks an injected value to be optional. If no valid object can be determined for the given key (and type), the framework does not throw an exception. The specific behavior depends on where the
Note that null is an acceptable value to be set in the context, and it is different from a key being removed from the context.
For example, if the following is called |
|
Eclipse specific annotation, indicates that updates for this
@Inject should be batched.
If you change such objects in the Eclipse context, the update is triggered by the |
|
The Eclipse platform supports additional annotations for special purposes, e.g., for receiving events (sent by the event service) or working with preferences. |
12.3. The objects on which Eclipse performs dependency injection
The Eclipse runtime creates objects for the Java classes referred by the application model. During this instantiation, the Eclipse runtime scans the class definition for annotations. Based on these annotations the Eclipse framework performs the injection.
Eclipse does not automatically inject dependencies into objects that are created with the new operator.
12.4. Dynamic dependency injection based on key-value changes
The Eclipse framework tracks which object expressed a dependency on which key and type. If the value associated with a key changes, the Eclipse framework re-injects the new value into any object that depends on the corresponding type. This means applications can be freed from having to install (and remove) listeners.
For example, you can define via @Inject that you want to get the current selection injected.
If the selection changes, the Eclipse framework will inject the new value.
The reinjection only works on methods and fields that are marked with @Inject.
It will not work on parameters injected into constructors, and methods that are marked with @PostConstruct, as these methods are only executed once.
|
This does not mean that Eclipse tracks the fields of the value to which the key points.
For example, if the mykey1 key points to a |
12.5. OSGi services and Eclipse dependency injection
OSGi services are available for dependency injection in Eclipse applications. If you define your custom OSGi services, you can inject them into your model objects. This removes the need to create singleton or factory implementations in your application to access data.
If a requested key is not found in the Eclipse context hierarchy, the Eclipse framework searches dynamically for a suitable OSGi service in the OSGi registry.
For example, if you have an OSGi service declared for the TaskService interface you can inject it via the following code snippet into a field of an Eclipse part.
@Inject TaskService service;13. The Eclipse context
13.1. Definition of the Eclipse context
During startup of an Eclipse application, the Eclipse runtime creates an object based on the IEclipseContext interface.
This object is called the context, or the Eclipse context.
The context is similar to a Map data structure, in which objects can be placed under a certain key.
The key is a String, and in several cases the fully qualified class name is used as the key.
The value (to which the key points) can be injected into other objects.
Unlike a map, the Eclipse context is hierarchical and can dynamically compute values for requested keys.
For certain model objects (see Which model elements have a local context?) a local context is created. Such a context is associated with an application model object.
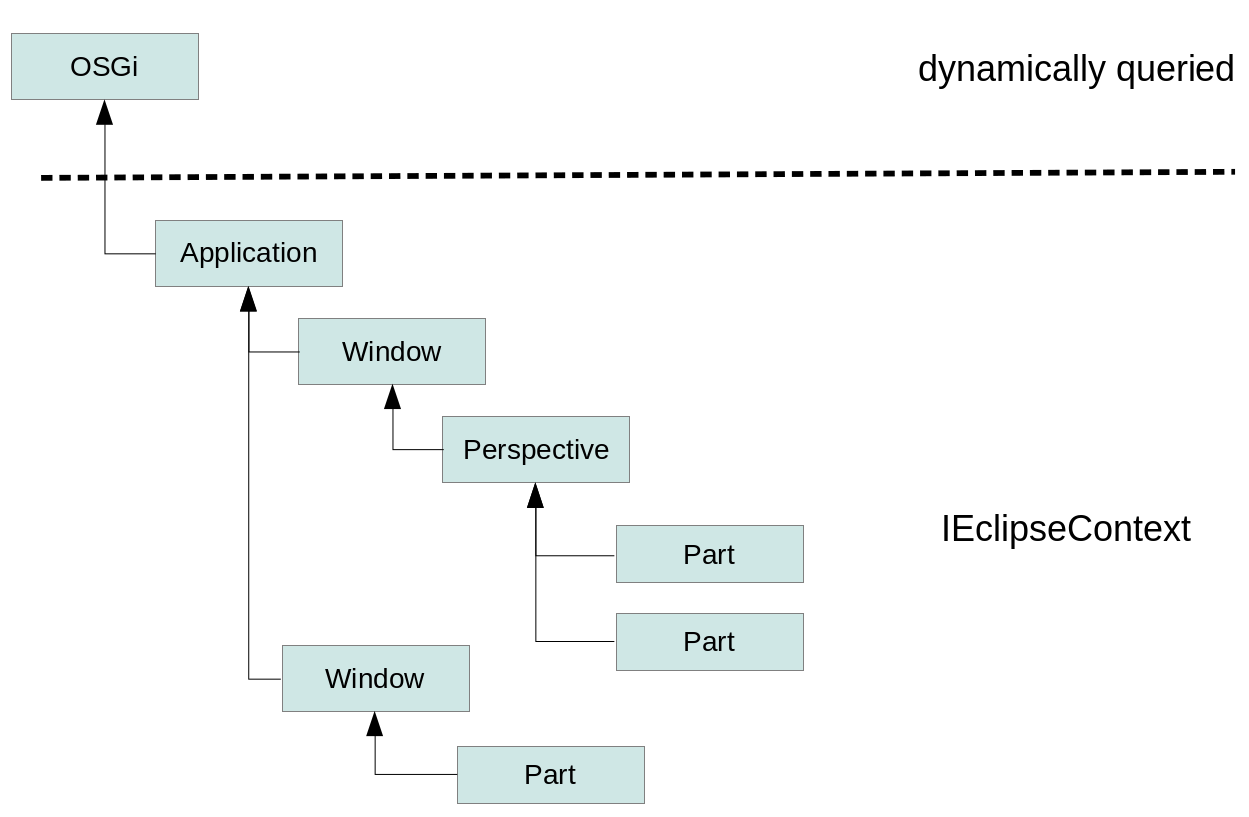
The different context objects are connected to form a hierarchical tree structure based on the structure of your application model. The highest level in this hierarchy is the application context.
A sample context hierarchy is depicted in the following picture.
Objects can be placed at different levels in the context hierarchy. This enables the same key to point to different objects in the hierarchy.
For example, a part can express a dependency on a Composite object via a field declaration similar to: @Inject Composite parent;
Since parts have different local contexts they can receive different objects of the type Composite.
13.2. Which model elements have a local context?
The following model elements implement the MContext interface and therefore have their own context:
-
MApplication -
MWindow -
MPerspective -
MPart -
MPopupMenu
13.3. Life cycle of the Eclipse context
During startup, the Eclipse framework creates the context hierarchy from the application model. By default, it assigns specific objects to predefined keys in the context, such as services that control Eclipse framework functionality.
The Eclipse platform creates both model objects and objects derived from class URI attributes. For each model element with a custom context the Eclipse framework determines which objects should be available in the local context of the model object. If required, it creates the required Java objects referred by the Class URI property of the model elements. This is the case if a part is visible to the user.
|
The renderer framework is responsible for creating the local context of the UI related model elements. This framework allows you to define classes that are responsible for setting up the UI implementation of the model objects. A class responsible for a model element is called the renderer for this model element. For example, the |
After the initial creation of the Eclipse context hierarchy, the framework or the application code can change the key-value pairs stored in the context. In this case, objects which were created with the related Eclipse functionality are updated with the new values.
Objects in the context are persisted in memory (transient), i.e., once the application is stopped the context gets destroyed.
13.4. Object selection for dependency injection
As described in The objects on which Eclipse performs dependency injection an object that is created by Eclipse can use annotations to describe its class dependencies.
During dependency injection for an object created by Eclipse, the Eclipse framework searches for a suitable object based on the specified key. The search starts in the local context associated with the application model object. If this key is not available, Eclipse continues to search in the parent context. This process continues until the main context has been reached.
As you learn in later chapters, the Eclipse context is not the only possible source of objects that can be injected. Other examples that are covered later are OSGi services, preferences, events and custom objects. The search happens (mostly) transparently for the caller of the injection.
13.5. Accessing model objects in the code
For the class references in the application model, the Eclipse framework creates the corresponding objects when needed. Such an object has access to its corresponding model object via dependency injection.
For example, in the part’s implementation, you can access the model information of a part via: @Inject MPart part;
13.6. Default entries in the Eclipse context
The Eclipse framework creates several objects in the context, including:
-
model objects - contain the data of the application model
-
services - software components that are defined by the Eclipse platform or via the OSGi service registry
-
several other objects that have explicitly been added to the context
The context can be modified by the application code and the framework. As the Eclipse framework automatically tracks the dependencies of the objects it creates, it can update them as described in Dynamic dependency injection based on key-value changes.
13.7. Qualifiers for accessing the active part or shell
The Eclipse platform places the part that is currently selected and the active shell into the IEclipseContext of the application object.
The related keys are defined in the IServiceConstants interface.
For example, the following method would allow you to track the current active part in another part.
// tracks the active part
@Inject
@Optional
public void receiveActivePart(
    @Named(IServiceConstants.ACTIVE_PART) MPart activePart) {
    if (activePart != null) {
        System.out.println("Active part changed "
                + activePart.getLabel());
    }
}
To track the active shell use the IServiceConstants.ACTIVE_SHELL key.
// tracks the active shell
@Inject
@Optional
public void receiveActiveShell(
    @Named(IServiceConstants.ACTIVE_SHELL) Shell shell) {
    if (shell != null) {
        System.out.println("Active shell (Window) changed");
    }
}|
Eclipse uses handlers to define actions that can be triggered via menu or toolbar entries. For a handler implementation class it is not necessary to use these qualifiers, as a handler is executed in the active context of the application. |
13.8. Tracking a child context with @Active
The @Active annotation allows you to track values in a child context.
The Eclipse framework keeps track of the current active branch in the hierarchy of the IEclipseContext.
For example, if the user selects a part, the path in the IEclipseContext hierarchy from the root to the IEclipseContext of the part is the current active branch.
With the @Active annotation you can track values in the current active branch of a child element.
Whenever the active branch changes and the value of the referred key changes this value is re-injected into the object that uses the @Active annotation.
The usage of this annotation is demonstrated by the following code snippet.
public class MyOwnClass {
    @Inject
    void setChildValue(
            @Optional @Named("key_of_child_value") @Active String value) {
        this.childValue = value;
    }
}|
The |
13.9. DI in Eclipse 3.x API code
Eclipse dependency injection functionality was developed for the Eclipse 4.x release.
Code that is still based on the 3.x API and runs on a 4.x runtime can access objects available for DI via the PlatformUI class.
// get current active context, allows access to objects with the get method
IEclipseContext activeContext = PlatformUI.getWorkbench().getService(IEclipseContext.class);
// or retrieve object directly
MyOSGiService osgiService = PlatformUI.getWorkbench().getService(MyOSGiService.class);
14. Using annotations to define behavior
14.1. API definition in a framework
If you use a framework in your application, you need to have a convention for how your application interacts with the framework. For example, if a Java object is responsible for handling a toolbar button click, the framework needs to know which method of this object needs to be called.
For this purpose, every framework defines an Application Programming Interface (API). This API defines how you can interact with the framework from your code. The API defines the interaction of application objects created or controlled by the framework. Typically, a framework uses inheritance or annotations for this purpose.
14.2. API definition via inheritance
The "traditional" way of defining an API is via inheritance. This approach requires that your classes extend or implement framework classes and interfaces. The Eclipse 3.x platform API used this approach.
The framework defines, for example, an abstract class which defines methods to be implemented.
In the example of the toolbar button the method might be called execute() and the framework knows that this method must be called once the button is clicked.
API definition via inheritance is a simple way to define an API, but it couples the classes tightly to the framework. For example, testing the class without the framework is difficult. It makes extending or updating the framework difficult because such an update may affect clients. This is why the Eclipse 4.x does not use this approach anymore.
14.3. API definition via annotations
The Eclipse 4.x platform API is based on annotations, e.g., annotations are used to identify which methods should be called at a certain point in time. These annotations are called behavior annotations.
The following table lists the available behavior annotations for parts.
| Annotation | Description |
|---|---|
|
Is called after the class is constructed and the field and method injection has been performed. |
|
Is called before the class is destroyed. Can be used to clean up resources. |
|
Is called whenever the part gets the focus. |
|
Is called if a save request on the part is triggered by the Eclipse framework. |
|
Is called before the model object is disposed, so that the part is able to save its instance state. This method is called before the @PreDestroy method. |
The @PostConstruct, @PreDestroy annotations are included in the jakarta.annotation package.
@Persist, @PersistState and @Focus are part of the org.eclipse.e4.ui.di package.
Eclipse defines additional behavior annotations for commands and for the application lifecycle that are covered in the respective chapters.
|
Behavior annotations imply that the framework needs to provide the specified parameters to the method, i.e., the framework performs method dependency injection.
If you add the |
14.4. Use the @PostConstruct method to build the user interface
It is recommended to construct the user interface of a part in a method annotated with the @PostConstruct annotation.
It would be possible to create the user interface in the constructor, but this is not recommended as field and method injection have not been done at this point.
Creating the user interface in an @PostConstruct method requires that @Inject methods are aware that the user interface might not have been created yet.
15. Exercise: Use @PostConstruct
15.1. Implement an @PostConstruct method
Add the following method to your TodoOverviewPart, TodoDetailsPart, and PlaygroundPart classes.
In case you created constructors for these classes, you can remove them.
import org.eclipse.swt.widgets.Composite;

import jakarta.annotation.PostConstruct;
// more code

@PostConstruct
public void createControls(Composite parent) {
    System.out.println(this.getClass().getSimpleName()
    + " @PostConstruct method called.");
}
15.2. Validate
Run your application and validate that the @PostConstruct method is called.
Ensure that your import statement is correct if you receive an error message similar to the following: Unable to process "TodoOverviewPart#createControls()": no actual value was found for the argument "Composite".
import org.eclipse.swt.widgets.Composite;

// MORE code
16. Exercise: Using dependency injection in the code
You can create objects using DI and make them available for other objects by placing them in the IEclipseContext.
In case you want to use DI for the creation of your custom objects, you can use the ContextInjectionFactory as demonstrated in this example.
16.1. Implementation
Create the following class.
package com.vogella.tasks.ui.parts;

import jakarta.inject.Inject;

public class ACustomClass {
    @Inject
    public String string;

    @Override
    public String toString() {
        return string;
    }
}
Change your playground part to the following.
package com.vogella.tasks.ui.parts;

import jakarta.inject.Inject;
import jakarta.inject.Named;

import org.eclipse.e4.core.contexts.ContextInjectionFactory;
import org.eclipse.e4.core.contexts.EclipseContextFactory;
import org.eclipse.e4.core.contexts.IEclipseContext;

public class PlaygroundPart {
    @Inject
    public PlaygroundPart(@Named("applicationContext") IEclipseContext ctx) { (1)

        IEclipseContext localCtx = EclipseContextFactory.create();
        localCtx.set(String.class, "My object available for DI");

        // You could connect your new local context with an existing context hierarchy
//      localCtx.setParent(context);

        // Create instance via factory (DI!)
        ACustomClass p = ContextInjectionFactory.make(ACustomClass.class, localCtx);
        // persist the newly created object in the application context
        // this makes the object available via DI for the whole application
        ctx.set(ACustomClass.class, p);(2)
    }
}| 1 | Retrieves the application context |
| 2 | Make the new object available for dependency injection |
16.2. Retrieve the created object via DI
Adjust your TodoDetailsPart class to get the new object injected.
package com.vogella.tasks.ui.parts;

import org.eclipse.e4.core.di.annotations.Optional;

import jakarta.inject.Inject;

public class TodoDetailsPart {

    @Inject @Optional (1)
    public void createControls(ACustomClass customObject) {
        System.out.println("Received: " + customObject);
    }
}| 1 | Using @Optional at the method level instructs the framework to call this method only if the context key can be found in the relevant IEclipseContext hierarchy |
16.3. Validate
Start your product and ensure that you see the correct output on the console.
Afterwards, remove the System.out statement.
17. Menu and toolbar application objects
17.1. Adding menu and toolbar entries
You can add menus and toolbars to your Eclipse application using the application model and position these entries at various locations. You can, for example, add a menu to a window or a part. Each element defines, directly or indirectly, one or more links to a class that is responsible for the execution. These classes are responsible for the behavior once the menu or toolbar entry is selected. Such a class is called handler class.
17.2. Using commands and handlers
The Eclipse application model allows you to specify commands and handlers.
You can use the Direct MenuItem or Direct ToolItem model elements. These entries define a reference to a class (handler class). An instance of this handler class is created by the framework and its annotated methods are called by the framework if necessary. Menus and toolbars support separators.
A command is a declarative description of an abstract action that can be performed, for example, Save, Edit, or Copy.
A command is independent of its implementation details. The Eclipse framework does not provide standard commands, e.g., you have to create all required commands in your application model.
The behavior of a command is defined via a handler.
A handler model element points to a class (handler class) via the contributionURI property of the handler.
This attribute is displayed as Class URI in the model editor.
Commands are used by the Handled MenuItem and Handled ToolItem model elements.
Prefer using commands over the usage of direct (menu or tool) items. Using commands together with handlers allows you to define different handlers for different scopes (applications or part) and you can define key bindings for the handler’s associated commands.
17.3. Behavior annotations and dependency injection for handler classes
In a handler class exactly one method must be annotated with the @Execute annotation.
In addition, you can annotate one method with the @CanExecute annotation.
If multiple methods in a handler class are annotated with the same annotation, only one of them will be executed by the framework.
The Eclipse runtime uses dependency injection to provide the parameters of the method.
The purpose of these annotations is described in the following table.
| Annotation | Description |
|---|---|
|
Marks the method which is responsible for the action of the handler class. The framework executes this method once the related user interface element, e.g., the menu entry, is selected. |
|
Marks a method to be visited by the Eclipse framework to check if the handler class can be executed.
If a handler class returns |
The following example demonstrates the implementation of a handler class.
package com.vogella.tasks.ui.handlers;

// import statements cut out
// ..

public class ExitHandler {
    @Execute
    public void execute(IWorkbench workbench) {
        workbench.close();
    }

    // NOT REQUIRED IN THIS EXAMPLE
    // just to demonstrate the usage of the annotation
    @CanExecute
    public boolean canExecute() {
        return true;
    }
}
A handler instance does not have its own IEclipseContext.
It is executed with the Eclipse context of the active model element that has an Eclipse context.
In most common cases this is the context of the active part.
All required parameters should be injected into the method annotated with @Execute, as you want the handler class to retrieve its runtime information during execution.
|
To ensure that you get the expected values from the active context, always inject the required values as parameters into your methods annotated with |
17.4. Determining the relevant handler for a command
If a command is selected, the runtime determines the relevant handler for the command. The application model allows you to create a handler for the application, a window and a part.
Each command can have only one valid handler for a given scope. The Eclipse framework selects the handler most specific to the currently selected model element.
For example, if you have two handlers for the "Copy" command, one for the window and another one for the part, then the runtime selects the handler closest to the model element that is currently selected by the user.
17.5. Trigger the evaluation of the can execute method
A method annotated with @CanExecute is called by the framework if a change in the Eclipse context happens.
For example, if you select a new part.
If the method returns false, the framework disables any menu and tool items that point to that command.
You can request the re-evaluation of the @CanExecute methods by sending out an event via the event broker.
// evaluate all @CanExecute methods
eventBroker.post(UIEvents.REQUEST_ENABLEMENT_UPDATE_TOPIC, UIEvents.ALL_ELEMENT_ID);

// evaluate a context via a selector
Selector s = (a selector that has an MApplicationElement or an ID);
eventBroker.post(UIEvents.REQUEST_ENABLEMENT_UPDATE_TOPIC, s);

// See  https://bugs.eclipse.org/bugs/show_bug.cgi?id=427465 for discussion on the implementation details
17.6. Mnemonics
The application model allows you to define mnemonics. A mnemonic appears as an underlined letter in the menu when the user presses and holds the ALT key and allows the user to quickly access menu entries by keyboard.
You specify mnemonics by prefixing the letter intended as the mnemonic with an ampersand (&) in the label definition.
For example, if you use the label &Save, the S will be underlined if the Alt key is pressed.
17.7. Naming scheme for command and handler IDs
A good convention is to start IDs with the top-level package name of your project and to use only lowercase letters.
The IDs of commands and handlers should reflect their relationship.
For example, if you implement a command with the com.example.contacts.commands.show ID, you should use com.example.contacts.handler.show as the ID for the handler.
If you have more than one handler for one command, add another suffix to it, describing its purpose, e.g., com.example.contacts.handler.show.details.
In case you implement commonly used functions in your RCP application, e.g., save, copy, you should use the existing platform IDs, as some Eclipse contributions expect these IDs to better integrate with the OS (e.g., on macOS, preferences are normally placed under the first menu).
A list of command IDs is available in org.eclipse.ui.IWorkbenchCommandConstants.
.Default IDs for commonly used commands
| Command | ID |
|---|---|
Save |
org.eclipse.ui.file.save |
Save All |
org.eclipse.ui.file.saveAll |
Undo |
org.eclipse.ui.edit.undo |
Redo |
org.eclipse.ui.edit.redo |
Cut |
org.eclipse.ui.edit.cut |
Copy |
org.eclipse.ui.edit.copy |
Paste |
org.eclipse.ui.edit.paste |
Delete |
org.eclipse.ui.edit.delete |
Import |
org.eclipse.ui.file.import |
Export |
org.eclipse.ui.file.export |
Select All |
org.eclipse.ui.edit.selectAll |
About |
org.eclipse.ui.help.aboutAction |
Preferences |
org.eclipse.ui.window.preferences |
Exit |
org.eclipse.ui.file.exit |
18. Exercise: Adding menus
In this exercise, you create commands and handlers for your application. Afterwards, you will create menu entries using these commands.
18.1. Create command model elements
Open the Application.e4xmi file of your com.vogella.tasks.ui plug-in and select the Commands entry.
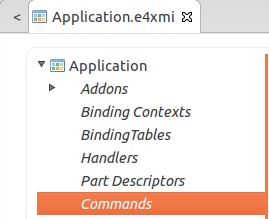
Via the Add… button you can create new commands. This selection is highlighted in the following screenshot.
The name and the ID are the important fields. Create the following commands.
| ID | Name |
|---|---|
org.eclipse.ui.file.saveAll |
Save |
org.eclipse.ui.file.exit |
Exit |
com.vogella.tasks.ui.command.createtask |
Create task |
com.vogella.tasks.ui.command.removetask |
Remove task |
com.vogella.tasks.ui.command.fortesting |
For testing |
18.2. Creating the handler classes
Create the com.vogella.tasks.ui.handlers package for your handler classes.
All handler classes implement an execute() method annotated with @Execute.
package com.vogella.tasks.ui.handlers;

import org.eclipse.e4.core.di.annotations.Execute;

public class SaveAllHandler {
    @Execute
    public void execute() {
      System.out.println((this.getClass().getSimpleName() + " called"));
    }
}
Now, create the following classes by copying the above class.
-
SaveAllHandler
-
ExitHandler
-
NewTaskHandler
-
RemoveTaskHandler
-
TestHandler
18.3. Creating handler model elements
Select the application-scoped Handlers entry in your application model and create the handlers from the following table for your commands. For the definition of handlers the ID, command and class are the relevant information.
Use the com.vogella.tasks.ui.handler prefix for all IDs of the handlers.
| Handler ID | Command | Class |
|---|---|---|
.saveall |
Save |
SaveAllHandler |
.exit |
Exit |
ExitHandler |
.newtask |
Create task |
NewTaskHandler |
.removetask |
Remove task |
RemoveTaskHandler |
.fortesting |
For testing |
TestHandler |
The application model editor shows both the name and the ID of the command.
The class URI follows the bundleclass:// schema, the table only defines the class name to make the table more readable.
For example, for the handler with the com.vogella.tasks.ui.handler.saveall ID uses the following entry to point to its handler class.
bundleclass://com.vogella.tasks.ui/com.vogella.tasks.ui.handlers.SaveAllHandler
18.4. Adding a menu
In your Application.e4xmi file select your TrimmedWindow entry in the model and flag the Main Menu attribute.
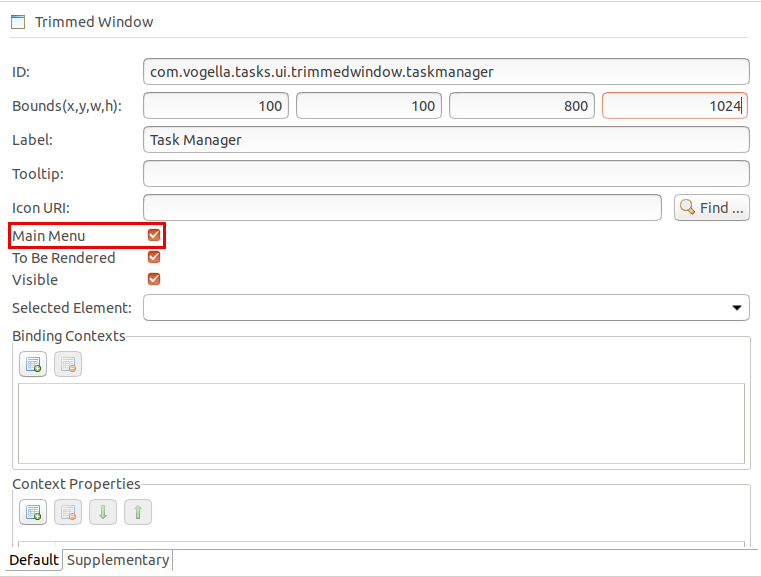
Assign the org.eclipse.ui.main.menu ID to your main menu.
|
Ensure that the ID of the main menu is correct. You use it later to contribute another menu entry via another plug-in. |
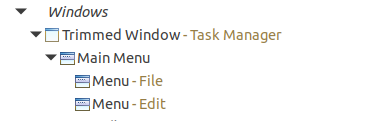
Add two menus: one with the label File and another with the label Edit.
Also set the org.eclipse.ui.file.menu ID for the File menu. Use com.vogella.tasks.ui.menu.edit as ID for the Edit menu.
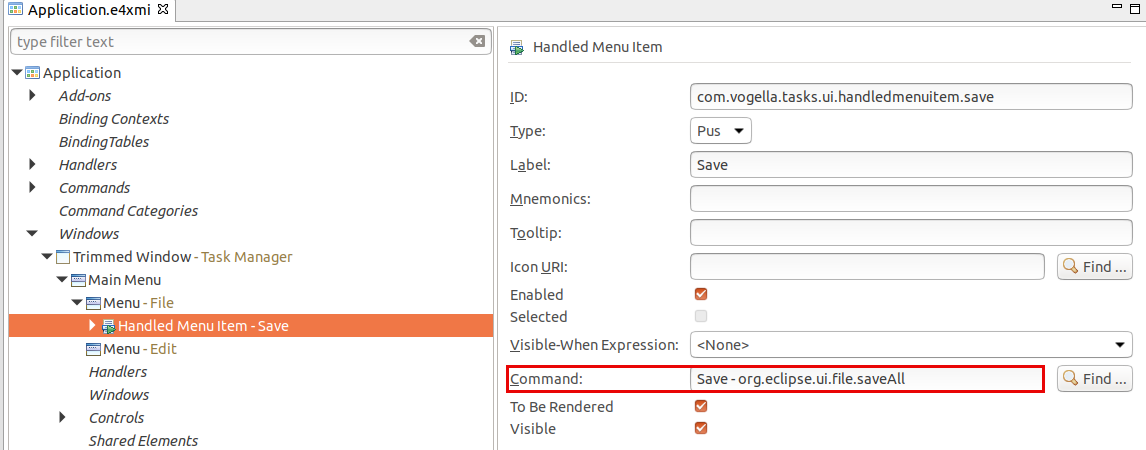
Add a Handled MenuItem model element to the File menu. This item should reference the Save command via the Command attribute.
Add a Separator after the Save menu item in your File menu. Also add a Handled MenuItem model element pointing to the Exit via the Command attribute.
Add all other commands you created to the Edit menu.
Afterwards, the menu structure should be like the following:
File
 ├── Save
 └── Exit
Edit
 ├── Create task
 ├── Remove task
 └── For testing
18.5. Implement a handler class for exit
To test if your handler is working, change your ExitHandler class, so that it closes your application, once selected.
package com.vogella.tasks.ui.handlers;

import org.eclipse.e4.core.di.annotations.Execute;
import org.eclipse.e4.ui.workbench.IWorkbench;

public class ExitHandler {
    @Execute
    public void execute(IWorkbench workbench) {
        workbench.close();
    }
}
18.6. Validate
Validate that your save handlers are called if you select them in the menu.
18.7. Possible issue: Exit menu entry on macOS
If you use the org.eclipse.ui.file.exit ID for your exit command, the Eclipse framework maps the menu entry to its default menu location on the macOS.
If the exit menu is not visible in its defined position, check its default location for macOS.
19. Learn more and get support
This tutorial continues on Eclipse RCP online training or Eclipse IDE extensions with lots of video material, additional exercises and much more content.
If you need more assistance we offer Online Training and Onsite training as well as consulting