This tutorial describes the product configuration file and the deployment of Eclipse applications. It covers features.
1. Product configuration file
1.1. Using a product configuration file
A product configuration file (product) defines the configuration of an Eclipse application. This includes icons, the splash screen, and the necessary plug-ins and features.
The Eclipse IDE allows you to create new product files via the wizard and provides an editor to easily change the file.
A product configuration must define the main application class. The default applications for Eclipse applications are:
-
org.eclipse.ui.ide.workbenchfor Eclipse IDE-based applications -
org.eclipse.e4.ui.workbench.swt.E4Applicationfor Eclipse RCP applications not related to the IDE

Custom applications implementing the IApplication interface can be used.
On the Overview tab of this editor, you can start the product. Pressing the Synchronize link writes the relevant product configuration information into the plugin.xml file.
On the Contents tab, you define the set of plug-ins and features that are included in the final application.
1.2. Splash screen
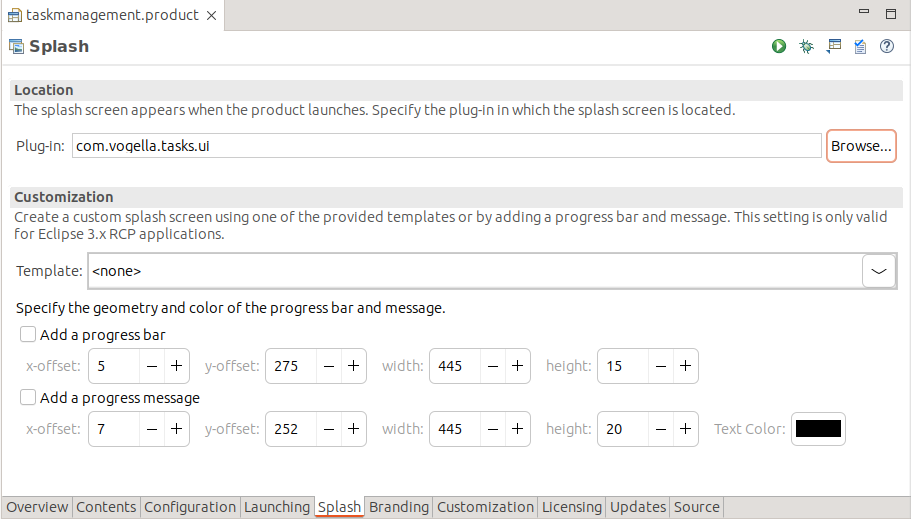
The Splash tab allows you to specify the plug-in that contains the splash screen.
The splash screen image can be in any of the following formats: PNG, JPG, GIF, or BMP. Transparency and animation are not supported.
The name is predefined as splash.EXTENSION and must be located in the root of the plug-in’s directory. Therefore, you need to put one of the following files into the project main directory:
-
splash.png
-
splash.jpg
-
splash.jpeg
-
splash.gif
-
splash.bmp
The predefined name and location of the splash screen image can be changed via the osgi.splashPath parameter, while the file name can be changed with the -showsplash path_to_file option.
1.3. Icons, launcher name, and program and VM arguments
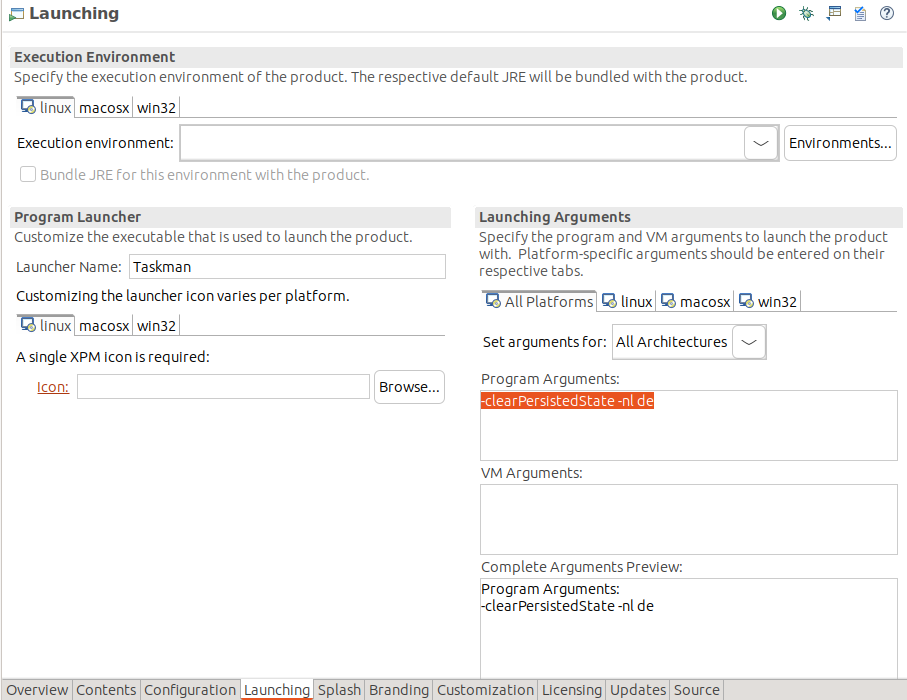
You can configure the launcher name and icon for your product. The launcher is the executable program that is created during the deployment of the product. A launcher is platform-specific. For example, the default launcher is called eclipse.exe on the Windows platform. This launcher has an associated icon. To change the name and the icon, select the Launching tab of your product configuration.
Here, you can specify the file name of the launcher and the icon that should be used. Ensure that the icons are in the correct format; otherwise, Eclipse will not use them.
|
The icon configuration depends on the platform you are using. Eclipse allows you to export your application for multiple platforms and uses the correct ones based on your product configuration. |
In the Launching Arguments section, you can specify parameters for your Eclipse application and arguments for the Java runtime environment. Program Arguments are parameters passed to the Eclipse application.
1.4. Product configuration limitations for Eclipse RCP applications
Currently, the definition of the splash handlers that can be registered via the Customization part of the Splash tab is not used by modern Eclipse RCP applications. Additionally, the configuration in the About Dialog and the Welcome Page section on the Branding tab is not directly supported in Eclipse RCP applications. These only work for Eclipse applications using the 3.x API.
2. Using features
2.1. Definition of feature projects and features
Using the Eclipse wizards, you can create feature projects in a similar way to how you create plug-in projects. An Eclipse feature project defines a feature.
A feature describes a list of plug-ins and other features that can be seen as a set of related components. It has a name, a version number, and, in most cases, license information assigned to it.
A feature is described via a feature.xml file. The following listing shows an example of such a file.
<?xml version="1.0" encoding="UTF-8"?>
<feature
      id="com.vogella.eclipse.featuretest.feature"
      label="Feature"
      version="1.0.0.qualifier"
      provider-name="vogella GmbH">

   <description url="https://www.example.com/description">
      [Enter Feature Description here.]
   </description>

   <copyright url="https://www.example.com/copyright">
      [Enter Copyright Description here.]
   </copyright>

   <license url="https://www.example.com/license">
      [Enter License Description here.]
   </license>

   <plugin
         id="com.vogella.eclipse.featuretest.feature"
         version="0.0.0"
    />

</feature>
The grouping of plug-ins into logical units makes it easier to handle a set of plug-ins. Instead of adding many individual plug-ins to your product configuration file, you can group them using features. This increases the visibility of your application structure.
Features can be used to install them into Eclipse applications and for the definition of Eclipse products. Features can be used as a basis to define a launch configuration.
Eclipse provides several predefined features, e.g., the org.eclipse.e4.rcp that contains the most commonly used plug-ins for Eclipse applications.
2.2. Feature or plug-in based products
A product can either be based on plug-ins or on features. This setting is done on the Overview tab of the product configuration file.
On the Contents tab in the product editor, you enter the plug-ins or features your product consists of.
A product can include dependencies automatically.
2.3. Creating a feature
You can create a new feature project via the menu entry.
If you open the feature.xml file, you can change the feature properties using a special editor.
The Information tab allows you to enter a description and copyright related information for this feature.
The Included Plug-ins tab allows you to change the included plug-ins in the feature. If you want to add a plug-in to a feature, use this tab. A frequent error made by new Eclipse developers is to add it to the Dependencies tab.
The Included Features tab allows you to include other features in this feature. The Dependencies tab allows you to define other features that must be present to use this feature.
The Build tab is used for the build process and should include the feature.xml file. The last two tabs give access to the configuration files in text format.
3. Deployment of the application
3.1. Creating a stand-alone version of the application
An Eclipse application needs to be exported (also called deployed) to run outside the Eclipse IDE. Exporting your product creates a folder with all required artifacts to run your application. This includes a native launcher tailored to the platforms, such as Windows or Linux that you exported it for.
Earlier releases of Eclipse supported a manual export via the product file and these options are still present in the user interface. Unfortunately, this does not work reliably anymore as the Eclipse platform development relies on a command line build using Maven to produce its components.
Therefore, it is recommended to set up a Maven Tycho build for building and deploying your application. With the latest Tycho version, setting up a build for Eclipse-based applications and plug-ins can be done efficiently.
3.2. Checklist for common export problems
If the export encounters a problem, please refer to the following table for a solution:
| Problem | Possible cause |
|---|---|
Export fails |
Try using an empty target directory, sometimes the export cannot delete the existing files and therefore fails. |
No executable file after the export |
Check the flag The product includes native launcher artifacts in your .product file on the Overview tab. |
Product could not be found |
Validate that all dependencies are included in the product. Delete an existing launch configuration and restart the product from the IDE to see if everything is configured correctly. |
Splash screen or other icons are missing |
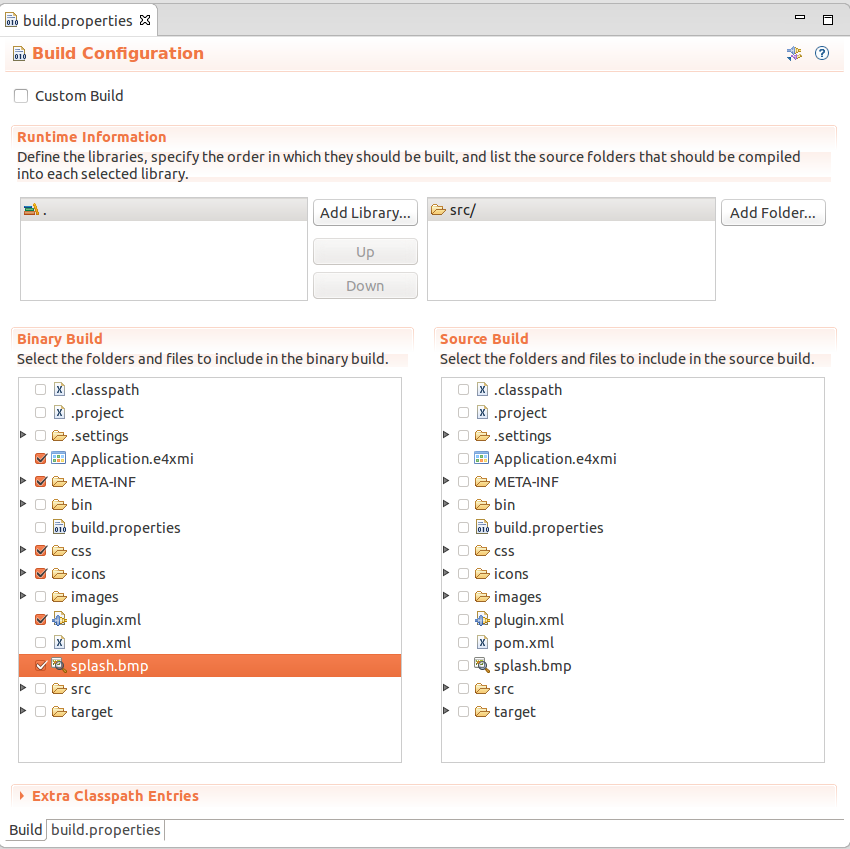
Check the build.properties file to see if all required images and icons are included in the export. |
Splash screen is missing |
Ensure that you have entered the defining plug-in in the Splash tab on the product configuration file. If this is not set, the splash screen is not displayed after the export. Unfortunately, it is displayed if you start the plug-in from the Eclipse IDE. |
Issues during the start of the application |
Check the log file in the workspace folder of your exported application to see the error messages during the start process. Alternatively, add the "-consoleLog" parameter to the ".ini" file in the folder of the exported application. |
applicationXMI argument is missing |
Check the build.properties file to see if the Application.e4xmi and the plugin.xml files are included in the export. |
Service could not be found or injected |
Make sure that the bundle that provides the service has the |
Application ID could not be found |
Define a start level of 1 and set auto-start to true for the |
Translations not available in the exported product |
Ensure, via the build.properties file of the relevant plug-in, that the files containing the translations are included in the export. |
3.3. Exercise: Use a static splash screen
Add a splash screen to your application. For this create or download a splash.bmp bitmap file.
Add the splash.bmp file to the main directory of your application. You can copy and paste it into the Package Explorer or Project Explorer view.
|
If you add files outside the Eclipse IDE, you need to Refresh your project to see the file in Eclipse. This can be done via the F5 key binding in the Package Explorer view. |
|
The file name and the location of the file must be correct, otherwise Eclipse will not use your splash screen. |
On the Splash tab of your product configuration file, define that your application plug-in contains the splash screen.

Start your application from the Eclipse IDE and verify that the splash is displayed.
3.4. Include the splash screen in the exported application
Configure that the splash.bmp file is included in the exported application by adding it to the build.properties file of your application plug-in.
|
Make sure that the target directory of the export is empty before you start the export. |
4. Optional exercise: Use a custom feature in the product
You could group your plug-ins into a custom feature. This is not required and can be unnecessary overhead if you only have one plug-in. It is useful if you have many plug-ins, so that you can group them.
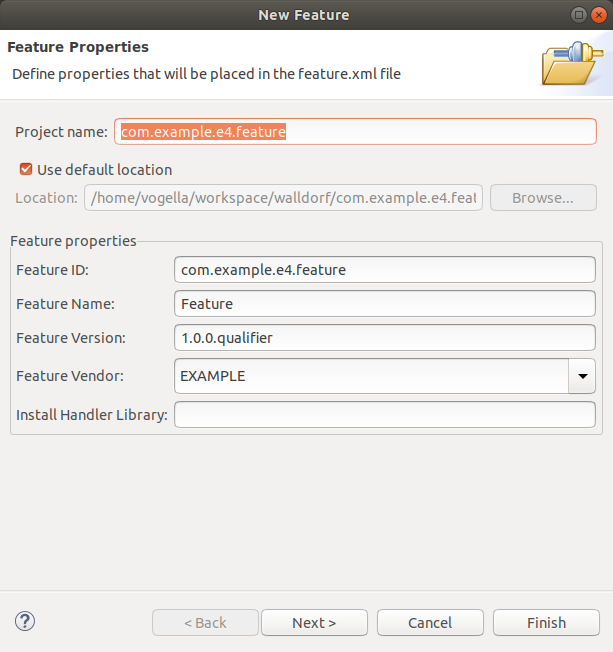
4.1. Create a feature project
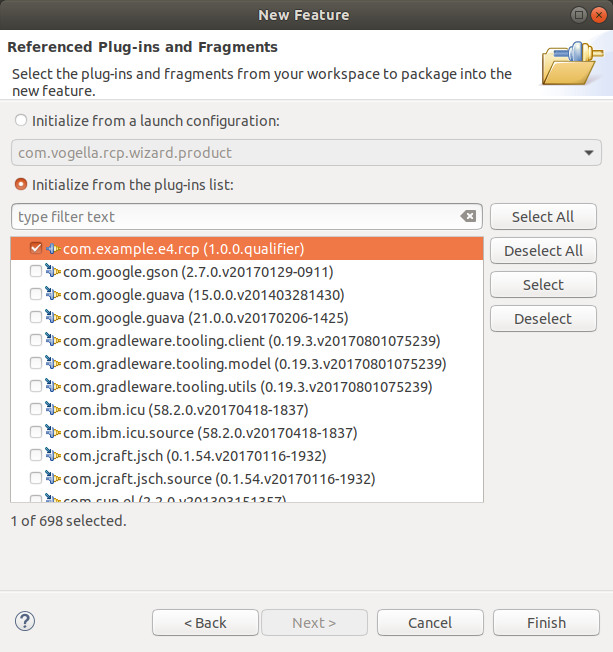
Create a new feature project named com.example.e4.feature via the entry. The following screenshot shows the first wizard page.
Include the com.example.e4.rcp plug-in into the new feature.
4.2. Create a new project for the product configuration file
Currently, the com.example.e4.rcp plug-in contains the .product file.
While you could leave the .product file in its current location, a typical project setup keeps the product in its own project.
This is because a product defines settings for the whole application and does not closely relate to only one plug-in.
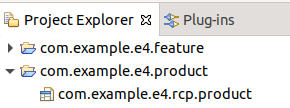
Therefore, create a new project of type General named com.example.e4.product and move the product file to this project.
4.3. Ensure that the product configuration file allows the use of plug-ins and features.
Ensure that the .product file is open.
Select the Overview tab and ensure the plug-ins and features option is selected.

4.4. Add the features as content to the product
Switch to the Contents tab in your product editor. The following entries should already be present.
-
org.eclipse.e4.rcp -
com.example.e4.rcp
Remove the com.example.e4.rcp entry via the Remove button.
We want to add the feature instead of the plug-in.
Add the following feature to your product via the Add Feature… button.
-
com.example.e4.feature

| The Include required Features and Plug-ins automatically includes required dependencies. |
4.5. Start the application via the product
Start your application using the product configuration file and ensure that the application starts correctly. If everything is configured correctly, the application should start as before with no visual difference.
|
If the application does not start, check that you start your application using the product configuration and not with an existing launch configuration. This ensures that your new product configuration is used. |
5. Eclipse product and export resources
5.1. vogella Java example code
If you need more assistance we offer Online Training and Onsite training as well as consulting