Eclipse JFace Tutorial. This tutorial gives an overview of the Eclipse JFace API for developing user interfaces.
1. Definition of Eclipse JFace
Eclipse JFace is a set of plug-ins based on the user interface toolkit SWT. JFace provides classes and frameworks that simplify common SWT use cases. JFace does not hide the SWT API; therefore, SWT knowledge is still required.
JFace provides the viewers framework, which simplifies the mapping of a data model to a visual representation. For example, viewers are available for combo boxes, lists, tables, and trees.
JFace provides helper classes to effectively manage your system resources, like colors, images, and fonts.
In addition, JFace provides support for handling preferences, preference pages, wizards, and dialogs. It contains functionality to support icon decorations and user-input help for SWT controls.
JFace Data Binding is a framework that connects properties of objects. It is typically used to synchronize fields of the user interface with properties of model objects and allows you to include validation and conversion in this synchronization process.
2. JFace resource manager for colors, fonts and images
SWT is based on the native widgets of the OS. Whenever an SWT widget is allocated, a corresponding OS-specific widget is created. The Java garbage collector cannot automatically clean up these OS-specific widget references.
Fortunately, all widgets that are created based on a parent widget are automatically disposed of when the parent Composite is disposed of.
If you develop Eclipse plug-ins, the Composite of a part is automatically disposed of once the part is closed.
Therefore, these SWT widgets are handled automatically in Eclipse plug-in projects.
This rule does not apply to fonts and images, as these may be reused in other places.
For this reason, they need to be explicitly disposed of.
JFace provides the ResourceManager and its derived classes for managing such resources automatically.
An instance of the LocalResourceManager class is created with a reference to a Control.
If this Control is disposed of, the resources created by the LocalResourceManager are disposed of.
// create the manager and bind to a widget
ResourceManager resManager =
    new LocalResourceManager(JFaceResources.getResources(), composite);

// create resources
Font font = resManager.
    createFont(FontDescriptor.createFrom("Arial", 10, SWT.BOLD));
// get an imageDescriptor and create an Image object
Image image = resManager.create(imageDescriptor);
The createImage() method expects an ImageDescriptor class.
To get an ImageDescriptor from an image file stored in your current plug-in, use the following:
Bundle bundle = FrameworkUtil.getBundle(this.getClass());
// use the org.eclipse.core.runtime.Path as an import
URL url = FileLocator.find(bundle,  new Path("icons/alt_window_32.svg"), null);
ImageDescriptor imageDescriptor = ImageDescriptor.createFromURL(url);
If you do not have an instance of Control, the LocalResourceManager provides another constructor.
A popular example is a LabelProvider, where you would not want to pass a Control to it to properly dispose of system resources afterward:
public class ResourceUsingLabelProvider extends LabelProvider {

    private ResourceManager resourceManager = new LocalResourceManager(JFaceResources.getResources());

    @Override
    public Image getImage(Object element) {
        if (element instanceof Task) {
            Bundle bundle = FrameworkUtil.getBundle(this.getClass());
            // use the org.eclipse.core.runtime.Path as an import
            URL url = FileLocator.find(bundle, new Path("icons/task.png"), null);
            ImageDescriptor imageDescriptor = ImageDescriptor.createFromURL(url);

            // return the image being created by the resourceManager
            return resourceManager.createImage(imageDescriptor);
        }

        return super.getImage(element);
    }

    @Override
    public void dispose() {
        super.dispose();

        // dispose the ResourceManager yourself
        resourceManager.dispose();
    }
}|
In case you do not pass a Control to the |
Prefer using ResourceManager to create resources.
This avoids issues with system resources and can prevent an SWTException with the message No more handles.
|
To create disabled images, you can create an |
3. ControlDecoration
The ControlDecoration class allows you to place image decorations on SWT controls.
These decorations can have a description text that is displayed once the user places the mouse over them.
During the layout of your screen, you need to make sure that enough space is available to display these decorations.
The following code snippet demonstrates their usage.
// create here a text widget

Text text= ...

// create the decoration for the text UI component
ControlDecoration deco =  new ControlDecoration(text, SWT.TOP | SWT.RIGHT);

// reuse an existing image
Image image = FieldDecorationRegistry.
    getDefault().
    getFieldDecoration(FieldDecorationRegistry.DEC_INFORMATION).
    getImage();
// set description and image
deco.setDescriptionText("This is a tooltip text");
deco.setImage(image);
// hide deco if not in focus
deco.setShowOnlyOnFocus(true);

//hide the decoration if the text widget has content
text.addModifyListener(e -> {
    Text source = (Text) e.getSource();
    if (!source.getText().isEmpty()) {
        deco.hide();
    } else {
        deco.show();
    }
});
You can hide and show the decoration via the corresponding methods, as demonstrated in the following code snippet.
deco.hide();
deco.show();
4. User input help with field assistance
Eclipse allows you to define assistance for user input for widgets.
The org.eclipse.jface.fieldassist package provides this functionality.
For example, you can define input help for a text field or a combo box so that the user gets possible input values presented.
The ContentProposalAdapter is responsible for providing the possible input values.
Its constructor takes:
-
Control: The widget for which suggestions are supplied. -
IControlContentAdapter: Maps the value from theIContentProposalto the widget and maps data back from the widget. -
IContentProposalProvider: Provides an array ofIContentProposalobjects. -
KeyStroke: Defines the keys that activate this content proposal. -
char[]: Characters that auto-activate this code completion.
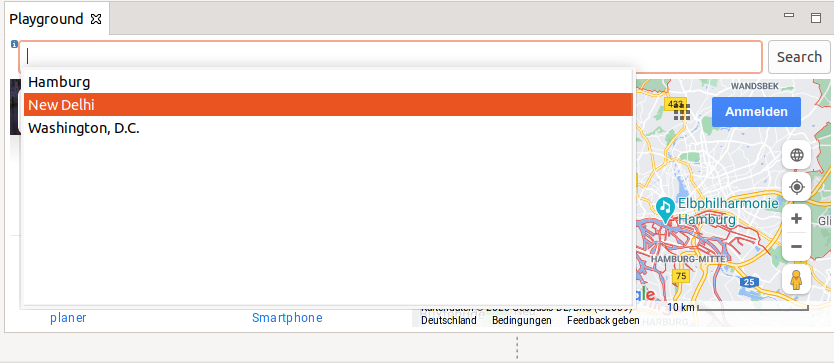
In the following example, the content proposal should get activated via certain keys ("." and "#") as well as the Ctrl+Space key combination.
The following code demonstrates the usage of the field assistance functionality.
import static org.eclipse.jface.layout.GridDataFactory.fillDefaults;
import static org.eclipse.jface.widgets.WidgetFactory.text;

parent.setLayout(new GridLayout(2, false));

text = text(SWT.BORDER).message("Enter City")
        .layoutData(fillDefaults()
        .grab(true, false).create())
        .create(parent);

// Define field assists for the text widget
// use "." and " " activate the content proposals
char[] autoActivationCharacters = new char[] { '.', ' ' };
KeyStroke keyStroke;
try {
    keyStroke = KeyStroke.getInstance("Ctrl+Space");
    new ContentProposalAdapter(text, new TextContentAdapter(),
    new SimpleContentProposalProvider("ProposalOne", "ProposalTwo", "ProposalThree"),
    keyStroke, autoActivationCharacters);
} catch (ParseException e1) {
    e1.printStackTrace();
}
Trigger the content assists in your editor. The expected output is shown in the screenshot below.
4.1. Field assistance without filtering
The AutoCompleteField can be used to dynamically calculate proposals.
You find an example in the exercises.
The AutoCompleteField class that we are using comes with default settings that cannot be changed.
This includes filtering, which is activated by default.
AutoCompleteField does not provide a way to change this, but since it is only doing some initial wiring, we can implement it ourselves without too much unnecessary duplication.
public class AutoCompleteFieldPart {

    private static class AutoComplete {
        private SimpleContentProposalProvider proposalProvider;
        private ContentProposalAdapter adapter;

        public AutoComplete(Control control, IControlContentAdapter controlContentAdapter, String... proposals) {
            proposalProvider = new SimpleContentProposalProvider(proposals);
            adapter = new ContentProposalAdapter(control, controlContentAdapter, proposalProvider, null, null);
            adapter.setPropagateKeys(true);
            adapter.setProposalAcceptanceStyle(ContentProposalAdapter.PROPOSAL_REPLACE);
        }

        public void setProposals(String... proposals) {
            proposalProvider.setProposals(proposals);
        }
    }
    // more code..
}
4.2. Field assist with custom filtering
The correct place to change the filter behavior is in the IContentProposalProvider#getProposals() method.
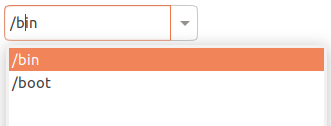
The following code shows an implementation of IContentProposalProvider that takes the caret position into consideration when applying the filter.
The input "/b|in" ("|" marks the caret position) should show proposals for all folders starting with a "b".
import java.util.regex.Pattern;
import org.eclipse.swt.widgets.Control;

// more imports

public class AutoCompleteFieldPart {

    private static class SubstringMatchContentProposalProvider implements IContentProposalProvider {

        private List<String> proposals = Collections.emptyList();

        @Override
        public IContentProposal[] getProposals(String contents, int position) {
            if (position == 0) {
                return null;
            }
            String substring = contents.substring(0, position);
            Pattern pattern = Pattern.compile(substring,
                    Pattern.LITERAL | Pattern.CASE_INSENSITIVE | Pattern.UNICODE_CASE);
            IContentProposal[] filteredProposals = proposals.stream()
                    .filter(proposal -> proposal.length() >= substring.length() && pattern.matcher(proposal).find())
                    .map(ContentProposal::new).toArray(IContentProposal[]::new);
            // callers expect us to return null if we do not find any matching proposal
            return filteredProposals.length == 0 ? null : filteredProposals;
        }

        public void setProposals(List<String> proposals) {
            this.proposals = proposals;
        }
    }

    private static class AutoComplete {
        private SubstringMatchContentProposalProvider proposalProvider;
        private ContentProposalAdapter adapter;

        public AutoComplete(Control control, IControlContentAdapter controlContentAdapter, List<String> proposals) {
            proposalProvider = new SubstringMatchContentProposalProvider();
            proposalProvider.setProposals(proposals);
            adapter = new ContentProposalAdapter(control, controlContentAdapter, proposalProvider, null, null);
            adapter.setPropagateKeys(true);
            adapter.setProposalAcceptanceStyle(ContentProposalAdapter.PROPOSAL_REPLACE);
        }

        public void setProposals(List<String> proposals) {
            proposalProvider.setProposals(proposals);
        }
    }
    // more code..
}
5. Eclipse JFace viewers
5.1. Purpose of the JFace viewer framework
The JFace viewer framework allows you to display a domain model in a standard SWT widget, like a list, combo, tree, or table, without converting the domain model beforehand.
A viewer allows you to set a content provider that provides the data for the viewer. The content provider makes no assumption about the presentation of the data model.
You can assign at least one label provider to a viewer. The label provider defines how the data from the model is displayed in the viewer.
5.2. Standard JFace viewer
JFace provides several standard viewer implementations.
These viewers are part of the org.eclipse.jface.viewers package.
The following list contains the most important ones.
-
ComboViewer -
ListViewer -
TreeViewer -
TableViewer
5.3. Standard content and label provider
The related interfaces for defining a content provider are described in the following table.
| Interface | Default implementation | Description |
|---|---|---|
IStructuredContentProvider |
ArrayContentProvider |
Used for the |
ITreeContentProvider |
Not available |
Used for the |
Important standard label providers are listed in the following table.
| Required class | Standard label providers | Description |
|---|---|---|
ILabelProvider |
LabelProvider |
Used for lists and trees, can return an icon and a label per element. |
CellLabelProvider |
ColumnLabelProvider |
Used for tables. Defines a label provider per column. |
6. JFace combo viewer
The ComboViewer class simplifies the implementation of an SWT combo (drop-down box).
Assume the following data model.
package com.vogella.eclipse.viewer;

public class Person {
    private String firstName;
    private String lastName;
    private boolean married;

    public Person(String firstName, String lastName) {
        this.firstName = firstName;
        this.lastName = lastName;
    }

    public String getFirstName() {
        return firstName;
    }

    public void setFirstName(String firstName) {
        this.firstName = firstName;
    }

    public String getLastName() {
        return lastName;
    }

    public void setLastName(String lastName) {
        this.lastName = lastName;
    }

    public boolean isMarried() {
        return married;
     }

    public void setMarried(boolean married) {
        this.married = married;
    }
}
The following example snippet shows you how you could use this given data model in a ComboViewer.
The listener is notified whenever the selection of the viewer changes.
// the following code is executed by the method which
// creates the user interface
// assumes parent is an SWT Composite

GridLayout layout = new GridLayout(2, false);
parent.setLayout(layout);

Label label = new Label(parent, SWT.NONE);
label.setText("Select a person:");
final ComboViewer viewer = new ComboViewer(parent, SWT.READ_ONLY);

// the ArrayContentProvider object does not store any state;
// therefore, you can reuse instances

viewer.setContentProvider(ArrayContentProvider.getInstance());
viewer.setLabelProvider(new LabelProvider() {
    @Override
    public String getText(Object element) {
        if (element instanceof Person) {
            Person person = (Person) element;
            return person.getFirstName();
        }
        return super.getText(element);
    }
});

List<Person> persons = Arrays.asList(new Person("Lars", "Vogel"),
        new Person("Tim", "Taler"), new Person("Jim", "Knopf"));

// set the input of the Viewer,
// this input is sent to the content provider
// must be called after setContentProvider

viewer.setInput(persons);

//react to the selection change of the viewer
//note that the viewer returns the actual object

viewer.addSelectionChangedListener(new ISelectionChangedListener() {
    @Override
    public void selectionChanged(SelectionChangedEvent event) {
        IStructuredSelection selection = (IStructuredSelection) event
            .getSelection();
        if (selection.size() > 0){
            System.out.println(((Person) selection.getFirstElement())
                    .getLastName());
        }
    }
});
You can get and set selections using Java objects based on your domain model.
// you can select an object directly via the domain object
Person person = persons.get(0);
viewer.setSelection(new StructuredSelection(person));

// retrieves the selection, returns the data model object
IStructuredSelection selection = viewer.getStructuredSelection();
Person p = (Person) selection.getFirstElement();
7. Learn more and get support
This tutorial continues on Eclipse RCP online training or Eclipse IDE extensions with lots of video material, additional exercises and much more content.
8. JFace resources
8.1. vogella Java example code
If you need more assistance we offer Online Training and Onsite training as well as consulting