This tutorial gives an overview of the available services in the Eclipse platform. These services are used to develop Eclipse RCP applications and Eclipse plug-ins.
1. Eclipse platform services
The services provided by the Eclipse platform simplify the implementation of common tasks. These services can be accessed via dependency injection. The following table gives an overview of the available platform services.
| Service | Description |
|---|---|
|
Used to search for elements in the model, create new model elements, clone existing snippets and insert new elements into the runtime application model. |
|
Used to retrieve and set the current active selection in the user interface. |
|
Gives access to existing commands and allows you to create and modify commands. |
|
Allows you to access, change and trigger handlers. |
|
Provides API to access and modify parts.
It allows you to switch perspectives and can be used to trigger that a method annotated with |
|
Provides functionality to send event data and to register for specified events and event topics. |
|
Activate and deactivate key bindings defined as |
|
Allows switching the styling of the application at runtime. |
|
Registers a popup menu (MPopupMenu) for a control. |
Other available services are:
-
org.eclipse.e4.core.services.Adapter- An adapter can adapt an object to the specified type, allowing clients to request domain-specific behavior for an object. It integratesIAdaptableandIAdapterManager. -
org.eclipse.e4.core.services.Logger- Provides logging functionality -
org.eclipse.jface.window.IShellProvider- allows access to aShell, depends on SWT.
2. Selection service
2.1. Using the selection service
The ESelectionService service allows you to retrieve and set the user interface selection in each top-level window and part.
This selection is stored under the IServiceConstants.ACTIVE_SELECTION context key.
2.2. Retrieving the selection service and setting the current selection
A client can get the selection service via dependency injection.
You can change the current selection with the setSelection() method of the ESelectionService class.
This is demonstrated in the following code.
@Inject ESelectionService selectionService; (1)

// more code

viewer.addSelectionChangedListener(event -> { (2)
    IStructuredSelection selection = viewer.getStructuredSelection();
    selectionService.setSelection(selection.getFirstElement()); (3)
});| 1 | In this example, you use field injection to retrieve the service |
| 2 | viewer is a JFace table viewer in this example |
| 3 | Sets the first selected element of the viewer as UI selection |
2.3. Getting the selection
A client can retrieve the current selection from the ESelectionService via the getSelection() method.
The getSelection(partId) method allows you to retrieve the selection of a specific part.
The selection can be retrieved via dependency injection.
For this, use the @Named annotation to specify the IServiceConstants.ACTIVE_SELECTION constant.
The Eclipse framework ensures that selections are only injected if the request type matches the selection.
The usage of dependency injection to retrieve the selection is demonstrated in the following code.
@Inject
public void setTasks(@Optional
        @Named(IServiceConstants.ACTIVE_SELECTION) List<Task> tasks) { (1)
        // do something with the list of todos
}

@Inject
public void setTask(@Optional
        @Named(IServiceConstants.ACTIVE_SELECTION) Task task) { (2)
        // do something with the task
}| 1 | This method is called if the current selection is a List |
| 2 | This method is called if the current selection is a Task |
3. Model Service
3.1. Definition of the model service
The model service gives you access to the application model and allows you to modify it at runtime. It allows you to search for, delete, or create model elements.
This service can be accessed via dependency injection, as demonstrated via the following snippet.
@Inject EModelService modelService;3.2. Searching model elements
The findElements() method allows you to search for specific model elements.
The following code shows an example for using the findElements() method.
package com.vogella.tasks.ui.handlers;

import java.util.ArrayList;
import java.util.List;

import org.eclipse.e4.core.di.annotations.Execute;
import org.eclipse.e4.ui.model.application.MApplication;
import org.eclipse.e4.ui.model.application.ui.MUIElement;
import org.eclipse.e4.ui.model.application.ui.basic.MPart;
import org.eclipse.e4.ui.workbench.modeling.EModelService;

public class ModelServiceExampleHandler {

    @Execute
    public void execute(MApplication application, EModelService service) {

        // find objects by ID
        findPartsById(application, service);

        // find objects by type
        findParts(application, service);

        // find objects by tags
        findObjectsByTag(application, service);

    }

    // example for search by ID
    private void findPartsById(MApplication application, EModelService service) {
        List<MPart> parts = service.findElements(application, "mypart",
                MPart.class, null);
        System.out.println("Found part(s) : " + parts.size());
    }

    // example for search by type
    private void findParts(MApplication application,
            EModelService service) {
        List<MPart> parts = service.findElements(application, null,
                MPart.class, null);
        System.out.println("Found parts : " + parts.size());
    }

    // example for search by tag
    private void findObjectsByTag(MApplication application,
            EModelService service) {
        List<String> tags = new ArrayList<>();
        tags.add("justatag");
        List<MUIElement> elementsWithTags = service.findElements(application,
                null, null, tags);
        System.out.println("Found parts(s) : " + elementsWithTags.size());
    }
}
The following code demonstrates how you can access the current perspective for a part.
package com.vogella.tasks.ui.handlers;

import org.eclipse.e4.core.di.annotations.Execute;
import org.eclipse.e4.ui.model.application.MApplication;
import org.eclipse.e4.ui.model.application.ui.MUIElement;
import org.eclipse.e4.ui.model.application.ui.advanced.MPerspective;
import org.eclipse.e4.ui.workbench.modeling.EModelService;

public class FindPerspectiveHandler {
    @Execute
    public void execute(MApplication application, EModelService service) {
        // search for a part with the following ID
        String ID = "com.example.e4.rcp.parts.tododetail";
        MUIElement element = service.find(ID, application);
        MPerspective perspective = service.getPerspectiveFor(element);
        System.out.println(perspective);
        // TODO do something useful with the perspective
    }
}
You can use the findElements method with a fifth parameter that allows you to specify additional search flags, e.g., IN_ACTIVE_PERSPECTIVE, OUTSIDE_PERSPECTIVE, IN_ANY_PERSPECTIVE.
See the Javadoc of the findElements method for further details.
3.3. Creating model elements
As the application model is interactive, you can dynamically create new model elements and add them to your application. For example, you can add new parts to your application. This will be demonstrated in the exercises.
3.4. Cloning elements or snippets
In the application model you can create Snippet model elements that can be used to instantiate model objects at runtime.
It is possible to copy existing application model elements via the model service.
You can use the cloneElement() and cloneSnippet() methods of the model service to copy an existing element or snippet.
The resulting object can be assigned to another model element.
3.5. Modifying existing model elements
You can access existing model elements, via the model service or via dependency injection and adjust their attributes.
The Eclipse framework automatically keeps track of the application model and changes to the model are reflected immediately in your application.
For example, if you add a new window to your application, it becomes visible instantly.
Or if you inject an MPart object and call its setLabel() method, the text of the part in a PartStack changes immediately.
3.6. Removing a model element
The deleteModelElement() method of EModelService allows you to remove a model element from your application.
It calls setToBeRendered(false) on the model element and removes it from its parent container.
4. Example of changing the application model
The following gives example for search model element and changing the application model at runtime.
4.1. Example: Search for a perspective and change its attributes
The following code shows how to access a PartSashContainer with the mypartsashcontainer ID.
It demonstrates how to modify model attributes.
In this example, it changes the container data parameter for its children. This will arrange (layout) the parts in the container.
@Execute
public void execute(EModelService service, MWindow window) {
    MPartSashContainer find = (MPartSashContainer) service.
        find("mypartsashcontainer", window);
    List<MPartSashContainerElement> list = find.getChildren();

    int i = 0;
    // make the first part in the container larger
    for (MPartSashContainerElement element : list) {

        if (i > 0) {
            element.setContainerData("20");
        } else {
            element.setContainerData("80");
        }
        i++;
    }
}
4.2. Example: Dynamically create a new window
To create new model objects you can use the createModelElement() of the model service.
After you created such an object you can add it to your application model at runtime.
For example, the creation of a new window for a running application is demonstrated by the following code snippet.
// create a new window and set its size
MWindow window = modelService.createModelElement(MWindow.class);
window.setWidth(200);
window.setHeight(300);

// add the new window to the application
application.getChildren().add(window);
4.3. Example: Dynamically create a new part
The following code demonstrates how to create and add a new part to the currently active window.
package com.vogella.tasks.ui.handlers;

import org.eclipse.e4.core.di.annotations.Execute;
import org.eclipse.e4.ui.model.application.MApplication;
import org.eclipse.e4.ui.model.application.ui.basic.MPart;
import org.eclipse.e4.ui.workbench.modeling.EModelService;
import org.eclipse.e4.ui.workbench.modeling.EPartService;
import org.eclipse.e4.ui.workbench.modeling.EPartService.PartState;

public class DynamicPartHandlerCode {
    // used as reference
    @Execute
    public void execute(MApplication application, EPartService partService,
            EModelService modelService) {

        // create new part
        MPart mPart = modelService.createModelElement(MPart.class);
        mPart.setLabel("Testing");
        mPart.setElementId("newid");
        mPart.setContributionURI("bundleclass://com.vogella.tasks.ui/"
                + "com.vogella.tasks.ui.parts.DynamicPart");
        partService.showPart(mPart, PartState.ACTIVATE);
    }
}
Typically you would add the part to a predefined PartStack.
Use the model service to search for the correct one.
|
5. Part service and editor-like behavior
5.1. Definition of the part service
The part service allows you to find and perform actions on parts in the application model.
It allows you to switch perspectives and to create and activate new parts based on part descriptors in the application model.
5.2. Accessing the part service
Use dependency injection to get access to the part service.
For example, via the @Inject EPartService partService; statement.
5.3. Example: Showing and hiding parts
The following example shows how you can find parts, hide or show them.
If the Visible attribute of the part was initially set to false (not visible), you need to call the setVisible(true) method of the model element to ensure that the part gets displayed.
@Inject private EPartService partService;

// search part with ID "com.example.todo.rcp.parts.tododetails"
// assume that a part with this ID exists
detailsTodoPart = partService.findPart("com.example.todo.rcp.parts.tododetails");

// hide the part
partService.hidePart(detailsTodoPart);

//show the part
detailsTodoPart.setVisible(true); // required if initially not visible
partService.showPart(detailsTodoPart, PartState.VISIBLE);
5.4. Example: Switching perspectives
The following example demonstrates switching to another perspective using the part service.
package com.vogella.tasks.ui.handlers;

import java.util.List;

import org.eclipse.e4.core.di.annotations.Execute;
import org.eclipse.e4.ui.model.application.MApplication;
import org.eclipse.e4.ui.model.application.ui.MUIElement;
import org.eclipse.e4.ui.model.application.ui.advanced.MPerspective;
import org.eclipse.e4.ui.model.application.ui.basic.MPart;
import org.eclipse.e4.ui.workbench.modeling.EModelService;
import org.eclipse.e4.ui.workbench.modeling.EPartService;
import org.eclipse.e4.ui.workbench.modeling.EPartService.PartState;

public class SwitchPerspectiveHandler {
    @Execute
    public void execute(MApplication app, EPartService partService,
            EModelService modelService) {
        MPerspective element =
                (MPerspective) modelService.find("secondperspective", app);
        // now switch perspective
        partService.switchPerspective(element);
    }
}
5.5. Using part descriptors
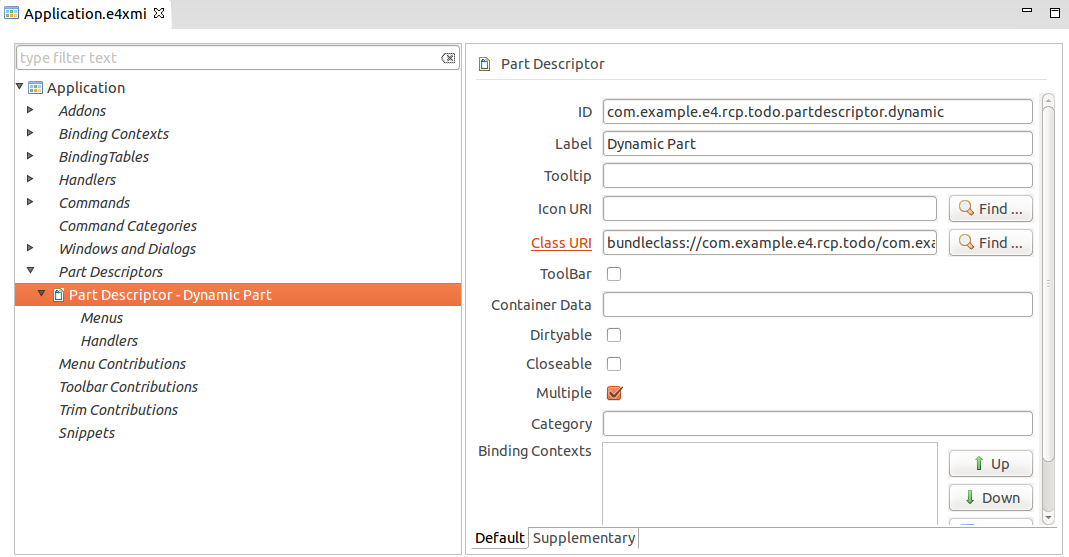
The part descriptor model element is a template for the creation of a part. By defining a common set of attributes via such a blueprint it is possible to create concrete instances of it via the part service.
Via the Multiple attribute of the part descriptor you configure if multiple instances of this part can be created.
An example of such a model element is shown in the following screenshot.
5.6. Example: Part descriptors and creating parts dynamically
The EPartService service allows you to create a new part based on a part descriptor.
This is demonstrated by the following example code.
package com.vogella.tasks.ui.handlers;

import org.eclipse.e4.core.di.annotations.Execute;
import org.eclipse.e4.ui.model.application.ui.basic.MPart;
import org.eclipse.e4.ui.workbench.modeling.EPartService;
import org.eclipse.e4.ui.workbench.modeling.EPartService.PartState;

public class OpenPartHandler {

    // the following code assumes that
    // the "com.vogella.tasks.ui.partdescriptor.fileeditor" ID
    // is used for the part descriptor
    @Execute
    public void execute(EPartService partService) {

        // create a new part based on a part descriptor
        // if multiple parts of this type are allowed a new part
        // is always generated

        MPart part = partService.createPart("com.vogella.tasks.ui.partdescriptor.fileeditor");
        part.setLabel("New Dynamic Part");

        // optional you could use the model service to find a certain container and add the new part to its children

         // now show the new part
        // as it is in this coding not added to a container it is shown in default container of the application (which is the last container)
        partService.showPart(part, PartState.ACTIVATE);
    }
}
5.7. Showing parts
To open and show a part in the application, you can use the EPartService.showPart(…, PartState.ACTIVATE) method.
If the part is already contained in a container like a stack, it is shown and granted focus.
If it is not yet contained in a container, it is added to one. By default, this is the last container, i.e. in most cases the last stack.
You can use the category field in the part descriptor and a tag in the container to open the new part in the specified container.
A category for a MPartDescriptor can be defined like this:
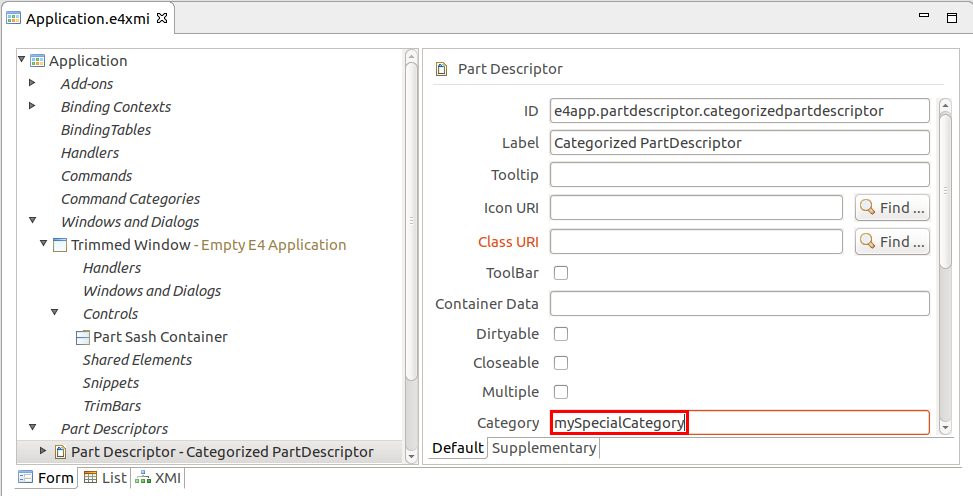
You can add a tag to your container, as depicted in the following screenshot.
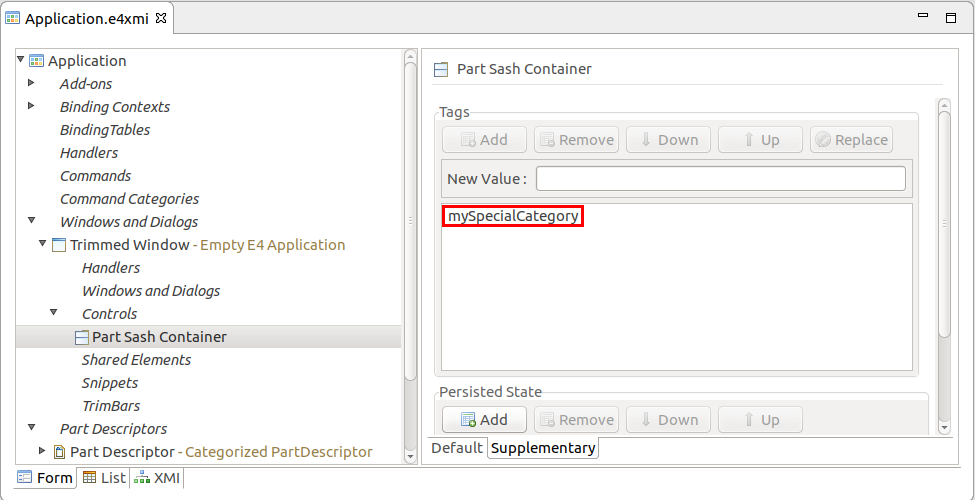
If the tag is the same as the category, the following code opens the new part in the specified container.
EPartService partService = getPartService();
partService.showPart("e4app.partdescriptor.categorizedpartdescriptor", PartState.ACTIVATE);
6. Implementing editor-like behavior
6.1. Parts that behave similar to editors
An editor is a part that requires the user to trigger a save operation to persist data changes. Editors that contain data, which can be saved, are typically called dirty.
The part service allows you to save dirty parts. Every part can mark itself as dirty, hence behave like an editor.
6.2. MDirtyable and @Persist
A part has a MDirtyable attribute that indicates that it can be marked as dirty.
A dirty state indicates that the part contains unsaved changes.
The MDirtyable object can be injected into a part.
You can use the setDirty(boolean) method to mark the part as dirty.
The following snippet demonstrates how to use the MDirtyable model property in a part to flag it as dirty after a button was pressed.
import jakarta.annotation.PostConstruct;
import jakarta.inject.Inject;

import org.eclipse.e4.ui.di.Persist;
import org.eclipse.e4.ui.model.application.ui.basic.MPart;
import org.eclipse.swt.SWT;
import org.eclipse.swt.events.SelectionAdapter;
import org.eclipse.swt.events.SelectionEvent;
import org.eclipse.swt.widgets.Button;
import org.eclipse.swt.widgets.Composite;

public class MySavePart {

    @Inject
    MPart part;

    @PostConstruct
    public void createControls(Composite parent) {
        Button button = new Button(parent, SWT.PUSH);
        button.addSelectionListener(new SelectionAdapter() {
            @Override
            public void widgetSelected(SelectionEvent e) {
                part.setDirty(true);
            }
        });
    }
}
The part service allows you to query the dirty parts and to call a method annotated with @Persist on the dirty parts.
This method saves the data of the part and sets the dirty flag back to false if the save operation was successful.
@Persist
public void save(MPart part, TaskService todoService) {
    // save changes via TaskService for example
    todoService.saveTodo(todo);
    // save was successful
    part.setDirty(false);
}
Every part is responsible for saving itself.
Hence every part that behaves like an editor must have a method annotated with @Persist.
|
6.3. Use part service to trigger save in editors
The part service allows you to trigger the @Persist method on the dirty parts via the saveAll() method.
The EPartService searches in each part which is marked as dirty for a method annotated with @Persist.
This method is called by the framework and has to save the data which the editor holds.
If saving the data was successful it should call the setDirty(false) method on the MDirtyable object.
The following example demonstrates that.
package com.vogella.tasks.ui.handlers;

import org.eclipse.e4.core.di.annotations.Execute;
import org.eclipse.e4.ui.workbench.modeling.EPartService;

public class SaveHandler {

    @Execute
    void execute(EPartService partService) {
        partService.saveAll(false);
    }
}
6.4. MPart and multiple editors
You can use the MPart model element to create multiple editors.
Every model element can have persisted data assigned to it that can be accessed via the getPersistedState() method.
In its @PostConstruct method the implementation class can get the MPart injected and access its persisted state.
This information can be used to configure the editor.
7. Command and Handler service
7.1. Purpose of the command and handler service
The command and handler services provide the functionality to work with commands and handlers.
Via the handler service you can create, activate and trigger handlers based on commands. The command service allows you to access, and configure commands, i.e. by setting the parameters.
7.2. Access to command and handler service
You can use dependency injection to access the services.
The relevant interfaces are ECommandService and EHandlerService.
7.3. Example of executing a command
The following example shows how to execute a handler for an existing command.
// create parameter for the command
// optional, can be null
Map<String, String> parameters = new HashMap<String, String>();
parameters.put(Constants.SEARCH_QUERY_ID, id);

ParameterizedCommand cmd =
    commandService.createCommand("com.example.mycommand", parameters);

// execute the registered handler for the command
handlerService.executeHandler(cmd);
7.4. Example of assigning a handler to a command
The following example shows how to add a new handler to an existing command.
It assumes that the AboutHandler class already exists.
Command command = commandService.getCommand("com.example.mycommand");

// check if the command is defined
System.out.println(command.isDefined());

// activate handler, assumption: the AboutHandler() class exists already
handlerService.activateHandler("com.example.mycommand",
        new AboutHandler());

// prepare execution of command
ParameterizedCommand cmd =
    commandService.createCommand("com.example.mycommand", null);

// check if the command can be executed
if (handlerService.canExecute(cmd)){
    // execute the command
    handlerService.executeHandler(cmd);
}
8. Learn more and get support
This tutorial continues on Eclipse RCP online training or Eclipse IDE extensions with lots of video material, additional exercises and much more content.
9. Links and literature
9.1. vogella Java example code
If you need more assistance we offer Online Training and Onsite training as well as consulting