1. Extending the Eclipse IDE
The Eclipse platform is an extensible framework that allows you to add, remove, or customize existing functionality.
Any download of the Eclipse IDE can be viewed as a specialized Eclipse application focused on supporting software development. An Eclipse application is composed of individual software components called plug-ins. For example, the Eclipse Java IDE provides the functionality to develop Java applications through the JDT plug-ins.
Since Eclipse is built as an extensible framework, plug-ins can use and extend other plug-ins.
During development, you can start a new instance of the Eclipse IDE, similar to any Java program, to test and debug your work. This instance is called a runtime Eclipse.
An easy way to start a runtime Eclipse is by selecting from the context menu of a plug-in or its manifest file. By default, this includes all the plug-ins from the workspace and the target environment, launching a runtime Eclipse with these plug-ins. If a plug-in is available both in the workspace and the target environment, the one from the workspace is used.

Similar to a regular Java program, you can debug the runtime Eclipse. Set a breakpoint in the source code line you want to inspect, right-click your plug-in, and select .
When the execution reaches a statement marked with a breakpoint, the execution stops, allowing you to debug the statement and inspect the current data.
2. Eclipse 3.x vs. Eclipse 4
| Outdated information. See https://www.vogella.com/tutorials/Eclipse4RCP/article.html - Eclipse 4 Tutorial, for an introduction into the Eclipse RCP programming. |
3. What are Extension Points?
Extension-points define interfaces for other plug-ins to contribute functionality (code and non-code).
They are defined in the plugin.xml file that must be in the root directory of your plug-in project.
Existing extensions (contributions) are collected during the start of an Eclipse application.
4. Main components of an Eclipse RCP application
The minimal required plug-ins to create and run a minimal Eclipse RCP application (with UI) are the two plug-ins org.eclipse.core.runtime and org.eclipse.ui.
Based on these components, an Eclipse RCP application must define the following elements:
-
Main program - An RCP main application class implements the interface
IApplication.
This class can be viewed as the equivalent to the main method for a standard Java application.
Eclipse expects that the application class is defined via the extension point org.eclipse.core.runtime.application.
-
A Perspective - Defines the layout of your application.
Must be declared via the extension point org.eclipse.ui.perspective.
-
Workbench Advisor - An invisible technical component that controls the appearance of the application (menus, toolbars, perspectives, etc).
The Eclipse application is the equivalent of the Java main() method.
Applications are defined via the extension point org.eclipse.core.runtime.applications and must extend IApplication.
5. Approach
If you learn programming you have two extreme choices. The first approach is that you explain everything first and then do it. The second choice is that you first do everything and then explain what you have done.
The following description tends towards the second approach.
We will develop a small RCP application, create a product and launch it, before explaining the project structure, the involved classes and what a product or a launch configuration is.
In my experience it is easier to understand an explanation, if you have already created an example.
The risk associated with that approach is that if you run into a problem you do not know how to solve it.
Therefore if you have problem starting your product, I suggest to read the chapter about launch configurations and if that does not help, check the "Products and Branding" chapter.
6. Application and Advisor Classes
During the startup of an Eclipse RCP application the Eclipse
runtime
will evaluate which class is defined via the
org.eclipse.core.runtime.application
extension point.
This is the equivalent of the main class of standard Java
programs.
This class is responsible for creating the SWT
Display
and for starting the event loop for the application.
This class is typically called Application
and must implement the
interface
IApplication.
Display display = PlatformUI.createDisplay();
PlatformUI.createAndRunWorkbench(display, new ApplicationWorkbenchAdvisor());
PlatformUI.createAndRunWorkbench()
creates and runs a
Workbench. The
Workbench
represents the graphical user interface of Eclipse. The visual
part of
the Workbench is represented via the
WorkbenchWindow
class. A
Workbench
can have several
WorkbenchWindows
opened. The inner part of the
WorkbenchWindow
is represented via the class
WorkbenchPage.
The
Workbench
is configured via a class of type
WorkbenchAdvisor. This class defines the initial Perspective and defines the
WorkbenchWindowAdvisor
class.
WorkbenchWindowAdvisor
calls the class
ActionBarAdvisor
which configures
Actions
for the
Workbench
and defines initial attribute for the
WorkbenchWindow
as initial size, title and visibility of the statusline.
public ActionBarAdvisor createActionBarAdvisor(IActionBarConfigurer configurer) {
    return new ApplicationActionBarAdvisor(configurer);
}

public void preWindowOpen() {
    IWorkbenchWindowConfigurer configurer = getWindowConfigurer();
    configurer.setInitialSize(new Point(400, 300));
    configurer.setShowCoolBar(false);
    configurer.setShowStatusLine(false);
    configurer.setTitle("Todo"); //$NON-NLS-1$
}
For example, you could set the initial position of the application via postWindowCreate() method.
// for further info see https://bugs.eclipse.org/bugs/show_bug.cgi?id=84938
@Override
public void postWindowCreate() {
    Shell shell = getWindowConfigurer().getWindow().getShell();
    shell.setLocation(100, 400);
    super.postWindowCreate();
}
The
ActionBarAdvisor
class is as of Eclipse 3.7 not important any more as the Action
framework is replaced by the superior command framework.
Each adviser allow to configure certain behavior of the application, e.g., the WorkbenchAdvisor allows to perform certain actions at startup or shutdown by overriding the preStartUp() and preShutdown() methods.
7. WorkbenchParts and Perspectives
7.1. WorkbenchParts - Views and Editors
As described earlier the WorkbenchWindow and the WorkbenchPage represent the visual and inner part of the graphical user interface.
The WorkbenchPage contains Parts that can be Views or Editors.
Views are used to display information in an RCP application; they can also be used to change data.
Views extend the abstract class ViewPart.
Editors extend the abstract EditorPart.
Both extend WorkbenchPart.
An editor typically requires that the user explicitly select "save" to apply the changes to the data while a view typically changes the data immediately.
All editors are opened in the same area. Via the perspective you can configure if the editor area is visible or not.
Views and Editors are defined via extension points in the file plugin.xml via the tab Extensions.
Views are defined via the extension point org.eclipse.ui.views and Editors via the extension point org.eclipse.ui.editors.
Views must implement the createPartControl() and setFocus() methods.
createPartControl() is used to create the UI components of the View.
createPartControl() will get as parameter a Composite that can be used to construct the user interface.
This composite has by default a FillLayout layout manager assigned to it.
This layout manager assigns the same space to all components equally.
setFocus() must set the focus to a specific UI component.
7.2. Perspective
A Perspective describes a certain configuration of Views and Editors.
A Perspective is defined via the org.eclipse.ui.perspectives extension point.
The WorkbenchParts that are part of a Perspective are either defined via a Java class defined in the extension point org.eclipse.ui.perspectives or via the org.eclipse.ui.perspectiveExtensions.
public class Perspective implements IPerspectiveFactory {
    public void createInitialLayout(IPageLayout layout) {
        layout.addView("de.vogella.rcp.intro.first.MyView", IPageLayout.TOP,
                IPageLayout.RATIO_MAX, IPageLayout.ID_EDITOR_AREA);
    }
}
layout.addView() adds a view to the perspective.
You can add placeholders for views via the layout.addPlaceholder() method call.
This methods accepts wildcards and a View with a matching ID would open in this area.
For example, if you want to open all views in a specific place you could use the layout.addPlaceholder("*",…) method call, or layout.addPlaceholder("view_id",….) to open a View with the "view_id" ID in this placeholder.
You can group view via a IFolderLayout that can be created via layout.createFolder() call and by adding Views to this folder via the addView(id) method on IFolderLayout.
8. Tutorial: Adding Views to your application
8.1. Create a view
The following will explain how to add views to your application.
We will continue to use the RCP project de.vogella.rcp.intro.first.
Add the extension "org.eclipse.ui.views" to your plug-in.
Open the plugin.xml file and the tab Extentions.
Right-click on your new view extension and select .
Maintain id de.vogella.rcp.intro.view.MyView as ID and the class de.vogella.rcp.intro.view.MyView.


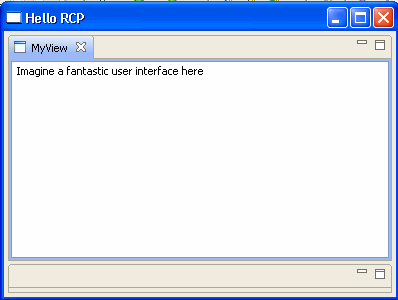
Create the class "MyView" by clicking on the "class" hyperlink and maintain the following code. Afterwards, your view is ready to be used.
package de.vogella.rcp.intro.first;

import org.eclipse.swt.SWT;
import org.eclipse.swt.widgets.Composite;
import org.eclipse.swt.widgets.Text;
import org.eclipse.ui.part.ViewPart;

public class MyView extends ViewPart {

    @Override
    public void createPartControl(Composite parent) {
        Text text = new Text(parent, SWT.BORDER);
        text.setText("Imagine a fantastic user interface here");
    }

    @Override
    public void setFocus() {
    }
}
8.2. Add the view to your perspective
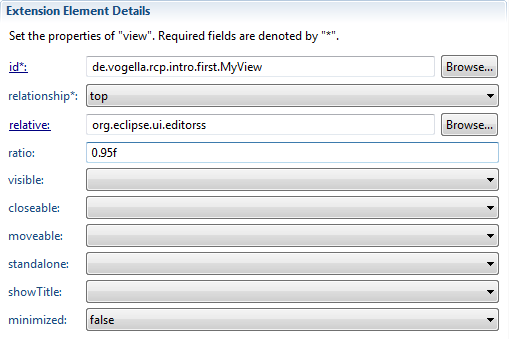
You have to add the view to your perspective. Add the extension "org.eclipse.ui.perspectiveExtensions" to your plugin.
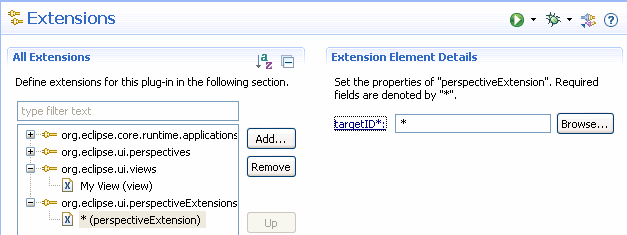
Right-click "*(perspectiveExtension)" .
Maintain your view id de.vogella.rcp.intro.first.MyView.
Make the view relative to org.eclipse.ui.editors which is the currently invisible editor area and make the view use all the space by selecting the maximum ratio of 0.95f.
8.4. Add view to perspective via code
I personally prefer extension points over code. Instead of using the extension point "org.eclipse.ui.perspectiveExtensions" you could add the view via code to the perspective. For this modify "Perspective.java" to the following.
package de.vogella.rcp.intro.view;

import org.eclipse.ui.IPageLayout;
import org.eclipse.ui.IPerspectiveFactory;

public class Perspective implements IPerspectiveFactory {

    public void createInitialLayout(IPageLayout layout) {
        layout.addView("de.vogella.rcp.intro.first.MyView", IPageLayout.TOP,
                IPageLayout.RATIO_MAX, IPageLayout.ID_EDITOR_AREA);
    }
}
9. Tutorial: Adding an Perspectives
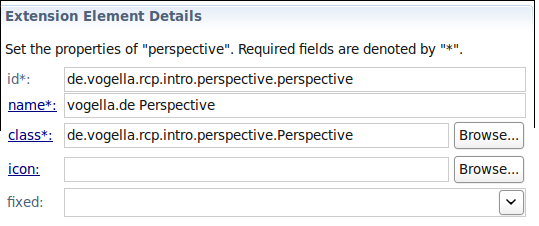
Create a new RCP project called "de.vogella.rcp.intro.perspective". Use the "RCP application with a view" as a template. In plugin.xml add a new extension point "org.eclipse.ui.perspectives". Give the perspective with the id "de.vogella.rcp.intro.perspective.perspective" and the name "vogella.com Perspective". Change the class name to "de.vogella.rcp.intro.perspective.Perspective".
Click on the "class*" link to create the class. The
createInitialLayout() method in your new class is
responsible for creating the
new perspective. We reuse the existing
view in the coding. After this
step the perspective is defined but
not yet reachable via the
application.
package de.vogella.rcp.intro.perspective;

import org.eclipse.ui.IPageLayout;
import org.eclipse.ui.IPerspectiveFactory;

public class Perspective implements IPerspectiveFactory {

    public void createInitialLayout(IPageLayout layout) {
        String editorArea = layout.getEditorArea();
        layout.setEditorAreaVisible(false);
        layout.setFixed(true);
        layout.addStandaloneView(View.ID,  false, IPageLayout.LEFT, 1.0f, editorArea);
    }

}
After defining your perspective you need to enable your application so that the user can select this perspective.
One alternative is to allow the user to select the perspective via the toolbar / coolbar. You can activate the switch between perspectives the ApplicationWorkbenchWindowAdvisor in method preWindowOpen() with configurer.setShowPerspectiveBar(true);
package de.vogella.rcp.intro.perspective;

import org.eclipse.swt.graphics.Point;
import org.eclipse.ui.application.ActionBarAdvisor;
import org.eclipse.ui.application.IActionBarConfigurer;
import org.eclipse.ui.application.IWorkbenchWindowConfigurer;
import org.eclipse.ui.application.WorkbenchWindowAdvisor;

public class ApplicationWorkbenchWindowAdvisor extends WorkbenchWindowAdvisor {

    public ApplicationWorkbenchWindowAdvisor(
            IWorkbenchWindowConfigurer configurer) {
        super(configurer);
    }

    public ActionBarAdvisor createActionBarAdvisor(
            IActionBarConfigurer configurer) {
        return new ApplicationActionBarAdvisor(configurer);
    }

    public void preWindowOpen() {
        IWorkbenchWindowConfigurer configurer = getWindowConfigurer();
        configurer.setInitialSize(new Point(400, 300));
        configurer.setShowStatusLine(false);
        configurer.setTitle("RCP Application");
        configurer.setShowPerspectiveBar(true);
    }
}
You should now be able to select your perspective interactively.
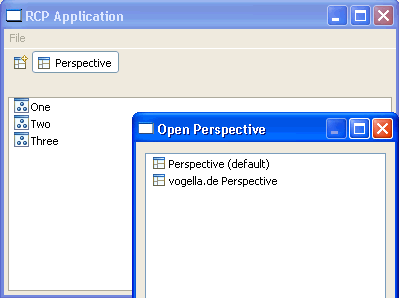
In addition, you could reuse the Eclipse command "org.eclipse.ui.perspectives.showPerspective" that allows to switch between perspectives. See https://www.vogella.com/tutorials/EclipseCommands/article.html - Eclipse Commands.
10. Tutorial: System Tray
The following add an icon for the RCP application to the system tray and adds a menu to this icon. We add the functionality that if the window is minimized then the program is not visible in the taskpane (only via the tray icon).

Create a new project "de.vogella.rcp.intro.traytest". Use the "Hello RCP" as a template. Open the class "ApplicationWorkbenchWindowAdvisor" and maintain the following code.
package de.vogella.rcp.intro.traytest;
import org.eclipse.swt.SWT;
import org.eclipse.swt.events.MenuDetectEvent;
import org.eclipse.swt.events.MenuDetectListener;
import org.eclipse.swt.events.SelectionAdapter;
import org.eclipse.swt.events.SelectionEvent;
import org.eclipse.swt.events.ShellAdapter;
import org.eclipse.swt.events.ShellEvent;
import org.eclipse.swt.graphics.Image;
import org.eclipse.swt.graphics.Point;
import org.eclipse.swt.widgets.Menu;
import org.eclipse.swt.widgets.MenuItem;
import org.eclipse.swt.widgets.Shell;
import org.eclipse.swt.widgets.Tray;
import org.eclipse.swt.widgets.TrayItem;
import org.eclipse.ui.IWorkbenchWindow;
import org.eclipse.ui.application.ActionBarAdvisor;
import org.eclipse.ui.application.IActionBarConfigurer;
import org.eclipse.ui.application.IWorkbenchWindowConfigurer;
import org.eclipse.ui.application.WorkbenchWindowAdvisor;
public class ApplicationWorkbenchWindowAdvisor extends WorkbenchWindowAdvisor {
private IWorkbenchWindow window;
private TrayItem trayItem;
private Image trayImage;
public ApplicationWorkbenchWindowAdvisor(
IWorkbenchWindowConfigurer configurer) {
super(configurer);
}
public ActionBarAdvisor createActionBarAdvisor(
IActionBarConfigurer configurer) {
return new ApplicationActionBarAdvisor(configurer);
}
public void preWindowOpen() {
IWorkbenchWindowConfigurer configurer = getWindowConfigurer();
configurer.setInitialSize(new Point(400, 300));
configurer.setShowCoolBar(false);
configurer.setShowStatusLine(false);
configurer.setTitle("Hello RCP"); //$NON-NLS-1$
}
// As of here is the new stuff
@Override
public void postWindowOpen() {
super.postWindowOpen();
window = getWindowConfigurer().getWindow();
trayItem = initTaskItem(window);
// Some OS might not support tray items
if (trayItem != null) {
minimizeBehavior();
// create exit and about action on the icon
hookPopupMenu();
}
}
// add a listener to the shell
private void minimizeBehavior() {
window.getShell().addShellListener(new ShellAdapter() {
// If the window is minimized hide the window
public void shellIconified(ShellEvent e) {
window.getShell().setVisible(false);
}
});
// If user double-clicks on the tray icons the application will be
// visible again
trayItem.addSelectionListener(new SelectionAdapter() {
@Override
public void widgetSelected(SelectionEvent e) {
Shell shell = window.getShell();
if (!shell.isVisible()) {
window.getShell().setMinimized(false);
shell.setVisible(true);
}
}
});
}
// We hook up on menu entry which allows to close the application
private void hookPopupMenu() {
trayItem.addMenuDetectListener(new MenuDetectListener() {
@Override
public void menuDetected(MenuDetectEvent e) {
Menu menu = new Menu(window.getShell(), SWT.POP_UP);
// creates a new menu item that terminates the program
MenuItem exit = new MenuItem(menu, SWT.NONE);
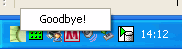
exit.setText("Goodbye!");
exit.addSelectionListener(new SelectionAdapter() {
@Override
public void widgetSelected(SelectionEvent e) {
window.getWorkbench().close();
}
});
// make the menu visible
menu.setVisible(true);
}
});
}
// This methods create the tray item and return a reference
private TrayItem initTaskItem(IWorkbenchWindow window) {
final Tray tray = window.getShell().getDisplay().getSystemTray();
TrayItem trayItem = new TrayItem(tray, SWT.NONE);
trayImage = Activator.getImageDescriptor("/icons/alt_about.gif")
.createImage();
trayItem.setImage(trayImage);
trayItem.setToolTipText("TrayItem");
return trayItem;
}
// clean-up after ourself
@Override
public void dispose() {
if (trayImage != null) {
trayImage.dispose();
}
if (trayItem != null) {
trayItem.dispose();
}
}
}Run your application and see that you have a system tray icon. Test the menu and the minimized behavior. If the application is minimized it should not be visible in the taskbar but only in the system tray.
11. WorkbenchAPI
TointeractwiththeWorkbenchyouhaveaccesstotheWorkbench API.Forexampleyoucanaccesstheactiveeditororviewandopenor closeViewsandEditors.
MostAPIcallsaredoneviatheWorkbenchPage. AcommandhandlercangetaccesstotheWorkbenchPagevia:
IWorkbenchPage page = HandlerUtil.getActiveWorkbenchWindow(event).getActivePage();AviewprovidesaccesstotheWorkbenchandtheWorkbenchWindow viathegetViewSite()method.Aneditorprovidesthesameaccessvia getEditorSite().
IWorkbenchPage page = getViewSite().getPage();IWorkbenchPage page = getEditorSite().getPage();YoucouldalsogettheWorkbenchpageoverthePlatformUI Singleton.
IWorkbenchPage page = PlatformUI.getWorkbench().getActiveWorkbenchWindow().getActivePage()OnceyouhaveaccesstothePageyoucancallitsAPI.The followingdemonstrateshowtofirstcloseallviewsintherunning applicationandhowtoopenaViewwithaspecificID.
IViewReference[] views = page.getViewReferences();
    for (IViewReference view : views) {
        page.hideView(view);
    }
    try {
        page.showView(View.ID);
    } catch (PartInitException e) {
        e.printStackTrace();
    }
return null;
Thefollowingshowshowtosaveaneditorandhowtocloseit.
IEditorPart editorPart = page.getActiveEditor();
    if (editorPart != null) {
        // save the editor without confirmation
        page.saveEditor(editorPart, false);
        // Close the editor and save before saving
        page.closeEditor(editorPart, true);
    }
YoucanalsoaddaPartListenertothepageandlistenfor changeinViewandEditors.Hereisanexamplehowtoaddsucha listenerinApplicationWorkbenchWindowAdvisor.
@Override
    public void postWindowOpen() {
        super.postWindowOpen();
        IWorkbenchPage page = PlatformUI.getWorkbench()
                .getActiveWorkbenchWindow().getActivePage();

        // Register a part listener for a certain View / Part

        page.addPartListener(new IPartListener2() {
            @Override
            public void partVisible(IWorkbenchPartReference partRef) {
                System.out.println("Part visible: " + partRef.getId());
            }

            @Override
            public void partOpened(IWorkbenchPartReference partRef) {
                System.out.println("Part opened: " + partRef.getId());
            }

            @Override
            public void partInputChanged(IWorkbenchPartReference partRef) {
            }

            @Override
            public void partHidden(IWorkbenchPartReference partRef) {
                System.out.println("Part hidden: " + partRef.getId());
            }

            @Override
            public void partDeactivated(IWorkbenchPartReference partRef) {
                System.out.println("Part deactivated:" + partRef.getId());
            }

            @Override
            public void partClosed(IWorkbenchPartReference partRef) {
                System.out.println("Part closed:" + partRef.getId());
            }

            @Override
            public void partBroughtToTop(IWorkbenchPartReference partRef) {
                System.out.println("Part top:" + partRef.getId());
            }

            @Override
            public void partActivated(IWorkbenchPartReference partRef) {
                System.out.println("Part activated: " + partRef.getId());
            }
        });
    }
12. Tips and Tricks
12.1. Load an image from your plugin
To load an image from your plug-in your use the AbstractUIPlugin.
AbstractUIPlugin.imageDescriptorFromPlugin(“YourPluginId”,”/icons/your.gif”).createImage();Alternatively, you could load the framework directly.
Bundle bundle = FrameworkUtil.getBundle(this.getClass());
URL url = FileLocator.find(bundle,  new Path("icons/alt_window_32.svg"), null);
Image image = ImageDescriptor.createFromURL(url).createImage();
12.2. Save users layout
To remember the user’s layout and window size for the next time you start your application, add configurer.setSaveAndRestore(true); to the initialize method of ApplicationWorkbenchAdvisor.
package addactiontoview;

import org.eclipse.ui.application.IWorkbenchConfigurer;
import org.eclipse.ui.application.IWorkbenchWindowConfigurer;
import org.eclipse.ui.application.WorkbenchAdvisor;
import org.eclipse.ui.application.WorkbenchWindowAdvisor;

public class ApplicationWorkbenchAdvisor extends WorkbenchAdvisor {

    private static final String PERSPECTIVE_ID = "AddActiontoView.perspective";

    public WorkbenchWindowAdvisor createWorkbenchWindowAdvisor(
            IWorkbenchWindowConfigurer configurer) {
        return new ApplicationWorkbenchWindowAdvisor(configurer);
    }

    public String getInitialWindowPerspectiveId() {
        return PERSPECTIVE_ID;
    }

    @Override
    public void initialize(IWorkbenchConfigurer configurer) {
        super.initialize(configurer);
        configurer.setSaveAndRestore(true);
    }

}
Eclipse has a predefined command to reset the perspective. See the Eclipse Commands tutorial.
12.3. Accessing the status line
The status line in an RCP application can be used to give the user some information about the running application. The shared message area can be used by all parts of the application to write messages to this area. The whole RCP application has access to the information in the shared status line therefore the information in the shared status line might be overwritten.
To show the status line in your RCP application use the "ApplicationWorkbenchWindowAdvisor" and set the status line visible in the method preWindowOpen().
public class ApplicationWorkbenchWindowAdvisor extends WorkbenchWindowAdvisor {
    //...
    @Override
    public void preWindowOpen() {
        // ....
        configurer.setShowStatusLine(false);
    }
}
The following writes a text to the status line from a view.
IStatusLineManager manager = getViewSite().getActionBars().getStatusLineManager();
manager.setMessage("Information for the status line");
From an editor you can access the status line via the following:
IEditorPart.getEditorSite().getActionBars();12.4. Finding unused dependencies
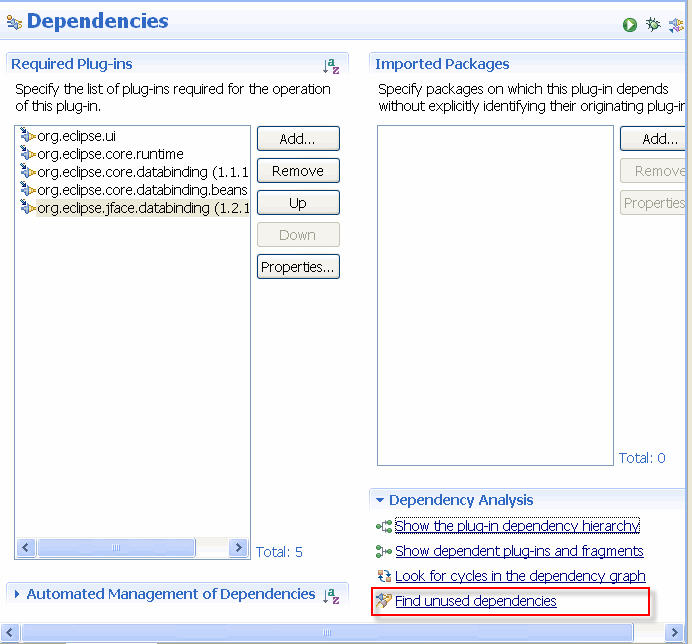
In the file plugin.xml (tab dependencies) you define on which plugins your plug-in depends. Of course you should only define the required plugins here. You can check if you have unused dependencies, by selecting Dependency Analysis → Find unused dependencies.
12.5. Multi-User settings
Eclipse RCP applications save configuration files in the folder ".metadata". In the standard settings the Eclipse RCP installation directory will be used for this folder. If several users are using the same installation folder, then you should supply the parameter "-data" to specify an alternative location. If you specify the value "@user.home/applicationname" the configuration will be saved in a user specific folder.
13. Recipes
This chapter contains a few recipes for typical development tasks and some additional background material.
13.1. Reading resources from plug-ins
You can access files in your plug-in via two different approaches:
-
via the
FileLocatorclass or -
via an Eclipse specific URL.
Both approaches require that your plug-in defines a dependency on the org.eclipse.core.runtime plug-in.
Both approaches return a URL that can be used to get an InputStream.
The following code shows an example with FileLocator.
Bundle bundle = FrameworkUtil.getBundle(this.getClass());
URL url = FileLocator.find(bundle,  new Path("path_to_file"));
The following code shows an example of the usage of the Eclipse specific URL.
URL url = null;

try {

  url = new URL("platform:/plugin/"
    + "your_bundle-symbolicname"
    + "path_to_file");

    } catch (MalformedURLException e1) {
      e1.printStackTrace();
}
Using the URL to create an InputStream and to read the file is demonstrated in the next code example.
public static String readTextFile(URL url) throws IOException {
    StringBuilder output = new StringBuilder();
    String lineSeperator = System.lineSeparator();

    try ( InputStream in = url.openConnection().getInputStream();
          BufferedReader br = new BufferedReader(new InputStreamReader(in)) ) {

        String inputLine;

        while ((inputLine = br.readLine()) != null ) {
            output.append(inputLine).append(lineSeperator);
        }

      if (output.length()>0) {
        // remove last line separator
        output.setLength(output.length() - lineSeperator.length());
      }
     }

    return output.toString();
}
13.2. Loading images from a plug-in
The ImageDescriptor class has a static method to create an ImageDescriptor instance directly from a URL.
ImageDescriptor is a light-weight representation of an Image.
Via the createImage() you can create the Image instance.
@Override
public Image loadImage(Class<Object> clazz, String path) {
    Bundle bundle = FrameworkUtil.getBundle(this.getClass());
    URL url = FileLocator.find(bundle, new Path("icons/alt_window_32.png"));

    ImageDescriptor imageDescr = ImageDescriptor.createFromURL(url);
    return imageDescr.createImage();
}
13.3. vogella Java example code
If you need more assistance we offer Online Training and Onsite training as well as consulting