This tutorial describes how to write unit and instrumentation tests for your Android application. It describes how to execute these tests via Android studio and Gradle. This tutorial assumes that you are familiar with Android programming in general.
1. Introduction to Android testing
1.1. Testing Android applications
Android applications run on a variety of devices. The Android framework and the surrounding open-source frameworks evolve at a high speed. To ensure that you application works well, it is import to write software tests. This helps you to enhance and maintain the Android application.
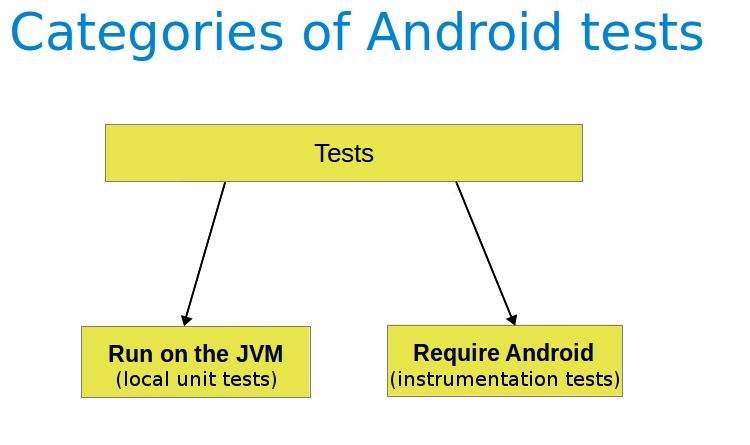
Unit testing for Android can be classified into:
-
Local unit tests - tests that can run on the JVM.
-
Instrumented unit tests - tests that require the Android system.
Local unit tests run much faster compared to the time required to deploy and run tests on an Android device. Prefer writing local unit tests and only run tests on Android, if you require a real Android system.
If you write local unit test and have dependencies to Android API, you need to replace them, e.g., via a mocking framework like Mockito.
1.2. What to test on Android applications
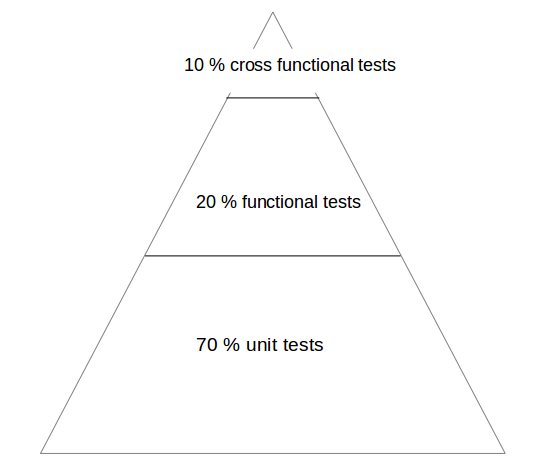
Your test should focus on the business logic of your application. A good rule of thumb is to have the following distribution of tests:
-
70-80 % unit tests to ensure stability of your code basis
-
20-30 % functional tests to ensure that the application works
-
some cross functional tests if your application integrates intensively with other Application components
You should test your application at least on one device with the lowest possible configuration. In addition, you should test on one device with the highest available configuration, e.g., pixel density, screen resolution to ensure that it works fine on these devices.
1.3. Tooling support for Android testing
The Android Testing Support library (ATSL) project from Google provides tooling for Android testing.
For example, it (AndroidJUnitRunner).
|
If you run local unit tests, a special version of the android.jar (also known as the |
The library provides a JUnit 4-compatible test runner (AndroidJUnitRunner), the Espresso test framework and the UI Automator test framework.
Espresso test framework can be used to test the User Interface of your application.
UI Automator allows to write cross application functional tests.
AndroidJunitRunner provides access to the instrumentation API, via the InstrumentationRegistery.
-
InstrumentationRegistry.getInstrumentation(), returns theInstrumentationcurrently running. -
InstrumentationRegistry.getContext(), returns theContextof this Instrumentation’s package. -
InstrumentationRegistry.getTargetContext(), returns the applicationContextof the target application. -
InstrumentationRegistry.getArguments(), returns a copy of argumentsBundlethat was passed to this Instrumentation. This is useful when you want to access the command line arguments passed to the instrumentation for your test.
It also gives access to the lifecycle via the ActivityLifecycleMonitorRegistry.
1.4. Android project organization for tests
The following is the default directory structure for your application and test code:
-
app/src/main/java- for your source code of your main application build -
app/src/test/java- for any unit test that can run on the JVM -
app/src/androidTest/java- for any test which should run on an Android device
If you follow this conversion, the Android build system runs your tests on the correct target (JVM or Android device).
|
Solving the "error duplicate files in path" error
If you receive the following error message: "error duplicate files in path. Path in archive: LICENSE.txt" you can add the following to your |
2. Android unit testing
2.1. Unit testing in Android
A unit test verifies in isolation the functionality of a certain component. For example, assume a button in an Android activity is used to start another activity. A unit test would determine if the corresponding intent was issued, not if the second activity was started
A unit tests for an Android application can be:
-
local unit test - which runs on the JVM
-
Android unit test - which runs on the Android runtime
If they run on the JVM, they are executed against a modified version of the android.jar Android library.
In this version all final modifiers have been stripped off.
This makes it easier to use mocking libraries, like Mockito.
The local unit tests of an Android project should be located in the app/src/test folder.
2.2. Required dependencies in the Gradle build file
To use JUnit tests for your Android application, you need to add it as dependency to your Gradle build file.
dependencies {
    // Unit testing dependencies
    testCompile 'junit:junit:4.12'
    // Set this dependency if you want to use the Hamcrest matcher library
    testCompile 'org.hamcrest:hamcrest-library:1.3'
    // more stuff, e.g., Mockito
}
2.3. Running the unit tests
2.3.1. Using Gradle
Run your unit tests with the gradlew test command.
2.3.2. Using Android Studio
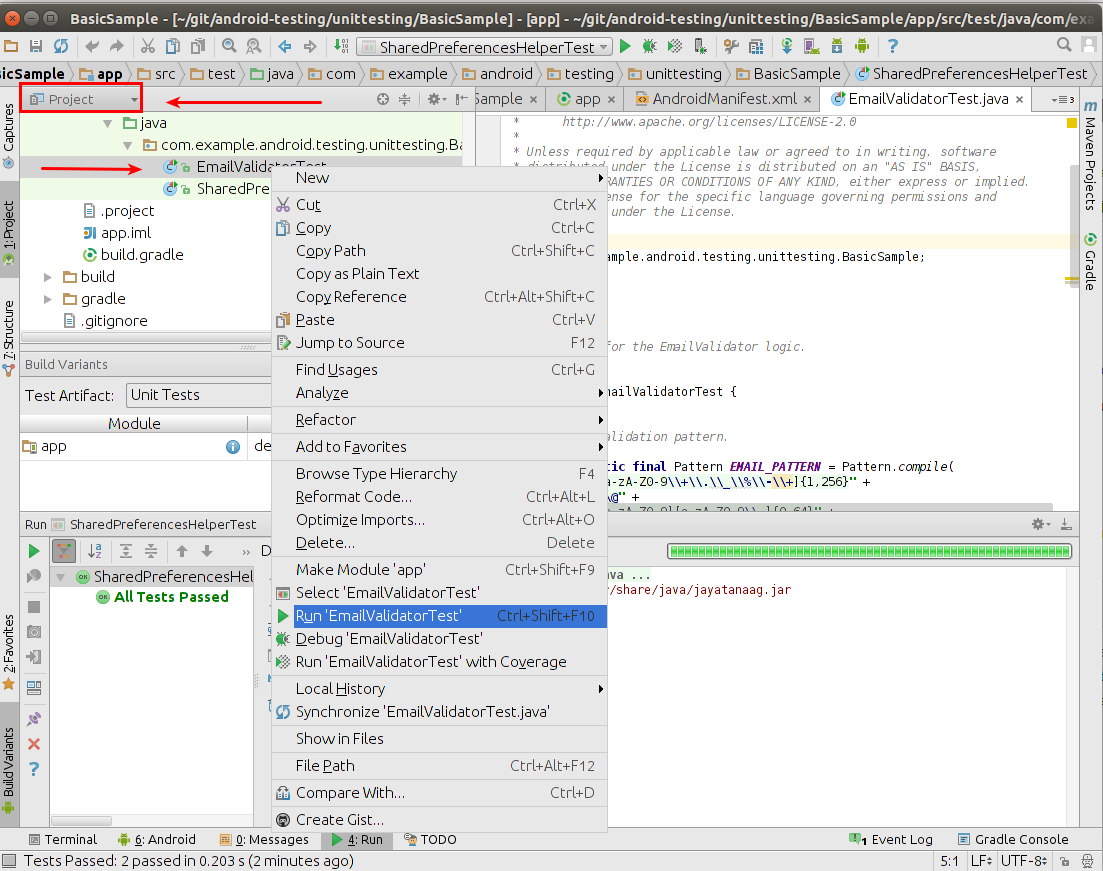
To run a unit test, right-click on your test class in the Project window and select Run.
2.4. Location of test reports
The Test reports are created in the app/build/reports/tests/debug/ directory.
The index.html gives an overview and links to the individual test pages.
2.5. Activating default return values for mocked methods in android.jar
By default, all calls to methods in the modified android.jar file throw exceptions.
This default should ensure that your unit tests only test your code and do not depend on any particular behavior of the Android platform.
If you want to configure a certain behavior, you can use a mocking framework to replace these call.
You can also instruct the Gradle build system to return default values for method calls in the `android.jar`with the following configuration in your Gradle build file.
android {
  // ...
  testOptions {
    unitTests.returnDefaultValues = true
  }
}
3. Exercise: Create unit test
In this exercise, you learn how to create a simple JUnit4 test for an Android project.
3.1. Preparation: Create Android project
Create the Android project as described in Android temperature converter.
3.2. Add JUnit dependency
Ensure you have the dependency to Junit in your app/build.gradle file.
dependencies {
    // Unit testing dependencies
    testImplementation 'junit:junit:4.12'
}
3.3. Create test
In your app/src/test directory create the following two test methods for the ConverterUtil class.
package com.vogella.android.temperature.test;

import static org.junit.Assert.*;

import org.junit.After;
import org.junit.Before;
import org.junit.Test;

import com.vogella.android.temperature.ConverterUtil;

public class ConverterUtilTest {

    @Test
    public void testConvertFahrenheitToCelsius() {
        float actual = ConverterUtil.convertCelsiusToFahrenheit(100);
        // expected value is 212
        float expected = 212;
        // use this method because float is not precise
        assertEquals("Conversion from celsius to fahrenheit failed", expected, actual, 0.001);
    }

    @Test
    public void testConvertCelsiusToFahrenheit() {
        float actual = ConverterUtil.convertFahrenheitToCelsius(212);
        // expected value is 100
        float expected = 100;
        // use this method because float is not precise
        assertEquals("Conversion from celsius to fahrenheit failed", expected, actual, 0.001);
    }

}
3.4. Run unit tests
Ensure your unit tests are correctly implemented by running test tests. They should run successfully.
4. Writing tests to run on the Android device
4.1. Instrumentation tests
The Android testing API provides hooks into the Android component and application lifecycle. These hooks are called the instrumentation API and allow your tests to control the lifecycle and user interaction events.
Under normal circumstances your application cannot control the lifecycle events and the user drives the application.
For example, if Android creates your activity the onCreate() method is called.
Or if the user presses a button your corresponding code is called.
Via instrumentation you can control these events via your test code.
For example, your instrumentation test can start the activity.
Afterwards, it can call the finish() and restart the activity to test if the instance state of the activity is correctly restored.
Instrumented unit tests are unit tests that run on Android devices and emulators instead of running on the Java Virtual Machine.
These tests have access to the real device and its resources and are useful to unit test functionality that cannot be easily mocked by mocking frameworks.
An example is a test which validates a Parcelable implementation.
An instrumentation-based test class allows you to send key events (or touch events) to the application under test.
With user interface testing framework like Espresso, the developer rarely has to use the instrumentation API directly.
4.2. How the Android system executes tests
The InstrumentationTestRunner is the base test runner for Android tests.
This test runner starts and loads the test methods.
Via the instrumentation API it communicates with the Android system.
If you start a test for an Android application, the Android system kills any process of the application under test and then loads a new instance.
It does not start the application, this is the responsibility of the test methods.
The test method controls the lifecycle of the components of the application.
The test runner also calls the onCreate() method of the application and activity under test during its initialization.
4.3. Mocking objects in Android
The mocking framework Mockito can also be used for instrumentation tests. This allows you to replace parts of the Android system that are not interesting for the test. The Android framework provided in the past specialized mocking classes but these are not necessary anymore.
4.4. Location of instrumentation tests
As described in Android project organization for tests the unit tests of an Android project should be located in the app/src/androidTest/java folder.
4.5. Define dependencies and testInstrumentationRunner in the Gradle build file
To use JUnit tests for your Android application you need to add the dependency to JUnit to your Gradle build file.
You also need to specify android.support.test.runner.AndroidJUnitRunner as testInstrumentationRunner in the build file.
defaultConfig {
       ..... more stuff
        testInstrumentationRunner "android.support.test.runner.AndroidJUnitRunner"
    }

dependencies {
    // Unit testing dependencies
    androidTestCompile 'junit:junit:4.12'
    // Set this dependency if you want to use the Hamcrest matcher library
    androidTestCompile 'org.hamcrest:hamcrest-library:1.3'
    // more stuff, e.g., Mockito
}
4.6. Using the @RunWith(AndroidJUnit4.class)
It is also recommended annotating the test with the @RunWith(AndroidJUnit4.class) annotation.
AndroidJUnit4 extends JUnit4, so if you use pure Junit4 syntax and ActivityTestRule it is not required.
But you need it, if you want to run, i.e., Espresso tests with ActivityTestRule and JUnit4.
4.7. Run the tests on Android
Run your local unit tests via Gradle with the gradlew connectedCheck command.
To run your local unit tests via Android Studio, right-click on your test class in the Project window and select Run.
4.8. Location of test reports
The test reports are created in the app/build/reports/androidTests/connected/ directory.
The index.html gives an overview and links to the individual test pages.
4.9. How to replace the application for instrumentation tests
You can replace the application class for the instrumentation tests by overriding the AndroidJUnitRunner and its newApplication method.
package com.vogella.android.daggerjunitmockito;

import android.app.Application;


public class MyMockApplication extends Application {

    @Override
    public void onCreate() {
       // do something important for your tests here
    }
}
Test runner
package com.vogella.android.daggerjunitmockito;

import android.app.Application;
import android.content.Context;
import android.support.test.runner.AndroidJUnitRunner;

public class MockTestRunner extends AndroidJUnitRunner {
  @Override
  public Application newApplication(ClassLoader cl, String className, Context context)
      throws InstantiationException, IllegalAccessException, ClassNotFoundException {
    return super.newApplication(cl, MyMockApplication.class.getName(), context);
  }
}
And you need to register this test runner in your build.gradle file.
android {
    /// more
        testInstrumentationRunner "com.vogella.android.daggerjunitmockito.MockTestRunner"
    }
    /// more
}
5. Exercise: Write Android instrumentation test and use mocking
This exercise demonstrates the usage of the Mockito framework for Android tests.
5.1. Create class to test
Add the following utility class.
package com.vogella.android.test.juntexamples.util;

import android.content.Context;

import java.io.FileOutputStream;

public class WriteConfigurationUtil {
    public static void writeConfiguration(Context ctx ) {
        try (FileOutputStream openFileOutput =
             ctx.openFileOutput( "config.txt", Context.MODE_PRIVATE);) {

            openFileOutput.write("This is a test1.".getBytes());
            openFileOutput.write("This is a test2.".getBytes());
        } catch (Exception e) {
            // not handled
        }
    }
}
5.2. Create a new unit test
Write a unit test which validates that:
* openFileOutput is called exactly once
* the write() method is called at least twice.
package com.vogella.android.test.juntexamples.mockitotests;


import android.content.Context;

import com.vogella.android.test.juntexamples.util.Util;

import org.junit.Rule;
import org.junit.Test;
import org.mockito.Mock;
import org.mockito.junit.MockitoJUnit;
import org.mockito.junit.MockitoRule;

import java.io.FileOutputStream;

import static org.junit.Assert.fail;
import static org.mockito.Matchers.any;
import static org.mockito.Matchers.anyInt;
import static org.mockito.Matchers.anyString;
import static org.mockito.Mockito.atLeast;
import static org.mockito.Mockito.times;
import static org.mockito.Mockito.verify;
import static org.mockito.Mockito.when;

public class WriteConfigurationUtilTest {

    @Rule
    public MockitoRule rule = MockitoJUnit.rule();
    @Mock
    Context context;

    @Mock
    FileOutputStream fileOutputStream;


    @Test
    public void writeShouldWriteTwiceToFileSystem() {
        try {
            when(context.openFileOutput(anyString(), anyInt())).thenReturn(fileOutputStream);
            Util.writeConfiguration(context);
            verify(context, times(1)).openFileOutput(anyString(), anyInt());
            verify(fileOutputStream, atLeast(2)).write(any(byte[].class));

        } catch (Exception e) {
            e.printStackTrace();
            fail();
        }
    }
}|
This test requires a dependency to the Mockito test framework. |
6. More on Android testing
6.1. Test groups
The @SmallTest, @MediumTest and @LargeTest annotations allows to classify tests.
This allows you to run, for example, only short running tests. You may run your long running tests on a continuous integration server.
To run only selected tests you can configure the InstrumentationTestRunner via your Gradle plug-in.
The following listing is an example for your build.gradle file to run only the tests annotated with @SmallTests.
android {
  //....
  defaultConfig {
  //....
    testInstrumentationRunner "android.support.test.runner.AndroidJUnitRunner"
    testInstrumentationRunnerArgument "size", "small"
  }
}
import android.test.suitebuilder.annotation.MediumTest;
import android.test.suitebuilder.annotation.SmallTest;
import org.junit.Test;
public class ExampleTest {
@Test
@SmallTest
public void validateSecondActivity() {
// Do something not so long...
}
@Test
@MediumTest
public void validateSecondActivityAgain() {
// Do something which takes more time....
}
}6.2. Test filtering
You can annotate tests with annotations. The Android test runner allows to filter these tests.
| Annotation | Description |
|---|---|
@RequiresDevice |
Specifies that the test should run only on physical devices, not on emulators. |
@SdkSupress |
@SDKSupress(minSdkVersion=18) |
6.3. Flaky tests
Actions in Android are sometimes time dependent.
To tell Android to repeat a test once it fails, use the @FlakyTest annotation.
Via the tolerance attribute of this annotation you can define how many times the test should be repeated before marking it as failed.
7. Testing Android components
7.1. Activity testing
To test an activity, you use the ActivityTestRule class provided by the Android Testing Support Library.
This rule provides functional testing of a single activity. The activity under test will be launched before each test annotated with @Test and before any method annotated with @Before. It will be terminated after the test is completed and all methods annotated with @After are finished. The Activity under Test can be accessed during your test by calling ActivityTestRule#getActivity().
package com.vogella.android.test.examples;

import android.support.test.filters.MediumTest;
import android.support.test.rule.ActivityTestRule;
import android.support.test.runner.AndroidJUnit4;
import android.view.View;
import android.widget.ArrayAdapter;
import android.widget.ListAdapter;
import android.widget.ListView;

import org.junit.Rule;
import org.junit.Test;
import org.junit.runner.RunWith;

import static org.hamcrest.Matchers.greaterThan;
import static org.hamcrest.Matchers.instanceOf;
import static org.hamcrest.Matchers.notNullValue;
import static org.junit.Assert.assertThat;

@MediumTest
@RunWith(AndroidJUnit4.class)
public class MainActivityTest {

   @Rule
   public ActivityTestRule<MainActivity> rule  = new  ActivityTestRule<>(MainActivity.class);

    @Test
    public void ensureListViewIsPresent() throws Exception {
        MainActivity activity = rule.getActivity();
        View viewById = activity.findViewById(R.id.listview);
        assertThat(viewById,notNullValue());
        assertThat(viewById, instanceOf(ListView.class));
        ListView listView = (ListView) viewById;
        ListAdapter adapter = listView.getAdapter();
        assertThat(adapter, instanceOf(ArrayAdapter.class));
        assertThat(adapter.getCount(), greaterThan(5));

    }
}
To configure the intent which is used to start the activity, override ActivityTestRule#getActivityIntent.
package com.vogella.android.test.examples;

import android.content.Intent;
import android.support.test.InstrumentationRegistry;
import android.support.test.filters.MediumTest;
import android.support.test.rule.ActivityTestRule;
import android.support.test.runner.AndroidJUnit4;
import android.view.View;
import android.widget.ListView;
import android.widget.TextView;

import org.junit.Rule;
import org.junit.Test;
import org.junit.runner.RunWith;

import static org.hamcrest.Matchers.instanceOf;
import static org.hamcrest.Matchers.is;
import static org.hamcrest.Matchers.notNullValue;
import static org.junit.Assert.assertThat;

@MediumTest
@RunWith(AndroidJUnit4.class)
public class SecondActivityTest {

    @Rule
   public ActivityTestRule<SecondActivity> rule  = new  ActivityTestRule<SecondActivity>(SecondActivity.class)
    {
        @Override
        protected Intent getActivityIntent() {
            InstrumentationRegistry.getTargetContext();
            Intent intent = new Intent(Intent.ACTION_MAIN);
            intent.putExtra("MYKEY", "Hello");
            return intent;
        }
    };

    @Test
    public void ensureIntentDataIsDisplayed() throws Exception {
        SecondActivity activity = rule.getActivity();

        View viewById = activity.findViewById(R.id.target);

        assertThat(viewById,notNullValue());
        assertThat(viewById, instanceOf(TextView.class));
        TextView textView = (TextView) viewById;
        assertThat(textView.getText().toString(),is("Hello"));
    }
}
7.2. Service testing
To test a service, you use the ServiceTestRule class provided by the Android Testing Support Library.
This rule provides a simplified mechanism to start and shutdown your service before and after your test. It guarantees that the service is successfully connected when starting (or binding to) a service. The service can be started (or bound) using one of the helper methods. It will automatically be stopped (or unbound) after the test completes and any methods annotated with @After are finished.
|
This rule doesn’t support IntentService, because it is automatically destroyed after the |
The following listing is an example of testing a service.
@RunWith(AndroidJUnit4.class)
@MediumTest
public class MyServiceTest {

    @Rule
    public final ServiceTestRule mServiceRule = new ServiceTestRule();

    // test for a service which is started with startService
    @Test
    public void testWithStartedService() {
        mServiceRule.
        startService(new Intent(InstrumentationRegistry.getTargetContext(),
                MyService.class));
        // test code
    }

    @Test
 // test for a service which is started with bindService
    public void testWithBoundService() {
        IBinder binder = mServiceRule.
                bindService(new Intent(InstrumentationRegistry.getTargetContext(),
                        MyService.class));
        MyService service = ((MyService.LocalBinder) binder).getService();
        assertTrue("True wasn't returned", service.doSomethingToReturnTrue());
    }
}
adb kill-server
adb start-server7.3. Receiver testing
Receivers can be tested directly. Assume the following receiver.
public class OutgoingCallReceiver extends BroadcastReceiver
{
@Override
public void onReceive(Context ctx, Intent i)
{
if(i.getAction().equalsIgnoreCase(Intent.ACTION_NEW_OUTGOING_CALL))
{
String phoneNum = i.getStringExtra(Intent.EXTRA_PHONE_NUMBER);
Intent intent = new Intent(ctx, MyActivity.class);
intent.putExtra("phoneNum", phoneNum);
intent.addFlags(Intent.FLAG_ACTIVITY_NEW_TASK);
ctx.startActivity(intent);
}
}
}You can test it, via an instrumented test and Mockito.
@Test
public void testStartActivity() {
// prepare data for onReceive and call it
Intent intent = new Intent(Intent.ACTION_NEW_OUTGOING_CALL);
intent.putExtra(Intent.EXTRA_PHONE_NUMBER, "01234567890");
mReceiver.onReceive(mContext, intent);
assertNull(mReceiver.getResultData());
// what did receiver do?
ArgumentCaptor<Intent> argument =
ArgumentCaptor.forClass(Intent.class);
verify(mContext, times(1)).startActivity(argument.capture());
Intent receivedIntent = argument.getValue();
assertNull(receivedIntent.getAction());
assertEquals("01234567890", receivedIntent.getStringExtra("phoneNum"));
assertTrue((receivedIntent.getFlags() &
Intent.FLAG_ACTIVITY_NEW_TASK) != 0);
}7.4. Content provider testing
To test a content provider, you use the ProviderTestCase2 class.
ProviderTestCase2 automatically instantiates the provider under test and inserts an IsolatedContext object.
This context is isolated from the Android system, but still allows file and database access.
The usage of the IsolatedContext object ensures that your provider test does not affect the real device.
ProviderTestCase2 also provides access to a MockContentResolver via the getMockContentResolver() method.
You should test all operations of the provider and also what happens if the provider is called with an invalid URI or with an invalid projection.
7.5. Loader testing
To test a loader, you use the LoaderTestCase class.
It is expected that a JUnit 4 rule will be provided in the future to replace this class.
8. Application testing
The application class contains the logic, data and settings that are relevant for the whole application. Therefore you should test this object, to ensure it works correctly.
You can write a JUnit 4 test for the application object and test it on the JVM. In this case you would mock all dependencies to the application object.
To test an Android application object on the Android runtime you use the ApplicationTestCase class.
It would be great if Google would provide a special JUnit4 rule for testing the application object, but at the moment this is not yet available.
The test runner of the Android tests (InstrumentationTestRunner) creates automatically an instance of application during its initialization phase.
If you do asynchronous processing in your onCreate method you should consider that.
9. Exercise: Testing the Android application
In this exercise, you learn how to write tests for your application object.
9.1. Create project
Create a new Android application with the com.vogella.android.testing.applicationtest package name based on the Empty Activity template.
Add the following application object to your application.
package com.vogella.android.testing.applicationtest;
import android.app.Application;
import java.util.ArrayList;
import java.util.List;
public class MyApplication extends Application {
public static final List<String> list = new ArrayList<String>();
}Also declare the application it in your manifest file.
<?xml version="1.0" encoding="utf-8"?>
<manifest xmlns:android="http://schemas.android.com/apk/res/android"
package="com.vogella.android.testing.applicationtest" >
<application
android:name=".MyApplication"
android:allowBackup="true"
android:icon="@mipmap/ic_launcher"
android:label="@string/app_name"
android:theme="@style/AppTheme" >
<activity
android:name=".MainActivity"
android:label="@string/app_name" >
<intent-filter>
<action android:name="android.intent.action.MAIN" />
<category android:name="android.intent.category.LAUNCHER" />
</intent-filter>
</activity>
</application>
</manifest>9.2. Create unit test for application object
In your app/src/test directory create a new unit test.
Assert that the MyApplication.list field is not empty and has initially a size of zero.
9.3. Create instrumented test for application object
Create the following unit test based on the JUnit 3 testing framework.
package com.vogella.android.testing.applicationtest;
import android.content.pm.PackageInfo;
import android.test.ApplicationTestCase;
import android.test.MoreAsserts;
public class ApplicationTest extends ApplicationTestCase<MyApplication> {
private MyApplication application;
public ApplicationTest() {
super(MyApplication.class);
}
protected void setUp() throws Exception {
super.setUp();
createApplication();
application = getApplication();
}
public void testCorrectVersion() throws Exception {
PackageInfo info = application.getPackageManager().getPackageInfo(application.getPackageName(), 0);
assertNotNull(info);
MoreAsserts.assertMatchesRegex("\\d\\.\\d", info.versionName);
}
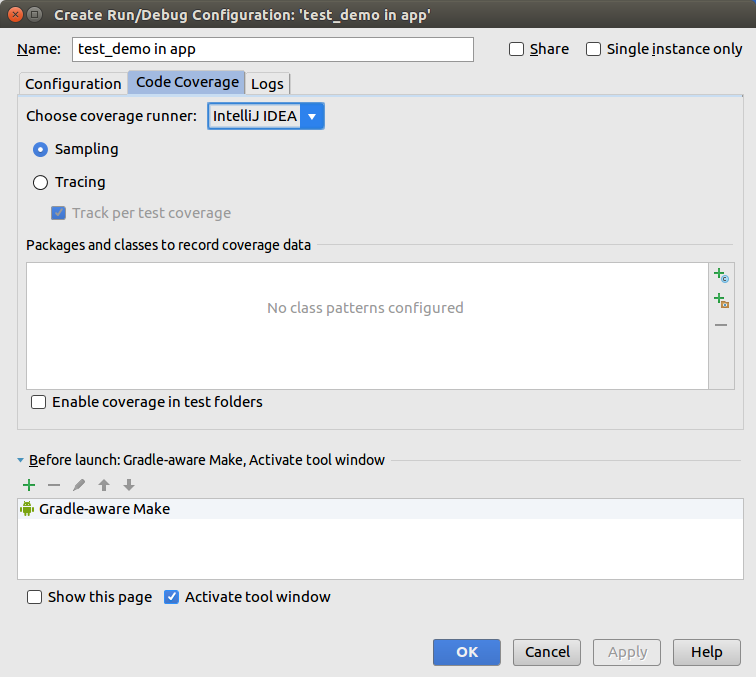
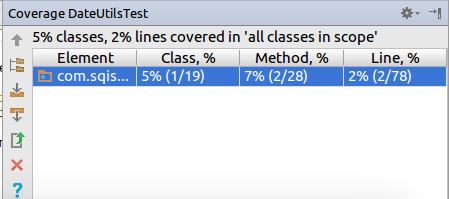
}10. Creating code coverage report
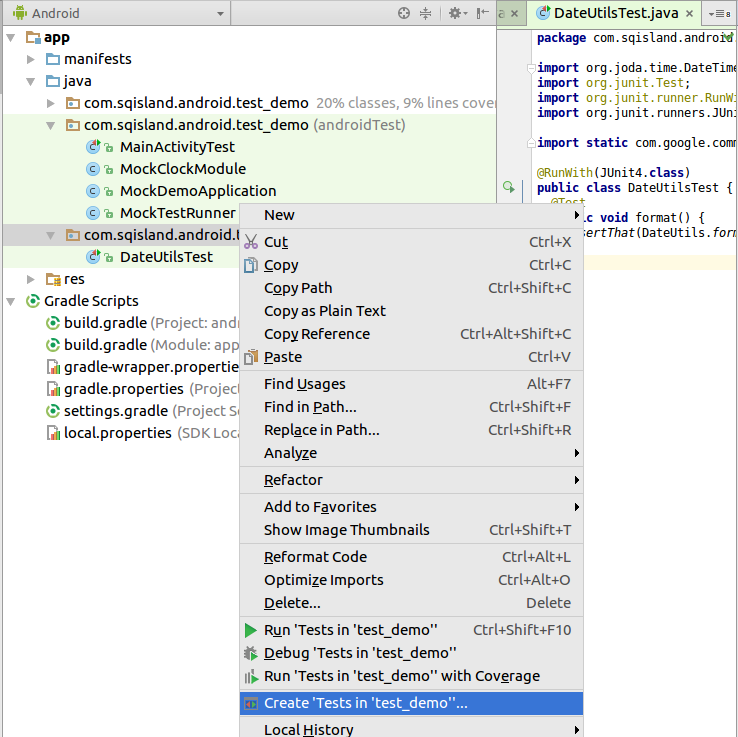
A code coverage report shows you how much of your application code is covered by tests. To create such a report, you can create a separate launch configuration. For this, select your package and select menu:[Create Tests in…].
You can now create a runtime configuration for the code coverage. If you run it a report is generated.

11. Using the Monkey tool for creating a random event stream
11.1. What is monkey?
Monkey is a command line tool that sends pseudo random events to your device. You can restrict Monkey to run only for a certain package and therefore instruct Monkey to test only your application.
11.2. How to use Monkey
The following command sends 2000 random events to the application with the de.vogella.android.test.target package.
adb shell monkey -p de.vogella.android.test.target -v 2000Monkey sometimes causes problems with the adb server. Use the following commands to restart the adb server.
adb kill-server
adb start-serverYou can use the -s [seed] parameter to ensure that the generated sequence of events is always the same.
For more info on Monkey please see the Monkey description.
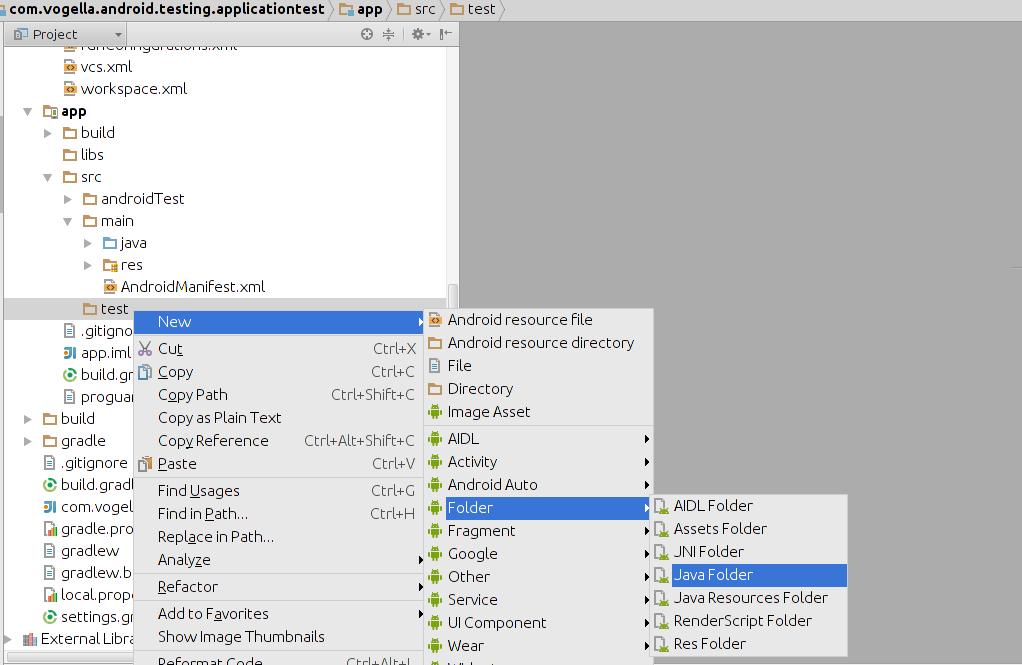
13. Test folder creation in Android Studio
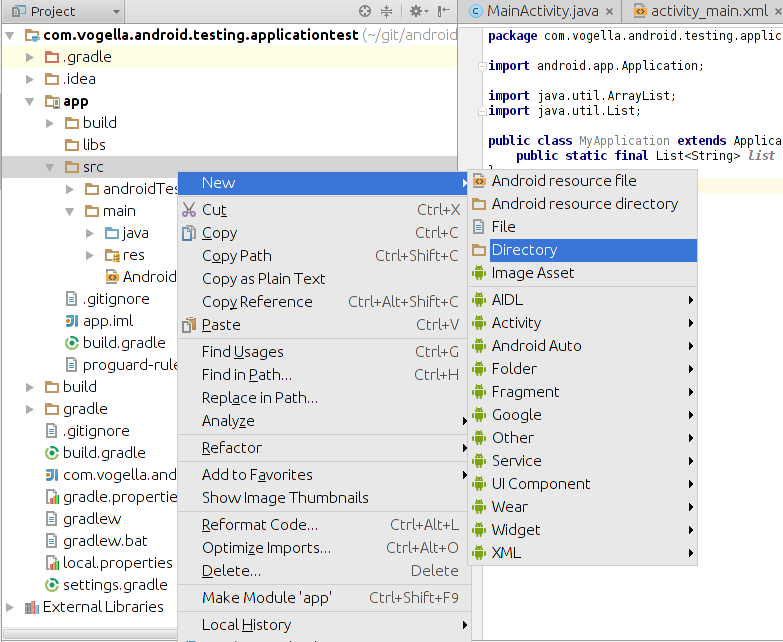
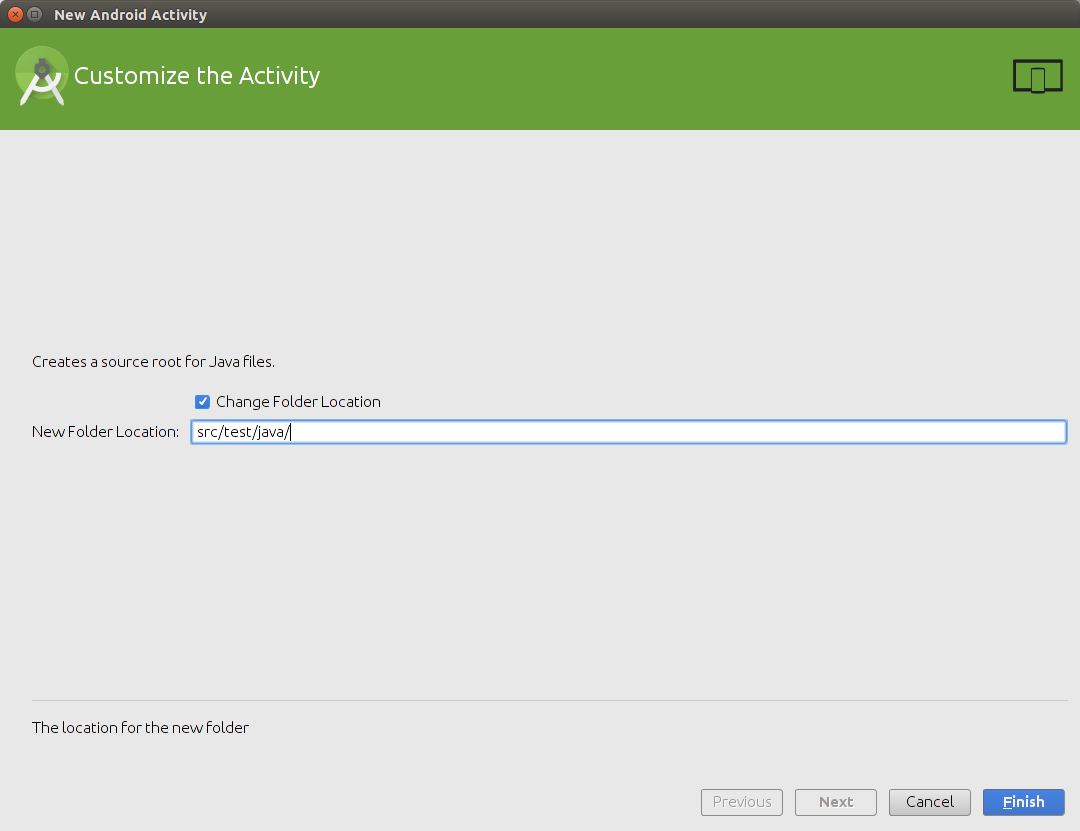
The recent versions of Android Studio has added a test folder to its default project template. In case you are using a template which does not create a test folder, you have to create it manually. To create the test folder in Android Studio, switch to the Project view, this shows you the directory structure of your project.
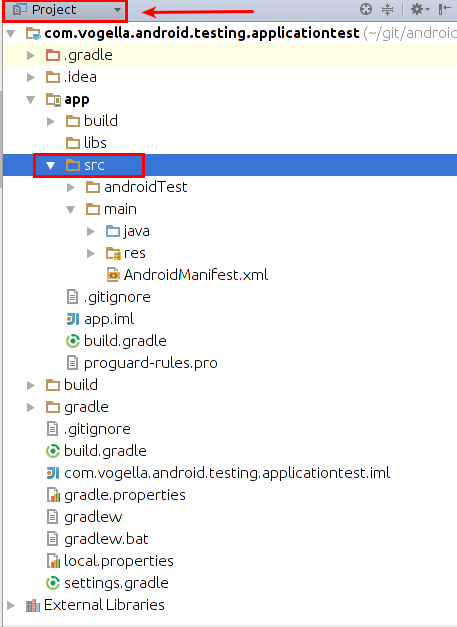
Select the src and use the context menu to create a new test folder.
If not yet done, also add the JUnit dependency to your Gradle build file.
dependencies {
    // Unit testing dependencies
    testCompile 'junit:junit:4.12'
    // Set this dependency if you want to use the Hamcrest matcher library
    testCompile 'org.hamcrest:hamcrest-library:1.3'
    // more stuff, e.g., Mockito
}|
The creation of the Java folder might add the new test directory as source file to your build.gradle file.
If you have the following entry in your |
Afterwards, you can add your unit test to this folder structure.
14. Android testing resources
AndroidToolsStaticChecks[Using static checks in Android for your code]
14.1. vogella Java example code
If you need more assistance we offer Online Training and Onsite training as well as consulting