This tutorial describes how to use the Fragment class to create scalable and flexible Android applications.
1. Fragments
1.1. What are single-pane or multi-pane layouts?
A panel or pane represents a part of the user interface. The term pane is a general term used to describe the concept that multiple views are combined into one compound view depending on the actual available space.

If not enough space is available only one panel is shown. This is typically called a single-pane layout.
If more space is available, multiple panels can be shown.

1.2. Definition of fragments
h A fragment is an independent Android component that can be used by an activity. A fragment encapsulates functionality so that it is easier to reuse within activities and layouts.
A fragment runs in the context of an activity, but has its own lifecycle and typically its own user interface. It is also possible to define fragments without a user interface, i.e., headless fragments.
Android devices exists in a variety of screen sizes and densities. Fragments simplify the reuse of components in different layouts and their logic. You can build single-pane layouts for handsets (phones) and multi-pane layouts for tablets. You can also use fragments also to support different layout for landscape and portrait orientation on a smartphone.
As it is possible to dynamically add and remove fragments from an activity. The usage of fragments allows to design flexible user interfaces.
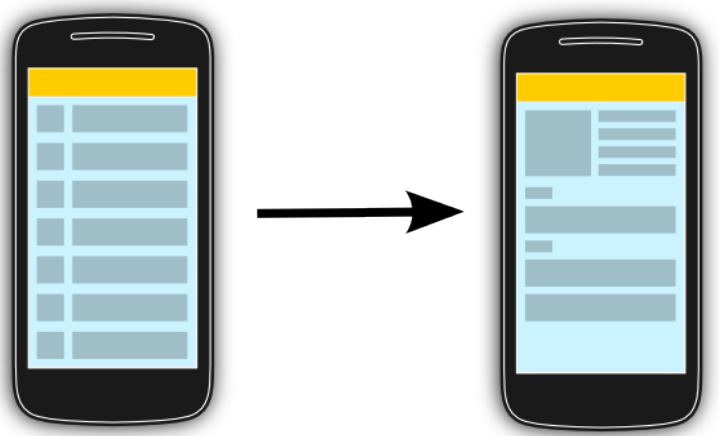
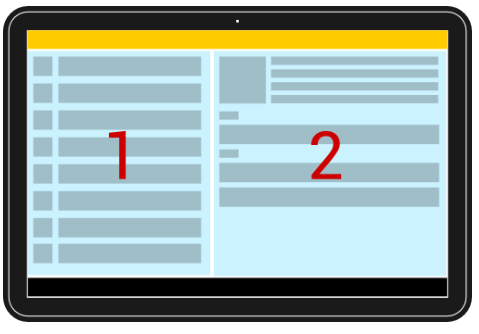
The typical example is a list of items in an activity. On a tablet you see the details immediately on the same screen on the right hand side if you click on item. On a smartphone you jump to a new detail screen. This is depicted in the following graphic.

The following discussion will assume that you have two fragments (main and detail), but you can also have more. We will also have one main activity and one detailed activity. On a tablet the main activity contains both fragments in its layout, on a handheld it only contains the main fragment.
The following screenshots demonstrates this usage.
1.3. Fragments and Context access
Fragments do not subclass the Context class.
Therefore you have to use the getActivity() method to get the parent activity.
1.4. How to support different screensizes with fragments
It is possible to define in the layout file of an activity that it contains fragments (static definition). You can also modify the fragments of an activity at runtime (dynamic definition).
To display different fragments in your activities based on the actual available space you can:
-
Use one activity, which displays two fragments for tablets and on handset devices. In this case change at runtime the fragments displayed by the activity whenever necessary. In this scenario you typically define instances of the
FrameLayoutclass as placeholder in your layout and add the fragments at runtime to them. -
Use separate activities to host each fragment on a handset. An activity may include multiple fragments for a certain configuration and for other configurations a different number. If a detailed fragment is there, the main activity tells the fragment that it should update itself. If a detail fragment is not available, the main activity starts the detailed activity.
Which option to select depends on the use case, typical the dynamic contribution is more flexible bit a bit harder to implement.
2. Defining and using fragments
2.1. Defining fragments
To define a new fragment you either extend the android.app.Fragment class or one of its subclasses.
Subclasses are for example, ListFragment, DialogFragment, PreferenceFragment or WebViewFragment.
The following code shows an example implementation.
package com.example.android.rssreader;

import android.app.Fragment;
import android.os.Bundle;
import android.view.LayoutInflater;
import android.view.View;
import android.view.ViewGroup;
import android.widget.TextView;

public class DetailFragment extends Fragment {

    @Override
    public View onCreateView(LayoutInflater inflater, ViewGroup container,
                             Bundle savedInstanceState) {
        View view = inflater.inflate(R.layout.fragment_rssitem_detail,
                container, false);
        return view;
    }

    public void setText(String text) {
        TextView view = (TextView) getView().findViewById(R.id.detailsText);
        view.setText(text);
    }
}
2.2. Application communication with fragments
To increase reuse of fragments, they should not directly communicate with each other. Every communication of the fragments should be done via the host activity.
For this purpose, a fragment should define an interface as an inner type.
The fragment requires that the activity that uses it, must implement this interface.
This way you avoid that the fragment has any knowledge about the activity that uses it.
In its onAttach() method it can check if the activity correctly implements this interface.
For example, assume you have a fragment which should communicate a value to its parent activity. This can be implemented like the following.
package com.example.android.rssreader;

import android.app.Activity;
import android.app.Fragment;
import android.os.Bundle;
import android.view.LayoutInflater;
import android.view.View;
import android.view.ViewGroup;
import android.widget.Button;

public class MyListFragment extends Fragment {

    private OnItemSelectedListener listener;

    @Override
    public View onCreateView(LayoutInflater inflater, ViewGroup container,
            Bundle savedInstanceState) {
        View view = inflater.inflate(R.layout.fragment_rsslist_overview,
                container, false);
        Button button = (Button) view.findViewById(R.id.button1);
        button.setOnClickListener(new View.OnClickListener() {
            @Override
            public void onClick(View v) {
                updateDetail("fake");
            }
        });
        return view;
    }

    public interface OnItemSelectedListener {
        public void onRssItemSelected(String link);
    }

    @Override
    public void onAttach(Context context) {
        super.onAttach(context);
        if (context instanceof OnItemSelectedListener) {
            listener = (OnItemSelectedListener) context;
        } else {
            throw new ClassCastException(context.toString()
                    + " must implemenet MyListFragment.OnItemSelectedListener");
        }
    }

    @Override
    public void onDetach() {
        super.onDetach();
        listener = null;
    }

    // may also be triggered from the Activity
    public void updateDetail(String uri) {
        // create a string just for testing
        String newTime = String.valueOf(System.currentTimeMillis());

        // inform the Activity about the change based
        // interface defintion
        listener.onRssItemSelected(newTime);
    }
}
2.3. Passing parameters to fragments
An activity can pass a bundle to the fragment.
detailFragment = new DetailFragment();

// configure link
Bundle bundle = new Bundle();
bundle.putString("link", link);
detailFragment.setArguments(bundle);
The fragment gets this in its onActivityCreated method.
@Override
public void onActivityCreated(Bundle savedInstanceState) {
    super.onActivityCreated(savedInstanceState);
    Bundle bundle = getArguments();
    if (bundle != null) {
        setText(bundle.getString("link"));
    }
}
3. Fragment life-cycle
A fragment has its own lifecycle. But it is always connected to the life cycle of the activity that uses the fragment.
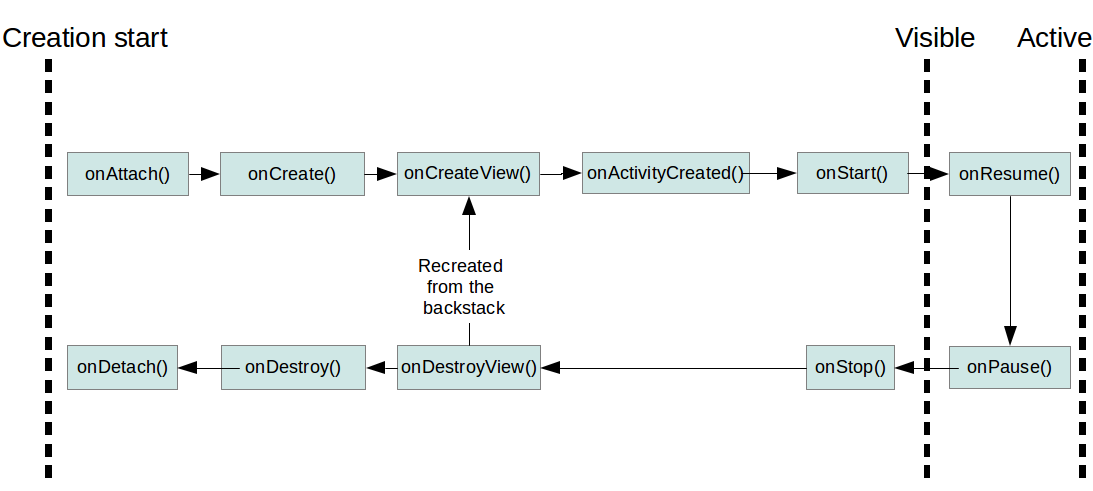
If an activity stops, its fragments are also stopped. If an activity is destroyed, its fragments are also destroyed.
Table Title
| Method | Description |
|---|---|
|
The fragment instance is associated with an activity instance.The fragment and the activity is not fully initialized. Typically you get in this method a reference to the activity which uses the fragment for further initialization work. |
|
Fragment is created. The
|
|
The fragment instance creates its view
hierarchy. In the
In this method you should not interactive with the activity, the activity is not yet fully initialized. There is no need to
implement this method for headless
|
|
The
Activity and fragment instance have been created as
well as
the
view
hierarchy of the activity.
At this point, view can
be accessed with
the
In this method you can instantiate objects that require a |
|
The
|
onResume() |
Fragment becomes active. |
|
Fragment is visible but becomes not active anymore, e.g., if another activity is animating on top of the activity which contains the fragment. |
|
Fragment becomes not visible. |
|
Destroys the view of the fragment. If the fragment is
recreated
from the backstack this method is called and afterwards
the
|
onDestroy() |
Not guaranteed to be called by the Android platform. |
4. Defining fragments for your activity
4.1. Adding fragments statically to the layout file
To use your new fragment, you can statically add it to an XML layout.
In this case the android:name attribute points to the corresponding class as demonstrated by the following code snippet.
<?xml version="1.0" encoding="utf-8"?>
<LinearLayout xmlns:android="http://schemas.android.com/apk/res/android"
    xmlns:tools="http://schemas.android.com/tools"
    android:layout_width="fill_parent"
    android:layout_height="fill_parent"
    android:baselineAligned="false"
    android:orientation="horizontal" >

    <fragment
        android:id="@+id/listFragment"
        android:layout_width="0dp"
        android:layout_weight="1"
        android:layout_height="match_parent"
        class="com.example.android.rssreader.MyListFragment"
        tools:layout="@layout/fragment_rsslist_overview">
    </fragment>
    <fragment
        android:id="@+id/detailFragment"
        android:layout_width="0dp"
        android:layout_weight="2"
        android:layout_height="match_parent"
        class="com.example.android.rssreader.DetailFragment"
        tools:layout="@layout/fragment_rssitem_detail">
    </fragment>

</LinearLayout>
Using this scenario makes sense in case you have different static layout files for different device configurations.
4.2. Handling dynamics in fragments
The FragmentManager class allows you to add, remove and replace fragments in the layout of your activity.
It can accessed in an activity via the getFragmentManager() method.
The modifications must be performed in a transaction via the FragmentTransaction class.
To modify the fragments in an activity you typically define a FrameLayout placeholder in the layout file.
<?xml version="1.0" encoding="utf-8"?>
<LinearLayout xmlns:android="http://schemas.android.com/apk/res/android"
    android:layout_width="match_parent"
    android:layout_height="match_parent"
    android:orientation="horizontal" >

    <FrameLayout
        android:id="@+id/listcontainer"
        android:layout_width="match_parent"
        android:layout_height="match_parent" />

    <FrameLayout
        android:id="@+id/detailscontainer"
        android:layout_width="match_parent"
        android:layout_height="match_parent"
        android:visibility="gone" />

</LinearLayout>
You use the FragmentManager to replace the container with a fragment.
// get fragment manager
FragmentManager fm = getFragmentManager();

// add
FragmentTransaction ft = fm.beginTransaction();
ft.add(R.id.your_placehodler, new YourFragment());
// alternatively add it with a tag
// trx.add(R.id.your_placehodler, new YourFragment(), "detail");
ft.commit();

// replace
FragmentTransaction ft = fm.beginTransaction();
ft.replace(R.id.your_placehodler, new YourFragment());
ft.commit();

// remove
Fragment fragment = fm.findFragmentById(R.id.your_placehodler);
FragmentTransaction ft = fm.beginTransaction();
ft.remove(fragment);
ft.commit();
A new fragment replaces an existing fragment in this container.
If you want to add the transaction to the backstack of Android, you use the addToBackStack() method.
This adds the action to the history stack of the activity and allows the user to revert this change via the back button.
4.3. Check if a fragment is present in the layout
To check if a fragment is part of your layout you can use the FragmentManager class.
The isInLayout() method works on if the fragment as added to the activity via its layout.
DetailFragment fragment = (DetailFragment) getFragmentManager().
    findFragmentById(R.id.detail_frag);
if (fragment==null || ! fragment.isInLayout()) {
    // start new Activity
    }
else {
    fragment.update(...);
}
4.4. Determine how many fragments are present
As the logic in the activity depends on the scenario (single/multi pane), you typically write a check to determine in which mode you are. There are several approaches to perform this. One way is to define a configuration file in the values resource folder. The key-value pairs defaults to false and a additional configuration file set this value to true for the desired screensize.
For example, this is a possible default config.xml configuration file.
<resources>
    <item type="bool" name="twoPaneMode">false</item>
</resources>
Create the same file in your res/values-land folder with a different value.
In the values-land folder you would place a config.xml configuration file with a different value.
<resources>
    <item type="bool" name="twoPaneMode">true</item>
</resources>
In your code you can access the state via the following snippet.
getResources().getBoolean(R.bool.twoPaneMode);4.5. Adding fragments transition to the backstack
You can add a FragmentTransition to the backstack to allow the user to use the back button to reverse the transition.
For this you can use the addToBackStack() method on the FragmentTransition object.
4.6. Animations for fragment transitions
During a fragment transaction, you can define animations based on the Property Animation API via the setCustomAnimations() method.
You can also use several standard Android animations via the setTransition() method call.
These are defined via the constants starting with FragmentTransaction.TRANSIT_FRAGMENT_*.
Both methods allow you to define an entry animation and an existing animation.
4.7. Persisting data in fragments
4.7.1. Persisting data between application restarts
Frequently in your Android application you need to persist your application data. For this, you can for example use an SQLite database or a file.
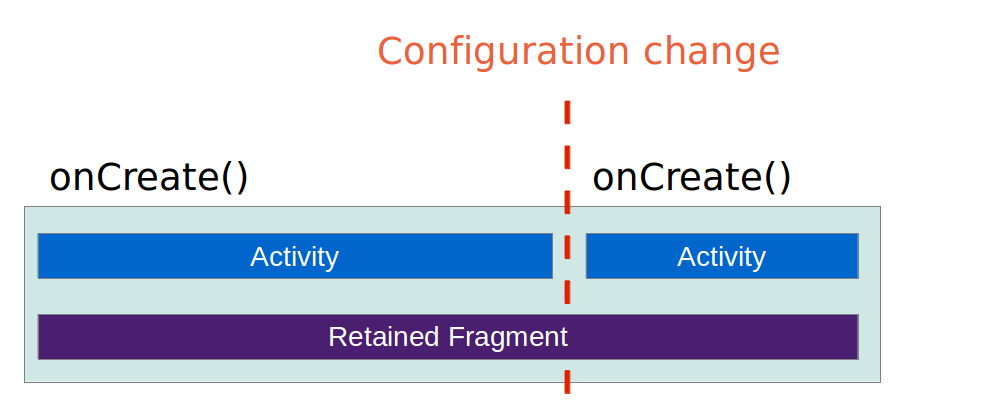
4.7.2. Persisting data between configurations changes
If you want to persist data between configuration changes, you can also use the application object.
In addition to that you can use the setRetainState(true) method call on the fragment.
This retains the fragment instances between configuration changes.
It only works if the fragments are not added to the backstack.
In this case the data must be stored as member (field).
|
Using this method is not recommended by Google for fragments that have a user interface. |
You can use the onSaveInstanceState() method to place the data in the Bundle.
You can retrieve that data the onActivityCreated() method.
5. Fragments for background processing
5.1. Headless Fragments
Fragments can be used without defining a user interface.
These are called headless fragments.
To implement such a fragment, return null in the onCreateView() method of your fragment.
|
It is recommended to use services for background processing.
If you want to do this via your fragments, the second best solution is to use headless fragments in combination with the |
5.2. Retained headless fragments to handle configuration changes
Headless fragment are typically used to encapsulate some state across configuration changes or for a background processing task. For this purpose, you would set your headless fragment to be retained. A retained fragment is not destroyed during configuration changes.
To set your fragment to retained, call its setRetainInstance() method.
To add such a fragment to an activity you use the add() method of the FragmentManager class.
If you need to refer to this Fragment later, you need to add it with a tag.
This allows you to search for it via the findFragmentByTag() method of the FragmentManager.
The usage of the onRetainNonConfigurationInstance() in the activity is deprecated and should be replaced by retained headless fragments.
6. Displaying dialogs with DialogFragments
6.1. Using fragments for dialogs
A DialogFragment is a special fragment that displays a modal window, floating on top of the current activity window.
An instance of DialogFragment can be used to display an existing Dialog implementation dialog or a custom view hierarchy.
The Dialog class is the base class for implementing a dialog.
Android provides several standard dialog implementation, AlertDialog, ProgressDialog, DatePickerDialog or TimePickerDialog.
Your DialogFragment can implement the onCreateDialog method and return such a dialog implementation.
If you want to create your custom view hierarchy you can build this in the onCreateView() method of the fragment.
6.2. Communication to the activity via the DialogFragment
Your implementation of DialogFragment communicates similar to other fragments to the activity.
One possible approach is that the fragment defines an interface that the activity must implement. The fragment can call back into the activity without knowing the implementation details of the activity.
An alternative approach is to use a shared ViewModel in which the fragment changes state which can trigger a method in the activity.
7. Exercise: Use fragments
The following tutorial demonstrates how to use fragments in a standard Android application. It does not use the support library. The application uses different numbers of fragments depending on portrait and landscape mode.
In portrait mode the main activity shows one fragment. From this fragment the user can navigate to another activity that contains another fragment.
In landscape mode the main activity shows both fragments side by side.
7.1. Create Project
Create a new Android project with the following data.
| Property | Value | Watch-out | ||
|---|---|---|---|---|
Application Name |
RSS Reader |
|||
Company Domain |
android.example.com |
|||
Package name |
com.example.android.rssreader |
|||
Template |
Empty Activity |
|||
Activity Name |
RssfeedActivity |
|
||
Layout Name |
activity_rssfeed |
|||
Backward compatibility |
Not selected |
|
|
Verify that you activity extends |
7.2. Create layout files for the fragments
Create a new layout file called fragment_rssitem_detail.xml in the res/layout/ folder.
<?xml version="1.0" encoding="utf-8"?>
<LinearLayout xmlns:android="http://schemas.android.com/apk/res/android"
    android:layout_width="match_parent"
    android:layout_height="match_parent"
    android:orientation="vertical" >

    <TextView
        android:id="@+id/detailsText"
        android:layout_width="wrap_content"
        android:layout_height="match_parent"
        android:layout_gravity="center_horizontal|center_vertical"
        android:layout_marginTop="20dip"
        android:text="Default Text"
        android:textAppearance="?android:attr/textAppearanceLarge"
        android:textSize="30dip" />

</LinearLayout>
The id must be correct, the fragment uses this to search for the TextView.
|
Create a new layout file called fragment_rsslist_overview.xml.
<?xml version="1.0" encoding="utf-8"?>
<LinearLayout xmlns:android="http://schemas.android.com/apk/res/android"
    android:layout_width="match_parent"
    android:layout_height="match_parent"
    android:orientation="vertical" >

    <Button
        android:id="@+id/updateButton"
        android:layout_width="wrap_content"
        android:layout_height="wrap_content"
        android:text="Press to update"/>

</LinearLayout>| Also here, the ID must be correct. |
7.3. Create fragment classes
Create the following classes that are used as fragments.
Start with the DetailFragment class.
package com.example.android.rssreader;

import android.app.Fragment;
import android.os.Bundle;
import android.view.LayoutInflater;
import android.view.View;
import android.view.ViewGroup;
import android.widget.TextView;

public class DetailFragment extends Fragment {

    @Override
    public View onCreateView(LayoutInflater inflater, ViewGroup container,
                             Bundle savedInstanceState) {
        View view = inflater.inflate(R.layout.fragment_rssitem_detail,
                container, false);
        return view;
    }

    public void setText(String text) {
        TextView view = (TextView) getView().findViewById(R.id.detailsText);
        view.setText(text);
    }
}
Create the MyListFragment class.
Despite its name it will not display a list of items.
Instead it will just have a button that allow to send the current time to the details fragment.
package com.example.android.rssreader;

import android.app.Fragment;
import android.content.Context;
import android.os.Bundle;
import android.view.LayoutInflater;
import android.view.View;
import android.view.ViewGroup;
import android.widget.Button;

public class MyListFragment extends Fragment {

    private OnItemSelectedListener listener;

    @Override
    public View onCreateView(LayoutInflater inflater, ViewGroup container,
                             Bundle savedInstanceState) {
        View view = inflater.inflate(R.layout.fragment_rsslist_overview,
                container, false);
        Button button = (Button) view.findViewById(R.id.updateButton);
        button.setOnClickListener(new View.OnClickListener() {
            @Override
            public void onClick(View v) {
                updateDetail("testing");
            }
        });
        return view;
    }

    public interface OnItemSelectedListener {
        void onRssItemSelected(String text);
    }

    @Override
    public void onAttach(Context context) {
        super.onAttach(context);
        if (context instanceof OnItemSelectedListener) {
            listener = (OnItemSelectedListener) context;
        } else {
            throw new ClassCastException(context.toString()
                    + " must implement MyListFragment.OnItemSelectedListener");
        }
    }

    // triggers update of the details fragment
    public void updateDetail(String uri) {
        // create fake data
        String newTime = String.valueOf(System.currentTimeMillis() + uri);
        // send data to activity
        listener.onRssItemSelected(newTime);
    }
}
7.4. Change the main layout file
Change the existing activity_rssfeed.xml file.
<?xml version="1.0" encoding="utf-8"?>
<LinearLayout xmlns:android="http://schemas.android.com/apk/res/android"
    xmlns:tools="http://schemas.android.com/tools"
    android:layout_width="fill_parent"
    android:layout_height="fill_parent"
    android:baselineAligned="false"
    android:orientation="horizontal" >

    <fragment
        android:id="@+id/listFragment"
        android:layout_width="0dp"
        android:layout_weight="1"
        android:layout_height="match_parent"
        class="com.example.android.rssreader.MyListFragment"
        tools:layout="@layout/fragment_rsslist_overview">
    </fragment>
    <fragment
        android:id="@+id/detailFragment"
        android:layout_width="0dp"
        android:layout_weight="2"
        android:layout_height="match_parent"
        class="com.example.android.rssreader.DetailFragment"
        tools:layout="@layout/fragment_rssitem_detail">
    </fragment>

</LinearLayout>| The tools: tag is optional. It points to a layout so that the preview in Android Studio can display the fragment. |
7.5. RssfeedActivity
Change the RssfeedActivity class so that it can act as call back for the list fragment and update the detailed fragment.
package com.example.android.rssreader;
import android.app.Activity;
import android.os.Bundle;
public class RssfeedActivity extends Activity implements MyListFragment.OnItemSelectedListener{
@Override
protected void onCreate(Bundle savedInstanceState) {
super.onCreate(savedInstanceState);
setContentView(R.layout.activity_rssfeed);
}
@Override
public void onRssItemSelected(String text) {
DetailFragment fragment = (DetailFragment) getFragmentManager()
.findFragmentById(R.id.detailFragment);
fragment.setText(text);
}
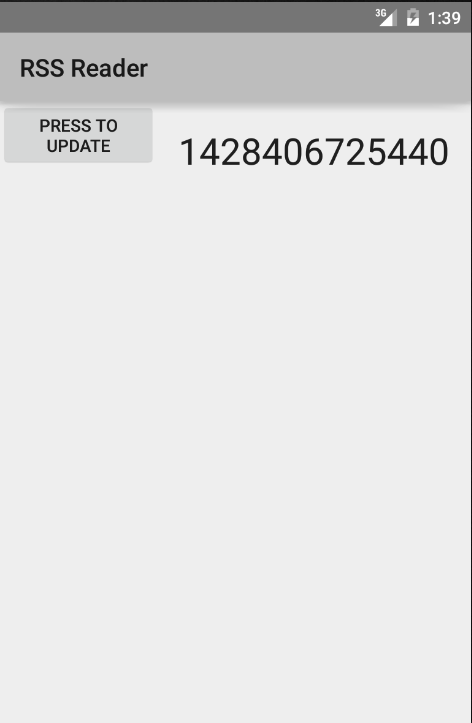
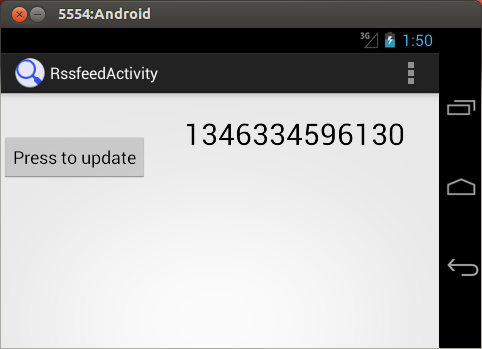
}7.6. Verify that the application works as expected
Start your application.
Both fragments should be displayed both in landscape and portrait mode.
You can use the emulator controls to change the orientation of the emulator.
If you press the button in the ListFragment, the DetailFragment gets updated.
8. Exercise: Fragments depending on the configuration
The RssfeedActivity should show two fragments (two panes) if started in landscape mode. If it is started in portrait mode only one fragment should be shown. In this exercise, you adjust your application to support this.
8.1. Create activity layout for portrait mode
Create the following activity_rssfeed.xml layout file based on the port resource qualifier for orientation.
<?xml version="1.0" encoding="utf-8"?>
<LinearLayout xmlns:android="http://schemas.android.com/apk/res/android"
    xmlns:tools="http://schemas.android.com/tools"
    android:layout_width="match_parent"
    android:layout_height="match_parent"
    tools:context=".RssfeedActivity"
    android:orientation="vertical">

    <FrameLayout
        android:id="@+id/fragment_container"
        android:layout_width="match_parent"
        android:layout_height="match_parent"
        android:orientation="horizontal"/>

</LinearLayout>
8.2. Define a boolean flag dependent of the resource selector
Create a file in your res/values folder called config.xml with the following setting.
<?xml version="1.0" encoding="utf-8"?>
<resources>
    <bool name="twoPaneMode">true</bool>
</resources>
Create the same file for the landscape configuration with a different value. This file is located in your res/values-port folder.
<?xml version="1.0" encoding="utf-8"?>
<resources>
    <bool name="twoPaneMode">false</bool>
</resources>
8.3. Adjust the DetailFragment fragment
Adjust the DetailFragment class to the following.
package com.example.android.rssreader;

import android.app.Fragment;
import android.os.Bundle;
import android.view.LayoutInflater;
import android.view.View;
import android.view.ViewGroup;
import android.widget.TextView;

public class DetailFragment extends Fragment {
    public static final String EXTRA_TEXT ="text";

    @Override
    public View onCreateView(LayoutInflater inflater, ViewGroup container,
                             Bundle savedInstanceState) {
        View view = inflater.inflate(R.layout.fragment_rssitem_detail,
                container, false);
        return view;
    }

    @Override
    public void onActivityCreated(Bundle savedInstanceState) {
        super.onActivityCreated(savedInstanceState);
        Bundle bundle = getArguments();
        if (bundle != null) {
            String text = bundle.getString(EXTRA_TEXT);
            setText(text);
        }
    }

    public void setText(String text) {
        TextView view = (TextView) getView().findViewById(R.id.detailsText);
        view.setText(text);
    }
}
8.4. Adjust the RssfeedActivity activity
Adjust the RssfeedActivity class to replace the existing fragment in case you are in single pane mode.
package com.example.android.rssreader;

import android.app.Activity;
import android.app.Fragment;
import android.app.FragmentTransaction;
import android.os.Bundle;

public class RssfeedActivity extends Activity implements
        MyListFragment.OnItemSelectedListener {

    @Override
    protected void onCreate(Bundle savedInstanceState) {
        super.onCreate(savedInstanceState);
        setContentView(R.layout.activity_rssfeed);
        if (getResources().getBoolean(R.bool.twoPaneMode)) {
            // all good, we use the fragments defined in the layout
            return;
        }
        // if savedInstanceState is null we do some cleanup
        if (savedInstanceState != null) {
            // cleanup any existing fragments in case we are in detailed mode (1)
            getFragmentManager().executePendingTransactions();
            Fragment fragmentById = getFragmentManager().
                    findFragmentById(R.id.fragment_container);
            if (fragmentById!=null) {
                getFragmentManager().beginTransaction()
                        .remove(fragmentById).commit();
            }
        }
        MyListFragment listFragment = new MyListFragment();
        getFragmentManager().beginTransaction()
                .replace(R.id.fragment_container, listFragment).commit();
    }

    @Override
    public void onRssItemSelected(String text) {
        if (getResources().getBoolean(R.bool.twoPaneMode)) {
            DetailFragment fragment = (DetailFragment) getFragmentManager()
                    .findFragmentById(R.id.detailFragment);
            fragment.setText(text);
        } else {
            // replace the fragment
            // Create fragment and give it an argument for the selected article
            DetailFragment newFragment = new DetailFragment();
            Bundle args = new Bundle();
            args.putString(DetailFragment.EXTRA_TEXT, text);
            newFragment.setArguments(args);
            FragmentTransaction transaction = getFragmentManager().beginTransaction();

            // Replace whatever is in the fragment_container view with this fragment,
            // and add the transaction to the back stack so the user can navigate back

            transaction.replace(R.id.fragment_container, newFragment);
            transaction.addToBackStack(null);

            // Commit the transaction
            transaction.commit();
        }
    }
}| 1 | This cleanup is necessary because we are using dynamically switching between two fragments and one fragments.
That is an unusual scenario, typically the selection of one or two fragment is based on the smallest width of a device and does not change at runtime.
The FragmentManager caches the fragment to optimize performance, so we need to ensure that we remove an existing detailed fragment. |
8.5. Validate your implementation
Test your application. If you run the application in portrait mode, you should see only one fragment. In horizontal mode you see both fragments.
Switch the orientation of the emulator. Press the button in portrait as well as in horizontal mode and verify that the detail activity shows the current time.
9. Exercise: Use a headless retained fragment to store the state
In this exercise, you would like to remember the last selection of the user. We use a headless fragment for this.
9.1. Create headless fragment
Create a new class called SelectionStateFragment.
package com.example.android.rssreader;

import android.app.Fragment;
import android.os.Bundle;
import android.view.LayoutInflater;
import android.view.View;
import android.view.ViewGroup;

public class SelectionStateFragment extends Fragment {
    public String lastSelection = "";

    @Override
    public View onCreateView(LayoutInflater inflater, ViewGroup container, Bundle savedInstanceState) {
        return null;
    }

    @Override
    public void onCreate(Bundle savedInstanceState) {
        super.onCreate(savedInstanceState);
        setRetainInstance(true);
    }
}
9.2. Use headless fragment to store the last selected value
Adjust the RssfeedActivity to the following.
package com.example.android.rssreader;

import android.app.Activity;
import android.app.Fragment;
import android.app.FragmentTransaction;
import android.os.Bundle;

public class RssfeedActivity extends Activity implements
        MyListFragment.OnItemSelectedListener {

    SelectionStateFragment stateFragment;

    @Override
    protected void onCreate(Bundle savedInstanceState) {
        super.onCreate(savedInstanceState);
        setContentView(R.layout.activity_rssfeed);
        stateFragment =
                (SelectionStateFragment) getFragmentManager()
                        .findFragmentByTag("headless");

        if(stateFragment == null) {
            stateFragment = new SelectionStateFragment();
            getFragmentManager().beginTransaction()
                    .add(stateFragment, "headless").commit();
        }

        if (getResources().getBoolean(R.bool.twoPaneMode)) {
            // restore state
            if (stateFragment.lastSelection.length()>0) {
                onRssItemSelected(stateFragment.lastSelection);
            }
            // otherwise all is good, we use the fragments defined in the layout
            return;
        }
        // if savedInstanceState is null we do some cleanup
        if (savedInstanceState != null) {
            // cleanup any existing fragments in case we are in detailed mode
            getFragmentManager().executePendingTransactions();
            Fragment fragmentById = getFragmentManager().
                    findFragmentById(R.id.fragment_container);
            if (fragmentById!=null) {
                getFragmentManager().beginTransaction()
                        .remove(fragmentById).commit();
            }
        }

        MyListFragment listFragment = new MyListFragment();
        getFragmentManager().beginTransaction()
                .replace(R.id.fragment_container, listFragment).commit();
    }

    @Override
    public void onRssItemSelected(String text) {
        stateFragment.lastSelection = text;
        if (getResources().getBoolean(R.bool.twoPaneMode)) {
            DetailFragment fragment = (DetailFragment) getFragmentManager()
                    .findFragmentById(R.id.detailFragment);
            fragment.setText(text);
        } else {
            // replace the fragment
            // Create fragment and give it an argument for the selected article
            DetailFragment newFragment = new DetailFragment();
            Bundle args = new Bundle();
            args.putString(DetailFragment.EXTRA_TEXT, text);
            newFragment.setArguments(args);
            FragmentTransaction transaction = getFragmentManager().beginTransaction();

            // Replace whatever is in the fragment_container view with this fragment,
            // and add the transaction to the back stack so the user can navigate back

            transaction.replace(R.id.fragment_container, newFragment);
            transaction.addToBackStack(null);

            // Commit the transaction
            transaction.commit();
        }
    }
}
9.3. Validate your implementation
Test your application. Press the button in horizontal mode and verify that the detail activity shows a value. Switch the orientation of the emulator twice and validate that the activity still shows the same value.
10. Exercise: Use animations for the fragment transition
You can define which animation is used for the transition of the fragments. In this exercise, you define your custom animations and use them for that.
10.1. Implement the animation
Create two animator resources in the res/animator folder of your app.
The first one should be called slide_down.xml and look like the following:
<?xml version="1.0" encoding="utf-8"?>
<objectAnimator
    xmlns:android="https://schemas.android.com/apk/res/android"
    android:interpolator="@android:anim/accelerate_decelerate_interpolator"
    android:propertyName="translationY"
    android:valueType="floatType"
    android:valueFrom="0"
    android:valueTo="1280"
    android:duration="@android:integer/config_mediumAnimTime"/>
The second one should be called slide_up.xml and look like the following:
<?xml version="1.0" encoding="utf-8"?>
<objectAnimator
    xmlns:android="https://schemas.android.com/apk/res/android"
    android:interpolator="@android:anim/accelerate_decelerate_interpolator"
    android:propertyName="translationY"
    android:valueType="floatType"
    android:valueFrom="1280"
    android:valueTo="0"
    android:duration="@android:integer/config_mediumAnimTime"/>
Enable these animations in before your replace operation of the fragment transaction.
FragmentTransaction transaction = getFragmentManager().beginTransaction();
transaction.setCustomAnimations(R.animator.slide_up,R.animator.slide_down);
transaction.replace(R.id.fragment_container, newFragment);
transaction.addToBackStack(null);

// Commit the transaction
transaction.commit();
10.2. Verify
Start your application and verity that the fragment transition is using your animation.
11. Exercise: Use the DialogFragment class
The following demonstrates the usage of the DialogFragment fragment to display modal windows.
Both the reuse of an dialog implementation and a custom layout for the dialog fragment is shown.
11.1. Create project and layout files
Create a new Android project with the com.android.vogella.dialogfragmentexample package.
Add at least two buttons to the activity layout.
Both should point to the onClick method via their android:onClick property.
Create the following layout file, called fragment_username.xml.
<LinearLayout xmlns:android="http://schemas.android.com/apk/res/android"
    android:id="@+id/edit_name"
    android:layout_width="wrap_content"
    android:layout_height="wrap_content"
    android:layout_gravity="center"
    android:orientation="vertical">

    <TextView
        android:id="@+id/lbl_your_name"
        android:layout_width="wrap_content"
        android:layout_height="wrap_content"
        android:text="Enter user name" />

    <EditText
        android:id="@+id/username"
        android:layout_width="match_parent"
        android:layout_height="wrap_content"
        android:imeOptions="actionDone"
        android:inputType="text" />
</LinearLayout>
11.2. Create fragments and adjust activity
Create the following two fragment classes.
package com.android.vogella.dialogfragmentexample;

import android.app.AlertDialog;
import android.app.Dialog;
import android.app.DialogFragment;
import android.content.DialogInterface;
import android.os.Bundle;
import android.widget.Toast;

public class MyAlertDialogFragment extends DialogFragment {

@Override
 public Dialog onCreateDialog(Bundle savedInstanceState) {
  return new AlertDialog.Builder(getActivity())
    // set dialog icon
    .setIcon(android.R.drawable.stat_notify_error)
    // set Dialog Title
    .setTitle("Alert dialog fragment example")
      // Set Dialog Message
    .setMessage("This is a message")

    // positive button
    .setPositiveButton("OK", new DialogInterface.OnClickListener() {
     public void onClick(DialogInterface dialog, int which) {
      Toast.makeText(getActivity(), "Pressed OK", Toast.LENGTH_SHORT).show();
     }
    })
    // negative button
    .setNegativeButton("Cancel", new DialogInterface.OnClickListener() {
     public void onClick(DialogInterface dialog, int which) {
      Toast.makeText(getActivity(), "Cancel", Toast.LENGTH_SHORT).show();
     }
    }).create();
 }
}
package com.android.vogella.dialogfragmentexample;
import android.app.DialogFragment;
import android.os.Bundle;
import android.view.KeyEvent;
import android.view.LayoutInflater;
import android.view.View;
import android.view.ViewGroup;
import android.view.WindowManager;
import android.widget.EditText;
import android.widget.TextView;
public class MyDialogFragment extends DialogFragment implements TextView.OnEditorActionListener {
private EditText mEditText;
public interface UserNameListener {
void onFinishUserDialog(String user);
}
// Empty constructor required for DialogFragment
public MyDialogFragment() {}
@Override
public View onCreateView(LayoutInflater inflater, ViewGroup container,
Bundle savedInstanceState) {
View view = inflater.inflate(R.layout.fragment_username, container);
mEditText = (EditText) view.findViewById(R.id.username);
// set this instance as callback for editor action
mEditText.setOnEditorActionListener(this);
mEditText.requestFocus();
getDialog().getWindow().setSoftInputMode(
WindowManager.LayoutParams.SOFT_INPUT_STATE_VISIBLE);
getDialog().setTitle("Please enter username");
return view;
}
@Override
public boolean onEditorAction(TextView v, int actionId, KeyEvent event) {
// Return input text to activity
UserNameListener activity = (UserNameListener) getActivity();
activity.onFinishUserDialog(mEditText.getText().toString());
this.dismiss();
return true;
}
}Change the code of your activity to the following listing.
package com.android.vogella.dialogfragmentexample;

import android.app.Activity;
import android.app.Fragment;
import android.app.FragmentManager;
import android.os.Bundle;
import android.view.View;
import android.widget.Toast;

public class MainActivity extends Activity implements MyDialogFragment.UserNameListener {

    @Override
    protected void onCreate(Bundle savedInstanceState) {
        super.onCreate(savedInstanceState);
        setContentView(R.layout.activity_main);
    }

    @Override
    public void onFinishUserDialog(String user) {
        Toast.makeText(this, "Hello, " + user, Toast.LENGTH_SHORT).show();
    }

    public void onClick(View view) {
        // close existing dialog fragments
        FragmentManager manager = getFragmentManager();
        Fragment frag = manager.findFragmentByTag("fragment_edit_name");
        if (frag != null) {
            manager.beginTransaction().remove(frag).commit();
        }
        switch (view.getId()) {
            case R.id.showCustomFragment:
                MyDialogFragment editNameDialog = new MyDialogFragment();
                editNameDialog.show(manager, "fragment_edit_name");
                break;
            case R.id.showAlertDialogFragment:
                MyAlertDialogFragment alertDialogFragment = new MyAlertDialogFragment();
                alertDialogFragment.show(manager, "fragment_edit_name");
                break;
        }
    }
}
11.3. Test dialog usage
If you run your application and click the corresponding button, your dialog should get displayed.
11.5. vogella Java example code
If you need more assistance we offer Online Training and Onsite training as well as consulting