File based persistence in Android. This tutorial describes how to save key-value pairs using the preference API in Android. It also explains how to read and write files in Android.
1. File based persistence
1.1. Methods of local data persistence
Android allows to persists application data via the file system. For each application the Android system creates a data/data/[application package] directory.
Android supports the following ways of storing data in the local file system:
-
Files - You can create and update files
-
Preferences - Android allows you to save and retrieve persistent key-value pairs of primitive data type.
-
SQLite database - instances of SQLite databases are also stored on the local file system.
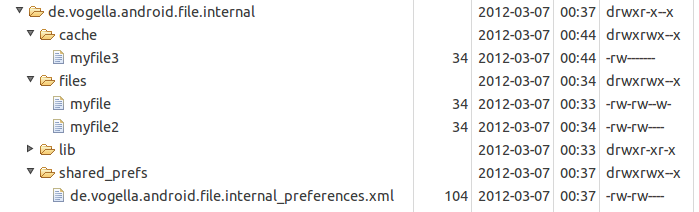
Files are saved in the files folder and application settings are saved as XML files in the shared_prefs folder.
If your application creates an SQLite database this database is saved in the main application directory under the databases folder.
The following screenshot shows a file system that contains file, cache files and preferences.
Only the application can write into its application directory. It can create additional sub-directories in this application directory. For these sub-directories, the application can grant read or write permissions for other applications.
1.2. Internal vs. external storage
Android has internal storage and external storage. External storage is not private and may not always be availale. If, for example, the Android device is connected with a computer, the computer may mount the external system via USB and that makes this external storage not available for Android applications.
1.3. Application on external storage
As of Android 8 SDK level it is possible to define that the application can or should be placed on external storage.
For this set the android:installLocation to preferExternal or auto.
In this case certain application components may be stored on an encrypted external mount point. Database and other private data will still be stored in the internal storage system.
2. Preferences
2.1. Storing key-value pairs
The SharedPreferences class allows to persists key-value pairs of primitive data types in the Android file system.
The PreferenceManager class provides methods to get access to these preferences.
The following code shows how to access preferences from a certain file
# getting preferences from a specified file
SharedPreferences settings = getSharedPreferences("Test", Context.MODE_PRIVATE);
Preferences should be created private for the application. They can be accessed via all application components.
A default store for preferences can be accessed via the PreferenceManager.getDefaultSharedPreferences(this) method call.
Preference value are accessed via the key and the instance of the SharedPreferences class, as demonstrated in the following listing.
SharedPreferences settings = PreferenceManager.getDefaultSharedPreferences(getActivity());
String url = settings.getString("url", "n/a");
To create or change preferences you have to call the edit() method on the SharedPreferences object.
Once you have changed the value you have to call the apply() method to apply your asynchronously to the file system.
Editor edit = preferences.edit();
edit.putString("username", "new_value_for_user");
edit.apply();|
The usage of the |
2.2. Preference Listener
You can listen to changes in the preferences via the registerOnSharedPreferenceChangeListener() method on SharedPreferences.
SharedPreferences prefs =
    PreferenceManager.getDefaultSharedPreferences(this);

// Instance field for listener
listener = new SharedPreferences.OnSharedPreferenceChangeListener() {
  public void onSharedPreferenceChanged(SharedPreferences prefs, String key) {
    // Your Implementation
  }
};

prefs.registerOnSharedPreferenceChangeListener(listener);
One watch out is that SharedPreferences keeps listeners in a WeakHashMap hence listener may be recycled if your code does not hold a reference to it.
2.3. User interface for preferences
Android allows you to create XML resource files which describes preference key-values.
An instance of PreferenceActivity or PreferenceFragment can generate a user interface for these files.
The user interfaces takes care of persisting the key-value pairs.
To create a preference resource file of type XML.
Android provides the PreferenceFragment class which simplifies the creation of a user interface for maintaining preference values.
This fragment can load an XML preference definition file via the method addPreferencesFromResource().
3. Exercise: Prerequisites
The following exercise assumes that you have created an Android project with the top-level package com.example.android.rssfeed.
This application has at least one entry in the toolbar with the R.id.action_settings id.
Once this toolbar entry is selected, an existing fragment is replaced.
4. Exercise: Preference setting for the RSS feed
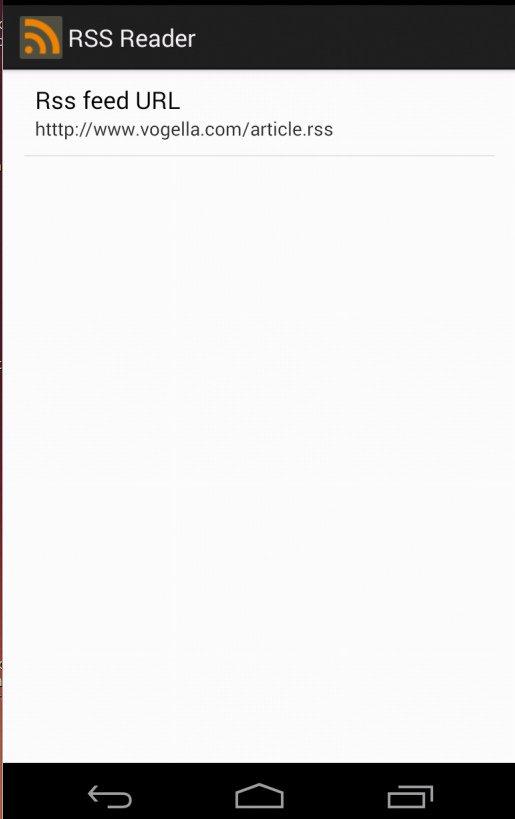
In this exercise, you allow the user to enter his preferred URL for an RSS feed via another fragment. This fragment uses a preference xml file to define the user interface.
4.1. Create preference file
Create an Android XML resource called mypreferences.xml in the xml folder. Add entries to this file similar to the following listing.
<?xml version="1.0" encoding="utf-8"?>
<PreferenceScreen xmlns:android="http://schemas.android.com/apk/res/android" >

    <EditTextPreference
        android:key="url"
        android:title="Rss feed URL"
        android:inputType="textUri"/>
    <CheckBoxPreference android:title="Aktiv" android:key="active"/>

</PreferenceScreen>
4.2. Create settings fragment
Create the class SettingsFragment.
It should extends PreferenceFragment.
This fragment loads the preference file and allows the user to change the values.
package com.example.android.rssreader;

import android.os.Bundle;
import android.preference.PreferenceFragment;

public class SettingsFragment extends PreferenceFragment  {
    @Override
    public void onCreate(Bundle savedInstanceState) {
        super.onCreate(savedInstanceState);
        addPreferencesFromResource(R.xml.mypreferences);
    }
}
4.3. Connect your settings fragment
Ensure that you open the preference fragment via the onOptionsItemSelected() method.
The relevant code is demonstrated in the following listing.
@Override
public boolean onOptionsItemSelected(MenuItem item) {
    switch (item.getItemId()) {
    // more code...
    case R.id.action_settings:
        // Launch settings activity
        if (getResources().getBoolean(R.bool.twoPaneMode)) {
            getFragmentManager().beginTransaction().replace(R.id.detailFragment, new
                    SettingsFragment()).commit();
        } else {
            getFragmentManager().beginTransaction().addToBackStack(null).replace(R.id
                     .fragment_container, new SettingsFragment()).commit();
        }
        return true;
        // more code...
    }
    // more code...
}
4.4. Use the preference value to load the RSS feed
The following code snippet demonstrates how you can access the preference value in a method.
// if you use this in a service or activity you can use this
// if you use this in a fragment use getActivity() or getContent() as parameter
SharedPreferences settings = PreferenceManager.getDefaultSharedPreferences(this);
String url = settings.getString("url", "https://www.vogella.com/article.rss");
4.5. Validate
Run your application.
Select from your action bar the Settings action.
You should be able to enter a URL.
If you press the back button and press the refresh button, ensure that the value of the url preference is used in your activity.
4.6. Optional: Show the current value in the settings
The following code snippet demonstrates how to show the current value in the preference screen.
package com.example.android.rssreader;

import android.content.SharedPreferences;
import android.os.Bundle;
import android.preference.EditTextPreference;
import android.preference.Preference;
import android.preference.PreferenceCategory;
import android.preference.PreferenceFragment;

public class SettingsFragment extends PreferenceFragment  implements SharedPreferences.OnSharedPreferenceChangeListener {

    @Override
    public void onCreate(Bundle savedInstanceState) {
        super.onCreate(savedInstanceState);
        addPreferencesFromResource(R.xml.mypreferences);
        // show the current value in the settings screen
        for (int i = 0; i < getPreferenceScreen().getPreferenceCount(); i++) {
            initSummary(getPreferenceScreen().getPreference(i));
        }
    }

    @Override
    public void onResume() {
        super.onResume();
        getPreferenceScreen().getSharedPreferences()
                .registerOnSharedPreferenceChangeListener(this);
    }

    @Override
    public void onPause() {
        super.onPause();
        getPreferenceScreen().getSharedPreferences()
                .unregisterOnSharedPreferenceChangeListener(this);
    }

    @Override
    public void onSharedPreferenceChanged(SharedPreferences sharedPreferences,
                                          String key) {
        updatePreferences(findPreference(key));
    }

    private void initSummary(Preference p) {
        if (p instanceof PreferenceCategory) {
            PreferenceCategory cat = (PreferenceCategory) p;
            for (int i = 0; i < cat.getPreferenceCount(); i++) {
                initSummary(cat.getPreference(i));
            }
        } else {
            updatePreferences(p);
        }
    }

    private void updatePreferences(Preference p) {
        if (p instanceof EditTextPreference) {
            EditTextPreference editTextPref = (EditTextPreference) p;
            p.setSummary(editTextPref.getText());
        }
    }
}
5. Android File API
5.1. Using the file API
Access to the file system is performed via the standard java.io classes.
Android provides also helper classes for creating and accessing new files and directories.
For example, the getDir(String, int) method would create or access a directory.
The openFileInput(String s) method provides access to an FileInputStream for the file.
The openFileOutput(String s, Context.MODE_PRIVATE) method provides access to an FileOutputStream for the file.
All modes except Context.MODE_PRIVATE are deprecated, files should be private to the application.
The following example shows the API usage.
public class Util {
    public static void writeConfiguration(Context ctx, String s ) {
        try (FileOutputStream openFileOutput =
             ctx.openFileOutput( "config.txt", Context.MODE_PRIVATE);) {

            openFileOutput.write(s.getBytes());
        } catch (Exception e) {
            // not handled
        }
    }
}
public void readFileFromInternalStorage(String fileName) {
String eol = System.getProperty("line.separator");
try (BufferedReader input = new BufferedReader(new InputStreamReader(
openFileInput(fileName))); ){
String line;
StringBuffer buffer = new StringBuffer();
while ((line = input.readLine()) != null) {
buffer.append(line + eol);
}
} catch (Exception e) {
// we do not care
}
}5.2. External storage
Android supports also access to an external storage system, e.g., the SD card. All files and directories on the external storage system are readable for all applications with the correct permission.
To read from external storage your application need to have the android.permission.READ_EXTERNAL_STORAGE permission.
To write to the external storage system your application needs the android.permission.WRITE_EXTERNAL_STORAGE permission.
You get the path to the external storage system via the Environment.getExternalStorageDirectory() method.
Via the following method call you can check the state of the external storage system. If the Android device is connected via USB to a computer, external storage might not be available.
Environment.getExternalStorageState().equals(Environment.MEDIA_MOUNTED)The following shows an example for reading from the external storage system.
private void readFileFromSDCard() {
    File directory = Environment.getExternalStorageDirectory();
    // assumes that a file article.rss is available on the SD card
    File file = new File(directory + "/article.rss");
    if (!file.exists()) {
        throw new RuntimeException("File not found");
    }
    Log.e("Testing", "Starting to read");
    BufferedReader reader = null;
    try {
        reader = new BufferedReader(new FileReader(file));
        StringBuilder builder = new StringBuilder();
        String line;
        while ((line = reader.readLine()) != null) {
            builder.append(line);
        }
    } catch (Exception e) {
        e.printStackTrace();
    } finally {
        if (reader != null) {
            try {
                reader.close();
            } catch (IOException e) {
                e.printStackTrace();
            }
        }
    }
}
6. Links and Literature
6.2. vogella Java example code
If you need more assistance we offer Online Training and Onsite training as well as consulting