This tutorial describes the usage of the Gradle build system for building Android applications. It includes the information how to configure build flavors.
1. Gradle for building Android applications
1.1. Using Gradle for Android apps
By default, Android projects are handled by the Gradle build system. If you create a new project in Android studio, the Gradle build scripts are automatically created. Android studio provides the Gradle runtime, hence no additional installation is required.
If you press the run button in Android Studio, it triggers the corresponding Gradle task and starts the application.
You can also run Gradle via the command line. To avoid unnecessary local installation, Gradle provides a wrapper script that allows you to run Gradle without any local installation.
|
You find the available versions of the Android Gradle plug-in under the following URL: https://jcenter.bintray.com/com/android/tools/build/gradle/ |
1.2. Conversion process from source code to Android application
The Java source files are converted to Java class files by the Java compiler.
The Android SDK contains a tool called dx that converts Java class files into a .dex (Dalvik Executable) file.
All class files of the application are placed in this .dex file.
During this conversion process redundant information in the class files are optimized in the .dex file.
For example, if the same String is found in different class files, the .dex file contains only one reference of this String.
These .dex files are therefore much smaller in size than the corresponding class files.
The .dex file and other resources, e.g., the images and XML files, are packed into an .apk (Android Package) file. The program aapt (Android Asset Packaging Tool) performs this step.
The resulting .apk file contains all necessary data to run the Android application and can be deployed to an Android device via the adb tool.
As of Android 5.0 the Android RunTime (ART) is used as runtime for all Android applications. ART uses a combination of Ahead Of Time and _Just In Time _ compilation. During the installation of an application on an Android device, the application code is translated into machine code.
The dex2oat tool takes the .dex file created by the Android tool chain and compiles that into an Executable and Linkable Format (ELF file).
This file contains the dex code, compiled native code and metadata.
Keeping the .dex code allows that existing tools still work.
1.3. Using Gradle on the command line
The Gradle build system is designed to support complex scenarios in creating Android applications:
-
Multi-distribution: the same application must be customized for several clients or companies
-
Multi-apk: supporting the creation of multiple apk for different device types while reusing parts of the code
You can start your Gradle build via the command line. Here is an overview of the important Android Gradle tasks:
| Command | Description |
|---|---|
|
build project, runs both the assemble and check task |
|
build project complete from scratch |
|
build project complete from scratch |
|
Run the tests |
|
Run the instrumentation tests |
To see all available tasks, use the gradlew wrapper command.
gradle build
# alternatively speedup second grandle build by holding it in memory
# gradle build --daemon
This command creates in the build folder the output of the Gradle build. By default, the Gradle build creates two .apk files in the build/outputs/apk folder.
To build and start your unit tests on the JVM use the following command.
gradle testTo build and start your instrumented tests on your Android device use the following command.
gradle connectedCheck1.4. Removing unused resources and Java classes via resource shrinking
The Gradle build system for Android supports resource shrinking at build time. This automatically removes resources that are unused from the packaged application. In addition to that, this also removes unnecessary resources from libraries you are depending on. This can hugely reduce the size of your application.
To enable resource shrinking, update your build file similar to the following snippet.
android {
    ...

    buildTypes {
        release {
            minifyEnabled true
            shrinkResources true
            proguardFiles getDefaultProguardFile('proguard-android.txt'), 'proguard-rules.pro'
        }
    }
}
1.5. Defining dependencies and keeping the version external
A good practice is to define the version of your library dependencies outside the dependencies closure for better maintenance.
ext {
    // App dependencies
    junitVersion = '4.12'
    mockitoVersion = '1.10.19'
    powerMockito = '1.6.2'
    hamcrestVersion = '1.3'
}

dependencies {
    // Dependencies for local unit tests
    testCompile "junit:junit:$junitVersion"
    testCompile "org.mockito:mockito-all:$mockitoVersion"
    testCompile "org.hamcrest:hamcrest-all:$hamcrestVersion"
    testCompile "org.powermock:powermock-module-junit4:$powerMockito"
    testCompile "org.powermock:powermock-api-mockito:$ext.powerMockito"
}| If you put the ext closure into the root build file, you can access its properties for example with '$rootProject.ext.junitVersion'. |
2. Building different flavors of your Android applications
2.1. Build types and build flavors
Android uses by default two build types: debug and release. For these build types you can create different flavors in you Gradle build.
The Gradle build system is also able to manage different flavors of an application. A product flavor defines a customized version of the application. This allows that some parts of the codebase or the resources can be different for variations of the app.
For instance, you can define different build variants for certain device categories, like phone or tablet. Another use case might be a paid or a free version of your app. Or you want to use different resources or classes during a test run.
2.2. Defining product flavors in your Gradle build file
You can use the productFlavors closure of you app/build.gradle file to define different variants of your product.
productFlavors {
    prod {
        applicationId = "com.vogella.android.gradlebuildflavors.prod"
        versionName = "1.0-paid"
    }

    mock {
        applicationId = "com.vogella.android.gradlebuildflavors.mock"
        versionName = "1.0-free"
    }
}
The whole build.gradle file might look like the following:
apply plugin: 'com.android.application'
android {
// as before....
flavorDimensions "version"
productFlavors {
prod {
dimension "version"
applicationId = "com.vogella.android.gradlebuildflavors.prod"
versionName = "1.0-paid"
}
mock {
dimension "version"
applicationId = "com.vogella.android.gradlebuildflavors.mock"
versionName = "1.0-free"
}
}
}
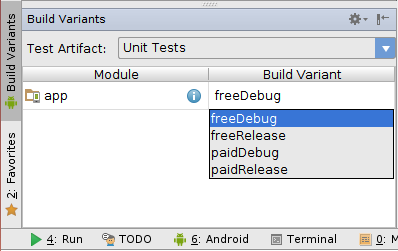
// as beforeAfter defining these flavors you can select them in the Build Variants view in Android Studio.
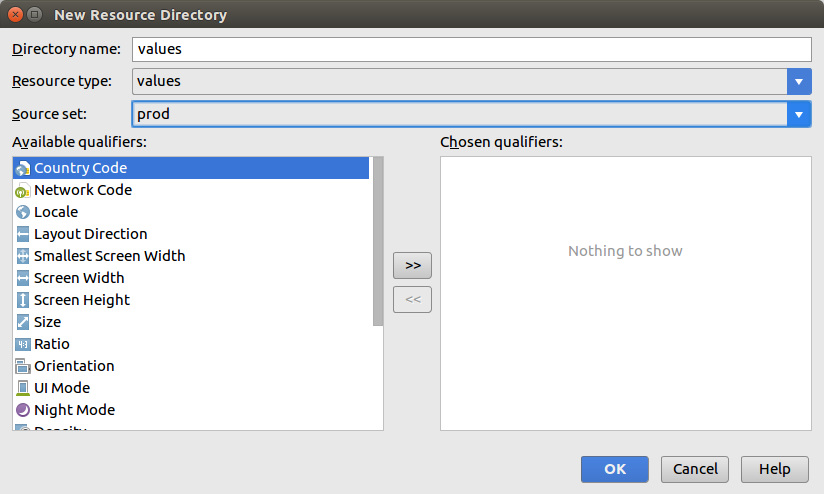
2.3. Providing different resources for the flavors
To define a different behavior for a certain flavor, you need to create suitable folders for the defined flavors under app/src/.
Flavor specific resources override the main resources. For example, if you provide a different application icon in a flavor the Android build system picks up the flavor specific one.
2.4. Providing different source sets for the product flavors
The directories in the src/ folder are called source sets. Every product flavor can define its own source set.
Code files are not replaced as resources, they are combined.
For example, you cannot have a com.example.MainActivity activity in your app/main/java/ folder and a different implementation in another flavor.
If you try this, you receive an error message about duplicate class definitions.
You can still provide different implementations by avoiding the creation of the class in your main source folder and instead create a class in each flavor.
3. Optional exercise: Use different product flavors for apps
In this exercise, you create an Android application with two different project flavors, called prod and mock.
The mock version defines different resources than the prod version. In this first sample the strings.xml file of the main folder/project is overridden. Which variant is build is defined via the Build Variants view.
3.1. Creating a new Android application
Create a new Project with the Empty Activity template and the top-level package com.vogella.android.gradlebuildflavors.
Define two additional product flavors in the app/build.gradle file called "prod" and "mock".
apply plugin: 'com.android.application'

android {
    // as before....

   flavorDimensions "version"
    productFlavors {
        prod {
            dimension "version"
            applicationId = "com.vogella.android.gradlebuildflavors.prod"
            versionName = "1.0-paid"
        }

        mock {
            dimension "version"
            applicationId = "com.vogella.android.gradlebuildflavors.mock"
            versionName = "1.0-free"
        }

    }
}

// as before
Create the desired folder structure for prod and mock flavors.
Copy the strings.xml from the main folder to the appropriate folder of the flavor.
Change the hello_world string of the strings.xml to Mock World! and Prod World! accordingly.
<resources>
    <string name="app_name">Flavor</string>
    <string name="hello_world">Mock World! </string>
</resources><resources>
<string name="app_name">Flavor</string>
<string name="hello_world">Prod World! </string>
</resources>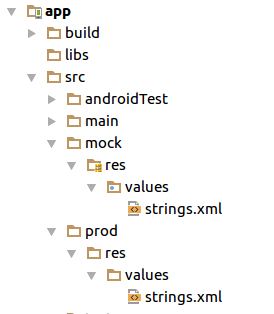
3.2. Validate
Select mockDebug as Build Variant in the Build Variants view of Android Studio and run your app.
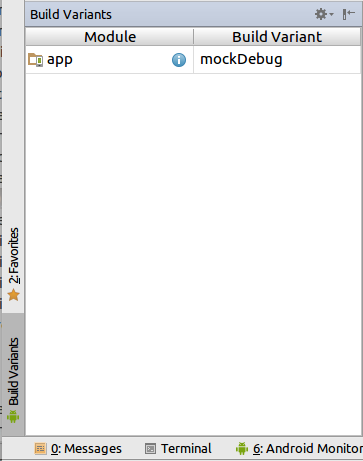
If you start your application you should see the string from the mock flavor. Select now you prod flavor and start it, you should see the other string.
3.3. Build via Gradle command line
Use the ./gradlew build command to build all your product flavors.
4. Providing different classes for testing and production
4.1. Prepare your application for testing with Gradle flavors
Create a class ShareIntentBuilder which starts an activity via the “share intent” via a static method with the following code.
import android.content.Context;
import android.content.Intent;

public class ShareIntentBuilder {

    public static void startSendActivity(Context context, String title, String body) {
        Intent intent = new Intent();
        intent.setAction(Intent.ACTION_SEND);
        intent.putExtra(Intent.EXTRA_TITLE, title);
        intent.putExtra(Intent.EXTRA_TEXT, body);
        intent.setType("text/plain");
        Intent chooserIntent = Intent.createChooser(intent, context.getResources().getText(R.string.share));
        chooserIntent.addFlags(Intent.FLAG_ACTIVITY_NEW_TASK);
        context.startActivity(chooserIntent);
    }
4.2. Implement different MainActivity versions for your flavors
Allow the activity which triggers this intent to be replaced in your “mock” flavor. If in a flavor “mock” is selected, start a second activity in your application which displays the send data. If the flavor "prod" is selected send the shared intent.
| Classes cannot be overriden, you need to create the classes in their specific flavors and not in the main flavor. |
5. Customize Gradle build
5.1. Rename the output apk
apply plugin: 'com.android.application'

android {
    // more
    buildTypes {
        release {
            minifyEnabled false
            proguardFiles getDefaultProguardFile('proguard-android.txt'), 'proguard-rules.pro'
        }
       applicationVariants.all { variant ->
           variant.outputs.each { output ->
               def file = output.outputFile
               def filename = file.name.replace("app", "lars")
               output.outputFile = new File(file.parent, filename)

           }
       }
// more
}
5.2. Specify a different keystore for your debug build
You can define a keystore in your build.gradle file. See https://tools.android.com/tech-docs/new-build-system/user-guide for details.
For example, you can redefine the keystore for the debug variant:
android {
    signingConfigs {
        debug {
            storeFile file("your.keystore")
        }
    }
}
6. Migrating an Android project created with Eclipse to Gradle
6.1. Importing an Eclipse-based Android project into Android Studio
Android projects come in two different configurations. Fhe first set of projects uses the legacy project structure used by the Eclipse ADT tooling which was used until 2013. The second set of project uses the new Gradle build structure. Gradle can be configured to support both formats, the Eclipse project structure and the Gradle project structure.
Once you added a valid Gradle file to your Eclipse-based Android project you can import it into Android Studio, via and by selecting the project folder with the Gradle build file.
6.2. Adding a Gradle file for your Eclipse-based Android project
To enable a Gradle build for your Eclipse-based Android project addthe following build.gradle to the root of your project.
buildscript {
    repositories {
        mavenCentral()
    }
    dependencies {
        classpath 'com.android.tools.build:gradle:2.2.0-beta3'
    }
}
apply plugin: 'com.android.application'


android {
     lintOptions {
          abortOnError false
      }

    compileSdkVersion 22
    buildToolsVersion "21.1.2"

        defaultConfig {
            targetSdkVersion 22
        }

    sourceSets {
        main {
            manifest.srcFile 'AndroidManifest.xml'
            java.srcDirs = ['src']
            resources.srcDirs = ['src']
            aidl.srcDirs = ['src']
            renderscript.srcDirs = ['src']
            res.srcDirs = ['res']
            assets.srcDirs = ['assets']
        }

        // Move the build types to build-types/<type>
        // For instance, build-types/debug/java, build-types/debug/AndroidManifest.xml, ...
        // This moves them out of them default location under src/<type>/... which would
        // conflict with src/ being used by the main source set.
        // Adding new build types or product flavors should be accompanied
        // by a similar customization.
        debug.setRoot('build-types/debug')
        release.setRoot('build-types/release')
    }
}
7. Android Gradle build links
7.1. vogella Java example code
If you need more assistance we offer Online Training and Onsite training as well as consulting